Active Directory
- Primary Domain Controller (DC)
- ADC (Additional Domain Controller)
- RODC (Read Only Domain Controller)
- Create Pointer Record
- Active Directory Backup
- FSMO Roles
- Seize FSMO Roles
- DC and ADC comparision
- Global Catalogue (GC)
-
Primary Domain Controller: 192.168.173.42
- First domain controller in the forest is called primary domain controller, When you create first domain controller a new forest is also created. FSMO roles has been assigned to this new primary domain controller.
- Install windows server.
- Assign static IP address, change computer name.
- Go to Server manager/add roles and features.
- Select Active Directory
- Select DNS if want to install in the same machine.
- Domain name: star.local
- IP Configuration
- Static IP: 192.168.173.40
- Subnet Mask: 255.255.255.0
- Default Gateway: 192.168.173.2
- DNS: 192.168.173.40 or 127.0.0.1
- Select promote this server to DNS.
- If it is first server then select create forest and provide domain name (star.local).
Additional Domain Controller (ADC2): 192.168.173.42
- To provide fault tolerance and load balancing additional DC is installed.
- All the domain controllers replicate active directory database with each other. So all the domain controllers will have same active directory database.
- Installation of ADC2, follow the installation procedure 1 to 6
- Go to server manager/add roles and features and select Active Directory Domain services only.
- Promote this server as additional domain controller.
- Select add a domain controller to an existing domain.
- Provide credentials of existing domain controller by clicking change.
- administrator@star.local and password.
- Click select and it will give list of all domain controllers of your network, select domain to which you want to add this additional domain controller.
- Default first site name is selected and grayed out as we have only one domain controller.
- Select replicate from existing ADC2.star.local as there is only one domain controller.
- Location of AD DS database, log files, SYSVOL.
- All pre requisite check complete, click install. Server will restart.
Check the following:
- Go to Active Directory users and computers. expand domain and click domain controllers. You will get both ADC1 and ADC2 along with all settings of main domain controller.
Check DNS:
- Go to DNS/forward lookup zone, Active Directory Integrated primary.
- Enter preferred DNS and alternate DNS Address in both Domain controllers.
Check Active Directory Replication:
- Open active directory sites and services
- Expand sites, expand default first site name.
- Right click automatically generated and replicate now.
- Right click on NTDS settings all tasks and check replication topology.
- Select NTDS settings, right click and properties/connections
Check how frequently replication taking place:
- Go to Group policy Management.
- Expand Forest/domain/group policy object.
Read only domain Controller: (RODC): 192.168.173.45
- You can add manually or browse for record.
- Browse/server/forward lookup/star.local/select host record.
- Records as follows
Active Directory Backup: https://www.youtube.com/watch?v=ngkvkxT7PRk&list=PLUZTRmXEpBy2QDBF2cssNtYhVqcDgiRnE&index=12
- Using windows backup feature, go to server manager/add and remove features/select windows backup.
- Run: wbadmin.msc to open backup console.
- Click backup once for manual backup, select backup schedule to run scheduled backup.
- Full server or custom,
- Custom: add items, select which item you want to backup.
- Select system state which included boot files, system files, registry, AD database, sysvol, certificate authority database
- Click on advanced settings/vss settings
- Select vss full backup.
- Location to store backup, local or remote shared folder.
FSMO – Flexible Single Master Operations
- FSMO roles are assign to primary domain controller or first domain controller in the forest.
- FSMO Roles are:
Role Name
Number
PDCEmulator
0
RIDMaster
1
InfrastructureMaster
2
SchemaMaster
3
DomainNamingMaster
4
Role
Scope
Naming context (Active Directory partition)
Schema master
Forest-wide
CN=Schema,CN=configuration,DC=<forest root domain>
Domain naming master
Forest-wide
CN=configuration,DC=<forest root domain>
PDC emulator
Domain-wide
DC=<domain>
RID master
Domain-wide
DC=<domain>
Infrastructure master
Domain-wide
DC=<domain>
FSMO Roles Transfer:
- FSMO roles can be transferred between domain controller swith the following methods:
- Before performing any seize or transfer process, we must make sure All DC’s are replicating with each other i.e replication between the DC’s should pass.
- The following permission should consider before role transfer.
FSMO Role
Administrator must be a member of
Schema
Schema Admins
Domain Naming
Enterprise Admins
RID
Domain Admins
PDC Emulator
Infrastructure
- Useful commands for powershell
- PS C:\users\Administrator>netdom query fsmo (it will show all 5 roles)
- Get-ADForest | select schemamaster,domainnamingmaster (will show who is the owner of schemamaster and domainnamingmaster role)
- Get-ADDomain | select pdcemulator,ridmaster,infrastructuremaster
- Ps c:\users\Administrator>Move-ADDirectoryServerOperationMasterRole -Identity ws2k19-dc01 -OperationMasterRole (now press tab) DomainNamingMaster or use role number 4
- Ps c:\users\Administrator>Move-ADDirectoryServerOperationMasterRole -Identity ws2k19-dc01 -OperationMasterRole 0.1.2.3.4 (will transfer all 5 roles)
Transfer FSMO roles using powershell:
LAB: Two domain controllers one running on win12 and second win19. Win 12 holds FSMO roles,
- Check who is the owner of all 5 fsmo roles.
- Open powershell and run ps c:\users\Administrators> Get-ADForest | select schemamaster,domainnamingmaster
- ps c:\users\Administrators> Get-ADDomain | select pdcemulator,ridmaster,infrastructuremaster
- All fsmo roles has been assigned to ws2k12-DC
- Ps c:\users\Administrator>Move-ADDirectoryServerOperationMasterRole -Identity ws2k19-dc01 -OperationMasterRole (now press tab) DomainNamingMaster or use role number 4
- Ws2k19-dc01 is the destination domain controller
- The above command will transfer only DomainNamingMaster role.
- Can also be perform using number instead of role name
- Ps c:\users\Administrator>Move-ADDirectoryServerOperationMasterRole -Identity ws2k19-dc01 -OperationMasterRole 4
- Confirm Y
- Check the role is transferred
- ps c:\users\Administrators> Get-ADForest | select domainnamingmaster
- Transfer the remaining roles all in one go
- Ps c:\users\Administrator>Move-ADDirectoryServerOperationMasterRole -Identity ws2k19-dc01 -OperationMasterRole 0,1,2,3,4
- Press y each time to confirm all three times.
- To get all fsmo role use the following:
- PS C:\users\Administrator>netdom query fsmo
Transfer FSMO role using GUI: From ADC2 to ADC1
Transfer RID Master, PDC Emulator, and Infrastructure Master.
- Login to ADC2 or where FSMO rules are running, Open active directory users & computers snap-in
- Now log into target domain (ADC1) from logged in ADC2.
- In Active directory users & computers, right click and select change domain controller.
- Select target domain controller ADC1
- Now logged in ADC1 (target domain)
- Right click on star.local and select operation master.
- Check three roles, RID, PDC and Infrastructure.
- Right click the domain name and click operations master.
- Click change to transfer role.
- Confirm to transfer.
Transferring Domain Naming Master:
- Open Active Directory Domains & Trusts.
- Now loginto Target domain controller ADC1 by right clicking and select change domain.
- Right click and select operation master.
- Click change and confirm.
Transferring the Schema Master:
- dll library by pressing Start > RUN > CMD (Administrator) and typing:
- regsvr32 schmmgmt.dll
- From RUN command open MMC by typing MMC.
- On the console menu press Add/Remove Snapin.
- Press Add and select Active Directory Schema.
- If you are NOT logged onto the target domain controller, in the snap-in, right-click the Active Directory Schema icon in the Console Root and press Change Domain Controller.
- Select the target domain controller (ADC1)
- Right click and select schema master and change
- All roles has been transferred.
Ntdsutil: Transferring the FSMO Roles using Ntdsutil
- On any domain controller, click start/Run/type ntdsutil
- C:\Windows\system32\ntdsutil.exe: roles
- fsmo maintenance: ? Enter to see list of available commands.
- Connections
- fsmo maintenance : connections
- server connections: connect to server adc1 (target server)
- Type q and enter to got back to fsmo maintenance
- Transfer rolename as follows
- fsmo maintenance : transfer naming master
- fsmo maintenance : transfer infrastructure master
- fsmo maintenance : transfer Pdc
- fsmo maintenance : transfer rid master
- fsmo maintenance : transfer schema master
- You will receive a warning windows, click yes
- Type q and enter until you quit.
- FMSO roles are seized when the running FSMO roles holder domain controller goes offline or corrupted and as it is offline or not working then we cannot transfer FSMO roles to another domain controller.
- DC01 holds the FSMO roles and DC02 is an additional domain controller.
- Due to DC01 domain controller unavailable so we seize FSMO roles and then assign to DC02.
- Run powershell as an administrator. Verify which domain holds all 5 FSMO roles by running PS C:\Users\Administrators\netdom query fsmo
- Run command PS C:\Users\Administrator>Move-ADDirectoryServerOperationMasterRole -identity WS2K19-DC02 -OperationMasterRole SchemaMaster,DomainNamingMaster,PDCEmulator,RIDMaster,InfrastructureMaster -Force
- Ener A to proceed for all.
- After few minutes roles will be transferred and to check run again
- PS C:\Users\Administrator>netdom query fsmo
Note: After seize FSMO role should not bring back domain controller.
DC and ADC Comparison and roles:
- If network have both DC and ADC and both are running, domain controller who got FSMO roles are in active mode and additional domain controller in running as standby.
- ADC can perform user authentication while in standby but cannot perform those task which is required FSMO roles.
- How to find which domain controller authenticate user request?
- Logon with a client machine and run the following on client machine
- Tun command at cmd>/set logonserver
- Cmd>/gpresult /r
- When you transfer FSMO roles from DC to ADC than ADC will become main domain controller.
Forest wide FSMO Role: The following roles must be only roles in the forest.
In a new network when you create a domain controller for domain (star.co.uk) , a new forest is also created. So 2 roles of forest and 3 roles of domain controller will be created. If you add additional domain controller then it will not have any roles as forest is already exist and primary domain controller is already exist.
If you add second domain(kingstar.com) in the same forest, then another domain controller will be created for the second domain and 3 roles will be created for this second domain in the forest.
Note: Forest will have 2 roles and domain controller will have 3 roles and ADC has no roles. Same forest second domain controller will have 3 roles. Child domain is created within root domain than it will have 3 roles as a domain controller for child domain created.
- Schema master:
- It is a database of Active Directory, Schema is the structure like table which has rows and columns. Data can be stored in the structure.
- There will be only one schema master in the root domain of the forest, if you have more than one domain controller (parent domain) and child domain controllers in the forest and additional domain controllers and RODC then all domains will have copies of same schema master in read only mode.
- If you have schema master in the primary domain controller and you have ADC as well, ADC will have a copy of schema master and all user authentication and other tasks can be performed with ADC even primary domain controller is unavailable. Schema master role is only required when you make changes in the schema master and you cannot update schema master.
- Schema master is used for modification in the structure, schema master update and when you install exchange server in the network as exchange server has some new attributes which modify the active directory database. It synchronize with all domain controllers, additional domain controllers and RODC in the forest.
- Users with Schema admin roles can make modification in schema master.
- If you make any changes it effects on all domains of forest.
- By default schema master is hidden for security reason that no one should make changes, To view schema master:
- Enable schema master console: Run/regsvr32 schmmgmt.dll (run this command to view schema master in MMC)
- Now schema console will be activated and you can add in MMC, simply Run/MMC and select snapin and add.
- It contains:
- Object Classes: By default Active directory has different types of objects like user, group, computer account, print account etc.. When an object is available than you can create user, group etc.. new objects can be created in AD. When you create a new object in AD you have to define its class.
- Attributes of Objects: new user is an object in which lot of attributes is there like first name, last name, address etc.. you enter values in the attributes.
Hierarchy of Active Directory Schema:
- Domain naming master.
- It also works at forest level and it is used when you create a new domain or removing a domain in the forest.
Domain Wide FSMO Role: Every domain will have these roles.
- RID Master:
- RID = Domain Name + SID (security identifier)
- SID: user permission are apply on SID. If you change user first name or last name than it will not impact on user’s security and it remain same. A unique SID number is assigned to each object when it is created.
- When you create ADC in the network than RID will assign a pool of SID so that ADC can assign a SID to newly created objects in ADC.
- RID = Domain Name + SID (security identifier)
- PDC Emulator (Primary Domain Controller):
- It should be available all the time.
- Time synchronization is performed.
- Infrastructure master.
Global Catalogue (GC): Port 3268
- When you install first domain controller in the forest then global catalogue is selected by default and greyed out, you cannot skip GC installation in the first domain of the forest. It keeps partial information of other domain controllers in the form of indexing and it is read only.
- To work Active directory work properly than GC should also work properly.
- GC cannot be installed separately, it will installed when you configure domain controller.
- The services of GC is running on domain controller is also act as global catalogue server. You must have min one GC and can have multiple in the network.
- It keeps domain controllers information in the forest in indexing format.
- Global catalogue finds objects and it maintain an index of all domain controllers information. From indexing it will first check the object belongs to which domain controller and then find details further.
- If a user unable to logon to network.
- Check, Global Catalogue server is working; it keeps indexing of all objects of all domain controllers.
- Check, LDAP is working. LDAP keeps information of all objects.
- In a network GC will find the domain controllers of any object from its indexing and LDAP of that domain controller will provide the information.
- DNS discover the Global Catalogue in a network and make sure DNS is working properly.
- To start troubleshooting if a user unable to login or object is not discoverable, check in the following sequence:
- User account is locked or disabled.
- User password is changed.
- First request comes to DNS, Check DNS can resolve the request, DNS has Global Catalogue record. Check DNS service report.
- Global Catalogue is working properly.
- LDAP is working properly. Its port are not blocked.
Global Catalogue Activities:
- Finds Objects: A global catalog enables user searches for directory information throughout all domains in a forest, regardless of where the data is stored. Searches within a forest are performed with maximum speed and minimum network traffic.
When you search for people or printers from the Start menu or choose the Entire Directory option within a query, you are searching a global catalog. Once you enter your search request, it is routed to the default global catalog port 3268 and sent to a global catalog for resolution.
- Supplies user principal name authentication :
A global catalog resolves user principal names (UPNs) when the authenticating domain controller does not have knowledge of the account. For example, if a user’s account is located in example1.microsoft.com and the user decides to log on with a user principal name of user1@example1.microsoft.com from a computer located in example2.microsoft.com, the domain controller in example2.microsoft.com will be unable to find the user’s account, and will then contact a global catalog to complete the logon process.
You have multiple domain in the forest(abc.com and xyz.com), a user is created in xyz.com and he want to login to system in abc.com, he can login if there is Global Catalogue configured in these two domains and a trust relationship between them.
Enable and disable global catalogue server of a domain:
- Logon to domain and go to active directory sites and services/default first site or site name/NTDS settings/General Tab, check and uncheck.
- Duration will take depends on the active directory size and number of users in the active directory, it starts saving in the C drive or where active directory folder is created.
Active Directory Schema: By default it is disabled, you need to enable it in snapin.
- Active directory schema is a structure like rows and columns where you can enter and save data.
- Run MMC and it will open snap in, go to file add/remove snap in.
- Select active directory schema and add
- It has classes and attributes.
- Search for any objects in attributes and if it is not indexed, select check box and indexed it.
DNS
- DNS - Domain Name System
- Domain Registration process
- DNS Name Resolution Process
- DNS Lab
- DNS Zones
- Forward Lookup Zone
- Reverse Lookup Zone
- Pointer Record
- DNS Records
- ping
- nslookup
- check DNS cache
-
DNS:
- DNS performs Name to IP and IP to Name resolution.
- It works at level 7.
- DNS is distributed system, information is spread among multiple server, it works on reference based.
- Create DNS zone on DNS server, zone is DNS database. you create a zone for every domain in DNS server.
Types of DNS server.
- Local DNS (AD DNS server)
- Installed DNS Server only: It works as forwarder, if the entry is not found in cache than forward it to root hind domain which is configured by default.
- DNS + Active Directory: When you install AD it required DNS server,
- Create zone for active directory, user can login using this domain.
- Create zone for public domain and create records for host.
- Public DNS server: user can access web site through internet.
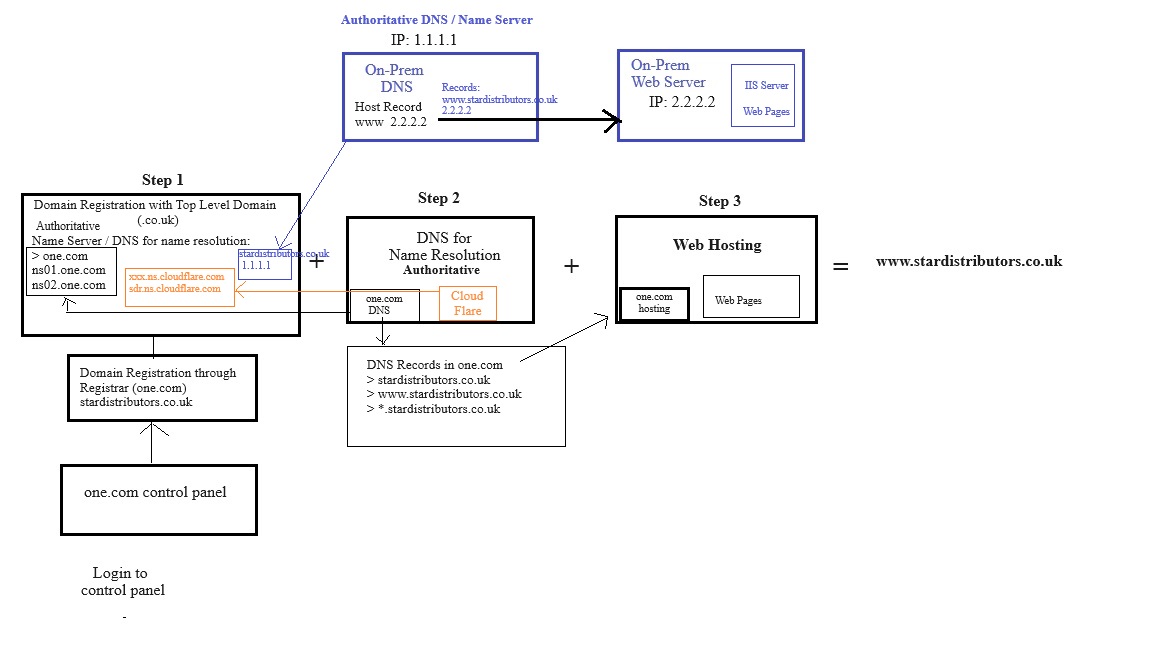
- Domain name registration + DNS for name resolution + Hosting
- Domain can be register with registrars and through the registrars domain will be entered in top level domain list.
- After registration name resolution required through DNS. Some registrars offer this service along with name registration.
- You can have your DNS server for name resolution or you can use DNS services from registrars. (go daddy or one.com)
- Need web server for hosting your web site, some registrars provide hosting service along with DNS and name registration.
- You can have your web server for hosting.
Domain Registration Steps:
- Step 1:
- Public Domain register with Top Level Domains (.com .org .co.uk .edu etc)
- Register through registrars (do daddy or one.com)
- After registration (stardistributors.co.uk) registrar will provide you control panel details for management of domain.
- Need to enter name server or DNS server details for name resolution of stardistributors.co.uk
- Step 2:
- Some registrars (one.com or cloud flare) provide DNS service for name resolution,
- Enter name server details through registrar panel which will be updated in the top level domain DNS server.
- one.com name servers (ns01.one.com & ns02.one.com)
- Cloudflare name servers (aaa.ns.cloudflare.com & xxx.ns.cloudflare.com)
- on-prem DNS server (enter public IP )
- Step 3:
- Some registrars (one.com or cloud flare) provide Web Hosting service for hosting your web site.
- DNS records for web hosting from one.com or cloud flare will be entered.
- On-Prem Web server: In DNS records, create www (host) record and enter IP address of web server.
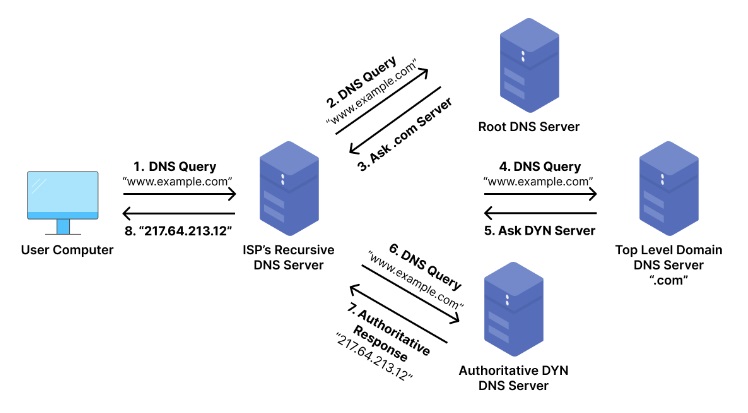
- A user want to access www.stardistributors.co.uk
- Query goes to DNS resolver which is either your ISP or companies local DNS server (Resolver).
- Resolver check its local cache, if an entry found which resolved earlier than it respond back the IP address of www.stardstributors.co.uk
- If an entry is not found in cache than it checks the host file and respond back the IP address
- If an entry is not found than it sends query to Root hint domain.
- It starts the resolution in reverse order of URL, www.stardistributors.co.uk.(there is . at the end of URL which is hidden) it represents root.
- Every DNS server has entries of root hint domain by default, there are total 13 root hint domains pre configured in every DNS server.
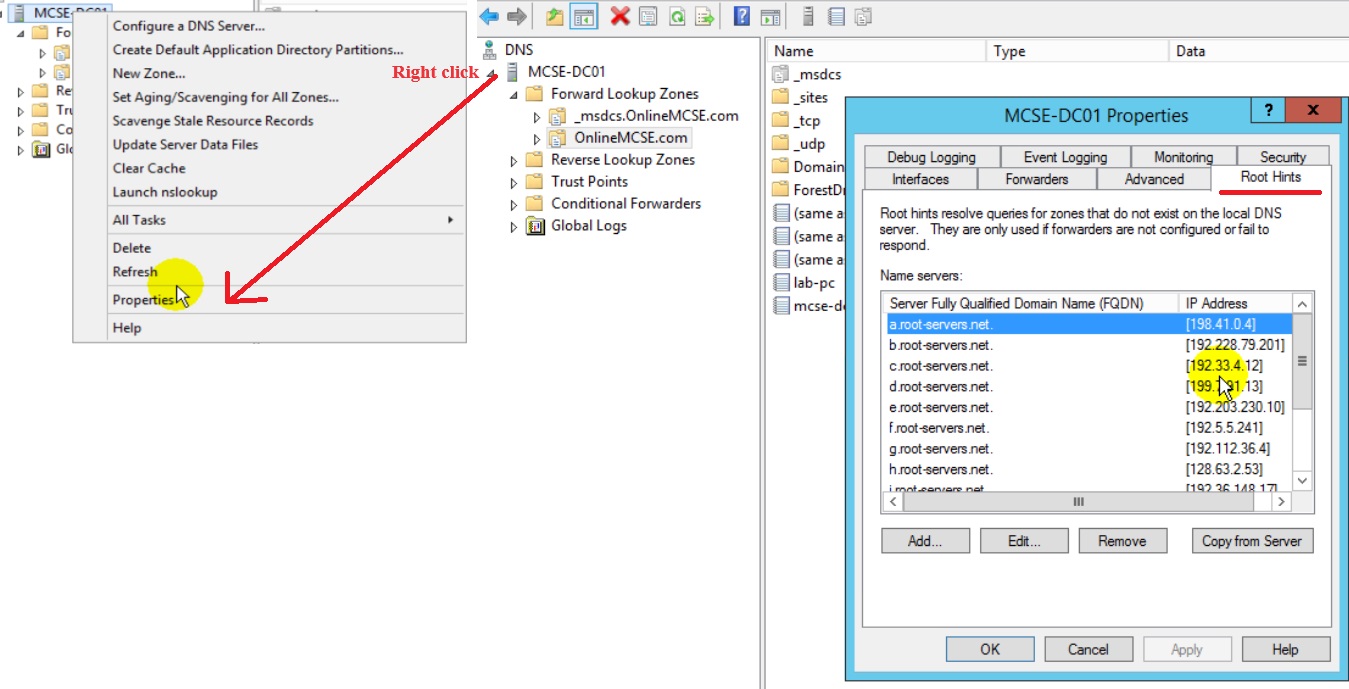
- Root hint domain contain information of all top level domains like .com .org .edu
- The root hint server does not resolve the name as they got information of top level domains only.
- Query returns with the name and address of the name server (DNS) for the top level domain “.co.uk” domain..
- Query goes to .co.uk top level domain DNS server for name resolution.
- Top level domain does not have an IP address but got information of Name Servers/Authoritative DNS Server of stardistributors.co.uk, Once you register the domain with top level domains, you enter the name server/authoritative DNS server entries in the top level domain server.
- Every registered domain must maintain DNS server in which name server details are entered. It could be on your premises or registrars service.
- Authoritative DNS Server: It has the records of
- www.example.com (host)
- ftp.example.com
- webmail.example.com
- IP address of this server entered in top level domain server as name servers.
- Query returns with Authoritative / Name server IP address.
- DNS sends the query to name server to get IP address of web server.
- This DNS server either maintain at your company or providers provide the DNS service.
- DNS server has the records of host and IP address of web servers.
- It returns the IP address for that host to “www.stardistributors.co.uk”.
DNS only installation and configuration:
- DNS alone which works as name resolution resolver.
- It will forward the query to Root hint domain as there is no Local or Public Domain is configured (no zone configured)
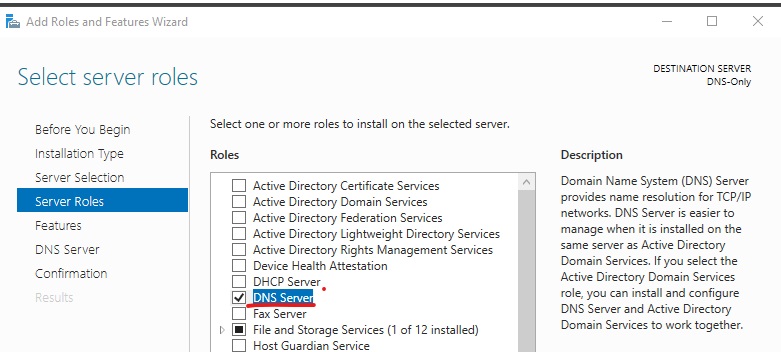
- Install windows server 2019 and go to manage and click add roles and features and select DNS only.
- continue the remianing steps to install.
- Open DNS.
- There is no zones are configured.
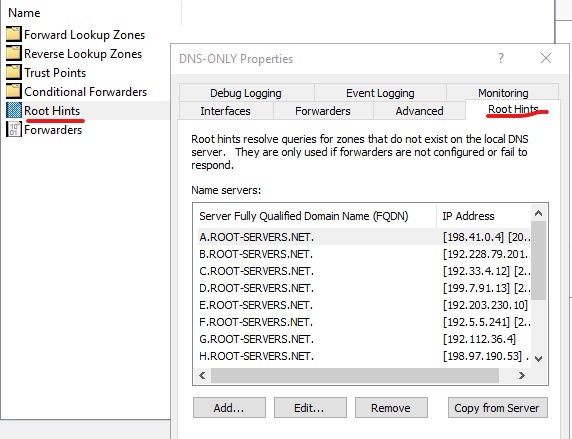
- It has root hints, this DNS will forward name resolution query to root hints.
- Root Hints:
- Advanced:
- Interfaces:
- Forwarders:
- Dbug Logging:
- Event Logging:
- Monitoring:
Active Directory only Installation:
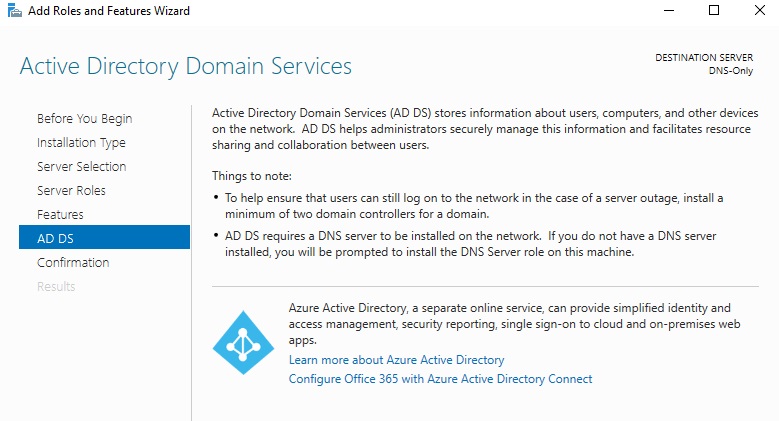
- Install windows server 2019 and go to manage and click add roles and features and select Active Directory Domain Services only.
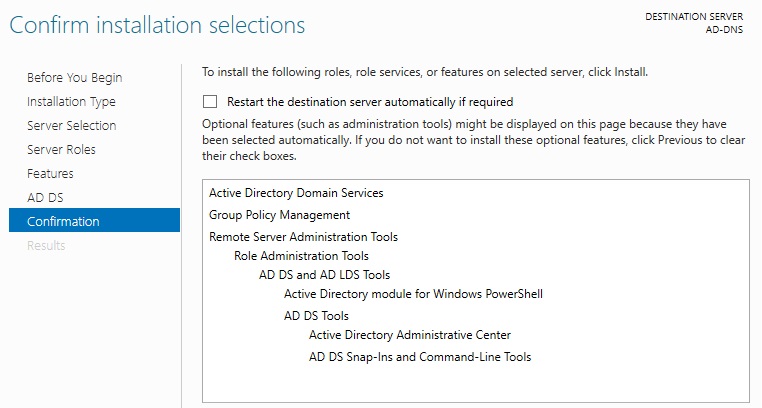
- The following features will be insalled for AD only option.
- Active Directory need to promote to domain controller.
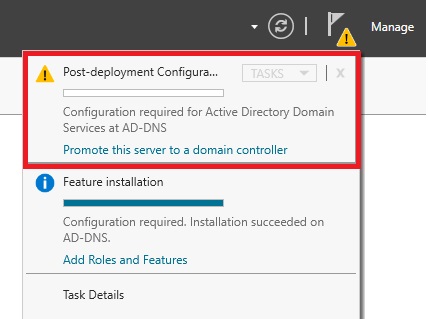
- click promote this server to a domain controller.
-
DNS & Active Directory Installation & Configuration (Local DNS):
- DNS works as name resolution resolver and forward the traffic to root hints and it also resolve local user Active Directory queries.
- Install windows server 2019 and go to manage and click add roles and features and select DNS only.
- You can install DNS alone and later AD can be installed additionally.
- Perform the rest steps.
- Configure office 365 with azure active director connect as well.
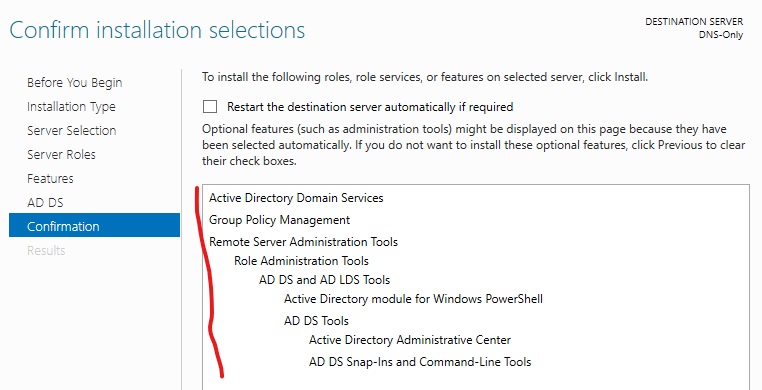
- Active Directory services will be installed.
- Group Policy Management
- Remote Server Administration Tools
- Role Administration Tools
- ADDS and AD LDS tools
- AD modules for powershell
- ADDS tools
- AD administration center
- ADDS snapins and command-line tools
- Configuration required, promote this server to a domain controller.
- Domain Controller:
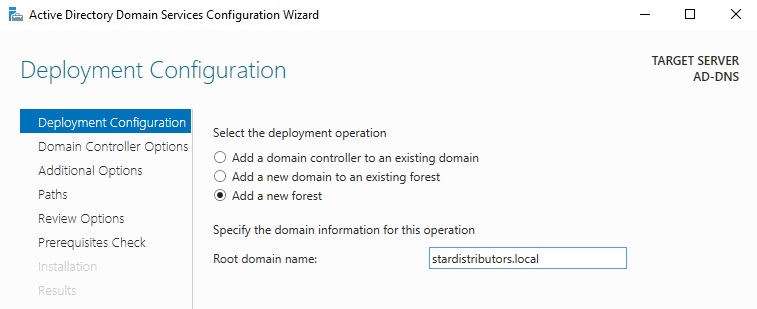
- Add a domain controller to an existing domain: choose this if you are adding an additional domain controller.
- Add a new domain to an existing forest: choose this to add a domain to an existing forest
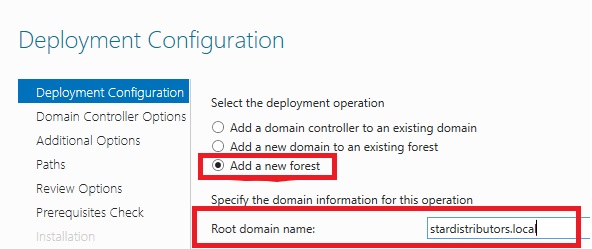
- Add a new forest: choose this to create a forest, a forest is a logical boundary in which you will have domain controller and additional domain controller.
- Give root domain name (FQDN): stardistributors.local (it will be a local domain used for Active directory)
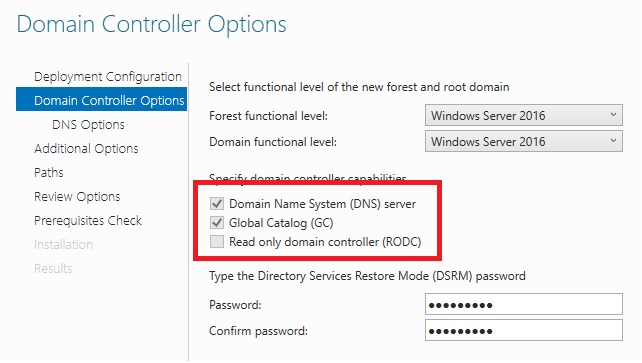
- DNS and Global Catalog will be configured as this is the primary DNS.
- select check box to crete DNS delegation.
- The NetBIOS domain name is assigned: It will not be FQDN which can alos be used to join domain.
- click next and if you want click on script which can be use with powershell.
- The computer will restart as active directory is configured and domain controller is configured.
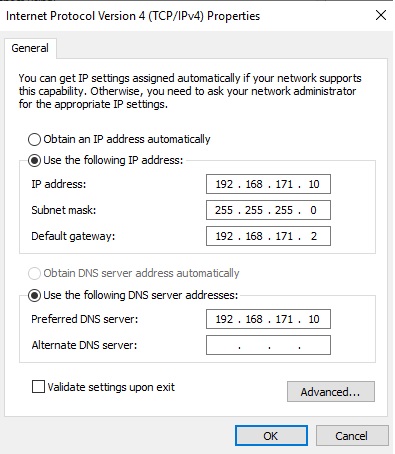
- After restart you will login to domain. TCP/IP settings where DNS IP is local server IP address.
- Go to AD and DNS settings.
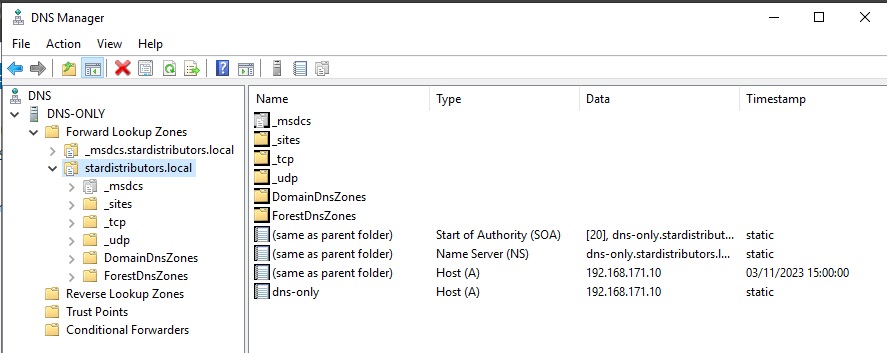
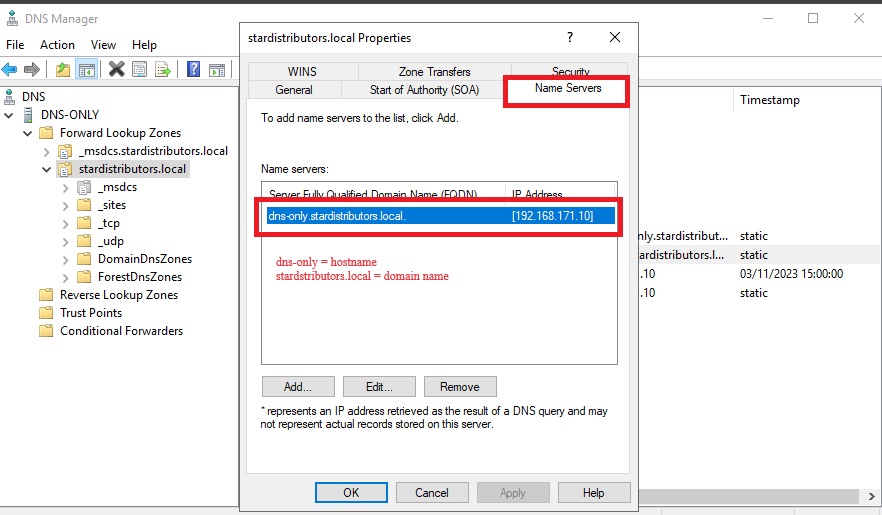
- zone created (stardistributors.local)
DNS & Public Domain Installation & Configuration (Public DNS):
- Install windows server 2019 and go to manage and click add roles and features and select DNS and AD.
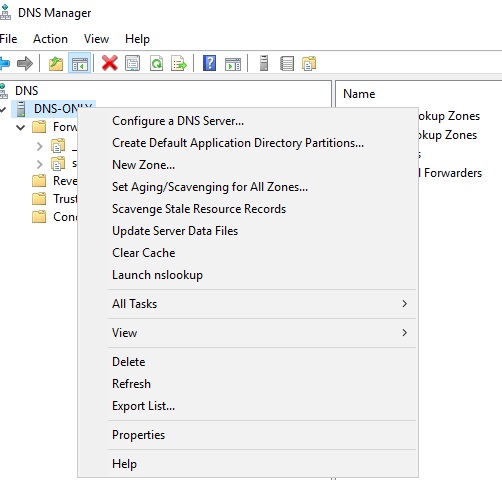
- Right click on DNS and select create zone (create a new domain).
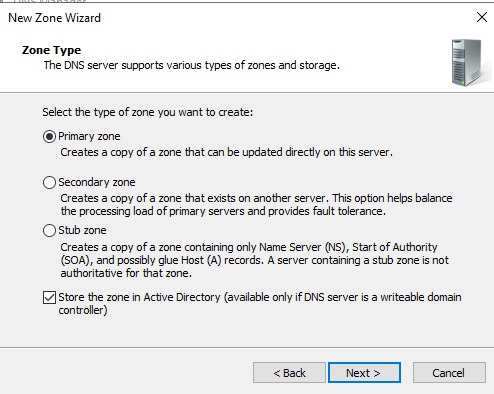
- select from options:
- Primary Zone:
- Secondary Zone:
- Stub Zone:
- Store the zone in AD.
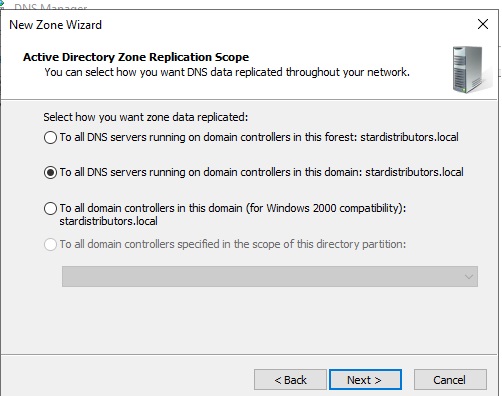
- Next, select active directory zone replication.
- select the type of lookup zone (forward ot reverse)
- Give Zone name stardistributors.co.uk and finish.
- New zone (public domain) stardistributors.co.uk created.
- Name Server and IP address should be added in the top level domain panel via registrar. This DNS is now Authoritative DNS server.
- By default there will be two active directory primary DNS zone.
- star.local
- local
- Expand Reverse Lookup Zones.
- Right click and create new zone.
- Primary Zone:
- Secondary Zone:
- Stub Zone:
- Store the zone in Active Directory (Available only if DNS server is a writeable domain controller): select check box if you want to store reverse zone stored in Active directory.
- Select Active Directory Replication Scope:
- To all DNS servers running on domain controller in this forest: star.local
- To all DNS servers running on domain controllers in this domain: star.local
- To all domain controllers in this domain (for windows 2000 compatibility): star.local
- Select IPv4 or IPv6 Reverse Lookup Zone.
- Enter first 3 octet of network ID, 192.168.173
- Finish,
- Two entries in reverse lookuo zones has been created.
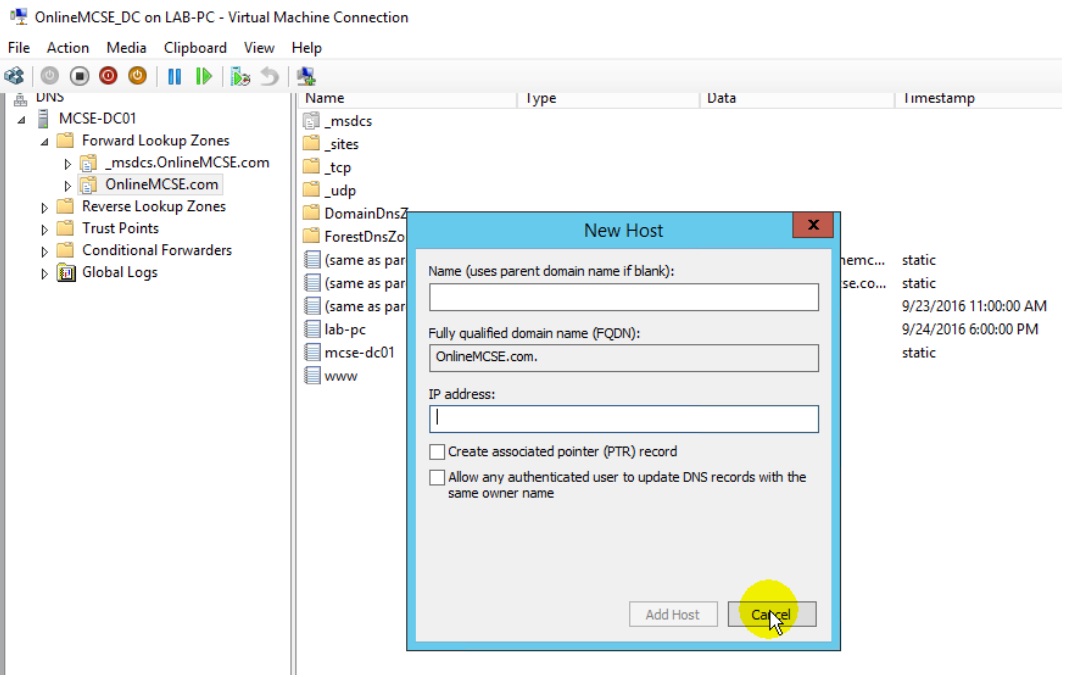
- Right click and add pointer entry for domain controller.
- Host A record: It provides IP address for the given name or name for the given IP address. IPV4 uses A and IPv6 uses AAAA.

- hostnames:
- www: for website hosting
- CNAME: Canonical name/alias name/true name, indicates that a domain name is the nickname or alias for another domain name. It will point to the host A record (main domain).
- Cname ==> Host A record ==> IP address (cname point to host A record and host A record point to IP address)
- www.stardistributors.co.uk (domain name)
- it.stardistributors.co.uk (www.stardistributors.co.uk should open)
- support.stardistributors.co.uk ((www.stardistributors.co.uk should open)
- MX:
- TXT:
- SRV:
- NS:
- DS:
- TLSA:
- CAA:
- www: for website hosting
- Domain: Name you register with top level domain.
- IP address: IP address of the server where these hostname services are installed and configured.
-
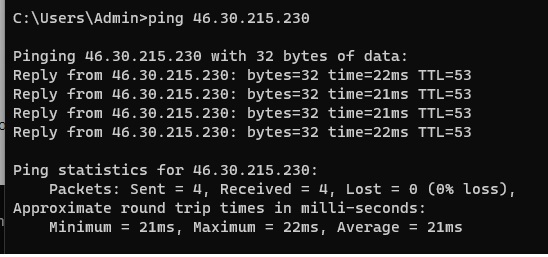
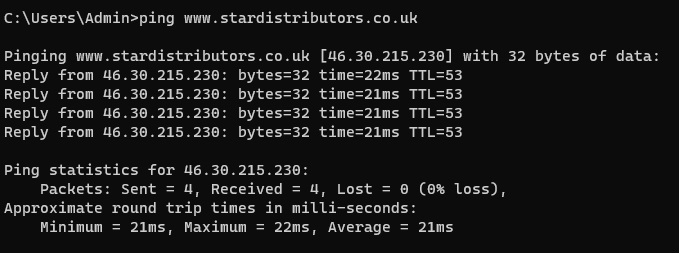
- When you ping www.stardistributors.co.uk it pings with IP address.
Load Balancing with DNS:You can create multiple host A records with the same host name but should provide different IP address. This scenarios used for laod balancing. If you have more than one same server than with round robin method request will go to different servers.
- DNS will use Round Robin method and provide both IP addresses.
- Client will store both IP addresses in cache.
- If a second client queires than DNS will provide both IP address but this time it will be shuffled and will change the order, it is called Round Robin method.
- You cannot control on traffic distribution as 30% send to server A and 70% on server B through DNS load balancing method. It required hardware based load balancer.

- Host A record is created for name and IP address. (Name = www or ftp or mx etc)
- * is used for all/any name.
- randomname.stardistributors.co.uk IP address
- It uses in sharepoint,
- ping IP address
- ipconfig /all
- ipconfig /flushdns
- When you run nslookup command from command prompt it queries with DNS and give response.
- It can provide all types of DNS records, while ping will provide only IP addresses against host name.
- search for Host A record: It will show how many Host A records is configured in DNS.
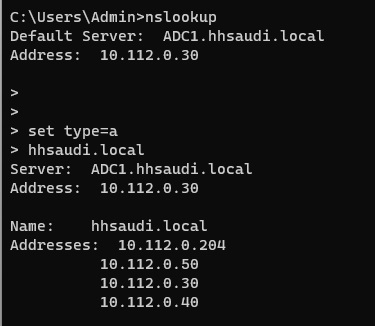
- Search for MX record.
- run at command prompt ipconfig /displaydns
- It will display all the records stored in cache.
Disk Management & Folder Sharing
Disk partition and management, Bitlock
- Disk Layout
- Basic
- Dynamic
- Diskpart: go to cmd and run diskpart
- DISKPART > List Disk.
- DISKPART> sel disk1 (select disk 1 where we have created 3 partitions)
- Now partition 4 will be created.
- You can format and give drive name. Now some space is allocated it will get waste, so create 3 primary partitions and 1 extended partition and can create logical drive in extended. Extended partition is like boundary and in that boundary you can have multiple logical drives.
- When you try to create fifth partition than system will give error and asked to change hard disk from basic to dynamic and create fifth partition. Installed O/S will not work.
- In the above delete 1 primary partition and create extended with logical partitions. You cannot keep data in extended partition so create logical drive in extended partition.
- Now create logical drive: Now we have 5 partitions in which 3 primary partitions and 2 logical drive in extended partition.
- Create Partition on One Hard Disk:
- In the above we have only 1 hard disk, to make partitions, right click and shrink volume and create partitions, max you can create 3 partitions.
- In the above 3 primary partitions and 2 logical drive or N number in extended partition.
- You can make primary partition active to boot O/S and you can have only 1 partition active.
- bcedit : Tool used to recover if your boot files is corrupt.
- msconfig:
- RAID:
- Disk Partitions:
- Primary Partition: From this partition we can boot operating system, if you do not have O/S cannot be booted.
- Can create Min 1 and Max 4 Primary partitions, from GUI you can create only 3 primary partition and for the fourth partition create through DISK PART command.
- We have created 3 primary partitions in Disk 1 and to make fourth primary partition we have to go to diskpart. If you create fourth partition than system will not create primary partition but extended partition.
- Bitlocker:
- To enable/disable bitlocker on disk, go to system\about\Bitlocker\select drive.
- Disk Layout
Folder Sharing
- Access shared folder
- Hidden Folder (using $)
- Create shared folder in fileserver
- Create shared folder and map drive with GPO
- File and Folder Auditing
- Authentication and Numeration
- Create Home Folder
- Local Profile and Roaming Profile
- Folder Redirection
- Disk Quota
- code
DHCP
- DHCP - Dynamic Host Configuration Protocol
- APIPA
- DORA Process
- DHCP Installation & Configuration
-
DHCP: Dynamic Host Configuration Protocol (Assigning IP address automatically to network computers)
Computers in a network required an IP address to communicate with each other, this can be done either manually or automatically,
- Manual Assignment: can be done using TCP/IP settings of an adapter.
- Automatic Assignment: using DHCP server or APIPA in Windows machines only.
APIPA: Automatic Private IP Address Assignment:
- If you have not assigned an IP address manually and there is no DHCP server is configured in your network, if you attach a windows machine in the network the it will generate IP address automatically using APIPA. It will assign private IP address from Class A 169.254.0.0/16.
- When a machine generate itself an IP address 169.254.1.2 and it will broadcast (send message to all in a network) to check is this address has been used, if it is assigned already then it will generate another IP address and broadcast again until the number has not been used.
- In APIPA machines broadcast continuously on a netowrk which may slow down the network.
DHCP: Dynamically assign tcp/ip configuration to client computer in a network.
- Earlier to DHCP BootP protocol method used to assign dynamic IP address but in that method we need to enter MAC address of each client machine manually. DHCP is also work as dynamic BootP.
- It will assign IP address from Scope (pool or IP address range).
- It uses UDP port 67 and 68 at transport layer. (UDP is connectionless protocol while TCP is connection oriented protocol).
- DHCP Client: any machine in which you define automatic IP configuration means its a DHCP client.
- It provides:
- IP Address
- Subnet Mask
- Domain Name
- Default Gateway
- DNS Server Address
- WINS Server Address
- It uses the method DORA(Discover, Offer, Request, Acknowledge) to assign IP address to client.
- Discover (Client to Server) : When a client machine attached to a network, it does not have its IP address and DHCP server address is also unknown, first it discover the DHCP server and it broadcast the request in the network, packet contain the following information. packet contain Destination broadcast address 255.255.255.255 and physical layer address FFFF.FFFF.FFFF if destination is using router. Client uses port number 68 to send/receive packet and DHCP server uses port 67 to send/receive packets.
-
Source IP Address (Client) 0.0.0.0 Destination IP Address (All) 255.255.255.255 (Broadcast address of Layer3 (network Layer) Source MAC-Address (client) 00-55-56-C0-00-01 Destination MAC-Address FFFF-FFFF-FFFF (Broadcast address of Layer 2 devices, physical layer MAC address ) DHCP Client Port Number 68/UDP DHCP Server Port Number 67/UDP Optional: Default Gateway, DNS, TFTP etc.
-
- Offer (Server to Client): Dhcp will accept the request and offers an IP address, along with Reference Id which broadcast again in the network. It offer the IP address to client but not assigned because there could be more than one DHCP server in the network and both has offered IP.
-
Source IP Address (DHCP) 10.21.1.2 Destination IP Address (All) 255.255.255.255 Source Mac-Address (DHCP) 00-60-05-C0-01-00 Destination Mac-Address (All) FFFF-FFFF-FFFF DHCP Client Port Number 68/UDP DHCP Server Port Number 67/UDP Offer IP-Address 10.21.1.11 Reference ID. Oxfef968b6 Optional: Default Gateway, DNS, TFTP etc.
-
- Request (Client to Server): Client requests DHCP to assign IP address using Reference ID, it broadcast again the network as no ip has been assigned and there is possibility of more than 1 DHCP server in the network.
- Discover (Client to Server) : When a client machine attached to a network, it does not have its IP address and DHCP server address is also unknown, first it discover the DHCP server and it broadcast the request in the network, packet contain the following information. packet contain Destination broadcast address 255.255.255.255 and physical layer address FFFF.FFFF.FFFF if destination is using router. Client uses port number 68 to send/receive packet and DHCP server uses port 67 to send/receive packets.
-
-
-
-
-
Source IP Address (Client) 0.0.0.0 Destination IP Address (All) 255.255.255.255 Source Mac-Address (DHCP) 00-60-05-C0-01-00 Destination Mac-Address (All) FFFF-FFFF-FFFF DHCP Client Port Number 68/UDP DHCP Server Port Number 67/UDP Reference ID. Oxfef968b6
-
-
-
- Acknowledge (Server to Client): Server sends packet to client to acknowledge and complete clients request for leased configuration. This message contains a valid lease for the IP address.
-
-
-
-
Source IP Address (DHCP) 10.21.1.2 Destination IP Address (All) 255.255.255.255 Source Mac-Address (DHCP) 00-60-05-C0-01-00 Destination Mac-Address (All) FFFF-FFFF-FFFF DHCP Client Port Number 68/UDP DHCP Server Port Number 67/UDP Obtain IP Address 10.21.1.11 Reference ID. Oxfef968b6 Optional: Default Gateway, DNS, TFTP etc.
-
-
-
-
DHCP Installation & Configuration:
- Must manually assign static IP address to machine in which DHCP is installing.
- rename host name of the machine.
- Go to add roles & features and select dhcp.
DHCP Configuration:
DHCP Scope: Enter start and end of IP address range.
- Enter exclude IP range which DHCP will not assign to clients.
- Define lease duration: it assign ip address for specific defined time.
- if the dhcp has join the domain and active directory is configured then it needs to authorize in active directory.
- One scope for one network ID, IP pool range cannot be split and use in another scope, suppose 192.168.1.1 to 100 define in a scope but you cannot use remaining 192.168.1.101 to 254 in another scope. superscope can be use to define multiple scope of same network ID or different network ID.
Superscope: It is a group of multiple scopes, create superscope and add multiple scopes in it so that DHCP server will assign IP address from other scope when one scope is exhausted. If all ips are used from one pool and you have created another pool, DHCP will not assign IP from that pool automatically. You have to create one logical scope called Superscope and add both scopes in it so DHCP will consider only one pool.
Address Pool: Define range of IP addresses, you can exclude range of IP addresses so DHCP will not assign to client. You can also reserve IP address to a client using its MAC address.
Address Leases:
- It is the time assigned to client for keeping IP address, once this lease time reached to 50% then client request to renew it. You can also renew lease manually c:/ipconfig renew.
- If DHCP server is not available then client again attempts for ip-address renew at 87.5% expiration of lease duration. after 87.5% client tendsto try to contact with secondary DHCP server by broadcast in network. When lease time duration is 100% expired then client automatically release confiruation and allocate ip-address itself from APIPA and does broadast in the network.
- By default it is 8 Days but you can also assign in hours & Minutes, or unlimited, but it is not a good practice to assign unlimited because any automatic changes will not push or update to clients.
- If you have wireless clients who is in and out frequently then you can assign lease time in hours or minutes.
if your client is wired connected then keep long lease in days. - Right click on scope and define lease.
- Advantage of lease: whenever you make changes in DHCP server it will effect in the client automatically when lease renewed.
- DHCP renew is unicast process and will perform request and acknowledge process.
- c:/ipconfig /all
- c:/ipconfig /release
- c:/ipconfig/renew
Reservation: On the basis of Mac address you can assign IP address. IP address will be reserved for that client. you can perform with two methods:
- Go to reservations, provide mac address and IP address.
- select the ip address from address leases and right click and add to reservation.
Superscope: combine multiple scopes into a singe superscope.
- Create one logical scope and assign scopes in it so DHCP will assume it as one scope.
- Scopes have different network ID's so that systems can not communicate with each other, we have to perform routing. Ex. you have two subnet 192.168.0.1 and 192.168.1.1, clients can cummunicate on this network by using router, we can use a system as a router, just add two NIC and enable routing. now client from 192.168.0.1 can communicate with 192.168.1.1 subnet. Define the gateway of first subnet 192.168.0.1 and second subnet 192.168.1.1. If client want to use internet than define NAT in router.
- In superscope one scope should have ip range in which DHCP ip is assigned 192.168.1.1 while the other scope can be define from other network ID 10.0.0.1 or 172.16.0.1 etc.. you can have scopes of different network ID but atleast one scope in which local DHCP ip address is given. if your DHCP IP is from different network Id and all your scopes are from different network ID than DHCP will not work.
- Superscope is created in same LAN with different network ID. If it is different LAN than superscope is used with relay agent.
Server Option: Further configuration can be define like Router, DNS, Static Route etc.. Settings defined in server option will have effect on all scopes of server. If you define in scope then this will effect on scope and its range of IP while if you define in server option than it will effect on all scopes. if it is define in both than scope option has priority to server option.
Scope Option: Further configuration can be define like Router, DNS, Static Route etc.. Settings defined in scope option will have effect only on that scope. Scope option is available under scope.
- Scope option is different than Scope, in scope you define ip range while in scope option or server option you define further configuration Router, DNS, static route etc..
Converged Network: network consist of different network ID, in order to communicate each other in different network they should have a router, if there is no router than they can communicate with converged network.
How to resolve converged network issue so that client can communicate with each other of different netowork IDs.
- Install two NIC and attach both on lan, enable routing if it is windows machine.
- Define default gateway as per network ID in both Lan machines. Define routing in routing table.
- machines on both different ID now communite with each other.
Policies:
- You have multiple lan with different network ID or subnet either in same location or remote location, DHCP server is installed in one subnet and it assigned IP addresses to all clients.
- can subnetA client get IP address from DHCP server which is on SubnetB?
- Clients from SubnetA send broadcast to get IP in subnetA but to reach subnetB there is router in the middle and router does not broadcase. When the request reach to router with destination address 255.255.255.255 and there is no entry in the routing table of router. Router is a broadcast filtering device and router won't forward broadcast packet, Router will discard the request.
Solution:
- 1) Use the router which broadcast.
- 2) Install DHCP server in every subnet or Configure a router to forward DHCP broadcast packet or Configure DHCP Relay Agent in the network.
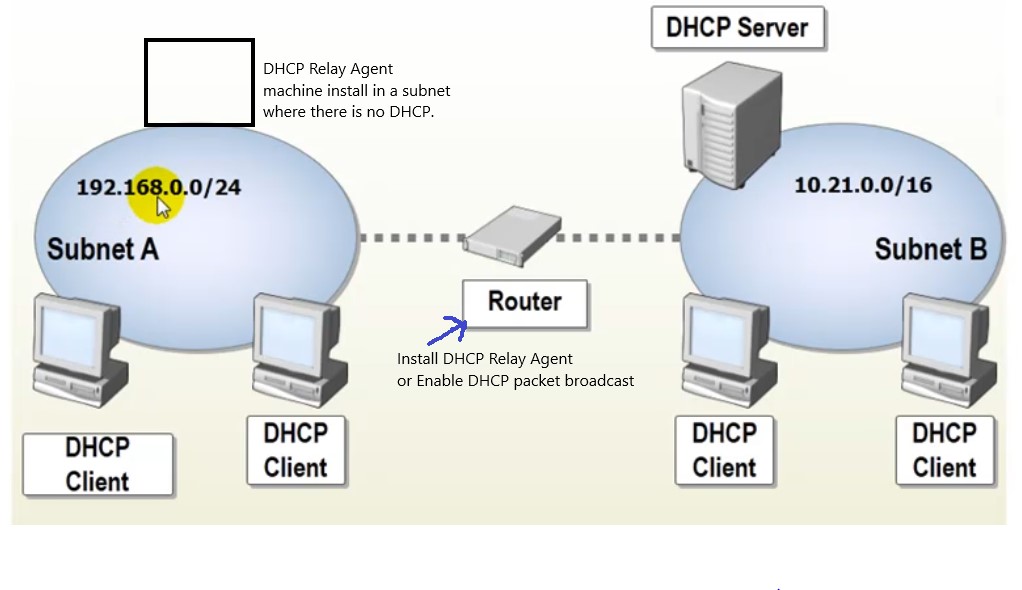
- Install dhcp relay agent on router or on a windows machine.
How Relay Agent works: Dora process will be done in 8 steps.
dhcp_relay_agent_dora.jpg
- Client1 broadcast a DHCPDiscover packet, it was discarded by router but reach to DHCP relay agent machine. When you configure relay agent we define DHCP server details. Relay agent and DHCP both have static IP and unicast is possible.
- Relay Agent forward DHCPDiscover packet to DHCP server, it converts broadcast to unicast message.
- DHCP server sends DHCPOffer packet to relay agent in unicast.
- Relay agent broadcast DHCPOffer packet.
- Client1 broadcast DHCPRequest packet.
- Relay Agent convert broadcast packet to unicast packet and forward it to DHCP server.
- DHCP unicast DHCPAcknowledge packet to relay agent.
- Relay agent broadcast DHCPAcknowledge packet.
How DHCP will assign IP address from 192.168.0.0 to SubnetA and 10.21.0.0 to SubnetB?
- Whenever a request is broadcasted then DHCP server will assign IP from 10.21.0.0 as request will be broadcasted in SubnetB and when a request is unicasted then it will assign IP from 192.168.0.0 as unicast request comes from relay agent for SubnetA.
Split Scope:
Failover:
Nacks: Negative Acknowledgement (Server to Client)
- Server assign IP address in the fourth packet of DORA process to client. it sends acknowledgement to client.
- If the IP address assign by server has been assigned manually to any machine in the network then server sends negative acknowledgement to client, client will inform to server that IP address has been assigned to it. DORA process will run again.
Decline: (Client to Server )
- You have two LAN in different location, DHCP is running on one remote location, client from another location send request to DHCP for IP address and DHCP has assign IP address and send offer, but in remote location there is another machine in which same IP has been assigned statially, it will be lengthy process for machines on remote location to inform dhcp server that same IP has been assigned, instead it will broadcast to Lan and machine will receive message to which server has assigned IP address, now machine send decline offer to DHCP server and request for a new IP address.
DHCP Release: Release of an IP address (Client to Server)
- IP will release in the following condition.
- When you restart machine.
- When you shutdown
- forcefully release using c:/ipconfig /release
- Microsoft Network Monitor: Tool is used to capture network.
Group Policy
Local Group Policy
- Disable USB storage devices for all users.
- Open the Group Policy Management Console (GPMC) and create a new GPO.
- Name the GPO and link it to the appropriate OU.
- Navigate to Computer Configuration > Policies > Administrative Templates > System > Removable Storage Access.
- Double-click on "Removable Disks: Deny execute access" and select "Enabled." Click on "OK" to save the changes.
- Double-click on "Removable Disks: Deny read access" and select "Enabled." Click on "OK" to save the changes.
- Double-click on "Removable Disks: Deny write access" and select "Enabled." Click on "OK" to save the changes.
- Close the Group Policy Management Editor.
- Apply the GPO to the appropriate OU.
- open cmd prompt and run C:\gpupdate\force
- code
- Disable USB storage devices for all users.
Active Directory
- code
- code
code
- code
- code
code
- code
- code
code
- code
- code
Remote Access
- AD
Subnetting
- AD
TCP/IP
- AD
Code
- Code
Outlook
Recalling an email sent by mistake. (delete unread copies or delete & replce with a new message).
- Open your Sent Items folder
- Double-click on the email you want to recall (to open it)
- Go to File> Info
- Click on Message Resend and Recall > Recall This Message
- Select the option you want from:
- Delete unread copies of this message, which 'recalls' the email by deleting it from the inbox
- Delete unread copies and replace with a new message, which 'recalls' unread copied by deleting them and sends a new email to recipients
- Tick the Tell me if recall succeeds or fails for each recipientbox to know whether your email was deleted or not
- Select OK
- code
Code
- code
- code
Code
- code
- code
Code
- code
- code
Code
- code
- code
Code
- code
- code
Code
- code
- code
Code
- code
- code
Code
- code
- code
Code
- code
- code
Code
- code
- code
Code
Code
- Code
- Code
- Code
- Code
Code
- code
- code
Code
- code
- code
Code
- code
- code
Code
- code
- code
Code
- code
- code
Code
- code
- code
Code
- code
- code
Code
- code
- code
Code
Code
- Code
- Code
- Code
- Code
Code
- code
- code
Code
- code
- code
Code
- code
- code
Code
- code
- code
Code
- code
- code
Code
- code
- code
Code
- code
- code
Code
- code
- code
Code
Code
- Code
- Code
- Code
- Code
Code
- code
- code
Code
- code
- code
Code
- code
- code
Code
- code
- code
Code
- code
- code
Code
- code
- code
Code
- code
- code
Code
- code
- code
Code
Code.
- Code
- Code
- Code
- Code
Code
- code
- code
Code
- code
- code
Code
- code
- code
Code
- code
- code
Code
- code
- code
Code
- code
- code
Code
- code
- code
Code
- code
- code
Code
Code
- Code
- Code
- Code
- Code
Code
- code
- code
Code
- code
- code
Code
- code
- code
Code
- code
- code
Code
- code
- code
Code
- code
- code
Code
- code
- code
Code
- code
- code
Code
code
- Code
- Code
- Code
- Code
Code
- code
- code
Code
- code
- code
Code
- code
- code
Code
- code
- code
Code
- code
- code
Code
- code
- code
Code
- code
- code
Code
- code
- code
Troubleshooting
A
- Code
- Code
- Code
- Code
B
- code
- code
C change computer name
- Change computer name:
- Go to system\about\rename this PC
- if the above does not work then in system\about\advanced system settings\computer name\ click on change, enter new name and restart.
D: desktop.ini, desktop icon issue on server
- 2 desktop.ini file on desktop
- A desktop.ini is a file that determines the way a folder is displayed by Windows. While usually hidden, these files can be found in any folder, anywhere on your computer, and they contain information and settings pertaining to that folder, like the icon used for it and its localized name.
-
Whenever you make certain changes to a folder, Windows automatically creates a desktop.ini file inside that folder. Any changes to the configuration and the layout settings of the containing folder are saved in the desktop.ini file, and there are no settings to change this behavior, as this is how Windows is programmed to function. If you right-click or press-and-hold on any desktop.ini file, and then click or tap Properties, you can see the "Type of file" field indicates this, displaying Configuration settings.
- Solution:
-
Type in "folder options" in the search field
Then, in the Advanced settings section of the View tab, check "Show hidden files, folders, or drives" and uncheck "Hide protected operating system files (Recommended)."
- Desktop Icons cannot access on windows server.
- To display desktop icons/right click on desktop and select Personalized/Themes/Desktop icon settings. Here you get error message
- Windows cannot access the specified device, path or file. you may not have the appropriate permission to access the item.
- Solution:
- Win +r and op Run: desk.cpl ,5
- select the required desktop icons and close.
- code
- 2 desktop.ini file on desktop
E
- code
- code
F
- code
- code
G
- code
- code
H
- code
- code
I
- code
- code
J
- Code
- Code
- Code
- Code
K
- code
- code
L
- code
- code
M
- code
- code
N
- code
- code
O
- code
- code
P
- code
- code
Q
- code
- code
R
- code
- code
S
- Code
- Code
- Code
- Code
T
- code
- code
U
- code
- code
V
- code
- code
W
- code
- code
X
- code
- code
Y
- code
- code
Z
- code
- code
Code
- code
- code
Win11
Installing Win 11 without Microsoft Account.
- In the beginning after selecting country/region, at lets connect you to a network (internet) selection press Shift + F10 or Shift + Fn+F10 which will open command prompt.
- at command prommpt type C:\windows\system32\oobe\BypassNRO and enter
- system will restart and select country/region, keyboard layout and now select I don't have internet.
- click continue with limited setup.
- follow the instruction to complete installation.
Clean Install & Upgrade
- Clean Install or reinstall: Download PC Health Check App to check min requirement. For clean install/reinstall, download ISO image or create windows installation media from https://www.microsoft.com/en-us/software-download/windows11
- For Free Upgrade on windows10 running: start/Settings/Update & Security/Windows Update: Download & Install.
- code
Shortcut using Wind key
- Win+A = Network
- Win + X = window open for
- Apps & Features
- Power Options
- Event Viewer
- System
- Device Manager
- Network Connections
- Disk Management
- Computer Management
- Windows Terminal
- Windows Terminal (Admin)
- Task Manager
- Settings
- File Explorer
- Search
- Run
- Shutdown
- Desktop
- Win+E = File Explorer
- Win+I = System
- Win+u = Accessibility
- Win+L = Lock Screen
- Win+S = Search
- Win+R = Run
- Win+N = Calendar
- Ctrl+Shift+Esc for task manager
Domain Join
- To join a domain: win + X /Domain or workgroup /Network ID
- Network ID grayed out:
- Check the version of o/s, Home or Pro? Home machines cannot be added to a domain.
- If version is home then upgrade to windows 11 pro.
- Select Start > Settings > System > About/ Product key and Activation/Upgrade your edition of Windows/Change Product key.
- Enter the 25-character Windows 11 Pro product key.
Select Next to start the upgrade to Windows 11 Pro.
- code
Turn Off Notifications
- start/settings/system/notifications: on/off
- Show notifications on the lock screen
- show reminders and incoming VOIP calls on the lock screen
- Allow notifications to play sounds
- list of apps in which notification on/off
- code
- start/settings/system/notifications: on/off
Taskbar Setting
- Right click on taskbar to open, Taskmanager is not accessible from here. Personalize/customize
- Search on/off
- Taskview on/off
- Widgets on/off
- Chat on/off
- Pen on/off (Touch screen)
- Touch keyboard on/off
- Virtual Touchpad on/off
- Taskbar alignment (left, center)
- Automatically Hide the taskbar
- Touch Keyboard on/off:
- start/setting/Personalization/Taskbar/touch keyboard on/off (in touch keyboard settings select pen and handwriting option)
- Personalised folder on start:
- start/settings/personlization/Start/Folders/select folders which appear on start next to power button.
- Multiple Desktops:
- Click on desktop and add multiple desktop with different apps.
- Hide Desktop Icons:
- Right click on desktop/view/show desktop icons.
- Advertising Notification on/off:
- start/settings/privacy & security / General on/off
- Right click on taskbar to open, Taskmanager is not accessible from here. Personalize/customize
Reset Network Settings to factory default.
- start/settings/Network & Internet/Advanced Network Settings/Network Reset (Reset Network Adapters to factory settings).
- code
Login with Local Account or Microsoft Account.
- A Microsoft login requires a connection to the internet to retrieve user settings and preferences; a local login does not require an internet connection.
- The major difference between a Local account and a Microsoft account is the lack of Microsoft features in Local Account such as OneDrive, Microsoft App Stores, etc.
- code
Display system information on desktop
- Download bginfo https://learn.microsoft.com/en-us/sysinternals/downloads/bginfo
- Run bginfo and select all and delete all fields.
- Select the required field and click add from the list.
- Click position and choose where this info should display.
- Save the file for future amendments.
- code
Mac OS
Forcefully quit a running program.
- COMMAND-OPTION-ESC : if any program is running which need to forcefully quit, press these three buttons and select the program and click force quit.
Connect to a Windows network shared folder
- Go to Finder folder and click Go/connect to server
- enter url smb://ip/foldername (smb://10.112.0.170/IT-Folder) and click connect
- it will connect to shared IT-Folder folder.
How to remove any application:
- Open application (Malwarebytes) for Mac. If you have multiple apps open, make sure Malwarebytes is the one selected.
- At the top of your Mac screen, click Help, then click Uninstall Malwarebytes.
- A prompt appears with the following message: ...
- Click Yes.
- Enter your Mac's password.
- Click OK.
- code
How to remove Kaspersky
- Quit the program if you have it open.
- open the software's installation file.
- Double click on "Uninstall Kaspersky" and confirm your choice by clicking on "uninstall".
- Enter the admin's name and password and click ok
- click on "Finish" to uninstall Kaspersky.
- code
Code
- code
- code
Code
- code
- code
Code
- code
- code
Code
- code
- code
Code
- code
- code
