A AbdulAziz-uk, apt
Github linux link
- https://github.com/AbdulAziz-uk/Linux
- code
- code
apt, yum, rpm, dnf, pacman
- apt = Advanced package tool use in debian based system - ubuntu
- It is a command-line utility in Ubuntu and other Debian-based Linux distributions used to manage software packages
- $sudo apt update : To refresh the package list
- $sudo apt upgrade : To install newer versions of installed packages
- $sudo apt install <package_name>: To install new software
- yum : use in Centos
- rpm : use in Redhat (RHEL)
- dnf: use in fedora
- apt = Advanced package tool use in debian based system - ubuntu
code
- code
- code
- code
code
- code
- code
- code
code
- code
- code
- code
code
- code
- code
- code
code
- code
- code
- code
B
code
- code
- code
- code
code
- code
- code
- code
code
- code
- code
- code
code
- code
- code
- code
code
- code
- code
- code
code
- code
- code
- code
code
- code
- code
- code
C : Components of Linux, Linux Distribution, Computer Management, cat, copy,
Computer Management
- $nproc: Displays number of CPU
- $free: Displays ram usage
- $top: Displays disk usage
- $pf -ef: Displays processes and IDs or $ps -ef | grep "name"`
- code
cat command
- $cat filename : it will display contents of file.
- $cat -n filename: it will display contents of file in numbers.
- $tac filename: it will display contents in reverse order of file. from bottom to top
- code
copy command
-
$cp source dest it willl make a copy of the file in the destination. $cp -r source dest -r: it will make a copy of the recursive file located in folders/subfolders to destinaiton $cp -i source dest It will prompt you before copying. $cp –rvf /root/* dest it will copy all files from root folder to dest with confirmation. $cp –rvfn /root/* dest it will copy only new files and not override existing file. v=display, f=forcefully, n=newfiles. - Move command can be use to rename or cut & paste.
- $mv file_name new_filename
- $mv file_name /destination path (it will cut and paste in the new location)
- code
-
Components of Linux
-
+----------------------------------------------------+
| User Applications (Vim, Docker, Apache, etc.) |
+----------------------------------------------------+
| Shell (Bash, Zsh, Fish, etc.) | <-- Part of the OS
+----------------------------------------------------+
| System Libraries (glibc, libc, OpenSSL, etc.) | <-- Part of the OS
+----------------------------------------------------+
| System Utilities (ls, grep, systemctl, etc.) | <-- Part of the OS
+----------------------------------------------------+
| Linux Kernel (Process, Memory, FS, Network) | <-- Core of the OS
+----------------------------------------------------+
| Hardware (CPU, RAM, Disk, Network, Peripherals) |
+----------------------------------------------------+
(a) Hardware Layer🔹 The physical components of the computer (CPU, RAM, disk, network interfaces, etc.).
🔹 The OS interacts with hardware using device drivers.
(b) Kernel (Core of Linux OS)🔹 The Linux Kernel is responsible for directly managing system resources, including:
Process Management – Schedules processes and handles multitasking.
Memory Management – Allocates and deallocates RAM efficiently.
Device Drivers – Acts as an interface between software and hardware.
File System Management – Manages how data is stored and retrieved.
Network Management – Handles communication between systems.
(c) Shell (Command Line Interface - CLI)
🔹 A command interpreter that allows users to interact with the kernel.
🔹 Examples: Bash, Zsh, Fish, Dash, Ksh.
🔹 Converts user commands into system calls for the kernel.
(d) User Applications🔹 End-user programs like web browsers, text editors, DevOps tools, etc.
🔹 Applications interact with the OS using system calls via the shell or GUI. - code
- code
-
Linux Distribution
- Linux distributions (distros) are different versions of Linux that package the Linux kernel with various software, system utilities, and package managers. Each distro is designed for different use cases, such as personal computing, server management, or security.
-
Ubuntu – One of the most beginner-friendly distros, widely used for personal and server use. It has great community support.
-
CentOS (discontinued, replaced by AlmaLinux/Rocky Linux) – Previously a popular choice for servers, based on Red Hat Enterprise Linux (RHEL).
-
Debian – A very stable and reliable distro, often used as a base for other distros like Ubuntu.
-
Fedora – A cutting-edge distro that introduces new features before they reach RHEL.
-
Arch Linux – A lightweight, rolling-release distro for advanced users who like customization.
-
Kali Linux – Designed for cybersecurity and penetration testing.
-
Alpine Linux – A lightweight, security-focused distro often used in containers.
- code
code
- code
- code
- code
code
- code
- code
- code
D: Date, Daemon, Delete, Disk Management, DNS
Date Display
- $date
- Wed Nov 12 02:58:30 PM GMT 2025
- Change date & time:
- $date and copy the line
- $date -s “paste the date and make change”.
- code
Daemon: it is a program which control services in the system like services stop start restart reload etc
-
Service Name Daemon Name SSH SSHD HTTP HTTPD NFS NFS-SERVER DNS NAMED - :
-
#systemctl status sshd
Show status of sshd service or systemctl is-active sshd or systemctl is-enabled sshd (enabled means permanently)
#systemctl stop sshd
To stop sshd service. It is temp stopped until reboot. Systemctl start sshd (restart)
#systemctl disable sshd
It will stop permanently. systemctl enable sshd.
#systemctl reload sshd
Service will reload, it is effective when you make changes. Users will not be disconnected.
#systemctl restart sshd
Service will restart and all connected users will disconnect.
Target
4 types you can set
Graphical.target: system state in gui mode
multi-user.target,: system state in command line
rescue.taget: O/S troubleshooting
emergency.target: emergency mode
#systemctl get-default
To check the system state mode
#systemctl isolate multi-user.target
It change the system state to command line mode. If you check systemctl get-default it shows graphical.target as it set temp. if system reboot it will start in graphical mode.
#systemctl Set-default multi-user.target
For permanent set system state into command line mode.
#Systemctl Poweroff
#Systemctl Reboot
- code
-
Delete file,
- $rm filename (rm is use to delete file), prompt for confirmation?
- $rm -f filename (-f = forcefully delete)
- $rm -r foldername ( rm -r is use to delete folder)
- $rm -r -f foldername (forcefully delete folder)
- $rm -v (verbose, it will display what is going to delete)
- code
- code
Disk Management
- code
- Types of disks:
- SSD = Solid State Drive
- HDD =
- SCSI = use in VMWARE
- EBS (AWS)
- Disks: lsblk
- $lsblk : it will display number of disks attached in the system.
- $df -h : it will display number of disks attached in the system.
- /dev/sda, /dev/sdb, /dev/sdc .etc..(a is first disk, b is second disk, c is third disk ...)
- sr0 is for cd/dvd rom.
- Partitions in the disk will display like /dev/sda1, /dev/sda2, /dev/sda3 etc.. or /dev/sdd1, /dev/sdd2, /dev/sdd3
- Create a disk in VM:
- Go to VM -->settings -->add hard disk --> scsi or recommended --> enter size -->create.
- $lsblk
- $fdisk -l
- $lsscsi = list scsi disk
- If you unable to view the newly created disk, reboot the system
- $reboot or $init 6
- sda 8:0 0 20G 0 disk
├─sda1 8:1 0 1M 0 part
└─sda2 8:2 0 20G 0 part /
sdb 8:16 0 10G 0 disk
sdc 8:32 0 20G 0 disk
└─sdc1 8:33 0 20G 0 part
sr0 11:0 1 1024M 0 rom - Three disk are attached (sda, sdb, sdc and cd-rom sr0)
- In production system, we cannot reboot so run the following scan at O/S level command, depends on how many disk are there.
- $echo "- - -" >>/sys/class/scsi_host/host0/scan
- $echo "- - -" >>/sys/class/scsi_host/host1/scan
- $echo "- - -" >>/sys/class/scsi_host/host2/scan
- $echo "- - -" >>/sys/class/scsi_host/host3/scan
- $lsblk (it shows all disks)
- sda 8:0 0 20G 0 disk
├─sda1 8:1 0 1M 0 part
└─sda2 8:2 0 20G 0 part /
sdb 8:16 0 20G 0 disk
└─sdb1 8:17 0 20G 0 part
sdc 8:32 0 10G 0 disk
sr0 11:0 1 1024M 0 rom - sda disk is 20GB, it has two partitions, sda1 & sda2 and it mount to /
- sdb disk is 50 GB, it has one partition, sdb1
- sdc disk is 10GB, it has no partition, not formatted. newly attached disk.
- Mount the disk:
- $lsblk
- sda 8:0 0 20G 0 disk
├─sda1 8:1 0 1M 0 part
└─sda2 8:2 0 20G 0 part /
sdb 8:16 0 20G 0 disk
└─sdb1 8:17 0 20G 0 part
sdc 8:32 0 10G 0 disk
sr0 11:0 1 1024M 0 rom - sda disk is 20GB, it has two partitions, sda1 & sda2 and it mount to /
- sdb disk is 50 GB, it has one partition, sdb1
- sdc disk is 10GB, it has no partition, not formatted.
- sda 8:0 0 20G 0 disk
- Format the disk with xfs file system.
- $mkfs.xfs /dev/sdc
- Mount the disk.
- $mkdir /disk_c
- $vim /etc/fstab
- add the following entry.
- /dev/sdc /disk_c xfs defaults 0 0
- save and exit
- Refresh the mount.
- root@docker:~# mount -a
mount: (hint) your fstab has been modified, but systemd still uses
the old version; use 'systemctl daemon-reload' to reload.
root@docker:~# systemctl daemon-reload - $lsblk or
- $df -hT
- sdc 8:32 0 10G 0 disk /disk_c
- $lsblk
Partition:
- Type of partitions:
- Primary: primary partitions are bootable, if you install 0/S in lvm partition than it will not boot. (/boot)
- LVM Partitions (Logival Volume Management), LVM disk can be exteded without downtime and shrinked while general disk cannot be extended. Create another disk and attach to system.
- RAID(Redundant Array of Indepenent Disks)
- We can create upto 4 partitions in each disk. Partitions cannot be extended without downtime/switch off.
- File system types:
- Windows : Fat32 (less than 4 GB file can store), NTFS (files can be above 4GB)
- Linux:
- EXT2:
- EXT3:
- EXT4:
- Ext4 stands for fourth extended file system.
- Max individual file size can be from 16 GB to 16 TB.
- XFS:
- Create a primary partitions.
- Attach the new disk or if using VM, create a new disk -->settings -->add hard disk --> scsi or recommended --> enter size -->create.
- $lsblk
- $fdisk -l
- $lsscsi list scsi disk
- If you unable to view the newly created disk, reboot the system
- $reboot or $init 6
- sda 8:0 0 20G 0 disk
├─sda1 8:1 0 1M 0 part
└─sda2 8:2 0 20G 0 part /
sdb 8:16 0 10G 0 disk
sdc 8:32 0 20G 0 disk
└─sdc1 8:33 0 20G 0 part
sr0 11:0 1 1024M 0 rom - Three disk are attached (sda, sdb, sdc and cd-rom sr0)
- In production system, we cannot reboot so run the following scan at O/S level command, depends on how many disk are there.
- $echo "- - -" >>/sys/class/scsi_host/host0/scan
- $echo "- - -" >>/sys/class/scsi_host/host1/scan
- $echo "- - -" >>/sys/class/scsi_host/host2/scan
- $echo "- - -" >>/sys/class/scsi_host/host3/scan
- $lsblk (it shows all disks)
- Create primary partition:
- $fdisk /dev/sdb
- enter m for help and it gives list of options to choose.
- n=add a new partition.
- Partition type
p primary (0 primary, 0 extended, 4 free)
e extended (container for logical partitions) - 4 free, 4 partitions can be created.
- Enter p to create primary partition.
- partition number (1-4, default 1): 1
- First sector (2048-20971519, default 2048): enter for default 2048 sector for meta data information.
- Last sector, +/-sectors or +/-size{K,M,G,T,P} (2048-20971519, default 20971519):
- calculate sectors in 5 GB and enter or + 5G and enter.
- Created a new partition 1 of type 'Linux' and of size 5 GiB. It will automatically calculate sectors.
- m and create second partition.
- w and q for save and exit.
- $lsblk
- sda 8:0 0 20G 0 disk
├─sda1 8:1 0 1M 0 part
└─sda2 8:2 0 20G 0 part /
sdb 8:16 0 10G 0 disk
├─sdb1 8:17 0 5G 0 part
└─sdb2 8:18 0 5G 0 part
sdc 8:32 0 20G 0 disk
└─sdc1 8:33 0 20G 0 part
sr0 11:0 1 1024M 0 rom - update kernel
- $partprobe /dev/sdb
- Format the partitions:
- $mkfs.xfs /dev/sdb1 (mkfs.xfs not found, $apt instal xfsprogs)
- $mkfs.xfs /dev/sdb2
- Mount the partition:
- mkdir /data1
- mkdir /data2
- $mount /dev/sdb1 /data1
- $mount /dev/sdb2 /data2
- The above is temp mounted, when you restart mount point will be deleted. For permanent mount point
- $vim /etc/fstab and add entry
- /dev/sdb1 /data1 xfs defaults 0 0
- first 0 = it will not backup metadata
- second 0 = do not check file system
- 1= it will take backup of metadata, check file system
- $mount (to check mount points)
- $lsblk = it shows /dev/sdb1 mounted on /data1 and /dev/sdb2 mounted on /data2
- $df -hT (shows disk sizes)
- Code
- Type of partitions:
Logical Volume

- Disks are attached to VM or physical disk.
- PV: Physical volume is created for each disk, multiple disks can be attached to one PV.
- VG: Volume Group is created with one or more PV (Physical Volumes)
- LV: Logical Volume is created on top of VG.
- LV is attached to FS (File System).
- When space is full in FS, it can be extend with space available in VG (volume group).
- Lab:
- After attaching the disks, scan it so it can be displayed.
- $echo "- - -">>/sys/class/scsi_host/host0/scan
- $echo "- - -">>/sys/class/scsi_host/host1/scan
- $echo "- - -">>/sys/class/scsi_host/host2/scan
- $echo "- - -">>/sys/class/scsi_host/host3/scan
- $lsblk
- sda 8:0 0 20G 0 disk
├─sda1 8:1 0 1M 0 part
└─sda2 8:2 0 20G 0 part /
sdb 8:16 0 20G 0 disk
sdc 8:32 0 10G 0 disk
sr0 11:0 1 1024M 0 rom - Three disks: sda, sdb, sdc
- PV Creation for sdb & sdc:
- $pvcreate /dev/sdb
- $pvcreate /dev/sdc
- Command 'pvcreate' not found: $apt install lvm2
- Physical volume "/dev/sdb" successfully created.
- Physical volume "/dev/sdc" successfully created.
- VG Creation:
- $vgcreate star1_vg /dev/sdb : Volume group "star1_vg" successfully created
- $vgcreate star2_vg /dev/sdc : Volume group "star2_vg" successfully created
- LV Creation:
- -L : provide how much space you need
- $lvcreate -L +10G -n oradata_lv star1_vg : Logical volume "oradata_lv" created.
- lvcreate -L +5G -n oradata_lv2 star2_vg : Logical volume "oradata_lv2" created.
- FS Creation:
- $mkfs.xfs /dev/star1_vg/oradata_lv
- Create a folder and assing mount point.
- $mkdir /logical_volume1
- $vim /etc/fstab
- /dev/star1_vg/oradata_lv /logical_volume1 xfs defaults 0 0
- $mount -a
- $mkdir /logical_volume2
- $vim /etc/fstab
- /dev/star2_vg/oradata_lv2 /logical_volume2 xfs defaults 0 0
- $mount -a
- $df -hT
- /dev/mapper/star1_vg-oradata_lv xfs 10G 228M 9.8G 3% /logical_volume1
/dev/mapper/star2_vg-oradata_lv2 xfs 5.0G 130M 4.9G 3% /logical_volume2 - $lsblk
- Extending Logical Volume Partition or increasing space in Logical Volume.
- 1. vgestend
- 2. lvextend
- Extend logical volume partition - space available:
- $lsblk
- sda 8:0 0 20G 0 disk
├─sda1 8:1 0 1M 0 part
└─sda2 8:2 0 20G 0 part /
sdb 8:16 0 20G 0 disk
└─star1_vg-oradata_lv 252:0 0 10G 0 lvm /logical_volume1
sdc 8:32 0 10G 0 disk
└─star2_vg-oradata_lv2 252:1 0 5G 0 lvm /logical_volume2
sr0 11:0 1 1024M 0 rom - sdb has 10 GB, sdc has 5 GB disk space available.
- Display PV:
- $pvs
- PV VG Fmt Attr PSize PFree
/dev/sdb star1_vg lvm2 a-- <20.00g <10.00g
/dev/sdc star2_vg lvm2 a-- <10.00g <5.00g
- Display VG:
- $vgs
- VG #PV #LV #SN Attr VSize VFree
star1_vg 1 1 0 wz--n- <20.00g <10.00g
star2_vg 1 1 0 wz--n- <10.00g <5.00g
- Display LV:
- $lvs
- LV VG Attr LSize Pool Origin Data% Meta% Move Log Cpy%Sync Convert
oradata_lv star1_vg -wi-ao---- 10.00g
oradata_lv2 star2_vg -wi-ao---- 5.00g - Extend oradata_lv & oradata_lv2:
- LV partition space can be extended if the space is available in VG (Volume Group).
- First check which LV need to be extended and from which VG it was created.
- When required space is available in Vg than extend LV.
- Method 1: can be extend without downtime.
- $lvextend -L +5G /dev/star1_vg/oradata_lv (lvpath = /dev/vgname/lvname) ==> this will extend partition space
- $lvextend -L +2.5G /dev/star2_vg/oradata_lv2
- Size of logical volume star1_vg/oradata_lv changed from 10.00 GiB (2560 extents) to 15.00 GiB (3840 extents).
Logical volume star1_vg/oradata_lv successfully resized. - Size of logical volume star2_vg/oradata_lv2 changed from 5.00 GiB (1280 extents) to 7.50 GiB (1920 extents).
Logical volume star2_vg/oradata_lv2 successfully resized. - $xfs_growfs /dev/star1_vg/oradata_lv (path = /dev/vgname/lvname ==> this will extend file system)
- $xfs_growfs /dev/star2_vg/oradata_lv2
- $mount -a
- $df -hT
- /dev/mapper/star1_vg-oradata_lv xfs 15G 326M 15G 3% /logical_volume1 (extend 5G, totoal is 15 G now)
- $lsblk
- Method 2:
- $lvextend -L +5G /dev/vgname/lvname -r ==> r means extending the file system too (with size defined)
- or
- $lvextend -l +100%FREE /dev/star1_vg/oradata_lv -r (with % of free space defined)
- lvextend -l +100%FREE /dev/star2_vg/oradata_lv2 -r
- $mount -a
- $df -hT
- $lsblk
- sdb 8:16 0 20G 0 disk
└─star1_vg-oradata_lv 252:0 0 20G 0 lvm /logical_volume1
sdc 8:32 0 10G 0 disk
└─star2_vg-oradata_lv2 252:1 0 10G 0 lvm /logical_volume2
sr0 11:0 1 1024M 0 rom - complete 100% remaining space is extended.
- Extend logical volume partition - space NOT available:
- If you do not have disk space to extend. add a new disk ==> extend PV ==> extend VG ==> extend LV ==> extend FS
- Go to VM --> Settings -->add a disk --> enter size 50GB --> create.
- $lsblk, check if disk is appeared, if not
- $echo "- - -">>/sys/class/scsi_host/host0/scan
- $echo "- - -">>/sys/class/scsi_host/host1/scan
- $echo "- - -">>/sys/class/scsi_host/host2/scan
- $echo "- - -">>/sys/class/scsi_host/host3/scan
- $echo "- - -">>/sys/class/scsi_host/host3/scan
- $lsblk
- Create PV
- $pvcreate /dev/sdd
- Extend VG
- $vgextend star1_vg /dev/sdd
- Volume group "star1_vg" successfully extended
- Extend LV:
- $lvextend -L +25G /dev/star1_vg/oradata_lv -r
- $df -hT
- /dev/mapper/star1_vg-oradata_lv xfs 45G 915M 45G 2% /logical_volume1
- now size is 45G
- After attaching the disks, scan it so it can be displayed.
- Delete a partition:
- Decommissioning/deleting a partition:
- $fdisk /dev/sdc
- This disk is currently in use - repartitioning is probably a bad idea. It's recommended to umount all file systems, and swapoff all swap partitions on this disk.
- $umount /dev/sdc1 /data1
- $umount: /data1: not mounted.
- $fdisk /dev/sdc
- select d=delete a partition
- enter partition number=2
- write and exit (w & q).
- code
- code
DNS Display
- $cat /etc/resolv.conf
- $systemd-resolve --status | grep Current (check for currently used DNS server IP address)
- code
E: echo,
echo is use to display text message on screen. Generally it is used in script to pass any message on screen.
- $echo "Welcome "
- $echo "Welcome to Star Distributors" > welcome.txt (it will save in welcome.txt file, it will create and save, if file exist then it will overwrite)
- $echo "Online Training in Devops$ >> welcome.txt (it will write next line in welcome.txt)
code
- code
- code
- code
code
- code
- code
- code
code
- code
- code
- code
code
- code
- code
- code
code
- code
- code
- code
code
- code
- code
- code
F: Folder/File Structure, File/Folder Creation, Folder Permission, File Permission, Find, File Size, File Management,
System Folder Structure: System Directories
- Linux is installed in root (/) directory or root partition. It has various subdirectories.
- $ls -ltr
- / : It is top most directory in any linux system, it is similar to C:\ in windows. all the sub folders and files are created within / folder.
- ~ : Tild represents home directory.
- ~# : root user home directory( /root)
- ~$: user home directory. (/home/user_name)
-
/ top level root directory. /root: it is a home directory for root user. /bin: contain commands used by normal users. /Home/user: It is a home directory for normal users /sbin: contain commands used by root user. /boot: it contain boot files. /etc: system configuration files. /tmp: stored temporary data. /dev: disk information is stored. /lib 32 & 64: stored libraries. /opt: contain and stored third party software /proc: process information. /mnt: information about mounting. /run: media device which helps to run. - Link or shortcut folders
-
Directory Description /sbin -> /usr/sbinSystem binaries for administrative commands (linked to /usr/sbin)./bin -> /usr/binEssential user binaries (linked to /usr/bin)./lib -> /usr/libShared libraries and kernel modules (linked to /usr/lib).
-
- System Folders
-
Directory Description /bootStores files needed for booting the system (not relevant in containers). /usrContains most user-installed applications and libraries. /varStores logs, caches, and temporary files that change frequently. /etcStores system configuration files.
-
- User & Application-Specific Folders
-
/homeDefault location for user home directories. /optUsed for installing optional third-party software. /srvHolds data for services like web servers (rarely used in containers). /rootHome directory for the root user.
-
- Temporary & Volatime Folders
-
Directory Description /tmpTemporary files (cleared on reboot). /runHolds runtime data for processes. /procVirtual filesystem for process and system information. /sysVirtual filesystem for hardware and kernel information. /devContains device files (e.g., /dev/null,/dev/sda).
-
- Mount Points
-
Directory Description /mntTemporary mount point for external filesystems. /mediaMount point for removable media (USB, CDs). /dataLikely your mounted volume from Windows ( C:/ubuntu-data).
-
Chown : change ownership of a file
- $sudo chown newusername filename
- code
File/Folder create list,edit,multiple files/folders,
-
#cat > filename It creates a file and you can enter text. Ctrl D to save. #cat >> filename Add new lines only. Cannot delete existing lines. #cat 2 > filename #cat filename To view/read file. #cat –n filename Displays with line numbers #du –sh filename Displays file size. #stat filename file status and access time. #cp source dest it willl make a copy of the file in the destination. #cp -r source dest it will make a copy of the folder in the destination. #cp –rvf /root/* dest it will copy all files from root folder to dest with confirmation. #Cp –rvfn /root/* dest it will copy only new files and not override existing file. v=display, f=forcefully, n=newfiles. -
Empty File Creation: touch,
#touch filename location it creates empty file #touch abc{1..10} location it will create files abc1 to abc10. #touch .file1 It will create hidden empty file. - Find file size:
- $du -sh filename
-
Edit File: vi or vim,
vi filename Create a file in editor. if file exist it open in editor mode.
it opens in escape mode, press i to get edit mode to add or delete.options i = insert mode.
q! = Exit, wq! Save and exit.
x = Delete character where cursor blinking, 4x delete 4char.
dw = Delete a word.
dd = Delete a line.
gg = Cursor goes to top.
shift g = Cursor goes to bottom.
u = undo.
ctrl r = Redo. -
List files and folders: list,
#ls List files and folders of current location. #ls -l Long list #ls -a List all files and folders including hidden. #ls -la Long list of files and folders including hidden. #ls -lt List of files with time stamp, latest created file on the top. #ls-R List directories and all its sub directories. #ls-hl Displays size of the file. Ls-lr or ls-ltr List of files with recently updated. r in reverse order #ls -d */ List all folders only from root #ls -d -1 */ List all folders one directory per line from root folder #ls -d /root/*/ List all folders only from /root directory -
Folder Creation: create, delete,
#mkdir foldername location creates folder. #mkdir .foldername creates hidden folder. #mkdir –p parent/child creates parent folder and child folder inside parent folder. #rename oldname newname oldname oldname newname oldname #mv sourcefolder dest It will move folder from source to destination location. #mv sourcename destiname it will copy file in the same location with new name. #rm -r foldername it will delete folder. #rm –rvf delete folder, v= display folder wich will delete, f= forcefully - Multiple folders in a series starting with Day-
- $mkdir -p Day-{1..30}
- It will create Day-1, Day-2, ....Day-30 folders.
- PWD: Present working directory
- $pwd : It shows complete path and on which directory currently working
- Multiple commands use with semicolon:
- $mkdir folder; cd folder; touch file{1..10}
- File Delete:
- $rm filename (rm is use to delete file), prompt for confirmation?
- $rm -f filename (-f = forcefully delete)
- $rm -r foldername ( rm -r is use to delete folder)
- $rm -r -f foldername (forcefully delete folder)
- $rm -v (verbose, it will display what is going to delete)
- cd : change directory
- $cd /etc (change to etc folder)
- $cd /home/abc (change to abc directory in home directory)
- $cd - (go back to previously working directory, /etc)
- $ls -la
- all files/folders including hidden
- . = current directory (if you want to execute any file from the current directory than you run $cat . filename
- .. = previous/parent directory (cd .. go back to previous directory)
- Absolute path = it starts from / and complete path mention (cd /etc/var/...)
- Relative path = move from current folder to sub folder without mentioning full path (cd abc) , abc is the folder in current path
- Code
-
Folder Permission: permission, default permission,
- $ls -ld aziz (folder permission): total 11 attributes in folder:
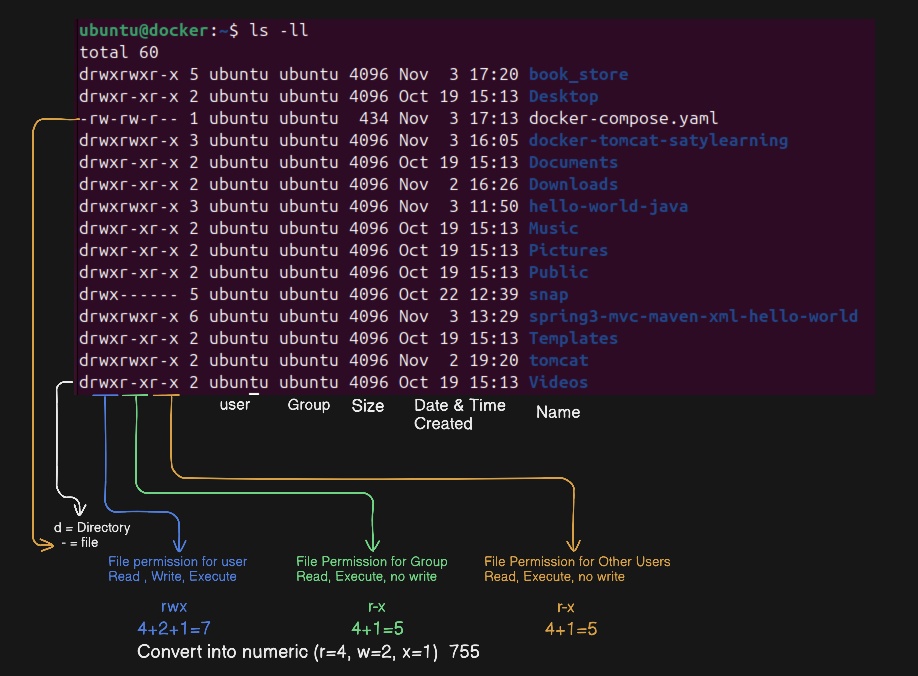
- Default Folder permission:
-
Default Folder Permission owner group owner other acl(.=no advance permission, +=acl) root rwx r-x r-x . normal user rwx rwx r-x - code
File Permission:
- $ls -l : Displays file & folder permissions
- $ls -l filename : Displays particular file permissions
-
Default File Permission owner group other no acl root user rw- r-- r-- . normal user rw- rw- r-- - check umask to set default permission.
File/Folder permission with Numeric Method: Attributes : Read (r=4), Write (w=2), Execute(x=1), chmod
- Read permission =4, Write permission =3, Execute permission =1, no permission=0,
- read,write & execute permission = 7 (4+2+1)
- Read permission only = 4
- Write permission only =2
- Write and Execute permission =3(2+1)
- Read permision only = 4
- Read and execute permission= 5(4+1)
- Read and write permission = 6 (4+2)
- Lab:
- $mkdir folder1
- $ls –ld /folder1
- drwxrwxr-x 2 ubuntu ubuntu 4096 Nov 12 14:03 folder1
- 775 (owner rwx, folder rwx, other r-x)
- Assign full permission to other rwx
- $chmod 777 folder1
- $ls -ld folder1
- drwxrwxrwx 2 ubuntu ubuntu 4096 Nov 12 14:03 folder1
File/Folder permissions with Symbolic Method: Attributes: R, W, X, chmod,
- Ls –ld /folder1 (drwx r-x r-x. 2 root root 10 sep 13:35 /folder1), Remove read permission on folder1 for others:
- chmod o-r /folder1 , drwx r-x --x. 2 root root 10 sep 13:35 /folder1 (chmod = change file mod bits)
- Adding read permission on folder1 for other:
- chmod o+r /folder1
- Set permission to a folder:
- chmod o=rwx or o=rw or o=r-- /folder2
- chmod o=--- /folder2 (other user cannot do any thing)
- Assign permission to only user1 and rest denied.
-
Method1: Add user1 to group and assign permission to group.
Usermod –G root user1 (groups user1: will display groups of user1)
Method2: groupadd dev
Chgrp dev /folder2 (ls –ld /folder2/) now group owner from root changed to dev.
Add a user to group dev (usermod –G dev user1)
Add user1 as owner of the folder2
chown user1 /folder2
Change both owner and group owner
chown root:root /folder2 (root will be the owner of folder and group) (chown=change file owner and group)
you can do this way: chmod u=---, g=---,o=--- /folder2 or chmod ugo=rwx /folder2 or chmod ugo-x /folder2 or chmod +x /folder2 or chmod –x /folder2.
-
- ACL: access control list
Find:
-
Syntax: $find location options argument $find / -name aziz it will find aziz from / root location. $find / -readable it will find readable permission files from root location $find /root empty it will find empty files in /root directory. $find / -perm 444 find files whose permission is 444 $find / -size 10M find files whose size is 10M $du -sh filename Find size of the file - code
- code
-
File Size
- $du -sh
- code
- code
File Management:
- code
- code
- code
copy & move (rename or cut & Paste)
-
$cp source dest it willl make a copy of the file in the destination. $cp -r source dest -r: it will make a copy of the recursive file located in folders/subfolders to destinaiton $cp -i source dest It will prompt you before copying. $cp –rvf /root/* dest it will copy all files from root folder to dest with confirmation. $cp –rvfn /root/* dest it will copy only new files and not override existing file. v=display, f=forcefully, n=newfiles. - Move command can be use to rename or cut & paste.
- $mv file_name new_filename
- $mv file_name /destination path (it will cut and paste in the new location)
- code
- code
-
umask
- It is a 4 digit number, default file permissions can be set with umask, when a new file is created than by default what permission should be applied.
- code
- code
G : Grep, Group, GUI <--> CLI,
grep option argument filename:
-
$grep root /etc/passwd
It will find/search root word in passwd file and display those lines on screen.
option -n
$grep -n root /etc/passwd
It will search and display the line numbers on which root word exist.
option -i
$grep –ni Root /etc/passwd
Ignore case sensitive (word with upper or lower case will be ignored)
option -on
$grep -o root /etc/passwd
It will only display word in the line, will not display the entire line.
option '^word'
$grep '^root' /etc/passwd
It will only display line where word root comes at the beginning of line.
option -A number
$grep -A 2 root /etc/passwd
it will display root line and 2 lines after word root from file.
option -B number
$grep -B 2 root /etc/passwd
it will display root line and 2 lines before word root from file.
$egrep –in ‘root|ftp|nologon’ /etc/passwd
Used for multiple words to search.
option -R
$grep -Rin root /etc
it will seach the entire folder for work root.
$grep –in ‘Sep’ /var/log/messages
It will display logs of Sep
$grep –in ‘Sep 05’ /var/…
It will display logs of sept 5
- code
- code
-
Group:
- When a user is created, a group with the same username is also created and added to user. separate group can also be created and add users to it.
- List of Group:
- $cat /etc/group
- Group Create:
- $groupadd --help
- groupadd1.jpg
- $addgroup --help
- $groupadd groupname
- Adding users to Group:
- Add user to group
- $usermod -aG groupname username
- View Group membership
- $groups username
- Changing primary group
- $usermod -g new_primary_group username
- Add additional group to user: suppose a user run $docker pull hello-world (only root have permission), add user to docker group.
- $usermod -aG docker username
- Add user to group
- Adding users to sudo group:
- On Debian-based systems
- $usermod -aG sudo username
- On RHEL-based systems
- $usermod -aG wheel username
- Adding user to sudoers
- Check sudoers permission:
- $ls -ltr /etc/sudoers
- -r--r----- 1 root root 1800 Jan 29 2024 /etc/sudoers (user, group has read access, others has no access)
- $visudo
- #user privilege specification, add the following line
- username ALL=(ALL:ALL) ALL
- :wq!
- On Debian-based systems
- Change group ownership of a file:
- $sudo chgrp group_name file_name
Switch GUI to CLI mode in Ubuntu
- $systemctl isolate multi-user.target (get into cli mode)
- $systemctl isolate graphical.target (get into gui mode)
- code
code
- code
- code
- code
code
- code
- code
- code
code
- code
- code
- code
code
- code
- code
- code
H : History, Help, Head/Tail,
Help Command:
- command --help or man command: both commands can be use to get help.
- cat --help
- man cat: it uses to display manual or help of any command. man cd (displays manual of cd command)
- code
- command --help or man command: both commands can be use to get help.
Head command: it is used to read file, head command displays only top 10 lines of a file while cat command displays the entire file.
- $cat /etc/passwd : It will display all text of the file.
- $head /etc/passwd : It will display top 10 lines of the file.
- $head /etc/passwd | nl : It will display top 10 lines with line numbers.
- $head /etc/passwd -n 15 | cat -n : It will display top 15 lines.
Tail command: tail is used to display bottom to top lines
- $tail /etc/passwd : It will display bottom 10 lines.
- $tail /etc/passwd | cat -n : It will display bottom 10 lines with line numbers.
- $tail –F /var/log/syslogs (it will run file continuously without closing and keep displaying a new lines added to logfile) while cat file will display text and any new lines updated will not display.
- code
- code
History
- It displays all commands executed since the startup of linux machine.
- search the command in the history:
- $ctrl r
- type command, it will show the command ran previously, press shift key to select that command,
- want to see more commands than press ctrl r to view all similar commands ran previously.
- code
Hostname
- set/change new hostname:
- $hostnamectl set-hostname name
- $bash (it will show new hostname)
- code
- set/change new hostname:
code
- code
- code
- code
code
- code
- code
- code
I : Installation of Ubuntu, RHEL, Centos, ID,
Installation RHEL on VMWare Workstation
- Download ISO image (search in google: rhel 7 image download)
- open vmware and create a new vm
- Enter vm name, location of ISO, RAM, disk size etc..and poweron
- select Date & time, keyboard, Language support
- select installation source: local or network
- Software selection: minimal, infrastructure server, file and print server, basic web server, virtualization host, Server with GUI,
- Installation destination: select disk and click I will configure partitioning and click done --> select standard partition and click + and define following partition type
- select / : Root partition: min 3 GB add mount point.
- / boot :Boot Partition: 500 MB size define add mount point.
- Swap partition: 2 GB size define and add mount point.
- Add a disk: adding additional disk.
- Network & Hostname:
- Network: configure and enter IP address manually or through DHCP.
- Hostname: enter hostname, click begin installation
- root password:enter root password, create a normal user and click done, installation begins which last for 30 to 40 min. After completion reboot.
- code
- code
Installation of Ubuntu on VMWare Workstation
- Download ISO image ubuntu-22.04.3-desktop-amd64.iso
- In vmware workstation, create new VM, install O/S later, linux = ubuntu 64 bit, save and edit the VM and define location of ISO, network adapter=bridged. power on VM.
- select try or install ubunut, select install ubuntu, normal installation with updates and continue, enter name other than admin, password, login autimatically and continue.
- Update apt repository:
- $sudo apt update
- Install java:
- Method 1: run the java command and it shows the following message
- $java (command 'java' not found, but can be installed with: apt install openjdk-17-jre-headless (select required version))
- Install JAVA: $sudo apt install openjdk-17-jre-headless
-
The JRE is the Java Runtime Environment. It is a package of everything necessary to run a compiled Java program, including the Java Virtual Machine (JVM), the Java Class Library, the
javacommand, and other infrastructure. However, it cannot be used to create new programs.The JDK is the Java Development Kit, the full-featured SDK for Java. It has everything the JRE has, but also the compiler (
javac) and tools (likejavadocandjdb). It is capable of creating and compiling programs.Usually, if you only care about running Java programs on computer you will only install the JRE. It's all you need. On the other hand, if you are planning to do some Java programming, you need to install the JDK instead.
Sometimes, even if you are not planning to do any Java development on a computer, you still need the JDK installed. For example, if you are deploying a web application with JSP, you are technically just running Java programs inside the application server. Why would you need the JDK then? Because the application server will convert JSP into Java servlets and needs to use the JDK to compile the servlets. I am sure that there are more examples.
- Method 2: get root access (sudo su)
- #sudo apt-cache search jdk (search for any particular jdk version)
- #apt-get install openjdk-8-jdk –y or
- #apt install default-jdk (for latest version)
- #java -version (use one hyphen in ubunutu)java -
- Set JAVA Environment Variable:
- Method 1: run the java command and it shows the following message
- Installing VMAgent:
- $sudo apt-get install -y open-vm-tools-desktop
- $sudo reboot
- copy text and paste will work.
- ifconfig: command 'ifconfig' not found, but can be installed with "sudo apt install net-tools", run this command.
- $sudo apt install net-tools
- SSH enabling: network error 'connection refused': SSH could be disabled/commented at port22.
- $ sudo apt install openssh-server
- $sudo vi /etc/ssh/ssh_config and remove(#) port 22, passwordAuthentication yes, save and close.
- $sudo service sshd or ssh restart.
- Access denied: after entering password it gives an error access denied. check user is created and password is correct.
- Install VIM Editor:
- $sudo apt install vim
- Code
- code
Installing package: ex java
- Before installing any package, first update apt respository $sudo apt update or $sudo apt-get update (earlier apt-get used)
- $sudo apt-get install (/etc/apt/sources.list = the lists of available packages) or search $apt-cache search jdk
- when you try to install any package it search in apt repository, if it is not available it gives en error and need to download the package.
- $java (it displays the version of java installed or provide information how to install), headless = there is no GUI.
- Installation docker with script:
- Any package wich is not availabel in apt repository, which required to download and then install, it can have multiple commands to run, instead of running each command, can included all in script and run.
- Method 1:
- step 1: setup docker's apt repository:
-
sudo apt-get update
sudo apt-get install ca-certificates curl
sudo install -m 0755 -d /etc/apt/keyrings
sudo curl -fsSL https://download.docker.com/linux/ubuntu/gpg -o /etc/apt/keyrings/docker.asc
sudo chmod a+r /etc/apt/keyrings/docker.asc
-
- Step 2: Install docker
- sudo apt-get install docker-ce docker-ce-cli containerd.io docker-buildx-plugin docker-compose-plugin
- Step 3 : Verify
- sudo docker run hello-world
- Method 2:
- #vi docker_install.sh
- paste all the commands of step 1 & step 2 save and exit
- $ chmod +x docker_install.sh (assign permission to run the file or executable)
- $./docker_install.sh (run the script)
- code
Ubuntu container in Docker
- Create a folder with name ubuntu-data in your downloads folder.
- Then run the below command in poweshell updating your username.
- docker run -dit `
--name ubuntu-container `
--hostname ubuntu-dev `
--restart unless-stopped `
--cpus="2" `
--memory="4g" `
--mount type=bind,source="C:/Users/Monica Korla/Downloads/ubuntu-container",target=/data `
-v /var/run/docker.sock:/var/run/docker.sock `
-p 2222:22 `
-p 8080:80 `
--env TZ=Asia/Kolkata `
--env LANG=en_US.UTF-8 `
ubuntu:latest /bin/bash - Explanation of each parameter.
-
Parameter Description -ditRuns the container in detached (-d), interactive (-i), and terminal (-t) mode. --name ubuntu-containerAssigns a name to the container for easy management. --hostname ubuntu-devSets the container’s hostname. --restart unless-stoppedEnsures the container restarts automatically unless manually stopped. --cpus="2"Limits the container to 2 CPU cores. --memory="4g"Allocates 4GB RAM to the container. --mount type=bind,source=C:/ubuntu-data,target=/dataMounts a folder from Windows into the container to persist data. -v /var/run/docker.sock:/var/run/docker.sockAllows running Docker commands inside the container (optional). -p 2222:22Maps port 2222 on the host to 22 (SSH) inside the container. -p 8080:80Maps port 8080 on the host to 80 (for web services). --env TZ=Asia/KolkataSets the timezone (modify based on your location). --env LANG=en_US.UTF-8Sets the language settings inside the container. ubuntu:latest /bin/bashUses the latest Ubuntu image and runs Bash shell.
Docker Command to Run Ubuntu Linux Container in mac or linux host (Persistent & Long-Term)
- docker run -dit \
--name ubuntu-container \
--hostname ubuntu-dev \
--restart unless-stopped \
--cpus="2" \
--memory="4g" \
--mount type=bind,source=/tmp/ubuntu-data,target=/data \
-v /var/run/docker.sock:/var/run/docker.sock \
-p 2222:22 \
-p 8080:80 \
--env TZ=Asia/Kolkata \
--env LANG=en_US.UTF-8 \
ubuntu:latest /bin/bash - Explanation of Each Parameter
-
Parameter Description -ditRuns the container in detached (-d), interactive (-i), and terminal (-t) mode. --name ubuntu-containerAssigns a name to the container for easy management. --hostname ubuntu-devSets the container’s hostname. --restart unless-stoppedEnsures the container restarts automatically unless manually stopped. --cpus="2"Limits the container to 2 CPU cores. --memory="4g"Allocates 4GB RAM to the container. --mount type=bind,source=C:/ubuntu-data,target=/dataMounts a folder from Windows into the container to persist data. -v /var/run/docker.sock:/var/run/docker.sockAllows running Docker commands inside the container (optional). -p 2222:22Maps port 2222 on the host to 22 (SSH) inside the container. -p 8080:80Maps port 8080 on the host to 80 (for web services). --env TZ=Asia/KolkataSets the timezone (modify based on your location). --env LANG=en_US.UTF-8Sets the language settings inside the container. ubuntu:latest /bin/bashUses the latest Ubuntu image and runs Bash shell. - code
- code
- docker run -dit \
ID
- $id
- uid=1001(aziz)gid=1001(aziz)groups=1001(aziz),27(sudo),100(users),984(docker),1003(admin)
- It will show the current user ID, Group ID, all group IDs assigned to user.
- $id username
IP, Gateway show
- $ip a
- $ip route show default
- code
- code
J : Job Sceduling, java,
Job Scheduling: Crontab
-
at
It is used to schedule a job only once. Make sure at job available in the system, rpm –qa | grep –I at, its daemon is atd.
at 12:50
at> touch abc
at>touch file1 ctrl D
At 12:50 time it schedule a job and creates two files abc & file1 or you can define particular time and date.
at 12:00 PM October 20 2020 or
at noon tomorrow, at next Monday, at fri
atrm
atrm 4
Remove job with job number
atq
Displays scheduled job list
crontab
It is used to schedule job continuously or repeatedly.
rpm -qa | grep crontab
To check crontab module is installed.
yum install crontab. Systemctl start crond.
Syntax
Cat /etc/crontab
It will display syntax.
(Min, hour, day, month, day of week, username, command)
crontab -e
It opens an editor, here you write command using above syntax
39 09 01 jan 03 root echo “welcome” >> test.txt save it. If you use * in minute then it will run every minute. If you use */2 run every 2 minutes.
crontab -l
It displays list of scheduled jobs
watch cat test.txt
It will open a file and we have define job schedule in every minute.
crontab -r
Delete.
Crontab -u username -e
Run crontab with a particular username.
Tail -f /var/log/cron
Check logs.
Crontab -r -I -u username filename
Sleep 60
Cd /etc/cron.hourly
Here you keep script, this file normally used in day to daty scheduling jobs in real time scenario instead of crontab,
- code
- code
-
Java Installation
- JDK & JRE (JDK is java developer kit is use by developers which also install JRE and compile, JRE is java runtime environment which is use for runtime only)
- $java --version (version of java is installed)
- $javac --version (version of java compiler is installed)
- $update-alternatives --list java (list of all java versions are installed)
- Install Java on ubuntu:
- $sudo apt search openjdk (There will be jdk and jre)
- $sudo apt search openjdk | grep -i 17 (all versions of 17 )
- JDK includes jre and compiler. Install JDK as it is used for development.
- $sudo apt-get update
- $sudo apt-get install openjdk-17-jdk -y or #sudo apt install default-jdk (latest jdk version) or simply type java and system will inform you the commands to run to install.
- Java Development Kit (JDK) is a software development environment used for developing Java applications and applets. It includes the Java Runtime Environment (JRE), an interpreter/loader (Java), a compiler (javac), an archiver (jar), a documentation generator (Javadoc), and other tools needed in Java development
- #java --version
- $javac --version (java compiler version)
- Install java on Fedora, CentOS:
- $sudo yum install update
- $sudo yum list | grep openjdk (list the jdk package)
- $sudo yum install java-1.8.0-openjdk or #sudo yum install java* -y
- $java -version
- code
code
- code
- code
- code
code
- code
- code
- code
code
- code
- code
- code
code
- code
- code
- code
code
- code
- code
- code
K: Kernel,
Kernel
- Kernel is a O/S program which makes communication between application (chrome, facebook, etc..) and hardware.
- Applications do not communicate directly with hardware, o/s kernel make it possible.
- code
code
- code
- code
- code
code
- code
- code
- code
code
- code
- code
- code
code
- code
- code
- code
code
- code
- code
- code
code
- code
- code
- code
L: List, LVM (logical volume)
List commands
-
#ls List files and folders of current location. #ls -l Long list #ls -a List all files and folders including hidden. #ls -la Long list of files and folders including hidden. #ls -lt List of files with time stamp, latest created file on the top. #ls-R List directories and all its sub directories. #ls-hl Displays size of the file. Ls-lr or ls-ltr List of files with recently updated. r in reverse order #ls -d */ List all folders only from root #ls -d -1 */ List all folders one directory per line from root folder #ls -d /root/*/ List all folders only from /root directory - code
- code
-
Logical volume
- Disks are attached to VM or physical disk.
- PV: Physical volume is created for each disk, multiple disks can be attached to one PV.
- VG: Volume Group is created with one or more PV (Physical Volumes)
- LV: Logical Volume is created on top of VG.
- LV is attached to FS (File System).
- When space is full in FS, it can be extend with space available in VG (volume group).
- Lab:
- After attaching the disks, scan it so it can be displayed.
- $echo "- - -">>/sys/class/scsi_host/host0/scan
- $echo "- - -">>/sys/class/scsi_host/host1/scan
- $echo "- - -">>/sys/class/scsi_host/host2/scan
- $echo "- - -">>/sys/class/scsi_host/host3/scan
- $lsblk
- sda 8:0 0 20G 0 disk
├─sda1 8:1 0 1M 0 part
└─sda2 8:2 0 20G 0 part /
sdb 8:16 0 20G 0 disk
sdc 8:32 0 10G 0 disk
sr0 11:0 1 1024M 0 rom - Three disks: sda, sdb, sdc
- PV Creation for sdb & sdc:
- $pvcreate /dev/sdb
- $pvcreate /dev/sdc
- Command 'pvcreate' not found: $apt install lvm2
- Physical volume "/dev/sdb" successfully created.
- Physical volume "/dev/sdc" successfully created.
- VG Creation:
- $vgcreate star1_vg /dev/sdb : Volume group "star1_vg" successfully created
- $vgcreate star2_vg /dev/sdc : Volume group "star2_vg" successfully created
- LV Creation:
- -L : provide how much space you need
- $lvcreate -L +10G -n oradata_lv star1_vg : Logical volume "oradata_lv" created.
- lvcreate -L +5G -n oradata_lv2 star2_vg : Logical volume "oradata_lv2" created.
- FS Creation:
- $mkfs.xfs /dev/star1_vg/oradata_lv
- Create a folder and assing mount point.
- $mkdir /logical_volume1
- $vim /etc/fstab
- /dev/star1_vg/oradata_lv /logical_volume1 xfs defaults 0 0
- $mount -a
- $mkdir /logical_volume2
- $vim /etc/fstab
- /dev/star2_vg/oradata_lv2 /logical_volume2 xfs defaults 0 0
- $mount -a
- $df -hT
- /dev/mapper/star1_vg-oradata_lv xfs 10G 228M 9.8G 3% /logical_volume1
/dev/mapper/star2_vg-oradata_lv2 xfs 5.0G 130M 4.9G 3% /logical_volume2 - $lsblk
- Extending file system or increasing space in Logical Volume.
- vgestend
- lvextend
- Display:
- pvdisplay
- vgdisplay
- lvdisplay
- After attaching the disks, scan it so it can be displayed.
- Delete a partition:
- Decommissioning/deleting a partition:
- $fdisk /dev/sdc
- This disk is currently in use - repartitioning is probably a bad idea. It's recommended to umount all file systems, and swapoff all swap partitions on this disk.
- $umount /dev/sdc1 /data1
- $umount: /data1: not mounted.
- $fdisk /dev/sdc
- select d=delete a partition
- enter partition number=2
- write and exit (w & q).
- code
- code
code
- code
- code
- code
code
- code
- code
- code
code
- code
- code
- code
code
- code
- code
- code
code
- code
- code
- code
M : move,
Move Command
- Move command can be use to rename or cut & paste.
- $mv file_name new_filename
- $mv file_name /destination path (it will cut and paste in the new location)
- code
- code
code
- code
- code
- code
code
- code
- code
- code
code
- code
- code
- code
code
- code
- code
- code
code
- code
- code
- code
code
- code
- code
- code
N: Network Management: nmcli, ifconfig, ping,
nmcli
- It works on networkmanager service. Should have net-tools installed.
- $apt install net-tools
- $yum install net-tools
- /usr/bin/nmcli is part of the network-manager package.
- $sudo apt-get install network-manager
- Path of nmcli:
- $which nmcli
- /usr/bin/nmcli
- check service:
- $systemctl status networkmanager
- nmcli3.jpg
- check how many interfaces have:
- $ip a
- It will show all physical, virtual, loopback, container interfaces of the system.
- In windows an IP address is directly assing to NIC where as in linux it assign to a connection and connection mount to NIC.
- In Linux you can assing IP addresses with the following methods:
- GUI: In ubuntu, click on network icon on top right corner and click on wired/wireless settings/IPV4.
- CLI: nmtui tool
- Configuration file:
- It is also possible to configure a static IP address from command line, which will be essential if you are running a server and do not have access to a Ubuntu GUI desktop.
- In ubuntu -->/etc/netplan/xxxxxxx.yaml,
- In centos /etc/sysconfig/network-scripts
- nmcli tool
- Add additional network adapters in VM
- Go to VM's settings/add/network adapter/finish, make changes once it is added, NAT, hostonly, custom (added one NAT and one host only )
- only network adapter is added but it is not configured.
- tab:
- $nmcli device press tab will show the attributes.
- Device:
- command & attributes used with device:
- $nmcli device --attributes
- attributes = show | up | down | add | modify | clone | edit | delete | monitor | reload | load | import | export
- By default, the following columns are shown:
DEVICE - interface name
TYPE - device type
STATE - device state
CONNECTION - connection activated on device (if any)
- Device Status:
- $nmcli dev status (shows info of adapters)
- nmcli1.jpg
- Device details show
- $nmcli device show - detailed information of adapters
- Device connection show
- $nmcli connection show - it shows connection details.
- nmcli2.jpg
- $nmcli connection show --active (shows only active connection)
- Disconnect Device:
- $nmcli dev disconnect interface_name (ens33)
- Connect Device:
- $nmcli dev connect interface_name (ens33)
- Device up
- $nmcli connection up connection_name
- Device Down
- $nmcli connection down connection_name
- Connection 'static' successfully deactivated (D-Bus active path: /org/freedesktop/NetworkManager/ActiveConnection/8)
- Delete device
- $nmcli device delete device_name
- command & attributes used with device:
- Connection:
- Add a new connection profile:
- Basic Properties can be define:
- con-name: The connection profile name
- ifname: The interface name where the profile will be applied
- type: The type of profile (ethernet, wifi, bridge, bridge-slave, …)
- ipv4.addresses (or ip4): 192.168.171.100/24
- ipv4.gateway (or gw4): 192.168.171.2
- ssid: The SSID of a network (also if it is hidden)
- wifi-sec.key-mgmt: The key management as wpa-psk (preshared-key), wpa-eap, …
- wifi-sec.psk: The SSID preshared key (the "password" of the wifi network
- Ethernet profile:
- $nmcli con add con-name star1 ifname eth0 type ethernet ip4 192.168.1.14/24 gw4 192.168.1.1
- Wifi Profile:
- $nmcli con add con-name wifiProfile ifname wl0 type wifi ip4 192.168.1.14/24 gw4 192.168.1.1 ssid "HHSAUDI" wifi-sec.key-mgmt wpa-psk wifi-sec.psk "password"
- Bridge Profile:
- $nmcli con add con-name myBridge type bridge ip4 192.168.1.14/24 gw4 192.168.1.1
- Basic Properties can be define:
- Create a new connection/Delete for the above two NIC.
- $nmcli connection add type ethernet con-name star1 ifname ens38 (type=ethernet, connection-name = star1, interface name = ens38)
- Connection 'star1' (49a19693-49e2-45da-be63-cea2c0442251) successfully added.
- $nmcli connection show
- $nmcli connection delete star1
- Create a new connection and assing a static ip address
- $nmcli con add type ethernet con-name static ifname ens38 autoconnect yes ip4 192.168.171.150/24 gw4 192.168.171.2
- $nmcli con add type ethernet con-name static ifname ens38 autoconnect yes ipv4.addresses 192.168.171.150/24 ipv4.gateway 192.168.171.2
- Modify and add/remove DNS IP
- $nmcli con mod static ipv4.dns "8.8.8.8"
- $nmcli con mod static -ipv4.dns 8.8.8.8
- Assign permission user to view connection:
- $nmcli con mod static connection.permissions user user1
- $nmcli con mod static connection.permissions user:user1,user2
- Reload all connections:
- $nmcli con reload
- Delete connection:
- $nmcli conn delete connection_name
- $nmcli conn delete UUID_number
- $nmcli connection delete Wired\ connection\ 1
- Add a new connection profile:
- Lab nmcli: Configure IP address in Ubuntu system.
- $ifconfig or $ip a (To find out NIC - interface details, it shows physical, virtual, loopback, container interface details)
- ens33 - NIC
- lo : loopback
- ens38: disconnected.
- show connection:
- $nmcli connection show
- nmcli4.jpg
- Show device:
- $nmcli device status
- nmcli4.jpg
- First activate the device connection up.
- $nmcli connection up Wired\ connection\ 1
- nmcli5.jpg
- $ifconfig or $ip a (To find out NIC - interface details, it shows physical, virtual, loopback, container interface details)
- It works on networkmanager service. Should have net-tools installed.
nmtui
- This command can be use in CLI based linux system.
- $nmtui
- code
GUI
- In ubuntu, click on network icon on top right corner and click on wired/wireless settings/IPV4.
- code
code
- code
- code
- code
Ping
- $ifconfig: displays LAN settings.
- It required the following package:
- In ubuntu:
- $apt-get install iputils-ping -y
- For RHEL, CentOS, and Fedora, install the Ping command using the following command:
- $dnf install iputils -y
- $ping --help
- code
- code
- code
ifconfig
- $ifconfig: Displays IP settings assigned to NIC
- $ip a : It also displays IP settings assigned to NIC
- $ip addr: It also displays IP settings assigned to NIC
- It required net-tools to run ifconfig
- $apt-get install net-tools -y
- code
- code
- code
- code
Code
- code
- code
- code
O
code
- code
- code
- code
code
- code
- code
- code
code
- code
- code
- code
code
- code
- code
- code
code
- code
- code
- code
code
- code
- code
- code
code
- code
- code
- code
P: Package Manager, Ping, Print, Password, Partition Management, pipe, Process Management, public IP,
Print Message / echo: It will print message on screen only.
-
#echo “message”
It will print message on screen only.
#echo “message” > filename
It will store message in a file.
- code
- code
-
Password: Break Root Password, user password policy
- User Password:
- change user password:
- $sudo passwd username
- Check current password settings:
- $sudo chage -l username (l for london)
- Account expires: never means the user account itself will never be automatically disabled, locked or made inaccessible., this settings refer to the account not the password.
- Configure account to never expire:
- $sudo chage -E -1 username
- Force password change at next login: Making the password immediately expired.
- $sudo chage -d 0 username (zero)
- $sudo chage --lastday 0 username (zero)
- Set maximum days between changes: The user must change their password every 90 days:
- $sudo chage -M 90 username
- $sudo chage --maxdays 90 username
- Set warning days before expiry: The user gets a warning 7 days before the password expires.
- $sudo chage -W 7 username
- $sudo chage --warndays 7 username
- Set an exact account expiration date: Is is account not password: The user's account will be disabled after this specific date.
- $sudo chage -E 2026-12-31 username
- $sudo chage --expiredate 2026-12-21 username
- change user password:
- Root user password is forgotten:
- restart the system and continuously press up and down arrow key and system will not reboot and halt at o/s selection screen. Select the first line and press ‘e’ to edit.
- Go down until reach linux16 line and come to end the line (press keyboard End key or Ctrl E)
- give space and write rd.break (break ram disk) ctrl X to start. It will on in rescue mode.
- Run this command mount –o remount rw /sysroot and enter.
- chroot /root and enter.
- passwd root and enter (it will edit /etc/shadow file). set new password.
- Create a file touch /.autorelabel and type exit enter and again exit enter.
- Code
- code
- code
- User Password:
Partition Management:
-
Hard disk types: SATA (Serial Attach) and PATA(Parallel Attach)
SATA (disks: sda, sdb, sdc,… partitions sda1, sda2, sda3.. sdb1, sdb2, sdb3..)
PATA (disks: hda, hdb, hdc,.. partitions: hda1, hda2, hda3.. hdb1, hdb2, hdb3)
Maximum partitions : 4 (4 primary only) or (3 primary + Extended (in extended logical No.n)
Format : ext2 (RHEL4), ext3(RHEL5), ext4(RHEL6) xfs (RHEL7)
-
Disk Partition:
Disk & partition
fdisk–l
Display disks & partitions.
lsblk
Display disks & partitions in a tree format.
lsblk –l
Display disks & partitions in list format.
Create partition
fdisk /dev/sdb
In order to create partitions first you need to enter into disk, all disk info is stored in /dev. Enter m will give list to perform actions.
Update kernel
partprobe
After creating a new partition or making any changes in partition kernel need to update with partprobe command. If you try to format without partprobe system will give error partition does not exist. Reboot the system will update kernel without using partprobe.
partprobe /dev/sdb
It will update particular hard disk. Partbrobe only will update kernel for all disks.
Format partition
blkid
To check partition is formatted or not. Data can be saved after formatting the newly created partitions. If partitions are not shown in the list it means it is not formatted. After formatting you can save data.
Mkfs –t ext2 /dev/sdb1
It will format the partition. Ext1, Ext2, Ext3,Ext4, XFS is the file system.
Create a directory/file to mount
Mkdir /dev/sdb1/partition1
First create a directory and then mount this directory and then you can save data.
Mount partition
Mount /dev/sdb1 /partition1
After creating new partition, partprobe, format need to mount the partition to save the data. After mounting you can save data.
Display mount partitions
Df –h
It will display all partitions that are mounted.
Unmount partition
Umount /partition1
When you reboot this mount will not exist.
Mount permanently
Vim /etc/fstab
To mount partition permanently even it exist after reboot.
Make an entry
/dev/sdb1 /partition1 ext2 defaults 0 0 save it.
Mount –a
This will update entries made in fstab.
Format
Mkfs –t ext3 /dev/sdb2
It will format sdb2 partition. Copy UUID
Mount with UUID
Mkdir /partition2
Go to vim /etc/fstab and make entry with UUID.
UUID=”jldfjawje” /partition2 ext3 defaults 0 0
Mount –a
Vfat
If you partition with vfat then it will work with windows system while ext will not.
Mkfs –t vfat /dev/sdb5
Make partition and mount.
Mkfs –t xfs /dev/sdb6
Partition using xfs, make folder and mount.
Unmount
Umount /partition1
Go to fstab and delete those lines. Save & mount –a. now go to fdisk –l and delete partitions. Partprobe /dev/sdb
- code
-
Swap Partition / temp memory / virtual memory:
- All runtime processes need space to process and it takes RAM, when RAM is getting full then processes cannot be executed and system get hanged, to overcome this situation we create a partition and assign swap file system. It gets linked with physical RAM and to run process if it required space then older processes shifted to swap memory and new process is dealt by RAM.
- Max 64 GB can be swap only. Swap partition hexcode (ID) is 82. So assign hexcode to this partition. Press t then 1.
-
Swap partition
Free -h
It will display swap partition details.
Swapon -s
Add hard disk for swap memory and reboot/ partition create.
Mkswap /dev/sdb1
Create a swap
Swapon sdb1
It will activate.when reboot it will disappear.
Mount
Vim /etc/fstab
Entry: dev/sdb1 swap swap defaults 0 0 save it and run mount -a
Deactivate
Swapoff /dev/sdb1
Go to fstab and remove entry and run mount -a and remove partition if needed. Partprobe /dev/sdb
Swap partition through file, if partition limit is full then you can use a space in the hard disk and create a file and this file use as swap partition.
Create
dd if=dev/zero of=/swapfile bs=512mb count=2
Create a file take a space from hard disk and create a file at root level. Block size will be 512 mb and count two times means will create 1024 mb or 1GB.
du -sh
It will display size of the created file.
mkswap /swapfile
Create a swap.
swapon /swapfile
Activate it. Give permission 600(chmod 600 /swapfile)
Vim /etc/fstab
Entry: /swapfile swap swap defaults 0 0 save it then run mount -a
Deactivate
Swapoff /swapfile
Rm -rf /swapfile
Delete file.
- code
Pipe | is use to run the command by using the result of first command.
- $cat filename | nl (it will display the contents of file in first command and after pipe it will display in number list)
- code
- code
Ping install on docker containers
- $apt install iputils-ping -y
- $apt install inetutils-ping -y
- code
Package Manager
- A package manager is a tool that automates the process of installing, updating, configuring, and removing software in a Linux system. It ensures that software and its dependencies are managed efficiently.
- How Does a Package Manager Work?
- Repositories (Repos):
- A package manager fetches software from official repositories (online storage of packages).
- Example: Ubuntu gets packages from archive.ubuntu.com.
- Installing Software:
- When you install software, the package manager:
- Downloads the package from the repository.
- Resolves dependencies (installs additional required software).
- Installs and configures the software automatically.
- Updating Software:
- A single command updates all installed packages to the latest version.
- Removing Software:
- The package manager also removes software cleanly without leaving unnecessary files.
- Repositories (Repos):
- Popular Package Managers in Linux
-
Linux Distro Package Manager Command Example Ubuntu, Debian apt(Advanced Package Tool)sudo apt install nginxFedora, RHEL, CentOS dnf(oryumfor older versions)sudo dnf install nginxArch Linux pacmansudo pacman -S nginxOpenSUSE zyppersudo zypper install nginx
-
- How Package Managers Fetch Software from Repositories?
- A repository is a server that stores software packages. When a package manager installs software:
- It checks the repository list (e.g., /etc/apt/sources.list in Ubuntu).
- It downloads the package and its dependencies.
- It installs and configures the software automatically.
- Essential Package Manager Commands.
- APT (Debian, Ubuntu)
- sudo apt update # Update package lists
sudo apt upgrade -y # Upgrade installed packages
sudo apt install nginx # Install a package
sudo apt remove nginx # Remove a package
sudo apt autoremove # Remove unused dependencies
sudo apt search nginx # Search for a package
- sudo apt update # Update package lists
- DNF (Fedora, RHEL, CentOS)
- sudo dnf check-update # Check for updates
sudo dnf update # Update all packages
sudo dnf install nginx # Install a package
sudo dnf remove nginx # Remove a package
- sudo dnf check-update # Check for updates
- Pacman (Arch Linux)
- sudo pacman -Syu # Sync and update all packages
sudo pacman -S nginx # Install a package
sudo pacman -R nginx # Remove a package
- sudo pacman -Syu # Sync and update all packages
- Zypper (OpenSUSE)
- sudo zypper refresh # Refresh package list
sudo zypper update # Update all packages
sudo zypper install nginx # Install a package
sudo zypper remove nginx # Remove a package
- sudo zypper refresh # Refresh package list
- APT (Debian, Ubuntu)
Process Management
- A process is a running program. Linux provides multiple utilities to monitor, manage, and control processes effectively. Each process has a unique Process ID (PID) and belongs to a parent process.
- A process is taking lot of resoures like cpu or memory which may cause bottleneck to other application or overall performance of system, so you need to identify the process and either stop or kill.
- View Process:
- $ps - shows running process
- $ps aux – View all running processes of all users, it shows user, PID, cpu, mem utilisation, start, time, command
- $ps aux | nl (Display all processes with line numbers)
- $ ps aux | wc -l (Display total number of processes running, wc -l used for wordcount line)
- $ps -ef (It displays the processes but without cpu and mem utilisaiton option)
- $ps aux | grep java (find a process of application java)
- $pidof processname (Find a PID of a running program)
- process1.jpg
- Docker Container:
- ps command does not work in ubuntu docker container, install in docker container.
- $apt update
- $apt install procps
- $ps
- $ps -u username – View processes for a specific user
- $ps -C processname – Show a process by name
- $pgrep processname – Find a process by name and return its PID
- $pidof processname – Find the PID of a running program
- Kill, stop or restart Process:
- $kill PID_number (process will kill but start again)
- $kill -9 PID_number (it will forcefully kill the process and process will not autorestart)
- $pkill processname (kill process using process name)
- $kill -STOP PID_number (Stop Process)
- $kill -CONT PID_number (resume process)
- Priorise or de-perioritise:
- Give preference to high priority process, resources will be given to these processes.
- $renice -n 10 -p PID – Lower priority of a process (higher number defined for lowering priority)
- $renice -n -5 -p PID – Increase priority of a process (requires root)
- Background and Foreground Processes:
Find Public IP
- $echo $(wget -qO - https://api.ipify.org)
- $echo $(curl -s https://api.ipify.org)
- code
code
- code
- code
- code
code
- code
- code
- code
Q
code
- code
- code
- code
code
- code
- code
- code
code
- code
- code
- code
code
- code
- code
- code
code
- code
- code
- code
code
- code
- code
- code
code
- code
- code
- code
R: Rename
Rename file and folder
- $rename oldname newname oldname
- code
- code
code
- code
- code
- code
code
- code
- code
- code
code
- code
- code
- code
code
- code
- code
- code
code
- code
- code
- code
code
- code
- code
- code
S: Sudo, Software Management, Shutdown/Reboot, SSH
Shutdown / Reboot :
-
Systemctl
Reboot (alias of systemctl)
Gracefully reboot system
Init 6
Forecefully reboot
reboot
Shutdown –r 15:50
Reboot at 15:50
Shutdown - +15
Reboot after 15 min
Shutdown –r now
Reboot now
Shutdown –c
Cancel reboot.
Shutdown –r now
Reboot now
Shutdown
Shutdown –h now
It will shutdown now.
- code
- code
-
Software Management:
-
#rpm –qa
It will display all packages installed.
#rpm –qa | wc –l
Total number of packages installed.
#rpm –qa firefox
It will display firefox is installed or not.
#firefox
Browser will open or can be opened from application
#rpm –ev firefox
E is for erase and v for verbose (you can view the process)
Install firefox
On VMWare with GUI
vmware settings: select vm>settings>use ISO image and browse location of image. click on cd/dvd icon in bottom and connect. CD icon appears on desktop.
Go to RHEL folder in CD>package> search firefox, copy package and paste on desktop and install.
Install with RPM
#rpm –ivh firefox…….
#df –h (To check CD iss mounted), cd /run/media/root/RHEL7.0/serverx86 and cd/Packages, #ls
#rpm –ivh firefox….. press tab and install.
#rpm –Uvh firefox
It will install update
#rpm –ivh forefox –force
Forcefully it install
YUM
It is used to install packages in Centos.
Yum list all
It shows all packages
Yum repolist
It list repository
Yum list installed
It list those package who are installed
Yum list httpd
Yum list nfs-utils
Yum info httpd
Yum reinstall httpd
Yum update httpd
Yum remove httpd
Yum autoremove httpd (it will remove dependencies)
Hum history
Yum history info 4
It shows details of ID 4 installed
Yum history undo 4
It will undo the ID 4 (uninstall)
Logs
cd /var/log
Tail –F yum.log
Yum search all “web server”
It shows webs server package
Yum search all “mail server”
It shows mail server package
Yum search all “dns server”
It shows dns server package
Repository
Local and network.
create
Local repository
Create a folder mkdir /examplerpm
Copy data from CD to /examplerpm (all files from CD incl repodata copied).
cd /etc/yum.repo.d
vim /example/repo
[example]
name =file:///examplerpm
enabled = 1
gpgcheck = 0
save this file
run yum clean all
yum repo list
(when you run yum command it will search in this file) all rpm files are in Package folder and how does system knows? It will look repodata and if found then proceed installation. repodata will inform where is rpm files are stored.
create
repodata
Mkdir/software/itrpm (create folders)
Createrep /software/
cd /etc/yum.repo.d
vim itrpm.repo
baseurl =file:///software
enabled = 1
gpgcheck = 0
save it
yum repolist
It will list repo files created.
Amend
update repodata
If you add/delete any rpm then repodata need to be update.
Createrepo --update /software/
Network Repository
Repodata created in network server.
- code
- code
-
Sudo: Super User DO #
-
It allows a user to execute a command as a super user. By default superuser(root) have got all administrative privilege but it is mostly locked and we create normal user and assigned required roles or permission to perform their task. You can run command with administrative privilege by using sudo.
- To switch user to root = sudo su , swith to user = su username
-
$sudo fdisk –l (it will ask password to confirm user, if this user is in sudo file then it works)
To give access to a user to run such commands first get the command binary
#which fdisk –l (it will display binary of the command)
Go to sudoers file by vim /etc/sudoers
se –nu (it will display line numbers) go to line 100 and press o to insert a line.
username ALL=(ALL) ALL (this user can run all commands which root can)
if you want a user to give permission to a particular command then instead of all type
username ALL=(ALL) /sbin/fdisk, /sbin/useradd save it.
If you want to give full permission except few restriction then
Username ALL=(ALL) ALL,!/sbin/reboot, !/sbin/useradd, !/usr/bin/passwd (now user cannot reboot, cannot create user and assign password) save it.
To assign similar permission to another user, copy the line & paste and change username. The best example is create a group and assign permission to that group and add required users to that group.
groupadd security (created a security group).
Gpasswd –M user1,user2,user3 security (to check user added run grep security etc/group)
Now go to vim /etc/sudoers and add group
%security ALL=(ALL) ALL
When a user run command using sudo system ask for password, you can skip this by
Username ALL=(ALL) NOPASSWD:ALL save it.
- sudo is a group which has administrative privilege, users can be added to sudo to give super user permission.
- code
-
SSH:
- Path = /etc/init.d/ssh
- $sudo apt install openssh-server -y
- $sudo apt install openssh-client -y
- $sudo systemctl status ssh
- $sudo ufw allow ssh
- Access from other linux or windows command prompt
- $ssh user_name@IP
- C:\ssh user_name@IP
- If status is inactive (dead): With socket enabled and ssh.service is inactive, you can ssh.
- ssh1.jpg
- In the above ssh.socket based activated.
-
With Ubuntu 24.04 LTS, Canonical has continued its trend of optimizing system resources, particularly with how SSH (OpenSSH) is handled. If you've been configuring SSH for a while, you might have noticed that starting from Ubuntu 22.10, SSH uses systemd socket-based activation instead of running as a standalone service by default.
While this change improves memory efficiency (especially for VMs and containers), it can also be a bit confusing if you're trying to configure SSH ports or listen addresses. In this article, I'll try to break it all down and show you how to manage SSH the way you want!
I have faced this issue when I launched Ubuntu instances in AWS Cloud and tried to enable password authentication in /etc/ssh/sshd_config, but it didn't work. I then started researching online to understand what was happening.
- Ubuntu now uses socket-based activation for SSH. This means that sshd doesn’t start until an incoming connection request is received. The benefits? Lower memory usage, especially in cloud and containerized environments, as SSH is only active when needed.
- Instead of the traditional SSH service (ssh.service), ssh.socket is now responsible for listening on port 22. When a connection attempt is made, ssh.socket directly starts sshd to handle the session, without starting ssh.service persistently.
- If you prefer the traditional method where SSH starts at boot and isn’t dependent on systemd sockets, you can disable socket-based activation and restore the classic behavior.
- $sudo systemctl disable --now ssh.socket (disable socket based ssh)
- $sudo systemctl enable --now ssh.service (enable service based ssh at startup)
- Allow /etc/ssh/sshd_config to fully control SSH settings (including ports and listen addresses)
- Remove ssh:
- sudo apt remove openssh-server
- Configuring custom ssh port:
- service based activation:
- To change the SSH port, edit $sudo vim /etc/ssh/sshd_config and set port number:
- port 22, change port number, save it and exit.
- Socke based activation:
- However, with socket-based activation, systemd intercepts port configurations and defaults to port 22 unless explicitly changed. Ubuntu 24.04 dynamically pulls port settings from /etc/ssh/sshd_config, eliminating the need to manually migrate configurations.
- Edit /etc/ssh/sshd_config, for example:
- enter new port number, save and exit.
- Reload systemd and restart ssh.socket:
- $sudo systemctl daemon-reload
- $sudo systemctl restart ssh.socket
- code
code
- code
- code
- code
code
- code
- code
- code
code
- code
- code
- code
T: Terminal, telnet
Terminal:
-
Alt+Ctrl+t Open a terminal Ctrl+d Close a terminal Shift+Ctrl+t Open a new Tab in terminal Shift+Ctrl+w Close Tab Ctrl+Pagedown Switch to next tab Ctrl+Pageup Switch to previous tab Shift+Ctrl+n New Terminal window open Shift+Ctrl+q Close window Shift+Alt ++ Increase font size Ctrl -- Decrease font size Ctrl 0 Normal Size Shift+Ctrl+c Copy Shift+Ctrl+v Paste Shift+Ctrl+f find Shift+Ctrl+g find next Shift+Ctrl+h find previous - code
-
Install telnet on docker container
- $apt install telnet -y
- code
- code
code
- code
- code
- code
code
- code
- code
- code
code
- code
- code
- code
code
- code
- code
- code
code
- code
- code
- code
U: User management, Group Management, uname, umask
User Management:
-
root@hostname:~#
root = user name, @ hostname(hostname or IP), ~ (tild sysmbol shows you are in home directory of user, when you change directory it shows directory name), # denotes you are a root user. aziz@hostname:~$ aziz =user name, @hostname(hostname or IP) ~ is the user home directory, $ denotes normal user, Normal User UID = 1000 to 60000 GID 1000 to 60000 (this range can be increased in /etc/login.defs).
System User DNS, DHCP, FTP, Apache, Samba, NFS etc.. used to manage services, 1 to 999 GID (1to999) in RHEL7, in RHEL6 UID =1 to 499 & GID=1 to 499. UID (user ID) and GID (Group ID) is assigned to a user and all policies are assigned to that ID. #cat /etc/passwd
user information stored in this path.
root:x:0:0:root:/root:/bin/bash
root = user’s login name
x = password pointer /etc/shadow, password is set (! = password is not set):
0 =UID
0 = GID
root = comments (define designation of user, administrator, manager etc..)
root = user’s home directory
/bin/bash = login shell# /etc/shadow
Password information is stored in this path.
root: xfaddoiuabelrje : : : : : : : (9 fields)
root = username
X39u3lkaefj = password in encrypted format
3 to 9 fileds= stored user password policies.#/etc/group
Group information is stored in this path.
root:x:0: ziz, Abdul, user1, user2
root = group name
x = password pointer (/etc/gshadow) password set
0=GID
Aziz,Abdul,user1.. = group members.#/etc/gshadow
Group password stored in this path.
Root: aoplw2lj fl : aziz : user1, user 2 (4 field)
Root = Group name
Alskjfoweivnl = encrypted password
0 = GID
Aziz = Group Admin
user1,user2 … = list of members.#/var/mail/root Mail information is stored in this path.
- code
-
Create user:
- Syntax = adduser/addgroup option argu username/groupname
- Users can be created with useradd or adduser (debian based system) command. useradd will not create home directory and other user information, it is mostly used in script where user interaction is not required. adduser command prompt user to enter details and it create a home folder.
- To get help $man adduser
- $useradd aziz
- user mohammed will be created without home directory and other user details.
- Create a user with home directory:
- $useradd -m username
- To specify a shell:
- $useradd -s /bin/bash username
- $adduser mohammed
- adduser1.jpg
- user mohammed will be created and prompt to enter details like, password, full name, room number, work phone etc..
- It also creates a user home directory /home/mohammed,
- It also creates a group of same user name.
- List of users
- $cat /etc/passwd
- adduser2.jpg
- list of users with details
- $head /etc/passwd (list top 5 users)
- $tail /etc/passwd (list last 5 users)
- $grep aziz /etc/passwd (user aziz information displayed)
- Add user with comment:
- $useradd –c “itsupport” abdul ( -c used to comment)
- Add user with ID
- $useradd –u 1010 user1 (user ID 1010 is manually entered)
- With Home Directory:
- $useradd –d /userdata/user2 user2 (create a folder userdata, user2 home directory is created in userdata folder).
- if you want to change user home directory to custom directory for all users, then change the file, vim etc/default/useraddcle
- Hidden files: when you create a user, in its home directory there are some hidden files created. . .. .bash_logout .bash_profile .bashrc .mozilla (if these files are corrupt or deleted, then user will not get shell (prompt), to recover these files are stored in central location and from there it is copied to /home folder), copy these files /etc/skel and check these files, copied and paste in /home folder. (cp -rvf .bash_logout …… .mozilla /home/user2)
- There are some files/folders which should be copied to user home directory by default when a user is created. Go to vim /etc/default/useradd and append skel=(give folder name whose files/folders need to be copied). Create a user and you login with this user which will not have shell but data will be copied, /etc/skel here all profile data is saved and we append this location. The best solution is copy all data into /etc/skel and create a user which allow user to login and data will also be copied in their home directory.
- Allows user to login:
- /bin/bash : it allows user to login.
- No login to user:
- $useradd –s /bin/nologin user3 (it wont allow to login)
Delete a user:
- $userdel --help (get help)
- Check a user home directory by going to
- $cd /home
- $ls -ll (long list)
- Delete a user
- $Userdel name (user account will be deleted but home directory exist)
- Delete a user with home directory
- $Userdel –rf username
User modification:
- $usermod --help
- usermod1.jpg
- Change the username:
- $usermod -l new_username old_username
- Change the home directory:
- $usermod -d /new_home_directory -m username
- Change the default shell:
- $usermod -s /bin/zch username
- Password help:
- $passwd --help
- passwd1.jpg
- Adding user to Group:
- $usermod -aG group_name user_name
- View Group membership
- $groups username
- aziz : aziz users admin (aziz is username : aziz is group name, users is group name, admin is group name)
- Changing primary group
- $usermod -g new_primary_group username
- Set or change user password: without password user cannot login. Root user can switch to any user even the password has not been assigned to user.
- $passwd username
- Check password is assigned to user:
- -S (report password status on the named account)
- $passwd -S aziz
- aziz P 2025-11-11 0 99999 7 -1 (P indicates password is set, L indicates not set)
- Lock the password/user account:
- $passwd -l username
- Unlock a user account
- $passwd -u username
- Password expiration: Set password expirty days:
- $chage -M 90 username (password expire in 90 days)
- password delete:
- $passwd -d username
-
user creation using script and assigned a password:
vim usercreation.sh (press i to go to insert mode)
#! /bin/bash
useradd user10
echo India123| passwd - -stdin user10 (press esc)
:wq! (save script)
RUN SCRIPT
sh usercreation.sh (user created with password assigned)
passwd -S user10 (check password status)
User Account Policies:
Chage -l user1 (shows account aging information)
Chage user1 (to reset the account options)
To change a particular record, chage -option newvalue username (chage - -help check)
- code
Create a group:
- $groupadd --help
- groupadd1.jpg
- $addgroup --help
- Creating a Group
- $groupadd groupname
- code
Adding Users to Groups
- Add user to group
- $usermod -aG groupname username
- View Group membership
- $groups username
- Changing primary group
- $usermod -g new_primary_group username
- Add additional group to user: suppose a user run $docker pull hello-world (only root have permission), add user to docker group.
- $usermod -aG docker username
- Add multiple users to a group:
- $gpasswd -M user1,user2,user3 group_name
- Add user to group
Adding user to sudo group
- On Debian-based systems
- $usermod -aG sudo username
- On RHEL-based systems
- $usermod -aG wheel username
- Adding user to sudoers
- Check sudoers permission:
- $ls -ltr /etc/sudoers
- -r--r----- 1 root root 1800 Jan 29 2024 /etc/sudoers (user, group has read access, others has no access)
- $visudo
- #user privilege specification, add the following line
- username ALL=(ALL:ALL) ALL
- :wq!
- On Debian-based systems
uname
- $uname
- Linux
- It will display which o/s is running
- code
uptime
- $uptime
- 14:56:25 up 3 days, 2:56, 1 user, load average: 0.00, 0.00, 0.00
- code
umask
- It is a 4 digit number, default file permissions can be set with umask, when a new file is created than by default what permission should be applied.
- code
- code
code
- code
- code
- code
V: VI Editor, Version
VI Editor
- $sudo apt install vim (to edit a file)
- code
- code
Find out version of O/S
- In Ubuntu: $lsb_release -a
- code
- code
code
- code
- code
- code
code
- code
- code
- code
code
- code
- code
- code
code
- code
- code
- code
code
- code
- code
- code
..W: who, whoami, which
$who
- It displays who are logged in
- code
- code
$whoami
- it displays logged in user name
- code
- code
$which application_name or $whereis application_name
- It shows the path where that application is installed
- $which bash
- /usr/bin/bash
- It will show path of bash
- $which java
- If it is installed than it will show path, if not installed it will not show anything.
- $whereis java
- If it is installed than it will show path, if not installed it will not show anything.
code
- code
- code
- code
code
- code
- code
- code
code
- code
- code
- code
code
- code
- code
- code
X
code
- code
- code
- code
code
- code
- code
- code
code
- code
- code
- code
code
- code
- code
- code
code
- code
- code
- code
code
- code
- code
- code
code
- code
- code
- code
Y
yum command : yum
- code
- code
- code
code
- code
- code
- code
code
- code
- code
- code
code
- code
- code
- code
code
- code
- code
- code
code
- code
- code
- code
code
- code
- code
- code
Z: Zip/Unzip,
Zip/Unzip:
- Compressed file: tar is used to archive files, for compression use gunzip, bunzip or xz commands.
- Archiving:
-
tar options archivefoldername file&folder, create a folder and go to folder and run
-
tar –cvf redhad.tar /etc (c for create, v for verbose, f for file type) it start archiving.
-
du –sh redhad.tar (display size = 30 mb, before archive it was 34 mb)
-
tar –xvf redhad.tar (it extract files in the same location and display contents of tar file)
-
tar –xvf redhad.tar –C /tmp/ (it will extract in tmp folder)
-
tar –tvf redhad.tar (list files)
-
- Compress:
-
tar –zvf redhat.gz /etc (it will compress etc folder as rehat.gz)
tar –zcvf rehat.tar.gz /etc (it will archive and compress)
du –sh redhat.tar redhat.gz (30 mb redhat.tar and 8.4mb redhat.tar.gz)
tar –jcvf redhat.tar.bz2 /etc (using gunzip command to archive and compress)
du –sh redhat.tar redhat.tar.gz redhat.tar.bz2 (30 mb, 8.4 mb, 7.0 mb)
tar –Jcvf redhat.tar.xz /etc (using xz command, J is capital)
du –sh redhat.tar.xz (5.7 mb)
-
- Extract:
-
tar –zxvf redhat.tar.gz (It will extract, use x instead of c)
-
tar –jxvf redhat.tar.bz2
-
tar –Jxvf redhat.tar.xz
-
Check zip in installed:
-
Zip: to check zip is installed (rpm –qa zip) (rpm –qa unzip)
-
zip abc.zip /etc (it will zip etc folder in abc.zip)
-
du –sh abc.zip (size 4.0k)
-
unzip abc.zip (it will unzip)
- code
- code
-
code
- code
- code
- code
code
- code
- code
- code
code
- code
- code
- code
code
- code
- code
- code
code
- code
- code
- code
Videos
Sanjay - RHEL 7
- Linux Intro
- Linux Installation Intro
- Linux Installation RHEL 7
- Linux Reboot
- /etc/passwd, /etc/shadow explain
- Linux File Hierarchy, LS command
- touch command
- mkdir command
- cat command
- and symbol
- head & tail
- echo command
- rm command
- cp command
- vim editor
- grep command
- find command
- zip, unzip command
- user management part 1
- user creation, deletion
- user passwd
- user home directory
- chmod, chown
- File & Folder permission, rwx or 4 2 1
- chmod, assign file permission
- Assign file permission
- Permission Management part 4
- Permission Management part 5
- Partition Management part 1
- Partition Manageent Part 2
- LVM part 1
- LVM part 2
- SWAP partition
- Linux Software Management RPM
- YUM part 1
- YUM part 2
- YUM part 3
- Systemctl
- Break Root Password method 1
- Break Root Password method 2
- Sudo command
- Job Scheduling
- Crontab
- Networking part 1
- nmcli 1
- nmcli 2
- nmcli 3
- rsync
- SSH part 1
- SSH part 2
- SSH part 3
- SSH part 4
Abhishek
- code
- code
- code
code
- code
- code
- code
code
- code
- code
- code
code
- code
- code
- code