Intro
- Jenkins is open source CI/CD engine. It is a web application developed using Java. It runs on port 8080.
- Devops pipeline start from Git, whenever code is committed in Git, a software is required to start a pipeline and build the code. When build is successful then perform unit test, to move code from one place to another place required software which can be achieved with Jenkins. It is like a scheduler which is designed for CI/CD, In Windows schedule task we perform through task scheduler jobs and cronjobs in linux.
- For continuous CI/CD with any tools (git, ansible, docker, kubernetes, maven,etc) these tools should be installed in jenkins server.
- Jenkins can be installed on physical machines, Virtual Machines, Openstalk, AWS or Azure Instances and containers. It can be installed on O/S like Linux flavours or Windows servers.
- Jenkins software is available with 32 bit and 64 bit.
- When you install Jenkins a user called jenkinks will be created, if you create multiple users in the system but internally they all work as default Jenkins user.
- By default, Jenkins runs at https://publicIP or localhost:8080/. This can be changed by editing jenkins.xml , which is located in installation directory. This file is also the place to change other boot configuration parameters, such as JVM options, HTTPS setup, etc.
- Item/Job: /var/lib/jenkins when you create a job in jenkins then a folder with job name is created:
- /var/lib/jenkins/jobs/jobname
- builds & config.xml file is also created.
- Workspace: When you run build a folder (workspace) will be created and job name within.
- /var/lib/jenkins/workspace/jobname (if files does not show, switch user and switch back again),
- Jenkins interface go to --> job-->workspace/jobname
- clone from GitHub, it will clone in workspace/jobname/
Installation:
Jenkins installation on Ubuntu/Debian: Create EC2 instance of Ububtu 20.04 with all traffic allowed
- Login to Instance:
- Putty (.ppk): Login to EC2 Instance: .ppk key is downloaded, run putty and paste public IP and go to SSH/Auth/Browse and select key. user: ec2-user. switch to roo : sudo su
- SSH client from amazon console (.pem): select ec2 instance and click connect and select SSH client, copy url, Go to the folder where you downloaded and kep .pem key, enter cmd on url and paste it here
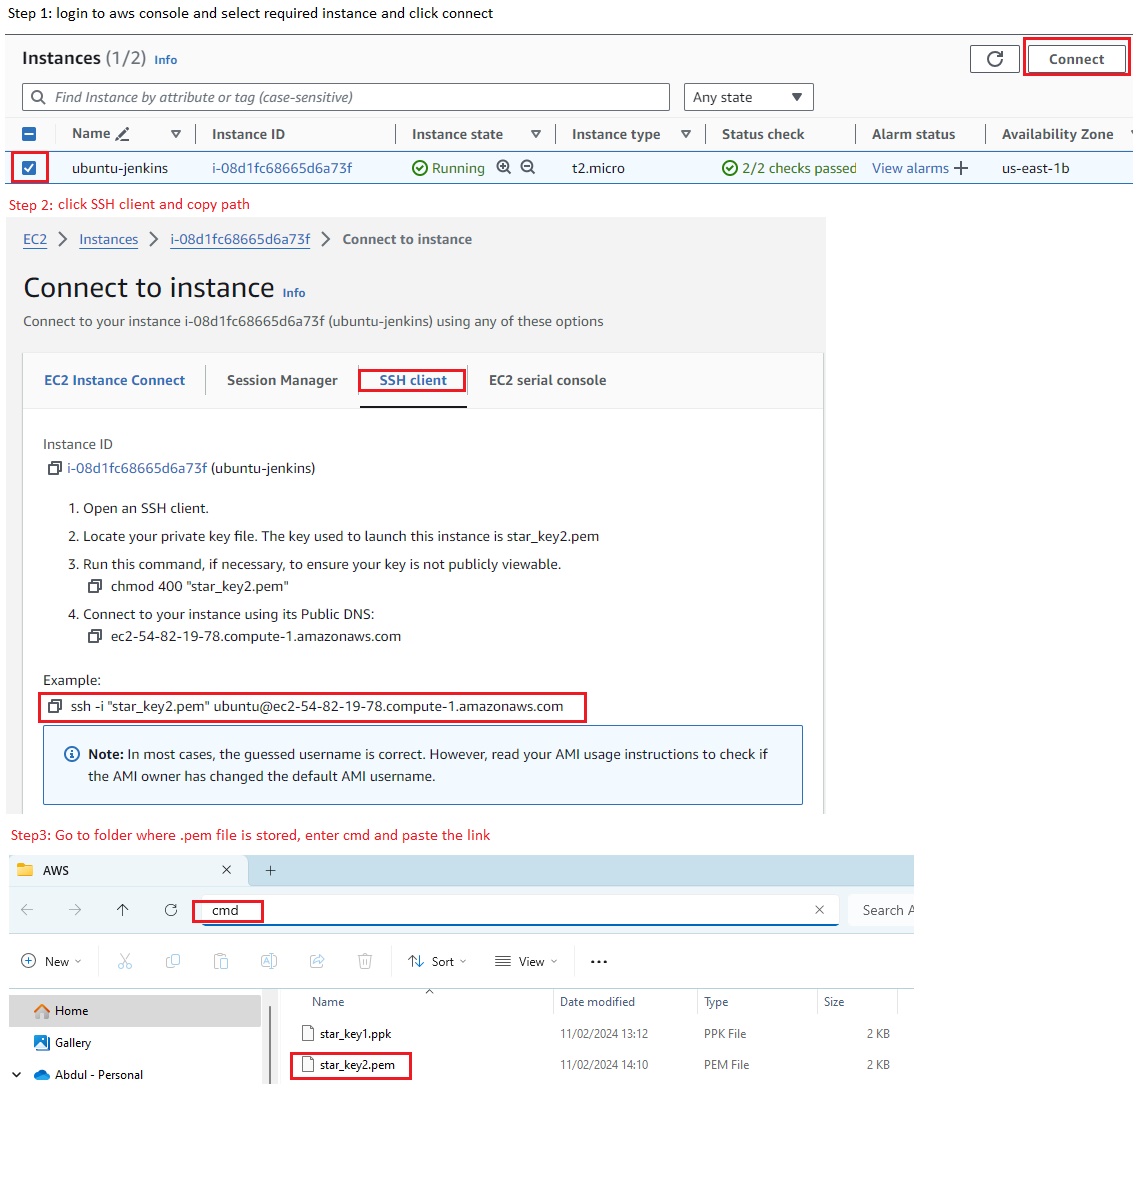
- Gitbash: select the folder where you downloaded and kept .pem key, right click and more option and select git bash, paste the link.
- Pre-requisite JAVA JDK Installation:
- Method 1: run the java command and it shows the following message
- #java (command 'java' not found, but can be installed with: apt install openjdk-17-jre-headless (select required version))
- Install JAVA: paste the link # sudo apt install openjdk-17-jre-headless
-
The JRE is the Java Runtime Environment. It is a package of everything necessary to run a compiled Java program, including the Java Virtual Machine (JVM), the Java Class Library, the
javacommand, and other infrastructure. However, it cannot be used to create new programs.The JDK is the Java Development Kit, the full-featured SDK for Java. It has everything the JRE has, but also the compiler (
javac) and tools (likejavadocandjdb). It is capable of creating and compiling programs.Usually, if you only care about running Java programs on computer you will only install the JRE. It's all you need. On the other hand, if you are planning to do some Java programming, you need to install the JDK instead.
Sometimes, even if you are not planning to do any Java development on a computer, you still need the JDK installed. For example, if you are deploying a web application with JSP, you are technically just running Java programs inside the application server. Why would you need the JDK then? Because the application server will convert JSP into Java servlets and needs to use the JDK to compile the servlets. I am sure that there are more examples.
- Method 2: get root access (sudo su)
- #sudo apt-get update (update apt repository)
- #sudo apt-cache search jdk (search for any particular jdk version)
- #apt-get install openjdk-8-jdk –y or
- #apt install default-jdk (for latest version)
- #java -version (use one hyphen in ubunutu)java -
- #sudo apt-get update (update apt repository)
- Set JAVA Environment Variable:
- Method 1: run the java command and it shows the following message
- Jenkins Installation:
- Refer Here for installation steps
- Refer Here for installing specific version of jenkins on ubuntu
- Refer Here for debian/ubuntu based
- Method 1: Download: In google search jenkis download and click jenkins download and deployment(https://www.jenkins.io/download/), click Ubuntu/Debian and copy the url. (Jenkins Debian Packages)
- #
wget -O /usr/share/keyrings/jenkins-keyring.asc \https://pkg.jenkins.io/debian-stable/jenkins.io-2023.key - #
echo deb [signed-by=/usr/share/keyrings/jenkins-keyring.asc] \ https://pkg.jenkins.io/debian-stable binary/ | sudo tee \ /etc/apt/sources.list.d/jenkins.list > /dev/null - Install Jenkins:
- $sudo apt-get update
- $sudo apt install openjdk-17-jre-headless (install java if it is not installed)
- $apt-get install jenkins
- $sudo systemctl start jenkins
- $ sudo systemctl enable jenkins
- $sudo systemctl status jenkins
- #
- Method 2: In google search jenkis download and click jenkins download and deployment (https://www.jenkins.io/download/), right click on Generic Java Package(.war) and copy link address (https://get.jenkins.io/war-stable/2.426.3/jenkins.war). Generic means it will run on any platform windows, linux, mac etc..
- $ wget https://get.jenkins.io/war-stable/2.426.3/jenkins.war
- run the file $java -jar jenkins.war
- Do not close the window after running the above command, if you close then need to run the command again $java -jar jenkins.war
- Access jenkins with webconsole:
- copy public ip from amazon ec2 instance, open browser and paste it 52.87.174.134/8080
- unlock jenkins : #cat /var/lib/jenkins/secrets/initialAdminPassword (copy and paste it in browser). enter new user name, password, email etc.. install suggested plugins.
- it install plugins like: folders, OWASP, Ant, Gradle, Pipeline, Git, Github, SSH Build Agents Mailer etc..
- By default, Jenkins runs at https://localhost:8080/. This can be changed by editing jenkins.xml , which is located in installation directory. This file is also the place to change other boot configuration parameters, such as JVM options, HTTPS setup, etc.
- Install jenkins CLI to access from command line.
- Default user Jenkins:
- Generally when you install jenkins, a new user (jenkins) gets created. Whatever you do in jenkins will be run as jenkins user. When you login with any user in jenkins and permform any action then it execute via jenkins user.
- login to jenkins user: su jenkins (it ask for password which has not been set)
- To check the user jenkins is created, su root--> vi /etc/passwd
- In windows jenkins runs as installed user.
- All commands of commandline (linux or windows) can be run from jenkins. Plugins is not required if these can be achieved with commands.
- To install any software it required administrative permissions(sudo), it cannot be run using jenkins user as it does not have administrative permissions.
- Jenkins user administrative rights:
- $sudo su
- # vi /etc/ssh/sshd_config
- password Authentication yes
- #service sshd restart
- #visudo
- add this line jenkins ALL=(ALL:ALL) NOPASSWD:ALL
- save (:wq!)
- #passwd jenkins (enter password)
- #su jenkins
- Install any software with jenkins user (sudo apt-get install git -y)
- Set Environmental Variable: error: command not found, this heppend if path is not set.
- JENKINS HOME:
- All the information about jenkins is stored in .jenkins directory, In specific linux installations path can be different.
- ~/.jenkins
- AWS Ubuntu EC2 Instance=/var/lib/jenkins
- JENKINS_HOME: Jenkins uses Environment Variable
- All the information about jenkins is stored in .jenkins directory, In specific linux installations path can be different.
- code
- Login to Instance:
Jenkins installation on RHEL, Fedora, CentOS, Amazon Linux,
- Login to Instance:
- Putty (.ppk): Login to EC2 Instance: .ppk key is downloaded, run putty and paste public IP and go to SSH/Auth/Browse and select key. user: ec2-user. switch to roo : sudo su
- SSH client from amazon console (.pem): select ec2 instance and click connect and select SSH client, copy url, Go to the folder where you downloaded and kep .pem key, enter cmd on url and paste it here
- Gitbash: select the folder where you downloaded and kept .pem key, right click and more option and select git bash, paste the link.
- Update:
- $sudo su (switch to root user)
- #cd ~ (change directory to home)
- #yum update -y
- Install opel:
- #amazon-linux-extras install epel (insall epel for AWS linux)
- Install Open JDK 17:
- Setup yum repository: #sudo amazon-linux-extras enable corretto8
- Install jdk 17: #sudo yum install java-17-amazon-corretto-devel -y
- #java -version
- Set Environment Variable.
- Jenkins:
- Download: In google search jenkins download and click jenkins download and deployment, click (centos, fedora, redhat as amazon linux is similar to them) copy and run the following commands,
- #wget -O /etc/yum.repos.d/jenkins.repo https://pkg.jenkins.io/redhat-stable/jenkins.repo
- #rpm --import https://pkg.jenkins.io/redhat-stable/jenkins.io-2023.key
- Install Jenkins:
- #yum install jenkins -y
- #sudo systemctl enable jenkins (Created symlink from /etc/systemd/system/multi-user.target.wants/jenkins.service to /usr/lib/systemd/system/jenkins.service.) It enable jenkins service to start at every boot.
- #sudo systemctl start jenkins (it will start jenkins service)
- #java --version
- #javac --version
- #systemctl status jenkins
- #hostname AWS-Dev-Server
- #cd /etc
- #vi hostname (remove line and paste AWS-DEV-Server) save it.
- #init 6 (restart the system so that changes take effect) server will reboot and changes will effect.
- copy public ip from amazon ec2 instance, open browser and paste it 52.87.174.134/8080
- unlock jenkins : #cat /var/lib/jenkins/secrets/initialAdminPassword (copy and paste it in browser). enter new user name, password, email etc.. install suggested plugins.
- it install plugins like: folders, OWASP, Ant, Gradle, Pipeline, Git, Github, SSH Build Agents Mailer etc..
- Download: In google search jenkins download and click jenkins download and deployment, click (centos, fedora, redhat as amazon linux is similar to them) copy and run the following commands,
- code
- Login to Instance:
Jenkins installation on Windows
- Pre-requisite JAVA:
- Download JAVA:go to oracle website https://www.oracle.com/uk/java/technologies/downloads/archive/ select java SE --> click on required versoin --> download .exe.
- Install JAVA: Double click .exe file to start.
- Environment Variable:Go to evironment variable (user for one user, system for all users) click
- New Variable name: JAVA_Home, Variable Value: C:\Program Files\Java\jdk-21
- Path: new and paste C:\Program Files\Java\jdk-21\bin
- Jenkins:
- Method 1: Download: go to https://www.jenkins.io/download/ and download jenkins.msi
- Install Jenkins:click on jenkins.msi to install.
- Method 2: In google search jenkis download and click jenkins download and deployment (https://www.jenkins.io/download/), right click on Generic Java Package(.war) and copy link address (https://get.jenkins.io/war-stable/2.426.3/jenkins.war) and paste it in browser which will downlaod jenkins.war, generic means it will run on any platform windows, linux, mac etc..
- create a folder and place jenkins.war file here, on address bar write cmd and enter, it open cmd prompt at this folder location, now run java-jar jenkins.war (it will install jenkins and do not close window)
- By default, your Jenkins runs at localhost:8080. This can be changed by editing jenkins.xml , which is located in your installation directory. This file is also the place to change other boot configuration parameters, such as JVM options, HTTPS setup, etc.
- code
- Pre-requisite JAVA:
Jenkins installation on Amazon Linux : 2023 with all trafic allowed
- Login to instance:
- Putty (.ppk): Login to EC2 Instance: .ppk key is downloaded, run putty and paste public IP and go to SSH/Auth/Browse and select key. user: ec2-user. switch to roo : sudo su
- SSH client from amazon console (.pem): select ec2 instance and click connect and select SSH client, copy url, Go to the folder where you downloaded and kep .pem key, enter cmd on url and paste it here
- Gitbash: select the folder where you downloaded and kept .pem key, right click and more option and select git bash, paste the link.
- Update:
- $sudo su (switch to root user)
- #cd ~ (change directory to home)
- #yum update -y
- Install opel:
- #amazon-linux-extras install epel (insall epel for AWS linux)
- Install Open JDK 17:
- Setup yum repository: #sudo amazon-linux-extras enable corretto8
- Install jdk 17: #sudo yum install java-17-amazon-corretto-devel -y
- #java -version
- Set Environment Variable.
- Jenkins:
- Download: In google search jenkins download and click jenkins download and deployment, click (centos, fedora, redhat as amazon linux is similar to them) copy and run the following commands,
- #wget -O /etc/yum.repos.d/jenkins.repo https://pkg.jenkins.io/redhat-stable/jenkins.repo
- #rpm --import https://pkg.jenkins.io/redhat-stable/jenkins.io-2023.key
- Install Jenkins:
- #yum install jenkins -y
- #sudo systemctl enable jenkins (Created symlink from /etc/systemd/system/multi-user.target.wants/jenkins.service to /usr/lib/systemd/system/jenkins.service.) It enable jenkins service to start at every boot.
- #sudo systemctl start jenkins (it will start jenkins service)
- #java --version
- #javac --version
- #systemctl status jenkins
- #hostname AWS-Dev-Server
- #cd /etc
- #vi hostname (remove line and paste AWS-DEV-Server) save it.
- #init 6 (restart the system so that changes take effect) server will reboot and changes will effect.
- copy public ip from amazon ec2 instance, open browser and paste it 52.87.174.134/8080
- unlock jenkins : #cat /var/lib/jenkins/secrets/initialAdminPassword (copy and paste it in browser). enter new user name, password, email etc.. install suggested plugins.
- it install plugins like: folders, OWASP, Ant, Gradle, Pipeline, Git, Github, SSH Build Agents Mailer etc..
- Download: In google search jenkins download and click jenkins download and deployment, click (centos, fedora, redhat as amazon linux is similar to them) copy and run the following commands,
- code
- Login to instance:
Jenkins installation on Containers:
- Pre-requisite JAVA:
- Download JAVA:
- Install JAVA:
- Jenkins:
- Download
- Install Jenkins:
- code
- code
- Pre-requisite JAVA:
Tools Installation: Git, Maven, Ansible, Jenkins, Tomcat9,
- Git Installation on ubuntu:
- Download:
- Install: #apt-get install git - y
- version : #git --version (use two hyphens)
- Maven Installation on ubuntu:
- Pre-requisite: JDK 17 (
- Install:#apt-get install maven -y
- Version: #mvn --version or #mvn -v
- Home directory: /usr/share/maven
- Install Git & Maven together: #sudo apt-get install -y git maven
- Maven Installation on Amazon Linux, RHEL, Fedora, CentOS
- Go to https://https://maven.apache.org/download.cgi -->Binary tar.gz archive and right click on link and copy address link.
- $sudo su
- #cd ~
- #cd /opt
- #wget https://dlcdn.apache.org/maven/maven-3/3.9.6/binaries/apache-maven-3.9.6-bin.tar.gz
- #tar -xzvf apache-maven-3.9.6-bin.tar.gz (files will be extracted here, move to a maven folder for easy understanding)
- #mv apache-maven-3.9.6 maven
- #cd /maven/bin
- #./mvn -v (it will show maven version) to run mvn from anywhere, set the Environment Variable of maven.
- Set Environment Varibale Maven:
- Go to root home directory #cd ~
- # ll -a (list of files including hidden)
- #vi .bash_profile
- below fi enter the following:
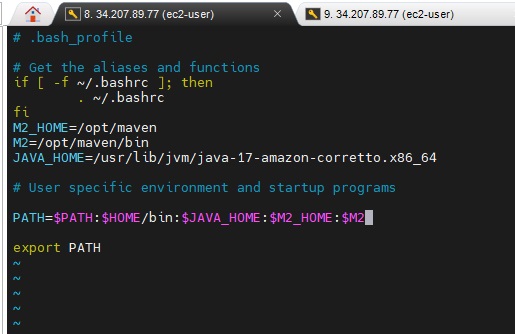
- M2_HOME=/opt/maven
- M2=/opt/maven/bin
- JAVA_HOME=/usr/lib/jvm/java-17-amazon-corretto.x86_64
- PATH=$PATH:$HOME/bin:$JAVA_HOME:$M2_HOME:$M2
- export PATH (save and exit)
- #echo $PATH (if it does not show path for maven and java)
- #source .bash_profile
- #echo $PATH (/sbin:/bin:/usr/sbin:/usr/bin:/root/bin:/usr/lib/jvm/java-17-amazon-corretto.x86_64:/opt/maven:/opt/maven/bin)
- To get java path: 'find / -name java-17* (it will give the path of java installed: /usr/lib/jvm/java-17-amazon-corretto.x86_64), now mvn command can run from anywhere
- #sudo init 6 (restart the server so that path takes effect)
- Shutdown and Restart: After shutdown and restart the maven installed machine, go to folder where agent files are unzipped, #cd /myagent and run #./run.sh
- POM.xml : Project Object Model, it contains the following information
- project information:
- Dependencies:
- Plugins:
- Profiles: in which environment it uses, dev, test or debug etc..
- Goals:
- compile: it will compile the source code
- Test: compile the code and test the code. (if you define command mvn test then first it will compile and then run test).
- Package: test the code and create package.
- Install:
- Deploy:
- clean: the extra folder which was created (target) will be removed.
- Execution goals:
- single: single goal execution, mvn compile or mvn test etc..
- multi goal: dual execution, mvn clean package (it will remove target folder and create package)
- Maven Errors:
- 1) Error injecting: org.apache.maven.plugin.war.WarMojo
- To solve the above error: open pom.xml file-->edit and in plugins section insert the following
-
<plugin> <groupId>org.apache.maven.plugins</groupId> <artifactId>maven-war-plugin</artifactId> <version>3.3.1</version> </plugin> - save and rerun build.
- 2)
- Ansible on ubuntu:
- Download:
- Install:
- Tomcat9 Installation on Ubuntu:
- video
- Method 1:
- $sudo apt update
- $sudo apt upgrade
- Pre-requisite JAVA: $ sudo apt install openjdk-17-jre-headless
- Go to https://archive.apache.org/dist/tomcat --> select tomcat-9/ -->v9.0.65/ --> bin --> right click on apache-tomcat-9.0.65.tar.gz and copy link address
- $cd /opt and download the Tomcat
- $sudo wget https://archive.apache.org/dist/tomcat/tomcat-9/v9.0.65/bin/apache-tomcat-9.0.65.tar.gz
- Extract the file: $sudo tar -xvf apache-tomcat-9.0.65.tar.gz and remove $rm -rf apache-tomcat-9.0.65.tar.gz
- $sudo su (get root)
- #change to /conf file root@abdul-ubuntu1:/opt/apache-tomcat-9.0.65/conf
- create user: edit file tomcat-users.xml #vi tomcat-users.xml or #nano tomcat-users.xml
- add this line before </user-name> <user username="admin" password="Trustu786" roles="admin-gui, manager-gui"/> save and exit (:wq!)
- Link two files startup and shutdown files: #sudo ln -s /opt/apache-tomcat-9.0.65/bin/startup.sh /usr/bin/startTomcat & #ln -s /opt/apache-tomcat-9.0.65/bin/shutdown.sh /usr/bin/stopTomcat
- Edit the file #vi /opt/apache-tomcat-9.0.65/weapps/manager/META-INF/context.xml and comment
- <!-- Valve className="org.apache.catalina.valves.RemoteAddrValve"
allow="127\.\d+\.\d+\.\d+|::1|0:0:0:0:0:0:0:1" /> -->
- <!-- Valve className="org.apache.catalina.valves.RemoteAddrValve"
- Edit the file #vi /opt/apache-tomcat-9.0.65/weapps/host-manager/META-INF/context.xml and comment
- <!-- Valve className="org.apache.catalina.valves.RemoteAddrValve"
allow="127\.\d+\.\d+\.\d+|::1|0:0:0:0:0:0:0:1" /> -->
- <!-- Valve className="org.apache.catalina.valves.RemoteAddrValve"
- root@abdul-ubuntu1:/opt/apache-tomcat-9.0.65/bin#./shutdown.sh
- root@abdul-ubuntu1:/opt/apache-tomcat-9.0.65/bin#./startup.sh
- Access tomcat on browser $https://publicIP:8080 or http://localhost:8080 (Check the tomcat is intall or not: Copy the public IP of the QA Server then paste in the browser and in the end enter port :8080), change the port if jenkins is also installed in the same machine as it also used port 8080.
- Change port: jenkins also use port 8080:
- #root@abdul-ubuntu1:/opt/apache-tomcat-9.0.65/conf# vi server.xml (find connector and change port xxxx) :wq! (save and exit)
- #sudo stopTomcat
- #sudo startTomcat and now access with new port in browser.
- Method 2:
- #sudo apt-get update
- #sudo apt-get install -y tomcat9
- #sudo apt-get install -y tomcat9-admin
- create user in Tomcat: in order jenkins to communicate Tomcat, usre credentials required.
- When you install Tomcat, a directory will be creaed in /etc --> cd tomcat9
- Create user: #sudo vi tomcat-users.xml (insert <user username="tomcat-user1" password="Trustu786" roles="manager-script,manager-status,manager-gui"/>)
- insert the line before </tomcat-users><user username="tomcat-user1" password="Trustu786" roles="manager-script,manager-status,manager-gui"/> :wq!
- restart tomcat #sudo service tomcat9 restart.
- Remove Tomcat.
- sudo apt remove --purge tomcat9 tomcat9-docs
- sudo apt autoremove
- sudo apt autoclean
- code
- Git Installation on ubuntu:
clearUbuntu Installation on VMware workstation
- Create a new VM.
- $sudo apt-get update
- Installing VMAgent:
- $sudo apt-get install -y open-vm-tools-desktop
- $sudo reboot
- copy text and paste will work.
- ifconfig: command 'ifconfig' not found, but can be installed with "sudo apt install net-tools", run this command.
- SSH enabling: network error 'connection refused': SSH could be disabled/commented at port22.
- $ sudo apt install openssh-server
- $sudo vi /etc/ssh/ssh_config and remove(#) port 22, passwordAuthentication yes, save and close.
- $sudo service sshd restart.
- Access denied: after entering password it gives an error access denied. check user is created and password is correct.
- Drag and Drop or copy:
- shutdown the ubuntu VM, go to edit settings --> option --> Guest Isolation and select both options.
- on Terminal --> $sudo vi /etc/gdm3/custom_conf (remove # from WaylandEnable=false), save and exit, run $sudo systemctl restart gdms. logout of user and login.
- code
- code
Integrate Jenkins with GitHub using GitHub Hook
Jenkis can be integrated with a GitHub repository.
- Create a Repository (star_java) in Github and create/push a file code1.java in star_java.
- Login to Github: click repository, click + top right corner to create a new repository (star_java), select public and create repository.
- Login to developer machine (windows based)
- Install git and create a folder (star_java) and run C:/star_java/git init to initialize git.
- open a notepad and write the following code and save as code1.java
-
class simple
{
public static void main(string args[])
{
system.out.println("Welcome to Cloudtraining");
}
}
- $git init
- $git status
- $git add .
- $git commit -m "Version 1"
- $git remote add origin https://github.com/stardistributors/star_java
- $git push origin master (enter github username & password).
- now code1java is pushed in star_java reposiroty.
- code
Integrate jenkins with GitHub Account.
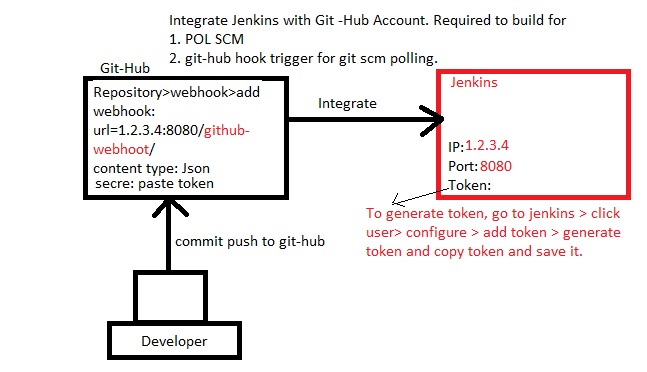
- Jenkins server is running on ubuntu, its public ip 52.87.174.134:8080
- Github Repository:https://github.com/stardistributors/star_java
- Go to github repository and click Settings/Webhooks/Add webhook
- Payload URL: http://52.87.174.134:8080/github-webhook/ (Public IP of jenkins server)
- Content Type: application/json
- secret: paste key (to get login to jenkins/configure/in API token click add new token/generate and copy, apply and save)
- click add webhook. (a green tick will appear which means it communicated with jenkins server)
- code
Create a job in Jenkins to test trigger
- Enter job name (job_star_java), select free style and ok
- In source code management select git and enter github repository url: https://github.com/stardistributors/star_java
- Error: If git is not installed in jenkins server then it gives an error, install git.
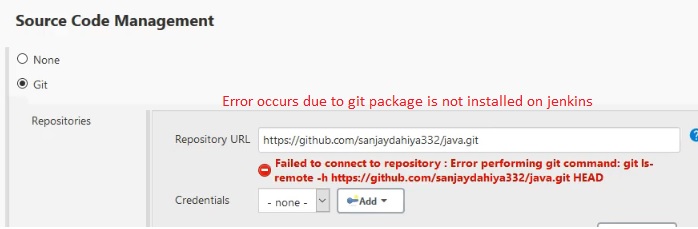
- Install git in Jenkins.
- code
Build Triggers Test
- Manual: we define git-hub url path to pull source code and run build manually.
- click down arrow next to job and select build now (it will start build).
- click on job and in build history there will be number generated #1 (if it is green then it has successfully triggered)
- click on number and click console output for more details.
- Triggers build remotely: We can trigger build remotely from anywhere.
- click on job (job_star_java) and go to Build Trigger and select Triggers build remotely, enter a token, a url will be generated with token.
- Build after other job is built: we use this option for any dependent job need to be finished first and run this build.
- Build Periodically: We can schedule job to run every particular time, no matter if there is any new commits in git hub or not but it runs periodically.
- select this option from Build trigger and define schedule of the trigger.
- click on ? to get more details about how to define. Build will run every defined time continuously.
- Poll SCM: It is similar to build periodically but it checks for new commits in git hub periodically and run if there is a new commit.
- select this option from Build Trigger and define schedule. Build will run every defined time and it starts build if there is any new commit.
- Git-Hub Hook Trigger for Git SCM Polling: It runs only when develops push new commits in git-hub not periodically time to time.
- select this option from Build Trigger. once developer commit then it will start the build immediately.
- You can use option (Poll SCM & Git-Hub Hook) only when git-hub account is integrate with jenkins, if new commit is pushed to git hub then jenkins trigger new build automatically.
- code
- Manual: we define git-hub url path to pull source code and run build manually.
code
- code
- code
- code
code
CI/CD Process Steps:
Step1 : Continuous Download: Step 1 to 4 are Continuous Integration, Step 5 is continuous Delivery
- Download code from Repository (Git-Hub, Big Bucket etc..)
- code
- code
Step 2: Continuous Build
- Create Artifact (Package)
- code
- code
Step 3: Continuous Deployment
- On which agent (compute resource) artifact should be deployed, usually it is QA servers (VMs of (Azure, AWS, etc), containers, on-prem machines etc..)
- Tomcat: User credentials, tomcat Public/Private_IP
- Install requied Plugins,
- Define path of artifact
- Define context path,
- code
- code
- On which agent (compute resource) artifact should be deployed, usually it is QA servers (VMs of (Azure, AWS, etc), containers, on-prem machines etc..)
Step 4: Continuous Test
- Once the artifact is deployed on QA server, testing starts.
- Testers create an script and uploaded on Git-hub,
- Define script command to run script for testing, Build: run script command(java -jar testing.jar)
- code
- code
Step 5: Continuous Delivery
- Deploy artifact(package) to production server.
- code
- code
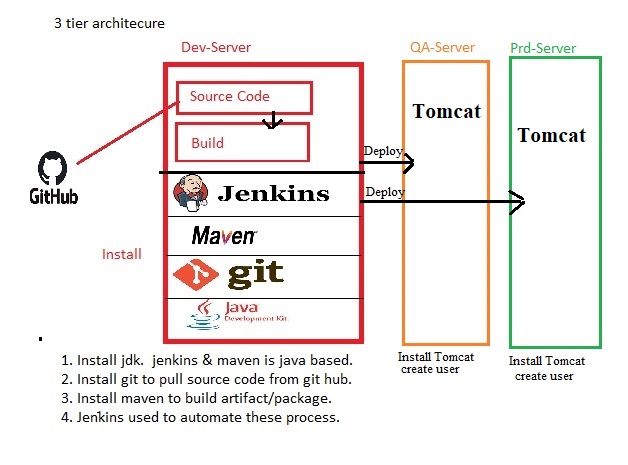
Project: 3 Tier (DEV, QA, PROD) model to run CI/CD process
- Videos related to the above project: Video1, Video2
Infrastructure: Create 3 ubuntu instances:
- Dev-Server:
- Install jdk as jenkins and maven is java based: check installation section for more details.
- Install git to pull source code from Git-Hub: check tools installation section for more details
- Install Maven to build artifact/package: check tools installation section for more details.
- Install jenkins to automate the CI/CD process: check tools installation section for more details.
- QA-Server:
- Install JDK: check installation section for more details
- Install Tomcat9: check tools installation section for more details.
- create user in Tomcat9: in order jenkins to communicate Tomcat, usre credentials required.
- When you install Tomcat9, a directory will be creaed in /etc --> cd tomcat9
- #sudo vi tomcat-users.xml (insert <user username="tomcat-user1" password="Trustu786" roles="manager-script,manager-status,manager-gui"/>)
- insert the line before </tomcat-users><user username="tomcat-user1" password="Trustu786" roles="manager-script,manager-status,manager-gui"/> :wq!
- restart tomcat #sudo service tomcat9 restart
- Prd-Server
- Install JDK: check installation section for more details
- Install Tomcat 9: check tools installation section for more details.
- create user in Tomcat: in order jenkins to communicate Tomcat, usre credentials required.
- When you install Tomcat, a directory will be creaed in /etc --> cd tomcat9
- #sudo vi tomcat-users.xml (insert <user username="tomcat-user2" password="Trustu786" roles="manager-script,manager-status,manager-gui"/>)
- insert the line before </tomcat-users><user username="tomcat-user2" password="Trustu786" roles="manager-script,manager-status,manager-gui"/> :wq!
- restart tomcat #sudo service tomcat9 restart
- code
- Dev-Server:
Step 1: Continuous Download - Link Jenkins job with Github:
- Create a job (new item)=star_job1, freestyle
- Source Code Management: select git and enter GitHub url = https://github.com/stardistributors/3Tier-Jenkins.git apply/save.
- Run Job: click Build Now (If you run the job, code gets cloning from GitHub into Dev/Jenkins computer).
- To check : click job --> click #1 -->console output
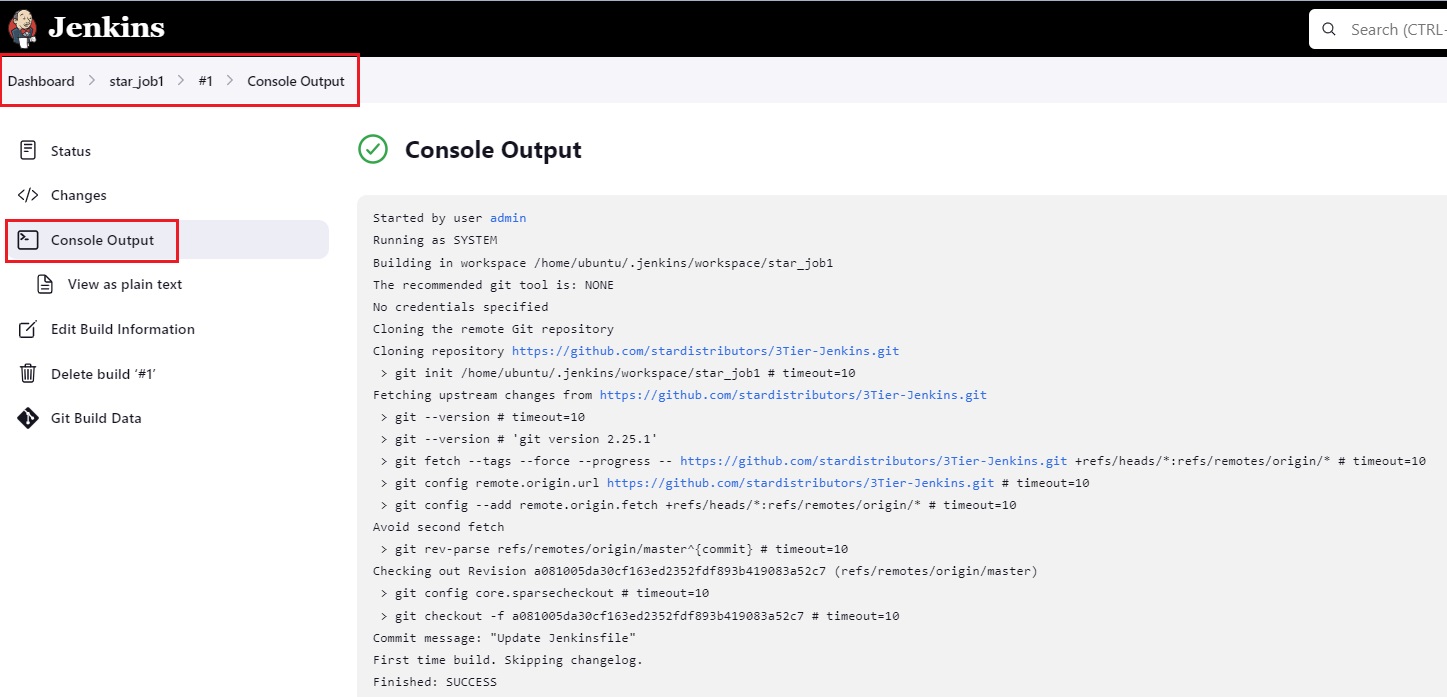
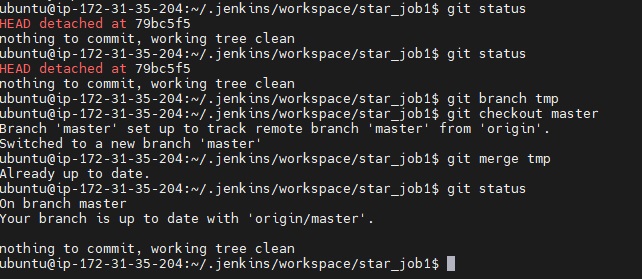
- Go to location: ubuntu@ip-172-31-35-204:~/home/ubuntu/.jenkins/workspace/star_job1 and see all files are downloaded from GitHub.
- workspace folder and job name(star_job1) folder will be created and in this folder all files will be cloned.

- This workspace can also be check in jenkins: click on job (star_job1)--> workspace
- Code has been downloaded, whenever developer makes changes in code and commit in Git Hub repository, code will cloned again depend upon the trigger defined.
- Code test (using sonarqube) before generating build.
- code
- code
Step 2: Continuous Build - Create an artifact (package) in Maven:
- using the above job (star_job1) --> Configure --> Build Steps
- Invoke top-level Maven Targets: Maven is installed in Dev Server which can be use to generate artifact.
- Goals = package (Maven command to generate artifact: In Maven "mvn package" command is use to generate artifact so enter package here) apply/save.
- Run the job --> Build Now > it will be #2
- Once you run the job, source code again gets downloaded(cloned) and generate an artifact.
- Error: build failed:
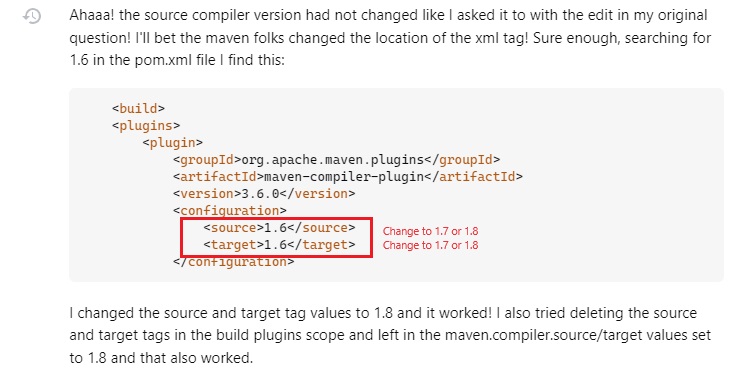
- In pom.xml file update as follows and commit:
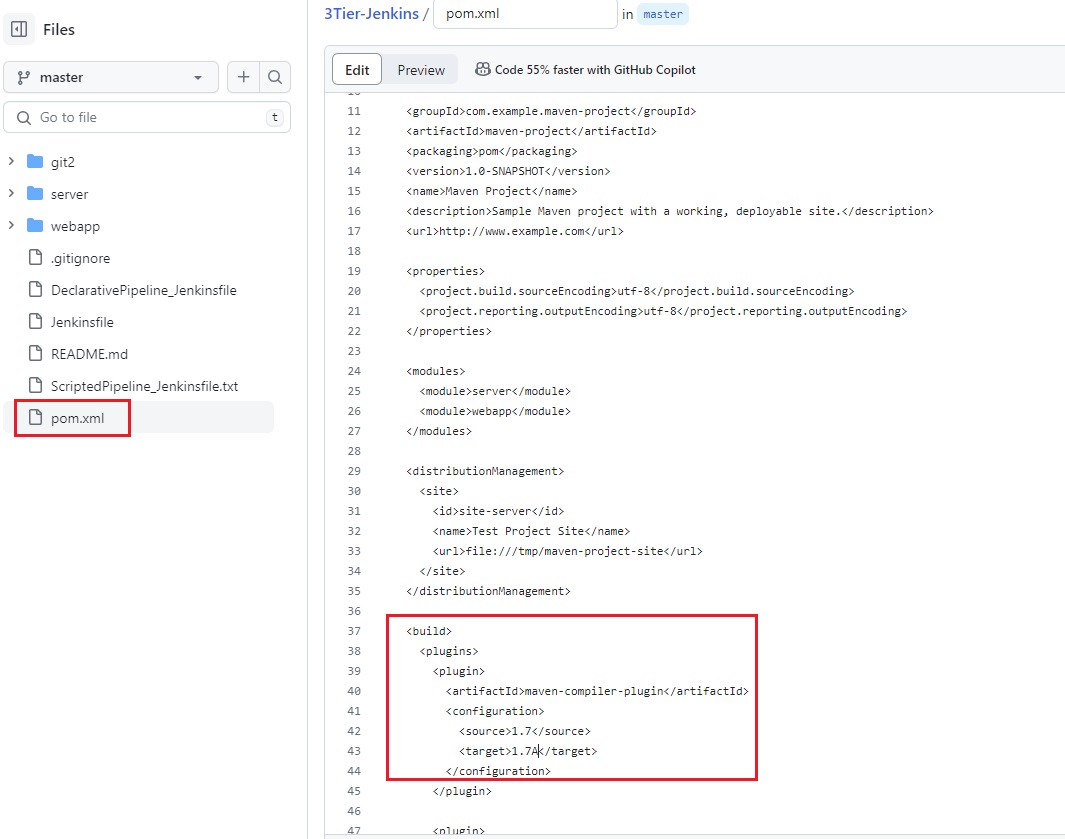
- After making changes and commit in GitHub pom.xml file, it needs to be update in the local repository.
- Run job again, after successfull completion .war file will be created. open console output the check the location : Building war: /home/ubuntu/.jenkins/workspace/star_job1/webapp/target/webapp.war
- code
Step 3: Continuous Deployment:deploy artifact (package) to QA (Tomcat) for testing
- Deploy the artifact created in Maven at /home/ubuntu/.jenkins/workspace/star_job1/webapp/target/webapp.war to QA server (Tomcat installed).
- Required plugin "deploy to container" in jenkins:
- Go to jenkins\manage jenkins\plugins\available plugin\ search deploy to container, select and install.
- Configure the job and select post Build Actions: select Deploy war/ear to a container.
- Enter **/*.war (war file is located in any folder with any name, in project there will ne more than 1 .war files generated, it will search for all .war files)
- Context path: qaenv(can enter any name, ), once it is deployed it can be access using https://publicIP:8080/contextpath (context path is the application name which has been deployed in tomcat server)
- Select where it should deploy?: select Tomcatxx or JBossxx, Glassfish
- Add credentials of user created in tomcat9(QA-Server): click add credentials and enter username, password, URL= http://Private IP:8080 (Private IP is entered because both Jenkins\Dev-Server & Tomcat9\QA-Server are running on AWS), internal communication can take place.
- Run the job: Build now (succssful)
- To check: https://QA-ServerpublicIP:8080/qaenv (access the application using context path in tomcat9 server in QA-Server)
- code
- code
Step 4: Continuous Testing: Download the testing script and execute in QA server
- On QA-Server artifact has been deployed in Step3, Application is available for testing team to perform test.
- Developers will create a testing script to test application, upload the script to GitHub repository, Download testing script from GitHub as developers uploaded to Github along with source code.
- Download testing script, create a new job and provide Git URL, in earlier job we have already defined git URL for source code to generate artifact. we cannot use two Git URLs in one job.
- Create a job (new item)=star_job2, freestyle
- Sourcecode management: enter testing repository URL:https://github.com/stardistributors/3TierTesting.git
- When you save and run, it will download the scrpting and other files from Git-Hub, but we need this script to be executed along with download.
- Go to add Build Step: select Execute shell and enter command so that it trigger script. (tools like selenium, loadlearner, sonarqube etc), testers will provide the command
- java-jar testing.jar (as it is dummy program, we use echo "testing passed" in execute command instead of java-jar testing.jar)
- save and run the job.
- There is no git is installed on QA server, but we have defined testing repositiry URL, testing script downloaded in Dev-Server and through internal communication it gets transferred to this star_job2.
Step 5: Continuous Delivery:
- Now we have two independent jobs(star_job1 & star_job2), link this two jobs.
- star_job should start after completion of star_job, it should not start manually, call star_job2 in star_job1
- Calling one job to another job: Go to star_job1 -->configure -->Post Build Action --> Build other project: projects to build = star_job2 save and run the job.
- run star_job1: Build Executor Status: star_job1 is running and once it is completed Build Queue will start star_job2.
- star_Job1 is the owner of artifact as it has been generated in job1, to deploy artifact to production in step 5, artifact should give ownership to star_job 2.
- Artifact should be archive(zip)before handover to star_job2, this can be performed in star_job1.
- Required: "copy artifact" plugin --> go to manage jenkins --> plugins --> search copy artifact and then select and install.
- Archive the artifact: go to star_job1 --> configure --> post Build Action --> Archive the artifact, scroll up and enter **/*.war apply and save.
- Now go to star_job2 and pull the archive artifact: configure --> Build --> copy artifact from another job = star_job1 save and apply. go to post Build Action and select Deploy war/ear to a container.
- Important: artifact from development will be archived then copy and pull to star_job 2 and then we deploy to production server. we do not deploy from testing (QS-Server).
- enter **/*.war and context path = prdenv, select tomcat9 and enter credentials of produciton then apply and save
- Run the job: Build now
- To check: https://prdpublicIP:8080/prdenv (this will be accesses by users).
- "Hello World"
Job(item) Configuration
General:
- Description:
Discard Old Builds:
- Avanced
Quiet Period:
- Avanced
- code
- Description:
Source Code Management:Here we define where is the source code available?
- Public Repository URL: www.github.com\repository (copy url of repository from GitHub and paste it here, if repository is public then credentials are not required)
- credentials: Enter crendials if repository is private
- code
Build Triggers: Schedule trigger. After making any changes in the code, define how build execute start automatically/manually. You can use option (Poll SCM & Git-Hub Hook) only when git-hub account is integrate with jenkins
- Manual: we define git-hub url path to pull source code and run build manually.
- In the manual process we click build now and it execute.
- click down arrow next to job and select build now (it will start build).
- click on job and in build history there will be number generated #1 (if it is green then it has successfully triggered)
- click on number and click console output for more details about build.
- Triggers build remotely: We can trigger build remotely from anywhere.
- click on job (job_star_java) and go to Build Trigger and select Triggers build remotely, enter a token, a url will be generated with token.
- Build after other job is built: we use this option for any dependent job need to be finished first and run this build.
- Build Periodically:(* * * * *) We can schedule job to run every particular time, no matter if there is any new commits in git hub or not but it runs periodically.
- select this option from Build trigger and define schedule of the trigger.
- click on ? to get more details about how to define. Build will run every defined time continuously.
- Poll SCM: It is similar to build periodically but it checks for new commits in git hub periodically and run if there is a new commit.
- select this option from Build Trigger and define schedule. Build will run every defined time and it starts build if there is any new commit.
- Git-Hub Hook Trigger for Git SCM Polling: It runs only when developers push new commits in git-hu not periodically time to time.
- select this option from Build Trigger. once developer commit then it will start the build immediately.
- Day/Night Build: Day build is scheduled for small builds like unit testing or it takes shorter time while night build is schedule in night time for big process like system testing, deployment etc
- Manual: we define git-hub url path to pull source code and run build manually.
Build Environment:
- Delete workspace before build starts: Before it start the build it delete the workspace, it clone again, generally it is called full build.
- User secret text(s) or file(s):
- Terminate the build if it's stuck: If it stuck more than the defined time then it will abort the job.
- Timeout Strategy: choose one from the following
- Abdolute:
- deadline:
- elastic:
- Likely stuck:
- No Activity:
- Time out minutes: enter numbere
- Time out Variable: set a build timeout environment variable
- Time out actions:
- Abort the Build
- Fail the Build
- Writing the Build Description
- Timeout Strategy: choose one from the following
- Add timestamps to the Console Output:
- Inspect build log for published build scans:
- With Ant:
Build Steps: To generate Artifact(package) from source code: Add Build steps: The following tools can be used to build artifact.
- Execute Windows Batch command: Run windows batch file in which define commands which you want to be executed in server.
- Execute shell: Define commands which you want to be executed in server. (mvn compile, mvn test, mvn package, mvn install, mvn deploy, mvn clean)
- Invoke Ant:
- Invoke top-level Maven Targets: Maven command will be executed.
- compile: it will compile the source code
- test: compile the code and test the code. (if you define command mvn test then first it will compile and then run test).
- package: test the code and create package.
- install:
- deploy:
- clean: the extra folder which was created (target) will be removed.
- Run with Timeout
- Set Build Status to "Pending" on Github account.
- code
Post Build Actions: After successfully generated the artifact, it now need to deploy to QA or testing server for testing.
- Aggregate downstream test restults:
- Archive the artifacts:
- Show where the artifact has been created.
- Chck the location: target/*.jar
- Build other Projects:
- Publish JUnit test result report:
- test report XMLs: enter location of test result = target/surefire-reports/*.xml
- Test output retention:
- Record fingerprints of files to track usage:
- Git Publisher:
- Deploy war/ear to a container:
- Enter **/*.war (war file is located in any folder with any name, in project there will ne more than 1 .war files generated, it will search for all .war files)
- Context path: qaenv(can enter any name, )
- Select where it should deploy?: select Tomcatxx or JBossxx, Glassfish
- Add credentials of user created in tomcat9(QA-Server): click add credentials and enter username, password, URL= http://Private IP:8080 (Private IP is entered because both Jenkins\Dev-Server & Tomcat9\QA-Server are running on AWS), internal communication can take place
- E-mail Notification:
- Set GitHub commit statu(universal):
- Set build status on GitHub commit (deprecated):
- Delete workspace when build is done:
- code
- code
- code
Job/Project configuration
Freestyle Project
- Click item+, enter project name (Hello-World), select free style and ok.
- a folder with the job/item name is created at /var/lib/jenkins/jobs/jobname, builds & config.xml file is also created.
- Workspace: When you run build a folder (workspace) will be created and job name within.
- /var/lib/jenkins/workspace/jobname (if files does not show, switch user and switch back again),
- Jenkins interface go to --> job-->workspace/jobname
- clone from GitHub, it will clone in workspace/jobname/
- Source management: enter GitHub url and run build so it will clone the files in workspace
- Build Steps: give command and run build. Build will perform the action which is defined as command.
- code
- Click item+, enter project name (Hello-World), select free style and ok.
Build package through maven.
- Install maven, you can define maven installation command and execute build.
- Make sure you have define jenkins user required permission.
- To build you can enter command mvn package.
- To check where the package has been created, click on job-->workspace-->target-->xxx.war or xxx.jar etc..
- code
code
- code
- code
- code
code
- code
- code
- code
code
- code
- code
- code
code
- code
- code
- code
code
- code
- code
- code
Master/Node or Distributed System Environment:
Requirement
- When a build is executed, it goes to Build Queue and it schedule the job on Build Executor where it provide a number #x and run build, there are 2 Build executors by default.
- Master node environment is used for distribution purpose, if you want to distribute load or run the job on different machine which is running different O/S or tools.
- Requirement:
- Jenkins will be installed on master machine and on slaves install same version of jdk as of master. #sudo apt install openjdk-17-jdk
- create passworless ssh communication
Master Jenkins
- Jenkins Service will be running.
- Jenkins Home directory will be present.
- Communicates with Jenkins Agents using SSH/TCP (jnlp)
- Install JDK:
- Method 1: run the java command and it shows the following message
- #java (command 'java' not found, but can be installed with: apt install openjdk-17-jre-headless (select required version))
- Install JAVA: paste the link # sudo apt install openjdk-17-jre-headless
-
The JRE is the Java Runtime Environment. It is a package of everything necessary to run a compiled Java program, including the Java Virtual Machine (JVM), the Java Class Library, the
javacommand, and other infrastructure. However, it cannot be used to create new programs.The JDK is the Java Development Kit, the full-featured SDK for Java. It has everything the JRE has, but also the compiler (
javac) and tools (likejavadocandjdb). It is capable of creating and compiling programs.Usually, if you only care about running Java programs on computer you will only install the JRE. It's all you need. On the other hand, if you are planning to do some Java programming, you need to install the JDK instead.
Sometimes, even if you are not planning to do any Java development on a computer, you still need the JDK installed. For example, if you are deploying a web application with JSP, you are technically just running Java programs inside the application server. Why would you need the JDK then? Because the application server will convert JSP into Java servlets and needs to use the JDK to compile the servlets. I am sure that there are more examples.
- Method 2: get root access (sudo su)
- #sudo apt-get update (update apt repository)
- #sudo apt-cache search jdk (search for any particular jdk version)
- #apt-get install openjdk-8-jdk –y or
- #apt install default-jdk (for latest version)
- #java -version (use one hyphen in ubunutu)java -
- #sudo apt-get update (update apt repository)
- Method 1: run the java command and it shows the following message
- Install Jenkins:
- Method 1: Download: In google search jenkis download and click jenkins download and deployment(https://www.jenkins.io/download/), click Ubuntu/Debian and copy the url. (Jenkins Debian Packages)
- #
wget -O /usr/share/keyrings/jenkins-keyring.asc \https://pkg.jenkins.io/debian-stable/jenkins.io-2023.key - #
echo deb [signed-by=/usr/share/keyrings/jenkins-keyring.asc] \ https://pkg.jenkins.io/debian-stable binary/ | sudo tee \ /etc/apt/sources.list.d/jenkins.list > /dev/null - Install Jenkins:
- $sudo apt-get update
- $sudo apt install openjdk-17-jre-headless (install java if it is not installed)
- $apt-get install jenkins
- $sudo systemctl start jenkins
- $ sudo systemctl enable jenkins
- $sudo systemctl status jenkins
- #
- Method 2: In google search jenkis download and click jenkins download and deployment (https://www.jenkins.io/download/), right click on Generic Java Package(.war) and copy link address (https://get.jenkins.io/war-stable/2.426.3/jenkins.war). Generic means it will run on any platform windows, linux, mac etc..
- $ wget https://get.jenkins.io/war-stable/2.426.3/jenkins.war
- run the file $java -jar jenkins.war
- Do not close the window after running the above command, if you close then need to run the command again $java -jar jenkins.war
- Method 1: Download: In google search jenkis download and click jenkins download and deployment(https://www.jenkins.io/download/), click Ubuntu/Debian and copy the url. (Jenkins Debian Packages)
- Login: from master machine to slave
- #ssh ubuntu@private_IP_slave1 (enter password)
- SSH connection established, create passwordless communication.
- #ssh-keygen (it will create public and private keys) /home/ubuntu/.ssh/id)rsa
- copy the pubic key id_rsa.pub #ssh-copy-id ubuntu@privateip_slave1 (it will save in authorized_keys of slave1)
- #ssh ubuntu@privateIP should not ask for password.
- Adding node to Master:
- Manage jenkins> manage nodes> new node> ubuntu-node1, select permanent agent and ok.
- remote root directory: enter path of workspace folder created on slave (/home/jenkins/workspace)
- label - node1-maven
- credentials: add credentials, (enter credentials of user if passworless authentication is not set)
- (save and close)
- to check click arrow next to node and log.
- Launch method: Launch agent via execution of command on the master
- Launch command: ssh ubuntu@privateip_slave java -jar slave.jar (This will run slave.jar on slave machine, which allow/accept jobs to be run on slave ) save it.
- refresh.
- Create a project/item and in General tab select Restrict where this project can run and enter label expression = node1-maven
- run job-->job will run on ubuntu-node1.
Ubuntu Node
- Jenkins Agent will be running.
- Only the builds workspaces scheduled will be available.
- Every Agent should have some labels.
- Create a user (jenkins), enable password authentication.
- #adduser jenkins
- Install JDK:
- #sudo apt-get update
- #sudo apt install openjdk-17-jdk(same version of master jenkins)
- #java -version
- Install Maven:
- #sudo apt-get install maven -y
- Passwordless SSH configuration:
- #whoami (ubuntu)
- #sudo passwd ubunutu (set password)
- #sudo vi /etc/ssh/sshd_config (PasswordAuthentication yes) save and exit.
- #sudo service sshd restart
- #visudo (for passwordless authentication)
- add this line: jenkins ALL=(ALL:ALL) NOPASSWD:ALL (Save and exit)
- Create workspace folder:
- workspace folder will be created in node when build run.
- #mkdir workspace
- #cd workspace
- #pwd (/home/ubuntu/workspace)
- code
- Download jar file.
- #wget http://privateIP_master:8080/jnlpJars/slave.jar (Note: Jars: J is capital, this slave.jar file is present in master jenkins which will be downloaded to slave machine)
- #ls -l
- ubuntu is the owner of the file and got RW permission not execute, give execute permission.
- #chmod 764 slave.jar
- code
- code
windows node
- code
- code
- code
- code
centos node
- code
- code
- code
- code
container node
- code
- code
- code
- code
- code
code
- code
- code
- code
Manage Jenkins
System Configuration
- System
- Jenkins Location
- Serve resource files from another domain
- Global properties
- Pipeline Speed / Durability
- Usage Statistics
- Global Build Time Out
- Develocity Build Scans
- Develocity integration
- Timestamper
- Fingerprints
- Administrative monitors configuration
- Global Build Discarders
- Default notification URL
- GitHub
- GitHub API usage
- GitHub Enterprise Servers
- Global Pipeline Libraries
- Build-timeout Plugin > BuildStep Action
- Git plugin
- Shell
- Extended E-mail Notification
- E-mail Notification
- code
- Tools
- Maven Configuration
- JDK Installation
- Git Installation
- Gradle Installation
- Ant Installation
- Maven Installation
- other plugin
- Plugins
- Updates
- Available Plugins
- Installed Plugins
- Advanced Settings
- Download Progress
- Nodes
- New Node
- Node Monitoring
- Clouds
- Install a plugin
- Docker
- Kubernetes
- Cloud Statistics
- Amazon EC2
- vSphere
- Azure VM Agents
- more
- Install a plugin
- System
Security
- Security
- Authentication
- Security Realm
- Authorization:
- Anyone can do anything:
- Legacy mode:
- Logged-in users can do anything (Default selected, any new users created will have full access admin permissions)
- Matrix based security
- Project based Matrix based security.
- Role based strategy: if it is selected then create roles with required permission and assigned role to users.
- Allow anynymous read access: If checked, this will allow users who are not authenticated to access Jenkins in a read-only mode.
- Markup Formatter
- Agents
- CSRF Protection
- Git Plugin notifyCommit access tokens
- Git Hooks
- Hidden security warnings
- API Token
- SSH Server
- Git Host Key Verification Configuration
- Credentials
- List of credentials stored
- Credential Providers
- Providers
- Types
- Restrictions
- Users
- Create User / modify an existing user: Enter user name, password and email address. By default all newly created users will have full access like admin. To control user permission install plugin.
- User Administration:
- Install Plugin Role Based Authorization Strategy: Permissions are assigned to users through roles.
- Go to manage jenkins --> security --> Authorization: select Role Based Strategy (by Default Logged-in users can do anything selected) save it.
- In security Manage and Assign roles option will appear.
- Manage and Assign Roles: By default this option is not visible, after installing role based authorization strategy plugin and change authorization to role based strategy it will appear.
- Manage Roles: 3 types of roles.
- Global Roles: list of roles like Overall, Credentials, Agent, Job, Run, View, Scm with check boxes, select the required check box for the role. first create a role and select required permissions.
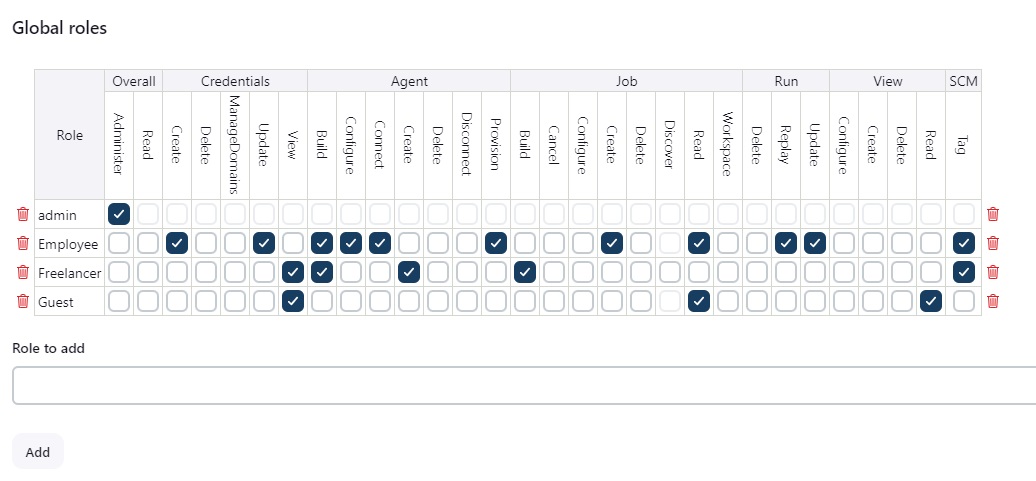
- Employee:
- Freelancer:
- Guest:
- Item Roles:List of item roles, Role to add, Pattern, Permission Template.
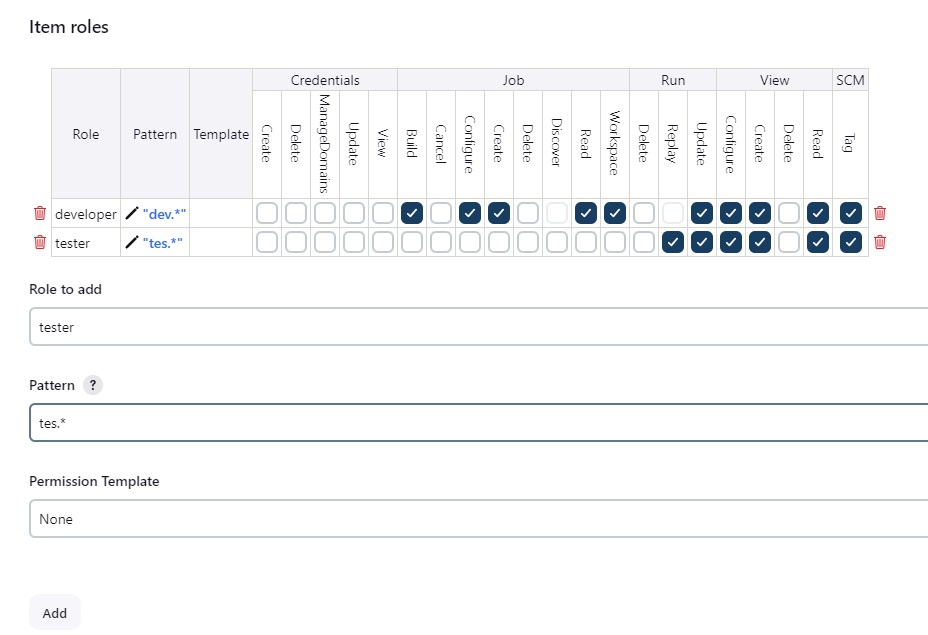
- developer, pattern (dev.* ,developer role can access only those jobs whose name start with dev)
- tester, tes.* , tester role can access only those jobs whose name start with tes)
- Agent Roles: list of roles, Roles to add, Pattern.

- Restart jenkins in order new roles to take effect.
- Assign Roles: add users and assign roles
- Permission Templates:
- Role Strategy Macros:
- Manage Roles: 3 types of roles.
- Security
Status Information
- code
- code
- code
Troubleshooting
- code
- code
- code
Tools & Actions
- code
- code
- code
code
- code
- code
- code
code
- code
- code
- code
Plugins:
Deploy to Container: This plugin is required when artifact need to deploy to QA-Server for testing.
- Go to jenkins\manage jenkins\plugins\available plugin\ search deploy to container, select and install.
- Plugins are extra functionality in jenkins, there are online and offline plugins.
- offline plugins can be uploaded by using manage jenkins-->plugins-->advanced.
- Location of plugins installed: /var/lib/jenkins
Copy Artifact: This plugin is required when Artifact need to deploy to Production Server, Artifact is generated in Dev-Server which first need to copy into Production before deploy.
- Manage Jenkins --> plugins --> search copy artifact and then select and install.
- code
Maven Integraion: This plugin is required to integrate maven with jenkins.
- Manage Jenkins-->Plugins --> Available Plugins --> search maven integration, select and install.
- Configure: Manage Jenkins --> tools -->maven --> add maven, name=maven, uncheck install automatically, MAVEN_HOME=/opt/maven (path of maven)
- code
Configure JAVA plugin
- Manage Jenkins --> tools -->jdk --> add jdk, name = jdk17, JAVA_HOME=/usr/lib/jvm/java-17-amazon-corretto.x86_64 (path of java)
- code
- code
Configure GitHub plugin
- Manage Jenkins-->Plugins --> Installed Plugins --> search github and disable Github branch source plugin, enable Github Plugin. click restart once no job is running. restart.
- code
- code
Plugin for Backup jenkins job
- code
- code
- code
code
- code
- code
- code
Projects:
3 Tier (DEV, QA, PROD) model to run CI/CD process
- Check details above in CI/CD Process Steps:
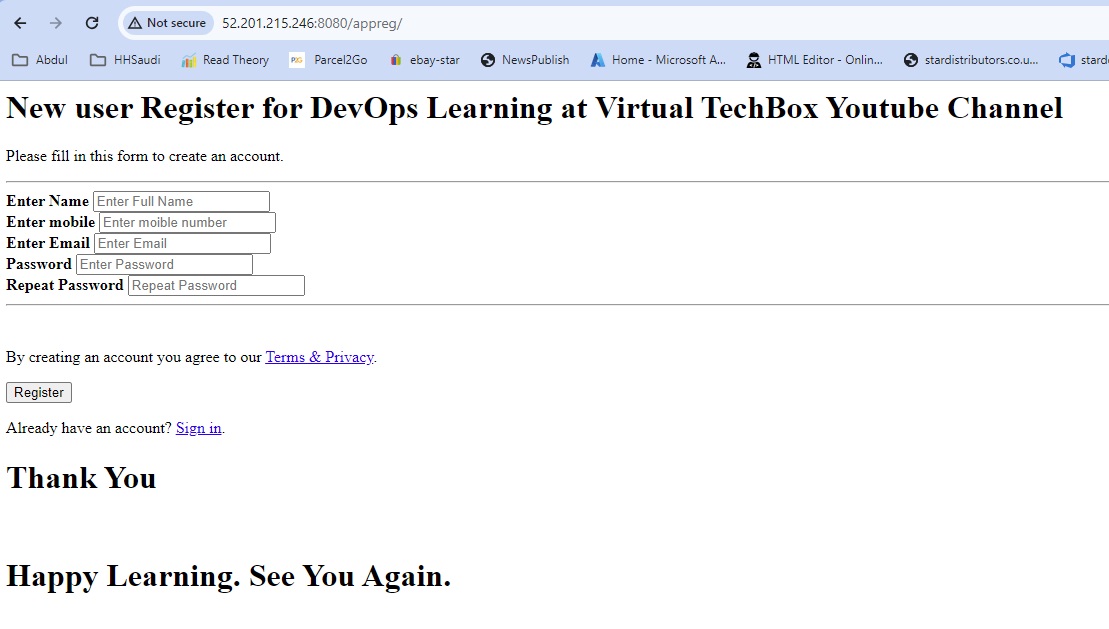
2 Tier Architecture App Registration: Git->Maven->Jenkins->Tomcat
- image
Infrastructure: Create 2 amazon linux servers (AWS-Dev-Server & AWS-Prd-Server) and install the following:
- Upate:
- $sudo su (switch to root user)
- #cd ~ (change directory to home)
- #yum update -y
- Install epel:
- #amazon-linux-extras install epel (insall epel for AWS linux)
- Install open JDK 17:
- Setup yum repository: #sudo amazon-linux-extras enable corretto8
- Install jdk 17: #sudo yum install java-17-amazon-corretto-devel -y
- #java -version
- Set JAVA Environment Variable.
- Method 1:
- In google search jenkis download and click jenkins download and deployment (https://www.jenkins.io/download/), right click on Generic Java Package(.war) and copy link address (https://get.jenkins.io/war-stable/2.426.3/jenkins.war). Generic means it will run on any platform windows, linux, mac etc..
- $ wget https://get.jenkins.io/war-stable/2.426.3/jenkins.war
- run the file $java -jar jenkins.war
- Do not close the window after running the above command, if you close then need to run the command again $java -jar jenkins.war
- In google search jenkis download and click jenkins download and deployment (https://www.jenkins.io/download/), right click on Generic Java Package(.war) and copy link address (https://get.jenkins.io/war-stable/2.426.3/jenkins.war). Generic means it will run on any platform windows, linux, mac etc..
- Method 2:
- Download Jenkins: Go to jenkins.io/download and select Redhat/Fedora/Alma/Rocky/Centos and copy
- #sudo wget -O /etc/yum.repos.d/jenkins.repo https://pkg.jenkins.io/redhat-stable/jenkins.repo
- #sudo rpm --import https://pkg.jenkins.io/redhat-stable/jenkins.io-2023.key
- #sudo yum upgrade
- Install Jenkins:
- #yum install jenkins -y
- #sudo systemctl enable jenkins (Created symlink from /etc/systemd/system/multi-user.target.wants/jenkins.service to /usr/lib/systemd/system/jenkins.service.) It enable jenkins service to start at every boot.
- #sudo systemctl start jenkins (it will start jenkins service)
- #java --version
- #javac --version
- #systemctl status jenkins
- #hostname AWS-Dev-Server
- #cd /etc
- #vi hostname (remove line and paste AWS-DEV-Server) save it.
- #init 6 (restart the system so that changes take effect) server will reboot and changes will effect.
- Access jenkins with https://publicIP:8080 and follow the procedure to change password.
- Shutdown Jenkins Server: restart jenkins after it has been shutdown.
- [ec2-user@AWS-Dev-Server ~]$ sudo systemctl enable jenkins
[ec2-user@AWS-Dev-Server ~]$ sudo systemctl start jenkins
[ec2-user@AWS-Dev-Server ~]$ systemctl status jenkins
- [ec2-user@AWS-Dev-Server ~]$ sudo systemctl enable jenkins
- Download Jenkins: Go to jenkins.io/download and select Redhat/Fedora/Alma/Rocky/Centos and copy
- Install Maven:
- Go to https://https://maven.apache.org/download.cgi -->Binary tar.gz archive and right click on link and copy address link.
- $sudo su
- #cd ~
- #cd /opt
- #wget https://dlcdn.apache.org/maven/maven-3/3.9.6/binaries/apache-maven-3.9.6-bin.tar.gz
- #tar -xzvf apache-maven-3.9.6-bin.tar.gz (files will be extracted here, move to a maven folder for easy understanding)
- #mv apache-maven-3.9.6 maven
- #cd /maven/bin
- #./mvn -v (it will show maven version) to run mvn from anywhere, set the Environment Variable of maven.
- Set Environment Varibale Maven:
- Go to root home directory #cd ~
- # ll -a (list of files including hidden)
- #vi .bash_profile
- below fi enter the following:
- M2_HOME=/opt/maven
- M2=/opt/maven/bin
- JAVA_HOME=/usr/lib/jvm/java-17-amazon-corretto.x86_64
- PATH=$PATH:$HOME/bin:$JAVA_HOME:$M2_HOME:$M2
- export PATH (save and exit)
- #echo $PATH (if it does not show path for maven and java)
- #source .bash_profile
- #echo $PATH (/sbin:/bin:/usr/sbin:/usr/bin:/root/bin:/usr/lib/jvm/java-17-amazon-corretto.x86_64:/opt/maven:/opt/maven/bin)
- To get java path: 'find / -name java-17* (it will give the path of java installed: /usr/lib/jvm/java-17-amazon-corretto.x86_64), now mvn command can run from anywhere
- Maven Plugin: Intall maven plugin in jenkins and configure:
- Install: Manage Jenkins-->Plugins --> Available Plugins --> search maven integration, select and install.
- Configure JDK: Manage Jenkins --> tools -->jdk --> add jdk, name = jdk17, JAVA_HOME=/usr/lib/jvm/java-17-amazon-corretto.x86_64
- Configure Maven: Manage Jenkins --> tools -->maven --> add maven, name=maven, uncheck install automatically, MAVEN_HOME=/opt/maven
- apply and save.
- Github Plugin: Manage Jenkins-->Plugins --> Installed Plugins --> search github and disable Github branch source plugin, enable Github Plugin. click restart once no job is running.
- Install Git:
- #yum install git
- Install Tomcat9 on second server (Prd-Server)
- $sudo su
- #cd ~
- #yum update -y
- Install JAVA
- Setup yum repository: #sudo amazon-linux-extras enable corretto8
- Install jdk 17: #sudo yum install java-17-amazon-corretto-devel -y
- #java -version
- Install tomcat9:
- Go to https://tomcat.apache.org/download-90.cgi
- Binary Distribution right click on tar.gz and copy link.
- #cd /opt
- #sudo wget https://dlcdn.apache.org/tomcat/tomcat-9/v9.0.86/bin/apache-tomcat-9.0.86.tar.gz
- #tar -xzcf apache-tomcat-9.0.86.tar.gz
- #mv apache-tomcat-9.0.86 tomcat (move extracted files to tomcat folder)
- #cd tomcat
- #cd /bin
- #./startup.sh (it will start the tomcat services) tomcat started.
- To acess: https://publicIP:8080
- Error: Access denied, or user login failed.
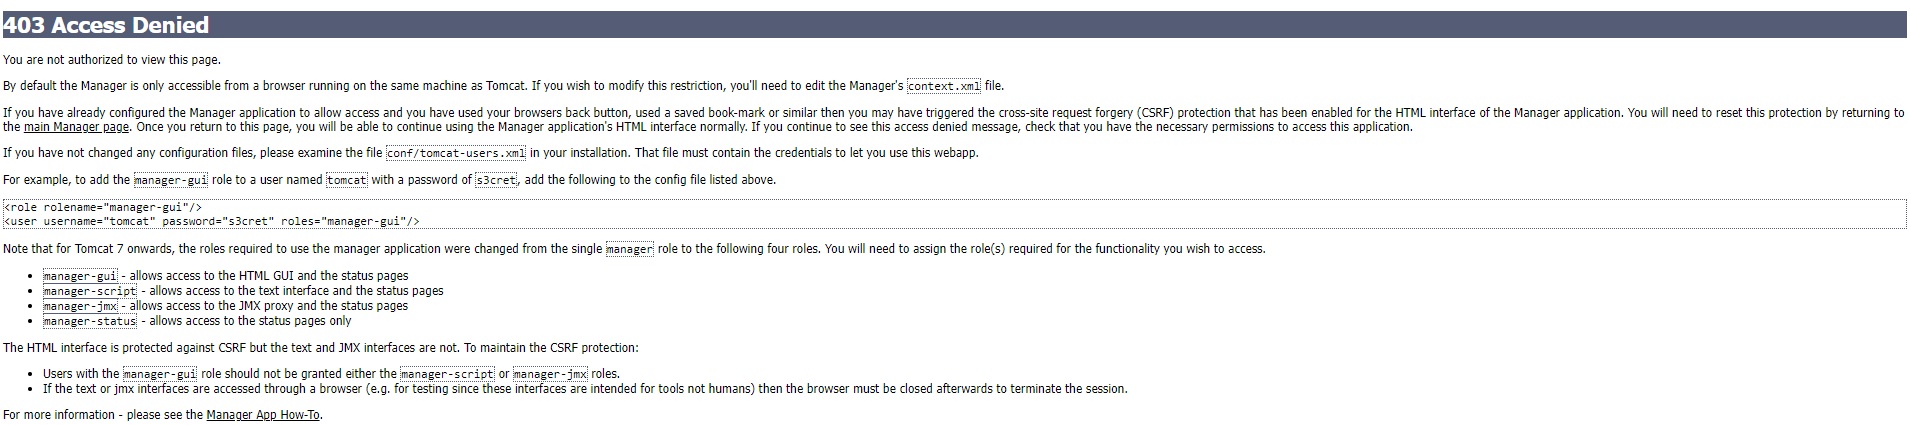
- Access denied: By default the manager is only accessible from browser running on the same machine as tomcat. To modify this restriction edit the manager's conext.xml file and comment a seciton.
- Edit the file #vi /opt/apache-tomcat-9.0.65/webapps/manager/META-INF/context.xml and comment
- <!-- Valve className="org.apache.catalina.valves.RemoteAddrValve"
allow="127\.\d+\.\d+\.\d+|::1|0:0:0:0:0:0:0:1" /> -->
- <!-- Valve className="org.apache.catalina.valves.RemoteAddrValve"
- edit the file #vi /opt/apache-tomcat-9.0.65/webapps/host-manager/META-INF/context.xml and comment
- <!-- Valve className="org.apache.catalina.valves.RemoteAddrValve"
allow="127\.\d+\.\d+\.\d+|::1|0:0:0:0:0:0:0:1" /> -->
- <!-- Valve className="org.apache.catalina.valves.RemoteAddrValve"
- root@abdul-ubuntu1:/opt/apache-tomcat-9.0.65/bin#./shutdown.sh
- root@abdul-ubuntu1:/opt/apache-tomcat-9.0.65/bin#./startup.sh
- or Link two files startup and shutdown files:
- #sudo ln -s /opt/apache-tomcat-9.0.65/bin/startup.sh /usr/bin/startTomcat
- #sudo ln -s /opt/apache-tomcat-9.0.65/bin/shutdown.sh /usr/bin/stopTomcat
- Add user:
- edit file tomcat-users.xml #vi tomcat-users.xml or #nano tomcat-users.xml
- add this line before </user-name> <user username="admin" password="Trustu786" roles="admin-gui, manager-gui, manager-script"/> save and exit (:wq!)
- Shutdown and Restart Tomcat Server: After shutdown and restart the tomcat server, need to start the tomcat.
- #cd /bin
- #./startup.sh (it will start the tomcat services) tomcat started.
- Upate:
Step 1 Step 2 Continuous Download / Continuous Build:
- create a job (app-reg-build), select maven project and ok (if maven project is not visible then install plugin maven integration)
- Source Code Management: enter GitHub repository =https://github.com/stardistributors/register-app.git
- Build Triggers= Build whenever a spanshot dependecy is built = select
- Build: root POM = pom.xml, Goals & Options = clean install
- run regardless of build result= select
- Run Build now.
- It downloads all the dependencies of 0hte build, buil is successafull.
- go to job -->workspace --> webapp --> target --> webapp.war (artifact build is created)
Step 5: Continuous Deploy to Production:
- Deploy artifact generated in step 1 to Tomcat Server.
- Install Tomcat Plugin:
- Manage Jenkins--> Plugins --> Available Plugin --> Deploy to Container, select and install. (This plugin allows you to deploy a war to a container after a successful build.)
- Add credentials of Tomcat user to jenkins: There are two ways, either you can enter credentials when selecting container in Post Build Action and deploy war to a container. or define in credentials.
- Manage Jenkins --> credentials --> system --> Global credentials -->add credentials -->kind = username with password, scope = (Global, jenkins,node, items, all child items), Enter username and password of tomcat9,
- Create a job: name = DeployBuildToTomcat, select maven project.
- Source code Management: select git and enter url =https://github.com/stardistributors/register-app.git
- Build: Root POM= pom.xml, Goals & Options=clean install
- Post Build Action = Deploy war to a container: war/ear files = **/*.war, context path=appreg(any name which can be used to access in tomcat), container= select tomcat9 with credentials, tomcat url = http://publicIP:8080 apply and save
- run Build now. (close any tomcat page opened)
- open browser http://publicIP:8080/appreg
Step 3: No Deploy to QA-Server
- code
- code
- code
- code
Step 4: No Testing at QA-Server
- code
- code
- code
- code
Step 6: Make changes in the code and Build should trigger immediately upon commit.
- Automate Build and Deploy to Production using POLL SCM (build trigger).
- Configure job (deploy build to tomcat) --> Build Trigger --> select POLL SCM and enter * * * * * (it means trigger will take place periodically every MINUTE HOUR DOM MONTH DOW), it checks for new commits in git hub periodically and run if there is a new commit.
- You can make changes in developer computer(local) and commit to central repository and then push to GitHub or make changes directly in GitHub adn commit.
- Login to Github -->repository:register-app -->webapp -->src/main/webapp --> open index.jsp, edit and make any changes. click commit changes.
- check in jenkins job will start.
- code
Unit testing in maven:
- image
Infrastructure:
- create 1 or 2 VM
- install jenkins, java, maven and tomcat
- code
- code
- code
Step 1:
- Jenkins: create a project (springpet-testing), freestyle.
- Source code Management: git = https://github.com/stardistributors/spring-petclinic.git
- Build Steps:Build can be executed with the following any method.
- Select Executing shell and enter command: mvn package
- select invoke top level maven targets: package
- execute build now.
- code
Step 2:Location of test results stored.
- When you define package in build, it perform compile-->testing-->build package (war/jar file)
- Once you executed build then a folder workspace is created and inside a folder with project name is also created.
- To check the test results performed in build step, go to workspace/project_name/target/surefire-reports (all test results in .xml files)
- code
Step 3: Show test results using post build actions:
- In post build action, select Publish jUnit test result report.
- test report XMLs: enter location of test result = target/surefire-reports/*.xml
- Test output retention:
- execute build: On dashboard/project a file will appear latest test result: browse for all test results.
- code
- In post build action, select Publish jUnit test result report.
Step 4: Show artifact, archiving the artifact, package build in step 2 (jar/war):
- Post Build Action: select Archive the artifacts
- Enter the location: target/*.jar (spring-petclinic-3.2.0-SNAPSHOT.jar)
- Execute build: check the project main page and click on last successful artifact.
- code
- Post Build Action: select Archive the artifacts
Step 5:
- code
- code
- code
- code
Upstream & Dowstream:
- image
Infrastructure:
- code
- code
- code
- code
Step 1: upstream: calling another project, downstream : the project which is called.
- code
- code
- code
- code
Step 2:
- code
- code
- code
- code
Step 3:
- code
- code
- code
- code
Step 4:
- code
- code
- code
- code
Step 5:
- code
- code
- code
- code
New Project:
- image
Infrastructure:
- code
- code
- code
- code
Step 1:
- code
- code
- code
- code
Step 2:
- code
- code
- code
- code
Step 3:
- code
- code
- code
- code
Step 4:
- code
- code
- code
- code
Step 5:
- code
- code
- code
- code
New Project:
- image
Infrastructure:
- code
- code
- code
- code
Step 1:
- code
- code
- code
- code
Step 2:
- code
- code
- code
- code
Step 3:
- code
- code
- code
- code
Step 4:
- code
- code
- code
- code
Step 5:
- code
- code
- code
- code
New Project:
- image
Infrastructure:
- code
- code
- code
- code
Step 1:
- code
- code
- code
- code
Step 2:
- code
- code
- code
- code
Step 3:
- code
- code
- code
- code
Step 4:
- code
- code
- code
- code
Step 5:
- code
- code
- code
- code
New Topic
Unit Testing
- Perform the test on a smaller unit of a program manually, usually it is performed by developers.
- For any testing developers provide script for testing, this script run through command in maven.
- testing tools will be installed in jenkins system to test.
- In maven when you defin package, it calls compile then testing then package.
- In maven src folder contain main and testing folder, maven perform the unit testing.
- mvn test (when you perform mvn package, it perform testing and packaging, but with mvn test it perform testing of code).
- go to Target/surefire-reports and there will be .xml files is the result of testing.
- Harness tools: These are the unit testing tool in various language.
- Junit in java
- pytest in pathon
- nunit/msunit in .NET (microsoft)
- jasmine in javascript/angular js
- mocka in nodesJS
- code
- code
Functional/System/ Selenium Test
- perform system test which is done by testers.
- Web based application: selenium, QTP
- API based application: soap ui, postman
- Mobile Apps: Appium
- code
xxxSNAPSHOTxxxxxx
- This is visible in java/maven projects.
- It means the project is in development stage not in release stage.
- xxx.jar/war is not a release build, it is a daily or weekly build in the project.
- code
Performance Testing
- Testing tools: JMeter, Load Running
- code
- code
code
- code
- code
- code
code
- code
- code
- code
code
- code
- code
- code
- code
- code
- code
- code
- code
- code
- code
- code
- code
- code
- code
- code
- code
- code
- code
- code
- code
- code
- code
- code
- code
- code
- code
- code
- code
- code
- code
- code
- code
- code
- code
- code
- code
- code
- code
- code
- code
- code
- code
- code
- code
- code
- code
- code
- code
- code
- code
- code
- code
- code
- code
- code
- code
- code
- code
- code
- code
- code
- code
- code
- code
- code
- code
- code
- code
- code
- code
- code
- code
- code
- code
- code
- code
- code
- code
- code
- code
- code
- code
- code
- code
- code
- code
- code
- code
- code
- code
- code
- code
- code
- code
- code
- code
- code
- code
- code
- code
- code
- code
- code
- code
- code
- code
- code
- code
- code
- code
- code
- code
- code
- code
- code
- code
- code
- code
- code
- code
- code
- code
- code
- code
- code
- code
- code
- code
- code
- code
- code
- code
- code
- code
- code
- code
- code
- code
- code
- code
- code
- code
- code
- code
- code
- code
- code
- code
- code
- code
- code
- code
- code


