Intro
- Docker is an open source containerization tool, that lets you run your application in an isolated environment called containers.
- Containers included:
- code
- Configs
- Runtime: containerd, CRI-O
- Environment
- Libraries
- Docker install on top of O/S, images of the applications are created with the help of Dockerfile and applications willl be deployed on containers using these images. This images have all required softwares & tools as a package.
- Challenges with Traditional Software Deployment Approaches.
- Before Docker, the software lifecycle involved several manual and error-prone processes:
- 1. Development:
- Developers manually installed required software and dependencies on their machines.
- Teams wrote lengthy setup instructions to replicate environments for development, testing, and production.
- 2. Testing:
- Test environments were manually configured to resemble production systems, but differences in configuration often caused problems.
- Even minor inconsistencies led to bugs that only appeared in production, making testing unreliable.
- 3. Deployment:
- Applications were packaged into .tar.gz files or .zip archives.
- Scripts or manual processes were used to copy files, install dependencies, and configure services—leading to human errors and delays.
- Challenges with Traditional apprach:
- Different operating systems, libraries, and configurations across environments lead to inconsistencies.
- Example: Development uses Python 3.4, but production runs Python 3.1, causing compatibility issues.
- Running multiple Virtual Machines (VMs) for different applications increases overhead.
- Hosting multiple applications on a single VM leads to resource contention.
- Manual configurations across development, testing, and production environments introduce human errors.
- Each environment may require different settings, leading to deployment failures.
- Applications running on the same VM can conflict due to shared dependencies, ports, or configurations.
- Example: Two applications requiring different versions of the same library can lead to unexpected failures.
- Solution? → Docker Containers
- How docker works? workflow with docker:
- Docker Images: The blueprints for containers, including code and dependencies.
- Docker Containers: The runnable instances created from images.
- Docker Registries: Storage locations for Docker images, such as Docker Hub.
- Docker Engine: The core component that powers Docker.
- Example: secretsanta
- The secretsanta is a java based application, to run the this application, it requires the following environment.
- Operating System:
- linux o/s,
- Dependencies:
- jdk
- convert code into artifact:
- Install maven
- Application run on port:
- 8080
- Package: To create package from the code: maven( package to build artifact(.jar))
- Deploy package: run command java-jar secretsanta-0.0.1-SNAPSHOT.jar or to run on different port java -Dserver.port=8999 -jar secretsanta-0.0.1-SNAPSHOT.jar.
- Access application:
- open browser and run http://ip:8080 or http://ip:8999
- Operating System:
- The above application will only run when the above environment is met. It can not run on any other environment.
- If the application need to run on different environemnt like windows machine than it will fail. we need to create a computer or VM with the windows o/s and install all dependencies.
- Docker has provided the solution to run the application on different environemnt using light weight images of o/s and dependencies.
- Docker will create the image using Dockerfile in which define all these requirements/dependecies like o/s, jdk, port and command java-jar app.jar
- Updload this image to docker hub where customer will download and run the image. When it runs it will create a container and install all required dependencies defined in dockerfile while creating image.
- check project section for all the steps.
- The secretsanta is a java based application, to run the this application, it requires the following environment.
- Containers are fast to create and use less hardware resources as it uses light weight applications.
- Application can migrate from one o/s to another o/s by simply copying application. suppose an application (oracle) is installed on windows and want to migrate to my SQL on linux which can be done by simply copying docker container (oracle) to docker mySQL on linux.
- Cgroup (Control group): limit the use of resources like cpu, memory utilization in container. In operating system a service called cgroup which control the limitation of utilization of resources at kernel level.
- Container runtime: it is a plugin who manages or control the container. commands through CLI interacts with runtime.
- dockerd
- containerd
- cri-o
Docker Installation: Docker Engine & Docker Desktop: it comes in 2 flavours, community edition (free) & enterprise edition (paid).
Docker Engine on Ubuntu / CentOS RHEL
- Method 1: Docker engine installation: Create a Ubuntu VM
- Check ubuntu version:
- $lsb_release -a
- Check if docker is installed:
- $docker --version (specific version display)
- $docker version (detailed version display)
- $docker info (full detailed version display)
- Root Access: Docker commands run with root privileges: Get root access
- $sudo su - (root user access)
- $whoami (root)
- $apt install docker.io (Install docker from docker repository)
- Error: E: Package 'docker.io' has no installation candidate: ubuntu package was not updated.
- $apt-get update
- $sudo apt install docker.io
- Run hello-world to check docker installation:
- $docker pull hello-world (only root user can access docker, assign permission to user)

- When you install docker a group is created with the name docker, whoever added to this group can run the docker commands, by default root user is added.
- When you create a user a group is also created with the same name of user, this group is primary group to this user. you can add additional group to this user
- Add user (abdul) to docker group:
- $sudo usermod -aG docker abdul (-a is used to assign as a secondary group, -A is use for primary group, G is used for group, docker is group, abdul is user), log off and log on. or run $newgrp docker (it will add user to docker)
- $sudo reboot or $newgrp docker
- sudo chmod 666 /var/run/docker.sock
- Start docker Service:
- $systemctl start docker or
- $sudo service docker start
- $systemctl enable docker
- $docker info
- Check docker status:
- $sudo docker service status
- Check ubuntu version:
- Method 2: Docker engine installation through script:
- Create Ubuntu instance (t2 micro)
- $sudo su - (root user access)
- $curl -fsSL https://get.docker.com -o get-docker.sh
- $ls
- $sh get-docker.sh
- $docker --version
- Check docker status:
- $sudo docker service status
- Create Ubuntu instance (t2 micro)
- Method 3: Install Docker from apt Repository
- Install Docker using apt Repository
- Create a ubuntu VM
- Step1: Updating the software Repository: (you can switch to root user and perform the installation)
- $sudo apt-get update
- Step 2: Download Dependencies:
- Allow your Ubuntu 20.04 system to access the Docker repositories over HTTPS by running.
- $sudo apt-get install apt-transport-https ca-certificates curl software-properties-common
- The above-mentioned command:
- Gives the package manager permission to transfer files and data over https.
- Allows the system to check security certificates.
- Installs curl, a a tool for transferring data.
- Adds scripts for managing software.
-
Step 3: Add Docker's official GPG key:
$sudo install -m 0755 -d /etc/apt/keyrings
$sudo curl -fsSL https://download.docker.com/linux/ubuntu/gpg -o /etc/apt/keyrings/docker.asc
$sudo chmod a+r /etc/apt/keyrings/docker.asc# Add the repository to Apt sources:
$echo \
"deb [arch=$(dpkg --print-architecture) signed-by=/etc/apt/keyrings/docker.asc] https://download.docker.com/linux/ubuntu \
$(. /etc/os-release && echo "${UBUNTU_CODENAME:-$VERSION_CODENAME}") stable" | \
$sudo tee /etc/apt/sources.list.d/docker.list > /dev/null
$sudo apt-get update - Step 4: Installing the Docker Repository: (docker -ce = docker community edition)
- $sudo apt-get install docker-ce docker-ce-cli containerd.io docker-buildx-plugin docker-compose-plugin
- Step 5: Enable Docker Service:
- $sudo systemctl start docker
- $sudo systemctl enable docker
- $sudo systemctl status docker
- Step 6: Verify that the installation is successful by running the
hello-worldimage:- $docker --version
- $docker version (detailed)
- $docker info (detailed)
- #sudo docker run hello-world
- Add user permission to execute docker comamnd (it is a normal user):
- $sudo usermod -aG docker username
- $newgrp docker (changes take affect immediately or restart machine)
- $sudo chmod 666 /var/run/docker.sock
- Check docker status:
- $systemctl status docker
- Removing Docker:
- $sudo apt-get remove docker docker-engine docker.io
- Installing Docker from Default Repositories:
- Step1: Updating the local repository:
- $sudo apt update
- Step2: Installing Docker
- $sudo apt install docker.io
- Step3: Check Docker Installation
- $docker --version
- $docker version
- $docker info
- Check docker status:
- $sudo docker service status
- Add user permission to execute docker comamnd (it is a normal user):
- $sudo usermod -aG docker username
- $newgrp docker (changes take affect immediately or restart machine)
- sudo chmod 666 /var/run/docker.sock
- Step1: Updating the local repository:
- Docker Engine Installation on CentOS:
- $docker --version
- $sudo yum check-update
- $yum install docker* -y
- $systemctl start docker
- $systemctl enable docker
- $docker info
- Check docker status:
- $sudo docker service status
- Location where docker is installed:
- $root@docker:~# docker info | grep -i root
Docker Root Dir: /var/lib/docker
- $root@docker:~# docker info | grep -i root
- Method 1: Docker engine installation: Create a Ubuntu VM
Docker Desktop on Windows / Mac & Linux
- https://docs.docker.com/docker-for-windows/install/
- Once docker is installed it activates hyper-v and you cannot run another hypervisor.
- Once it is installed use powershell to run docker commands
- Windows:
- Download Docker Desktop Installer .exe (https://docs.docker.com/docker-for-windows/install/)
- Run Docker Desktop Installer.exe
- Default path C:\Program Files\Docker\Docker
- If your administrator account is different to your user account, you must add the user to the docker-users group:
- Run Computer Management as an administrator.
- Navigate to Local Users and Groups > Groups > docker-users.
- Right-click to add the user to the group.
- Sign out and sign back in for the changes to take effect.
- Install from Command Line:
- "Docker Desktop Installer.exe" install
- If you’re using PowerShell you should run it as:
- Start-Process 'Docker Desktop Installer.exe' -Wait install
- If using the Windows Command Prompt:
- start /w "" "Docker Desktop Installer.exe" install
- WSL:
- ubuntu:
- Install Docker Desktop on Ubuntu.
- Download DEB package.
- Install gnome terminal:
- $sudo apt install gnome-terminal
- Uninstall the tech preview or beta version of Docker Desktop for linux:
- $sudo apt remove docker-desktop
- Install the package using apt repository:
- $sudo apt-get update
- Change the directory to Download as DEB package is there.
- $cd Download
- root@master:/home/abdul/Downloads# sudo apt-get install ./docker-desktop-amd64.deb
- By default, Docker Desktop is installed at /opt/docker-desktop
- Launch Docker Desktop.
- Navigate to the Docker Desktop application in your Gnome/KDE Desktop. (click show all application and look docker desktop and click)
- docker_desktop1.jpg
- Select Docker Desktop to start Docker. The Docker Subscription Service Agreement displays.
- Select Accept to continue. Docker Desktop starts after you accept the terms.
- Note that Docker Desktop won't run if you do not agree to the terms. You can choose to accept the terms at a later date by opening Docker Desktop.
- Navigate to the Docker Desktop application in your Gnome/KDE Desktop. (click show all application and look docker desktop and click)
- Alternatively, open a terminal and run:
- $systemctl --user start docker-desktop
- Docker Desktop Removal:
- Ubuntu:
- $sudo apt remove docker-desktop
- This removes the Docker Desktop package itself but doesn’t delete all of its files or settings.
- Manually remove leftover file.
- $rm -r $HOME/.docker/desktop
- $sudo rm /usr/local/bin/com.docker.cli
- $sudo apt purge docker-desktop
- This removes configuration and data files at $HOME/.docker/desktop, the symlink at /usr/local/bin/com.docker.cli, and purges the remaining systemd service files.
- Windows:
- From GUI:
- From the Windows Start menu, select Settings > Apps > Apps & features.
- Select Docker Desktop from the Apps & features list and then select Uninstall.
- Select Uninstall to confirm your selection.
- From the CLI:
- Locate the installer C:\Program Files\Docker\Docker\Docker Desktop Installer.exe
- Uninstall Docker Desktop:
- in powershell: $Start-Process 'Docker Desktop Installer.exe' -Wait uninstall
- In the command prompt: start /w "" "Docker Desktop Installer.exe" uninstallMac
- After uninstalling Docker Desktop, some residual files may remain which you can remove manually. These are:
- C:\ProgramData\Docker
C:\ProgramData\DockerDesktop
C:\Program Files\Docker
C:\Users\<your user name>\AppData\Local\Docker
C:\Users\<your user name>\AppData\Roaming\Docker
C:\Users\<your user name>\AppData\Roaming\Docker Desktop
C:\Users\<your user name>\.docker
- C:\ProgramData\Docker
- From GUI:
- Debian
- $sudo apt remove docker-desktop
- Manually remove leftover file.
- $rm -r $HOME/.docker/desktop
$sudo rm /usr/local/bin/com.docker.cli
$sudo apt purge docker-desktop
- Mac:
- From the GUI:
- Open Docker Desktop.
- In the top-right corner of the Docker Desktop Dashboard, select the Troubleshoot icon.
- Select Uninstall.
- When prompted, confirm by selecting Uninstall again.
- From the CLI:
- /Applications/Docker.app/Contents/MacOS/uninstall
- After uninstalling Docker Desktop, some residual files may remain which you can remove:
- rm -rf ~/Library/Group\ Containers/group.com.docker
rm -rf ~/.docker
- rm -rf ~/Library/Group\ Containers/group.com.docker
- With Docker Desktop version 4.36 and earlier, the following files may also be left on the file system. You can remove these with administrative privileges:
- /Library/PrivilegedHelperTools/com.docker.vmnetd
/Library/PrivilegedHelperTools/com.docker.socket
- /Library/PrivilegedHelperTools/com.docker.vmnetd
- From the GUI:
- Ubuntu:
- Code
Docker Engine Vs Docker Desktop
- Docker Engine: is the core of Docker. It is a client-server application with these major components:
- A server which is a type of long-running program called a daemon.
- A REST API which specifies interfaces that programs can use to talk to the daemon and instruct it what to do.
- A command line interface (CLI) client.
- Docker Engine takes in commands from the Docker client, and manages Docker objects like images, containers, networks, and volumes. It’s also responsible for building and running Docker containers.
- Docker Desktop: is an application for MacOS and Windows machines for the building and sharing of containerized applications. It includes Docker Engine, Docker CLI client, Docker Compose, and Kubernetes. It provides a graphical user interface (GUI) to work with Docker, which makes it more user-friendly than using the Docker Engine alone. With Docker Desktop, you can easily start, stop, and manage Docker containers, and it comes preconfigured to work with your local system.
- Code
- Docker Engine: is the core of Docker. It is a client-server application with these major components:
Where docker is installed: location of docker
- $root@docker:~# docker info | grep -i root
Docker Root Dir: /var/lib/docker - Code
- $root@docker:~# docker info | grep -i root
User Permission
- In Linux System:
- When you install docker a group is created with the name docker, whoever added to this group can run the docker commands, by default root user is added.
- $cat /etc/group : it will list all groups
- When you create a user a group is also created with the same name of user, this group is primary group to this user. you can add additional group to this user
- $sudo usermod -aG docker abdul (-a is used to assign as a secondary group, -A is use for primary group, G is used for group, docker is group, abdul is user), log off and log on. or run $newgrp docker (it will add user to docker)
- Create a user and set password and PasswordAuthentication set to yes
- Create a group #sudo groupadd docker
- add user to the group #sudo usermod -aG docker username
- or
- $sudo chmod 666 /var/run/docker.sock (all the users of the computer will have access to run docker commands)
- $sudo systemctl restart docker
- In Windows
- If your administrator account is different to your user account, you must add the user to the docker-users group:
- Run Computer Management as an administrator.
- Navigate to Local Users and Groups > Groups > docker-users.
- Right-click to add the user to the group.
- Sign out and sign back in for the changes to take effect.
- If your administrator account is different to your user account, you must add the user to the docker-users group:
- code
- In Linux System:
Troubleshooting
- Got permission denied while trying to connect to the Docker daemon at unix:///var/run/docker.sock. Is the docker daemon running?
- Solution 1:
- Run docker command as "sudo"
- $sudo docker ....
- This allows to run any docker command as administrator. This error comes if you run the command other than root and does not have required permission.
- Add your user to the Docker Group:
- $sudo usermod -aG docker $USER (It gives user permission to file unix:///var/run/docker.sock)
- $newgrp docker (no need to restart)
- Solution 1:
- Failed to start docker.service:
- root@master:~# systemctl start docker
- Failed to start docker.service: Unit docker.service not found.
- $sudo apt-get install docker-ce
- $systemctl start docker
- Control-Plane node status is Not Ready after KinD restart, same IP is assigned to control-plane and worker node,
- $systemctl stop docker
- $systemctl start docker
- $systemctl enable docker
- $init 6 (reboot)
- code
- Got permission denied while trying to connect to the Docker daemon at unix:///var/run/docker.sock. Is the docker daemon running?
Node JS on Ubuntu
- Method 1: Using snap package manager (it will be easy to upgrade/downgrade versions)
- In google search snap nodejs and click the link
- click on install button on top right corner.
- copy the command:
- $sudo snap install node --classic (select version to install and copy the command)
- $sudo snap install node --channel=23/stable --classic
- $node --version
- $npm --version
- To upgrade/downgrade, click drop down button and select version, copy command and run in ubuntu
- Instead of install you type refresh.
- $sudo snap refresh node --channel=21/stable --classic (downgrading to 21)
- $sudo snap refresh node --classic (latest version will install)
- Method 2: go to node js official page: nvm (node version manager)
- click download and select the required version and o/s using nvm
- click copy to clipboard and paste it in ubuntu and install
- Method 1: Using snap package manager (it will be easy to upgrade/downgrade versions)
Commands used in Docker Container, Images, Host, Client, Daemon, volume storage
Container
- Containers can be created using image, and images are created using o/s, dependency, libraries, etc..
- Using the image n number of containers can be created.
- Custom image: After required customization and configuration of container, you can create custom image.
- $docker container --help
- attach Attach local standard input, output, and error streams to a running container
- commit Create a new image from a container's changes
- cp Copy files/folders between a container and the local filesystem
- create Create a new container
- diff Inspect changes to files or directories on a container's filesystem
- exec Execute a command in a running container
- export Export a container's filesystem as a tar archive
- inspect Display detailed information on one or more containers
- kill Kill one or more running containers
- logs Fetch the logs of a container
- ls List running containers
- ls -a List stoped, exit containers
- pause Pause all processes within one or more containers
- port List port mappings or a specific mapping for the container
- prune Remove all stopped containers
- rename Rename a container
- restart Restart one or more containers
- rm Remove one or more containers
- run Create and run a new container from an image
- start Start one or more stopped containers
- stats Display a live stream of container(s) resource usage statistics
- stop Stop one or more running containers
- top Display the running processes of a container
- $docker top container_ID
- unpause Unpause all processes within one or more containers
- update Update configuration of one or more containers
- wait Block until one or more containers stop, then print their exit codes
- Commands
Create Container $docker run -d --name xyz -p 9000:9000 image_name:tag create container using image in detach mode, using port 9000 with define version, two ports defined, first port is container port and second port is host port, container is installed within host docker. options used with run command --name give a name to container -it open interactive terminal in the container -d running container in detached/background mode -e pass an environment variable tag version of image -v attach an external directory or device as a volume --volume-from sharing volumes between containers -rm delete a container on exit -p port mapping , container port with host port, ex -p 8080:80 (8080 is host port) -P capital P, used for automatic port mapping, container port mapped with host port greater than 30000 --link linking of containers ctrl+p, ctrl+q To come out of a running container without exit List Containers $docker container ls or docker ps list of running container $docker container ls -a or ps -a List of all containers including running and stopped container docker container inspect cont_name / cont_id To get detailed information about container Start / Stop restart Container docker container start cont_name / cont_id To start a stopped container docker container stop cont_name / cont_id To stop a started container docker container stop $(docker ps -aq) To stop all running containers docker container restart cont_name / cont_id To restart a container docker container restart -t 10 cont_name / cont_id To restart after 10 seconds Delete Container docker container rm cont_name / cont_id To delete a stopped container docker container rm -f cont_name / cont_id To delete a running container forcefully docker container rm $(docker ps -aq) To delete all stopped containers docker container rm -f $(docker ps -aq) To delete all running and stopped containers Logs docker logs cont_name / cont_id To get logs of a container View open Ports docker port cont_name / cont_id To view ports open on a container Port Mapping #docker container run -it -p 3600:80 ubuntu /bin/bash It will create container with port 3600 mapped - List of containers:
- $docker container ls (list of running containers)
- $docker container ls -a (list of all containers running & stopped)
- $docker ps (list of all containers running)
- $docker ps -a (list to stopped containers)
- location of containers: can view with root account, or it will give permission denied error
- root@docker:/var/lib/docker/containers
- Delete containers:
- $docker container rm container_ID (it will delete stopped container)
- $docker container rm -f container_ID (it will delete container forcefully, if running)
- $docker rm -f $(docker ps -aq) delete all container running/stopped in quite mode.
- Create container using raw image: you must define -it
- $docker run -itd --name=web5 ubuntu
- $docker ps
- 692749995bce ubuntu "/bin/bash" 5 seconds ago Up 4 seconds web5
- As we know there is no processes running in raw image, to keep alive we run -it (interactive terminal), it runs a process which keep container alive otherwise container get exited.
- $docker top web5 (there is /bin/bash process is running)
- $docker run -d --name=web6 ubuntu
- $docker ps (there is nothing to run in the container and it gets exited, so we use --it, so terminal runs and a process runs in container which keep container alive)
- To login to raw container
- $docker attach web6
- come out of container without exiting
- $ctrl p q
- Create container using service image: you can define -d only
- $docker run -d --name=web1 nginx
- should give -d (in detached mode means do not run on current terminal), --name=web1 (container name) nginx (image name)
- location of containers: can view with root account, or it will give permission denied error
- root@docker:/var/lib/docker/containers (you will see long container IDs)
- process in linux system (host machine processes):
- creation of container is a process in linux
- $ps -ef (it will show a process is created for container)
- container_process1.jpg
- container process id = 8881
- If you kill process 8881 than container get stopped.
- $kill -9 8881
- program which runs terminal:
- $echo $SHELL (show interactive shell)
- /bin/bash (bash is the terminal program on which you enter commands)
- Login to container terminal
- $docker exec -it container_name bash
- you will get into bash terminal of container
- Resources of container created:
- mount
- vNIC
- process
- filesystem
- Processes of container: find out from outside the container
- $docker top container_name/ID
- Create container:
- $docker container run ubuntu
- It will create container but exited the terminal after creation.
- $docker run ubuntu sleep 60
- It will create container and occupy the terminal for 60 seconds, you cannot run any commands on this terminal.
- open another terminal and run $watch docker container ls
- $docker run -d --name=web2 ubuntu
- It will run in detach mode.
- $docker run -it --name=web3 ubuntu
- It will run in interactive mode, means ubuntu will be running continuously in the background.
- $docker run -it --name=web4 ubuntu /bin/bash
- It will run in interactive mode, enter into ubuntu terminal.
- $docker run -it --name=webserver1 ubuntu /bin/bash
- it will give container name webserver1
- $docker container run ubuntu
- Details of container:
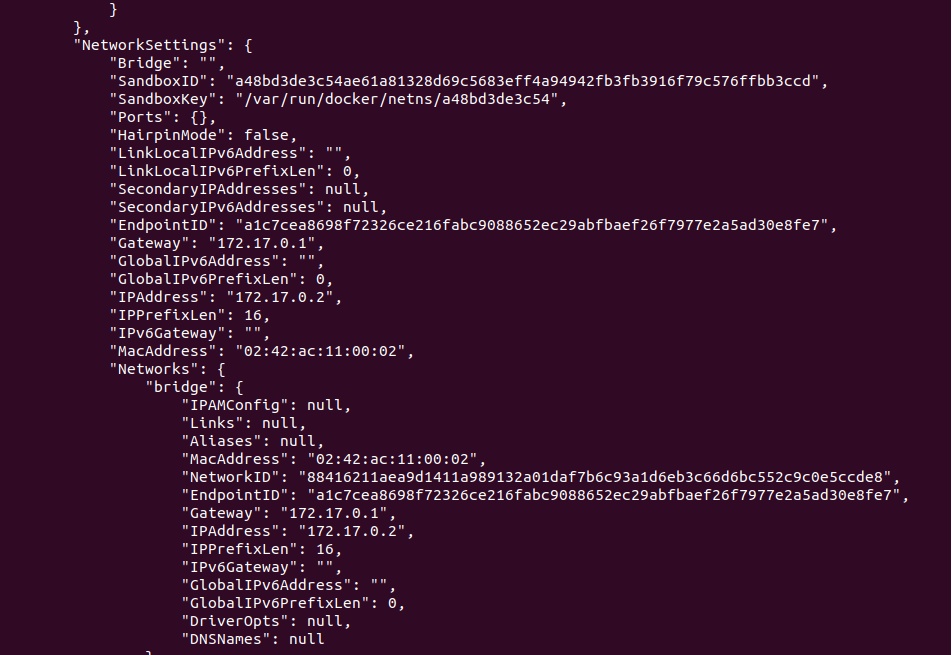
- $docker inspect container_name/ID
- Private IP is assigned "172.17.0.2" it is assigned by bridge network
- $docker network ls
- $docker network inspect bridge | grep -i subnet ("172.17.0.0/16")
- Get container statistics (cpu, memory usage ):
- $docker stats container_name
- Stop container:
- $docker container stop container_ID
- Stop all running containers:
- $docker stop $(docker ps -aq)
- Start container:
- $docker container start container_ID
- Restart container:
- $docker container restart container_ID
- Restart container after 10 seconds
- $docker restart -t 10 cont_name / cont_id
- Come out of container:
- if you run exit you will come out of container terminal but container will get stop.
- cntrl p than ctrl q
- Get into container:
- $docker container attach container_ID/name
- $docker exec -it container_ID/Container_name /bin/bash
- root@jfjfov98234:/#ls
- bin boot dev docker-entrypoint.d docker-entrypoint.sh etc home lib lib64 media mnt opt proc root run sbin srv sys tmp usr varbin boot dev docker-entrypoint.d docker-entrypoint.sh etc home lib lib64 media mnt opt proc root run sbin srv sys tmp usr var
- The above looks like folders of linux O/S, but this is the foot print of O/S taken from raw image. These folders container minimal required files.
- The following are ubuntu O/S files:
- bin boot dev home lib64 lost+found mnt proc run sbin.usr-is-merged srv sys usr bin.usr-is-merged cdrom etc lib lib.usr-is-merged media opt root sbin snap swap.img tmp var
- Remove container: running container will not remove, stop first then remove
- $docker container rm container_ID
- $docker container rm container_ID container_ID
- Remove all unused containers, volumes, images
- $docker system prune -a --volumes -f
- Remove container forecefully: running container will also be removed
- $docker container rm -f container_ID
- Delete all stopped containers:
- $docker rm $(docker ps -aq)
- Delete cache
- $docker builder prune -a
- Delete volume
- $docker volume prune -a
- Define hostname, DNS while creating container:
- $docker container run -it --hostname webserver --dns 8.8.8.8 ubuntu:14.04
- $hostname
- $ifconfig
- $cat /etc/resolv.conf
- Port Mapping:
- When you install docker on host VM is called docker host, a docker ethernet (docker0) is also created on docker host and assign a IP address.
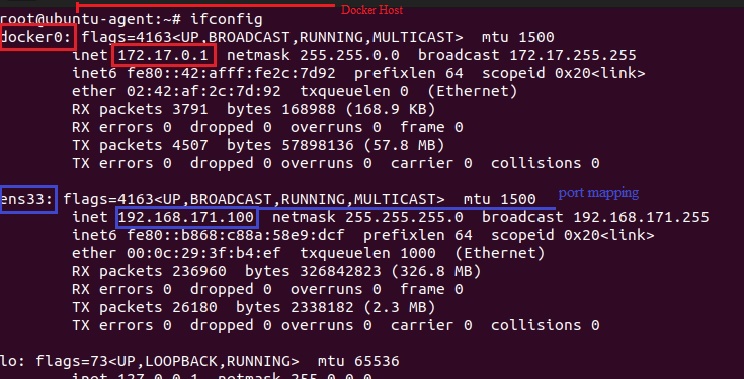
- Ip's to containers are assigned from this pool. Application running on container/IP can be access from docker host only.
- To access the application from outside the docker host configure port mapping.
- Perform the port mapping with docker host main ethernet (ens33) ip address (192.168.171.100), Internet is working on this host.
- Assign port while creating container: ubuntu container is creating and deploying apache2
- $root@ubuntu-agent:~# docker container run -it -p 3600:80 ubuntu /bin/bash
- root@0fea384b2d41:/# apt-get update (you are in ubuntu container terminal with /bin/bash)
- root@0fea384b2d41:/# apt-get install apache2
- root@0fea384b2d41:/# service start httpd
- root@0fea384b2d41:/# cd /etc/www/html
- root@0fea384b2d41:/var/www/html# echo "Welcome to star Distributors / Port Mapping " > index.html
- root@0fea384b2d41:/var/www/html# service apache2 start

- Access the application from outside:
- $root@ubuntu-agent:~#ifconfig
- copy IP address of host (ens33), in real time will take public IP address.
- open browser: http://192.168.171.100:3600
- Rename:
- $docker container rename container_ID newname
- root@ubuntu-agent:~# docker container rename 0fea384b2d41 apache-server1

- Get into container/get container bash terminal
- $docker exec -it container_name/ID /bin/bash
- Copy: copy file to a container
- create a file
- $root@ubuntu-agent:~#echo "some text" > data1
- $root@ubuntu-agent:~#docker container cp data1 container_ID:/tmp/ (copy file in a container's /tmp/ folder)
- Check in container's /tmp/ folder
- Kill: Forcefully stop the container.
- root@ubuntu-agent:~#docker conainer kill container_ID/name
- Wait: Block until one or more containers stop, then print their exit codes
- root@ubuntu-agent:~#docker container wait container_ID/name
- Pause / unpase:
- root@ubuntu-agent:~#docker container pause container_ID/name
- root@ubuntu-agent:~#docker conainer ls
- root@ubuntu-agent:~#docker container unpause container_ID/name
- Prune:
- $docker contianer prune (Remove all stopped containers)
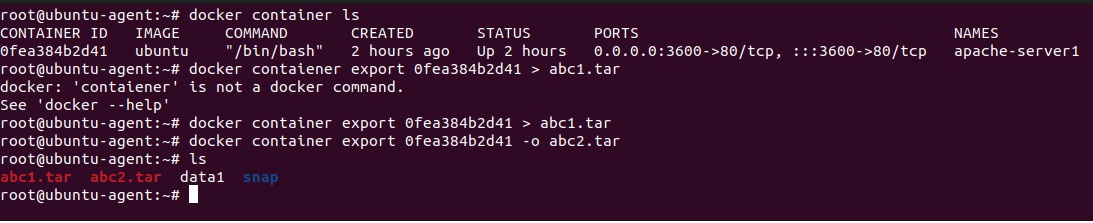
- Export:
- Exporting container which creates .tar file
- root@ubuntu-agent:~# docker contaiener export 0fea384b2d41 > abc1.tar (instead of > you can use -o )
- root@ubuntu-agent:~# docker contaiener export 0fea384b2d41 -o abc2.tar
- root@ubuntu-agent:~#ls (abc1.tar and abc3.tar created).
- Create image by importing the .tar file and deploy.
- root@ubuntu-agent:~#docker image import abc1.tar starimage1 (image with the name starimage1 will be created)

- root@ubuntu-agent:~# docker image ls
- root@ubuntu-agent:~# docker container run -it starimage1 /bin/bash

- Exporting container which creates .tar file
- Commit:
- Creating image of running container:
- root@ubuntu-agent:~#docker container commit container_ID image_name
- Limit memory and cpu to be used by a contianer:
- root@ubuntu-agent:~#root@ubuntu-agent:~# docker run -it --memory="512m" --cpus="1.5" ubuntu:1 (image ubuntu:1 is located at current path)
- root@ubuntu-agent:~# docker stats container_ID (to check memory utilization)
- Check utilization:
- root@ubuntu-agent:~# docker stats --no-stream
- Create a container with a specific user, using user ID
- root@ubuntu-agent:~#docker run -u 1001:1001 ubuntu:1
- Read only container, no modification is allowed inside container:
- root@ubuntu-agent:~# docker container run --read-only -it -d -p 5000:80 ubuntu:1 (container is read only).
- root@ubuntu-agent:~# docker exec -it be495dd5a482 /bin/bash
- root@be495dd5a482:/# mkdir abc
- mkdir: cannot create directory 'abc': Read-only file system
- Give permission on /tmp folder to make changes:
- root@ubuntu-agent:~# docker container run --read-only -v /tmp --tmpfs /tmp -it -d -p 5000:80 ubuntu:1
- root@ubuntu-agent:~# docker exec -it ca621efbd40b /bin/bash
- root@ca621efbd40b:/# cd /tmp
- root@ca621efbd40b:/tmp# mkdir test (it creaes test folder)
- Find out how many times countainer restart:
- root@ubuntu-agent:~# docker inspect ca621efbd40b | grep -i restartcount
- "RestartCount": 0,
- Health Check:
- Clone Healthcheck repository: https://github.com/AbdulAziz-uk/Healthcheck-docker-demo.git
- root@ubuntu-agent:~# git clone https://github.com/AbdulAziz-uk/Healthcheck-docker-demo.git
- root@ubuntu-agent:~/Healthcheck-docker-demo# ls
- open dockerfile:
-
# Base imageFROM node:18-alpine
# Set workdirWORKDIR /app
# Copy app filesCOPY server.js .
# Install curl and expressRUN apk add --no-cache curl && npm install express
# Expose portEXPOSE 8080
# Add healthcheckHEALTHCHECK CMD curl --fail http://localhost:8080/health || exit 1
# Run appCMD ["node", "server.js"] - Build image:
- root@ubuntu-agent:~/Healthcheck-docker-demo# docker build -t healthcheck .
- Deploy image:
- root@ubuntu-agent:~/Healthcheck-docker-demo# docker run -d healthcheck
-
- root@ubuntu-agent:~/Healthcheck-docker-demo#docker container ls (check stauts = healthy)
- Check logs from host machine without going inside container:
- create a folder:
- root@ubuntu-agent:~# mkdir logs
- Create a nginx container and point to logs folder of ngnix logs
- root@ubuntu-agent:~# docker run -v $(pwd)/logs:/var/log/nginx nginx
- root@ubuntu-agent:~#ls (two log files has been created for the nginx container)
- create a folder:
- Tail logs of the container:
- Tail last 20 lines of the log of the container:
- root@ubuntu-agent:~# docker logs -f --tail 2 ca621efbd40b
- Find out a specific process is running inside container:
- root@ubuntu-agent:~# docker exec -it ca621efbd40b sh -c "ps aux |grep java" (check java is running inside container)
- Container with restriction max process = 100, read only mode, memory = 256m
- root@ubuntu-agent:~# docker run -it --pids-limit 100 --memory=256m --read-only ubuntu:1 /bin/bash
- Try to create a file (error: read only file system)
- Multi-Container Link:
- docker --link
- docker compose
- docker networking
- python script
- Scenario 1:
- Step1: #docker run --name bb1 -it busybox
- to come out of interactive terminal without exit/stop container, ctrl p than ctrl q
- Step2: #docker run --name bb2 -it --link bb1:bb1link busybox
- ping bb1 (You are terminal of bb2 and pinging to bb1)
- To ping bb1 to bb2
- Scenario 2:
- Create 2 containers, mySQL and wordpress, create link betwen them.
- wordpress is a php based application used by developers to create a website and it is integrated with database to store clients input.
- Step1: #docker run --name mysql -d -e MYSQL_ROOT_PASSWORD=India123 mySQL:5
- hub.docker.com search mysql, click mysql and in description check einvirnment variable defined.
- click tag to get the versions of mySQL, in the above we are using tag/version 5
- Get into mySQL container:
- #docker exec -it mysql bash
- Connect to mySQL (check description in mySQL for commands)
- #mysql -u username -p
- you wil get mysql prompt
- mysql> show databases; (it will show databases information_schema, mysql, performance_schema, sys)
- mysql> use sys;
- create a database (google.com search emp and dept table for mysql(justinsomnia) and get the code
- copy the emp and dept code and paste it so it will create two tables.
- mysql> select * from emp;
- mysql> select * from dept;
- Step 2: create wordpress container and linked with mysql (define port as wordpress can be accessed on browser)
- #docker run --name starwordpress -d -p 9090:80 --link mysql:mysqldatabase wordpress
- Access wordpress in any browser http://publicIP:9090
- Database information provide
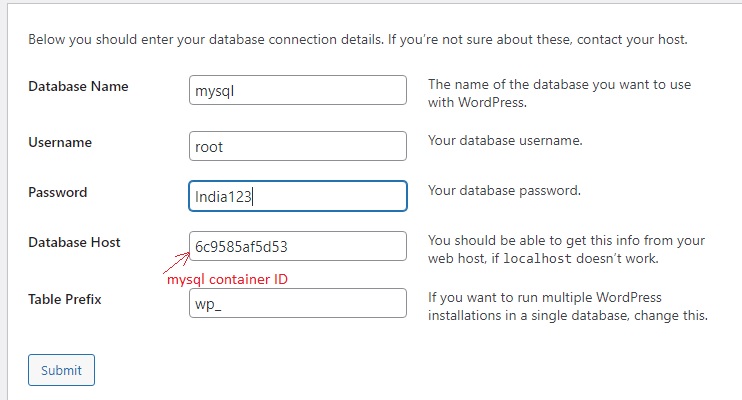
- click submit

- Code
- Scenario3: Create CICD 3 tier architecture environment in docker container.
- Step1: create jenkins container
- $docker run -- name development -d -p 5050:8080 jenkins/jenkins
- Access with any browser http://publicIP:5050
- To get password, get into jenkins
- $docker exec -it development bash
- $cat /var/jenkins_home/secrets/initialAdminPassword
- Step2: Create tomcat container and linked with jenkins (development)
- #docker run --name testing -d -p 6060:8080 --link development:jenkins tomcat:9.0
- Step3: create tomcat container and liniked with jenkins
- #docker run --name production -d -p 7070:8080 --link development:jenkins tomcat:9.0
- #docker container ls (3 conainers running, 1 jenkins and 2 tomcat)
- check testing server on any browser http://publicIP:6060
- check testing server on any browser http://publicIP:7070
- Error: Description The origin server did not find a current representation for the target resource or is not willing to disclose that one exists or 404 error
- Resolve:
- Get into tomcat container #docker exec testing -it bash
- #cd /usr/local/tomcat
- #cp -r webapps.dis/* webapps
- Now access the tomcat in the browser.
- Step1: create jenkins container
- Scenario4: Create jenkins master and jenkins slave: Refer here
- Step1: #docker run --name master -d -p 6060:8080 jenkins/jenkins
- Step2: #docker run --name slave -it --link master:jenkins ubuntu
- Step3: download slave.jar file from master.
- #wget master:6060/jnlpJars/slave.jar (wget command not found) install wget
- #apt -get update
- #apt-get install wget
- #wget master:8080/jnlpJars/slave.jar
- Step4: Login to Jenkins and install plugin docker
- manage jenkins > manage plugin > Available > docker
Images
- Images: It is a combination of binaries and libraries which are required for an application/software to run. Docker has packaged important/required binaries and libraries of software and called it a docker image. You install that image in a container.
- Types of Images:
- Raw Image: O/S minor footprint: search nginx in docker hub, click any image and it will open in github where you can see FROM xxxx
- Service Images: Full fledge O/S or software (it includes raw image)
- $docker pull docker.io/ubuntu
- Ubuntu image contains raw or minor footprint of ubuntu, it contain basic commands which is required to maintain application, like cd command, ls command etc.
- raw_image1.jpg
- It will open github dockerfile, check FROM
- raw_image2.jpg
- if you try to download the raw image, it gives the message that image is already downloaded, it is inside ubuntu image.
- raw_image3.jpg
- List of images:
- $docker images (list of images in local repository )
- $docker system df (show docker disk usage)
- $docker system info
- Search image:
- $docker search docker.io/nginx
- Go to docker.io in browser and search nginx
- Parent/child image:
- when you have service image you cannot delete raw image.
- Pull nginx image: It will pull from docker.io if you do not mention registry name.
- Pull nginx image from docker.io repository:
- $docker pull nginx:latest
- we have not defined url for this repository, it will go to hub.docker.com registry (docker.io) and search for nginx image with latest version and download.
- you can define repository
- $docker pull docker.io/nginx:latest
- $docker images
- location of image on docker host: /var/lib/docker/image/overlay2/imagedb/content/sha256/
- Pull sonarqube lts-community image
- $docker pull sonarqube:lts-community (imagename:tag, where tag is used for version, it will check the local repository and if not found then go to docker repository)
- location of image on docker host: /var/lib/docker/image/overlay2/imagedb/content/sha256/
- Delete dangle images:
- Delete cache of dangle images:
- $docker builder prune
- Delete cache of dangle & active images:
- $docker builder prune -a
- Delete dangle images and dangle image cache to make space.
- $docker system df (it will show the space utilization)
- Pull jenkins image from jenkins community
- search images in jenkins community
- $docker search jenkins/jenkins
- pull image from jenkins community
- $docker pull jenkins/jenkins
- search images in docker.io community
- $docker search docker.io/jenkins
- download from docker community
- $docker pull docker.io/jenkins/jenkins
-
Image $docker image --help help on image command $docker pull Image_name:tag Download a docker image $docker search image_name search a docker image $docker list images or $docker image ls List of all docker images $docker image ls -a List all images with space used $docker image rm image_ID Delete image $docker image rm -f image_ID Delete image forcefully $docker push image_name or $docker push image_Id Upload docker image $docker rmi image_name Delete a single docker image $docker system prune -a Delete all images $docker commit container_name/container_id image_name To create a docker image from container $docker build -t image_name . To create a docker image from dockerfile $docker inspect image_name get detailed information of image $docker image save image_nae tarfile_name To save an image as tar file $docker image load tarfile to extract an image from tar file $docker container commit container_ID image_name Create image with the running container. - Lab: pull base image, Build an custom image, push and pull image
- Pull ubuntu image from docker:
- $docker image pull ubuntu:14.04
- $docker images or $docker image ls
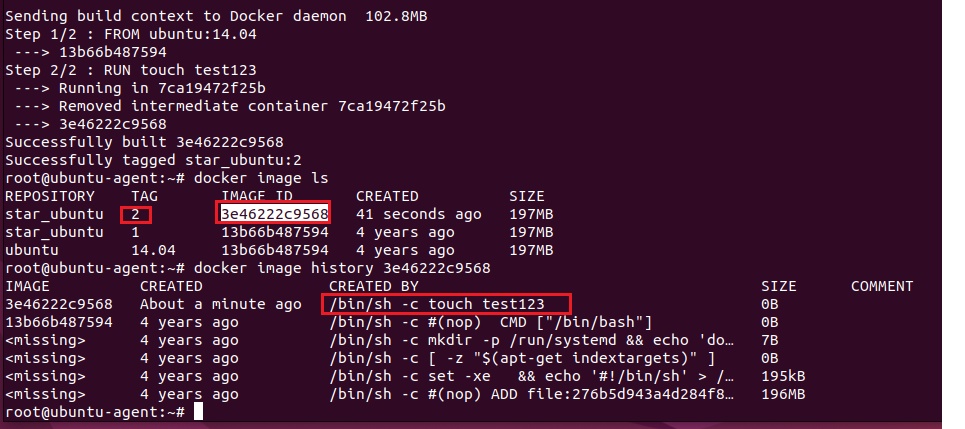
- $ docker image history 13b66b487594

- Creating a custom image of ubuntu with docker file.
- create a Dockerfile
- $vim Dockerfile (if you use different name than at the time of deployment you use -f filename), enter the following code
-
FROM ubuntu:14.04 #FROM is use to define base image, save & exit
- Build Image:
- $docker build -t star_ubuntu:1 . (t is for tag, . dot means Dockerfile is at current path) dot has been given at the end to define Dockerfile is at current path, if used custom name than we should define -f filename
- custom ubuntu image with the name star_ubuntu:1 has been created.
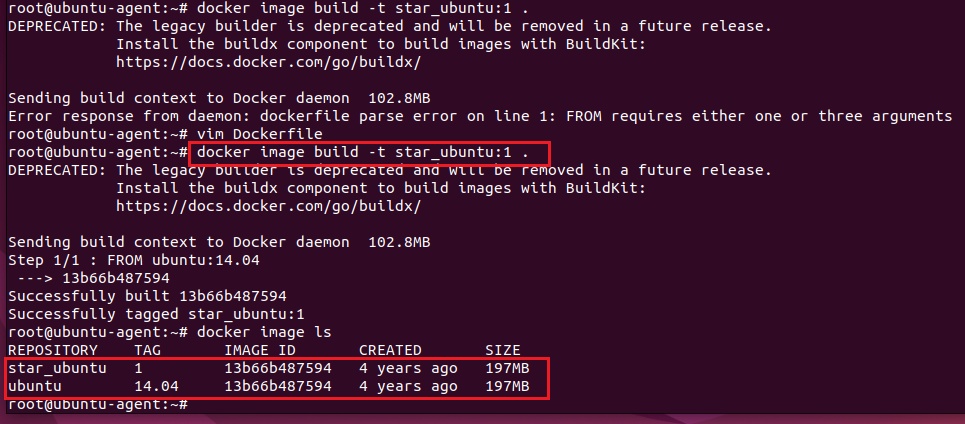
- both IMAGE ID are same as we have not made any changes or not added any new layer while building custom image so there is no additional layer in the image.
- create a Dockerfile
- Layers in Docker file:
- Every step in Dockerfile which takes space is consider as layer, suppose downloading it required space which is consider as layer. cd (change directory) is not consider as layer.
- Create a file test123 in the new custom image of ubuntu to add a new layer.
- Edit Dockerfile:
- $ vim Dockerfile
- FROM ubuntu:14.04
RUN touch test123 (this is a layer where it creates test123 file), save & exit
- Build an image 2:
- $docker build -t star_ubuntu:2 .
- $ docker image history 3e46222c9568
- Image ID has been changed and if run history there is one layer added /bin/bash -C touch test123, remaining 5 layers are same as there was in base image.
- Edit Dockerfile:
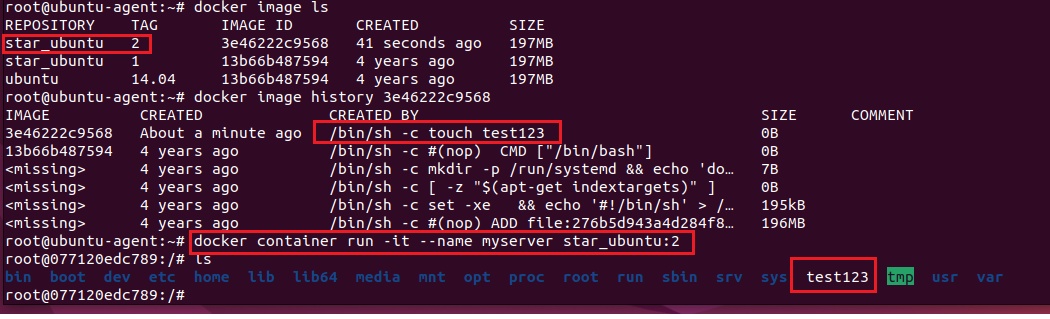
- Create a continer using custom image (star_ubuntu:2):
- $ docker run -it --name=myserver star_ubuntu:2
- Lab:
- Create a custom image of ubuntu:14.04 and run these commands, apt-get update, apt-get install apache2, tree, openssh-server & client, change directory to /html and change index.html, service apache 2 start.
- $ vim Dockerfile
- FROM ubuntu:14.04
RUN touch test123 # create a file test123
RUN apt-get update && apt-get install -y apache2 # update apt repository, install apache2
RUN apt-get install -y tree openssh-server openssh-client #install tree and openssh
RUN cd /var/www/html #change directory
RUN echo "Welcome to Star Distributors " > /var/www/html/index.html #change index.html file #it save the text in index.html
RUN service apache2 start # start apache2 service - save & exit
- FROM ubuntu:14.04
- $ vim Dockerfile
- Build an image 3:
- $ docker image build -t star_ubuntu:3 .
- Create container with image star_ubuntu:3
- $docker container run -it --name webserver1 star_ubuntu:3
- check apache2 service status
- $service apache2 status
- start apache2 service
- $service apache2 restart
- $docker inspect webserver2: it will display the ip
- Access the site
- $curl 172.17.0.2
- Lab:
- Create an image with tag name as per the git commit, after commit to github than commit name should be taken as tag while creating image.
- Boardgame repository is taken for this lab,
- install java and maven and Build the image.
- $docker build -t boardgame:$(git rev-parse --short HEAD) .
- Create an image with tag name as per the date
- root@ubuntu-agent:~# docker build -t ubuntu:release-$(date +%Y-%m-%d) .
- root@ubuntu-agent:~#docker image ls
- REPOSITORY TAG IMAGE ID CREATED SIZE
ubuntu release-2025-05-13 7d0907079ba5 15 seconds ago 211MB
- Delete image:
- $docker rmi imagename
- $docker remove image imagename
- Remove dangling images (imges with <none> name <none> tag
- root@ubuntu-agent:~# docker rmi $(docker images -f "dangling=true" -q)
- Find out how many images created after a particular image:
- docker image ls -f "since=ubuntu:1"
- Multi Architect/Platform Images:
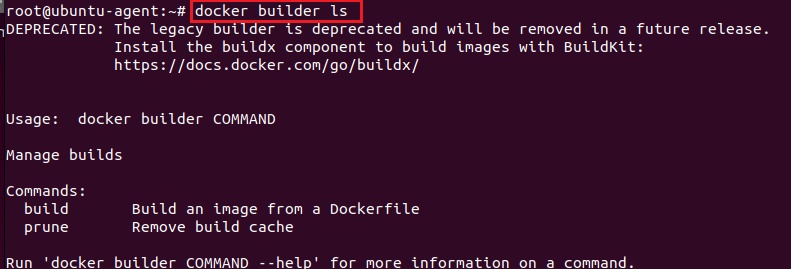
- docker builder is not installed, If you have installed docker desktop than builder is installed.
- $docker builder ls
- Install docker buildx:
- $sudo apt install docker-buildx (it is an extension to buildkit)

- if you check all supported linux/amd64 architecture, to support arm64 architecture.
- $docker buildx create --name multiarch --platform linux/amd64,linux/arm64 --driver docker-container --bootstrap --use
- $docker builder ls

- now it support arm64, amd64
- create an image:
- $vim Dockerfile
- FROM ubuntu
CMD ["echo", ubuntu image with multi platform"]
- FROM ubuntu
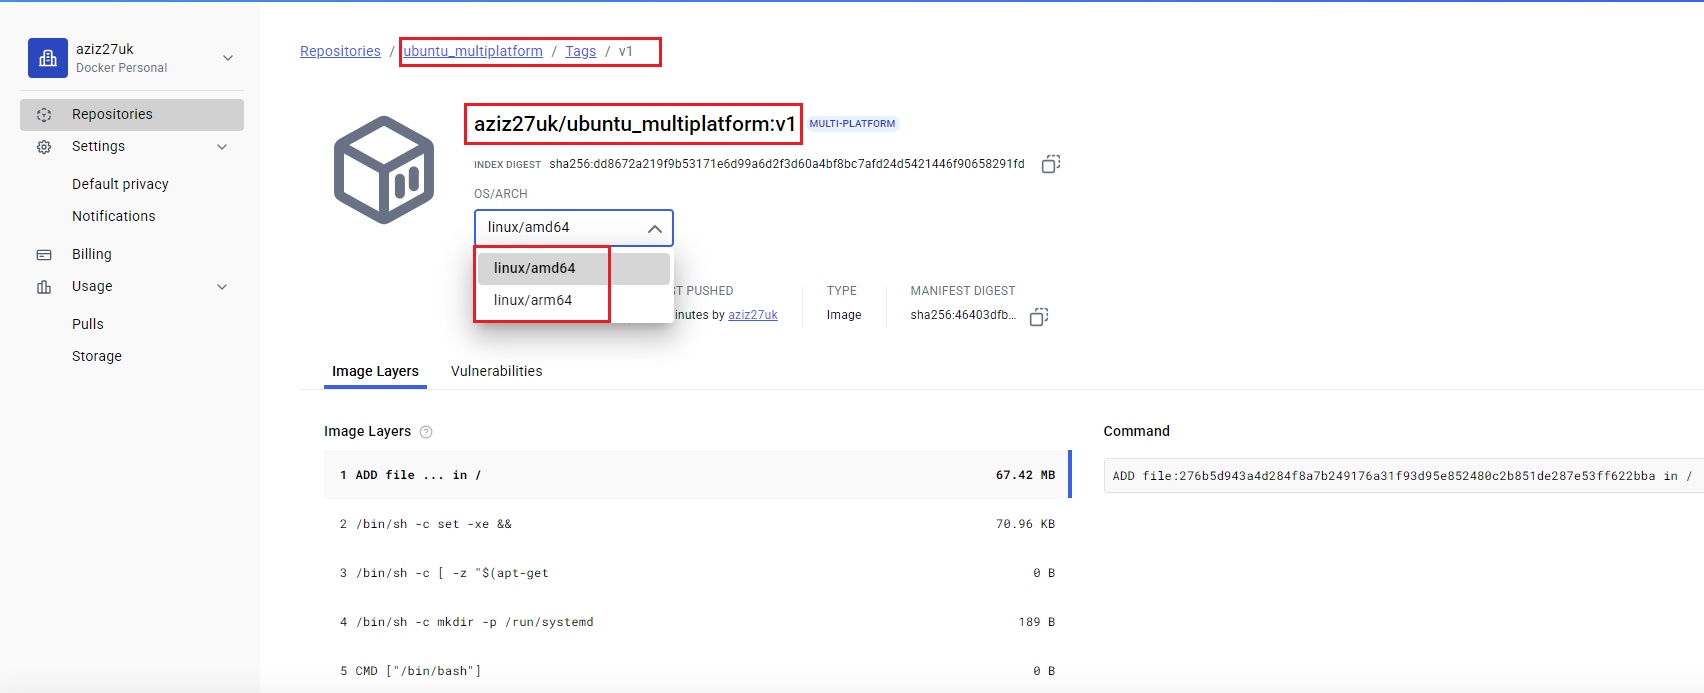
- $docker buildx build --platform linux/amd64,linux/arm64 -t ubuntu_multiplatform:v1 .

- $docker buildx build --platform linux/amd64,linux/arm64 --push -t ubuntu_multiplatform:v1 .
- Error: failed to solve: failed to push ubuntu_multiplatfom:v1: server message: insufficient_scope: authrization failed
- it does not store in local docker, it has to be in docker hub
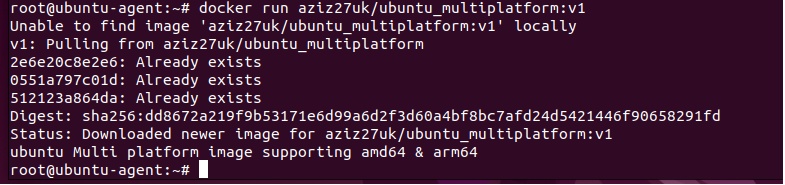
- $docker buildx build --platform linux/amd64,linux/arm64 --push -t aziz27uk/ubuntu_multiplatform:v1 .
- Go to docker hub and check the image:
- $vim Dockerfile
- Test: Create two VMs (amd64 & arm64)
- deploy on both vms
- $docker run aziz27uk/ubuntu_multiplatform:v1
-
- docker builder is not installed, If you have installed docker desktop than builder is installed.
- Image Layers:
- Docker Images are the combination of layers, when you pull an image from docker hub a number of layers downloaded.

- When ou first pull an image in a fresh aws instance a number of layers will be downloaded.
- When you pull second image less number of layers will be downloaded and it goes on further pulls, if layers of first pull image is simlar in second pull image then it will not download in second image and it will only download new layers of second image.
- When you delete first image it will only delete those layers which are not dependant to other images.
Host
- The host o/s on which docker is installed is called docker host.
- code
Client
- Terminal which is used to access docker is called docker client, when you install docker a docker client is also installed and it runs in the background, which is responsible for taking commands and pass it to another background process called daemon.
- code
- code
LAMP Architecture
-
LAMP Architecture:
- LAMP architecture environment can be created for developers who are building a website using open source technologies.
- L = Linux o/s
- A = Application Development using php
- M = backend database should run mySQL
- P = Application server run on Apache Tomcat.
- On Linux machine install mySQL, php and tomcat containers and linked with each other.
LAMP Architecture Lab:
- Step1: Install Linux ubuntu instance
- loginto ubuntu instance and install docker
- Step2: create mySQL container
- Step3: create tomcat container and linked with mySQL
- Step4: create php container and linked with mySQL & tomcat
- #docker run --name myphp -d --link mydb:mysql --link apache:tomcat php:7.2-apache
- #docker container ls (3 containers running)
- LAMP architecture environment can be created for developers who are building a website using open source technologies.
-
code
-
Daemon
- Daemon will analyse the type of command and route it to the following.
- Docker Images:
- Docker Containers:
- Docker Registry: it is where docker images are saved.
- public registry: Maintained by hub.docker.com
- private registry: it is private in nature
- code

Containers: tomcat, ubuntu, nginx, httpd, mysql, jenkins, apache2, python application, SonarQube,
Syntax and parameters used in creating conainers.
- $docker run -it -d -p <hostport>:<container_port> --name <container_name> <image_name> <shell>
- $docker run -it -d -p 8080:80 --name=abc image_name /bin/bash
- parameters:
- -it = interactive terminal, when container is creaed, a terminal of conainer will be opened, terminal depends on image , /bin/bash or sh can be use. if you do not define than container will be created and exited.
- -d = container will run in detach/background.
- -p or -P :
- it is used for port mapping source port and destination port, host port (port of pc/vm) and destination port is container port, outside traffic reach to pc/vm IP address by defining port 8080 which is mapped with container port 80.
- container port cannot be change but source port can be change. If you use captal P than system will define any available port in the sysem, if you use p than you enter the port number. Right hand side port is container port cannot be change, left hand side port is source port which could be any available port.
- port_mapping5.jpg
- Accessing within a VM:
- port_mapping3.jpg
- Accessing from outside VM:
- port_mapping4.jpg
- --name=abc: abc name will be assign to container, if you do not define than docker will assign a random name.
- image_name: enter image name which is use to create conainer, if image is not pulled already or in local repository than it will search in docker repository and download the image.
- /bin/bash or sh: It depends on image that what kind of shell it can give.
- code
Tomcat
- $docker run -it -d -p <hostport>:<container_port> --name <container_name> <image_name> <shell>
- code
- code
Jenkins
- Step 1: #docker pull jenkins/jenkins (The jenkins image has been deprecated for over 2 years in favor of the jenkins/jenkins:lts image provided and maintained by the Jenkins Community as part of the project's release process. Use image:>
docker pull jenkins/jenkins>docker run -p yourportNo:8080 --name=jenkins-master -d jenkins/jenkins) - Step2: #docker run --name myjenkins -p 9090:8080 -d jenkins/jenkins
- Step3: access jenkins: open browser http://publicIP:9090 or in VM if through docker host IP in browser http://192.168.171.100:9090
- Step4: Recover password:
- Get into jenkins and get bash prompt as you are in docker
- #docker exec - it myjenkins bash
- #cat /var/jenkins_home/secrets/initialAdminPassword (password will be displayed)
- You can acces jenkins home directory either mapping jenkins home directory (/var/jenkins_home) to your machine's local file system or
- specify --volume option in the run command (--volume jenkins-data:/var/jenkins_home), can access through terminal or
- Get into jenkins and get bash prompt as you are in docker
- Step 1: #docker pull jenkins/jenkins (The jenkins image has been deprecated for over 2 years in favor of the jenkins/jenkins:lts image provided and maintained by the Jenkins Community as part of the project's release process. Use image:>
ubuntu
- #docker run --name mynginx -P -d ubuntu:14.04
- #docker container ls
- To get into container: #docker exec -it docker_ID /bin/bash
- code
Nginx
- #docker run --name mynginx -P -d nginx (docker will do port mapping of default port to any port >30,000, if you use small p then define port number of your choice)
- creating container and assigning port automatically using -P (capital P) in detach mode and pull image. Port mapping is done for appications which can be access through browser.
- $docker container ls (get port number)
- To get into container: #docker exec -it docker_ID /bin/bash
- Access through browser: http://192.168.171.100:32678 (port mapping has been defined while creating containers, it can be access from outside using host IP address with port number)
- code
httpd
- #docker run --name webserver -P -d httpd
- #docker container ls (take port number)
- To get into container: #docker exec -it docker_ID /bin/bash
- open browser and use with host IP http://192.168.171.100:port_number
- code
mysql
- It requires environment variable while creating container.
- #docker run --name mysql -d -e MYSQL_ROOT_PASSWORD=India123 mysql:5 (it download the image mysql version 5 and create container)
- To open interactive terminal in bash
- #docker exec -it mysql /bin/bash
- you will be in mysql container and to connect to mysql database
- #mysql -u username -p
- you wil get mysql prompt
- mysql> show databases; (it will show databases information_schema, mysql, performance_schema, sys)
- mysql> use sys;
- create a database (google.com search emp and dept table for mysql (https://justinsomnia.org/2009/04/the-emp-and-dept-tables-for-mysql/) copy code
- paste it so it will create two tables.
- mysql> select * from emp;
- mysql> select * from dept;
- code
Apache2
- Create a ubuntu container in interactive mode and get into container:
- $docker container run -it ubuntu /bin/bash
- update ubuntu:
- root@8b75a0cba7e2:/# apt-get update
- Install apache2 in the container:
- root@8b75a0cba7e2:/# apt-get install apache2
- Go to html folder to make changes in index.html
- root@8b75a0cba7e2:/#cd /var/www/html
- root@8b75a0cba7e2:/var/www/html#echo "Welcome to Star Distributors / Training " > index.html
- Start apache2 service (httpd)
- root@8b75a0cba7e2:/var/www/html#service apache2 start (make sure you are inside container and in html foder)
- Get more details of container with inspect command
- root@ubuntu:~#docker container inspect 8b75a0cba7e2
- Access web site
- root@ubuntu:~#curl https://172.17.0.2

- Try with http

- open browser: http://172.17.0.2
- Error:
- Check resource utilisation by container:
- $docker container top container_ID
- $docker container stats container_ID
- $free -h
- Create a ubuntu container in interactive mode and get into container:
Python application
- Following is the python appliction using flask module:
- flask is the dependency which you install in your system:
- $apt install python3-pip
- $pip install flask
Mongo DB
- $docker run -d -p 27017:27017 --name star_mongoDB -e MONGO_INITDB_ROOT_USERNAME=admin -e MONGO_INITDB_ROOT_PASSWORD=123 mongo
SonarQube
- $docker run -itd --name sonarqube-server -p 9000:9000 sonarqube:lts-community
Code
- Code
Code
- Code

Registry: Docker Hub, ECR(Elastic Container Registry of AWS), Push & Pull images,
Docker Public Repository
- hub.docker.com
- username = aziz27uk
- pass : Y......!
- Lab:
-
Create a customize image from container running ubuntu and install git, create an image from container and uploaded into public registry.
- #docker run --name myubuntu -it ubuntu
- #apt-get update
- #apt-get install git
- #exit
Convert container into an image.
- #docker commit myubuntu aziz27uk/starubuntu (image name should start with userID of docker hub, image name is aziz27uk/starubuntu)
- Image is available in docker host which need to upload into docker hub.
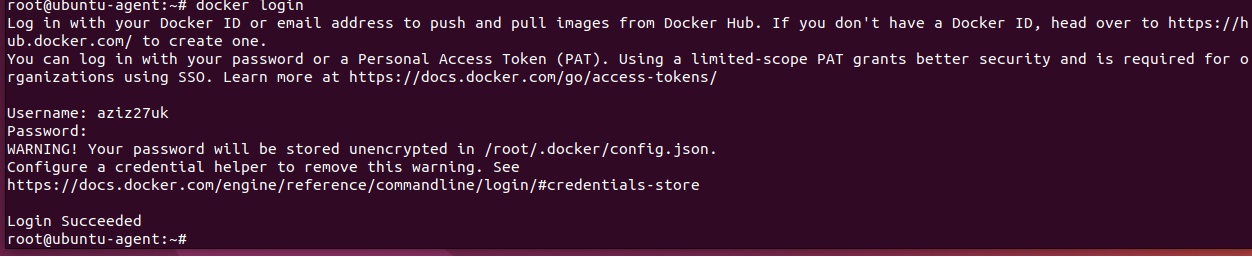
- Login to docker hub from terminal.
- #docker login (enter login name and password)
- #docker push aziz27uk/starubuntu
- login to docker hub and check your images in repositories.
Docker Private Repository
- You create a cutom image with required o/s, applications, plugin, extensions, etc. It can be shared online so that particular person can use and deploy after entering credentials.
- Create an account with docker hub and upload your images. hub.docker.com (username = aziz27uk or aziz27uk@yahoo.co.uk, pass : Y......!
- In private repository users required username and password to enter to download image.
- code
Docker Alpine Repositiry
- In this repository images are in very low in size whereas original size of official images are very big.
- code
- code
Upload image and deploy from Docker Registry
- Create a image
- Exporting container which creates .tar file
- root@ubuntu-agent:~# docker contaiener export 0fea384b2d41 > abc1.tar (instead of > you can use -o )
- root@ubuntu-agent:~# docker contaiener export 0fea384b2d41 -o abc2.tar
- root@ubuntu-agent:~#ls (abc1.tar and abc3.tar created).
- Create image by importing the .tar file and deploy.
- root@ubuntu-agent:~#docker image import abc1.tar starimage1 (image with the name starimage1 will be created)
- root@ubuntu-agent:~# docker image ls
- root@ubuntu-agent:~# docker container run -it starimage1 /bin/bash
- Create tag for the image: tag name should be unique, create with name used to create account with docker hub (aziz27uk)
- $docker tag starimage1 aziz27uk/ubuntu_apache
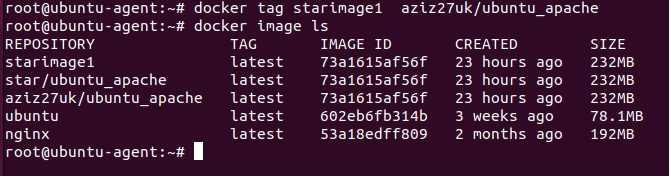
- $docker image ls (check tag is applied)
- Upload image(starimage1)
- $docker image push star/ubuntu_apache (public by default)
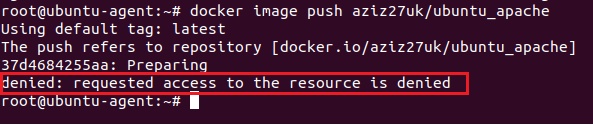
- Error: request acces to resource is denied
- Login to Docker Hub:
- $docker login (enter credentials)
- $docker image push star/ubuntu_apache

- image pushed, check in docker hub

- Deploy container using custom image (aziz27uk/ubuntu_apache)
- root@ubuntu-agent:~# docker container run -it -name webserver aziz27uk/ubuntu_apache:latest /bin/bash
- first it will check the local repository, if image is not found than it will check docker hub.

- data1 folder was created before image is created.
- Exporting container which creates .tar file
- code
- code
- Create a image
Own Private Registry at on-prem
- Instead of using Docker reigstry to upload and share images, you can create your own registry on one of the computer and share with other branches of the company. Other branches can access with the public IP address.

- Lab:
- Create a VM
- on cloud / on prem
- Install docker
- $apt-get update
- $sudo su - (root user access)
- $sudo apt install docker.io
- Pull docker registry image from docker hub
- $docker image pull registry
- $docker image pull nginx
- $docker image pull ubuntu
- $docker image ls (3 images: registry, nginx, ubuntu)
- $docker container ls
- Deploy registry image (registry works at 5000 port)
- root@ubuntu-agent:~# docker container run -itd -p 5000:5000 --name star_registry registry
- root@ubuntu-agent:~#docker container ls
- check any images in the private registry:
- $root@ubuntu-agent:~#apt-get install elinks
- open browser and run http://127.0.0.1:5000/v2/_catalog
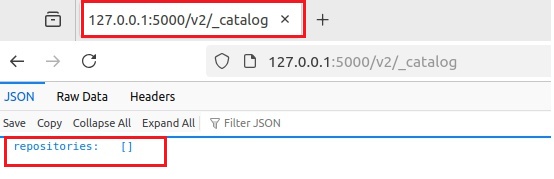
- There is no images in the registry.
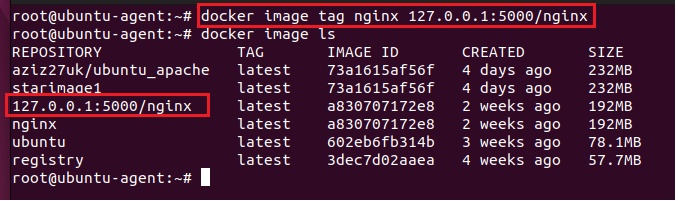
- Push image nginx to private registry:
- root@ubuntu-agent:~# docker image tag nginx 127.0.0.1:5000/nginx
- root@ubuntu-agent:~#docker image ls (it will show all images including tagged one)
- Now push the tagged registry into private repository
- root@ubuntu-agent:~#docker push image 127.0.0.1:5000/nginx
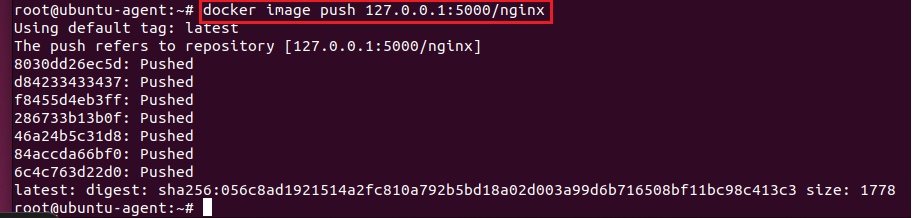
- open browser and run http://127.0.0.1:5000/v2/_catalog
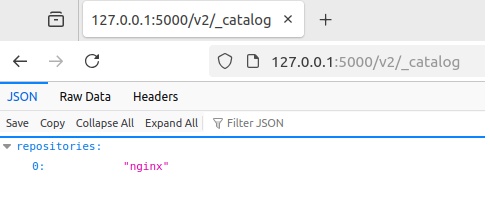
- nginx image has been pushed to private registry.
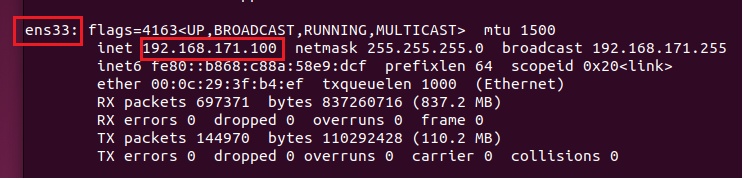
- VM's IP address is 192.168.171.100 or public IP address of VM
- root@ubuntu-agent:~#ifconfig
- Tag it:
- root@ubuntu-agent:~# docker image tag nginx 192.168.171.100:5000/nginx
- Push it to local repository:
- root@ubuntu-agent:~#docker image push 192.168.171.100:5000/nginx

- The above interface accept secure https only, either bypass/skip https or install certificate.
- bypass/skip http:
- root@ubuntu-agent:~#vim daemon.json
-
{"insecure-registries" : ["192.168.171.100:5000"]}
- save the file and exit
- copy the file to /etc/docker
- root@ubuntu-agent:~#cp daemon.json /etc/docker
- restart docker host:
- root@ubuntu-agent:~#systemctl restart docker
- docker registry container get stopped, start it
- root@ubuntu-agent:~#docker container start container_ID

- root@ubuntu-agent:~#docker image push 192.168.171.100:5000/nginx
- it shows layer is already exist, due to earlier attempt

- try with other image

- check in the browser of different VMs:

- install certificate for HTTPS:
- create certificate:
- root@ubuntu-agent:~#mkdir certificate
- root@ubuntu-agent:~# openssl req -new -newkey rsa:2048 -nodes -keyout -sha256 -keyout cert/domain.key -x509 -days 365 -out cert/domain.crt
- Country Name (2 letter code) [xx]: enter
- state of province name (full name) []: enter
- locality time (ex, city) [Default city]: enter
- Organization Name (ex, company) [Default Company Ltd]: enter
- Organizational Unit Name (ex, section) []: enter
- Common Name (eg, your name or your server's hostname []: repo.docker.local
- Email Address: []: enter
- cd /etc/docker
- mkdir cert.d
- cd cert.d
- mkdir repo.docker.local:5000
- cd
- cd cert/
- cp domain.crt /etc/docker/cert.d/repo.docker.local\:5000/ca.crt
- cd
- systemctl restart docker
- root@ubuntu-agent:~# docker container run -d -p 5000:5000 --name secure_registry -v $(pwd)/cert/:/cert -e REGISTRY_HTTP_TLS_CERTIFICATE=/cert/domain.crt -e REGISTRY_HTTP_TLS_KEY=/cert/domain.key registry
- root@ubuntu-agent:~# docker image tag nginx repo.docker.local:5000/nginx
- docker image ls
- root@ubuntu-agent:~# docker image push repo.docker.local:5000/nginx
- Error: private_registry12.jpg
- Edit /etc/hosts and add 192.168.171.100 repo.docker.local
- root@ubuntu-agent:~# docker image push repo.docker.local:5000/nginx
- code
- code
ECR - Elastic Container Registry (AWS)
- Create a Ubuntu VM and install Docker.
- $sudo apt update
- $sudo apt install docker.io (Install docker from local repository)
- Run hello-world to check docker installation:
- $docker pull hello-world (only root user can access docker, assign permission to user)
- When you install docker a group is created with the name docker, whoever added to this group can run the docker commands, by default root user is added.
- When you create a user a group is also created with the same name of user, this group is primary group to this user. you can add additional group to this user
- Add user (abdul) to docker group:
- $sudo usermod -aG docker abdul (-a is used to assign as a secondary group, -A is use for primary group, G is used for group, docker is group, abdul is user), log off and log on. or run $newgrp docker (it will add user to docker)
- Start docker Service:
- $systemctl start docker or
- $sudo service docker start
- $systemctl enable docker
- $docker info
- Check docker status:
- $sudo docker service status
- Login to AWS and search Elastic Container Registry:
- search elastic container registry.
- create a repository.
- Repository name:
- 565393050355.dkr.ecr.eu-west-2.amazonaws.com/star_ecr (565393050355.dkr.ecr.eu-west-2.amazonaws.com = namespace, star_ecr = repository name).
- Encryption configuration:
- AES-256: Industry standard Advanced Encryption Standard (AES) encryption
- AWS KMS: AWS Key Management Service (KMS)
- Create
- ecr1.jpg
- click star_ecr to check images in this repository:
- ecr2.jpg
- click view push commands to get commnads to push the images to this repository from docker.
- ecr3.jpg
- First need to install AWS CLI to give the credentials of aWS on machine from where you push the commands.
- $curl "https://awscli.amazonaws.com/awscli-exe-linux-x86_64.zip" -o "awscliv2.zip" click for url.
- $unzip awscliv2.zip
- $sudo ./aws/install
- $aws configure
- It is not a best practice to push and pull images to repository using root user. create a user and give permission and perform task.
- Create a user:
- Go to IAM>user>create a user, enter name and click Provide user access to the AWS Management Console, select i want to ceate IAM user. Custom password, next
- By default this user added to Admins group, Assign policy so that this user can push / pull images from private repository =
- click attach policies directly and choose Amazon EC2ContainerRegistryFullAccess.
- click create.
- Click on created user and go to security credentials>Access keys> select command line interface (CLI)>next>create access key and copy both access and secret key.
- Login to AWS Console with CLI:
- $aws configure
- AWS Access key ID: AKIAYHJANJLZRSJXLAVY
- AWS Secret Access key: EJ6oegC3e2O2ZnaCF9L/1T4lcJVemC1o16kPvSLUZ
- Default Region Name: eu-west-2
- Default output format: table
- Now copy the command and paste it.
- Retrive an authentication token and authenticate your Docker client to your registry.
- aws ecr get-login-password --region eu-west-2 | docker login --username AWS --password-stdin 565393050355.dkr.ecr.eu-west-2.amazonaws.com
- Error: An error occurred (InvalidSignatureException) when calling the GetAuthorizationToken operation: Signature not yet current: 20250601T172510Z is still later than 20250601T123631Z (20250601T122131Z + 15 min.)
Error: Cannot perform an interactive login from a non TTY device - Solution: sudo apt-get install ntp, sudo service ntp start
- aws ecr get-login-password --region eu-west-2 | docker login --username AWS --password-stdin 565393050355.dkr.ecr.eu-west-2.amazonaws.com
- Login Succeeded.
- $docker images (list of images )
- secret_santa:v1
- Create tag for the image:
- $docker tag secret_santa:v1 565393050355.dkr.ecr.eu-west-2.amazonaws.com/star_ecr:latest
- $docker images
- 565393050355.dkr.ecr.eu-west-2.amazonaws.com/star_ecr:latest
- Push image to ECR private repository:
- $docker push 565393050355.dkr.ecr.eu-west-2.amazonaws.com/star_ecr:latest (with this tag docker will push image to AWS private registry)
- Check in the AWS ecr images
- Pull the image from ECR private registry:
- $aws configure list (check credetials added)
- copy the url from AWS ecr image: 565393050355.dkr.ecr.eu-west-2.amazonaws.com/star_ecr:latest
- $docker pull <aws_account_id>.dkr.ecr.<region>.amazonaws.com/<repository_name>:<tag>
- $docker pull 565393050355.dkr.ecr.eu-west-2.amazonaws.com/star_ecr:latest
- Create the container using the AWS ECR private registry image:
- $docker run -d --name star_secretsanta -p 8081:8080 565393050355.dkr.ecr.eu-west-2.amazonaws.com/star_ecr:latest
- Create a Ubuntu VM and install Docker.
code
- code
- code
- code
Network Host & Container
Host network, docker network, container network
- Host / Docker host Networking:
- Windows 11 is installed on a PC which has got IP address 10.50.10.186 from network.
- VMWare workstation is installed and configured NAT in virtual network editor with CIDR 192.168.171.0 /24, VM's created will be assign IP address from this range and all VMs will have internet as NAT is configured.
- A VM is created and has got an ip address: 192.168.171.106. 255.255.255.0, G/W 192.168.171.2
- When you install a docker on a VM, it creates a docker0 interface and assign an IP address 172.17.0.1 from CIDR range 172.17.0.0/16 which is linked with host network.
- Docker installed on VM is called docker host and it has a different private/public IP address (ex.,192.168.171.100)
- This VM will have interface eth0 or ens33 and has IP address 192.168.171.100
- $ifconfig or
- $ip a
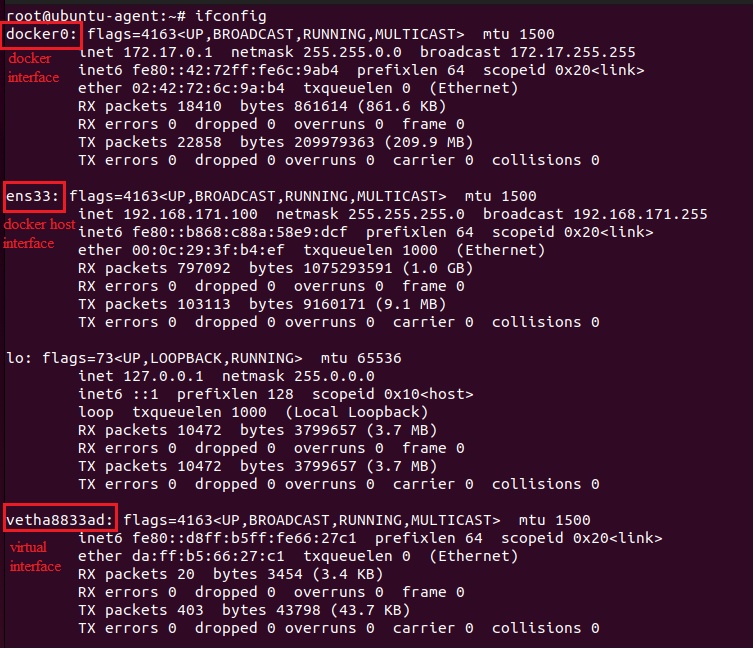
- docker0 is the network interface of docker
- ens33 is the docker host/ubuntu interface
- vetha8833ad is container network interface assigned by docker bridge.
- IPtable:
- save IPtable in a file.
- $iptables-save > iptable1
- $cat iptable1
- # Generated by iptables-save v1.8.10 (nf_tables) on Tue Oct 21 12:54:05 2025
*raw
:PREROUTING ACCEPT [10833:34270208]
:OUTPUT ACCEPT [0:0]
-A PREROUTING -d 172.17.0.2/32 ! -i docker0 -j DROP
-A PREROUTING -d 172.17.0.3/32 ! -i docker0 -j DROP
-A PREROUTING -d 172.17.0.4/32 ! -i docker0 -j DROP
COMMIT
# Completed on Tue Oct 21 12:54:05 2025
# Generated by iptables-save v1.8.10 (nf_tables) on Tue Oct 21 12:54:05 2025
*filter
:INPUT ACCEPT [0:0]
:FORWARD DROP [0:0]
:OUTPUT ACCEPT [0:0]
:DOCKER - [0:0]
:DOCKER-BRIDGE - [0:0]
:DOCKER-CT - [0:0]
:DOCKER-FORWARD - [0:0]
:DOCKER-ISOLATION-STAGE-1 - [0:0]
:DOCKER-ISOLATION-STAGE-2 - [0:0]
:DOCKER-USER - [0:0]
-A FORWARD -j DOCKER-USER
-A FORWARD -j DOCKER-FORWARD
-A DOCKER ! -i docker0 -o docker0 -j DROP
-A DOCKER-BRIDGE -o docker0 -j DOCKER
-A DOCKER-CT -o docker0 -m conntrack --ctstate RELATED,ESTABLISHED -j ACCEPT
-A DOCKER-FORWARD -j DOCKER-CT
-A DOCKER-FORWARD -j DOCKER-ISOLATION-STAGE-1
-A DOCKER-FORWARD -j DOCKER-BRIDGE
-A DOCKER-FORWARD -i docker0 -j ACCEPT
-A DOCKER-ISOLATION-STAGE-1 -i docker0 ! -o docker0 -j DOCKER-ISOLATION-STAGE-2
-A DOCKER-ISOLATION-STAGE-2 -o docker0 -j DROP
COMMIT
# Completed on Tue Oct 21 12:54:05 2025
# Generated by iptables-save v1.8.10 (nf_tables) on Tue Oct 21 12:54:05 2025
*nat
:PREROUTING ACCEPT [1921:353679]
:INPUT ACCEPT [0:0]
:OUTPUT ACCEPT [1106:77649]
:POSTROUTING ACCEPT [1106:77649]
:DOCKER - [0:0]
-A PREROUTING -m addrtype --dst-type LOCAL -j DOCKER
-A OUTPUT ! -d 127.0.0.0/8 -m addrtype --dst-type LOCAL -j DOCKER
-A POSTROUTING -s 172.17.0.0/16 ! -o docker0 -j MASQUERADE
-A DOCKER -i docker0 -j RETURN
COMMIT
# Completed on Tue Oct 21 12:54:05 2025 - explanation:
- -A POSTROUTING -s 172.17.0.0/16 ! -o docker0 -j MASQUERADE: (MASQUERADE = NAT), it perform the natting for CIDR 172.17.0.0/16 for interface docker0
- Docker Networking:
- Docker creates the following network:
- $docker network ls
- root@docker:~# docker network ls
NETWORK ID NAME DRIVER SCOPE
3cbea76b9050 bridge bridge local
2043aee75972 host host local
aa07fab46e70 none null local
- root@docker:~# docker network ls
- Find out how many bridge network in linux system:
- $brctl show
- Container Network Drivers: The following are network drivers in container netowrks.
- bridge
- host
- MacVlan
- IPVlan: Breaking large network into small networks
- none
- bridge:
- After docker installation a bridge network created.
- All containers network by default assicate with bridge network. Any containers created will get by default IP address and virtual adapter from bridge network.
- bridge creates isolated network for containers.
- It act as a virtual switch (SDN Switch = Software Define Network Switch), it is non-manageable switch where you cannot do routing & switching.
- It provides virtual adapter and IP addresses to containers from default CIDR range 172.17.0.0/16
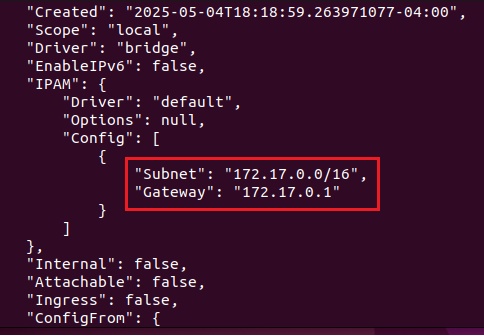
- $docker inspect bridge: It provides network details of bridge and containers
- subnet of bridge
- $docker inspect bridge | grep -i subnet
- "Subnet": "172.17.0.0/16"
- containers IP address assigned.
- Lab: containers of docker host attached to same bridge can communicate and have internet access
- $docker run -it --name=web1 alpine
- $docker run -it --name=web2 alpine
- $docker inspect web1
- $docker inspect web2 (take ip address)
- Login to web1
- $docker exec -it web1 sh (alpine does not have bash terminal)
- #ping 172.17.0.3 (pinging)
- Outbound traffic rule: Outbound traffic is allowed from outside.
- #ping google.com (pinging)
- #ip route
- default via 172.17.0.1 dev eth0
172.17.0.0/16 dev eth0 scope link src 172.17.0. - default via 172.17.0.1 is the gateway through which traffic goes out.
- This gateway connects container with host machine.
- Inbound traffic rule: inbound is restricted from outside
- When you access the container within this network you can connect directly with container IP address (from 172.17.0.0/16 range)
- If need to connect from outside than you hit docker host IP address 192.168.171.103 and it is mapped with container IP address.
- If you have multiple containers and need to access from outside than docker host IP is already mapped with a container, so you configure port map and access from outside.
- Perform port configuration where a port number is bind with container IP, to access container from outside the network you hit docker host IP with port number and it will connect you to container
- Container:
- Each container should have ip address so that it can communicate others.
- After container is created a virtual interface and ip address is assgined by bridge.
- Container Public IP: bridge uses NAT and linked with host machine, so host IP will act as public IP of container. container IP will translate wot host IP to access outside netowork.
- Virtual Interface:
- It makes communication between docker host and container.
- It is visible only when container is in running.
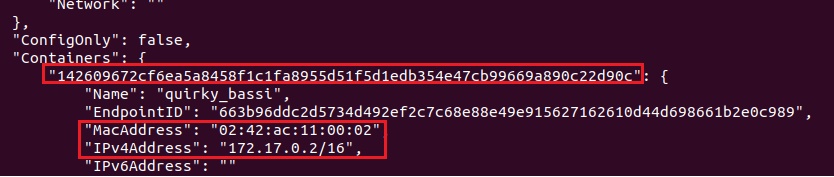
Container, IP, hostname, DNS, Route
- Get container IP address:
- $docker inspect --format='{{.NetworkSettings.IPAddress}}' web3 (web3 is container name, you can use container ID)
- Get into running container:
- $docker exec -it 920b4d076d84 /bin/bash
- container hostname:
- $hostname
- f973f33fb7c8
- container DNS:
- $cat /etc/resolv.conf
- nameserver 192.168.171.2 (it is VM gatway address)
- Routing Table:
- root@920b4d076d84:/# route -n
- network9.jpg
- Get container IP address:
Create a docker custom network, custom IP range, Expose bridge network containers,
- $docker inspect bridge | grep -i subnet
- "subnet": "192.168.0.0/16"
- It uses class B CIDR range and provides 65534 ip address.
- All containers belong to same bridge than it will be a security concern, for isolation we can create custom bridge and create containers accordingly.
- $docker network --help
- Lab 1:
- Create a custom bridge network:
- $docker network create star_network1
- Network is created: 53814025c4a2743eee335e51ac2058b6957167f69fa66edc8af454c77670d581
- $docker network inspect star_network1
- It has assign network subnet "172.18.0.0/16" (default is 172.17.0.0 and assing next network range)
- Disconnect container from a network:
- $docker network disconnect star_network2 containerID.
- Delete network:
- $ docker network rm star_network1
- Assign custom IP range:
- $ docker network create star_network2 --subnet=10.10.10.0/24
- IP range:
- $ docker network inspect star_network2
- "Subnet": "10.10.10.0/24"
- Create a container in the above network:
- $ docker container run -it --network=star_network2 ubuntu:14.04
- check IP address assign:
- $ifconfig
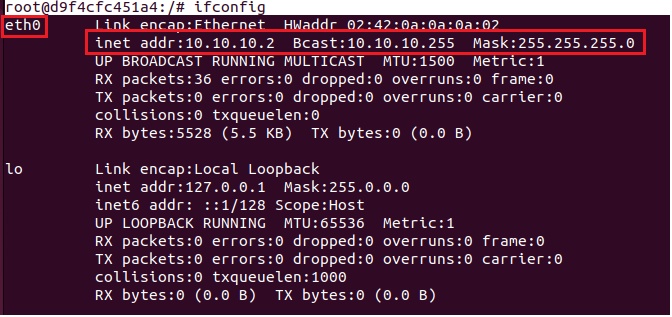
- Create a container in the above network with a specific IP address:
- root@ubuntu-agent:~# docker container run -it --network=star_network2 --ip 10.10.10.50 ubuntu:14.04
- root@7aa6235915bf:/# ifconfig
- inet addr:10.10.10.50 Bcast:10.10.10.255 Mask:255.255.255.0
- Containers of same network can ping but cannot ping with different network.
- ping 172.17.0.2 cannot ping
- ping 10.10.10.x/24
- Create a custom bridge network:
- Lab 2:
- Create a custom bridge network with particular subnet CIDR:
- custom_bridge1.jpg
- $docker network create --subnet 192.168.10.0/24 --driver bridge front
- $docker inspect star_bridge
- $docker network create --subnet 192.168.20.0/24 --driver bridge star_backend
- $docker inspect star_bridge
- There will be a gateway for each bridge, this gateway connects with host machine.
- $ifconfig (install apt install net-tools)
-
br-5acce29343bc: flags=4099<UP,BROADCAST,MULTICAST> mtu 1500
inet 192.168.10.1 netmask 255.255.255.0 broadcast 192.168.10.255
ether 5a:97:e9:a6:28:4c txqueuelen 0 (Ethernet)
RX packets 0 bytes 0 (0.0 B)
RX errors 0 dropped 0 overruns 0 frame 0
TX packets 0 bytes 0 (0.0 B)
TX errors 0 dropped 0 overruns 0 carrier 0 collisions 0br-f805e3ffe9cd: flags=4099<UP,BROADCAST,MULTICAST> mtu 1500
inet 192.168.20.1 netmask 255.255.255.0 broadcast 192.168.20.255
ether 62:5c:0c:23:66:1d txqueuelen 0 (Ethernet)
RX packets 0 bytes 0 (0.0 B)
RX errors 0 dropped 0 overruns 0 frame 0
TX packets 0 bytes 0 (0.0 B)
TX errors 0 dropped 0 overruns 0 carrier 0 collisions 0docker0: flags=4163<UP,BROADCAST,RUNNING,MULTICAST> mtu 1500
inet 172.17.0.1 netmask 255.255.0.0 broadcast 172.17.255.255
inet6 fe80::7c22:87ff:fe6f:b8b9 prefixlen 64 scopeid 0x20<link>
ether 7e:22:87:6f:b8:b9 txqueuelen 0 (Ethernet)
RX packets 22 bytes 784 (784.0 B)
RX errors 0 dropped 0 overruns 0 frame 0
TX packets 54 bytes 7395 (7.3 KB)
TX errors 0 dropped 71 overruns 0 carrier 0 collisions 0 - The above is three bridge whose gateway is assigned.
- front bridge gateway: 192.168.10.1
- back bridge gateway: 192.168.20.1
- default bridge gateway(docker0): 172.17.0.1
- Create container in Database
- $docker run -d --name=database --network backend -e MYSQL_ROOT_PASSWORD=Trustu786 mysql:5.6
- $docker inspect database | grep -i IPAddress
- 192.168.20.2
- Create container in Business App
- $docker run -d --name=bus_app --network front --network backend nginx
- docker inspect bus_app | grep -i IPAddress
- "IPAddress": "192.168.20.3",
"IPAddress": "192.168.10.2", - Get into container:
- $docker exec -it bus_app sh
- #apt update -y ; apt install net-tools -y
- #ifconfig
- network10.jpg
- Install telnet: Can check reachability with telnet
- #apt install telnet -y
- This container can communicate with backend and front containers.
- #telnet 192.168.20.2:3306 (daabase port number 3306)
- Trying 192.168.20.2...
Connected to 192.168.20.2.
- Create container in frontend
- $docker run -d --name=front --network front nginx
- $docker inspect 6b09d1bf2b9a | grep -i IPAddress
- "IPAddress": "192.168.10.3",
- Get into container:
- $docker exec -it front sh
- #apt update ; apt install net-tools -y ; apt install telnet -y
- #ifconfig
- #telnet 192.168.20.2 3306 (unable to connect to database container)
- #telnet 192.168.10.2 80 (connect to bus_app using IP assigned by bridge
- Connect/Disconnect containers to network: network-->connect-->bridgename-->container_name
- Front can connect to Bus_App
- Bus_app can connect with backend & front
- Front cannot connect with DB
- Front need to connect to DB?
- Either change Front or DB network
- Change front container network to db network
- Container networks are hot plug means on running mode you can change its network.
- network-->connect-->new bridgename-->container_name
- $docker network connect backend front
- now connect to cotainer front and check there will be two IPs
- $docker exec -it front sh
- #ifconfig
- #telnet 192.168.20.2 3306
- front container can communicate with database.
- Disconnect front container with database
- $docker network disconnect backend front
- Delete all containers
- $docker rm -f $(docker ps -aq)
- Delete custom network:
- $docker network rm backend
- $docker network rm front
- Terminate all unused network (not attached with any container)
- $docker network prune
- Expose bridge network container:
- How to access application running on container from external world.
- Incoming Traffic configuration.
Communication between different network containers with/without port mapping
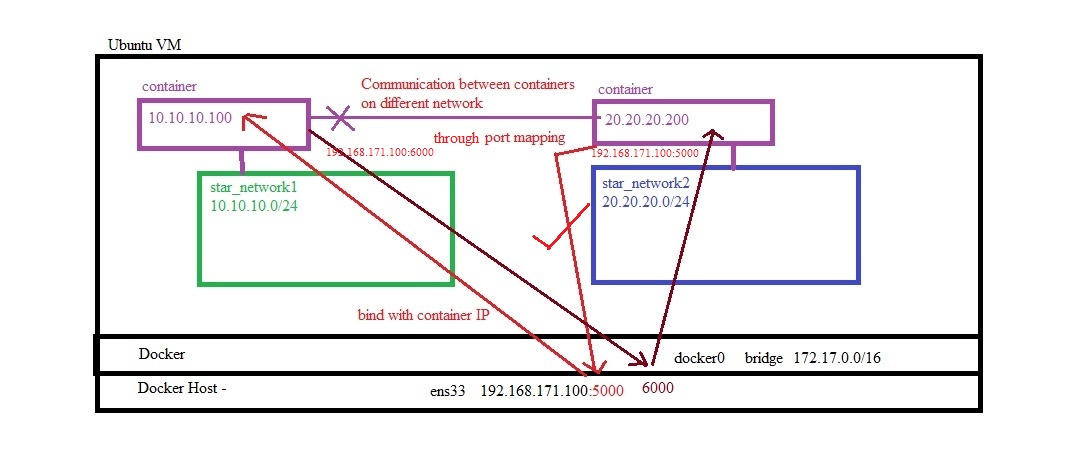
- Create two networks
- Create first network star_network1 (10.10.10.0/24)
- root@ubuntu-agent:~# docker network create star_network1 --subnet=10.10.10.0/24
- root@ubuntu-agent:~# docker network ls
- root@ubuntu-agent:~# docker network inspect 34c63a095cf6
- Create second network star_network2 (20.20.20.0/24)
- root@ubuntu-agent:~# docker network create star_network1 --subnet=20.20.20.0/24
- Deploy ubuntu:14.04, install apache2 container on both networks:
- First container deployed on First network star_network1
- root@ubuntu-agent:~# docker container run -it --network=star_network1 --ip 10.10.10.100 -p 5000:80 ubuntu:14.04 (portmapping: 5000 will be host port and 80 will be container port to access appliction)
- root@434c3d51f440:/# ifconfig
- inet addr:10.10.10.100 Bcast:10.10.10.255 Mask:255.255.255.0
- root@434c3d51f440:/#apt-get update
- root@434c3d51f440:/# apt-get install apache2
- root@434c3d51f440:/# cd /var/www/html
- root@434c3d51f440:/var/www/html# echo "Welcome to site created on star_network1 with the IP 10.10.10.100" > index.html
- root@434c3d51f440:/var/www/html# service apache2 start
- Second container deployed on second network star_network2
- root@ubuntu-agent:~# docker container run -it --network=star_network2 --ip 20.20.20.200 -p 6000:80 ubuntu:14.04 (portmapping: 6000 will be host port and 80 will be container port to access appliction)
- root@67cf40ae74c1:/# ifconfig
- inet addr:20.20.20.200 Bcast:20.20.20.255 Mask:255.255.255.0
- root@67cf40ae74c1:/#apt-get update
- root@67cf40ae74c1:/# apt-get install apache2
- root@67cf40ae74c1:/# cd /var/www/html
- root@67cf40ae74c1:/var/www/html# echo "Welcome to site created on star_network2 with the IP 20.20.20.200" > index.html
- root@67cf40ae74c1:/var/www/html# service apache2 start
- root@67cf40ae74c1:~# apt-get install wget (to access the site on 10.10.10.100:5000)
- Access the site with port mapping:
- root@67cf40ae74c1:~# wget 10.10.10.100 (it will not connect as trying to access from container 2 an application running on container1)
- To access hit dockerhost IP with port 5000
- root@67cf40ae74c1:~# wget 192.168.171.100:5000
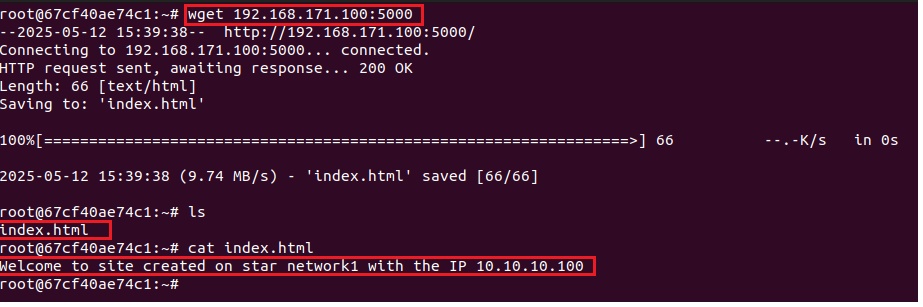
- Try from first container to access application on second container.
- root@434c3d51f440:~#apt-get install wget
- root@434c3d51f440:~# wget 192.168.171.100:6000
- Access without port mapping
- code
Communication between two containers, frontend and backend in MongoDB
- ForntEnd container = MongoExpress: using URL access the mongoDB
- BackEnd container = MongoDB : Actual database which will be access through front end.
- code
- code
code
- code
- code
- code
code
- code
- code
- code


Image : Docker File
Dockerfile parameters:
- Images: It is a combination of binaries and libraries which are required for an application/software to run. Docker images are light weight and small in size.
- Types of Images:
- Raw Image: O/S minor footprint: It has very necessary & required O/S commands which helps and manage the application. search nginx in docker hub, click any image and it will open in github where you can see FROM xxxx
- Service Images: Full fledge O/S or software (it includes raw image which helps and manage the application)
- $docker pull docker.io/ubuntu
- Ubuntu image contains raw or minor footprint of ubuntu, it contain basic commands which is required to maintain application, like cd command, ls command etc.
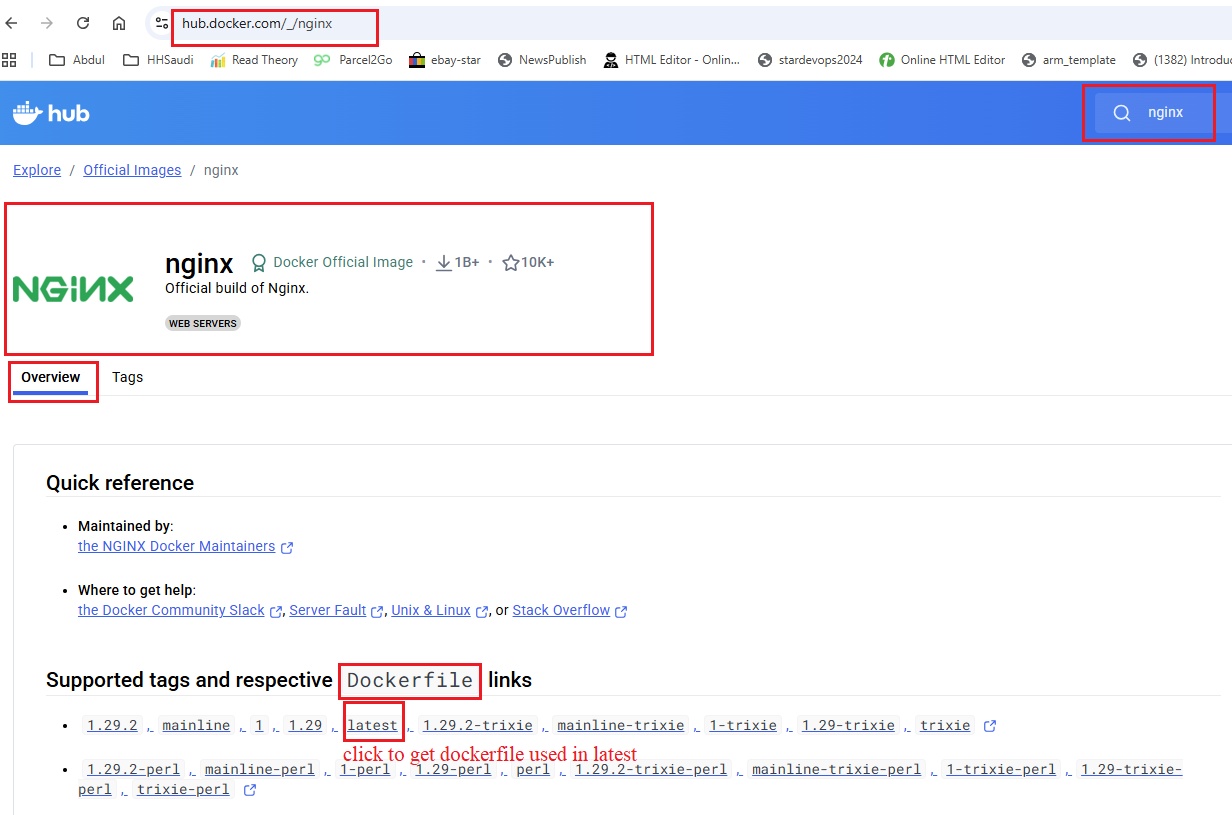
- It will open github dockerfile, check FROM
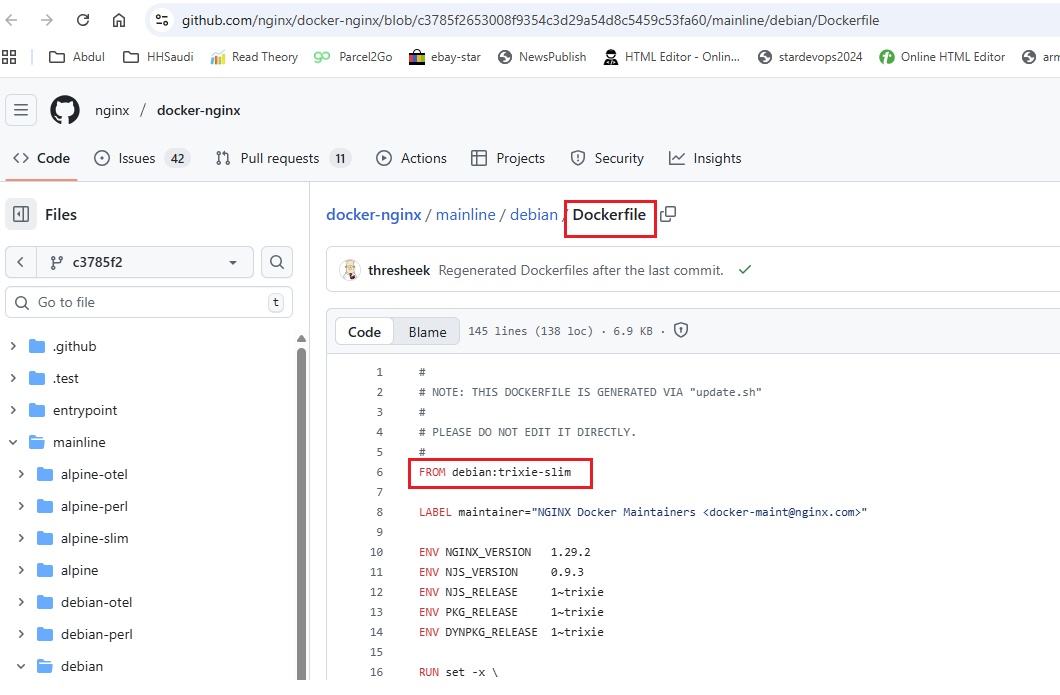
- if you try to download the raw image, it gives the message that image is already downloaded, it is inside ubuntu image.
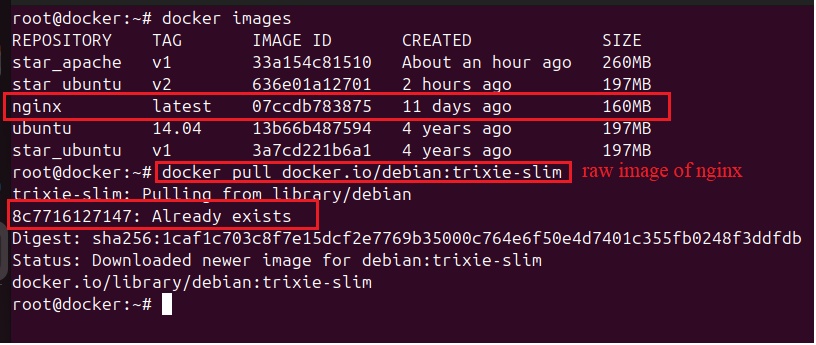
- Custom Image: It has raw image (O/S) + main application Code + Dependencies + executable command
- with the help of Dockerfile a custom Docker image can be created.
- Workflow of Dockerfile:
- Create a Dockerfile
- First we define base image which supports to run main application: Define with FROM
- copy the source code of main application.
- Install any dependencies which is needed to run application.
- Define command which should be executed when run image.
- Build the custom_image.
- Create container with custom_image
- Dockerfile/declarative method : It is a smiple text file in which you define the following parameters (case sensitive), than you build the image using this Dockerfile:
- FROM: Use to specify the reference of base/raw image. It is the raw image which has minimal/basic commands required to manage application. it is manadatory parameter. You can use more than one FROM parameter in multi-staging.
- MAINTAINER: This represents name of the organization or the author who created this docker file.
- CMD: This is used to specify the initial command that should be executed when the container starts.
- ENTRYPOINT: Used to specify the default process that should be executed when container starts. It can also be used for accepting arguments from the CMD instruction.
- RUN: Use for running linux commands within the container. It is generally helpful for installing the software in the container.
- USER: Used to specify the default user who should login into the container.
- WORKDIR: Used to specify default working directory in the container.
- COPY: Copying the files from the host machine to the container.
- ADD: Used for copying files from host to container, it can also be used for downloading files from remote servers.
- ENV: Used for specifying the environment variables that should be passed to the container.
- EXPOSE: Used to specify the internal port of the container.
- VOLUME: Used to specify the default volume that should be attached to the container.
- LABEL: Used for giving label to the container. optional parameter, pass info abt image, who created, email, etc.. check with $docker inspect image image_name
- STOPSIGNAL: Used to specify the key sequences that have to be passed in order to stop the container.
- CMD and ENTRYPOINT does not create a layer as it does not occupy space.
Docker Commit
- You create an image of an existing docker container with all software/application installed so it can be used later to create container.
- Step1: Create a container:
- #docker run --name myubuntu -it ubuntu
- #apt-get update
- #apt-get install git -y
- #git --version
- Step2: create an image/snapshot of the above container myubuntu
- docker commit myubuntu ubuntugit (image of myubuntu will be created with the name ubuntugit, this image has git )
- #docker images (ubuntugit image is created)
- Step3: create a container using ubuntugit image.
- #docker run --name starubuntu -it ubuntugit
- #git --version (git is installed in the image)
- Code
- Code
Dockerfile examples:
Create a custom image with Ubuntu base image + a file.
- Pull ubuntu base image:
- $docker image pull ubuntu:14.04
- $docker image ls
- $docker image history 13b66b487594
- Create a Dockerfile and enter the code
- $vim Dockerfile (if you use different name than at the time of deployment you use -f filename)
- copy and paste the following code, it simply use ubuntu:14.04 image.
-
FROM ubuntu:14.04 #Defining to take ubuntu:14.04 base image to create custom image, save & exit
- Build Image 1:
- $docker image build -t star_ubuntu:1 . (t is for tag, . dot means file at current path) dot has been given at the end to define Dockerfile is at current path, if used custom name than we should define -f filename
- $docker image build -t star_ubuntu -f custom_filename .
- custom ubuntu image with the name star_ubuntu:1 has been created.
- both IMAGE ID are same as we have not made any changes in building custom image so there is no additional layer in the image.
- Create a file test123 in the new custom image of ubuntu.
- edit Dockerfile:
- root@ubuntu-agent:~# vim Dockerfile
- FROM ubuntu:14.04
RUN touch test123 - save & exit
- Build an image 2:
- root@ubuntu-agent:~# docker image build -t star_ubuntu:2 .
- root@ubuntu-agent:~# docker image history 3e46222c9568
- Image ID has been changed and if run history there is one layer added /bin/bash -C touch test123, remaining 5 layers are same as there in base image.
- Deploy custom image:
- root@ubuntu-agent:~# docker container run -it --name myserver star_ubuntu:2
- Code
- Pull ubuntu base image:
Ubuntu image, Run apt-get update, apt-get install apache2, tree, openssh-server & client, curl, change directory to /html and change index.html, service apache 2 start.
- $vim Dockerfile
- FROM ubuntu:14.04
RUN touch test123
RUN apt-get update && apt-get install -y apache2 # update and install apache2
RUN apt-get install -y tree openssh-server openssh-client curl #install tree and openssh, curl
RUN cd /var/www/html #change directory
RUN echo "Welcome to Star Distributors " > /var/www/html/index.html #change index.html file
RUN service apache2 start # start apache2 service - save & exit
- FROM ubuntu:14.04
- Build Image:
- $docker image build -t star_ubuntu:3 .
- Create Container
- $docker container run -d --name webserver1 star_ubuntu:3
- Get IP address of container:
- $docker inspect container_ID
- Get into container:
- $docker exec -it container_ID bash
- Access the web app
- $curl IP
- $vim Dockerfile
Create image using python/flask and output "Hello, Star Distributors" message.
- Create a directory:
- $mkdir python
- create a python code file and paste the code
- Python code
-
$vim app.pyCreate a Dockerfilefrom flask import Flask
app = Flask(__name__)
@app.route("/")def home():return "Hello, Star Distributors"if __name__ == "__main__":app.run(host="0.0.0.0", port=5000)
- $vim Dockerfile
-
FROM python:3.9-slimWORKDIR /appADD app.py app.pyRUN pip install flaskEXPOSE 5000CMD ["python", "app.py"]
- Can also be write without WORKDIR:
-
FROM python:3.9-slimADD app.py app/app.pyRUN pip install flaskEXPOSE 5000CMD ["python", "/app/ app.py"]
- Can also be write in shell form:
-
FROM python:3.9-slimADD app.py app/app.pyRUN pip install flaskEXPOSE 5000CMD python app.py
-
- save & exit
-
- Build Image:
- Make sure you are in python folder
- $docker build -t star_python1 .
- Tag the Image:
- $docker tag star_python aziz27uk/star_python1
- $docker images
- root@docker:~/python# docker images
REPOSITORY TAG IMAGE ID CREATED SIZE
aziz27uk/star_python1 latest c8008819201e 18 minutes ago 133MB
star_python1 latest c8008819201e 18 minutes ago 133MB
- Push Image to docker hub repositor:
- $docker login:
-
USING WEB-BASED LOGIN
i Info → To sign in with credentials on the command line, use 'docker login -u <username>'
Your one-time device confirmation code is: GLCQ-PSLW
Press ENTER to open your browser or submit your device code here: https://login.docker.com/activateWaiting for authentication in the browser…
WARNING! Your credentials are stored unencrypted in '/root/.docker/config.json'.
Configure a credential helper to remove this warning. See
https://docs.docker.com/go/credential-store/ - open the link in the browser and enter the above code:
- Enter credentals of docker hub : aziz27uk@yahoo.co.uk and password: Yez....!
- Push the image to docker hub:
- $docker push aziz27uk/star_python1
- Confirm in hub.docker.com
- Create a container:
- $docker run -d -p 8081:5000 --name=test1 aziz27uk/star_python1:latest
- Access the python application:
- Check which processes is running on container:
- $docker top test1
- only one process (CMD python app.py ) is running.
- check logs of container:
- $docker logs test1
- Run a command in container from outside
- $docker exec test1 ls (it will run ls command in container and show result)
- Create a directory:
parameter: FROM
- we define base image which helps and run main application.
- search the base image on docker hub: go to hub.docker.com and in search type ububtu, it will list all available ubuntu images. click on tag to select different version.
- FROM ubuntu:24.04
- FROM alpine:3.14 (you insall packages in alpine with apk, #apk install net-tools)
parameter: COPY vs ADD
-
Command COPY ADD Copy single file Yes Yes Copy Multiple Files Yes Yes Copy Multiple Files in one Layer Yes Yes Copy files from URL No Yes Copy Archive Files (.gz .tar) No Yes - Create a folder and create some files in it for this demo:
- $mkdir ubuntu
- $ubuntu/ abc.txt data.txt text1.txt text2.txt text3.txt
- Copy single file:
- COPY
- $vim Dockerfile
-
FROM ubuntu:14.04
RUN mkdir aziz
COPY text*.txt /aziz/ - create image: $docker build -t copy-demo .
- Create container: $docker run -it -d --name copy-demo1 copy-demo
- Login to Contianer and check folder aziz: $docker exec -it container_ID /bin/bash
- It copied text1.txt text2.txt tex3.txt in aziz folder.
-
- ADD
-
FROM ubuntu:14.04
RUN mkdir aziz
ADD text*.txt /aziz/ - create image: $docker build -t add-demo .
- Create container: $docker run -it -d --name add-demo1 add-demo
- Login to Contianer and check folder aziz: $docker exec -it container_ID /bin/bash
- It copied text1.txt text2.txt tex3.txt in aziz folder.
- both has performed same action.
-
- Copy Multiple files in one layer:
-
FROM ubuntu:14.04
RUN mkdir aziz1
COPY text*.txt abc.txt data.txt /aziz1/ - create image: $docker build -t copy-multiple-demo .
- Create container: $docker run -it -d --name multiple-demo1 copy-multiple-demo
- Login to Contianer and check folder aziz1: $docker exec -it container_ID /bin/bash
- It copied text1.txt text2.txt tex3.txt abc.txt and data.txt in aziz1 folder.
-
- ADD Multiple files in one layer:
-
FROM ubuntu:14.04
RUN mkdir aziz1
ADD text*.txt abc.txt data.txt /aziz1/ - create image: $docker build -t add-multiple-demo .
- Create container: $docker run -it -d --name multiple-demo1 add-demo
- Login to Contianer and check folder aziz: $docker exec -it container_ID /bin/bash
- It copied text1.txt text2.txt tex3.txt abc.txt and data.txt in aziz1 folder.
- both has performed same action.
-
- Copy files from URL using ADD
- ADD http://url /destination-folder/
-
FROM ubuntu:14.04
RUN mkdir aziz
ADD https://file-examples.com/wp-content/storage/2017/02/file-sample_1MB.doc /aziz/ - create image: $docker build -t copy-url .
- Create container: $docker run -it -d --name url-cont copy-url
- Login to Contianer and check folder aziz1: $docker exec -it container_ID /bin/bash
- It copied file-sample-1MB.doc in aziz folder.
- Copy archive file & extract
- Create a tar.gz file
- $tar -cvzf data.tar.gz abc.txt data.txt text1.txt text2.txt text3.txt
- It creates data.tar.gz
- ADD http://url /destination-folder/
-
FROM ubuntu:14.04
RUN mkdir aziz
ADD data.tar.gz /aziz/ - create image: $docker build -t add-tar .
- Create container: $docker run -it -d --name tar-cont add-url
- Login to Contianer and check folder aziz1: $docker exec -it container_ID /bin/bash
- docker exec -it tar-cont /bin/bash
root@ddcc6470ff76:/# ls
aziz bin boot dev etc home lib lib64 media mnt opt proc root run sbin srv sys tmp usr var
root@ddcc6470ff76:/# cd aziz
root@ddcc6470ff76:/aziz# ls
abc.txt data.txt text1.txt text2.txt text3.txt - It copied and extracted file data.tar.gz in aziz folder.
- Create a tar.gz file
-
parameter: RUN
- Code
parameter: CMD vs ENTRYPOINT
- Both CMD & ENTRYPOINT commands are used to run after image has been deployed in container.
- CMD exercise:
- $vim Dockerfile
- FROM alpine:latest
- CMD ["ls","-l"] #defines the default command that runs when the container starts.
- Create image:
- $docker build -t alpine-cmd .
- Create container:
- $docker run alpine:cmd1
- it will create a container and run ls -l command
- $docker ps -a
- look command = "ls -l"
- Overwrite the command:
- In the above Dockerfile we have define ls -l which will be excuted after container created. you can enter manual command while creating container which will overwrite the dockerfile command. it replace the command.
- $docker run alpine-cmd ls -ll (it will overwrite ls -l and will run ls -ll)
- $docker run alpine-cmd ls -a (it will overwrite ls -l and will run ls -a)
- ENTRYPOINT exercise:
- $vim Dockerfile
- FROM alpine:latest
ENTRYPOINT ["ls", "-l"] #defines the default command that runs when the container starts. - Create image:
- $docker build -t alpine-entry .
- Create container:
- $docker run alpine:entry
- it will create a container and run ls -l command
- $docker ps -a
- look command = "ls -l"
- Append/Extend the command:
- In the above Dockerfile we have define ls -l which will be excuted after container created. you can enter manual command while creating container which will extend the dockerfile command. It extend command adn both will run.
- $docker run alpine-cmd ls -a (it will run ls -la)
- Combined CMD & ENTRYPOINT:
- $vim Dockerfile
- FROM alpine:latest
ENTRYPOINT ["ls"]
CMD ["-l"] - Create image:
- $docker build -t alpine-dual .
- Create container:
- $docker run alpine:dual
- it will create a container and run ls -l command
- $docker ps -a
- look command = "ls -l"
- Overwrite the command:
- In the above Dockerfile we have define ls -l which will be excuted after container created. you can enter manual command while creating container which will extend the dockerfile command. It extend command adn both will run.
- $docker run alpine-dual -a (it will overwrite -l command will run ls -a)
- In both multiple CMD & ENTRYPOINT, docker will apply the last define command.
- If you define two CMD/ENTRYPOINT commands in Dockerfile than last will execute (tree)
- Create Dockerfile:
- $vim Dockerfile
- FROM ubuntu:latest
RUN apt-get update && apt install tree -y
CMD ["ls"]
CMD ["df"] - save & exit
- FROM ubuntu:latest
- Create Image
- $docker build -t dual-cmd .
- Create Container:
- $docker run dual-cmd
- it will display df
Create a custom image of Nginx
- Create a dockerfile by taking nginx as the base image(image from docker hub) and specify the maintainer as aziz.
- $ sudo su -
- # vim dockerfile
-
FROM nginx
MAINTAINER aziz - :wq!
- Construct an image from the above dockerfile.
- #docker build -t aziznginx . ( t stands for tag, . stands for current working dir aziznginx is the new image name )
- Code
- Create a dockerfile by taking nginx as the base image(image from docker hub) and specify the maintainer as aziz.
Cache Busting:
-
- Whenever an image is build from a dockerfile, docker reads its memory and checks which steps/instructions were already executed. These steps will not be re-executed.
It will execute only the new instructions. This is a time saving mechanism provided by docker. - The disadvantage is that as it will not re execute previous steps so any updated package will not be run so we can end up installing software packages from a repository which is updated long time back. (we run apt-get update before installing any package so it will not be updated).
- && will be used re execute previous installed package.
create a docker file and define code to create a ubunutu container, update repository and install git.
FROM ubuntu
MAINTAINER logiclabs
RUN apt-get update
RUN apt-get install -y git- build image: #docker build -t myubuntu .

- All steps 1,2,3,4 are performed by pulling details from docker hub.
- Amend docker file and add RUN apt-get install tree
FROM ubuntu
MAINTAINER aziz
RUN apt-get update
RUN apt-get install -y git
RUN apt-get install tree- build image: #docker build -t myubuntu1 .

- Observe the output, Step 2, 3, 4 is using cache. Only step 5 is executed freshly.

- suppose if you are installing tree package after few months then it is drawback that it will not update repository and install tree on previously updated repository. To avoid this we use && and define in the dockerfile whichever step you want to execute again.
FROM ubuntu
MAINTAINER aziz
RUN apt-get update && apt-get install -y git tree- build image: #docker build -t myubuntu2 .

- Whenever an image is build from a dockerfile, docker reads its memory and checks which steps/instructions were already executed. These steps will not be re-executed.
-
Code
- Code
Code
- Code
Writing Dockerfile for Java Based Application where artifact (.jar) file is generated with maven.
- Create a ubuntu VM
- $sudo apt update
- Clone the project from git hub into a ubuntu machine.
- $git clone https://github.com/AbdulAziz-uk/secretsanta.git
- $cd secretsanta
- $ls
- ansible.txt
- Jenkinsfile
- Jenkinsfile1
- mvnw
- mvnw.cmd
- pom.xml
- preview-images
- README.md
- src
- xyz.txt
- To build this application we should have jdk and maven.
- Install jdk:
- Install maven:
- root@master:~/secretsanta# sudo apt install maven -y (it will install maven and jdk together)
- root@master:~/secretsanta#mvn -version
- root@master:~/secretsanta#java --version
- Build package with maven:
- $mvn package (it will package the code along with dependencies and generate artifact which will be executable of the package)
- $cd /target
- secretsanta-0.0.1-SNAPSHOT.jar file is created
- dockerfile_javabased1.jpg
- Create a Dockerfile to deploy container using the above .jar file: we required a base image of linux (ubuntu) and jdk17 to run this application. we do not need maven as we have .jar file already.
- $vim Dockerfile
-
FROM openjdk:8u151-jdk-alpine3.7 (search alpine linux based with jdk image in docker hub)
EXPOSE 8080
ENV APP_HOME /usr/src/app (Defining an environment where APP_HOME is the varible for path /usr/src/app app folder will be created)
COPY target/secretsanta-0.0.1-SNAPSHOT.jar $APP_HOME/app.jar (copying contents of secretsanta-0.0.1xxx.jar to app.jar)
WORKDIR $APP_HOME (work directory will be /usr/src/app)
ENTRYPOINT exec java -jar app.jar (or CMD ["java","-jar","app.jar"] (as soon as container is created the command will run)
- Build image:
- root@master:~/secretsanta# docker build -t secret_santa:v1 .
- Error: - LegacyKeyValueFormat: "ENV key=value" should be used instead of legacy "ENV key value" format (line 5)
- JSONArgsRecommended: JSON arguments recommended for ENTRYPOINT to prevent unintended behavior related to OS signals (line 11) - Solution: ENV APP_HOME=/usr/src/app
- Solution: CMD ["java","-jar","app.jar"]
- make changes in the Dockerfile for both lines and run build again
- root@master:~/secretsanta# docker images
- secret_santa:v1 image created
- Deploy image:
- root@master:~/secretsanta#docker run -d --name star_secretsanta -p 8081:8080 secret-santa:v1
- root@master:~/secretsanta#docker container ls
- root@master:~/secretsanta#docker container inspect container_ID
- Access application in browser:
- Define ubuntu, jdk, maven in the Dockerfile
- In the above scenario we have created jar file and than create image using Dockerfile. Here we will define maven in Dockerfile.
- Create a ubuntu VM
Writing Docker file for NodeJS Based Application
- Create a ubuntu VM
- $sudo apt update
- Clone the project from git hub into a ubuntu machine.
- root@master:~# git clone https://github.com/AbdulAziz-uk/nodejs-webapp-public.git
- root@master:~/nodejs-webapp-public# ls
- about.html
- app.js
- index.html
- package.json
- README.md
- Create a Dockerfile:
- root@master:~/nodejs-webapp-public# vim Dockerfile
- FROM node:alpine
COPY ./ ./
RUN npm install
EXPOSE 8081
CMD ["npm", "start"] - FROM node:alpine (base image of nodejs from alpine)
- COPY ./ ./ (copying all contents of nodejs application to container and run app.js from container)
- RUN npm install (installing dependencies which are mentioned in package.json)
- EXPOSE 8081 : port defining
- CMD ["npm","start"]
- FROM node:alpine
- root@master:~/nodejs-webapp-public# vim Dockerfile
- Build Image :
- root@master:~/nodejs-webapp-public# docker build -t nodejs_webapp:v1 .
- root@master:~/nodejs-webapp-public#docker images
- nodejs_webapp:v1 image is created.
- Deploy Image:
- root@master:~/nodejs-webapp-public# docker run -d --name star_nodejsapp -p 8084:8081 nodejs_webapp:v1
- port 8081 is defined in the code to run this application in the container, 8084 is the port mapping for host.
- root@master:~/nodejs-webapp-public# docker container ls
- root@master:~/nodejs-webapp-public# docker container inspect container_ID
- Access application:
- http://192.168.171.200:8084/
- Create a ubuntu VM
Code
- Code
Layer Architecture or cache
- Create a custom image of ubuntu and display layers.
- pull ubuntu:14.04 image:
- root@ubuntu-agent:~# docker image pull ubuntu:14.04
- create a file
- $vim Dockerfile
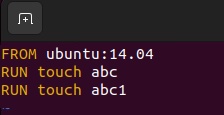
- FROM ubuntu:14.04
RUN touch abc
RUN touch abc1 - In the docker file three stages has been defined, use ubuntu:14.04 base image, create abc and abc1 files.
- save & exit
- Build image 4
- root@ubuntu-agent:~# docker image build -t star_ubuntu:4 .
- It shows steps 1/3, 2/3, 3/3
- In step 1/3 it pull centos: It creates a container 13b66b487594
- In step 2/3 it create abc file: it creates a container 718f57b3b44c and ran command touch abc and removed container
- In step 3/3 it creates abc1 file: it creates a container 97c3934dbdca and ran command touch abca and removed container
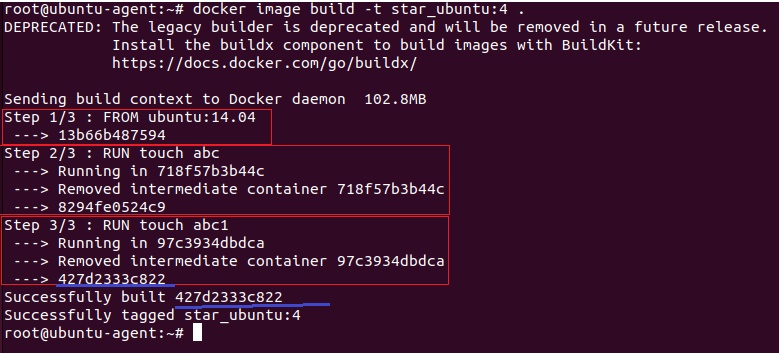
- root@ubuntu-agent:~# docker image ls
- image with image_ID 50872258475b
- Add more task in the docker file to check layers behaviour:
- $vim Dockerfile
- add in the file
- RUN touch abc2
RUN touch abc3
- RUN touch abc2
- save & exit
- Build Image 5:
- root@ubuntu-agent:~# docker image build -t star_ubuntu:5 .
- In step 2 & 3 it did not create container, it took from cache
- step 4 & 5 performed by creating containers.
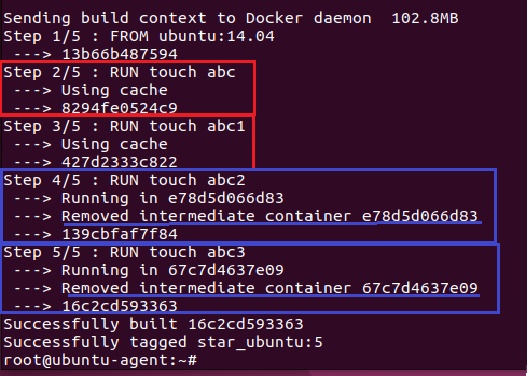
- Add more task in the docker file to check layers behaviour:
- $vim Dockerfile
- add in the file
- RUN apt-get update -y && apt-get install httpd -y && apt-get install tree -y
- save & exit
- Build Image 6:
- root@ubuntu-agent:~# docker image build -t star_ubuntu:6 .
- For new task it will create container and after task completion container will be deleted. Task done earlier will take it from cache.
- Create image without cache:
- When you create the image using the same dockerfile it takes the task from the cache previously done and run new tasks. If you want everytime it should run all task from beginning, define in the command --no-cache
- root@ubuntu-agent:~# docker image build -t star_ubuntu:1 . (it creates an image star_ubuntu 1) run the same command again.
- root@ubuntu-agent:~# docker image build -t star_ubuntu:1 . (it creates an image star_ubuntu2 but took task which was done earlier from cache).

- If you do not want task to be taken from cache due to some bugs in the code and trying to build image with all tasks to test.
- root@ubuntu-agent:~# docker image build --no-cache -t star_ubuntu3 . (it will run all task define in the dockerfile)
Environment Variable:
- $vim Dockerfile
- ENV Name=stardistributors
ENV Pass=docker@2020
- ENV Name=stardistributors
- Instead of entering the values in the code eveytime, we call it with variable name.
- Build:
- root@ubuntu-agent:~# docker image build -t star_ubuntu:8 .
- Test Environment variable:
- root@ubuntu-agent:~# docker container run -it star_ubuntu:8
- root@58590fd3c0ce:/# env
- Use the Environment value:
- we create a user and set password by calling variables
- $vim Dockerfile
- RUN useradd $Name && echo "$Name:$Pass" | chpasswd
- Build:
- root@ubuntu-agent:~# docker image build -t star_ubuntu:9 .
- Deploy:
- root@ubuntu-agent:~# docker container run -it star_ubuntu:9
- change user
- root@489649978bc8:/# su stardistributors
- code
- $vim Dockerfile
login to container with normal user:
- When you create a container and take interactive terminal it logged in as root, log in with a user
- $vim Dockerfile
- USER $Name
- Save & Exit
- Build:
- root@ubuntu-agent:~# docker image build -t star_ubuntu:10 .
- Deploy:
- root@ubuntu-agent:~# docker container run -it star_ubuntu:10
- stardistributors@e6dce761fb30:/$ Logged in with user
set PWD/Working Path for container
- After deploying container, pwd is set to /var/www/html
- $vim Dockerfile
- WORKDIR /var/www/html
- save & exit
- Build
- root@ubuntu-agent:~# docker image build -t star_ubuntu:11 .
- Deploy:
- root@ubuntu-agent:~# docker container run -it star_ubuntu:11
- stardistributors@ffb26f1abd19:/var/www/html$ Logged in with user and directory to /var/www/html
- code
Copy / ADD / CMD into container
- Copy a text file into container:
- root@ubuntu-agent:~# touch data123
- root@ubuntu-agent:~# vi Dockerfile
- COPY data123 /var/www/html
- save & exit
- Build:
- root@ubuntu-agent:~# docker image build -t star_ubuntu:12 .
- Deploy
- root@ubuntu-agent:~# docker container run -it star_ubuntu:12
- layer_architecutre5.jpg
- Copy a tar file into container:
- Create a tar file of /etc/
- root@ubuntu-agent:~# tar -czvf docker.tar.gz /etc/
- root@ubuntu-agent:~#ls
- root@ubuntu-agent:~# vi Dockerfile
- COPY docker.tar.gz /var/www/html
- save & exit
- Build:
- root@ubuntu-agent:~# docker image build -t star_ubuntu:13 .
- Deploy
- root@ubuntu-agent:~# docker container run -it star_ubuntu:13
- ADD docker.tar.gz
- It will extract the tar file and copied into destination
- root@ubuntu-agent:~# vi Dockerfile
- ADD docker.tar.gz /var/www/html
- save & exit
- Build:
- root@ubuntu-agent:~# docker image build -t star_ubuntu:14 .
- Deploy
- root@ubuntu-agent:~# docker container run -it star_ubuntu:14
- root@ubuntu-agent:~#ls
- ADD URL
- it download all html files from internet into container destination
- root@ubuntu-agent:~# vi Dockerfile
- ADD https://nicepage.com/ht/79260/business-strategy-agency-html-template# /var/www/html
- save & exit
- Build:
- root@ubuntu-agent:~# docker image build -t star_ubuntu:15 .
- Deploy
- root@ubuntu-agent:~# docker container run -it star_ubuntu:15
- root@ubuntu-agent:~#ls
- Run Tree command in container
- Make sure tree package is intalled in container and defined in Dockerfile
- root@ubuntu-agent:~# vi Dockerfile
- CMD ["tree"]
- save & exit
- Build:
- root@ubuntu-agent:~# docker image build -t star_ubuntu:16 .
- Deploy
- root@ubuntu-agent:~# docker container run -it star_ubuntu:16
- Install python and get python termial
- root@ubuntu-agent:~# vi Dockerfile
- RUN apt-get update && apt-get install -y python
CMD ["python"] - save & exit
- RUN apt-get update && apt-get install -y python
- Build:
- root@ubuntu-agent:~# docker image build -t star_ubuntu:17 .
- Deploy
- root@ubuntu-agent:~# docker container run -it star_ubuntu:17
- root@ubuntu-agent:~# vi Dockerfile
- Build:
- root@ubuntu-agent:~# docker image build -t star_ubuntu:18 .
- Deploy
- root@ubuntu-agent:~# docker container run -it star_ubuntu:18
SSH configuration for containers
- Define SSH configuration in Dockerfile for image so that you can SSH the containers.
- $docker contaiener ls or : check there is no port defined
- $docker contaiener inspect container_ID : check there is no port defined
- root@ubuntu-agent:~# vi Dockerfile
- RUN apt-get install -y openssh-server
RUN apt-get install -y openssh-client
RUN mkdir -p /var/run/sshd
EXPOSE 22
CMD ["/usr/sbin/sshd", "-D"]
- RUN apt-get install -y openssh-server
- save & exit
- Build:
- root@ubuntu-agent:~# docker image build -t star_ubuntu:19 .
- Deploy:
- root@ubuntu-agent:~# docker container run -itd star_ubuntu:19
- Test:
- root@ubuntu-agent:~# docker container ls (check port 22/tcp is configured0
- root@ubuntu-agent:~# docker container inspect 88a278ba4ea8 (to get IP address of container =172.17.0.2)
- root@ubuntu-agent:~# ssh root@172.17.0.2
- layer_architecture6.jpg
- Port Mapping:
- To access the container from outside the network, need to perform port mapping.
- port mapping with docker host IP (192.168.171.100), if it is public IP than it can be access from outside with port.
- root@ubuntu-agent:~# docker container run -it -p 5000:22 star_ubuntu:19
- ssh -p 5000 root@192.168.171.100
- Check ports are open:
- sudo netstat -plunt
- sudo ufw allow 22
Custom Name for dockerfile and located in different folder
- By default we use name Dockerfile to create docker file and build the image, instead of Dockerfile we can use custom name.
- While creating the image we defind dot . which means file is at current path and it check Dockerfile name and execute.
- Suppose Dockerfile moved to other folder (images) than execute the command by defining the path
- root@ubuntu-agent:~# docker image build -t star_ubuntu:19 -f /images/Dockerfile .
- or
- root@ubuntu-agent:~# docker image build -t star_ubuntu:19 -< /images/Dockerfile .
- Build image with custom file name.
- root@ubuntu-agent:~# mkdir images
- root@ubuntu-agent:~# cd images
- root@ubuntu-agent:~/images# vim file1
- FROM ubuntu:14.04
RUN touch abc
- FROM ubuntu:14.04
- Build image 20:
- root@ubuntu-agent:~/images# docker image build -t star_ubuntu:20 -f file1 . (current in the images folder and file1 is in the same folder)
- code
Build image without creating dockerfile
- root@ubuntu-agent:~# docker image build -t star_ubuntu:21 -<<EOF
FROM ubuntu:14.04
RUN apt-get update
RUN touch abc123
EOF - Image will build star_ubuntu 21
- Code
- root@ubuntu-agent:~# docker image build -t star_ubuntu:21 -<<EOF
Build image with file located remotely.
- file is uploaded on https://stardistributors.co.uk/devops/devops_tools/docker/Dockerfiles/docker_image_file1.txt
- Build image:
- root@ubuntu-agent:~# docker image build -t star_ubuntu:22 -f https://stardistributors.co.uk/devops/devops_tools/docker/Dockerfiles/docker_image_file1.txt .
- code
- code
Docker init
- Python application:
- It works as Dockerfile or replacement of Dockerfile.
- python application (app.py) & requirements.txt file on root home folder.
- app.py
-
from flask import Flaskapp = Flask(__name__)@app.route('/')def hello_world():return 'Hello, World!'if __name__ == '__main__':app.run(debug=True, host='0.0.0.0', port=8000)
- requirements.txt
- Flask==2.1.0
Werkzeug==2.2.2
gunicorn==20.1.0
- To use docker init you need Docker Desktop 4.26.1 and later. check docker installation seciton.
- $docker init
- What application platform does your project use? select python and enter
- What version of Python do you want to use? (3.10.12) enter
- What port do you want your app to listen on? (8000) enter
- What is the command you use to run your app (e.g., gunicorn 'myapp.example:app' --bind=0.0.0.0:8000)? python3 app.py
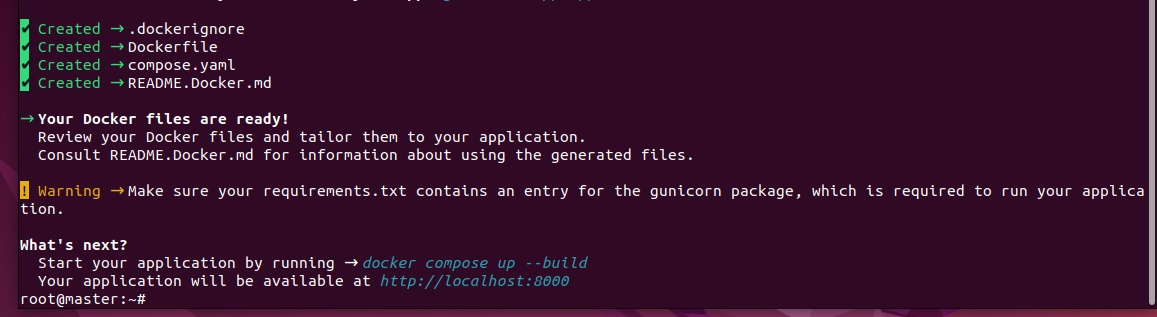
- check Dockerfile for more details: $vim Dockerfile
- Start your application by running
- $docker compose up --build
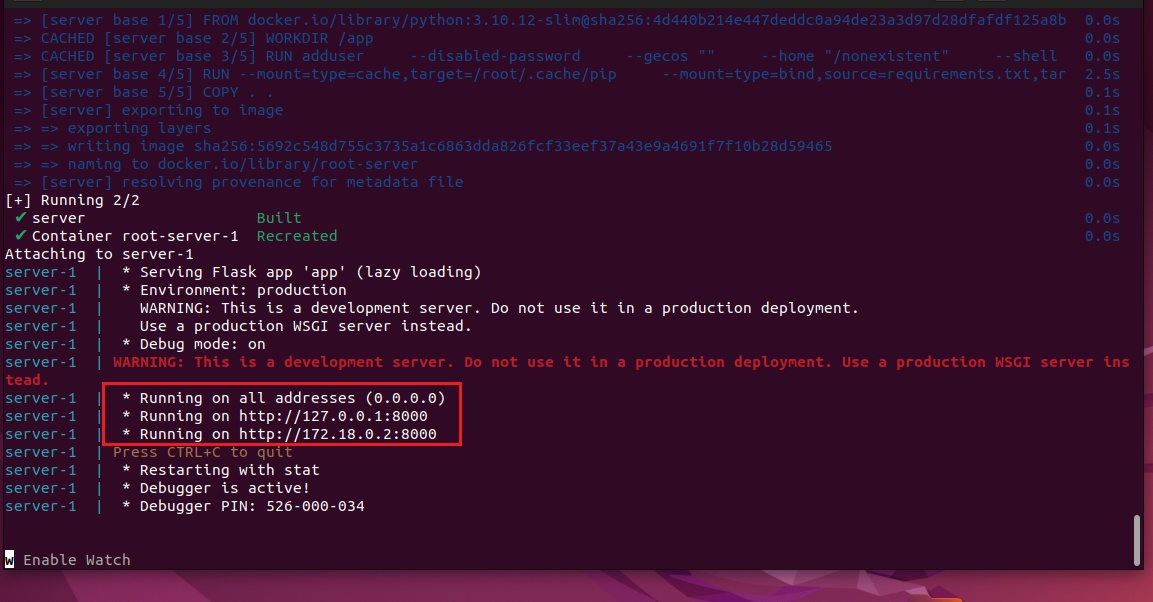
- Your application will be available at http://localhost:8000
- Node JS Application:
- create a file $vim app.js
- // app.js
const express = require('express');
const app = express();
const port = 3000;
app.get('/', (req, res) => {
| res.send('Hello, World');
});
app.listen(port, () => {
| console.log('Server running on http://localhost:${port}');
});
- // app.js
- create a package-lock.json
- create a package.json
- $docker init
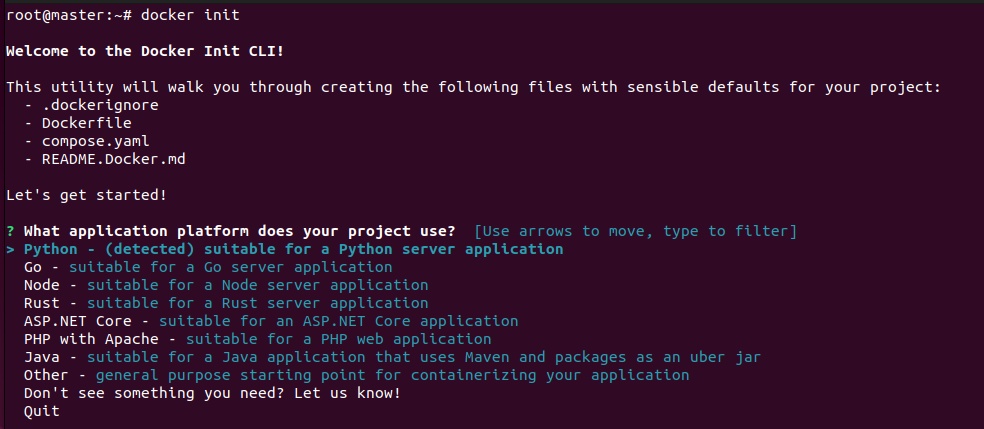
- What application platform does your project use? select node and enter
- What version of Node do you want to use? (23.7.0)
- Which package manager do you want to use? npm is automatically selected
- What command do you want to use to start the app? (npm start)
- What port does your server listen on? 3000
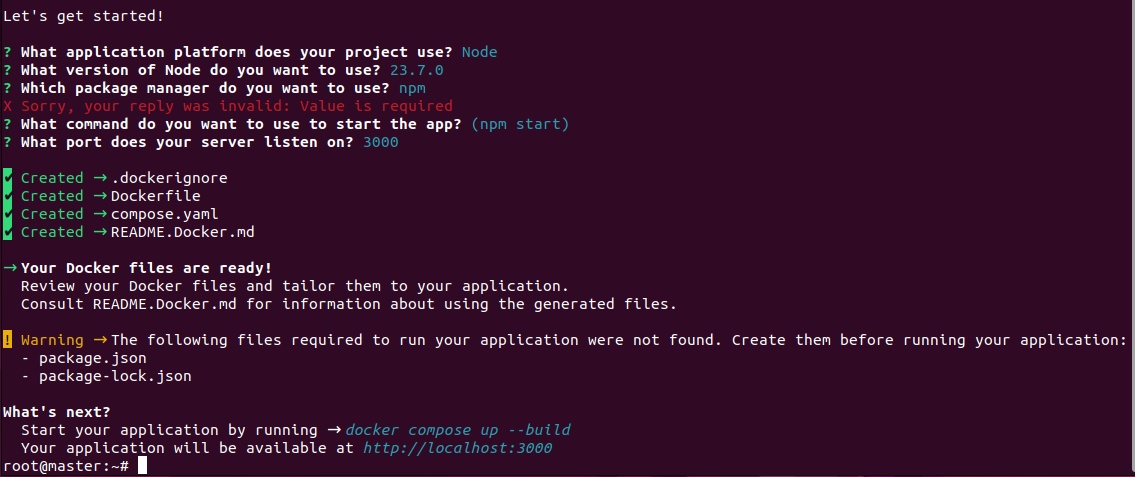
- compose.yaml, Dockerfile, README.Docker.md files are created.
- $docker compose up --build
- Docker Scout:
Multi Stage Docker File - java based application
- In this method we divide the task in multiple stages. It is very useful when performing troubleshooting where you do not need to run all stages of dockerfile.
- Click for Multistage-Dockerfile-Java Github Repository.
- In the Dockerfile-ubuntu: Single Stage
- FROM ubuntu
RUN apt update -y &&\
apt install default-jdk -y &&\
java -version
RUN apt install maven -y &&\
mvn -version
RUN apt install -y wget
RUN wget https://archive.apache.org/dist/tomcat/tomcat-9/v9.0.8/bin/apache-tomcat-9.0.8.tar.gz
RUN mkdir /opt/tomcat &&\
mv apache-tomcat-9.0.8.tar.gz /opt/tomcat &&\
tar -xvzf /opt/tomcat/apache-tomcat-9.0.8.tar.gz
RUN groupadd tomcat &&\
useradd -s /bin/false -g tomcat -d /opt/tomcat tomcat
RUN cd /opt/tomcat/apache-tomcat-9.0.8 &&\
chmod 777 conf bin &&\
chown -R tomcat webapps/ work/ temp/ logs/ bin/
ENTRYPOINT ["sh","/opt/tomcat/apache-tomcat-9.0.8/bin/startup.sh"]- base image defined,
- run update and install jdk,
- install maven,
- install wget,
- install tomcat to run the application.
- untar tomcat package
- useradd tomcat
- assign ownership to user
- ENTRYPOINT
- In the above dockerfile, many stages has been defined and will take longer time to finish and if there is any error than it start from top, it may complete from cache but perform all tasks. for every stage it creates a container and perform the task and delete the conainer.
- The size of the image will be very big, we divide into multiple stages in different dockerfiles. Divide this code into two stages.
- Dockerfile: Multi Stage
-
# Stage-1 Build
FROM maven as maven
RUN mkdir /usr/src/mymaven
WORKDIR /usr/src/mymaven
COPY . .
RUN mvn install -DskipTests# Stage-2 Deploy
FROM tomcat
WORKDIR webapps
COPY --from=maven /usr/src/mymaven/target/java-tomcat-maven-example.war .
RUN rm -rf ROOT && mv java-tomcat-maven-example.war ROOT.war - In stage 1, we take image of maven which also contain jdk. We create a folder and copying all files from local host to container and run the build to create artifact(.war) file.
- In stage 2, we take image of tomcat which is pre-installed, copying .war file and paste it in current directory (--from=maven, this is define for stage1), run
-
- Clone the repository:
- root@master:~# git clone https://github.com/AbdulAziz-uk/Multistage-Dockerfile-Java.git
- Build Image with Single Stage Dockerfile:
- root@master:~/Multistage-Dockerfile-Java# docker build -t single_stage_image -f Dockerfile-ubuntu .
- root@master:~/Multistage-Dockerfile-Java#docker images (check the size of image)
- Build Image with Multi Stage Dockerfile:
- root@master:~/Multistage-Dockerfile-Java# docker build -t multi_stage_image -f Dockerfile .
- root@master:~/Multistage-Dockerfile-Java#docker images (468 mb)
- Deploy container with Single stage image:
- Deploy container with multi stage image:
- root@master:~/Multistage-Dockerfile-Java# docker run -d -p 8080:8080 --name web_app1 multi_stage_image
Multi Stage Docker File - NodeJS based application
- Click for Multi Stage Dockerfile NodeJS based application Github Repository.
- Dockerfile: Multi Stage
-
FROM node:12.13.0-alpine as build
WORKDIR /app
COPY package*.json ./
RUN npm install
COPY . .
RUN npm run buildFROM nginx
EXPOSE 3000
COPY ./nginx/default.conf /etc/nginx/conf.d/default.conf
COPY --from=build /app/build /usr/share/nginx/html
-
- Clone the repository:
- root@master:~# git clone https://github.com/AbdulAziz-uk/Multistage-Dockerfile-NodeJS.git
- Build image:
- root@master:~/Multistage-Dockerfile-NodeJS# docker build -t multistage_nodejs -f Dockerfile .
- root@master:~/Multistage-Dockerfile-NodeJS#docker images (size is 193 MB)
- Deploy image:
- root@master:~/Multistage-Dockerfile-NodeJS# docker run -d -p 3000:3000 --name nodejs_app multistage_nodejs
- Access application:
- open browser http://192.168.171.200:3000
- Code
Code
- code

Volume Storage:
- Docker Installation Location in Ubuntu:
- By default docker is installed at /var/lib/docker path.
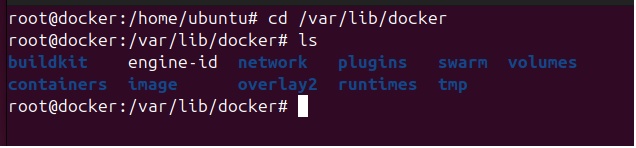
- All the data stored in docker will save at this location, it consume space of host machine.
- If container gets corrupt or deleted than all its data will be lost.
- Host machine get corrupt or deleted than all the data will be lost.
- To secure container's data, persistent data volume can be created and mount with containers.
- Persistent Data: Docker containers are typically ephemeral, meaning their file systems are isolated and any data generated within a container is lost when the container is removed. Volumes provide a way to store data outside of containers, ensuring that it persists across container lifecycle events.
- Volume types:
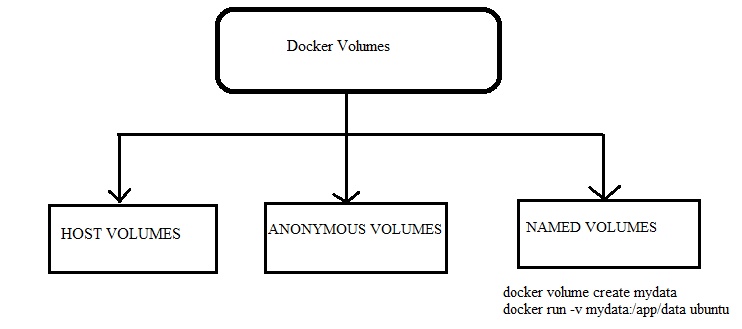
- Host-Mounted Volumes:
- Host-mounted volumes allow you to specify a directory from the host machine that is mounted into the container. This can be useful when you want to share data between the host and container.
- docker run -v /path/on/host:/path/in/container myapp
- Example: Mount the
/var/datadirectory on the host machine to the/datadirectory in the container. - docker run -v /var/data:/data myapp
- Anonymous Volumes:
- Anonymous volumes are created automatically by Docker and are managed for you. They are typically used when you don't need to manage the volume explicitly, such as for temporary or cache data.
- docker run -v /path/in/container myapp
- Example: Create an anonymous volume for a PostgreSQL database container.
- docker run -v /var/lib/postgresql/data postgres
- Named Volumes:
- Named volumes are explicitly created and given a name, making it easier to manage and share data between containers. They are useful for maintaining data between container restarts and for sharing data between multiple containers.
- docker volume create mydata
docker run -v mydata:/path/in/container myapp - Example: Create a named volume called
mydataand use it to persist data for a web application container. - docker volume create mydata
docker run -v mydata:/app/data myapp
- External Volume:
- SAN or NAS or Cloud storage can be use and mounted with containers.
- First we make connectivity with docker host machine and than mount with containers.
- Lab: create a disk in VM (consider a NAS storage)
- Switch off VM.
- Edit virtual machine settings/Add hard disk/scsii/20GB/create and power on VM.
- $lsblk (list block disk, it shows the details of disk), take disk name.
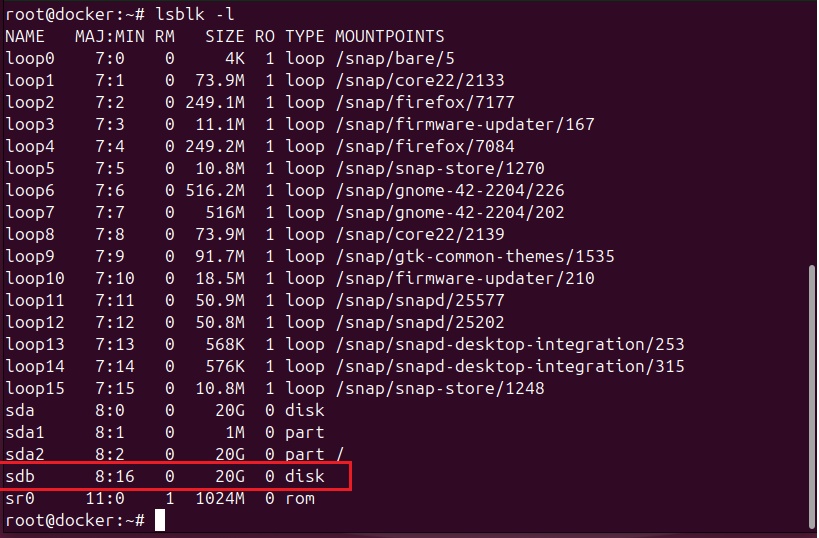
- $sudo fdisk /dev/sdb (disks are stored in /dev folder, first disk used sda and second disk uses sdb)
- n = create a partition, p=primary, e=extended.
- enter partition number (1-4), select size
- w to save details.
- This is a raw disk, need to format before use
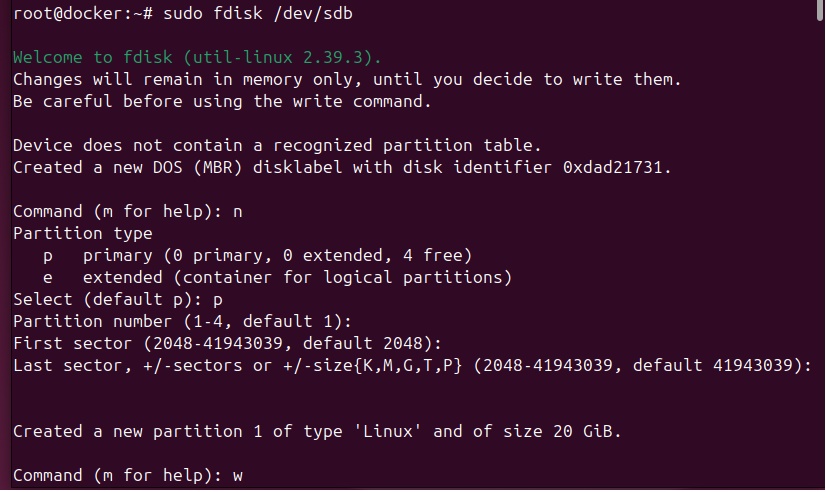
- $lsblk (list block disk, it shows the details of disk), take disk name.
- Format the disk: $sudo mkfs -t ext4 /dev/sdb1
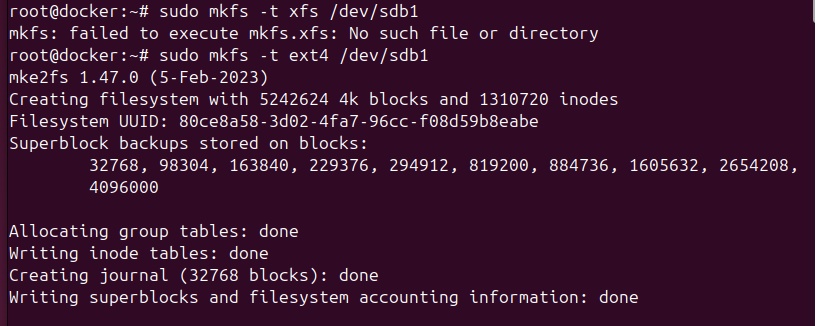
- Create a folder and mount the folder:
- $mkdir data
- Create a mount point:
- $mount /dev/sdb1 /root/data/
- Create a container and attach mount point as volume.
- $docker pull mysql:5.6
- $docker run -d --name=star_mysql -v /root/data:/var/lib/mysql -e MYSQL_ROOT_PASSWORD=Trustu786 mysql:5.6
- Check the /root/data, some files are created by mysql.
- $ls /root/data/

- Get into container: $docker exec -it star2_mysql /bin/bash
- root@2d318bbe494a:/# mysql
- root@2d318bbe494a:/# mysql -u root -p (enter database password)
- mysql> show databases;
- It will show default databases. create new databases
- mysql> create database example;
- mysql> create database payment;
- mysql> create database transaction;
- Delete the container, but database data still exist at /root/data.
- root@docker:~# docker rm -f star_mysql
- Create a new container and attach volume.
- root@docker:~# docker run -d --name=star2_mysql -v /root/data:/var/lib/mysql -e MYSQL_ROOT_PASSWORD=Trustu786 mysql:5.6
- Get into container:
- root@docker:~# docker exec -it star2_mysql /bin/bash
- root@2d318bbe494a:/# mysql
- root@2d318bbe494a:/# mysql -u root -p (enter password)
- mysql> show databases;
- +---------------------+
| Database |
+---------------------+
| information_schema |
| example |
| #mysql50#lost+found |
| mysql |
| payment |
| performance_schema |
| transaction |
+---------------------+
7 rows in set (0.00 sec) - Data from external volume has been attached to new container.
- Lab: Attach multiple volumes to a container.
- $mkdir data1 data2
- Create a mount point:
- $mount /dev/sdb1 /root/data1/
- $mount /dev/sdb1 /root/data2/
- Create a container and attach both mount points as volume.
- $docker run -itd --name=star_app -v /root/data1:/logs -v /root/data2:/datastore alpine
- Lab: Attach a volume to multiple container.
- make a directory and create a index file.
- $mkdir /root/web
- $cd /root/web
- $web#echo "Welcome to star" > index.html
- Create two containers and attach same volume (/root/web)
- $docker run -d --name=web1 -v /root/web:/usr/share/nginx/html nginx
- Get into container: $docker exec -it web1 /bin/bash
- $ls (index.html)
- index.html has been created on base volume, when it mount with container, data of base volume will also visible in container.
- $echo "change of text" > index.html
- $docker run -d --name=web2 -v /root/web:/usr/share/nginx/html:ro nginx (this will be read only)
- Get into container: $docker exec -it web1 /bin/bash
- $ls (index.html)
- $echo "change site" > index.html (unable to do , read only)
- Simple Docker Volume/ Host-Mounted volume:
- Data of docker container can be store on docker host and can retrieve data after deleting container and attch with other container.
- Step1: create a folder on root:
- #mkdir /dockervolume (it will be a mount point not a location of data store on docker host, like in windows when you attach a usb you get drive D, E etc.. and when you remove usb and attach another usb you get the same drive d or e, so this folder dockervolume is like drive and data storing could be in different location which can be retrieved from docker inspect command.
- Step2: create a container and attach volume
- #docker run --name myubuntu -it -v /dockervolume unubtu
- ctrl p ctrl q
- Step3: logon to ubuntu container and create some files in the mounted /dockervolume. only data store in volume folder will be saved.
- #touch aziz11 aziz12 aziz13 aziz14
- Step4: docker container inspect myubuntu
- locate mount and copy location. data is stored in this location
- Step5: Delete container and go to above location and you can find data files.
- Docker volume container (sharable):
- #docker run --name myubuntu1 -it --volumes-from myubuntu ubuntu
- #cd dockervolume
- #ls (you will see files aziz11 aziz12 aziz13 aziz14)
- create new files #touch abdul11 abdul12 abdul 13 abdul14
- #docker container attach containerID (make sure you are in /)
- #cd /dockervolume
- #ls (al files is there aziz11..... abdul11.....mohammed11......)
- #docker run --name myubuntu2 -it --volumes-from myubuntu1 ubuntu
- #cd dockervolume
- #ls (you will see files aziz11 aziz12 aziz13 aziz14, and abdul11 abdul12 abdul 13 abdul14)
- #touch mohammed11 mohammed12 mohammed13 mohammed14
- Create another docker container sharing the same volume:
- connect to myubuntu or myubuntu1 or myubuntu2 and you will get all files in the volume as volume is shred among them, and you will see all files aziz11..... abdul11.....mohammed11...... these files are stored in /ubuntuvolume and will be available in all shared volume.
- Before deleting docker containers get the path from myubunt as its volume has been shared, By using path you can retrieve data.
- Create volume container/sharable volume container:This volume should be attached with container which has some data.
- #docker volume create myvolume
- #docker inspect myvolume
- "Mountpoint": "/var/lib/docker/volumes/myvolume/_data", (location)
- copy/create any file in the myvolume location
- create a tomcat container and attach myvolume in /temp folder.
- #docker run --name mytomee1 -d -P -v myvolume:/tmp tomee
- #docker exec -it mytomee1 bash
- #cd /tmp
- #ls
- #docker volume rm myvolume (to delete volume)
- #docker volume prune (to delete all volumes)
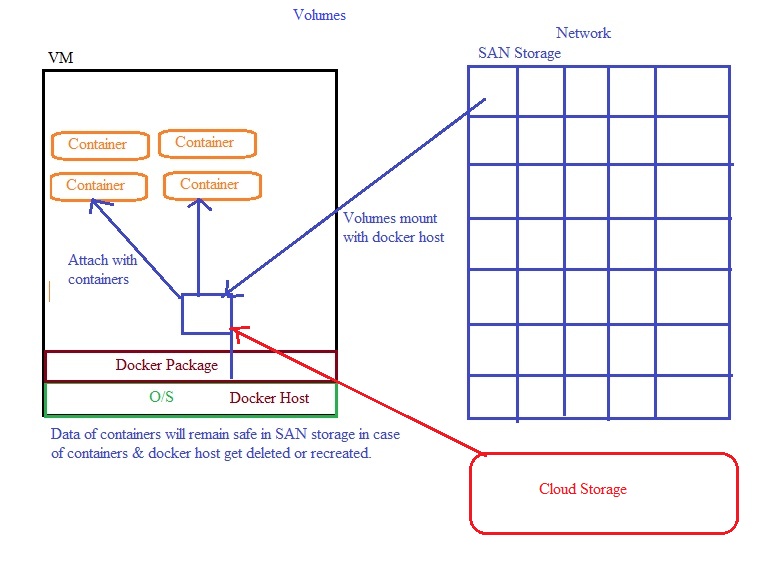
- Docker volumes are a way to persist data generated or used by Docker containers. They provide a means to store and manage data separately from the container itself, ensuring that data persists even if the container is stopped or removed. Docker volumes are commonly used for scenarios where you need to share data between containers or when you want to keep data separate from the container's file system
- We install a O/S on VM, install docker package on it so it will called docker host.
- Containers are created on docker host and any data stored in containers are volatile, get deleted when container restart.
- We can create storage on docker host and shared with containers but there is risk of docker host get deleted or corrupt so data may lost.
- The best solution is to create a SAN storage or cloud storage and mount with docker host and share the storage with containers.
- Persistent Data: Docker containers are typically ephemeral, meaning their file systems are isolated and any data generated within a container is lost when the container is removed. Volumes provide a way to store data outside of containers, ensuring that it persists across container lifecycle events.
- Volume Management: You can create, list, inspect, and remove volumes using Docker CLI commands like docker volume create, docker volume ls, docker volume inspect, and docker volume rm.
- $docker container inspect container_ID (check volume is attached)
- $docker volume ls
- Create a volume on docker host and shared with container:
- $docker volume --help
- create create a volume
- inspect Display detailed information on one or more volumes
- ls list volumes
- prune remove all unused local volumes
- rm remove one or more volumes
- $docker volume create volume1
- $docker volume ls
- $docker volume inspect volume1

- Attach / mount volume to container:
- creating a container using image from docker hub aziz27uk/ubuntu_apache, attaching a volume at /tmp folder
- root@ubuntu-agent:~# docker container run -it -v volume1:/tmp --name webserver aziz27uk/ubuntu_apache /bin/bash
- now to /tmp folder and create some files and folders which you can also view in docker host as volume is created on docker host and attached to container's /tmp folder
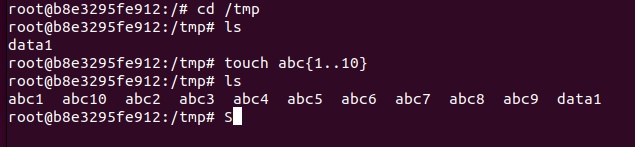
- Go to docker host location /var/lib/docker/volumes/volume1/_data and check files

- Delete the container and create a new container and attached the volume
- root@ubuntu-agent:~# docker container run -it -v volume1:/tmp --name webserver2 aziz27uk/ubuntu_apache /bin/bash
- Go to /tmp folder and check the data which was stored in this volume is available.

- add new files touch abc11 abc12 abc13
- Attach the same volume to a new container
- root@ubuntu-agent:~# docker container run -it -v volume1:/tmp --name webserver2 aziz27uk/ubuntu_apache /bin/bash
- This user will also get the files abc11 abc12 abc13 as the same volume is attached with both containers.
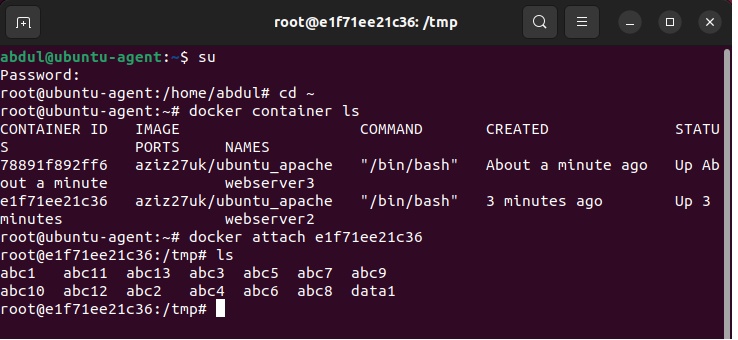
- Create a mysql container and attach volume
- Pull docker image mysql
- root@ubuntu-agent:~# docker image pull mysql
- root@ubuntu-agent:~#docker image ls
- root@ubuntu-agent:~#docker image inspect mysql
- locate the volume mount path mentioned in the image,
- when you deploy mysql container volume path is set to /var/lib/mysql
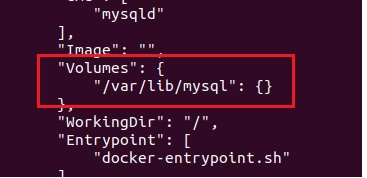
- Deploy mysql:
- root@ubuntu-agent:~# docker container run -it --name sql-server -e MYSQL_ALLOW_EMPTY_PASSWORD=true mysql /bin/bash
- deploying mysql with the name sql-server and set the environment variable MYSQL_ALLOW_EMPTY_PASSWORD
- bash-5.1# mysql (type mysql and enter)
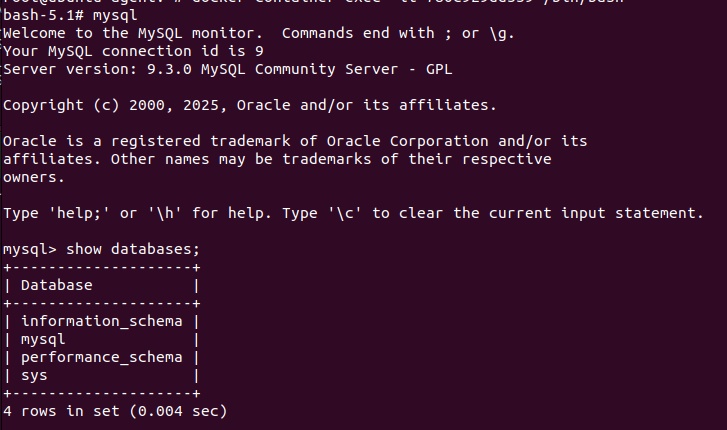
- mysql>show databases;
- mysql>create database finance;
- mysql>show databases;
- exit sql and check volume
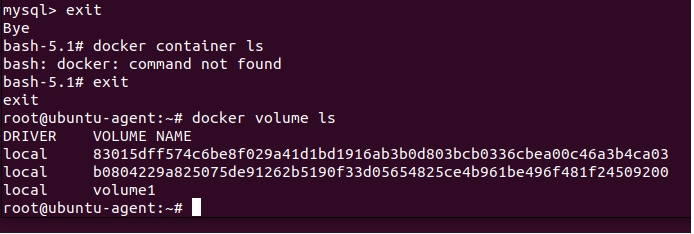
- there are 2 volumes, one is volume1 created on docker host and other sql volume.
- To check volume for sql run
- root@ubuntu-agent:~#docker volume inspect b0804229a825075de91262b5190f33d05654825ce4b961be496f481f24509200

- check volumes
- If you delete container but volume will remain available at docker host location.
- Deploy mysql and attach existing mysql volume
- root@ubuntu-agent:~# docker container run -it -v b0804229a825075de91262b5190f33d05654825ce4b961be496f481f24509200:/var/lib/mysql --name sql-server -e MYSQL_ALLOW_EMPTY_PASSWORD=true mysql /bin/bash
- check the location of volume in image and define (/var/lib/mysql)
- Delete volume:
- root@ubuntu-agent:~# docker volume rm 83015dff574c6be8f029a41d1bd1916ab3b0d803bcb0336cbea00c46a3b4ca03

- Stop: $docker container stop container_ID
- Remove the container: $docker container rm container_ID
- Delete the volume: $docker volume rm volume_ID
- $docker volume --help
- Project: MongoDB: volume mount for database using docker compose
- Docker Compose to set up a MongoDB container and a MongoDB Express (Mongo-Express) container.
- Create a Ubuntu VM.
- Install Docker
- Install Docker compose
- Create docker compose file:
- $vim docker-compose.yml
-
version: '3'
services:
mongodb:
image: mongo
container_name: mongodb
networks:
- mongo-network
ports:
- "27017:27017"
environment:
- MONGO_INITDB_ROOT_USERNAME=admin
- MONGO_INITDB_ROOT_PASSWORD=123mongo-express:
image: mongo-express
container_name: mongo-express
networks:
- mongo-network
ports:
- "8081:8081"
environment:
- ME_CONFIG_MONGODB_SERVER=mongodb
- ME_CONFIG_MONGODB_ADMINUSERNAME=admin
- ME_CONFIG_MONGODB_ADMINPASSWORD=123
- ME_CONFIG_BASICAUTH_USERNAME=admin
- ME_CONFIG_BASICAUTH_PASSWORD=123networks:
mongo-network:
driver: bridge - check code with YAML Lint.
- We define two services: mongodb and mongo-express.
- The mongodb service uses the official MongoDB image and specifies a named volume mongodb_data for persisting MongoDB data.
- We set environment variables for the MongoDB container to create an initial admin user with a username and password.
- The mongo-express service uses the official Mongo Express image and connects to the mongodb service using the ME_CONFIG_MONGODB_SERVER environment variable.
- We also set environment variables for the Mongo Express container to configure it.
-
- Now, navigate to the directory containing the
docker-compose.ymlfile in your terminal and run:- $docker-compose up
- Docker Compose will download the necessary images (if not already downloaded) and start the MongoDB and Mongo Express containers. You can access the MongoDB Express web interface at http://localhost:8081 and log in using the MongoDB admin credentials you specified in the docker-compose.yml file.
- The data for MongoDB will be stored in a Docker named volume named
mongodb_data, ensuring that it persists even if you stop and remove the containers. - To stop the containers, press
Ctrl+Cin the terminal where they are running, and then run: - $docker-compose down
- This will stop and remove the containers, but the data will remain in the named volume for future use. create a new container and mount the volume.
- $vim docker-compose.yml
- Code
Docker Compose
Intro
- Create multiple containers with different resources can be possible with docker compose, it is a yaml/json file where you define different configuration for containers.
- The same compose file can be used to delete the resoruces.
- It works similar like AWS cloudformation.
- Rquirement:
- Docker should be installed and daemon must be start and enable.
- $docker info
- Docker compose package should be installed.
- $docker compose
- In google search Docker compose install.
- Docker should be installed and daemon must be start and enable.
- Creating multi container architecutre using YAML file in docker compose. To configure/deploye multiple containers and linked each other in one attempt, can be peformed using YAML file. you can define all commands in yaml file and execute.
- Intstall docker compose in docker host: https://docs.docker.com/compose/install/
- # curl -L "https://github.com/docker/compose/releases/download/1.29.2/docker-compose-$(uname -s)-$(uname -m)" -o /usr/local/bin/docker-compose
- # chmod +x /usr/local/bin/docker-compose
- #docker-compose --version
Deploy a tomcat container with docker compose:
- #vim docker-compose.yml (if you create with other name aziz.yml)
-
---
version: '3'
services:
mytomee:
image: tomee
ports:
- 5050:8080
... - To check above defined keypair value is correct, go to http://www.yamllint.com
- #docker-compose up -d
- #docker-compose -f aziz.yml up -d (if you have created with other name )
- #docker-compose -f aziz.yml down (delete containers)
- code
Deploy a mysql and wordpress and link each other with docker compose:
- #vim wordpress.yml
-
---
version: '3'
services:
mydb:
image: mysql:5
environment:
MYSQL_ROOT_PASSWORD: India123mywordpress:
image: wordpress
ports:
- 6060:80
links:
- mydb:mysql
... - #docker-compose -f wordpress.yml up -d (it will deploy mysql and wordpress and linked each other)
- http://publicIP:6060 (access wordpress)
- #docker -exec -it root_mydb_1 bash (check container name )
- #docker-compose -f wordpres.yml down (delete all containers)
- code
Deploy Master / Slave of jenkins through docker-compose:
- #vim masterslave.yml
- stdin_open: true and tty: true (ubuntu will not be exited)
-
---
services:
master:
image: jenkins/jenkins
ports:
- "5050:8080"
slave:
image: ubuntu
stdin_open: true
tty: true
version: "3" - Access jenkins with publicIP:5050
- Retrieve Administrator pasword:
- #docker exec -it root_master_1 bash
- #cat /var/jenkins_home/secrets/initialAdminPassword
- Passwordless connectivity between master and slave.
- login to slave (ubuntu)
- code
- #vim masterslave.yml
Deploy LAMP architecture with docker compose:
-
L: Linux
A: Appliction Development( php)
M: Backend Database (MySQL)
p: Application Server (Apache Tomcat)Linux is already installed on AWS instance or docker host, install docker and docker compose on docker host, create a yaml file to deploy php, mysql and apache tomcat.
#vim lamp.yml
---
version: '3'services:
mydb:
image: mysql:5
environment:
MYSQL_ROOT_PASSWORD: India123apache:
image: tomee
ports:
- 6060:8080
links:
- mydb:mysql
php:
image: php:7.1-apache
links:
- mydb:mysql
- apache:tomcat
...- #docker-compose -f lamp.yml up -d
- code
- code
-
Deploy CICD environment using docker compose where jenkins container linked with two tomcat containers.
- #vim cicd.yml
-
---
version: '3'
services:
devserver:
image: jenkins/jenkins
ports:
- 7070:8080qaserver:
image: tomee
ports:
- 8899:8080
links:
- devserver:jenkins
prodserver:
image: tomee
ports:
- 9090:8080
links:
- devserver:jenkins
... - check http://publicIPdockerhost:5050 for jenkins
- http://publicIPdockerhost:6060 for qaserver
- http://publicIPdockerhost:7070 for prdserver
- code
- code
code
- code
- code
- code
Docker Swarm
Intro
- It is the process of running docker containers on multiple docker host machines in a distributed environment.
- A single service runs on all containers but thier host machines could be different.
- Docker swarm is the tool used for performing container orchestration.
- code
- code
Lab

- create 4 instances and install docker in each machine.
- # curl -fsSL https://get.docker.com -o get-docker.sh
- # sh get-docker.sh
- Change hostname of all machines
- #hostnamectl set-hostname newname
- #bash
- or
- #vim /etc/hostname (remove ip address and enter name)
- #init 6 (restart )
- Initialize docker swam service on Manager machine
- docker swarm init --advertise-addr 172.31.42.135
- it will generate a token which need to run on every worker machine.
- docker swarm join --token SWMTKN-1-27lf3n7xxqy2u3gb61mvfybk51uqjq9hj4m5uwdd4lcgtgafth-0hmrtwzrcyqv4h7cl3euekq68 172.31.44.50:2377
- on manager run : #docker node ls
- code
- code
code
- code
- code
- code
code
- code
- code
- code
code
- code
- code
- code
code
- code
- code
- code
code
- code
- code
- code
Integrate Docker with Jenkins,
Integrate Docker with Jenkins
- Create a ubuntu VM
- Update repository:
- $sudo apt update
- Install JDK:
- $java (type java and enter, if java is not installed,it gives options to install)
- $ sudo apt install openjdk-17-jre-headless
- $java --version
- Install Git:
- $sudo apt install git
- Install jenkins
- sudo wget -O /etc/apt/keyrings/jenkins-keyring.asc \
https://pkg.jenkins.io/debian-stable/jenkins.io-2023.key
echo "deb [signed-by=/etc/apt/keyrings/jenkins-keyring.asc]" \
https://pkg.jenkins.io/debian-stable binary/ | sudo tee \
/etc/apt/sources.list.d/jenkins.list > /dev/null
sudo apt-get update
sudo apt-get install jenkins - paste the above and enter
- $sudo systemctl start jenkins
- $ sudo systemctl enable jenkins
- $sudo systemctl status jenkins
- $jenkins --version
- sudo wget -O /etc/apt/keyrings/jenkins-keyring.asc \
- Access jenkins:
- open browser and enter http://ip:8080
- Get password from the defined location and enter.
- Install Docker:
- $sudo apt install docker.io
- $sudo service docker restart
- $sudo chmod 666 /var/run/docker.sock (all the users of the computer will have access to run docker commands)
- $sudo systemctl restart docker
- $docker --version
- Install plugins: Docker
- Go to Manage jenkins>plugin>available plugins>search docker
- select docker pipeline, docker plugin, docker-build-step
- Go to Manage jenkins>plugin>available plugins>search docker
- Configure Tools, their locations and automatic installers: JDK, Git, Maven, Docker
- Go to manage jenkins > tools >
- JDK installations: Name=jdk17, select install automatically and select install from adoptium.net and choose jdk-17.x.x (click Add JDK to install different version of JDK)
- Git installations: Name=Default, (git was installed so take it default)
- Maven installation: name=maven3, install from apache, select version
- Docker installation: name = docker, select install automatically, select Download from docker.com, docker version = latest
- apply and save.
- Credentials: Configure credentials for Git, docker etc
- Manage jenkins>Security>Credentials>System>Global credentials> Add Credentials:
- Docker:
- scope = Global (Jenkins, nodes, items, all child items, etc)
- username = username of hub.docker.com(aziz27uk)
- Password = enter password
- ID=Docker_hub
- Description=Docker_hub
code
- code
- code
- code
code
- code
- code
- code
code
- code
- code
- code
code
- code
- code
- code
code
- code
- code
- code
code
- code
- code
- code
Projects
Secretsanta (Java Based Application): create an image of secretsanta with docker and deploy on containers. (Ubuntu environment).
- Create a Package of secretsanta which can be deployed on following environment..
- Create Environment:
- secretsanta application on github
- Create ubuntu VM
- $ sudo apt-get update
- Install jdk 11:
- $java (it suggest command to install java, install openjdk-11-jre-headless)
- Install Maven: convert code into artifact
- $apt install maven
- Install Git:
- $apt install git
- Clone application:
- $git clone https://github.com/AbdulAziz-uk/secretsanta.git
- $cd secretsanta
- Build package: to get jar file
- root@master:~/secretsanta#mvn package
- BUILD SUCCESS
- root@master:~/secretsanta#cd target
- secretsanta-0.0.1-SNAPSHOT.jar
- Deploy the package:
- root@master:~/secretsanta/target# java -jar secretsanta-0.0.1-SNAPSHOT.jar
- Access the application on browser:
- Create a Image of secretsanta which can be deployed on any environment:
- Create ubuntu VM
- $ sudo apt-get update
- Install docker:
- $sudo su - (root user access)
- $sudo apt install docker.io
- $docker pull hello-world (only root user can access docker, assign permission to user)
- Bydefault docker command will not run without sudo, to run with other user provide the permission to user by adding to docker group.
- When you install docker a group is created with the name docker, whoever added to this group can run the docker commands, by default root user is added.
- When you create a user a group of is also created with the same name of user, this group is primary group to this user. you can add additional group to this user
- $sudo usermod -aG docker username (-a is used to assign as a secondary group, -A is use for primary group, G is used for group, docker is group, abdul is user), log off and log on. or run
- $newgrp docker (it will add user to docker)
- Create a Dockerfile:
- vim Dockerfile
-
FROM openjdk:8u151-jdk-alpine3.7 (This image form alpine includes linux ubuntu and light weighted, search alpine ubuntu with jdk)
EXPOSE 8080
ENV APP_HOME /usr/src/app (variable APP_HOME defining)
COPY target/secretsanta-0.0.1-SNAPSHOT.jar $APP_HOME/app.jar (copying secretsanta-0.0.1xxx to app.jar)
WORKDIR $APP_HOME (work directory)
ENTRYPOINT exec java -jar app.jar (CMD also can be used) or you can also write ["java","-jar","app.jar"]
- Build Docker Image:
- root@master:~/secretsanta# docker build -t appsanta:v1 .
- Error: - LegacyKeyValueFormat: "ENV key=value" should be used instead of legacy "ENV key value" format (line 5)
- JSONArgsRecommended: JSON arguments recommended for ENTRYPOINT to prevent unintended behavior related to OS signals (line 11) - Solution: ENV APP_HOME=/usr/src/app
- Solution: CMD ["java","-jar","app.jar"]
- root@master:~/secretsanta#docker images (appsanta image is created)
- Deploy container using image:
- root@master:~/secretsanta# docker run -d --name santa -p 8080:8080 appsanta:v1
- root@master:~/secretsanta#docker ps
- root@master:~/secretsanta#docker container inspect docker_ID (to get IP and port number)
- Upload image to docker Registry/Repository public:
- Login to Docker Hub:
- root@master:~/secretsanta#docker login (login to docker hub, enter credentials)
- Create tag for the image:
- Tag name should be unique, create with name used to create account with docker hub (aziz27uk)
- $docker tag appsanta:v1 aziz27uk/secret_santa (tag name is secret_santa for the image appsanta:v1)
- $docker images (aziz27uk/secret_santa listed)
- Push image to Dockerhub:
- $docker push aziz27uk/secret_santa
- Check in Docker Hub:
- Login to hub.docker.com and enter credentials and check image has been pushed.
- Login to Docker Hub:
- Deploy container using image uploaded on docker hub:
- root@ubuntu-agent:~# docker run -d --name santa -p 8090:8080 aziz27uk/secret_santa (host port is 8090 and contaiener port 8080, image aziz27uk/secret_santa uploaded on docker hub)
- Access the application on browser:
- Change host port and deploy another container:
- root@master:~/secretsanta# docker run -d --name santa1 -p 8082:8080 appsanta:v1
- You can change host port but cannot change container port as it runs on tomcat which runs on port 8080, java applications runs by default on tomcat which runs on 8080.
- Now two applications are running on two different containers and can be accesses with different ports in browser.
- Create ubuntu VM
- code
- Create a Package of secretsanta which can be deployed on following environment..
Secretsanta (Java Based Application): Jenkins CI/CD piepeline with docker to create image, push to docker hub and deploy on container (Ubuntu environment)
- Code
- Code
- Code
- Code
- Code
Secretsanta (Java Based Application): Jenkins CI/CD piepeline with maven to create package, push to docker hub and deploy on VM (linux environment)
- code
- code
- code
Web-App (NodeJS Application): Create an image of NodeJS-Web-App with Docker and deploy on docker container (ubuntu).
- Nodejs_web_app contain following files:
- Dockefile (defined base image, run commands to create docker image)
- README.md
- about.html
- app.js (code of node js)
- index.html
- package.json (requirements/dependencies defined)
- Create a ubuntu VM
- Update repository:
- $sudo apt update
- Install JDK:
- $java (type java and enter, if java is not installed,it gives options to install)
- $ sudo apt install openjdk-17-jre-headless
- $java --version
- Install Git:
- $sudo apt install git
- Install Docker:
- $sudo apt install docker.io
- $sudo service docker restart
- $sudo chmod 666 /var/run/docker.sock (all the users of the computer will have access to run docker commands)
- $sudo systemctl restart docker
- $docker --version
- Clone source code from Github
- root@master:~# git clone https://github.com/AbdulAziz-uk/nodejs-webapp-public.git
- root@master:~# cd nodejs-webapp-public
- Create Dockerfile:
- root@master:~/nodejs-webapp-public# vim Dockerfile
- FROM node:alpine
COPY ./ ./
RUN npm install
EXPOSE 8081
CMD ["npm", "start"] - FROM node:alpine # base image define from alpine for lightweight.
- COPY ./ ./ # copy all source file to destination
- RUN npm install #install npm
- EXPOSE 8081 # expose port 8081 for host.
- CMD ["npm", "start"] # it will start npm
- FROM node:alpine
- save & exit
- root@master:~/nodejs-webapp-public# vim Dockerfile
- Build image :
- root@master:~/nodejs-webapp-public# docker build -t nodejs-webapp:v1 .
- root@master:~/nodejs-webapp-public#docker images
- Deploy container:
- root@master:~/nodejs-webapp-public# docker run -d --name star_nodesjs_webapp -p 8081:8080 nodejs-webapp:v1
- Access the Application:
- $docker container ls
- $docker container inspect container_ID (take IP address and port number)
- open browser http://172.17.0.2/8081
- nodejs_webapp1.jpg
- code
- Nodejs_web_app contain following files:
Web-App (NodeJS Application): Jenkins CI/CD create an image of NodeJS-Web-App with Docker and deploy on docker container (ubuntu).
- Nodejs_web_app contain following files:
- Dockefile (defined base image, run commands to create docker image)
- README.md
- about.html
- app.js (code of node js)
- index.html
- package.json (requirements/dependencies defined)
- Create a ubuntu VM
- Update repository:
- $sudo apt update
- Install JDK:
- $java (type java and enter, if java is not installed,it gives options to install)
- $ sudo apt install openjdk-17-jre-headless
- $java --version
- Install Git:
- $sudo apt install git
- Install jenkins
- sudo wget -O /etc/apt/keyrings/jenkins-keyring.asc \
https://pkg.jenkins.io/debian-stable/jenkins.io-2023.key
echo "deb [signed-by=/etc/apt/keyrings/jenkins-keyring.asc]" \
https://pkg.jenkins.io/debian-stable binary/ | sudo tee \
/etc/apt/sources.list.d/jenkins.list > /dev/null
sudo apt-get update
sudo apt-get install jenkins - paste the above and enter
- $sudo systemctl start jenkins
- $ sudo systemctl enable jenkins
- $sudo systemctl status jenkins
- $jenkins --version
- sudo wget -O /etc/apt/keyrings/jenkins-keyring.asc \
- Access jenkins:
- open browser and enter http://ip:8080
- Get password from the defined location and enter.
- Install Docker:
- $sudo apt install docker.io
- $sudo service docker restart
- $sudo chmod 666 /var/run/docker.sock (all the users of the computer will have access to run docker commands)
- $sudo systemctl restart docker
- $docker --version
- Install plugins: Docker
- Go to Manage jenkins>plugin>available plugins>search docker
- select docker pipeline, docker plugin, docker-build-step
- Go to Manage jenkins>plugin>available plugins>search docker
- Configure Tools, their locations and automatic installers: JDK, Git, Maven, Docker
- Go to manage jenkins > tools >
- JDK installations: Name=jdk17, select install automatically and select install from adoptium.net and choose jdk-17.x.x (click Add JDK to install different version of JDK)
- Git installations: Name=Default, (git was installed so take it default)
- Maven installation: name=maven3, install from apache, select version
- Docker installation: name = docker, select install automatically, select Download from docker.com, docker version = latest
- apply and save.
- Credentials: Configure credentials for Git, docker etc
- Manage jenkins>Security>Credentials>System>Global credentials> Add Credentials:
- Docker:
- scope = Global (Jenkins, nodes, items, all child items, etc)
- username = username of hub.docker.com(aziz27uk)
- Password = enter password
- ID=Docker_hub
- Description=Docker_hub
- Create CI/CD pipeline:
- New Item:
- item name=secret_santa, select pipeline and ok
- General:
- Discard old build: Max # of builds to kepp = 3
- Pipeline:
- Pipeline script: select Hello World script to start writing script.
- In the script we have define to take source code from Github, use docker to build image using Dockerfile by giving . and upload on docker hub and create container using image.
- nodesjs_webapp_script
-
pipeline{agent anytools{jdk"jdk17"maven"maven3"}stages{stage('Source_Code'){steps{git branch: 'main', url:'https://github.com/AbdulAziz-uk/nodejs-webapp-public.git'}}stage('Build,upload image to docker hub & deploy image on docker container'){steps{scripts{withDockerRegistry(credentialsId: 'Docker_Hub', toolName: 'docker'){sh "docker build -t aziz27uk/nodejs_webapp:v1 ."sh "docker push aziz27uk/nodejs_webapp:v1"sh "docker run -d --name star_nodejs_webapp -p 8081:8080 aziz27uk/nodejs_webapp:v1"}}}}}}
- New Item:
- Build Now: run ci/cd pipeline
- Access application:
- open browser http://172.17.0.2:8081
- Code
- Nodejs_web_app contain following files:
Game 2048
- create a docker file using vscode from ubuntu terminal:
- root@master:~/game-2048# sudo code /Dockerfile --user-data-dir='.' --no-sandbox
- Docker Image:
- Docker Container:
- code
- code
- code
- code
- create a docker file using vscode from ubuntu terminal:
3 Ways to create Docker Image for Java Applications:
- click for details
- Code
- Code
Docker integration with Jenkins, Full Stack Pipeline, Install, maven, Trivy, Sonarqube, nexus
- Create a VM and install jdk, git, jenkins, maven.
- Update repository:
- $sudo apt update
- Install JDK:
- $java (type java and enter, if java is not installed,it gives options to install)
- $ sudo apt install openjdk-17-jre-headless
- $java --version
- Install Git:
- $sudo apt install git
- Install jenkins
- sudo wget -O /etc/apt/keyrings/jenkins-keyring.asc \
https://pkg.jenkins.io/debian-stable/jenkins.io-2023.key
echo "deb [signed-by=/etc/apt/keyrings/jenkins-keyring.asc]" \
https://pkg.jenkins.io/debian-stable binary/ | sudo tee \
/etc/apt/sources.list.d/jenkins.list > /dev/null
sudo apt-get update
sudo apt-get install jenkins - paste the above and enter
- $sudo systemctl start jenkins
- $ sudo systemctl enable jenkins
- $sudo systemctl status jenkins
- $jenkins --version
- Access jenkins:
- open browser and enter http://ip:8080
- Get password from the defined location and enter.
- Install suggested plugins.
- sudo wget -O /etc/apt/keyrings/jenkins-keyring.asc \
- Install maven:
- $ sudo apt install maven
- Update repository:
- Create a VM ubuntu and install jdk 17, docker, Sonarqube.
- Update repository:
- $sudo apt update
- Install JDK: Required jdk 17 for sonarqube
- $java (type java and enter, if java is not installed,it gives options to install)
- $ sudo apt install openjdk-17-jre-headless
- $java --version
- Install Docker:
- $sudo apt install docker.io -y
- Give permission to user to run docker commands
- $sudo usermod -aG docker username
- $newgrp docker
- Create docker container of sonarqube.
- $docker pull sonarqube:lts-community
- $docker run -d --name sonar -p 9000:9000 sonarqube:lts-community
- Access sonarqube: open browser http://http://192.168.171.200:9000
- username = admin
- password = admin (default)
- Update repository:
- Create a VM ubuntu and install docker, Nexus.
- Update repository:
- $sudo apt update
- Install docker
- $sudo apt install docker.io -y
- Give permission to user to run docker commands
- $sudo usermod -aG docker username
- $newgrp docker
- search for docker nexus image in google
- sonatype/nexus3
- $ docker run -d -p 8081:8081 --name nexus sonatype/nexus3
- Access nexus:
- open browser http:192.168.171.200:8081
- login: username=admin , password= retrieve frm /nexus-data/admin.password
- Get into container: root@master:~# docker exec -it ba6eaa7a3698 /bin/bash
- $cd sonatype-work,> $cd nexus> $cat admin.password and copy the password.
- Update repository:
- Install plugins in Jenkins: Go to manage jenkins/plugins
- JDK 17: Eclipse Temurin installer
- SonarQube Scanner:
- Docker, Docker pipeline, Docker-buid-step
- OWASP dependency check
- config file provider
- maven integration
- nexus artifact uploader
- pipeline stage view
- Configure the plugins which installed.
- Go to manage jenkins > tools
- JDK Installation: Name=JDK17, select install automatcally, select Install from adoptium.net, select version jdk-17.0.15+6
- Git: Name=Default,
- SonarScanner for MSBuild installations: name=sonar-scanner, install automatically, choose latest version
- Maven Installation: Name=maven3, install automatically, version 3.6.1
- Dependency-Check Installation: Name=DC, install automatically, add installer and select install from github.com, version=dependency-check 6.5.1
- Docker Installation: Name=docker, install automatically, Add installer=run shell command and enter
- sudo apt update
- sudo apt install docker.io -y
- sudo usermod-aG docker username
- newgrp docker
- Tool Home = /usr/
- Create Pipeline: New item
- Enter an item name = Full-Stack-CICD, pipeline
- General: Discard old build = 3 Max # of builds to keep
- Definition: Pipeline Script: select Hello World and make the follwing script.
- Github Repository: BoardgameListingApp
- Click to get yaml file. Full-Stack-CICD.yml
- odcInstallation : 'DC' : performing owasp dependency check installation on DC, it takes time to install NVD (National Vulnerability Database) since 2002 to latest year.
- Configure SonarQube Server:
- Generate token in sonarqube first and copy the token.
- Go to sonar qube/administrations/security/users/Generate tokens/Name=sonar_token Generate, copy the token
- Add the token in the credentials:
- Go to Manage Jenkins/Security/Credentials/Global/+Add Credentials: kind = secret, scope=Global (jenkins,nodes, items, all child items etc, secret = paste token, ID = sonar-token, description = sonar-token.
- Configure SonarQube Server
- Go to Manage Jenkins/System/SonarQube servers/AddSonarQube: Name=sonar, URL=http://192.168.171.200:9000, server authentication token=sonar-token (defined in add the token in the credentials)
- Stuck at Finished Jar Analyser: perform the following POM.xml and and run Build Again.
- Generate token in sonarqube first and copy the token.
- Configure POM.xml: Define the repositories of nexus repository in pom file.
- Source code has been uploaded on Github. go to github repository BoardgameListingApp
- In sonar qube/Browse/copy the path. http://192.168.171.200:8081/repository/maven-releases/
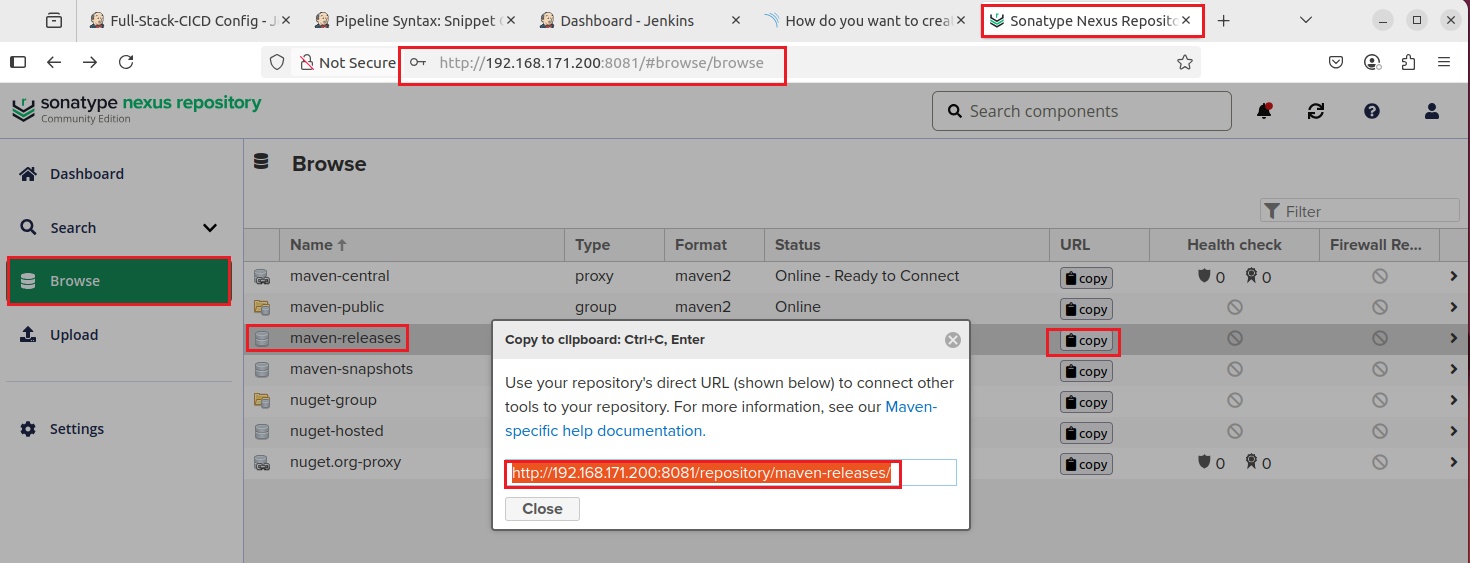
- open POM.xml edit and enter the url of Nexus maven-releases and maven-snapshots in <distributionManagement>. commit changes.
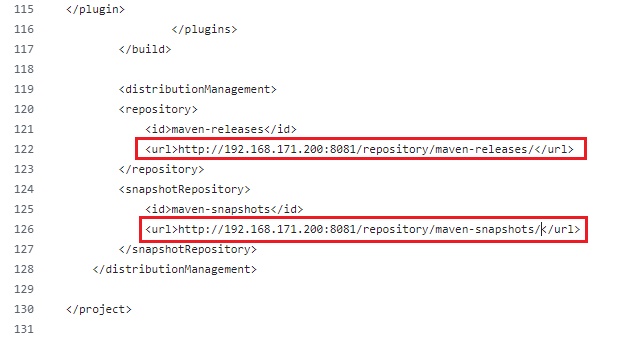
- Run Build now.
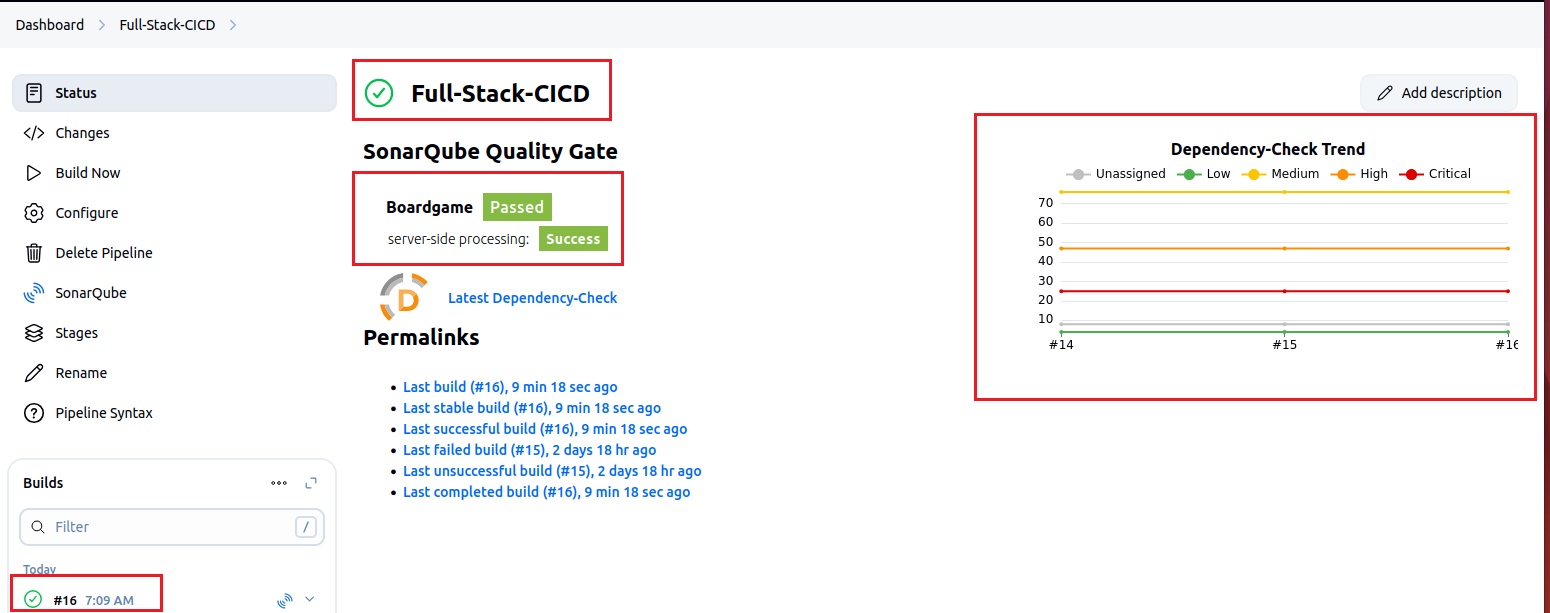
- Go to SonarQube >Project and check the outcome of Boardgame Bugs and Vulnerabilities.
- Configure Quality Gate:
- Get the token: go to SonarQube/Administration/Configuration/Webhooks/Create:
- Name=Jenkins, URL=http://192.168.171.200:8080/sonarqube-webhook/ , create.
- Add in pipeline script stage: To create the code, open pipeline syntax and search waitForQualityGate: wait for SonarQube analysis to be completed and return quality gate status, Server authentication=sonar-token and click Generate Pipeline script. copy code part waitForQualityGate abortPipeline:false and paste in pipeline script.
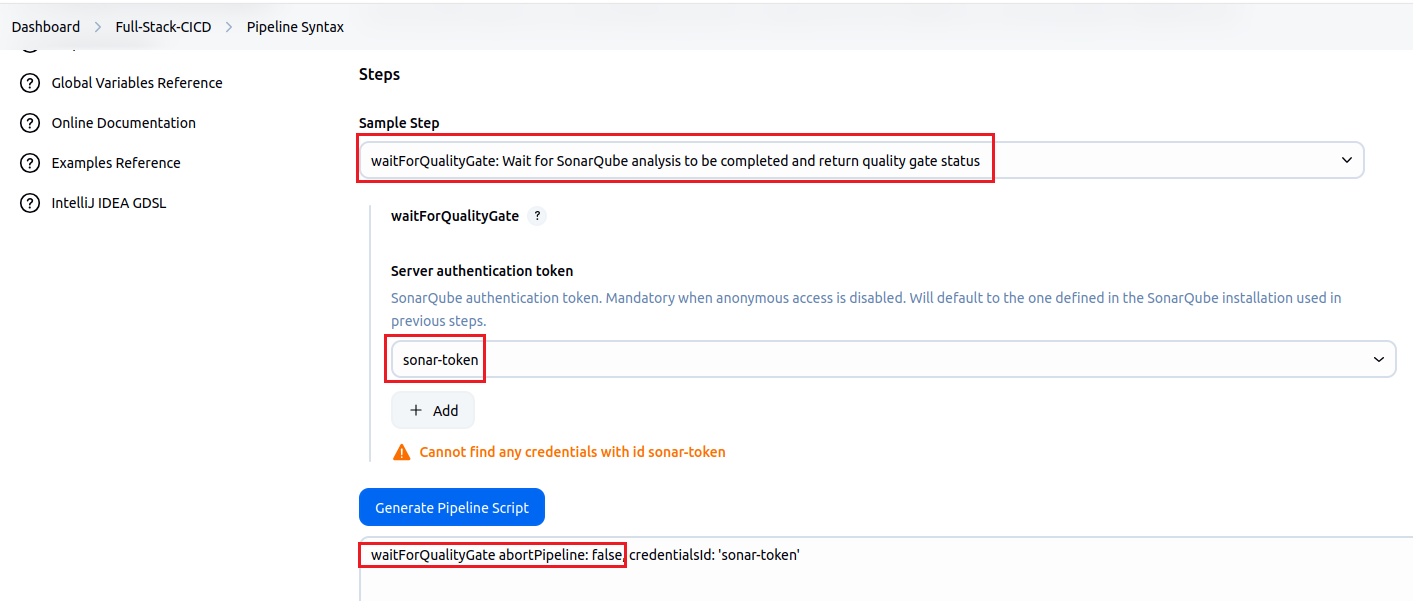
-
stage('Quality Gate') {steps {waitForQualityGate abortPipeline: false}}
- This code will test the Quality Gate in SonarQube.
- Generate the settings.xml file
- Go to Manage Jenkins/Managed Files/ + Add a new Config/ select Global Maven settings.xml, ID=global-maven-settings>next, file is created.
- enter user credentials, two ways, either add Sever Credentials or searc <server> and add, uncomment and add the details
- <server>
<id>maven-releases</id>
<username>admin</username>
<password>Trustu786</password>
</server>
<server>
<id>maven-snapshots</id>
<username>admin</username>
<password>Trustu786</password>
</server> - Click Submet.
- Upload Artifacts to Nexus: Method1
- Install Plugin if not: Pipeline Maven Integration Plugin than you will see withMaven:Provide Maven environment in pipelinesyntax
- In Pipeline syntax, choose withMaven:Provide Maven environment in pipelinesyntax, Maven=maven3, JDK=jdk17, Global Maven Settings Config =MyGlobalSettings, uncheck Maven Traceability, Generate Pipeline scirpt and copy script.
- Paste the script in Pipeline.
- Define commands to push the artifact to nexus: at //some block
- Go to pipeline syntax and search nexusArtifactUploader: Nexus Artifact Uploader, Nexus Version=NEXUS3, Protocol=HTTP, Nexus URL=192.168.171.200:8081, credentails (provide the credentials of nexus , go to jenkins/credentials/Global/Add Credentials/kind = Username with Password, scope=Global(Jenkins, nodes, items, all child items, etc), username=admin, Password=Trustu786, ID=nexus_cred), (get the groupId details from pom.xml)GroupId=com.javaproject, version=0.0.1, Repository=maven-releases, Atifact Add, ArtifactId=database_service_project, type=jar, File=/var/lib/jenkins/workspace/Full-Stack-CICD/target/database_service_project-0.0.1.jar (go to pipeline/#buildnumber/workspaces /var/lib/jenkins/workspace/Full-Stack-CICD and go to target and copy jar file and paste it here) and clcik generate pipeline script and copy and paste it in pipeline script.
-
stage('Quality Gate' ) {steps {waitForQualityGate abortPipeline:false}}stage('Deploy Artifacts to Nexus' ) {steps {withMaven(globalMavenSettingsConfig: 'global-maven-settings', jdk: 'jdk17', maven: 'maven3', mavenSettingsConfig: '', traceability: false) {nexusArtifactUploader artifacts: [[artifactId: 'database_service_project', classifier: '', file: '/var/lib/jenkins/workspace/Full-Stack-CICD/target/database_service_project-0.0.1.jar', type: 'jar']], credentialsId:'nexus_cred',groupId:'com.javaproject', nexusUrl:'192.168.171.200:8081', nexusVersion:'nexus3', protocol:'http', repository:'maven-releases', version:'0.0.1'}}}
- Method 2: Deploy Artificat with mvn package:
-
stage('Deploy Artifacts to Nexus' ) {steps {withMaven(globalMavenSettingsConfig: 'global-maven-settings', jdk: 'jdk17', maven: 'maven3', mavenSettingsConfig: '', traceability: false)sh "mvn package"}}
-
- Either one can be use to deploy artifact.
- Apply & Save
- Run Build now
- Docker Build Image:
- Configure Docker Hub credentials: Go to manage jenkins/credentials/global/new credentials/Scope=Global(jenkins,nodes,items,all child items,etc), username=aziz27uk, password=Yez.... ID=Docker_Hub, Description=Deocker_Hub.
- open pipeline synstex and choose withDockerRegistry:Sets up Docker registry endpoint, Docker registry URL=no need if repository is public, Registry credentials=select aziz27uk/******(Docker_Hub), Docker Installation=select docker and Generate Pipeline Script and copy the script.
- Docker commands alway define in script {}
-
stage('Docker Build Image' ) {steps {script {// This step should not normally be used in your script. Consult the inline help for details.withDockerRegistry(credentialsId: 'Docker_Hub', toolName: 'docker') {sh "docker build -t board_cicd:latest ."sh "docker tag board_cicd:latest aziz27uk/board_cicd:latest"}}}}
- Trivy to scan docker image for vulnerabilities.
- Install Trivy and configure:
- Two way you can perform, either install the trivy locally in your VM with the following steps or Install through Jenkins tools.
- Step 1: Install Dependencies: Run the following command to install necessary dependencies:
- $sudo apt-get install wget apt-transport-https gnupg lsb-release
- Step 2: Add Trivy Repository Key: Add the Trivy repository key to your system's trusted keyring:
- $wget -qO - https://aquasecurity.github.io/trivy-repo/deb/public.key | gpg --dearmor | sudo tee /usr/share/keyrings/trivy.gpg > /dev/null
- Step 3: Add Trivy Repository: Add the Trivy repository to your system's list of package sources:
- $echo "deb [signed-by=/usr/share/keyrings/trivy.gpg] https://aquasecurity.github.io/trivy-repo/deb $(lsb_release -sc) main" | sudo tee -a /etc/apt/sources.list.d/trivy.list
- Step 4: Update Package List: Update the package lists to include the newly added Trivy repository:
- $sudo apt-get update
- Step 5: Install Trivy:
- $sudo apt-get install trivy -y
- $trivy -v
- Install Trivy through Jenkins custom tools.
- Trivy image scan code for pipeline script.
-
stage('Trivy Image Scan' ) {steps {sh "trivy image aziz27uk/board_cicd:latest"}}
-
- Push image to Docker Hub.
-
stage('Docker Push Image' ) {steps {script {withDockerRegistry(credentialsId: 'Docker_Hub', toolName: 'docker') {sh "docker push aziz27uk/board_cicd:latest"}}}}
-
- Deploy image to Docker Container:
- Check Dockerfile is there in GitHub, if not than create one.
-
FROM adoptopenjdk/openjdk11
EXPOSE 8080
ENV APP_HOME /usr/src/appCOPY target/*.jar $APP_HOME/app.jar
WORKDIR $APP_HOME
CMD ["java", "-jar", "app.jar"]
-
-
stage('Deploy application to Docker Container' ) {steps {script {withDockerRegistry(credentialsId: 'Docker_Hub', toolName: 'docker') {sh "docker run -d -p 8085:8080 aziz27uk/board_cicd:latest"}}}}
- Check Dockerfile is there in GitHub, if not than create one.
- Run Build now.
- Error: Got permission denied while trying to connect to the Docker daemon socket at unix:///var/run/docker.sock: Post http://%2Fvar%2Frun%2Fdocker.sock/v1.29/auth: dial unix /var/run/docker.sock: connect: permission denied
- Solution: run $sudo chmod 666 /var/run/docker.sock or instead of this command which opens it to everyone, use sudo chown root:docker /var/run/docker.sock
- Image uploaded to nexus repository in maven-releases
- Image pushed to docker hub:
- container is created: $docker container ls , $docker container inspect condianer_ID
- Access application: http192.168.171.200:8085 (we have defined in code port 8085)
- Create a VM and install jdk, git, jenkins, maven.
Java based app: Jenkins integrate with Kubernetes cluster, CICD, maven, Docker, Kubernetes
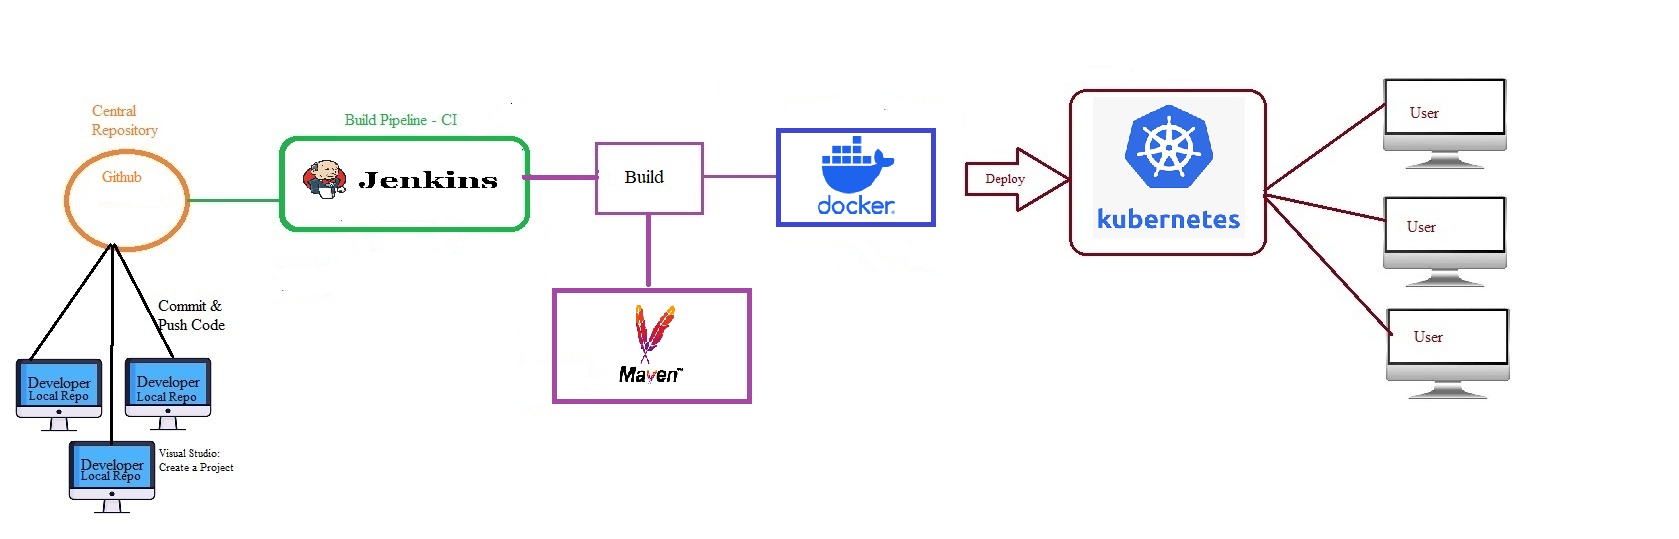
- Step 1: Elastic Kubernetes Service Cluster Setup in AWS
- Launch new Ubuntu VM using AWS Ec2 ( t2.micro)
- Connect to machine and install kubectl using below commands
-
curl -o kubectl https://amazon-eks.s3.us-west-2.amazonaws.com/1.19.6/2021-01-05/bin/linux/amd64/kubectl
chmod +x ./kubectl
sudo mv ./kubectl /usr/local/bin
kubectl version --short --client
-
- Install AWS CLI latest version using below commands
-
sudo apt install unzip
curl "https://awscli.amazonaws.com/awscli-exe-linux-x86_64.zip" -o "awscliv2.zip"
unzip awscliv2.zip
sudo ./aws/install
aws --version
-
- Install eksctl using below commands
-
curl --silent --location "https://github.com/weaveworks/eksctl/releases/latest/download/eksctl_$(uname -s)_amd64.tar.gz" | tar xz -C /tmp
sudo mv /tmp/eksctl /usr/local/bin
eksctl version
-
- Step 2: Create IAM role & attach to EKS Management Host & Jenkins Server
- Create New Role using IAM service ( Select Usecase - ec2 )
- Add below permissions for the role
- IAM - fullaccess
- VPC - fullaccess
- EC2 - fullaccess
- CloudFomration - fullaccess
- Administrator - acces
- Enter Role Name (eksroleec2)
- Attach created role to EKS Management Host (Select EC2 => Click on Security => Modify IAM Role => attach IAM role we have created)
- Attach created role to Jenkins Machine (Select EC2 => Click on Security => Modify IAM Role => attach IAM role we have created)
- Step 3: Create EKS Cluster using eksctl
- Syntax:
- eksctl create cluster --name cluster-name
--region region-name
--node-type instance-type
--nodes-min 2
--nodes-max 2 \ --zones ,
- eksctl create cluster --name cluster-name
- eksctl create cluster --name ashokit-cluster --region ap-south-1 --node-type t2.medium --zones ap-south-1a,ap-south-1b
- Note: Cluster creation will take 5 to 10 mins of time (we have to wait). After cluster created we can check nodes using below command.
- $kubectl get nodes
- Syntax:
- Step 4: Jenkins Server Setup in Linux VM
- Create Ubuntu VM using AWS EC2 (t2.medium)
- Enable 8080 Port Number in Security Group Inbound Rules
- Connect to VM using MobaXterm
- Instal Java
-
sudo apt update
sudo apt install fontconfig openjdk-17-jre
java -version
-
- Install Jenkins:
-
sudo wget -O /usr/share/keyrings/jenkins-keyring.asc \
  https://pkg.jenkins.io/debian-stable/jenkins.io-2023.key
echo deb [signed-by=/usr/share/keyrings/jenkins-keyring.asc] \
  https://pkg.jenkins.io/debian-stable binary/ | sudo tee \
  /etc/apt/sources.list.d/jenkins.list > /dev/null
sudo apt-get update
sudo apt-get install jenkins
-
- Start Jenkins:
-
sudo systemctl enable jenkins
sudo systemctl start jenkins
-
- Verify Jenkins:
-
sudo systemctl status jenkins
-
- Open jenkins server in browser using VM public ip:
-
http://public-ip:8080/
-
- Copy jenkins admin pwd:
-
sudo cat /var/lib/jenkins/secrets/initialAdminPassword
-
- Create Admin Account & Install Required Plugins in Jenkins
- Git
- JDK
- Maven
- Docker
- Step 5: Configure Maven as Global Tool in Jenkins
- Manage Jenkins -> Tools -> Maven Installation -> Add maven
- Step 6 : Setup Docker in Jenkins:
-
curl -fsSL get.docker.com | /bin/bash
sudo usermod -aG docker jenkins
sudo systemctl restart jenkins
sudo docker version
-
- Step 7 : Install AWS CLI in JENKINS Server
- URL : https://docs.aws.amazon.com/cli/latest/userguide/getting-started-install.html
- Execute below commands to install AWS CLI
-
sudo apt install unzip
curl "https://awscli.amazonaws.com/awscli-exe-linux-x86_64.zip" -o "awscliv2.zip"
unzip awscliv2.zip
sudo ./aws/install
aws --version
- Step 8 : Install Kubectl in JENKINS Server
- Execute below commands in Jenkins server to install kubectl
-
curl -o kubectl https://amazon-eks.s3.us-west-2.amazonaws.com/1.19.6/2021-01-05/bin/linux/amd64/kubectl
chmod +x ./kubectl
sudo mv ./kubectl /usr/local/bin
kubectl version --short --client
- Step 9 : Update EKS Cluster Config File in Jenkins Server
- Execute below command in Eks Management host & copy kube config file data
$ cat .kube/config -
Execute below commands in Jenkins Server and paste kube config file
cd/var/lib/jenkins<br/> sudo mkdir .kube
$ sudo vi .kube/config -
Execute below commands in Jenkins Server and paste kube config file for ubuntu user to check EKS Cluster info
cd <br/> ls -la
$ sudo vi .kube/config -
check eks nodes
$ kubectl get nodes - Note: We should be able to see EKS cluster nodes here.
- Execute below command in Eks Management host & copy kube config file data
- Step 10 : Create Jenkins CI CD Job
- Stage-1 : Clone Git Repo
- Stage-2 : Maven Build
- Stage-3 : Create Docker Image
- Stage-4 : Push Docker Image to Registry
- Stage-5 : Deploy app in k8s eks cluster
-
pipeline {agent anytools{maven "Maven-3.9.9"}
stages {stage('Clone Repo') {steps {git 'https://github.com/ashokitschool/maven-web-app.git'}}stage('Maven Build') {steps {sh 'mvn clean package'}}stage('Docker Image') {steps {sh 'docker build -t ashokit/mavenwebapp .'}}stage('k8s deployment') {steps {sh 'kubectl apply -f k8s-deploy.yml'}}}}
- Step 11 : Access Application in Browser
- We should be able to access our application
- URL : http://LBR/context-path/
- Step 12: After your practise, delete Cluster and other resources we have used in AWS Cloud to avoid billing
- Code
NodeJS based app: Jenkins integrate with kubernetes cluster, CICD, maven, Docker, Kubernetes
- Code
Java App: Deploy on Kubernetes, using GitHub-Maven-Docker Buid-Docker Push - Deploy on kubernetes cluster - Manually deloyment without CICD
- Java based app jenkins, maven, docker, kubernetes, manually1.jpg
- Pre-requisite
- Java based application code
- Maven: Covert code to Package (To build code for java based application required maven)
- Docker: Create image for containers.
- Kubernetes Cluster: Deploy microserice java application.
- Code Repository on GitHub:
- https://github.com/AbdulAziz-uk/docker-Java-kubernetes-project.git
- code contain the following
- Productcatalogue: microserivce
- src
- Dockerfile:
- FROM openjdk:8-jre
ADD target/productcatalogue-0.0.1-SNAPSHOT.jar app.jar
ADD product-catalogue.yml app-config.yml
EXPOSE 8020
ENTRYPOINT ["java","-Djava.security.egd=file:/dev/./urandom","-jar","app.jar", "server", "app-config.yml"] - Calling base image for openjdk:8
- ADD xxxx.jar file to app.jar
- ADD product-catalogue.yaml file to app-config.yml
- EXPOSE port 8020 (Port numbers are different for each microservice)
- ENTRYPOINT:
- FROM openjdk:8-jre
- pom.xml
- product-catalogue.yaml
- shopfront: microserivce
- src
- Dockerfile
- FROM openjdk:8-jre
ADD target/shopfront-0.0.1-SNAPSHOT.jar app.jar
EXPOSE 8010
ENTRYPOINT ["java","-Djava.security.egd=file:/dev/./urandom","-jar","/app.jar"]
- FROM openjdk:8-jre
- pom.xml
- stockmnager: microserivce
- src
- Dockerfile
- FROM openjdk:8-jre
ADD target/stockmanager-0.0.1-SNAPSHOT.jar app.jar
EXPOSE 8030
ENTRYPOINT ["java","-Djava.security.egd=file:/dev/./urandom","-jar","/app.jar"]
- FROM openjdk:8-jre
- pom.xml
- kubernetes
- README.md
- Install Git: To clone repository in local computer
- $git clone https://github.com/AbdulAziz-uk/docker-Java-kubernetes-project.git
- Install Maven: To Build Java Code
- $mvn --version
- Export Maven Environment Variable: $export MAVEN_HOME=/usr/share/maven
- $echo $MAVEN_HOME
- $cd productcatalogue
- productcatalogue$ls (there is no target folder)
- docker-Java-kubernetes-project1.jpg
- There is no .jar file in the code, so to create docker image it required as we have defined in Dockerfile. so create .jar file with maven.
- abdul@master:~/docker-Java-kubernetes-project/productcatalogue$ mvn clean install
- /target folder will be created and there will be xxxxx.jar file will be there.
- docker-Java-kubernetes-project3.jpg
- abdul@master:~/docker-Java-kubernetes-project/shopfront$ mvn clean install
- Error: docker-Java-kubernetes-project4.jpg
- Solution: run $mvn clean install -DskipTests
- abdul@master:~/docker-Java-kubernetes-project/shopfront$ mvn clean install -DskipTests (jar file is created in target folder)
- abdul@master:~/docker-Java-kubernetes-project/stockmanager$ mvn clean install -DskipTests (jar file is created in target folder)
- Push image to Docker Hub:
- abdul@master:~/docker-Java-kubernetes-project/stockmanager$ docker login (enter credentials)
- Install Docker:
- $docker --version
- Create image:
- $abdul@master:~/docker-Java-kubernetes-project/productcatalogue$ docker build -t product-catalogue .
- docker-Java-kubernetes-project2.jpg
- run mvn package first to create build package (xxx.jar) than create image. perform this step in maven first and run again to create docker image.
- during creation of image we are defining docker hub repository so no need to create tag again.
- abdul@master:~/docker-Java-kubernetes-project/productcatalogue$ sudo docker build -t aziz27uk/productcatalogue:latest .
- abdul@master:~/docker-Java-kubernetes-project/shopfront$ sudo docker build -t aziz27uk/shopfront:latest .
- abdul@master:~/docker-Java-kubernetes-project/stockmanager$ sudo docker build -t aziz27uk/stockmanager:latest .
- $docker images (3 images created)
- docker-Java-kubernetes-project5.jpg
- Push image to Docker Hub:
- abdul@master:~/docker-Java-kubernetes-project/stockmanager$ docker login (enter credentials)
- abdul@master:~/docker-Java-kubernetes-project/stockmanager$ sudo docker push aziz27uk/productcatalogue
- abdul@master:~/docker-Java-kubernetes-project/stockmanager$ sudo docker push aziz27uk/shopfront
- abdul@master:~/docker-Java-kubernetes-project/stockmanager$ sudo docker push aziz27uk/shopmanager
- check in hub.docker.com images has been pushed.
- Install Kubernetes Cluster:
- we have defined yaml file for all three microservices.
- productcatalogue-service.yaml
-
apiVersion: v1kind: Servicemetadata:name: productcataloguelabels:app: productcataloguespec:type: NodePortselector:app: productcatalogueports:- protocol: TCPport: 8020name: http
---apiVersion: apps/v1kind: Deploymentmetadata:name: productcataloguespec:selector:matchLabels:app: productcataloguereplicas: 1template:metadata:labels:app: productcataloguespec:containers:- name: productcatalogueimage: aziz27uk/productcatalogue:latestports:- containerPort: 8020livenessProbe:httpGet:path: /healthcheckport: 8025initialDelaySeconds: 30timeoutSeconds: 1
-
- shopfront-service.yaml
-
------apiVersion: v1kind: Servicemetadata:name: shopfrontlabels:app: shopfrontspec:type: NodePortselector:app: shopfrontports:- protocol: TCPport: 8010name: http
---apiVersion: apps/v1kind: Deploymentmetadata:name: shopfrontspec:selector:matchLabels:app: shopfrontreplicas: 1template:metadata:labels:app: shopfrontspec:containers:- name: shopfrontimage: aziz27uk/shopfront:latestports:- containerPort: 8010livenessProbe:httpGet:path: /healthport: 8010initialDelaySeconds: 30timeoutSeconds: 1
-
- stockmanager-service.yaml
-
---apiVersion: v1kind: Servicemetadata:name: stockmanagerlabels:app: stockmanagerspec:type: NodePortselector:app: stockmanagerports:- protocol: TCPport: 8030name: http
---apiVersion: apps/v1kind: Deploymentmetadata:name: stockmanagerspec:spec:selector:matchLabels:app: stockmanagerreplicas: 1template:metadata:labels:app: stockmanagerspec:containers:- name: stockmanagerimage: aziz27uk/stockmanager:latestports:- containerPort: 8030livenessProbe:httpGet:path: /healthport: 8030initialDelaySeconds: 30timeoutSeconds: 1
-
- There are two sections in manifest file/yaml file, one is for service Nodeport and another for Deployment.
- abdul@master:~/docker-Java-kubernetes-project/kubernetes$ kubectl apply -f productcatalogue-service.yaml
- abdul@master:~/docker-Java-kubernetes-project/kubernetes$ kubectl get deployment
- abdul@master:~/docker-Java-kubernetes-project/kubernetes$ kubectl get svc
- abdul@master:~/docker-Java-kubernetes-project/kubernetes$ kubectl get pods
- abdul@master:~/docker-Java-kubernetes-project/kubernetes$ kubectl describe pod productcatalogue-77949b7dd5-cqknm
- get the ip address and port number
- abdul@master:~/docker-Java-kubernetes-project/kubernetes$ kubectl apply -f shopfront.yaml
- abdul@master:~/docker-Java-kubernetes-project/kubernetes$ kubectl get deployment
- abdul@master:~/docker-Java-kubernetes-project/kubernetes$ kubectl get svc
- abdul@master:~/docker-Java-kubernetes-project/kubernetes$ kubectl get pods
- abdul@master:~/docker-Java-kubernetes-project/kubernetes$ kubectl apply -f stockmanager.yaml
- abdul@master:~/docker-Java-kubernetes-project/kubernetes$ kubectl get deployment
- abdul@master:~/docker-Java-kubernetes-project/kubernetes$ kubectl get svc
- abdul@master:~/docker-Java-kubernetes-project/kubernetes$ kubectl get pods
- Access application:
- abdul@master:~/docker-Java-kubernetes-project/kubernetes$ kubectl get svc (take ip and port numbers)
- docker-Java-kubernetes-project6.jpg
- open browser: http://http://192.168.171.200:31970/
- http://192.168.171.200:32168/products
- http://192.168.171.200:30389/stocks
- Code
Java App: Deploy on Kubernetes, using GitHub-Maven-Docker Buid-Docker Push - Deploy on kubernetes cluster - with CICD
- Java based app jenkins, maven, docker, kubernetes, CICD1.jpg
- Code
DevSecOps: Docker integration with Jenkins, Full Stack Pipeline, SonarQube, OWASP, Trivy, Docker, Jenkins
- Devops: Generally in devops CICD includes Code + Build + Test + Deploy, if you include security aspect in which tools use sonarque, OWASP, Trivy, Test etc..
- DevSecOps: it is a combination of Development+Security+Operations. Security tools such as
- Code Scan: Sonar which is a code scan to check code smell or vulnerabilities , malicious code, In this SonarQube scan which scan the code. In this method code comes from Github and scan using sonarqube,
- Dependency check: Code will have dependency to run the program, OWASP dependency check will scan the code for dependency check.
- Image Scan: Trivy, Which scans the image. Docker scout, snik is also provide this service.
- Tools used:
- Github
- SonarQube
- OWASP
- Trivy
- Tests
- Docker
- Jenkins: It is CICD tool,
- GitHub Repository: https://github.com/AbdulAziz-uk/wanderlust.git
- Create a Ubuntu VM:
- Install Git and clone repository:
- $sudo apt update
- $git clone https://github.com/AbdulAziz-uk/wanderlust.git
- Install Docker & Docker compose:
- $sudo apt install docker.io -y
- $sudo apt install docker-compose -y
- $docker ps
- Error: Permission denied while trying to connect to the Docker Daemon socket at unix:///var/run/docker.sock: Get "http//%/2Fvar%2Fdocker.sock/v1.24/containers/json@: dial unix /var/run/docker.sock: connect: permission denied
- Solution: Add the user to docker group if it is not root.
- $sudo usermod -aG docker ubuntu or $user
- $sudo reboot or if you do not want to reboot $newgrp docker
- Install Jenkins: LTS
- Jenkins runs on java, need to install java first
- $java (system will propose commans to run to install java)
- $sudo apt install openjdk-17-jre
- sudo wget -O /etc/apt/keyrings/jenkins-keyring.asc \
https://pkg.jenkins.io/debian-stable/jenkins.io-2023.key
echo "deb [signed-by=/etc/apt/keyrings/jenkins-keyring.asc]" \
https://pkg.jenkins.io/debian-stable binary/ | sudo tee \
/etc/apt/sources.list.d/jenkins.list > /dev/null
sudo apt-get update
sudo apt-get install jenkins - jenkins --version$systemctl status jenkins (it runs on port 8080)
- login to jenkins: open browser http:IP/8080
- recover password from the given path and paste it.
- Install SonarQube container:
- $docker run -itd --name sonarqube-server -p 9000:9000 sonarqube:lts-community
- open browser: https://ip:9000
- user=admin, password = admin
- You can get projects using azure, Bitbucker, Bitbucket cloud, Github, GitLab, it will fetch code from these repositories, scan and generate report and send report to them.
- Install Trivy:
- sudo apt-get install wget apt-transport-https gnupg lsb-release
wget -qO - https://aquasecurity.github.io/trivy-repo/deb/public.key | sudo apt-key add -
echo deb https://aquasecurity.github.io/trivy-repo/deb $(lsb_release -sc) main | sudo tee -a /etc/apt/sources.list.d/trivy.list
sudo apt-get update
sudo apt-get install trivy - Try commands:
- trivy image imagename
- trivy fs --security-checks vuln,config Folder_name_OR_Path
- trivy image --severity HIGH,CRITICAL image_name
- trivy image -f json -o results.json image_name
- trivy repo repo-url
- Example:
- $trivy image redis (it will download the redis image and scan and give report)
- sudo apt-get install wget apt-transport-https gnupg lsb-release
- Install Jenkins Plugin:
- The following plugins rquired: Go to Manage jenkins/plugin and search the following plugins and install.
- SonarQube Scanner:
- Manage Jenkins/plugins/Available Plugins/search sonarqube scanner
- Sonar Quality Gates:
- Manage Jenkins/plugins/Available Plugins/search quality gates
- OWASP Dependency-Check:
- Manage Jenkins/plugins/Available Plugins/search OWASP Dependency-Check
- Docker:
- Manage Jenkins/plugins/Available Plugins/search Docker
- restart jenkins.
- Integration Jenkins <==> SonarQube
- Devsecop_Jenkins_integrate_Docker1.jpg
- SonarQube: webhook, token
- Step1: Create Webhook: Access SonarQube/administration/Configuration/Webhooks/create,
- Name=sonar-webhook,
- URL=192.168.171.200:8080/sonarqube-webhook/ (enter jenkins URL) click create.
- Step2: Generate Token: Access SonarQube/Security/users/Tokens and click create,
- Name=sonar-token,
- duration=30 and generate.
- Copy token. This token will define in jenkins. This token will authenticate connection from jenkins to Sonarqube.
- Jenkins: Install plugin, setup sonarqube server, setup tool
- Step3: Setup SonarQube Servers: Go to Manage Jenkins/System/SonarQube servers/Add Sonar Qube:
- Name=sonar,
- URL which can be copied from sonar. http://192.168.171.200:9000
- server authentication token: Paste the token which was created in Step2 or you can add token with Add from Credentials, secret text, paste token, ID=sonar-token, save.
- Devsecop_Jenkins_integrate_Docker2.jpg
- Step4: Quality Gates: Go to Manage Jenkins/Tools/SonarQube Scanner installations/Add sonarQube Scanner insta:
- Name=sonar-scanner,
- Install automatically, select version save.
- Devsecop_Jenkins_integrate_Docker3.jpg
- Setup OWASP Dependency Check:
- In the above step we have installed OWASP Dependency Check plugin.
- Go to Manage jenkins/tools/ Dependency-Check installations/
- Name=DC
- Install from = Github
- select install automatically
- Version = select
- Devsecop_Jenkins_integrate_Docker4.jpg
- Create Jenkins Pipeline CICD. (Creating Declarative Pipeline in which we define different stages in the code).
- Go to jenkins/new item
- Name=wornderlust-CICD
- General/Description = This is a CICD DevSecOps for Wanderlust project.
- Discard old builds = max number of builds to keep = 3
- Github project = https://github.com/AbdulAziz-uk/wanderlust.git
- Throttle Builds = 1 (Approximately 60 minutes between builds, to avoid generating frequent builds)
- Triggers=GitHub hook trigger for GITScm polling (for automatic trigger to run pipeline upon change)
- Groovy Script:
- Go to jenkins/new item
- Code
MongoDB: Communication between two containers, frontend and backend:
- ForntEnd container = MongoExpress: using URL access the mongoDB
- BackEnd container = MongoDB : Actual database which will be access through front end.
- code
- code
MongoDB: volume mount for database using docker compose
- Github repository: cd
- Docker Compose to set up a MongoDB container and a MongoDB Express (Mongo-Express) container.
- Create a Ubuntu VM.
- Install Docker
- Install Docker compose
- Create docker compose file:
- $vim docker-compose.yml
-
version: '3'
services:
mongodb:
image: mongo
container_name: mongodb
networks:
- mongo-network
ports:
- "27017:27017"
environment:
- MONGO_INITDB_ROOT_USERNAME=admin
- MONGO_INITDB_ROOT_PASSWORD=123mongo-express:
image: mongo-express
container_name: mongo-express
networks:
- mongo-network
ports:
- "8081:8081"
environment:
- ME_CONFIG_MONGODB_SERVER=mongodb
- ME_CONFIG_MONGODB_ADMINUSERNAME=admin
- ME_CONFIG_MONGODB_ADMINPASSWORD=123
- ME_CONFIG_BASICAUTH_USERNAME=admin
- ME_CONFIG_BASICAUTH_PASSWORD=123networks:
mongo-network:
driver: bridge - check code with YAML Lint.
- We define two services: mongodb and mongo-express.
- The mongodb service uses the official MongoDB image and specifies a named volume mongodb_data for persisting MongoDB data.
- We set environment variables for the MongoDB container to create an initial admin user with a username and password.
- The mongo-express service uses the official Mongo Express image and connects to the mongodb service using the ME_CONFIG_MONGODB_SERVER environment variable.
- We also set environment variables for the Mongo Express container to configure it.
-
- Now, navigate to the directory containing the
docker-compose.ymlfile in your terminal and run:- $docker-compose up
- Docker Compose will download the necessary images (if not already downloaded) and start the MongoDB and Mongo Express containers. You can access the MongoDB Express web interface at http://localhost:8081 and log in using the MongoDB admin credentials you specified in the docker-compose.yml file.
- The data for MongoDB will be stored in a Docker named volume named
mongodb_data, ensuring that it persists even if you stop and remove the containers. - To stop the containers, press
Ctrl+Cin the terminal where they are running, and then run: - $docker-compose down
- This will stop and remove the containers, but the data will remain in the named volume for future use. create a new container and mount the volume.
- $vim docker-compose.yml
Interview
What is Docker, container vs VM,
- Docker is an open source containerization platform on which we can install any application. It is light weighted fast and use less hardwae resources.
- Application can migrate from one o/s to another by simply copying application.
- Mainly docker is use to build images, deploy applications on containers, high availability.
- Containers are very light weight and they do not have complete o/s, it contains only required libraries and application dependencies, whereas in VM it has complete o/s.
Docker Lifecycle
- If there is a requirement to containerization of an application which start with writing a dockerfile to run the application, like base o/s image, dependencies to run application etc and create an image,
- images will be deployed on containers.
Docker components
- Client: docker CLI, using cli you execute docker commands
- Docker Host: Docker daemon will receive all commands and execute it
- Registry: it is a repository in which images are stored.
Docker ADD vs COPY, Networking types, isolating conainers
- Docker ADD can copy the files from a URL like wget whereas copy can only copy files from host system into the container.
- Networking type:
- Bridge: it is defualt networking in docker, when you install docker on VM (host) it creates a virtual Network adapter (VNIC) docker0 and assign ip addresses to containers from default CIDR (172.17.0.0/16). It act as SDN (software define network) swich. all containers within a bridge can communicate with each other, All containers can have internet with the help of NAT which is install during docker setup, it uses docker host IP address to send traffic outside world.
- Overlay: when you have multiple host, docker swam or kubernetes.
- Host: containers on same network can communicate with each other whereas communication between different networks which can be done through port mapping, port mapping with host IP.
- MacVlan: It is configured in a special requirements.
- None:
- isolating containeres: through creating different networks containers are isolated.
- code
Docker daemon
- Docker is single daemon process, single poing of failure, if it goes down than all the applications are down.
- Doceker daemon runs as a root user, any process running as a root can have security issues.
- Podman can be used as alternative which is not run as root user.
- code
code
- code
- code
- code
code
- code
- code
- code
Videos
Sanjay Dahiya
- Introduction to Docker and Docker Container
- Basic Commands, create, start, stop, remove Containers
- Container port mapping, rename, copy, kill, wait, pause, unpause, prune, export
- Create Image, Push and Pull From Docker HUB
- Docker Volumes, Mount
- Host your own docker registry
- Host your own docker registry Lab Part-1 AWS
- Setup Private Docker Registry_ Secure SSL Certificate- HTTPS
- Dockerfile Part-1
- Dockerfile Part-2
- Dockerfile Part-3
- Dockerfile Part-4
- Dockerfile Part-5
- Dockerfile Part-6
- Docker Compose Part-1
- Docker Compose Part-2
- Docker Compose Part-3
- Docker Network part -1
- Docker Network part -2
- Docker Network part -3
- Docker Network part -4
- Docker Network part -5
- Docker Swarm part-1
- Docker Swarm part-2
Sai Krishna - IntelliQIT
- Docker Intro
- Docker Installation on Linux
- mysql, jenkin, tomcat container creation
- Link Command and 3 Tier Setup
- CICD 3 Tier setup in Docker
- Docker Compose 1
- Docker Compose 2
- Docker Compose 3
- Docker Volume 1
- Docker Volume 2
- Docker File 1
- Docker File 2
- Docker File 3
- Docker Registry 1
- Docker Swam 1
- Docker Swam 2
- Docker Swam 3
- Kubernetes
- Integrate Ansible with Docker
- Kubectl
- GKE - Google Kubernetes Cluster
- Kubernetes - pod creation
- Kubectl
- Interview Q & A
- Docker on Windows
Docker in details in hindi
- https://www.youtube.com/watch?v=MzhD6ZzC9UM&list=PLYEK_dHOjwtMxKufouGs2QGLH1qhJw0T-
- code
- code
Docker in urdu
- https://www.youtube.com/watch?v=w__klNXHeV4
- https://www.youtube.com/watch?v=1ymi24PeF3M&t=24s
- code
code
- code
- code
- code