Azure Infrastructure, Hierarcy, Tenancy, Subscription, RG, Resources
Azure Infrastructure & Data Centers
-
 >
> 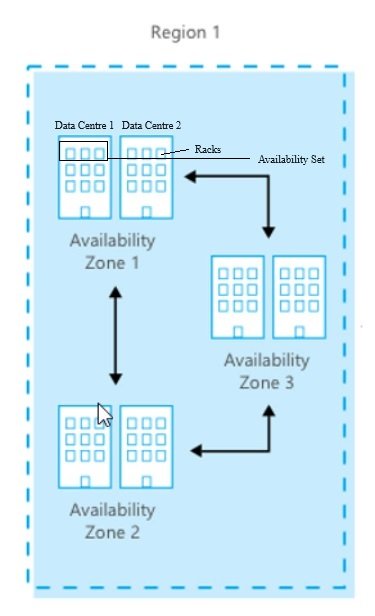
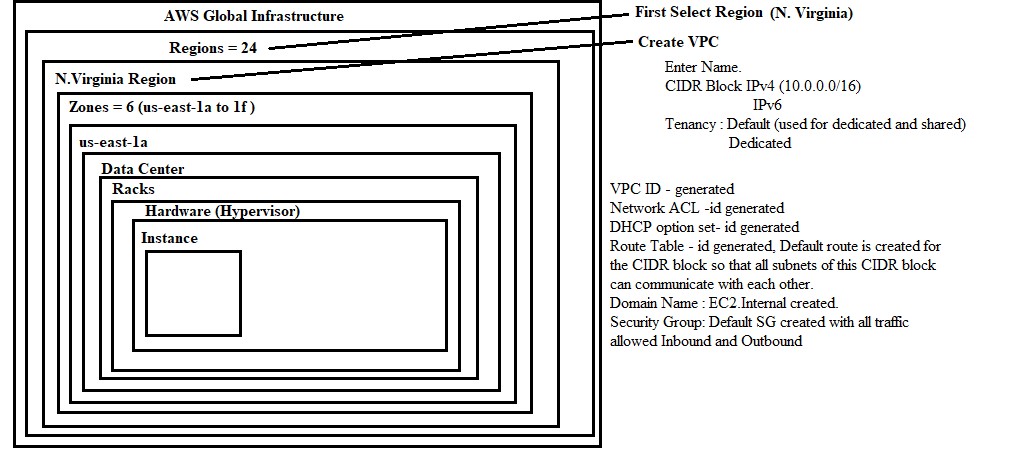
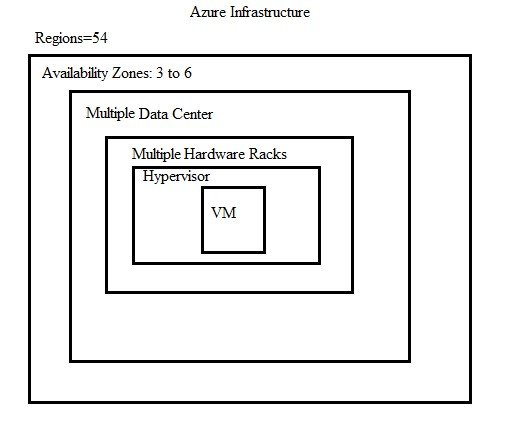
- Azure has got nearly 60 Regions world wide.
- Each region has min 3 Availability zone which extend to 6.
- Each Availability Zone has more than one Data center.
- Each Data center has multiple Racks and each rack has mulitple servers.
- Servers are grouped into fault domain and update domain available at one data center.
- code
-
Azure Account Hierarchy
- Hierarchy of Azure Account:
- Default Directory(tenant), Default Domain, Defualt Subscription: Azure creates a defualt directory which represents as tenant, default domain (azizazure0410gmail.onmicrosoft.com) and a default subscription.
- Create additional Tenant or directory:
- Go to All Services/Identity/Microsoft Entra Id/Manage tenants/+ Create
- select a tenant type: Microsoft Entra ID, Azure AD B2C (Provide highly customizable sign-in and other identity management experiences for your external facing applications.)
- Configuration: Organization name=BestGift4u, Initial domain name=bg4u (bg4u.onmicrosoft.com: should be unique)
- Region: UK South.
- To create any resource in the above tenant, you must have a subscription. Either create a new subscription or move from another tenant, when you move from another tenant than all its resources will also be moved.
- Create additional Subscription: Default directory will have default subscription. You can create multiple subscription within a default directory/additional directory or tenant.
- To create additional subscription, go to subscription click +Add. Priciing for each subscription is maintained separately. Resource group is created in subscription.
- Move subscription: Go to subscription and click change directory, select the new directory to which subscrption to be attached.
- Configure Custom Domain : Integrate with Active Directory to get company domain and when you create users in AD than their suffix will be your company domain.
- Create additional Tenant or directory:
- Switch Directory: When you have multiple directory/tenant, you can switch by going to account on right hand at top corner and switch directory or from Entra ID.
- Users of a Directory/Tenant: User created in one directory/tenant will not reflect in another directory/tenant.
- Microsoft Entra Connect: It is used to sync on prem ADDS users with Azure AD which is called hybrid identity.
- Query: Azure AD uses Rest API over HTTP or HTTPS for query while ADDS uses LDAP (Light Weight Directory Access Protocol)
- Authentication:
- ADDS uses kerberos for authentication.
- Azure AD uses SAML, WS-Federation, Open ID-Connect
- Authorization: OAuth for authorization in Azure AD. Third party services like Facebook, google, yahoo etc..
- No nesting: Users and groups are created in a flat structure. There are no OU (Organizational Units) or GPO (Group Policy Objects) in Azure AD.

-
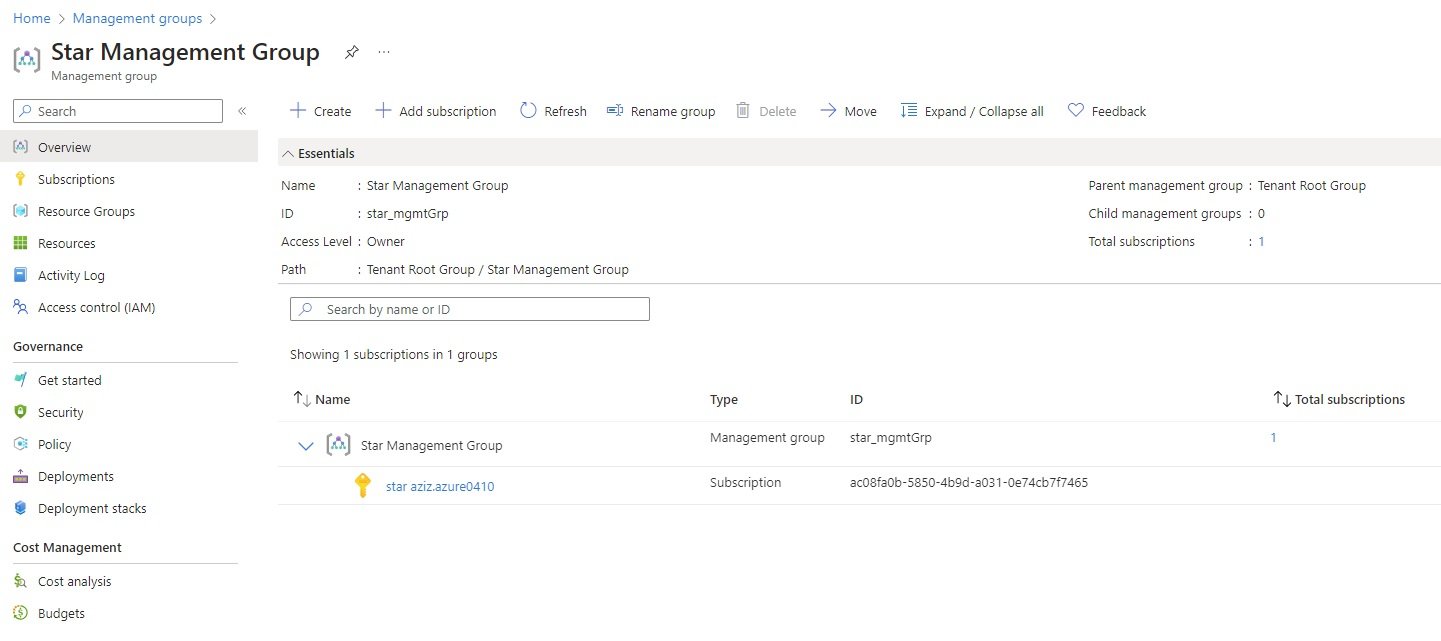
Management Group:
- To manage mulitple subscription, create managent group.
- Search management groups: click start using management group to create.
- go to management group created and add subscriptions.
- Policies applied at management level will inherit to subscription and than RG and than resources.
- Subscription:
- Resource Group:
- Resources:
Tenancy/Default Directory
- Creating account on Azure
- azure_account.jpg
- Go to portal https://portal.azure.com and create an account using email address and password.
- Microsoft will create a Tenancy/ Default Directory.
- Tenant ID and Entra ID will be generated and assigned to email.
- You can create multiple tenancy but there will be separate subscription to every tenancy in order to access resources.
- You can assign subscription to any tenancy but there will be only one subscription to one tenancy.
- Create a new tenancy/directory: Go to Entra ID-->Manage tenants-->Create and choose Microsoft Entra ID (you should have P1 or P2 license to create Tenant with Entra ID), a directory will be created.
- Switch a directory/tenancy: click on top right corner and click switch directory
- Whenever we create a resource then request goes to Azure Resource Manager API and it checks the relevant resource provider and forward the request accordingly.
- Creating account on Azure
Subscription & Management Group
-

- To access azure resources, first create a subscription. Without subscription you cannot create any resource.
- Default tenancy will be the first directory created in Entra ID when signup with Azure.
- Per subscription:
- one account administrator.
- can create, cancel new subscription,
- change the billing
- Change the service administrator.
- One Service Administrator.
- Manage services in azure portal.
- Assign users to co administrator role.
- Co administrator : 200 users per accountYou can create multiple tenancy but subscription can only be associated with one tenancy at a time.
- one account administrator.
- You can attach subscription to different directory. Once you change the subscription all its resources will also be move to new directory, no users will be moved to new directory.
- You can add co administrator at subscription level only. At resource level you can assign role to users. select the user from list of Active Directory.
- Management Group: Group created to manage multiple subscriptions. it is the top most level in the azure.
- Per subscription:
- Code
-
Resource Group
- It is a logical container, which holds all resources.
- Any resource that is creating in Azure must and should be in any of the resource group. Resource cannot create without a resource group.
- If you delete RG than all its resources will be deleted.
- RG and resources can be in different regions. RG contains metadata information of resources and this metadata info stored at location specified in RG.
- Sometime when you create a resource and azure will automatically creates RG in the background.
- RG can move to another RG or subscription.
- Resource groups are created within subscription which is under account. Resrouce Group Hierarchy:

- Create Azure Account
- Subscription create
- Create Resource Group
- Create All Resources in RG
- Create Resource Group
- Subscription create
- code
Resources
- All resources are created witgin a Resource Group and RG are associated with subscription, if you movesubscription to different directory then all its resources will be moved.
- code
- code
Delete Azure Subscription
- https://learn.microsoft.com/en-us/azure/cost-management-billing/manage/cancel-azure-subscription
- To completely delete an Azure account, you must first cancel and delete all active subscriptions in the Azure Portal.
- Cancel your subscriptions:
- Sign in to the Azure Portal.
- Search for and select Cost Management + Billing
- In the left menu, select Subscriptions or Azure subscriptions.
- Click on the subscription you want to cancel.
- At the top of the page, select Cancel.
- Follow the prompts, acknowledge any running resources, select a cancellation reason, and click Cancel subscription
- Delete the subscription:
- After a subscription is canceled, it cannot be permanently deleted immediately.
- Free Trial: The "Delete subscription" option becomes available 3 days after cancellation.
- Pay-As-You-Go: The subscription is usually deleted automatically 90 days after cancellation, or it can be deleted manually once any outstanding balances are settled.
To manually delete, return to the subscription, click Delete, and type the name of the subscription to confirm.
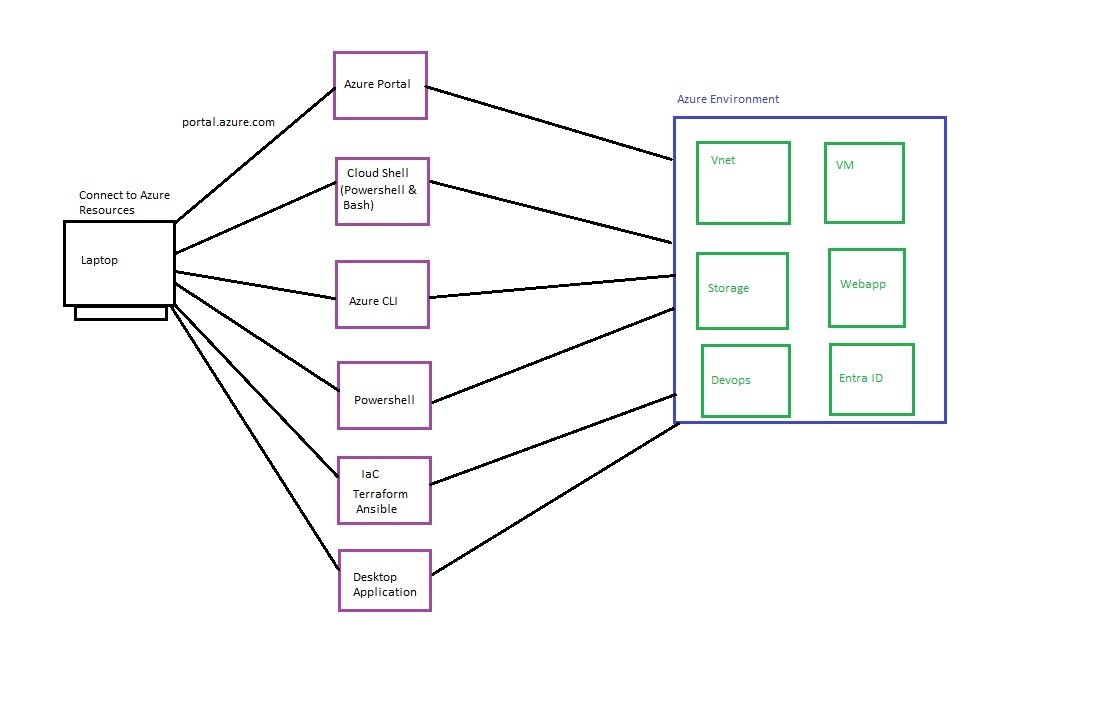
Azure Access: portal, powershell, cloudshell, CLI, Desktop Application, IaC
- Following are the options to Access Azure Resources.
GUI Web Portal
- Web Portal: https://portal.azure.com
- Enter user name, password, code if dual authentication enabled.
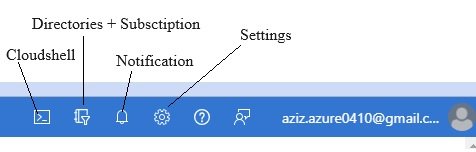
- Top Menu Bar
- Dashboard
- Individual and shared dashboard, individual dashboard for single user access and maintian by user only.
- shared dashboard created and shared with team members so every one will have similar dashboard with assigned permission through RBAC.
- Pin the required resources in dashboard.
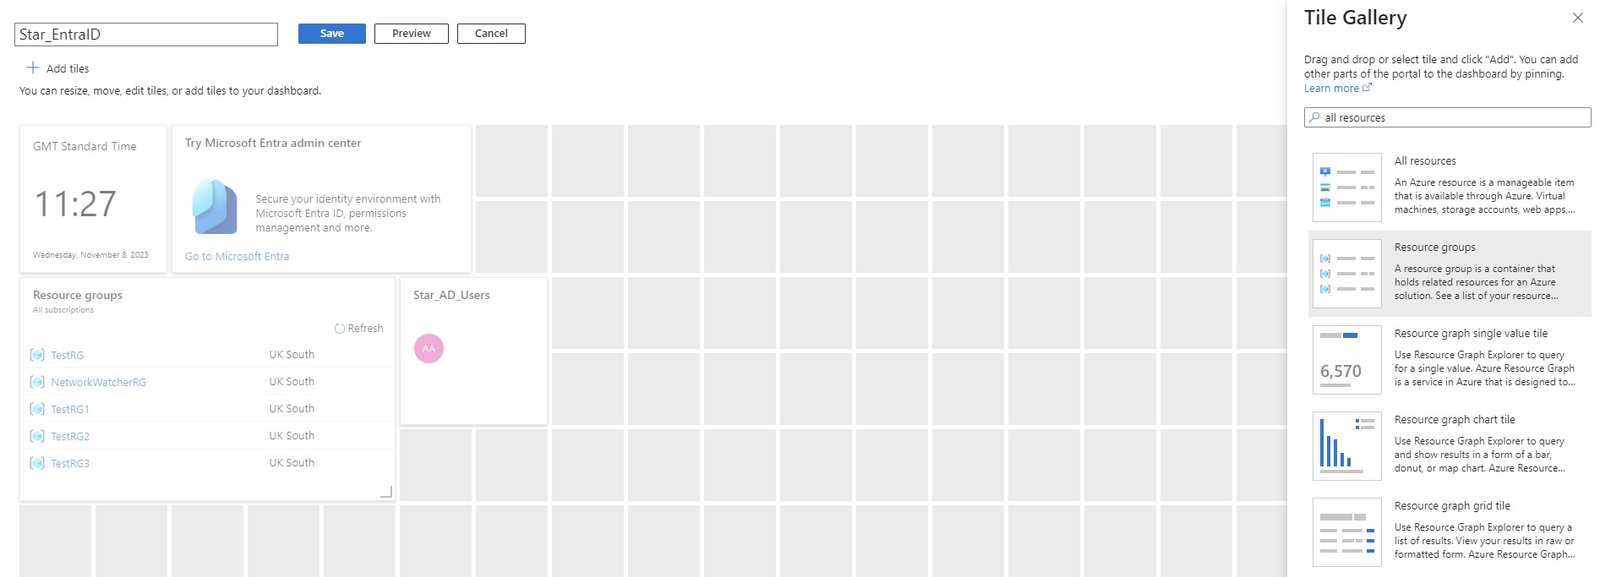
- Click on dashboard, it shows default dashboard, click new to create.
- select pre configured dashboard or custom.
- In custom, enter name for dashboard, add pre-defined tiles and arrange.
- To add resource tile, go to particular resource or search and go to that resource and click pin and add to dashboard.

- Share: shared with other users in AD with RBAC rule.
- Export: You can download dashboard locally in jason format.
- Clone: Make copy and use in other project/deparment.
- Auto refresh: select time how frequent dashboard get refreshed.
- Portal Settings:
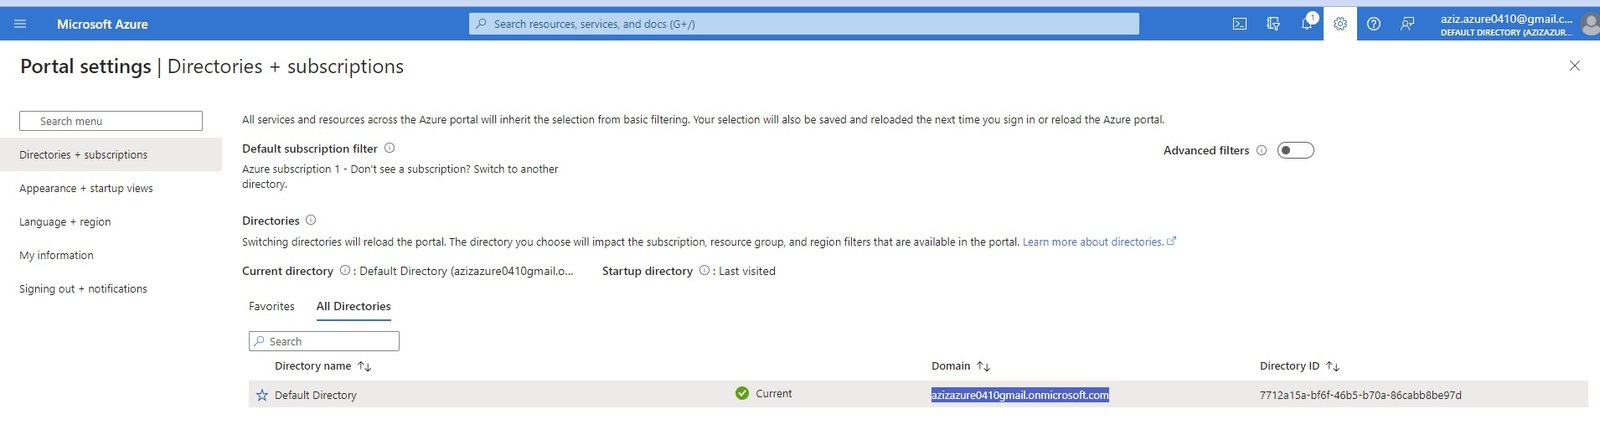
- Directories + subscription: show list of directories. When you create a subscription, a default directory created and you can have different directory with every subscription.
- Appearance + Startup views: select appearance
- Menu Behaviour:
- Theme:
- High Contrast:
- Startup views: select which will be default page when you login to azure.
- Home:
- Dashboard:
- Language + Region: select different language and region.
- My Information: email address used for creation of azure account.
- Sign out + Notification:
- Signing out: Enable directory level idle timeout. Check box
- select check box and enter time hours and minutes (after this period you will be logged out)
- Sign me out when inactive: choose time (this willl available if you have not choosed idle timout)
- Notification: Enable popoup notifiction.
- Signing out: Enable directory level idle timeout. Check box
- code
Powershell from windows machine
- Install latest powershell: https://learn.microsoft.com/en-us/powershell/azure/install-azure-powershell?view=azps-15.5.0
- Powershell: Need to install azure AZ module in your local computer, should have access to local disks. two kind of powershell
- Windows Powershell: Interactive shell
- Windows Powershell ISE (Interactive Scripting environment), script can be run and debug.
- AZ Module Installation:
- Go to https://learn.microsoft.com/en-us/powershell/azure/?view=azps-12.3.0
- Powershell Version: Run the following command from PowerShell to determine your PowerShell version:
- PS C:\WINDOWS\System32/$PSVersionTable.PSVersion
- Azure RM Module (Classic Model): Determine if you have the AzureRM PowerShell module installed: It is used in Azure classic model deployment.
- PS C:\Get-Module -Name AzureRM -ListAvailable
- Get Execution Policy:
- PS C:\Get-ExecutionPolicy -list (it must be RemoteSigned) if not set execution policy to RemoteSigned.
- Install AZ Module (ARM Model): Use the Install-Module cmdlet to install the Az PowerShell module from windows powersell:
- PS C:\Open powershell as an administrator.
- PS C:\Install-Module -Name Az -Repository PSGallery -Force or
- PS C:\Install-Module -Name Az -AllowClobber -Scope Allusers
- PS C:\Get-Module -Name Az -ListAvailable
- Update AZ Module: Use Update-Module to update to the latest version of the Az PowerShell module:
- PS C:\Update-Module -Name Az -Force
- Uninstall AZ Module: To uninstall AZ Module: Uninstall the Azure PowerShell module
- Open Powershell and run.
-
-
-
Azure Login Login PS: Connect-AzAccount (A popup windows will appear, enter credentials)
PS: Connect-AzAccount -TenantId "xxxxxxxx" (connect to a different Tenant ID)
Logout PS: Logout-AzAccount Subscription List PS: Get-AzSubscription list of specific subscription PS: Get-AzSubscription-TenandId "xxxxxxxx" select subscription PS: Get-AzSubscription "xxxxxxx" Resource Group List of all RG Ps:Get-AzResourceGroup Create empty RG PS: New-AzResourceGroup -Name RG01 -Location "uksouth" PS: New-AzResourceGroup RG02 "uksouth" with Tags PS:New-AzResourceGroup -Name RG03 -Location "uksouth" -Tag @{Empty=$null; Department="Marketing"} Delete RG PS:Remove-AzResourceGroup -Name "RG01" confirm yes/no
-
- It will open login window, enter credentials.

- It provides Account, Subscription, Tenant ID.
-
- Error:

- Solution: run az module update.
- Choosing Subscription:
- Get-AzSubscription (it will list all subscription, copy subscription Id)
- select-AzSubscription -Subscription "Subscription Id" (now you are in this subscription)
- Powershell commands: https://learn.microsoft.com/en-us/powershell/module/?view=azps-12.2.0 (search for resources like Az.compute )
Cloudshell (Powershell & Bash) from azure portal
- Azure provides two command line options with Powershell and Bash
- login to Azure portal and click cloudshell on top of screen. you will have two options
- create azure storage to run the cloud shell commands
- Bash: similar to CLI.
- Powershell: Azure borwser based powershell, it does not have access to your local drives, thats why need to create storage.
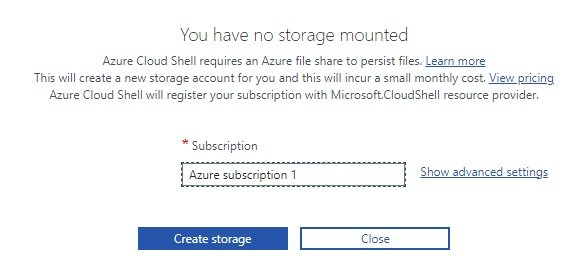
- create storage account.
- code
CLI - Command Line Interface
- It is a Bash version of cloudshell
- Install on Windows:
- Click for more details: https://learn.microsoft.com/en-us/cli/azure/vm?view=azure-cli-latest
- Download and Install Azure CLI: https://learn.microsoft.com/en-us/cli/azure/install-azure-cli-windows?tabs=azure-cli
- Download msi file. double click to install.
- Go to command prompt and C:\az (if azure cli is installed than it will give list)
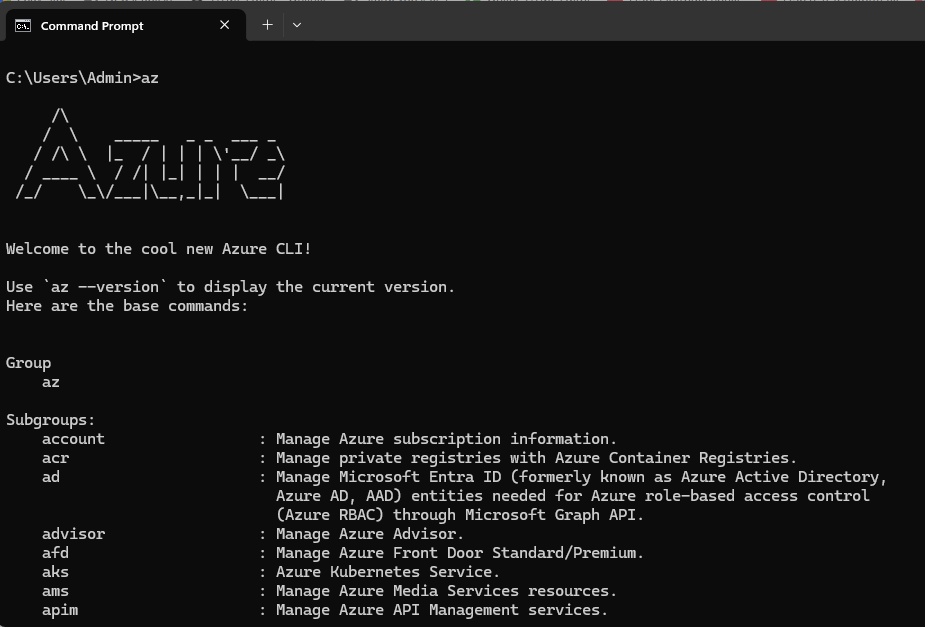
- syntax is different in powershell.
- Azure cheat sheet: https://github.com/AbdulAziz-uk/Azure-CLI-cheat-sheet
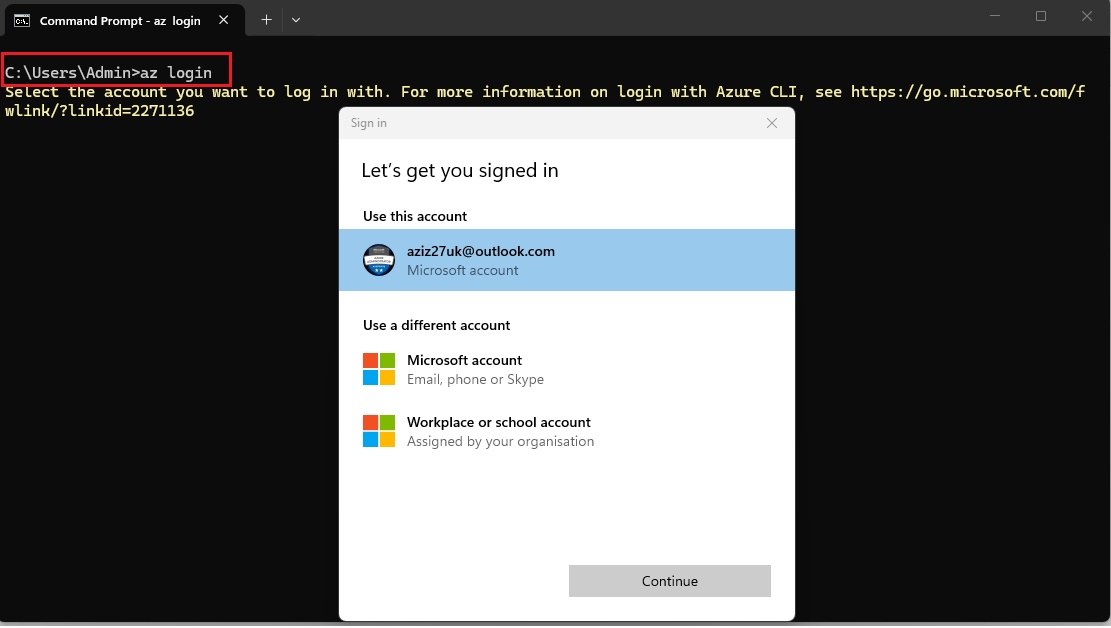
- Login to Azure with CLI:
- C:\>az login (popup window will open to enter credentials).
- C:\ az login -u email_address
- Account list:
- C:\az account list
- Set subscription:
- C:\az account set --subscription "xxx"
- Create a Resource Group:
- C:\>az group create --name star-RG1 --location uksouth (https://learn.microsoft.com/en-us/azure/azure-resource-manager/management/manage-resource-groups-cli#code-try-0)
- Code
- Create a Virtual Network (https://learn.microsoft.com/en-us/azure/virtual-network/quick-create-cli)
- C:\>az
- MAC Machine:
Desktop Application
- Download azure desktop application and install
- It is similar like web portal.
- code
- code
IaC (Terraform, Ansible)
- Define user credentials to access cloud portal in terraform and ansible code.
- code
- code
code
- code
- code
- code

Azure All Services

- Azure Provides the two services (Azure Resources & Azure Entra ID)
Azure Resources
- Azure provides different services (compute, networking, database, storage, etc) in which you create your resource.
- Different Tools available to create resources in Azure. You can create through GUI, Command line or ARM template.
Azure Entra ID (AD)
- code
- code
- code
code
Creating azure resources Manually and Automation.
Manually
- code
- code
- code
ARM Template
- It is use to automate the process in creation of resources.
- It uses Json format scripting (Java Script Object Notation).
- It comes in Infrastructure as a code.
- Templates are JavaScript Object Notation (JSON) files. To create templates, you need a good JSON editor.
- Visual Studio Code with the Azure Resource Manager Tools extension.
- Download and install visual studio code editor,
- Install visual studio code editor, and open it, on left side panel click extension and search
- select first Azure Resoruce Manager (ARM) Tools and install it.

- You also need either the Azure CLI or the Azure PowerShell module installed and authenticated.
- Make sure in visual studio code at bottom select language mode Azure Resource Manager template is selected.
- Download and install visual studio code editor,
- Visual Studio Code is ready for ARM template.
- Schema: Manadatory, Location of the JavaScript Object Notation (JSON) schema file that describes the version of the template language. The version number you use depends on the scope of the deployment and your JSON editor.
- Content Version: Manadory, Version of the template (such as 1.0.0.0).
- api Profile:
- parameters:
- Variables:
- Functions:
- Resources:
- Outputs:
- Schema: Manadatory, Location of the JavaScript Object Notation (JSON) schema file that describes the version of the template language. The version number you use depends on the scope of the deployment and your JSON editor.
- Content Version: Manadory, Version of the template (such as 1.0.0.0).
- api Profile:
- parameters:
- "parameters": {
"<parameter-name>" : {
"type" : "<type-of-parameter-value>",
"defaultValue": "<default-value-of-parameter>",
"allowedValues": [ "<array-of-allowed-values>" ],
"minValue": <minimum-value-for-int>,
"maxValue": <maximum-value-for-int>,
"minLength": <minimum-length-for-string-or-array>,
"maxLength": <maximum-length-for-string-or-array>,
"prefixItems": <schema-for-validating-array>,
"items": <schema-for-validating-array-or-boolean>,
"properties": <schema-for-validating-object>,
"additionalProperties": <schema-for-validating-object-or-boolean>,
"discriminator": <schema-to-apply>,
"nullable": <boolean>,
"metadata": {
"description": "<description-of-the parameter>"
}
}
}
- "parameters": {
- Variables:
- "variables": {
"<variable-name>": "<variable-value>",
"<variable-name>": {
<variable-complex-type-value>
},
"<variable-object-name>": {
"copy": [
{
"name": "<name-of-array-property>",
"count": <number-of-iterations>,
"input": <object-or-value-to-repeat>
}
]
},
"copy": [
{
"name": "<variable-array-name>",
"count": <number-of-iterations>,
"input": <object-or-value-to-repeat>
}
]
}
- "variables": {
- Functions:
- "functions": [
{
"namespace": "<namespace-for-functions>",
"members": {
"<function-name>": {
"parameters": [
{
"name": "<parameter-name>",
"type": "<type-of-parameter-value>"
}
],
"output": {
"type": "<type-of-output-value>",
"value": "<function-return-value>"
}
}
}
}
],
- "functions": [
- Resources:
- "resources": [
{
"condition": "<true-to-deploy-this-resource>",
"type": "<resource-provider-namespace/resource-type-name>",
"apiVersion": "<api-version-of-resource>",
"name": "<name-of-the-resource>",
"comments": "<your-reference-notes>",
"location": "<location-of-resource>",
"dependsOn": [
"<array-of-related-resource-names>"
],
"tags": {
"<tag-name1>": "<tag-value1>",
"<tag-name2>": "<tag-value2>"
},
"identity": {
"type": "<system-assigned-or-user-assigned-identity>",
"userAssignedIdentities": {
"<resource-id-of-identity>": {}
}
},
"sku": {
"name": "<sku-name>",
"tier": "<sku-tier>",
"size": "<sku-size>",
"family": "<sku-family>",
"capacity": <sku-capacity>
},
"kind": "<type-of-resource>",
"scope": "<target-scope-for-extension-resources>",
"copy": {
"name": "<name-of-copy-loop>",
"count": <number-of-iterations>,
"mode": "<serial-or-parallel>",
"batchSize": <number-to-deploy-serially>
},
"plan": {
"name": "<plan-name>",
"promotionCode": "<plan-promotion-code>",
"publisher": "<plan-publisher>",
"product": "<plan-product>",
"version": "<plan-version>"
},
"properties": {
"<settings-for-the-resource>",
"copy": [
{
"name": ,
"count": ,
"input": {}
}
]
},
"resources": [
"<array-of-child-resources>"
]
}
]
- "resources": [
- Outputs:
- "outputs": {
"<output-name>": {
"condition": "<boolean-value-whether-to-output-value>",
"type": "<type-of-output-value>",
"value": "<output-value-expression>",
"copy": {
"count": <number-of-iterations>,
"input": <values-for-the-variable>
}
}
}
- "outputs": {
-
Blank ARM Template json file.
- Open visual studio and define schema.

- Once you type "$schema": it will prompt windows, on which level you want to apply template, select deploymentTempalte.json (it works at resource group level). enter ,
- enter "" and select ContentVerison and enter version number and enter ,
- enter "" and select resources, it provides option to choose {} or []
- select [] and save the file as blank.json

- Validate the code that there is no syntax errors.
- search in google json validator and choose jsonlint.com
- copy and paste in jsonlint.com and click validate.
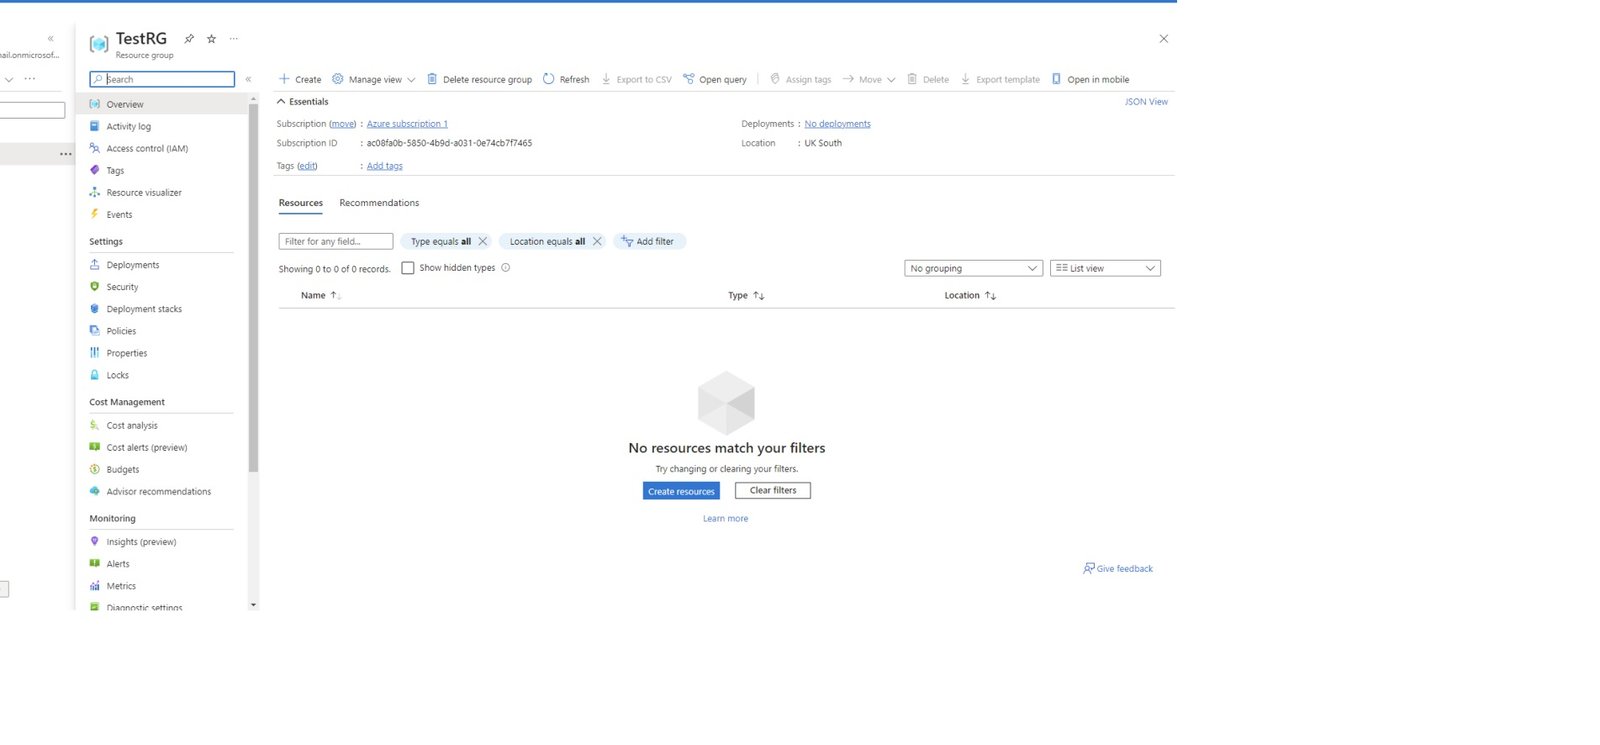
Deploy the above blank template in TestRG (Resource Group):
- Open powershell and create a variable and define where is blank template file is stored.

- $blanktemplate = C:\Users\Admin\Desktop\star cloud\devops\azure\ARM_Template\blank.json
New-AzResourceGroupDeployment -Name blanktemplate -Location 'UK South' -ResourceGroupName TestRG -TemplateFile $blanktemplate

- Highlight first line and execute and highlight second line and execute. or execute all.

- Deployment succeeded.
- Check deployment: Go to azure portal>resource group> deployment>template

- The template was blank as there was no resource. it has been deployed successfully.
- Enter "$schema": choose deployment template",
- Enter "ContentVersion": "10.0.0.0",
- Enter "" resources: [
- Enter "" choose "type":"MicrosoftStorageaccount", (it is a resource provider for storage account).
- Enter "" choose "apiversion":"2015-06-15", than a popup will appear to choose version, select latest.
- Enter "" choose "name" :"starstorage1973",
- Enter "" choose "location" : "uksouth",
- Enter "" choose "sku": {
- "mame": "Standard_LRS"
- },
- Enter "" choose "kind": "StorageV2",
- Enter "" choose "Properties":{
-
"supportsHttpsTrafficOnly" : true
- }
- }
- ]
- }
- save file strageaccount.json
- Go to jsonlint.com and validate to check any errors.
- Go to powershell ISE and run

- storage account is created.
- The above is hardcoded template where values has been defined in the code, define Parameters so that values should be entered manually and template is reusable.
Remove Storage Account with powershell:
PS: Remove-AzStorageAccount -ResourceGroupName "TestRG" -AccountName "starstorage1973" -Force
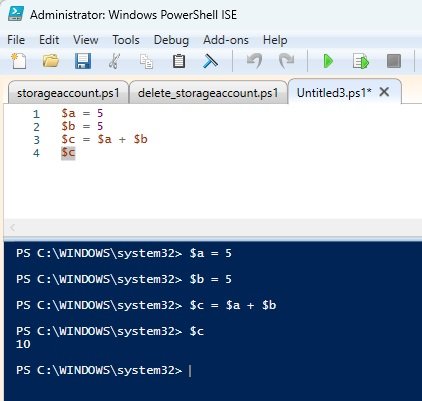
Parameters: It refers to actual values, which can be call multiple times in code. Example
5+5 = 10 (these values can be defined in varibales)
$a=5
$b=5
$c = $a+$b
$c
In powershell when you define $c it gives result = 10.
Storage Account deployment using Parameters:
- Enter "$schema": choose deployment template",
- Enter "ContentVersion": "10.0.0.0",
- Enter "" parameters: {
- "storagename": {
- "type": "string",
- "minlength":4,
- "maxlength":20
- }
- },
- Enter "" resources: [
- Enter "" choose "type":"MicrosoftStorageaccount", (it is a resource provider for storage account).
- Enter "" choose "apiversion":"2015-06-15", than a popup will appear to choose version, select latest.
- Enter "" choose "name" :"[parameter (storagename)]",
- Enter "" choose "location" : "uksouth",
- Enter "" choose "sku": {
- "mame": "Standard_LRS"
- },
- Enter "" choose "kind": "StorageV2",
- Enter "" choose "Properties":{
-
"supportsHttpsTrafficOnly" : true
- }
- }
- ]
- }
- save file strageaccountwithparameter.json
- defining parameter for name, so that you can enter different name with same remaining values to deploy storage account.

- Go to powershell ISE and run

- storage account created, when you execute template it ask to enter storage name.
Functions:
- it is use for dynamic inputs.
- List of functions ; https://learn.microsoft.com/en-us/azure/azure-resource-manager/templates/template-functions
- Location of storage account should be dynamically taken from location of Resource Group.

- run powershell command.

Variables:
- code
Automation with Terraform
Automation with Ansible
- code
- code
- code
code
- code
- code
- code
code
- code
- code
- code
code
- code
- code
- code
General- Resource Group (RG)
- General.jpg
- Resource Manager
- All resources
Management groups
- An Azure Management Group is a container that helps you organize and manage multiple Azure subscriptions together. It is used when you have multiple subscriptions.
- It allows you to apply governance, access control, and policies at a higher level so they automatically inherit down to subscriptions and resources.
- When an Azure tenant is created, Azure automatically creates a root management group at the top of the hierarchy. This is commonly called the Tenant Root Group and serves as the default parent for all other management groups and subscriptions.
- Characteristics:
- Automatically created by Azure.
- There is only one Tenant Root Group per Azure tenant.
- All management groups and subscriptions ultimately exist beneath it.
- You cannot delete it.
- It is typically used for organization-wide governance.
- Real-world example: Suppose a company has three departments:
- IT, Finnance, HR
- The hierarchy could like like:
- Tenant Root Group (Default)
│
├── IT Management Group
│ ├── Development Subscription
│ └── Production Subscription
│
├── Finance Management Group
│ └── Finance Subscription
│
└── HR Management Group
└── HR Subscription - If you assign a security policy at the Tenant Root Group, it is inherited by all child management groups, subscriptions, resource groups, and resources unless specifically overridden where allowed. If you assign a policy only to the IT Management Group, it affects the IT subscriptions but not Finance or HR.
- mg1.jpg
- Create Management Group: To create hierarchy of management group, Go to All Services/Resource Manager/Organization/Management Group/Create.
- Recent resources
- Resource Explorer
- Resource graph explorer
- Rsource graph queries
Resource groups
- rg1.jpg
- All Resources
- Favourite resources
- Recent resources
Resource groups
- Create new RG or Edit existing
What is RG
- It is a logical container, which holds all resources.
- Any resource that is creating in Azure must and should be in any of the resource group. Resource cannot create without a resource group.
- If you delete RG than all its resources will be deleted.
- RG and resources can be in different regions. RG contains metadata information of resources and this metadata info stored at location specified in RG.
- Sometime when you create a resource and azure will automatically creates RG in the background.
- RG can move to another RG or subscription.
- Resource groups are created within subscription which is under account. Resrouce Group Hierarchy:
- Hierarchy of Azure Account and Resources:
- 1. Create Azure Account
- 2. Create Azure Subscription
- 3. Create Resource Group
- 4. Create All Resources in RG
- 3. Create Resource Group
- 2. Create Azure Subscription
- First You create an Azure account using Email address, It prvides free Entra ID but in order to create any resource you need to create subscription where you provide billing details. Create Resource Group and all resources will be created under RG.
Create RG
Through Portal:
- Select Subscription
- Enter RG Name: star-RG1
- Select Region: UK South
- Enter Tag Name:
Through Powershell:
- https://learn.microsoft.com/en-us/powershell/module/az.resources/new-azresourcegroup?view=azps-10.4.1
-
PS C:\ New-AzResourceGroup -Name RG01 -Location "uksouth" (Required Parameter):
Azure Login Login PS: Connect-AzAccount (A popup windows will appear, enter credentials) Logout PS: Logout-AzAccount Subscription List PS: Get-AzSubscription list of specific subscription PS: Get-AzSubscription-TenandId "xxxxxxxx" select subscription PS: Get-AzSubscription "xxxxxxx" Resource Group List of all RG Ps:Get-AzResourceGroup Create empty RG PS: New-AzResourceGroup -Name RG01 -Location "uksouth" PS: New-AzResourceGroup RG02 "uksouth" with Tags PS:New-AzResourceGroup -Name RG03 -Location "uksouth" -Tag @{Empty=$null; Department="Marketing"} Delete RG PS:Remove-AzResourceGroup -Name "RG01" confirm yes/no
Through Terraform:
- Go to https://stardistributors.co.uk/devops/devops_tools/terraform/terraform.html -->Azure Resrouces-->RG and check instllation.
- Resource Group code:
- Go to terraform.io and select provider Azure (azurerm) and click documentation, search resource group and select azurerm_resource_group
-
resource "azurerm_resource_group" "RG" { name = "star-RG" location = "UK South" } - "azure_resource_group" is refer to resource group and predefined. "RG" is defined as variable, it could be any name and can be refer in the code for resource group.
- name = "star-RG" is resource group name.
- Azure provider and Resource Group creation.
-
create a file rg.tf and use the following codeterraform {required_providers {azurerm = {source = "hashicorp/azurerm"version = "4.8.0"}}}
provider "azurerm" {subscription_id = "bf451d83-70d1-4d80-b3ee-b8055cabeb8a"tenant_id = "9db1f91c-beb4-41d8-8d5a-1db91d23d5f3"client_id = "5b055d8f-bad7-4779-ade9-1e78e30d6895"client_secret = "~Sw8Q~Q_2mfy1jQgAOvMf2Bg_zrJBJtJK8LahcS4"features {}}
resource "azurerm_resource_group" "RG2" {name = "star-RG2"location = "UK South"}- save the file before initialize.
- Subscription Id: login to portal.azure.com and click subscription and copy ID.
- Tenant Id: Go to entra ID and in overview coy tenant ID
- Client Id: Go to Entra ID/manage/App Registration/New Registration/Enter name (terraform) and click ok.
- Client_Secret: In terrafom blade/manage/Certificates & secrets/new client secret/enter name(star-ClientSecret), copy value and save it in notepad. If it is not copied than generate new one.
- Assign Required Permission to terraform application: To create resources required permission needed, Go to subscription/Access control (IAM)/add role assignment/select privileged administrator roles and select contributor role /search for member terraform and select terraform and review and assign.
- Now resrouces can be created. add code to create resource
- Terraform Initialization: click Terminal and open new terminal:
- PS C:\terraform>terraform init
- Terraform has been initiated successfully. Plugin has been downloaded and installed. terraform.lock.hcl is created which contain provider details
- Terraform Plan:
- PS C:\terraform>terraform plan -out rg.tfplan
- It shows plan which will be executed, check output.
- Terraform apply:
- PS C:\terraform> terraform apply "rg.tfplan" (it will execute and create resource)
- Deleting resource:
- PS C:\terraform>terraform destroy
-
- Locals Block: provider and Resource Group creation with Locals block.
-
terraform {required_providers {azurerm = {source = "hashicorp/azurerm"version = "4.8.0"}}}
provider "azurerm" {subscription_id = "bd2ade99-0834-4cfe-bb19-ddf0e89ed9f4"tenant_id = "4b9f3326-b87a-468f-89d4-4c34403eae39"client_id = "363c6475-89bc-4948-9396-6dc6849eeb14"client_secret = "yUR8Q~2w~xi~~i6hUJkw4XCZRPCNVwIpIkTrcaPW"features {}}locals {resource_group_name="Star-RG"location="UK South"}resource "azurerm_resource_group" "RG" {name = local.resource_group_namelocation = local.location}
-
- Code
Through CLI: az group
- Azure cheat sheet: https://github.com/AbdulAziz-uk/Azure-CLI-cheat-sheet
- https://learn.microsoft.com/en-us/cli/azure/group?view=azure-cli-latest
- PS C:\ az group (will give the required arguments)
- az group create --name myresourcegroup --location eastus
- C:\>az group create --name star-RG1 --location uksouth (https://learn.microsoft.com/en-us/azure/azure-resource-manager/management/manage-resource-groups-cli#code-try-0)
Through Ansible:
- Code
Delete RG
- Through portal:
- go to RG which need to be deleted.
- Delete Resource Group.
- Enter Resource Group name and click delete.
- Through CLI:
- az group delete --name RG_name
[--acquire-policy-token]
[--change-reference]
[--force-deletion-types {Microsoft.Compute/virtualMachineScaleSets, Microsoft.Compute/virtualMachines, Microsoft.Databricks/workspaces}]
[--no-wait]
[--yes]
- az group delete --name RG_name
- Through Powershell:
- Code
- Through Terraform:
- Go to https://stardistributors.co.uk/devops/devops_tools/terraform/terraform.html -->Azure Resrouces-->RG
- Code
- Through portal:
Manage RG
- Overview:
- Overview:
- Create:
- Delete Resource Group:
- Move RG:
- Edit Tags.
- Deployments: check all deployments has been done in the RG.
- Activity Log:
- Code
- Access Control (IAM)
- Code
- Tags:
- Resource Visualizer:
- Events:
- Settings:
- Deployment: check all deployments has been done in the RG.
- Security:
- Deployment Stacks:
- Policies:
- Properties: Displays properties of resource group.
- rg1.jpg
- Locks:
- Read-only: If you apply read-only lock then you cannot create resources in the RG. (Message: The selected Resource Group is Read only)
- Delete: If you apply Delete lock then you cannot delete resource group.
- Cost Management:
- Cost Analysis:
- Cost Alerts:
- Budget:
- Advisor Recommendations:
- Monitoring:
- Alerts
- Metrics
- Dagnostic settings
- Logs
- Advisor Recommendations:
- Workbooks
- Automation:
- Export Template
- Help:
- Code
List RG through CLI
- PS C:\az group list
- List RG in uksouth: az group list --query "[?location=='uksouth']"
- code
Code
- code
- code
- code
code
- code
- code
- code
- Tags
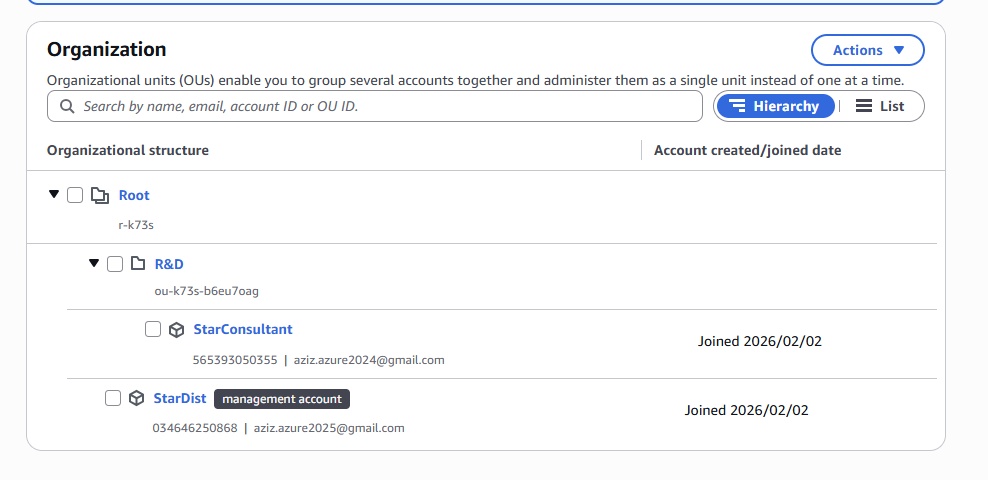
Organization
- Service groups
- Management groups
- Subscriptions
Tools
- Resource graph explorer
- Resource graph queries
- Resource visualizer
- Resource explorer
- ARM API playground
- Resource mover
Deployments
- Templates
- Template specs
- Help
- Service groups
Subscriptions
- An Azure Subscription is a logical container used to provision and manage Azure resources. It is also the unit for billing, access control, and quotas.
- Example:
- Imagine Azure is a shopping mall:
- Azure Tenant = The entire mall
- Management Group = A floor of the mall (used to organize shops)
- Azure Subscription = An individual shop with its own budget and manager.
- Resource Group = A section inside the shop.
- Resources = The actual products (VMs, databases, storage, etc.)
- Subscription Hierarchy
- Azure AD Tenant (Microsoft Entra ID)
│
└── Tenant Root Management Group
│
├── Management Group: Production
│ ├── Subscription A
│ │ ├── Resource Group: WebApp-RG
│ │ │ ├── Virtual Machine
│ │ │ ├── Storage Account
│ │ │ └── SQL Database
│
└── Management Group: Development
└── Subscription B
└── Resource Group: Dev-RG
└── App Service
- Azure AD Tenant (Microsoft Entra ID)
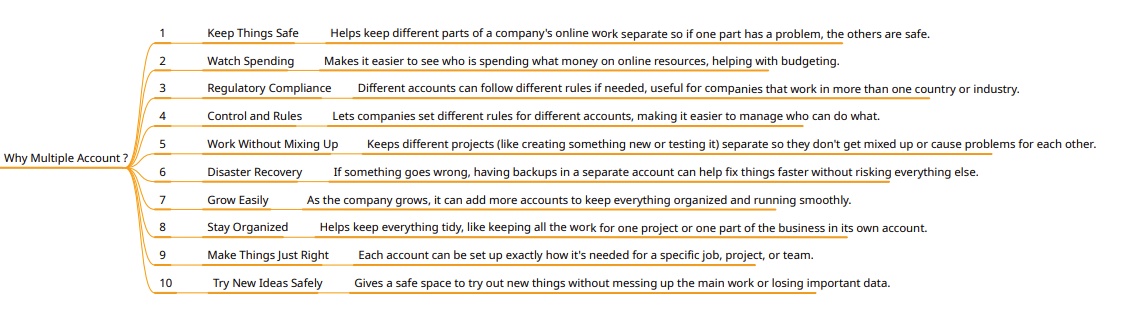
- Why use multiple subscriptions?
- Separate billing for different teams or projects.
- Isolate production, development, and testing environments.
- Apply different access permissions using Azure RBAC.
- Manage service limits and quotas independently.
- Organize resources by department or business unit.
- Create a subscription:
- subscription5.jpg
- Go to All services/Resource Manager/Organization/Subscriptions/+Add (STAR-SUB-HUB, STAR-SUB-PROD, STAR-SUB,STAG, STAR-SUB-DEVTEST)
- Basic
- subscription1.jpg
- Advanced
- subscription2.jpg
- Budget
- subscription3.jpg
- Tags
- subscription4.jpg
- Review+Create
- Tags
- Template specs
- Operations center
- Billing
Cost Management + Billing
- billing1.jpg
Access control (IAM)/summary>
- + Add role assignment
Billing scopes
- select user and view billing scope
- Diagnose and solve problems
Cost management
- Cost analysis
- Cost alerts
- Budgets
- Adivsor recommendations
Billing
- Invoices
- Payment methods
- Payment history
- Resevation transactions
- Billing profiles
- Benefits
Product + services
- All billing subscriptions
- REservations + Hybrid Benefit
- Savings plans
Settings
- Properties
- Exports
- Cost allocation
- Transfer requests
- Support + troubleshooting
- Free services
- Quotas
- Reservations
- Get started
- Education
- Preview features
- Quickstart center
- Help and support
Networking
Networking monitoring & management
- Overview
- Network Watcher
- Network managers
- Cross-tenant connections
Monitoring
- Topology
- Connection monitor
- Traffic analytics
- Network insights
- Alerts
Network diagnostics
- IP flow verify
- NSG diagnostics
- Next hop
- Effective security rules
- VPN troubleshoot
- Packet capture
- Connection troubleshoot
Metrics
- Usage + quotas
Logs
- Flow logs
- Migrate flow logs
- Diagnostic logs
Help
- Support + troubleshooting

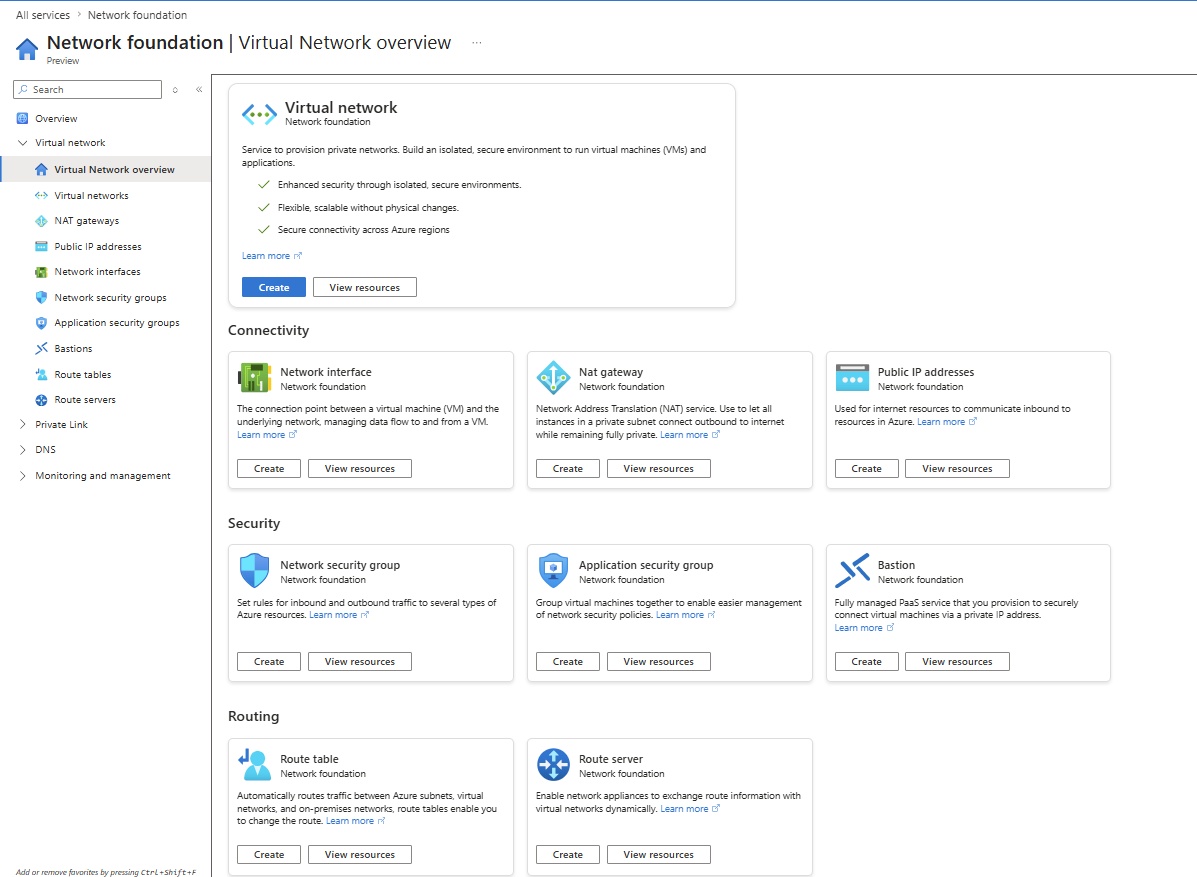
- Network Foundation:
Bastions
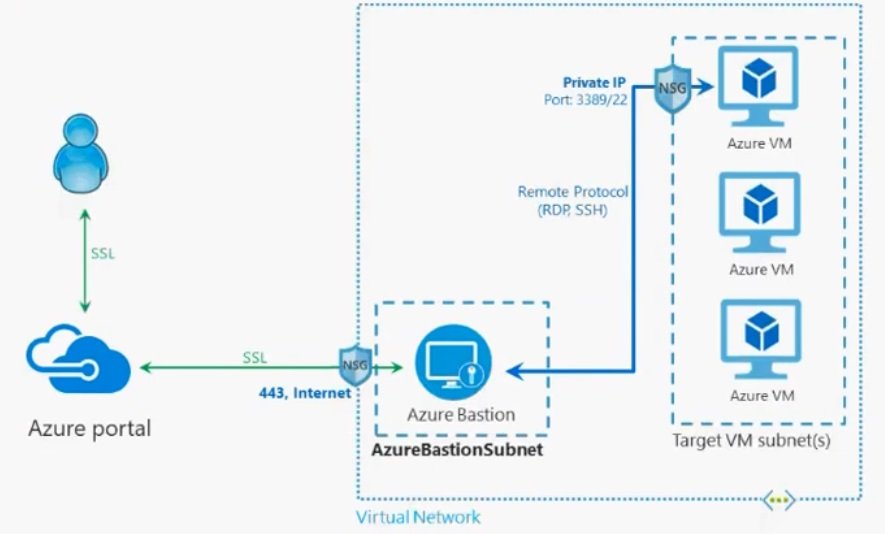
- Azure Bastion is a managed Azure PAAS service that allows you to securely connect to Virtual Machines (VMs) using RDP (Windows) or SSH (Linux) directly through the Azure portal — without exposing public IP addresses on the VMs.
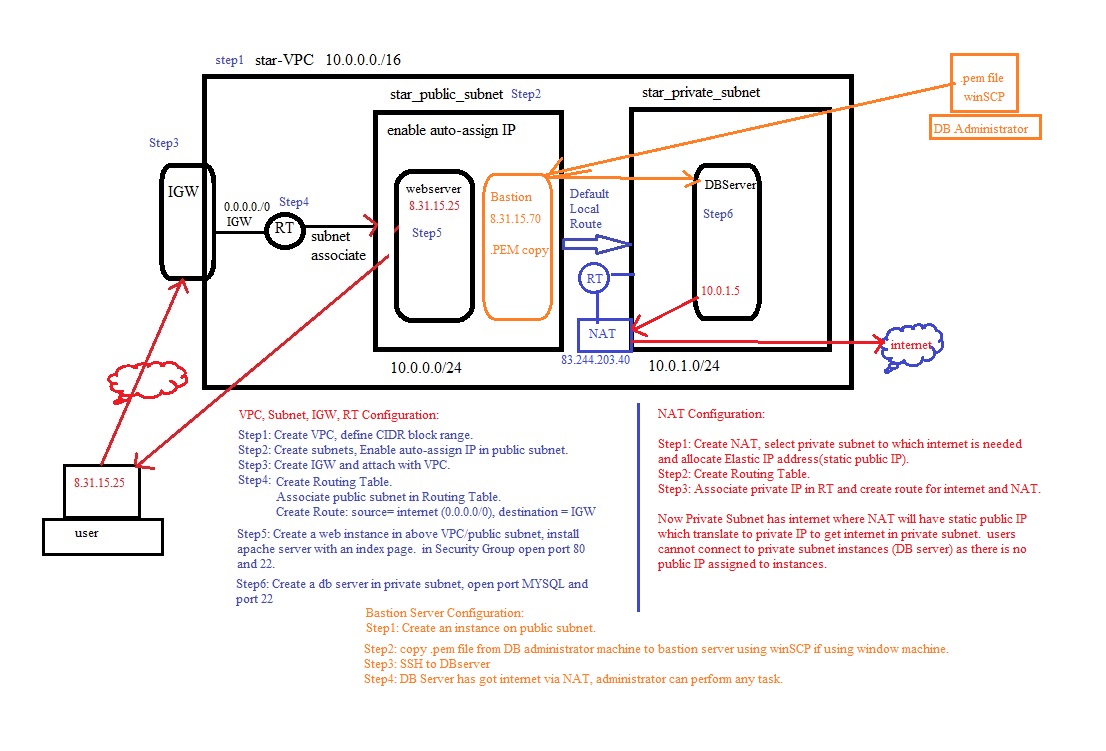
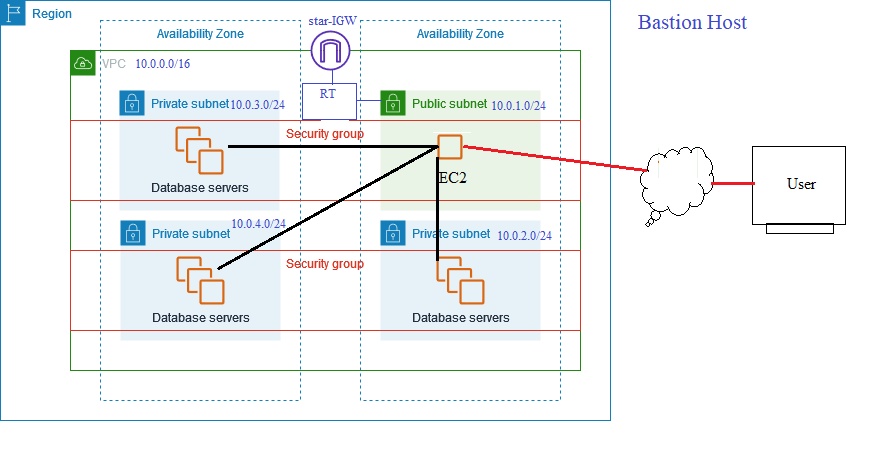
- Bastion allows web based RDP access to your vnet VM and you do not need RDP/SSH tools on your laptop.
- It works as jump server. You will connect to Bastion server/host with its public IP and than access VM through SSL https 443 port using private IP.
- It is provisioned inside your virtual network, It provides secure and seamless RDP/SSH connectivity to your virtual machines directly in the Azure portal over SSL.
- If you have multiple Vnets that you want to RDP or SSH into from the Azure management portal, then you should deploy Azure Bation for each of those Vnets
- Subnet name must be AzureBastionSubnet.
- All the resources will be created on different subnet with private IP. Bastion host will connect you to these resources.
- Example:
- Normally, to connect to a VM: Your Laptop → Internet → Public IP of VM → RDP/SSH (This is risky because hackers can scan the internet for open ports.)
- With Azure Bastion: Your Laptop → Azure Portal → Azure Bastion → Private VM (The VM stays private and does not need a public IP.)
Lab:
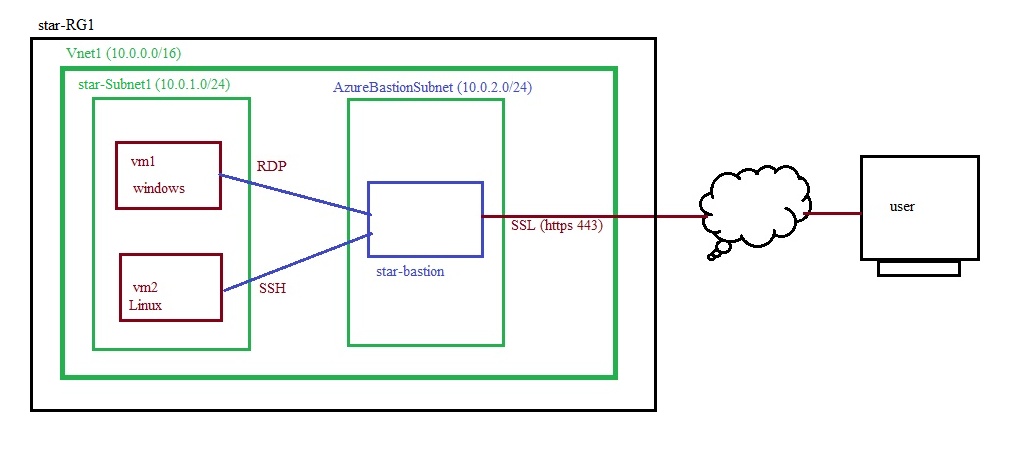
- Create a RG: star-RG1
- Create a virtual network:
- star-Vnet1 (10.0.0.0/16),
- 2 subnets (10.0.1.0/24 & 10.0.2.0/26)(one for VMs and one for bastion)
- Azure Bastion requires a dedicated subnet named: AzureBastionSubnet.
- Create bastion with public IP and vms with private IP only.
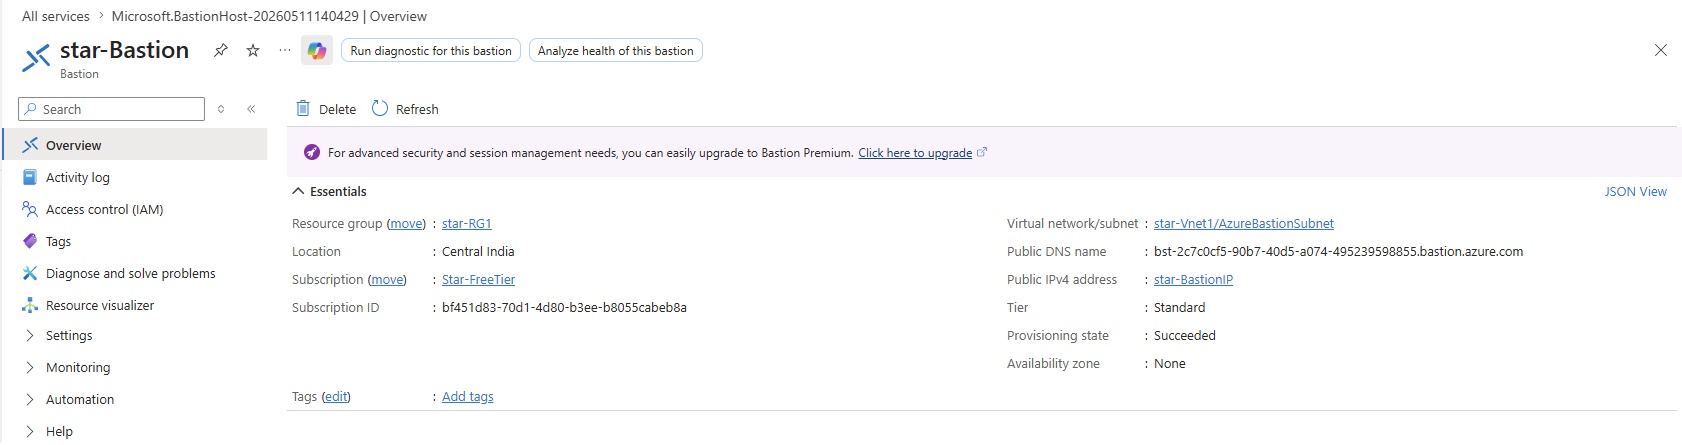
- Create Bastion Host: Go to All Services/Networking/Network foundation/Bastions and click create.
- Basics
- Subscripton: Star-FreeTier
- Resource Group: star-RG!
- Instance details
- Name: star-Bastion
- Region: Central India
- Tier: Basic/Standard/Premium
- Instance count: Basic=2, Bastion Standard/Premium SKU can support 2-50 instances. To learn more, see Instances and host scaling
- Vnet = star-Vnet1,
- Subnet= AzureBastionSubnet 10.0.2.0/26
- IP Address: Public IPV4 / Private IP Addres (Grayed out, Can edit in premium SKU)
- Public IP Address: Create new (star-BastionIP) / User existing
- Advanced
- Copy and paste: Check box
- IP-based connection: check box
- Kerneros authentication: Check box
- Native client support: Check box
- Shareable Link: Check box
- Session recording: check box, grayed out, need premium
- Review and create.
- Create a VM:
- Create or add VMs in the above created workloadsubnet.
- No public IP address.
- Allow required in bound ports. review and create.
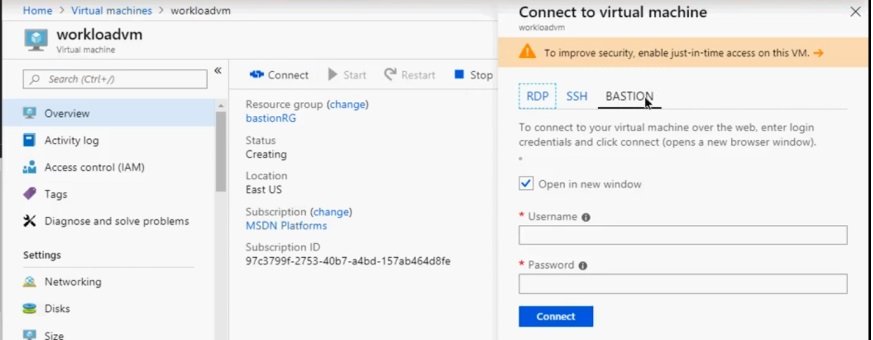
- Test the conneciton:
- Login to Azure through any browser: portal.azure.com
- Go to vm/ connect and select connect via bastion

- Enter credentails and connect to VM without public IP.
- It will open a browser and connect to VM, connected without using RDP or SSH.
Bastion Edit/Configure
- Overview
- Activity log
- Access control (IAM)
- Tags
- Diagnose and solve problems:
- Resource visualizer:
- Settings
- Sessions
- Configuration
- Identity
- Properties
- Locks
- Moitoring
- Metrics
- Logs
- Diagnostics settings
- Connection Troubleshoot
- Automation
- Tasks
- Export template
- Help
- Resource health
Difference between VPN and Bastion:
-
VPN Azure Bastion Connects whole network Connects specific VM Requires VPN client Browser-based More complex Easier setup Network-level access VM-level access
-
- Code
- Custom IP Prefix:
- DNS Private Resolver: Check in Vnet\DNS
- DNS Zones: Check in Vnet\DNS\Public DNS Zone
- NAT Gateways:Check in Vnet\Virtual Network\NAT gateways.
- Network Interfaces: Check Vnet\Virtual Network\Network Interfaces
- Network Managers:
- Private DNS Zones: Check in Vnet\DNS\Private DNS Zone
- Private Link: Check in Vnet\Private Link\Private Endpoints
- Public IP Addresses: Check Vnet\Virtual Network\Public IP Addresses
- Public IP Prefixes:
- Route Tables:Check Vnet\Virtual Networks\Route Tables
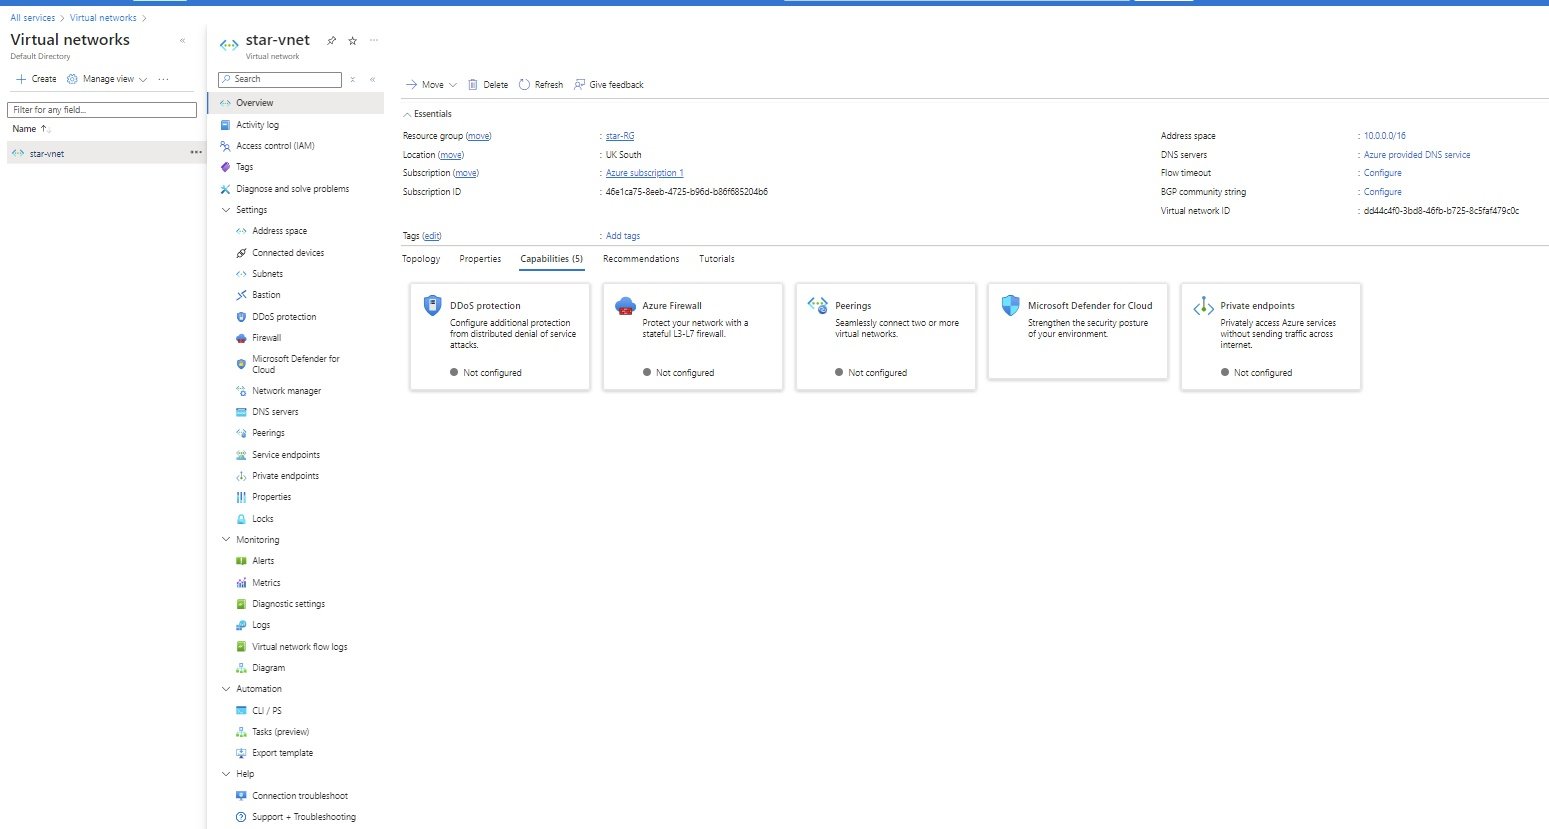
Vnet (Virtual Network)
- Overview
- network_foundation_overview.jpg
Virtual Networks
Vnet Intro
- Define CIDR range, Subscription, RG, Location, Subnet Range, DDos Protection, Service Endpoints, Firewall, Reserved IP Addesses, Vnet Template,
- Virtual network is your own islolated network within a public network.
- Vnet act as a container for subnets. Vnet must have at least one subnet.
- Vnet is Region specific. Vnet can expand to zones within a region. Resources can be created in different zones of that region.
- Usually region is selected where most traffic comes from. Pricing of that region also palys an important role.
- You can create multiple vnets and they will be isolated from one another weather they are in same subscription or different subscription.
- You can create separate vnets for dev, testing, production that use the same CIDR.
- Azure uses SDN (Software Define network) that lets you create your own network.
- In a vnet you can create multiple subnets (Vlans) for isolation purpose. These subnets will communicate with each other using their first IP address of subnet range.
- Network Security Group can be attached with each subnet. This network security group is directly bind with NIC of Virtual machine.

- Access to internet: By default all VMs can access the internet, you can control the access by using NSG (Network Security Group). If you enter private IP to the VM than still outbound traffic will be enabled and vm will have internet.
- Within the VNet, all VMs can communicate with each other using private IP. You don’t required public IP for VMs within a Vnet to communicate with each other.
- Inbound and outbound traffic can be controlled using NSG at three levels:
- Vnet Level (DDOS protection)
- Vnet Level (Azure Firewall)
- Subnet Level (NSG)
- Vnets can be connected to each other using vnet peering.
- On-premises data center to Azure resources using site-to-site VPN or Express route (Hybrid environment).
Create Vnet with Azure Portal:
- Login and search virtual network and click create.
- Basic:
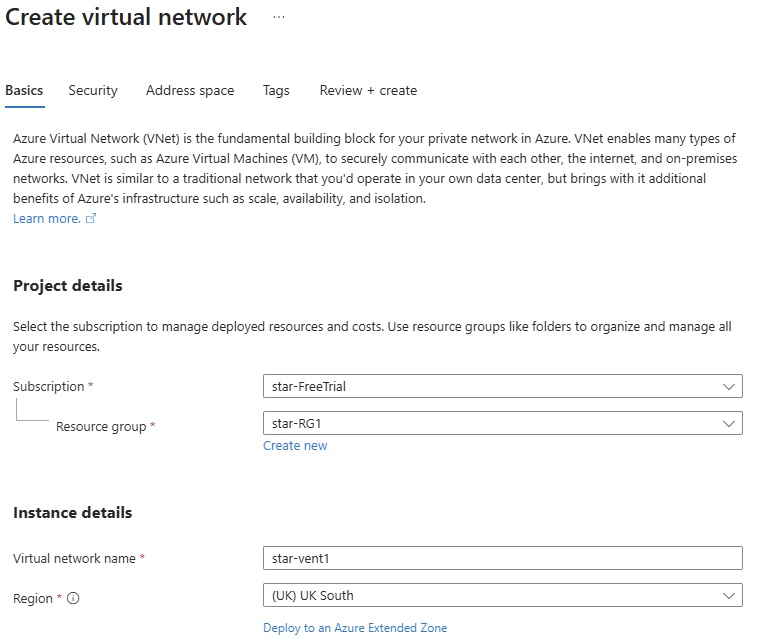
- select subscription: Star-FreeTrial
- Resource Group: create or select existing star-RG1,
- name of vnet: create star-vnet1
- Region: select from the list (uk south)
- click Deploy to an azure extended zone to configure (it can deploy to extended zones)
- Security: Enhance the security of your virtual network with these additional paid security services, if you select any service an additional charges need to pay.
- Virtual Network Encryption:
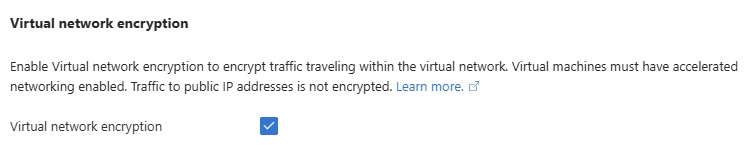
- Enable Virtual network encryption to encrypt traffic traveling within the virtual network. Virtual machines must have accelerated networking enabled. Traffic to public IP addresses is not encrypted. Learn more.
- select check box
- Azure Bastion:
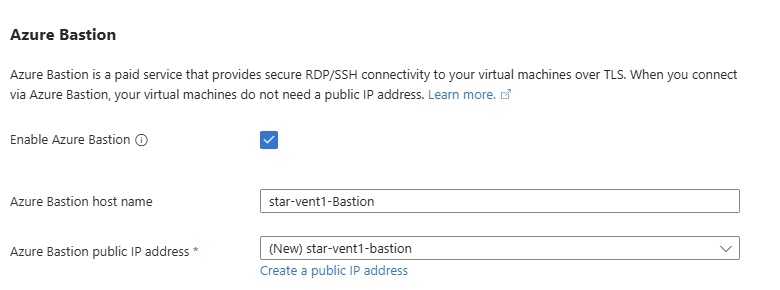
- Azure Bastion is a paid service that provides secure RDP/SSH connectivity to your virtual machines over TLS. When you connect via Azure Bastion, your virtual machines do not need a public IP address. Learn more.
- select check box and configure
- Azure Bastion host nane: Star-Vnet1-Bastion
- Azure Bastion Public IP Address
- Azure Firewall: select check box an configure
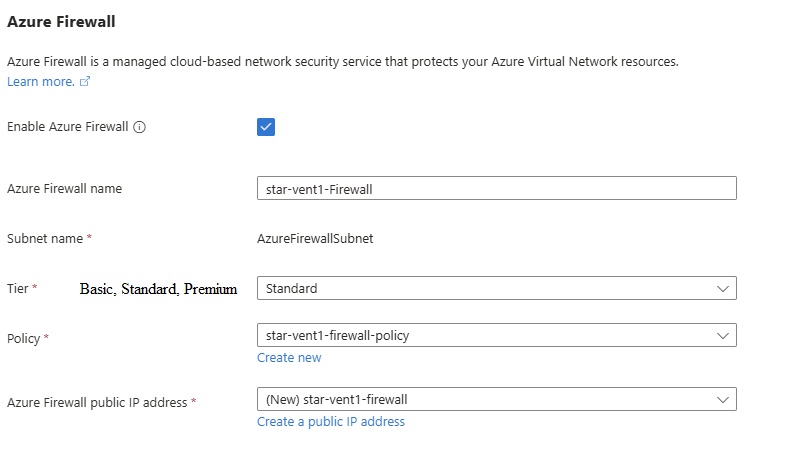
- Azure Firewall is a managed cloud-based network security service that protects your Azure Virtual Network resources. Learn more.
- Select check box
- Azure DDos Network Protection: select check box and configure.
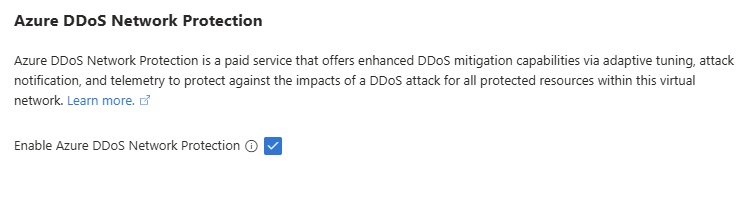
- Azure DDoS Network Protection is a paid service that offers enhanced DDoS mitigation capabilities via adaptive tuning, attack notification, and telemetry to protect against the impacts of a DDoS attack for all protected resources within this virtual network. Learn more.
- Virtual Network Encryption:
- Address space:
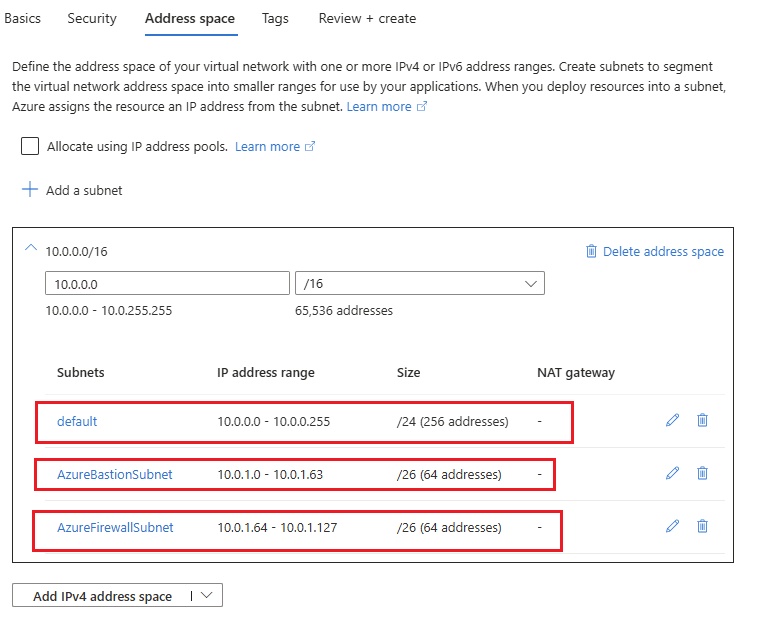
- Click for IP Subnet calculator
- Enter CIDR: by default a range will appear, click three dots and change CIDR range or enter new IP range (10.0.0.0/16)
- Other address range is taken automatically for the previous security selection for firewall and bastion.
- Edit / Add subnet: When you create a vm, NIC is attached to subnet where it provides IP address from subnet range.
- Click for IP Subnet calculator
- + Add Subnet:
- Select an address space and configure your subnet. You can customize a default subnet or select from subnet templates if you plan to add select services later. Learn more
- select subnet purpose: select from drop down to choose the purpose of creating subnet:
- Default: It is default subnet created, edit and change name.
- Azure Bastion:
- Azure firewall:
- Firewall Management (force tunneling),
- Virtual Network gateway,
- Route server.
- Enter subnet name: subnet1, subnet2, etc..
- Enter subnet address range ipv4 or ipv6: create 2 subnets (10.0.0.0/24, 10.0.1.0/24)
- 251 ips will be available, Azure reserves 5 IPs (network, broadcast, dns)
- private subnet:
- Private subnets enhance security by not providing default outbound access. To enable outbound connectivity for virtual machines to access the internet, it is necessary to explicitly grant outbound access. A NAT gateway is the recommended way to provide outbound connectivity for virtual machines in the subnet. Learn more
- Enable private subnet (no default outbound access): check box.
- After March 31, 2026, private subnet will be the default selection for new virtual networks. Learn more
- Security:
- Simplify internet access for virtual machines by using a network address translation gateway. Filter subnet traffic using a network security group. Learn more
- NAT Gateway:
- create NAT gateway so that with private IP can access internet.
- A NAT gateway is recommended for outbound internet access from subnets. Edit the subnet to add a NAT gateway. Learn moreWhen operating on a private subnet, certain functionalities such as Windows Activation and host operating system updates may not be available without outbound access. To enable outbound connectivity for virtual machines in this subnet, it is recommended to select a NAT gateway
- Network Security Group:
- All subnets should use a network security group to filter network traffic.
- create network security group and attach to subnet.
- Route Table: choose from list if already created.
- Service Endpoints:
- Create service endpoint policies to allow traffic to specific azure resources from your virtual network over service endpoints. Learn more
- Subnet Delegation:
- Delegate subnet to a service, choose from list if created.
- Network Policy for private endpoints:
- The network policy affects the types of network policies that control traffic going to the private endpoints in this subnet. Learn more
- select from dropdown: Disable, network security groups, Route tables.
- Tags:
- Review + Create.
Create Vnet with Terraform:
Creating virtual network with two subnets without calling values
- vnet8.jpg
- Vnet1 (10.0.0.0/16), subnet1 (10.0.1.024), subnet2(10.0.2.0/24).
- Go to terraform.io and click provider and select Azure and click documentation and search virtual network and select azurerm_virtual _network, copy code and make changes as follows.
-
terraform {required_providers {azurerm = {source = "hashicorp/azurerm"version = "4.8.0"}}}
provider "azurerm" {subscription_id = "bd2ade99-0834-4cfe-bb19-ddf0e89ed9f4"tenant_id = "4b9f3326-b87a-468f-89d4-4c34403eae39"client_id = "363c6475-89bc-4948-9396-6dc6849eeb14"client_secret = "YFU8Q~gf2nHQyuv50lQjGkCZ0-M8YdZbGVoklcvs"features {}}resource "azurerm_resource_group" "RG" {name = "star-RG1"location = "Central India"}
resource "azurerm_virtual_network" "vnet1" {name = "star-Vnet1"location = "Central India"resource_group_name = "star-RG1"address_space = ["10.0.0.0/16"]
subnet {name = "star-subnet1"address_prefixes = ["10.0.1.0/24"]}
subnet {name = "star-subnet2"address_prefixes = ["10.0.2.0/24"]}
tags = {environment = "star-vnet1"}
depends_on = [ azurerm_resource_group.RG ]} -
- Save file (vnet) and open Terminal
- Terraform initialize
- #terraform init
- Terraform plan
- #terraform plan -out vnet.tfplan
- Terraform apply
- #terraform apply "vnet.tfplan"
- Destroy/Delete
- #terraform destroy
Creating virtual network, subnets by defining local variable block, separate variable file & Count Meta Argument, create number of subnet based on input, Create Multiple Subnets using for_each Meta Argument:
#Creating RG, Virtual network, 2 subnets, NIC, NSG, NSG association to subnet (star-subnet1).
locals {resource_group_name="Star-RG"location="UK South"security_group="SG"virtual_network ={name="star-Vnet1"address_space="10.0.0.0/16"}subnets=[{name = "subnet1"address_prefixes = ["10.0.1.0/24"]},
{name = "subnet2"address_prefixes = ["10.0.2.0/24"]}]}resource "azurerm_resource_group" "RG" {name = local.resource_group_namelocation = local.location}
resource "azurerm_virtual_network" "vnet" {name = local.virtual_network.namelocation = local.locationresource_group_name = local.resource_group_nameaddress_space = [local.virtual_network.address_space]
}
resource "azurerm_subnet" "subnet-A" {name = local.subnets[0].nameresource_group_name = local.resource_group_namevirtual_network_name = local.virtual_network.nameaddress_prefixes = local.subnets[0].address_prefixesdepends_on = [ azurerm_virtual_network.vnet ]}
resource "azurerm_subnet" "subnet-B" {name = local.subnets[1].nameresource_group_name = local.resource_group_namevirtual_network_name = local.virtual_network.nameaddress_prefixes = local.subnets[1].address_prefixesdepends_on = [ azurerm_virtual_network.vnet ]}resource "azurerm_network_interface" "NIC1" {name = "star-NIC1"location = local.locationresource_group_name = local.resource_group_name
ip_configuration {name = "internal"subnet_id = azurerm_subnet.subnet-A.idprivate_ip_address_allocation = "Dynamic"public_ip_address_id = azurerm_public_ip.publicIP.id}depends_on = [ azurerm_subnet.subnet-A ]}
resource "azurerm_public_ip" "publicIP" {name = "StarPublicIP1"resource_group_name = local.resource_group_namelocation = local.locationallocation_method = "Static"
tags = {Dept = "IT"}depends_on = [ azurerm_resource_group.RG ]}
resource "azurerm_network_security_group" "NSG" {name = "star-NSG1"location = local.locationresource_group_name = local.resource_group_name
security_rule {name = "NSG-Rule1"priority = 500direction = "Inbound"access = "Allow"protocol = "Tcp"source_port_range = "*"destination_port_range = "3389"source_address_prefix = "*"destination_address_prefix = "*"}
tags = {Name = "NSG"}}resource "azurerm_subnet_network_security_group_association" "NSG-Subnet" {subnet_id = azurerm_subnet.subnet-A.idnetwork_security_group_id = azurerm_network_security_group.NSG.id}Creating virtual network, subnets by defining separate variable file & Count Meta Argument:
- Create a subnet_variable.tf
-
variable "no_of_subnet" {type = numberdefault = 2}
-
- Create a provider.tf
-
terraform {required_providers {azurerm = {source = "hashicorp/azurerm"version = "4.8.0"}}}
provider "azurerm" {subscription_id = "bd2ade99-0834-4cfe-bb19-ddf0e89ed9f4"tenant_id = "4b9f3326-b87a-468f-89d4-4c34403eae39"client_id = "363c6475-89bc-4948-9396-6dc6849eeb14"client_secret = "yUR8Q~2w~xi~~i6hUJkw4XCZRPCNVwIpIkTrcaPW"features {}}
-
- Create subnet_count.tf
-
locals {resource_group_name="star-RG"location="UK South"virtual_network={name="Vnet1"address_space="10.0.0.0/16"}subnets=[{name = "subnet1"address_prefix = "10.0.1.0/24"},
{name = "subnet2"address_prefix = "10.0.2.0/24"}]}
resource "azurerm_resource_group" "RG" {name = local.resource_group_namelocation = local.location}
resource "azurerm_virtual_network" "VNET" {name = local.virtual_network.namelocation = local.locationresource_group_name = local.resource_group_nameaddress_space = [local.virtual_network.address_space]depends_on = [ azurerm_resource_group.RG ]}
resource "azurerm_subnet" "subnets" {count = var.no_of_subnetname = local.subnets[count.index].nameresource_group_name = local.resource_group_namevirtual_network_name = local.virtual_network.nameaddress_prefixes = [local.subnets[count.index].address_prefix]depends_on = [ azurerm_virtual_network.VNET ]
-
- Create a subnet_variable.tf
Create Number of Subnets based on Input:
- Create a subnet_variable.tf
-
variable "no_of_subnet" {type = numberdefault = 2}
-
- Create a provider.tf
-
terraform {required_providers {azurerm = {source = "hashicorp/azurerm"version = "4.8.0"}}}
provider "azurerm" {subscription_id = "bd2ade99-0834-4cfe-bb19-ddf0e89ed9f4"tenant_id = "4b9f3326-b87a-468f-89d4-4c34403eae39"client_id = "363c6475-89bc-4948-9396-6dc6849eeb14"client_secret = "yUR8Q~2w~xi~~i6hUJkw4XCZRPCNVwIpIkTrcaPW"features {}}
-
- Create subnet_count_input.tf
-
locals {resource_group_name="star-RG"location="UK South"virtual_network={name="Vnet1"address_space="10.0.0.0/16"}}
resource "azurerm_resource_group" "RG" {name = local.resource_group_namelocation = local.location}
resource "azurerm_virtual_network" "VNET" {name = local.virtual_network.namelocation = local.locationresource_group_name = local.resource_group_nameaddress_space = [local.virtual_network.address_space]
depends_on = [ azurerm_resource_group.RG ]}
resource "azurerm_subnet" "subnets" {count = var.no_of_subnetname = "Subnet${count.index}"resource_group_name = local.resource_group_namevirtual_network_name = local.virtual_network.nameaddress_prefixes = ["10.0.${count.index}.0/24"]depends_on = [ azurerm_virtual_network.VNET ]}
-
- #terraform plan -out subnet_count_input.tfplan -var="no_of_subnet=4"
- #terraform apply "subnet_count_input.tfplan"
- Create a subnet_variable.tf
Create Number of Subnets based on Input & apply restriction:
- Create a subnet_variable.tf
-
variable "no_of_subnet" {type = numberdefault = 2validation {condition = var.no_of_subnet < 5error_message = "Value should be less than 5." (make sure V is capital and at the end of line there is full stop)}}
-
- Create a provider.tf
-
terraform {required_providers {azurerm = {source = "hashicorp/azurerm"version = "4.8.0"}}}
provider "azurerm" {subscription_id = "bd2ade99-0834-4cfe-bb19-ddf0e89ed9f4"tenant_id = "4b9f3326-b87a-468f-89d4-4c34403eae39"client_id = "363c6475-89bc-4948-9396-6dc6849eeb14"client_secret = "yUR8Q~2w~xi~~i6hUJkw4XCZRPCNVwIpIkTrcaPW"features {}}
-
- Create subnet_count_restrict.tf
-
locals {resource_group_name="star-RG"location="UK South"virtual_network={name="Vnet1"address_space="10.0.0.0/16"}}
resource "azurerm_resource_group" "RG" {name = local.resource_group_namelocation = local.location}
resource "azurerm_virtual_network" "VNET" {name = local.virtual_network.namelocation = local.locationresource_group_name = local.resource_group_nameaddress_space = [local.virtual_network.address_space]
depends_on = [ azurerm_resource_group.RG ]}
resource "azurerm_subnet" "subnets" {count = var.no_of_subnetname = "Subnet${count.index}"resource_group_name = local.resource_group_namevirtual_network_name = local.virtual_network.nameaddress_prefixes = ["10.0.${count.index}.0/24"]depends_on = [ azurerm_virtual_network.VNET ]} - #terraform plan -out subnet_count_input.tfplan -var="no_of_subnet=5"
- it will through error as no of subnets is 5, enter any value less than 5
- Remove default = 2 from variable.tf and you do not need to give -var="no_of_subnet=x" as system will ask to enter value.
- #terraform apply "subnet_count_input.tfplan"
-
- Create a subnet_variable.tf
Create Multiple Subnets using for_each Meta Argument:
>- Create a subnet_variable.tf
-
variable "no_of_subnet" {type = numberdefault = 2}
-
- Create a provider.tf
-
terraform {required_providers {azurerm = {source = "hashicorp/azurerm"version = "4.8.0"}}}
provider "azurerm" {subscription_id = "bd2ade99-0834-4cfe-bb19-ddf0e89ed9f4"tenant_id = "4b9f3326-b87a-468f-89d4-4c34403eae39"client_id = "363c6475-89bc-4948-9396-6dc6849eeb14"client_secret = "yUR8Q~2w~xi~~i6hUJkw4XCZRPCNVwIpIkTrcaPW"features {}}
-
- Create subnet_count.tf
-
locals {resource_group_name="star-RG"location="UK South"virtual_network={name="Vnet1"address_space="10.0.0.0/16"}subnets= {subnet1 = {name = "subnet1"address_prefix = "10.0.1.0/24"},subnet2 = {name = "subnet2"address_prefix = "10.0.2.0/24"}}}
resource "azurerm_resource_group" "RG" {name = local.resource_group_namelocation = local.location}
resource "azurerm_virtual_network" "VNET" {name = local.virtual_network.namelocation = local.locationresource_group_name = local.resource_group_nameaddress_space = [local.virtual_network.address_space]
depends_on = [ azurerm_resource_group.RG ]}
resource "azurerm_subnet" "subnets" {for_each = local.subnetsname = each.value.nameresource_group_name = local.resource_group_namevirtual_network_name = local.virtual_network.nameaddress_prefixes = [each.value.address_prefix]depends_on = [ azurerm_virtual_network.VNET ]} - #terraform plan -out subnet_for_each.tfplan
- #terraform apply "subnet_for_each.tfplan"
-
- Create a subnet_variable.tf
- Code
Using map of values for defining virtual network, name, location, security group, subnets
-
terraform {required_providers {azurerm = {source = "hashicorp/azurerm"version = "4.8.0"}}}
provider "azurerm" {subscription_id = "bd2ade99-0834-4cfe-bb19-ddf0e89ed9f4"tenant_id = "4b9f3326-b87a-468f-89d4-4c34403eae39"client_id = "363c6475-89bc-4948-9396-6dc6849eeb14"client_secret = "yUR8Q~2w~xi~~i6hUJkw4XCZRPCNVwIpIkTrcaPW"features {}}locals {resource_group_name="Star-RG"location="UK South"}resource "azurerm_resource_group" "RG" {name = local.resource_group_namelocation = local.location}
resource "azurerm_network_security_group" "SG" {name = "star-SG"location = local.locationresource_group_name = local.resource_group_name}
resource "azurerm_virtual_network" "vnet" {name = "star-vnet1"location = local.locationresource_group_name = local.resource_group_nameaddress_space = ["10.0.0.0/16"]
subnet {name = "subnet1"address_prefixes = ["10.0.1.0/24"]security_group = azurerm_network_security_group.SG.id}
subnet {name = "subnet2"address_prefixes = ["10.0.2.0/24"]security_group = azurerm_network_security_group.SG.id}
tags = {environment = "star-Vnet1"}}
-
Create a vnet, subnets defining in locals block/mapping values:
-
Subnets are creating withing a virtual network resource.terraform {required_providers {azurerm = {source = "hashicorp/azurerm"version = "4.8.0"}}}
provider "azurerm" {subscription_id = "bd2ade99-0834-4cfe-bb19-ddf0e89ed9f4"tenant_id = "4b9f3326-b87a-468f-89d4-4c34403eae39"client_id = "363c6475-89bc-4948-9396-6dc6849eeb14"client_secret = "yUR8Q~2w~xi~~i6hUJkw4XCZRPCNVwIpIkTrcaPW"features {}}locals {resource_group_name="Star-RG"location="UK South"security_group="SG"virtual_network ={name="star-Vnet1"address_space="10.0.0.0/16"}subnets=[{name = "subnet1"address_prefixes = ["10.0.1.0/24"]},
{name = "subnet2"address_prefixes = ["10.0.2.0/24"]}]}resource "azurerm_resource_group" "RG" {name = local.resource_group_namelocation = local.location}
resource "azurerm_network_security_group" "SG" {name = local.security_grouplocation = local.locationresource_group_name = local.resource_group_name}
resource "azurerm_virtual_network" "vnet" {name = local.virtual_network.namelocation = local.locationresource_group_name = local.resource_group_nameaddress_space = [local.virtual_network.address_space]
subnet {name = local.subnets[0].nameaddress_prefixes = local.subnets[0].address_prefixessecurity_group = azurerm_network_security_group.SG.id}
subnet {name = local.subnets[1].nameaddress_prefixes = local.subnets[1].address_prefixessecurity_group = azurerm_network_security_group.SG.id}
tags = {environment = "star-Vnet1"}}
-
Create Subnets as a separate resource using existing RG & Vnet:
- Go to terraform.io and click on documentation and search for subnets, copy resource subnet part only and leave RG & Vnet code and make necessary changes.
- Create a file subnet.tf and paste the following subnet code.
-
resource "azurerm_subnet" "example" { name = "example-subnet" resource_group_name = azurerm_resource_group.example.name virtual_network_name = azurerm_virtual_network.example.name address_prefixes = ["10.0.1.0/24"] delegation { name = "delegation" service_delegation { name = "Microsoft.ContainerInstance/containerGroups" actions = ["Microsoft.Network/virtualNetworks/subnets/join/action", "Microsoft.Network/virtualNetworks/subnets/prepareNetworkPolicies/action"] } } } -
terraform {required_providers {azurerm = {source = "hashicorp/azurerm"version = "4.8.0"}}}
provider "azurerm" {subscription_id = "bd2ade99-0834-4cfe-bb19-ddf0e89ed9f4"tenant_id = "4b9f3326-b87a-468f-89d4-4c34403eae39"client_id = "363c6475-89bc-4948-9396-6dc6849eeb14"client_secret = "yUR8Q~2w~xi~~i6hUJkw4XCZRPCNVwIpIkTrcaPW"features {}}locals {resource_group_name="Star-RG"location="UK South"security_group="SG"virtual_network ={name="star-Vnet1"address_space="10.0.0.0/16"}subnets=[{name = "subnet1"address_prefixes = ["10.0.1.0/24"]},
{name = "subnet2"address_prefixes = ["10.0.2.0/24"]}]}resource "azurerm_resource_group" "RG" {name = local.resource_group_namelocation = local.location}
resource "azurerm_virtual_network" "vnet" {name = local.virtual_network.namelocation = local.locationresource_group_name = local.resource_group_nameaddress_space = [local.virtual_network.address_space]
}resource "azurerm_network_security_group" "SG" {name = local.security_grouplocation = local.locationresource_group_name = local.resource_group_name}
resource "azurerm_subnet" "subnet-A" {name = local.subnets[0].nameresource_group_name = local.resource_group_namevirtual_network_name = local.virtual_network.nameaddress_prefixes = local.subnets[0].address_prefixesdepends_on = [ azurerm_virtual_network.vnet ]}
resource "azurerm_subnet" "subnet-B" {name = local.subnets[1].nameresource_group_name = local.resource_group_namevirtual_network_name = local.virtual_network.nameaddress_prefixes = local.subnets[1].address_prefixesdepends_on = [ azurerm_virtual_network.vnet ]} - In the above subnets are creating as a separate resource.
Create Vnet with Powershell:
- Create a RG, Vnet, Subnet, Associate Subnet to Vnet, Configure Private and Public IP and associate them to Vnet:
- Required Field: Name, AddressPrefix, Subnet Name, Subnet Prefix
- Method1:
-
Login PS:Connect-AzAccount - select correct subscritpion PS:Select-AzSubscription -SubscriptionId "xxxx" RG Create PS:New-AzResourceGroup -Name TestRG -Location UKSouth Vnet Create PS:New-AzVirtualNetwork -ResourceGroupName TestRG -Location UKSouth -Name Test-Vnet -AddressPrefix 10.0.0.0/16 List PS:Get-AzVirtualNetwork Subnet Create PS: New-AzVirtualNetworkSubnetConfig -Name Test-Subnet1 -AddressPrefix 10.0.0.0/24 Vnet-Subnet Link PS: - Method2: Declaring variables.
-
$vNetName = 'Test-Vnet'
$resourceGroupName = 'TestRG'
$location = 'UKSouth'
$AddressPrefix = @('10.0.0.0/16')
$subnet01Name = 'Test-Subnet1'
$subnet01AddressPrefix = '10.0.1.0/24'#Create new Azure Virtual Network with above subnet configuration
New-AzVirtualNetwork -Name $vNetName -ResourceGroupName $resourceGroupName -Location $location -AddressPrefix $AddressPrefix -Subnet $subnet01#########################################################
#Remove Azure Virtual Network
Remove-AzVirtualNetwork -Name $vNetName -ResourceGroupName $resourceGroupName#########################################################
- Associate the subnet to the virtual network as follows:
- $virtualNetwork | Set-AzVirtualNetwork
configure a private and a public IP address in PowerShell, and associate them to this VNet.
When we created the VNet, a private IP address was already created for us automatically by Azure. However, we are going to create another and associate it, together with the public IP address, to a network interface card (NIC).
- Get the Vnet and Subnet information:
- $vnet = Get-AzVirtualNetwork -Name PacktVirtualNetwork -ResourceGroupName PacktVNetResourceGroup
- $subnet = Get-AzVirtualNetworkSubnetConfig -Name default -VirtualNetwork
- Create a Private and Public IP Address:
- $publicIP = New-AzPublicIpAddress `
-Name PacktPublicIP `
-ResourceGroupName PacktVNetResourceGroup `
-AllocationMethod Dynamic `
-Location EastUS - $IpConfig = New-AzNetworkInterfaceIpConfig `
- $publicIP = New-AzPublicIpAddress `
-Name PacktPrivateIP `
-Subnet $subnet `
-PrivateIpAddress 10.0.0.4 `
-PublicIPAddress $publicIP `
-Primary- create a network interface and assign the configuration to it as follows:
- $NIC = New-AzNetworkInterface `
-Name PacktNIC `
-ResourceGroupName PacktVNetResourceGroup `
-Location EastUS `
-IpConfiguration $IpConfig - Associate the subnet to the virtual network as follows:
-
Vnet Blade: Subnets, Firewall, Peering, srvc & pvt Endpoints,
- Overview:
- Move: You can move virtual network to different Resource Group or Another Subscription.
- Delete: You can delete Virtual Network
- Resource Group : Change Vnet to different resource Group
- Subscription : View current and change subscription
- Activity Log:
- Access Control (IAM):
- Tags: Add and change Tags
- Diagnose and Solve Problems:
- Resource visualizer
- Settings:
Address Space:
- The address space for a virtual nework. Addres range can be increased or add additional address range.
- subnet calculator
- Add a new address space: + Add address space
- Enter the CIDR Range (10.0.0.0/16)
- enter number of subnets needed (2)
- Enter number of hosts in each subnet required (254 or 512 or 1024 etc)
- click calculate.
- Virtual Network can have multiple address range like 10.0.0.0 and 172.16.0.0 and each address space can have multiple subnets.
- communication between these address space is possible at layer 3 level (router), if you want layer 4 level communication between both VMs then at Network Security Group need to allow specific traffic.
- Peered virtual nework address space: shows list of peering with other virtual network.
- Connected Devices: It shows connected devices in this virtual network.
Subnets:
- Click for IP Subnet calculator
- List of subnets will show here which can be edited or deleted
- Create a subnet: Go to Networking/Vnet/subnet/add subnet
- Subnet purpose: choose: Default, Azure Bastion, Azure firewall, Firewall management(forced tunneling), virtual network gateway, Route Server
- Name: Enter subnet name
- IPv4 or IPv6: select and provide address range.
- Address range: address range for subnet.
- Private subnet: check box: Private subnets enhance security by not providing default outbound access. To enable outbound connectivity for virtual machines to access the internet, it is necessary to explicitly grant outbound access. A NAT gateway is the recommended way to provide outbound connectivity for virtual machines in the subnet.
- NAT Gateway: A network address translation (NAT) gateway is recommended for outbound internet access from a subnet.
- NSG (Network Security Group): All subnets should use a network security group to filter network traffic.
- Route Table:
- Service Endpoints:Create service endpoint policies to allow traffic to specific azure resources from your virtual network over service endpoints.
- Microsoft Azure Active Directory:
- Microsoft Azure CosmosDB:
- Microsoft.CognitiveServices:
- Microsoft.ContainerRegistry:
- Microsoft.EventHub:
- Microsoft.KeyVault:
- Microsoft.ServiceBus:
- Microsoft.Sql:
- Microsoft.Storage:
- Microsoft.Storage.Global:
- Microsoft.Web
- Subnet Delegation: Delegate subnet to a service
- Dell.Storage/fileSystems
- GitHub.Network/networkSettings
- informatica.DataManagement/service
- Mirosoft.ApiManagement/service
- Microsoft.Apollo/npu
- Microsoft.App/environments
- Microsoft.App/testClients
- Microst.AVA/PrivateClouds
- Microsoft.AzureCommunicationsGateway/networkSettings
- Microsoft.AzureCosmosDB/clusters
- Microsoft.BareMetal/AzureHostedService
- Microsoft.BareMetal/AzureVMWare
- Microsoft.BareMetal/CrayServers
- Network Policy for Private Endpoints:
- The network policy affects the types of network policies that control traffic going to the private endpoints in this subnet. Learn more
- Disabled
- Network security groups
- Route tables
- Edit subnet:
- Subnet ID: /subscriptions/12766954-151c-4f2e-bef9-8161abe83b11/resourceGroups/HUB-RG/providers/Microsoft.Network/virtualNetworks/HUB-RG-vNET1/subnets/HUB-RG-subnet1
- Subnet purpose:You cannot change subnet purpose.
- Name: You cannot change subnet name.
- Starting address: change
- Size: change
- Private subnet: Private subnets enhance security by not providing default outbound access. To enable outbound connectivity for virtual machines to access the internet, it is necessary to explicitly grant outbound access. A NAT gateway is the recommended way to provide outbound connectivity for virtual machines in the subnet, Enable private subnet (no default outbound access) : Check box
- Security: Simplify internet access for virtual machines by using a network address translation gateway. Filter subnet traffic using a network security group.
- NAT gateway: None, or select if configured. A NAT gateway is recommended for outbound internet access from subnets. Edit the subnet to add a NAT gateway. Learn more
- Network Security group: none or select if configured.
- Route table: None or select if configured.
- Service Endpoint:
- Create service endpoint policies to allow traffic to specific azure resources from your virtual network over service endpoints. Learn more
- Choose services from list:
- subnet_services.jpg
- Subnet Delegation:
- Delegate subnet to a service: None or choose from list.
- subnet_delegate_services.jpg
- Network Policy for Private Endpoints:
- The network policy affects the types of network policies that control traffic going to the private endpoints in this subnet. Learn more
- Disabled
- Network security groups
- Route tables
- Bastion: Check above in Network Foundation.
- vnet_bastion.jpg
- Choose which VM of that subnet need to connect with bastion service.
- DDoS Protection: You can define DDoS protection and check its status.
- Protect your public IP resources in the virtual network from distributed denial of service attacks.Learn more
- Enable and configure.
Firewall:
- No firewall exists in this virtual network. Click here to add a new firewall.
- It will create firewall in that subnet.
- If you create firewall from All services/network security/firewall than during creation you need to choose vnet and firewall will be created in that subnet.
- Microsoft Defender for Cloud:
- Network Manager:
DNS:
- vnet_DNS.jpg
- Azure assign its DNS server by default, when you create a VM in this subnet Azure will assign DNS values to this VM by default.
- For more details check Vnet\DNS
Peerings:
- Types of peering
Local (same region but diff vnets)
- No peering is required within a region.

- The above is the local peering where there is only one vnet in the same region and there are different subnets.
- VM's on different subnets can communicate with each other without peering.
-
Same region but different virtual networks. They may be on same/diff subscription, same/diff tenant.
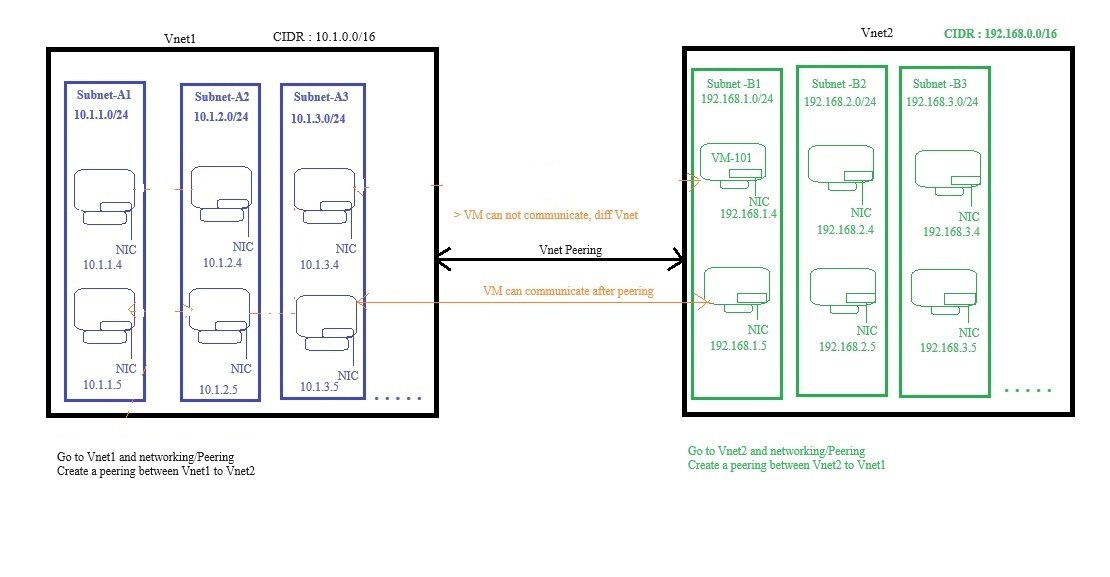
-
connection between two Vnets where both are on same region but different virtual network. They may be on same/diff subscription, same/diff tenant.
-
Peering means transfer of data between connected sources without using internet. When you create peering your resources will communicate using private IP address but name resolution will not take place.
-
There is no DNS in peering and you need to define your DNS for name resolution.
-
Adding address space or new subnets after peering is created not possible, so delete peering and add new address space or subnet and recreate peering.
-
The traffic between virtual machines in the peered virtual networks is routed through the Microsoft backbone infrastructure, much like traffic is routed between virtual machines in the same virtual network, through private IP addresses only.
- No downtime to resources in either virtual network when creating the peering, or after the peering is created.
-
Peering provides IP connectivity only. It does not contain name resolution. The Cloud Administrator must understand clearly if the machines are being joined to a domain (Active Directory DNS resolution recommended) or if they are going to rely on default Azure name resolution.
-
Peering Data Transfer charges: When using VNET peering traffic is charged for ingress (inbound) and egress (outbound) at both ends of the peered networks.
-
Peering is a 1-to-1 relationship, and they are intransitive.
-
For example: if you have these following peering connections configured A<to>B and A<to>C networks, there is no IP connectivity between B and C networks. If there is a need to connect those networks, we would have a couple of options to choose from:
- First create a peering between (B<>C).
- Second, we could enable routing in the A network (using Azure Firewall or a Network Virtual Appliance -NVA so that connection B to C via A).
- code
- Lab:
- Create two virtual network (Vnet1 & Vnet2) within the same region using different IP range.
- Create vm on both vnet to test the connection. By default firewall is enabled in windows server, either create rule or disable firewall to test.
- Go to All Resources/Networking/Vnet and click Vnet1 or Vnet2, click add and enter name for peering vnet1tovnet2, connection is bidirectional, means one connection is needed and it works on both sides.
- Peer details:
- Virtual network deployment model
- Resource manager: select
- Classic
- Virtual network deployment model
- Select RG if vnet on different resource group.
- Enter name for peering from vnet2tovnet1 .
- Configure virtual network access settings:
- Configure forwarded traffic:
- Vnet1 to vnet 2:
- Vnet2 o vnet 1:
- Gateway transit settings: gateway uses in site to site, point to site connections.
- Local Gateway:
- Remote Gateway (on peered vnet):
- Each virtual network, including a peered virtual network, can have its own gateway. A virtual network can use its gateway to connect to an on-premises network.
- Gateway transit is a peering property that enables one virtual network to utilize the VPN gateway in the peered virtual network for cross-premises or VNet-to-VNet connectivity.
-
 You can also configure spokes to use the hub VNet gateway to communicate with remote networks.
 - In hub-and-spoke network architecture, gateway transit allows spoke virtual networks to share the VPN gateway in the hub, instead of deploying VPN gateways in every spoke virtual network.
- In the diagram, gateway transit allows the peered virtual networks to use the Azure VPN gateway in Hub-RM. Connectivity available on the VPN gateway, including S2S, P2S, and VNet-to-VNet connections, applies to all three virtual networks. The transit option is available for peering between the same or different deployment models. The constraint is that the VPN gateway can only be in the virtual network using Resource Manager deployment model, as shown in the diagram.
- Routes to the gateway-connected virtual networks or on-premises networks will propagate to the routing tables for the peered virtual networks using gateway transit.
-
You can also configure spokes to use the hub gateway to communicate with remote networks. To allow gateway traffic to flow from spoke to hub, and connect to remote networks, you must:
- Configure the peering connection in the hub to allow gateway transit.
- Configure the peering connection in each spoke to use remote gateways.
- Configure all peering connections to allow forwarded traffic.
- It uses hub and spoke architecture.
- In this there will be a centralized point (HUB) to which all points get connected. It is a hub vnet (Hub-RM), there are two vnets deployed using RM and classic model and connected with Hub Vnet.
- Virtual network gateway deployed on Hub.
- All inbound or ingress data transfers to Azure data centers from on-premises environments are free. However, outbound data transfers (except in few cases like backup recovery) incur charges.
- In the case of a hybrid architecture in which on-premises is connected to Azure via a VPN or Express Route, data egress charges vary according to the connection type.
- Even in cloud-only architectures, accessing hosted applications directly incurs charges.
Important:
- You can't add address ranges to or delete address ranges from a virtual network's address space once a virtual network is peered with another.
Check ICMP Allowed in VMs:
- VMs are on different Vnet which can not communicate with each other. Creating peering between Vnets.
- Go to firewall of each VM and allow firewall for ICMP either by creating a new rule for inbound or enable existing rule.
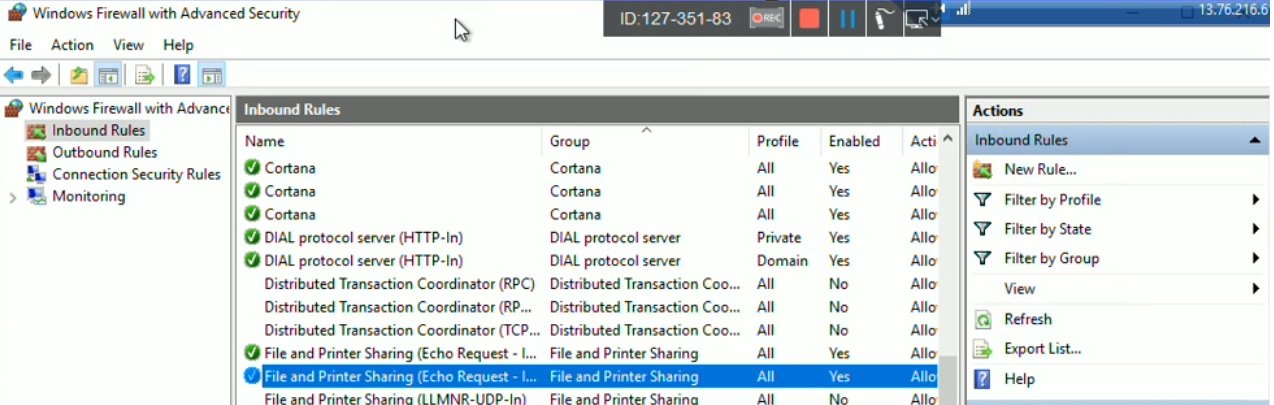
- All VMs should ping each other of other VNet.
Let’s review the different data charges in the following common scenarios.
- VPN
- Express Route.
- Application Access / VM.
- Data Traffic Costs and Availability Zones.
- Intra-Network Traffic: Peering.
1. VPN
Azure supports Site-to-Site and Point-to-Site VPN connections from on-premises data centers. These connections terminate in a virtual network gateway created for a specific Azure Virtual Network. While a Site-to-Site VPN is used for extending an on-premises network to Azure, it can also be used to connect one Azure VNet to another. On the other hand, a Point-to-Site VPN is for mobile users or traveling users who want to connect securely to an Azure network from a public network.
Data egress for Site-to-Site and Point-to-Site connections are charged at regular data transfer rates.
The first 5GB/month (outbound) is free, and any data transfer beyond that is charged based on the following usage slab:
Outbound Data Transfers:
- 5GB-10TB $0.087/GB
- 10-50TB $0.083/GB
- 50-150TB $0.07/GB
For data transfers beyond 500TB, customers should contact the Microsoft sales team to get an organization-specific deal.
2. ExpressRoute
Microsoft Azure ExpressRoute offers direct connections without traversing the internet between on-premises data centers and Azure. There are two types of billing plans associated with ExpressRoute; data charges depend on the plan selected by the client. For metered plans, inbound data transfer is free, but customers are charged for outbound data transfer based on Azure data center regions grouped as zones.
For ExpressRoute traffic, the zones are defined as follows:
Zone 1: West US, East US, North Central US, South Central US, East US 2, Central US, West Europe, North Europe, France Central, France South, Canada East, Canada Central.
Zone 2: East Asia, Southeast Asia, Australia East, Australia Southeast, Japan East, Japan West, Korea Central, Korea South, India South, India West, India Central.
Zone 3: Brazil South.
Outbound data is charged at a rate of;
- $0.025/GB for Zone 1.
- $0.05/GB for Zone 2.
- $0.14/GB for Zone 3.
In unlimited billing plans, both inbound and outbound data transfers are free because the client must pay a flat fee based on the selected port speed.
3. Application Access:
Outbound data transfer rates apply when hosted applications or VMs are accessed directly over the Internet. Some common examples include accessing or downloading files from applications, management activities through RDP and SSH connections for VMs.
The data transfer rates are the same as what was explained in the VPN section above.
Data Traffic Costs and Availability Zones.
Azure offers three availability zones in enabled regions to ensure high availability.
Azure places VMs in fault domain and update domains after the VMs are deployed in an availability zone.
Azure availability zones are generally available now and all inbound and outbound data is free until February 1, 2019. From that date forward, charges of $0.01/GB will be applied to all data transfers connected to the same VNet from a resource in an availability zone to another resource in a different availability zone.
4. Intra-Network Traffic: Peering
VNet peering seamlessly connects two Azure VNets, allowing traffic to traverse the Microsoft backbone infrastructure without using a virtual network gateway. VNet peering is a preferred method of connecting two Azure VNets because it helps avoid charges associated with a virtual network gateway. It’s also more secure because the traffic passes through the Microsoft backbone network.VNet peering is particularly useful in hub-spoke topologies.
In such topologies, the hub VNet hosts the management components and applications are segregated to different spoke VNets. These spoke VNets are connected to the Hub network through VNet peering.
Different data charges apply for VNet peering between the same Azure region and different Azure regions, otherwise known as Global VNet Peering. It’s important to note that both inbound and outbound traffic incurs charges for VNet peering. VNet peering in the same region incurs an inbound and outbound data transfer charge of $0.01/GB. For Global VNet Peering, the transfer rates are dependent on the zones between which the data is being transferred.

- When you select enable, it creates the tag in the NSG to allow traffic between vnets. NSG uses tag to allow all IPs of that tag to apply rule.
- Enable setting for other way direction as well.
- code.
Global (cross region and diff vnets, no VPN gateway)

- connection between two Vnets where both are on different region and different virtual network.
- No need to create VPN gateways as it was used in vnet to vnet communication. Without internet resources can communicate using Microsoft Backbone Network.
- Lab
- Peering between SDvnet (10.0.0.0/16) to PRDvnet (192.168.1.0/24)
- Create two virtual networks either in same or different region with same or diff network ID.
- Connect two virtual networks using peering.
- Deploy VM on both vnets and ping to check connection.

- Go to virtual network>select the network SDVnet.
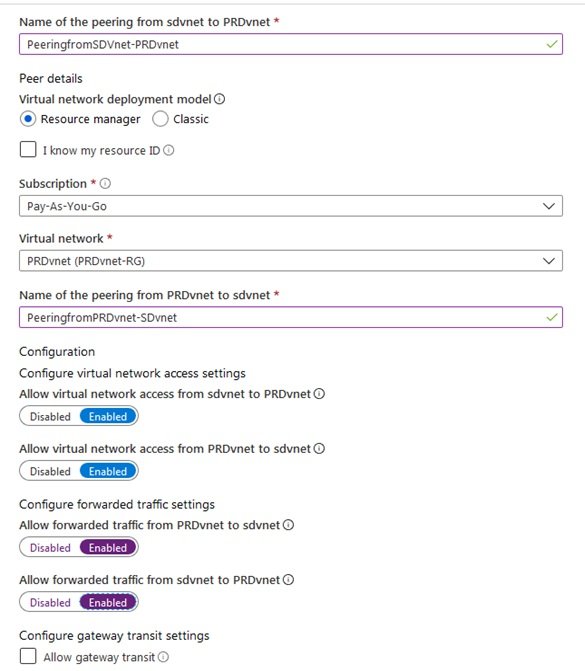
- Create peering on both directions.
- code
Vnet to Vnet (cross region-old with VPN gateway)
- Connection where both Vnets are on different Region and different Virtual Networks.
- It was used before introduction of global peering.
- The only difference between Vnet-Vnet and Global Peering is creating VPN gateway on both side because there was no Microsoft Backbone Network. They both have public IP address assigned in Vnet-Vnet connection. Communication between two virtual network gateway happens with IPSec/IKEv2. Vnet-Vnet is implemented for backward compatibility and better data encryption.
- Global peering advantage is low latency as it uses Microsoft backbone network and either there is no hops between or few hops.
- Vnet to Vnet peering by VPN Gateway:
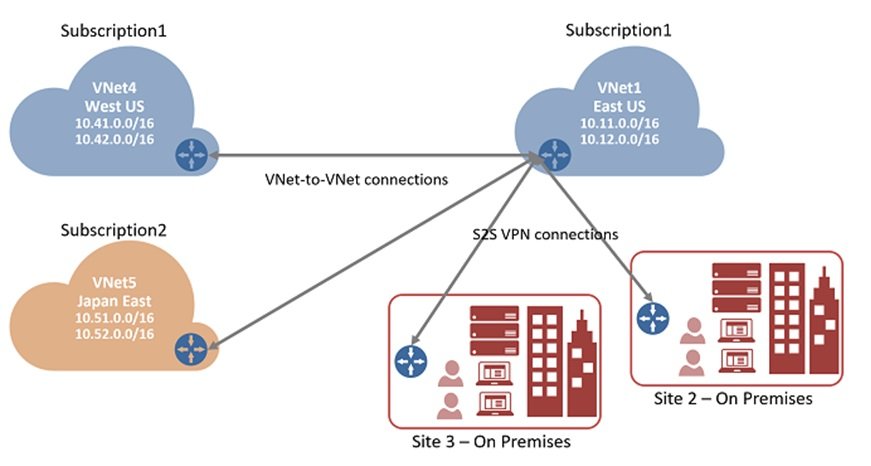
- It is similar to site-to-site IPsec connection but differ the way local network gateway is configured. When you configure site-to-site then you configure local network gateway manually.
- LAB:
- Create 2 vnets (Vnet1, Vnet4 ), CIDR (10.11.0.0/16 & 10.41.0.0./16).
- Virtual Network Setting Vnet1:
- Name: Vnet1.
- Address space: 10.11.0.0/16
- Subscription: Select the subscription you want to use.
- Resource group: star-RG.
- Location: UK South
- Subnet
- Name: Vnet1-Subnet
- Address range: 10.11.1.0/24
- GatewaySubnet
- Name: gatewaysubnet1
- Address range: Enter 10.11.2.0/30
- Virtual Network Gateway Setting Vnet1:
- Name:VPNGTW1
- Gateway type: Select VPN.
- VPN type: Select Route-based.
- SKU: Select the gateway SKU you want to use.
- Public IP address name: VPNGTW1-IP.
- Connection
- Name: connection1
- Shared key: Enter India1234. You can create the shared key yourself. When you create the connection between the VNets, the values must match.
- Add Additional Settings:
- Virtual Network Setting:
- Name: Vnet4.
- Address space: 10.41.0.0/16
- Subscription: Select the subscription you want to use.
- Resource group: str-RG.
- Location: UK South.
- Subnet
- Name: Vnet4subnet
- Address range: 10.41.1.0/24
- GatewaySubnet
- Name: VPNGTW2
- Address range: 10.41.2.0/30
- Virtual Network Gateway Settings:
- Name: VPNGTW2
- Gateway type: Select VPN.
- VPN type: Select Route-based.
- SKU: Select the gateway SKU you want to use.
- Public IP address name: VPNGTW2-IP
- Connection
- Name: connection2
- Shared key: Enter India1234. You can create the shared key yourself. When you create the connection between the VNets, the values must match.
- Add Additional Settings:
- Create two subnets (10.11.1.0/24 & 10.41.1.0/24)
- Create 2 VMs of ubuntu in each Vnet. (VM1 & VM2), assign public IP to VM1, (in free trial only 3 public IPs are allowed, 2 public IP will be used with VPN gateway and 1 with VM1)
- Create 2 Virtual Network Gateways (VPNGTW1, VPNGTW2)
- Create 2 gateway subnets (gatewaysubnet1 (10.11.2.0/30), gatewaysubnet2(10.41.2.0/30)
- Create 2 connections for both network gateways,
- Basics:
- Go to virtual network gateways and select VPNGTW1, select connections and click add
- connection type: Vnet-Vnet, other available site-to-site & Express Route
- Establish bidirectional connectivity: select check box and enter name for both connections (connection1(VPNgateway 1 to VPNgatewa2), connection2 (VPNgateway 2 to VPNgateway 1))
- Region: select region.
- Settings:
- First virtual network gateway: VPNGTW1
- Second virtual network gateway: VPNGTW2
- Shared key(PSK): India1234 (same shared key use for both network gateways)
- IKE protocol: Select IKEv1 or IKEv2 protocol for encryption
- Use Azure private IP Address:
- Enable BGP:
- Enable Custom BGP Address:
- IPSec / IKE policy: Default/Custom
- User policy based traffic selector: Enable/Disable
- DPD timeout in seconds: 45
- Connection Mode: Default/initiatorOnly/ResponderOnly
- Create
- Verify Connection:
- 2 connections are created. wait until status shows connected.
- open putty and Login to VM1 using public IP
- ping to VM2 using private IP.
- connect to VM1 using private IP $ssh privateIP of VM2.
- ping VM2 to VM1 using private IP.
-
If you want to add additional connections, navigate to the virtual network gateway from which you want to create the connection, then select Connections. You can create another VNet-to-VNet connection, or create an IPsec Site-to-Site connection to an on-premises location. Be sure to adjust the Connection type to match the type of connection you want to create.
-
You can create site to site connection with on-premise 2 and 3, site to site connection from subscription1 to subscription 2 etc..
- Types of Connectivity
Point to Site VPN
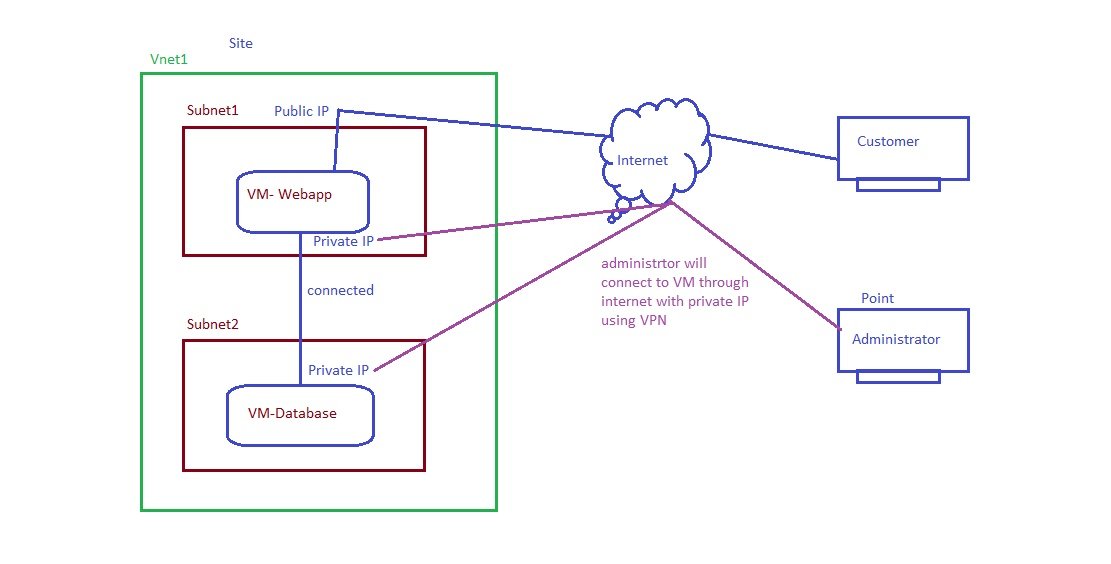
- Access the resources (VM) with its private IP via internet.
- Secure communication between individual PC and Azure services is a very important matter. T connect to Azure via a VPN tunnel instead of the public internet. Therefore, you can connect to your Azure VMs as they exist in the local network whenever needed, if you do not prefer to do a Site-to-Site VPN connection and you only want specific clients to connect to Azure that way.
- Secure connection between client to a specific virtual network.
- Support Windows & Mac devices.
- A Point-to-Site VPN connection can only work with
- virtual network gateway
- Route-based VPN type.
- To connect from Mac devices, you need to make sure that IKEv2 VPN is selected as a tunnel type during the Point-to-Site configuration
- Only one address pool for the network you are connecting from can be added.
- You cannot upload more than 20 root certificates for a Point-to-Site connection
- Client can be behind NAT and will not use public IP address and it will be secure.
- No need to open inbound ports in the client side and it will be secure. SSTP uses port 443 for outbound connection and client is behind the router so outbound port should be opened. Clients private IP address will translate to public IP address through NAT.
- When client dial to access VPN server and uses SSTP protocol then outbound port 443 should be open to communicate with VPN Gateway.
- In firewall usually port 443 (https) remain open in every organization.
- LAB: Point to Site (P2S) VPN deployment using certificate.

- Create a Virtual Network Gateway:
- Name: VPNGW1
- Region: UK South
- Gateway type: VPN/ExpressRoute
- VPN Type: Route-based/Policy-based
- SKU: selection of sku depend upon requirement and usage,(VPNGw1)
- Generation: Selection depend upon requirement, Basic and Generation 1 to 5(Generation1)
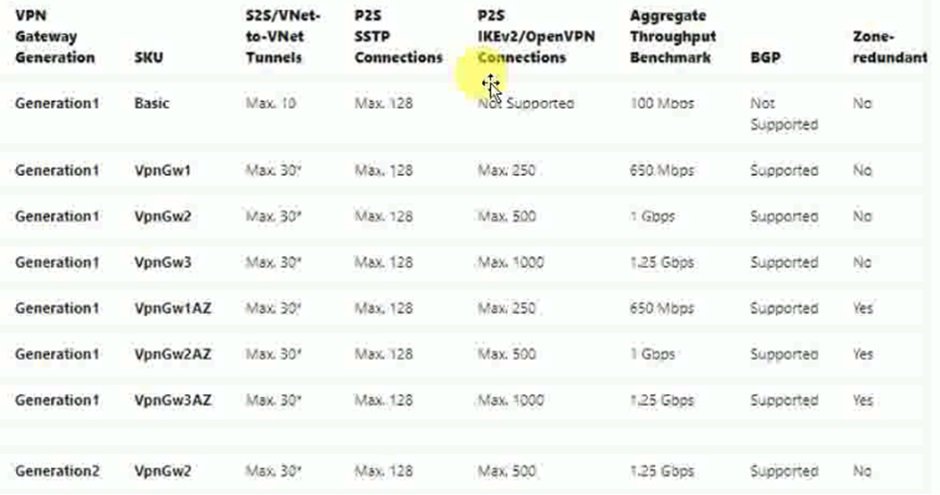
- Virtual Network: Vnet1
- Subnet: auto selected.
- Public IP Address: create new / use existing (VPNGTW1-IP)
- Public IP Address SKU: Basic
- Assignment: Dynamic
- Enable active-active mode: Disabled
- Configure BGP: Disabled
- Create. (takes 30 to 40 minutes)
- Go to resource and in settings click point-to site configuration.
- Address pool: 192.168.1.0/24 (IP will be assign to user from this pool)
- Tunnel Type:
- Point to site connection using SSTP and
- site 2 site connection using IKEv2/open VPN with number of connection supported and throughput speed.
- Some clients like MAC or Linux do not support sstp and require IKEv2 or Open VPN
- Authentication type: Root certificate install at VPN gateway while client certificate install at client machine.
- Azure Certificate
- RADIUS authentication
- Azure Active Directory
- save and download vpn
- Gateway Subnet Address: It is dedicated subnet IP address range for virtual gateway only, Select Ip address or create gateway subnet.
- Enable Active-Active Mode:
- Enabled: When you select enable active and standby mode will be created, on prem VPN is connected with active VPN gateway and in case of any disaster or maintenance or downtime from azure then standby mode will become active for high availability.
- Disabled: If you select Disable then both will be in active mode and you need to define second IP address.
- Public IP Address: Assign or create new.
- BGN : Disabled
- Review and create virtual network gateway. (Takes 25 to 30 minutes to create).
- Generate a Certificate:
- Certificates are used by Azure to authenticate clients connecting to a VNet over a point-to-site VPN connection. This can be done either by a CA server or self-signed certificate. Once you obtain a root certificate, you upload the public key information to Azure. The root certificate is then considered 'trusted' by Azure for connection over P2S to the VNet.
- Generate Root Certificate:
- Go to MMC and add/remove snapin/select certificates or start\run\certmgr.msc
- Create self-signed certificate: Root Certificate: Run following command in powershell to create a self-signed root certificate and change name. Go to MMC and in personal check root certificate is assigned after running command.
- $cert = New-SelfSignedCertificate -Type Custom -KeySpec Signature -Subject "CN=thecloudservicesROOT" -KeyExportPolicy Exportable -HashAlgorithm sha256 -KeyLength 2048 -CertStoreLocation "Cert:\CurrentUser\My" -KeyUsageProperty Sign -KeyUsage CertSign.
- Now go to root certificate in mmc\certificate and right click export without key and select base 64-encoded and give location and create a folder and save it as p2siteVPNrootcert.
- You also generate client certificates from the trusted root certificate, and then install them on each client computer. The client certificate is used to authenticate the client when it initiates a connection to the VNet.
- Generate Client Certificate:
- Create Client certificate and signed this certificate with root certificate and change DNSName. You can define any name it not need to FQDN. Client certificate will be required on each machine which need to communicate with VPN. Check personal folder in MMC\Certificates.
- New-SelfSignedCertificate -Type Custom -DnsName TechLyncsCLIENT1 -KeySpec Signature -Subject "CN=TechLyncsCLIENT1" -KeyExportPolicy Exportable -HashAlgorithm sha256 -KeyLength 2048 -CertStoreLocation "Cert:\CurrentUser\My"-Signer $cert -TextExtension @("2.5.29.37={text}1.3.6.1.5.5.7.3.2")
- The root certificate must be generated and extracted prior to creating your point-to-site configuration in the next sections.
- Point to Site Configuration: Go to virtual network gateway created above: and click point-to-site configuration, click configure now
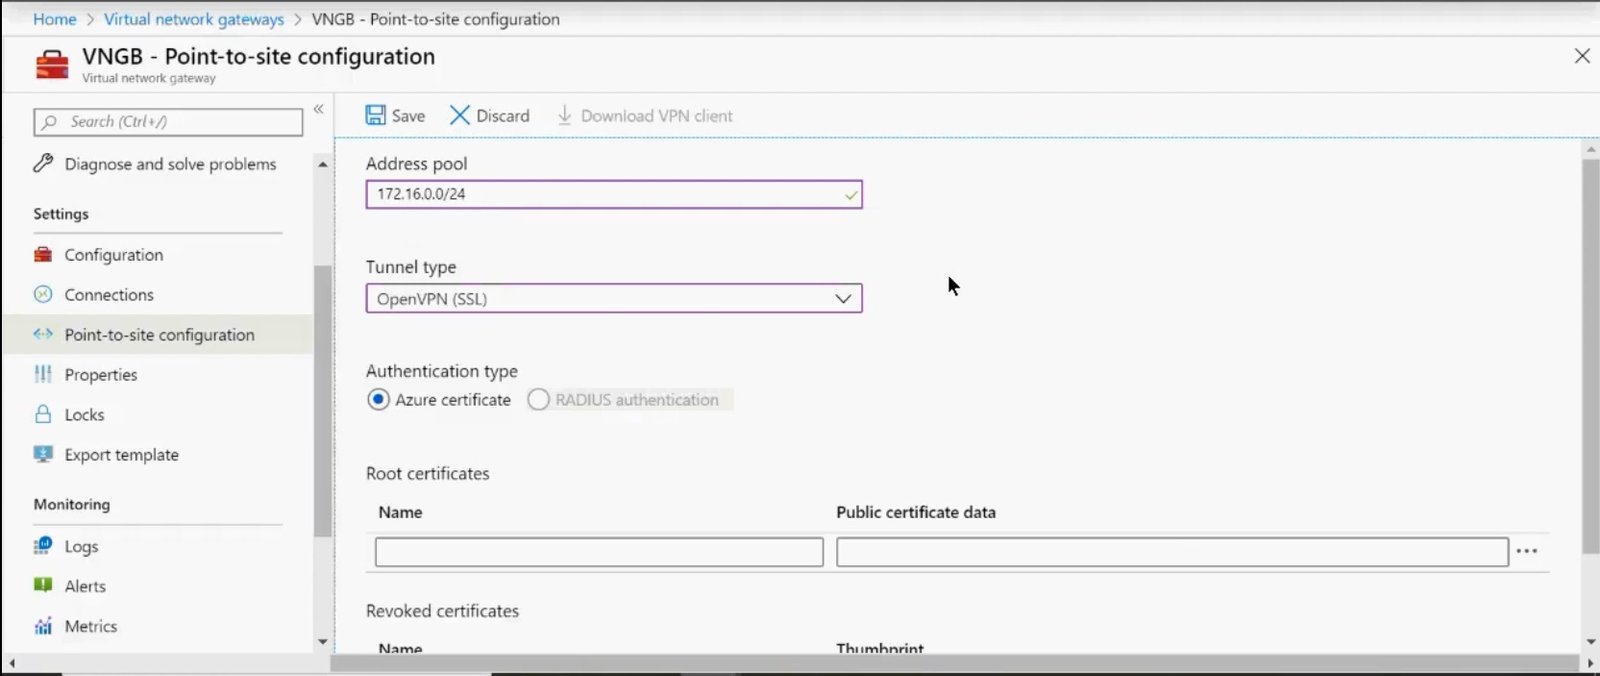
- Address pool: The IP address range which is assign to VPN client. You can define any address pool but should not conflict with existing one.
- Tunnel type: Below all are tunnelling protocol and used to create tunnel. It will encrypt and decrypt data transmission. A tunnel is created and data transmit from this tunnel securely.
- OpenVPN: An SSL/TLS based VPN protocol. An SSL VPN solution can penetrate firewalls, since most firewalls open TCP port 443 outbound, which SSL uses. Open VPN can be used to connect from Android, iOS, Windows, Linux and MAC devices.
- IKEv2/IPsec: IKEv2 VPN can be used to connect from MAC devices and windows 10 and server 2016..
- WireGuard:
- SSTP: Secure Socket Tunnel Protocol is only supported on windows devies.
- L2TP/IPsec:
- PPTP:
- If you have cross platform clients then you can select either open VPN or IKEv2. You can select combination of IKEv2 and SSTP or IKEv2 and open VPN. Select IKEv2 and SSTP.
- Authentication Type:
- Azure Certificate: upload the key, Open the root cert in notepad++ , remove start and end line, bring all in one line. Make sure no space anywhere in the line.
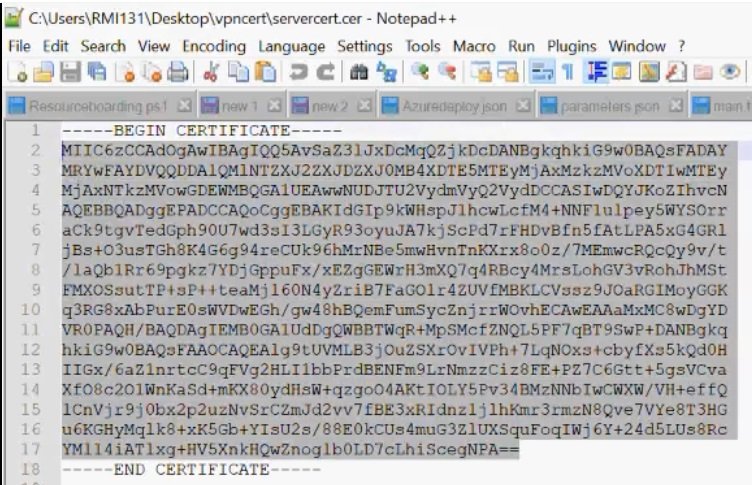
- Copy this and paste it in certificate page.

- RADIUS authentication:
- Save it.
- Create Client VPN:

- Once point to site configuration is saved, you will be able to download VPN client or manually can create VPN with windows native option.
- With the above steps both root and client certificate is installed in a machine in which two powershell scripts executed.
- To install in a different client machine, install both root and client certificates but export both certificates with key and store in a place, then go to MMC of client machine and import these two certificates. Go to MMC\certificate\root cert\right client export and this time should select export the private key.
- In client computer install client certificate in personal folder
- Install root certificate in trusted root certificate. Go to MMC\certificate (select computer account) install it here.
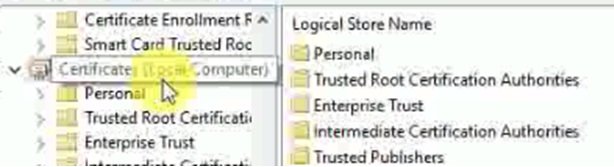
- A zipped file will be downloaded. Unzip the file and three folders will be generated:
- Generic: Contains general information about the VPN client configuration that was specified earlier, and a certificate that needs to be installed
- WindowsAmd64: Contains the executable for all 64-bit Windows clients
- WindowsX86: Contains the executable for all 32-bit Windows clients
- Install the executable that will fit your OS. Once it is installed, you will note that a VPN connection has been added to your connections.
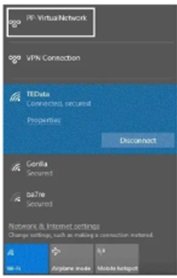
- Click on the VPN connection, PP-Virtual Network, and click on Connect.
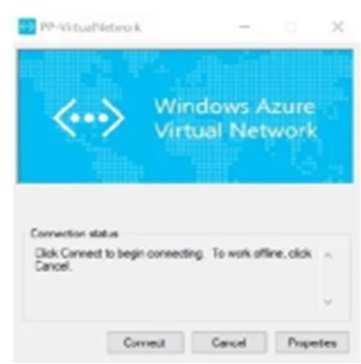
- Now, you can use a remote desktop to log on to any VM that exists within the virtual network you are connected to remotely, using its private IPaddress.
- Revoke client certificate: copy thumbprint and paste it in VPN gateway. Go to client certificate and double click.
- code
Site to Site VPN
- Connect your on-premises network to an Azure virtual network over an IPsec/IKE (IKEv1 or IKEv2) VPN tunnel.
- It requires a VPN device located on-premises that has an externally facing public IP address assigned to it.
- No IP overlapping in gateway subnet, vnet address and on-prem ip addresses.
- Lab:
- Azure:
- VNet.
- Gateway Subnet.
- VPN Gateway .
- Local Network Gateway on Azure which connects and hold information about On-premises network.
- VPN Connection.
- VM to test with on-prem.
- On premise:
- Configure A VPN Device at on-prem location (hardware / software based).
- IPsec supported VPN.
- Static Public IP Address.
-
1. Create a Vnet:
- Virtual network name: VNet1
- Address Space:1.0.0.0/16
- Subscription: The subscription you want to use
- Resource Group: TestRG1
- Region: East US
- Subnet: FrontEnd: 10.1.0.0/24, BackEnd: 10.1.1.0/24 (optional for this exercise)
- Gateway subnet address range:1.0.255.0/27
- Virtual network gateway name: VNet1GW
- Public IP address name: VNet1GWIP
- VPN type: Route-based
- Connection type: Site-to-site (IPsec)
- Gateway type: VPN
- Local network gateway name: Site1
- Connection name: VNet1toSite1
- Shared key: For this example, we use abc123. But, you can use whatever is compatible with your VPN hardware. The important thing is that the values match on both sides of the connection.
2. Create a Gateway subnet:
- Go to vnet and subnet and click create gateway subnet.
- Enter IP address range.
3. Create a Virtual Network Gateway : selecting connection type site-to-site
- Go to virtual network gateway and click add.
4. Create Local Network Gateway: Create a local network gateway to represent the on-premises site that you want to connect toa virtual network. The local network gateway specifies the public IP address of the VPN device and IP address ranges located on the on-premise site.
- Go to Networking / Hybrid Connectivity / local network gateway and click add.
- Enter name: Name for local network gateway
- IP Address: On-premise public IP address. VPN device at on-premise.
- Address Range: On-premise IP address range.
- Cofigure BGP Setting: unselect
- Subscription, RG, Location: select the same region for vnet, virtual network gateway and local network gateway
5. VPN Connection:
- Go to virtual network gateway/connections/ click add.
- Name: Azure-onprem-connection
- Connection Type: Site to Site using IPsec
- select virtual network gateway.
- select local network gateway.
- shared key: enter key or any password.
- IKE protocol: IKE1 or IKE2 (Select which protocol support your on-prem vpn device)
- create it.
Need to create tunnel between Azue and On-premise:
Go to connection and download file after selecting the on-prem device. a configuration file will be downloaded and it contain steps to perform at on-prem vpn device.
6. Create a VM for testing:
On-Premise Configuration.
1. Configure your VPN Device: use downloaded file
- Download VPN Device script: Perform phase1 and phase2 connection.
- code
Express Route
- code
- code
VPN Gateway
- It is like software based VPN device or software based appliance or managed gateway which is configured with vnet. It places in vnet.
- it can be use with
- Peering (same or different region)
- Site to Site VPN or Gateway to Gateway VPN
- Point to Site VPN
- Express Route.
- Gateway subnet: It required a dedicated subnet and this subnet can have only gateway.
- To deploy gateway takes lot of time.
- Azure provides 99.9% SLA.
- One Vnet can have only one virtual gateway.
- Lab:
- Go to virtual network gateway in azure portal.
- click add, enter name, RG, subscription, name and region.
- Gateway type:
- VPN: it is used for point to site or site to site vpn connection.
- VPN Type:
- Route-based: It is used for point to site vpn connection.
- Policy -based: Site to Site VPN with multiple tunnel connection.
- ExpressRoute: it is used for on prem to vnet conneciton.
- SKU: VPNGW1 to VPNGW5, check the SKU chat for selection of SKU.
- Vnet: select in which gateway need to create.
- Subnet: select gateway subnet
- Go to vnet/subnets/gateway subnet to create new gateway subnet
- Public IP: create or assign.
- Enable Active-Active Mode: it related to high availability
- Enable: If it is enabled than it will be in active active mode.
- Disable: if it disabled than it will be in active standby mode.
- Configure BGP ASN: keep disabled.
- Videos
- Video1
- code
Deleting/Disabling Peering
- Go to Virtual Network > Peering > select peering > Delete or you can disable.
- You should have Network Contributor roles assigned to your account.
- code
Service Endpoints: PAAS
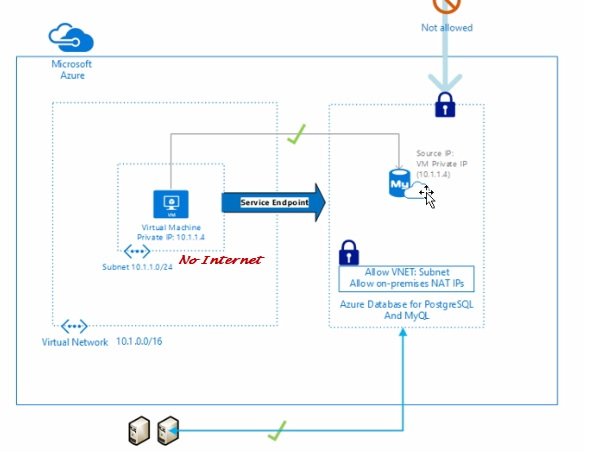
- Azure provides various services which required internet to access them. Service endpoint provides private IP address and communication are done through Microsoft backbone network instead of internet.
- An Azure Virtual Network Service Endpoints allows resources inside an Azure Virtual Network (VNet) to securely connect to Azure services using Microsoft backbone network instead of the Internet.
- Azure Service Endpoints are configured on Azure Virtual Network (VNet) subnets to allow secure, direct connectivity from the subnet to supported Azure PaaS services over the Microsoft backbone network.
- Service endpoint are configured on a service and all the resources of that service can be accessed, suppose it is created on storage service than all storage accounts can be accessed unlike private endpoint where service is created on a particular storage
- Azure services supported:
-
Azure Service Purpose Microsoft Azure Storage Accounts Secure access to Blob, File, Queue, Table Azure SQL Database Private access to SQL databases Azure Cosmos DB Secure database connectivity Azure Key Vault Secure secrets and certificates Azure Service Bus Messaging services Azure Event Hubs Streaming/event ingestion Azure App Service Web apps access restriction Azure Container Registry Secure image pulls Azure Data Lake Storage Big data storage Azure Synapse Analytics Analytics platform Azure Cognitive Services AI services Azure Backup Backup traffic security
-
- Normal communication: VM → Internet → Azure Storage
- Through Service Endpoint: VM → Azure Backbone Network → Azure Storage
- Example:
-
Suppose you have:
- VNet:
star-Vnet1 - Subnet:
star-Subnet1 - Storage Account:
starstorage1
You can:
- Enable Microsoft.Storage service endpoint on
star-Subnet1 - Configure the Storage Account firewall to allow access only from that subnet
Result:
- VMs in that subnet can access Storage without internet but Microsoft Backbone network.
- Internet access to the storage account can be blocked.
- VNet:
Lab Scenario Storage Account: Access storage account from a subnet using private IP through Microsoft Backbone Private Network.
- Go to All Services/Networking/Network Foundation\Virtual Network\Select Vnet(star-Vnet1)\settings\Service Endpoint
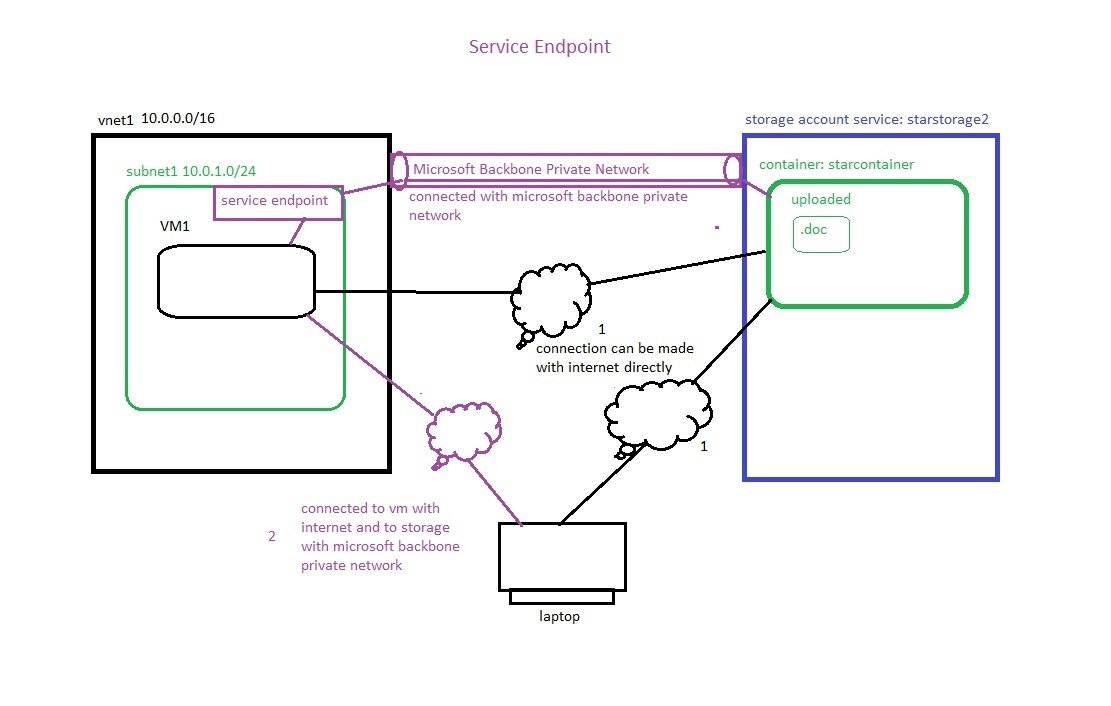
- Create a vnet: star-Vnet1 (10.0.0.0/16), subnet (star-subnet1 10.0.1.0/24).
- Create a VM: star-VM1 in subnet1, RDP Allowed, Public IP.
- Create a Service endpoint in subnet1:
- Go to All Services/Networking/Vnet/subnet1 and in service endpoints and from list select Microsoft.storage and save it.
- Service endpoints are available for the following Azure services and regions.
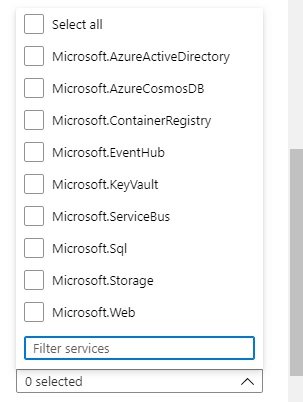
- Azure Storage (Microsoft.Storage)
- Azure SQL Database(Microsoft.Sql)
- Azure Synapse Analytics (Microsoft.Sql)
- Azure Database for PostgreSQL Server (Microsoft.Sql)
- Azure Database for MySQL server (Microsoft.Sql)
- Azure Database for MariaDB (Microsoft.Sql)
- Azure Cosmos DB (Microsoft.AzureCosmosDB)
- Azure Key Vault (Microsoft.KeyVault)
- Azure Service Bus (Microsoft.ServiceBus)
- Azure Event Hubs(Microsoft.EventHub)
- Azure Data Lake Store Gen 1(Microsoft.AzureActiveDirectory)
- Azure App Service (Microsoft.Web)
- Azure Cognitive Services (Microsoft.CognitiveServices)
- check service endpoint status = succeeded.
- Create a storage Account:
- Basics
- Go to storage Account/+ Add
- Subscription: select subscription
- RG: star-RG
- Storage Accont name: starstorage2
- Region: UK South
- Preferred storage type: Azure Blob Storage or Azure Data Lake Storage Gen2 / Azure Files / Other(Tables and Queues)
- Performance: standard / Premium
- Redundancy: Geo-Redundant storage (GRS), Review and create.
- Advanced
- Networking
- Public access: Access your resource from anywhere through a public network. Note: Allowing access to your resource through a public network increases security risk,(Enable/Disable/Secure by permeter)
- Block access storage account through internet, Go to storage account/security+networking/networking/public network access=Enabled from selected virtual networks and IP addresses, select virtual network (vnet1) and subnet = subnet1. save it. Now storage account cannot be accessed through internet but can be access from VM1.
- ServiceEndpoint2.jpg
- IPv4 Addresses:
- Private endpoint:
- Network routing:
- Data Protection
- Recovery: Protect your data from accidental or erroneous deletion or modification.
- Enable point-in-time restore for containers: Check box (Use point-in-time restore to restore one or more containers to an earlier state. If point-in-time restore is enabled, then versioning, change feed, and blob soft delete must also be enabled. Learn more)
- Enable soft delete for blobs:Check box, 7 Days to retain deleted blobs (Soft delete enables you to recover blobs that were previously marked for deletion, including blobs that were overwritten. Learn more)
- Enable soft delete for containers: Check box, 7 Days to retain deleted containers (Soft delete enables you to recover containers that were previously marked for deletion. Learn more, Enabling soft delete for frequently overwritten data may result in increased storage costs Learn more,
- Enable soft delete for classic file sharesl Check box, 7 Days to retain deleted classic file shares (Soft delete enables you to recover classic file shares that were previously marked for deletion. Learn more
- Tracking
- Manage versions and keep track of changes made to your blob data: Check box:
- Enable versioning for blobs. Check box
- Enable blob change feed. Check box
- Access control
- Enable version-level immutability support: Check box (Allows you to set time-based retention policy on the account-level that will apply to all blob versions. Enable this feature to set a default policy at the account level. Without enabling this, you can still set a default policy at the container level or set policies for specific blob versions. Versioning is required for this property to be enabled. Learn more
- Security
- Confgure security settings that impace your storage account.
- Encryption
- Encryption type:
- Enable support for customer-managed keys:
- Enable infrastructure encryption: Check box
- Tags
- Review + create
- Create Container: Go to storage created and go to data storage and create container
- name=starcontainer and upload a file. (.doc)
- Access to storage account from laptop using internet:
- Download and install azure storage explorer in a laptop, launch azure storage explorer, connect using sign in with azure (enter credentials) and go to storage accounts/starstorage1/starcontainer/uploaded file displayed.
- Access to storage account through VM using Microsoft backbone network:
- Connect to VM using RDP and public IP.
- Install Microsoft Azure Storage Explorer in VM and open it.
- Connect Azure storage explorer with Azure account, in explorer click open connect dialog and provide azure account details. select subscription and select azure and enter credentials.
- select check box default directory and it will load subscription. reauthenticate with credentials.
- Browse storage account.
- Or
- Access through powershell script from VM:
- open powershell ISE and run the following script.
- Before running the script, get the following information from storage:
- Access Key: fKtbWJcgcTcXyldyPze4XImnHcqTGLu+jiONoKbMGm6ooH2WH4usmfjkhr8FiV9BJI2w2subxftL+AStZh+EmQ== (starstorage1/security+networking/Access keys, copy key)
Storage Name: starstorage1
File share Name: star-fileshare - Script:
-
$acctKey = ConvertTo-SecureString -String "fKtbWJcgcTcXyldyPze4XImnHcqTGLu+jiONoKbMGm6ooH2WH4usmfjkhr8FiV9BJI2w2subxftL+AStZh+EmQ==" -AsPlainText -Force
$credential = New-Object System.Management.Automation.PSCredential -ArgumentList "Azure\starstorage1", $acctKey
New-PSDrive -Name Z -PSProvider FileSystem -Root "\\starstorage1.file.core.windows.net\star-fileshare" -Credential $credential - Once you run the above script, Win R and run \\starstorage1.file.core.windows.net\star-blobshare
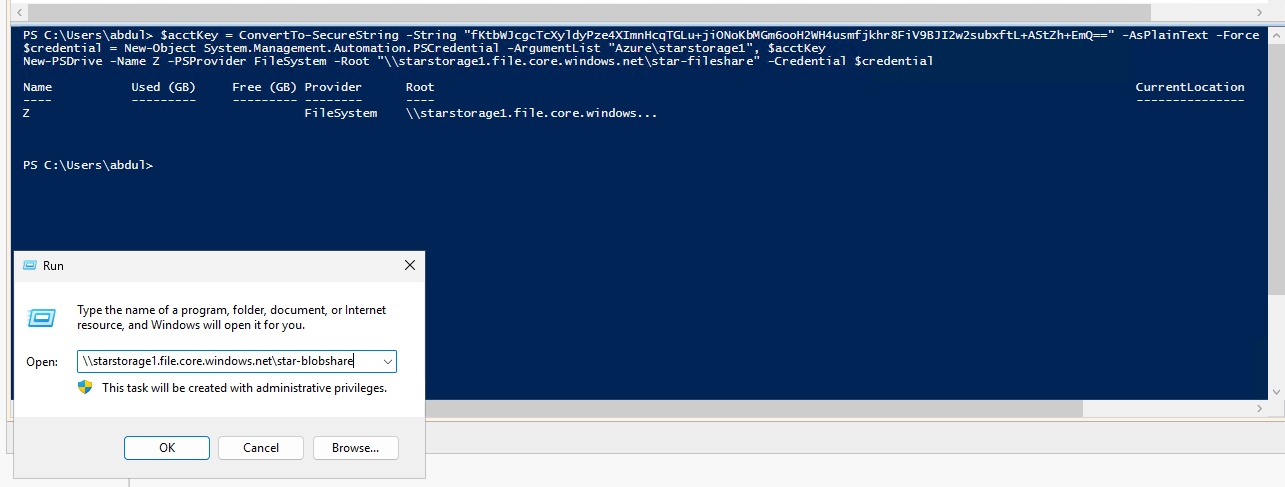
- Create folder and upload file (iis_script.ps1)
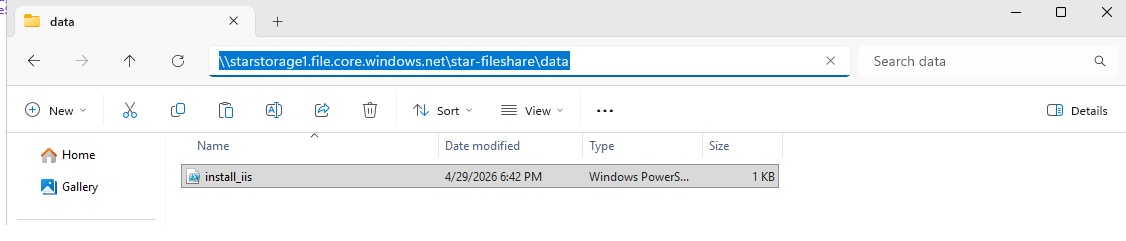
- You can map the drive using \\starstorage1.file.core.windows.net\star-blobshare
- Access to storage account through service endpoint:
- Connect to VM, open azure storage explorer, click open connect dialog and select subscription and enter credentials.
- click explorer and expand azure subscription to find storagecontainer.
Lab Scenario Storage Account: Restrict access to Azure file share over the internet, allowed access from Vnet/Subnet level using service endpoint.
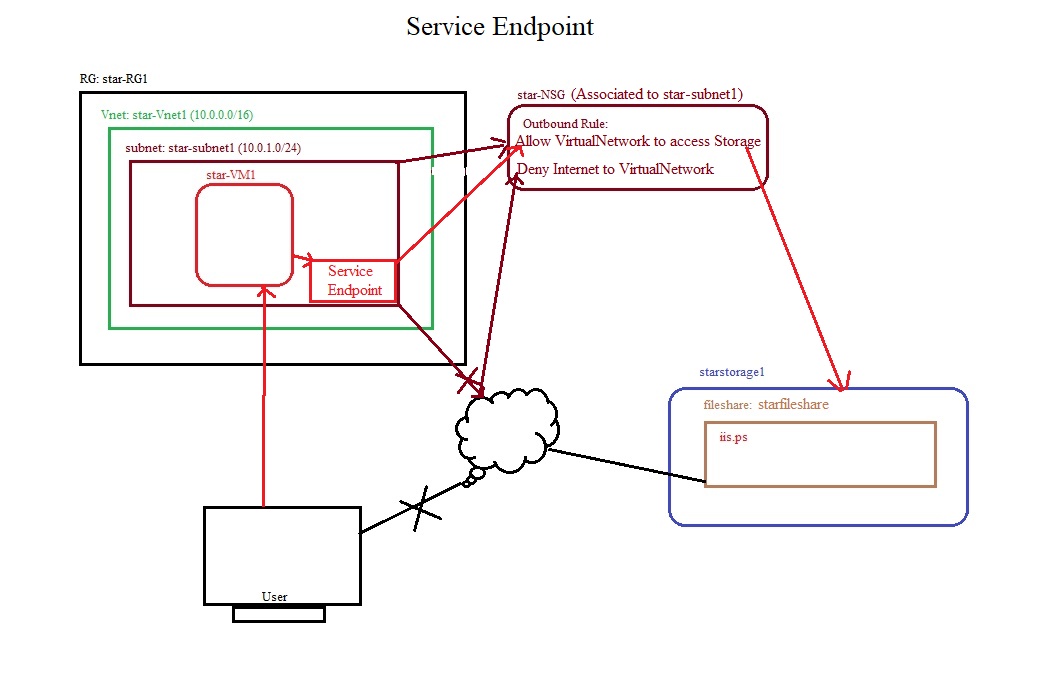
- Create a Resource Group: star-RG1
- Create a vnet: star-Vnet1 (10.0.0.0/16), subnet (star-subnet1 10.0.1.0/24).
- Create NSG: star-NSG, Add two outbound rules & 1 Inbound rule
- Outbound:
- Allow VirtualNetwork from any port to access Storage any port: Source=Service Tag, Source service tag: VirtualNetwork, Source port ranges=*, Destination=Service Tag, Destination service tag=Storage, Service=Custom, Destination port ranges=*, protocol =any or TCP, Action=Allow, priority=100 Name=AllowStorageAccess
- Deny virtualNetwork from any port to Internet: Source=Service Tag, Source service tag: VirtualNetwork, Source port ranges=*, Destination=Service Tag, Destination service tag= Internet, Service=Custom, Destination port ranges=*, protocol =any or TCP, Action=Deny, priority=110 Name=Deny_Internet
- Inbound:
- Allow VirtualNetwork from any port to access RDP from any port. This is to RDP access virtual machine to check the storage access using private IP with microsoft backbone network. Source=Any, Source port ranges=*, Destination service tag=VirtualNetwork, Service=RDP, Destination port ranges=3389, protocol =TCP, Action=Allow, priority=120 Name=Allow-RDP
- Create a VM: star-VM1 in subnet1, Public inbound ports=None, star-NSG, Public IP.
- Create a Service endpoint in subnet1:
- Go to All Services/Networking/Vnet/subnet1 and in service endpoints and from list select Microsoft.storage and save it.
- Service endpoints are available for the following Azure services and regions.
- Azure Storage (Microsoft.Storage)
- Azure SQL Database(Microsoft.Sql)
- Azure Synapse Analytics (Microsoft.Sql)
- Azure Database for PostgreSQL Server (Microsoft.Sql)
- Azure Database for MySQL server (Microsoft.Sql)
- Azure Database for MariaDB (Microsoft.Sql)
- Azure Cosmos DB (Microsoft.AzureCosmosDB)
- Azure Key Vault (Microsoft.KeyVault)
- Azure Service Bus (Microsoft.ServiceBus)
- Azure Event Hubs(Microsoft.EventHub)
- Azure Data Lake Store Gen 1(Microsoft.AzureActiveDirectory)
- Azure App Service (Microsoft.Web)
- Azure Cognitive Services (Microsoft.CognitiveServices)
- check service endpoint status = succeeded.
- Create a storage Account/File share:
- Go to storage Account/+ Add
- Subscription: select subscription
- RG: star-RG1
- Storage Accont name: starstorage1
- Region: CentralIndia
- Preferred storage type: Azure Blob Storage or Azure Data Lake Storage Gen2 / Azure Files / Other(Tables and Queues)
- Performance: standard / Premium
- Redundancy: LRS,
- Advanced
- Access Tier = Hot
- Networking
- Public network access: Enable
- Public network access scope: Enable from selected virtual netowrks and IP addresses,
- Virtual networks: select star-Vnet1, Subnets=star-Subnet1,
- Private endpoint: none
- Network Routing = Microsoft network routing.
- Data protection: Recovery, Disable all
- Security: keep default
- Encryption: keep default
- Review and create.
- Create Fileshare:
- Click created storage/Data Storage/File shares
- Basics
- Name: star-fileshare
- Access Tier: Transaction optimized.
- Backup
- Uncheck Enable backup
- Review and create.
- Upload file in file share.
- You dont have access, we have defined outbound rule in star-NSG to allow storage through star-subnet1.
- Access to storage account from laptop using internet:
- RDP to star-VM1.
- open powershell and run the following script.
- Before running the script, get the following information from storage:
- Access Key: fKtbWJcgcTcXyldyPze4XImnHcqTGLu+jiONoKbMGm6ooH2WH4usmfjkhr8FiV9BJI2w2subxftL+AStZh+EmQ== (starstorage1/security+networking/Access keys, copy key)
Storage Name: starstorage1
File share Name: star-fileshare - Script:
-
$acctKey = ConvertTo-SecureString -String "fKtbWJcgcTcXyldyPze4XImnHcqTGLu+jiONoKbMGm6ooH2WH4usmfjkhr8FiV9BJI2w2subxftL+AStZh+EmQ==" -AsPlainText -Force
$credential = New-Object System.Management.Automation.PSCredential -ArgumentList "Azure\starstorage1", $acctKey
New-PSDrive -Name Z -PSProvider FileSystem -Root "\\starstorage1.file.core.windows.net\star-fileshare" -Credential $credential - Once you run the above script, Win R and run \\starstorage1.file.core.windows.net\star-blobshare
- Create folder and upload file (iis_script.ps1)
- You can map the drive using \\starstorage1.file.core.windows.net\star-blobshare
- Private Endpoints:
- Normally communication between virtual network resources with PAAS services are done with Internet, which is not secure.
- private_endpoint1.jpg
- If your VM needs to connect to these PAAS services eventhough all are in same network but still they need internet to access them.
- An Azure Private Endpoint allows a service in Azure to be accessed privately through a private IP address inside your Virtual Network (VNet), instead of using the public internet.
- It uses Microsoft private link technology.
- private_endpoint2.jpg
- Private Endpoint is a NIC which is created in virtual network so that PAAS servics can be accessed privately and securely through Microsoft Backbone network. PAAS services like storage, SQL, Keyvault, web app etc.. These PAAS services have public endpoint which are generally used to connect them but to keep secure we use private endpoint to access them privately and securely.
- You need to disable to public accessibility of PAAS service in order for the traffic to use private endpoint.
- Suppose in your network you have x number of VMs which need to connect to storage account via private endpoint, in this case a NIC is created on the Vnet and we need to give IP address, It will be tideous if this IP get changed, For easy administration we use DNS zone. Alias record are created for that service. Separate DNS zone will be created for different PAAS services.
- private_endpoint3.jpg
- Example:
- Normally, an Azure service like: WebApp, Storage Account, SQL Database is accessible using a Public endpoint such as: https://mywebapp.azurewebsites.net, with private endpoint it will be access with private ip like 10.0.2.4.
- Now only resources connected to the VNet (VMs, VPN users, ExpressRoute users, on-premises users) can access it privately.
- Why use Private Endpoint?
- Removes public internet exposure
- Improves security
- Helps meet compliance requirements
- Traffic stays on Microsoft backbone network
- Prevents data exfiltration
- Allows secure hybrid connectivity
- Lab: Configuring Azure Web App with Private Endpoint with DNS Registration, deny public access: Access from wihtin a vnet and publicy denied.
- For more details click here.
- private_endpoint9.jpg
- Create a RG: star-RG1
- Create a Vnet: star-Vnet1 (10.0.0.0/16), VM-Subnet(10.0.1.0), EndPont-Subnet (10.0.2.0/24), AzureBastionSubnet(10.0.3.0/26)
- Create NSG: star-NSG
- Create Bastion Service: star-Bastion
- Create a Virtual Machine: star-VM1, public inbound ports=none, Public IP = None (To access this VM either need VPN or Bastion service as there is no Public IP).
- Create a storage account: starstorage1, standard, LRS, Enable public access from all networks,
- Create container in the above storage account: star-container1(Anonymous access level=private grayed out),
- Access VM: Go to VM/Connect/Bastion and enter credentials and it will connect to VM in Browser.
- Download and install azure storage explorer in the VM, launch azure storage explorer, connect using sign in with azure (enter credentials) and go to storage accounts/starstorage1/starcontainer/upload a file.
- OR
- Access through powershell script from VM:
- open powershell ISE and run the following script.
- Before running the script, get the following information from storage:
- Access Key: fKtbWJcgcTcXyldyPze4XImnHcqTGLu+jiONoKbMGm6ooH2WH4usmfjkhr8FiV9BJI2w2subxftL+AStZh+EmQ== (starstorage1/security+networking/Access keys, copy key)
Storage Name: starstorage1
File share Name: star-fileshare - Script:
-
$acctKey = ConvertTo-SecureString -String "fKtbWJcgcTcXyldyPze4XImnHcqTGLu+jiONoKbMGm6ooH2WH4usmfjkhr8FiV9BJI2w2subxftL+AStZh+EmQ==" -AsPlainText -Force
$credential = New-Object System.Management.Automation.PSCredential -ArgumentList "Azure\starstorage1", $acctKey
New-PSDrive -Name Z -PSProvider FileSystem -Root "\\starstorage1.file.core.windows.net\star-fileshare" -Credential $credential - Once you run the above script, Win R and run \\starstorage1.file.core.windows.net\star-blobshare
- Create folder and upload file (iis_script.ps1)
- You can map the drive using \\starstorage1.file.core.windows.net\star-blobshare
- Disable to public access of storage: Go to storage/starstorage1/Security+networking\networking\public access\manage\Disable.
- Try to access the storage in VM and upload a file. It will fail. There is no private endpoint and no NIC attached to Vnet and public access is disabled.
- Create Private Endpoint:
- Go to storage/Security+networking\networking\private endpoint and click private endpoint/Create private endpoint.
- Basics
- Subscription: Freetier
- Resource Group: star-RG1
- Instance details
- Name: storage1-pvtendpnt
- Network Interface Name: storage1-pvtendpnt-nic
- Region: Central India
- Resource
- Subscription: freetier
- Resource type: Microsoft.storage/StorageAccounts
- Resource: starstorage1
- Target sub-resource: choose blob
- Virtual Network
- Virtual network = star-Vnet1
- Subnet: EndPont-Subnet
- Private IP configuration
- Dynamically allocate IP address: System will assign
- Statically allocate IP address: We need to give IP address
- Application security group:
- Create or choose if already created.
- DNS
- private_endpoint4.jpg
- Integrate with private DNS zone, it will create new or can choose if already created.
- Tags
- Review+Create.
- private_endpoint5.jpg
- Go to private endpoint and click Settings/DNS configuration
- private_endpoint6.jpg
- Private address 10.0.2.4 is created for NIC (storage1-Pvtendpnt-nic).
- privatelink.blob.core.windows.net a private DNS zone is created.
- Go to private DNS zone/DNS Management/Recorsets\An alias record is created for starstorage1 with the IP 10.0.2.4
- private_endpoint7.jpg
- Click virtual Network Links: Private DNS link (privatelink.blob.core.windows.net) is linked to virtual network (star-Vnet1), VM is created in this vnet.
- Go to VM and run nslookup: Ps C:\nslookup starstorage1.blob.core.windows.net
- private_endpoint8.jpg
- Try to upload a file and it will upload.
- Public access is disabled. Accessing with private endpoints.
- Difference between Service Endpoints Vs Private Endpoints:
- Code
- Properties: Vnet Properties will display.
- Locks:
- Monitoring:
- Alerts:
- Metrics:
- Diagnostic Settings:
- Logs:
- Virtual Network Flow Logs:
- Diagram:
- Automation:
- CLI / PS:
- Tasks (Preview):
- Export Template:
- Help
- Connection Troubleshoot:
- Support + Troubleshooting:
- Code
- Overview:
NAT Gateways:
- code
Public IP Address:
- When two computers need to communicate with each other an IP address is required.

- Private IP Address: Used for communication with the internet.
- Private IP Address allows azure resource to communicate with other resources within a Vnet or communication between site to site using VPN gateway or Express Route where public IP not used.
- Private IP address can change from dynamic to static, go to NIC management/blade and change it.
- Public IP Address: Used for communication within an Azure virtual network.
- Public IP Address is a resource itself in Azure.
- Public IP address is not assgined directly to resource but it is assgin to gateway, Azure uses source netting and translate private IP into public IP.
- Azure has NAT gateway where public IP is assigned, all our resources uses private IP which translate to public IP and traffic goes outside. This service is not available in AWS.
- Some Azure resources are out of Vnet scope which required Public IP to access like Database, Storage etc..
- Resources of Vnet can communicate with each other using private IP. These IP addresses can be from same or different IP class, as they are within a same vnet so they can communicate with each other.
- By default outbound traffic of resources is allowed which is defined in default NSG rule.
- For security reason if public IP is not assigned to resource but need to communicate azure services which required Public IP can use service endpoint.
- When you start the resource/VM than its NIC is associated with whichever Public IP resource will get IP address.
- There are two ways to make dynamic IP address to static of a VM
- From IP resource: Go to Management/IP resource blade and change dynamic to static IP addess, In this scenario VM may restart.
- From VM: Go to VM Management / Blade and stop the VM, warning message will appear that Public IP is dynamic and you will loose the IP, here select reserve IP. If you stop the VM from VM list than warning will not appear and you will loose public IP.
- Public IP is visible when VM is in running mode or a static IP is assigned.
- DNS runs recursive query in which one DNS communicate with another DNS. DNS record exist in cache depends on the TTL time define. O/S also have cache which keep DNS information. Client and DNS keep the record of TTL time and if query comes again to DNS than it checks the record and TTL time which is still active than provide the recorded information.
- Azure by default has a dynamic assignment of a public IP address to a newly created resource/VM unless we change it to a static. If the allocation is dynamic than public ip address will get change when stop and start the VM. Assign static public IP to avoid.
-
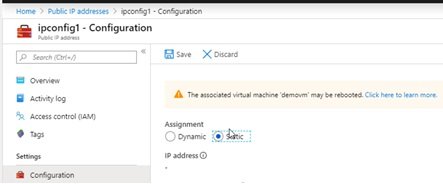
- Go to IP resource / configuration and change to static.
- You can reserve dynamic public IP address, go to the VM blade and stop it, a message will appear to reserver public IP. If you stop VM from resource list than this message will not appear and you will loose assigned public IP.
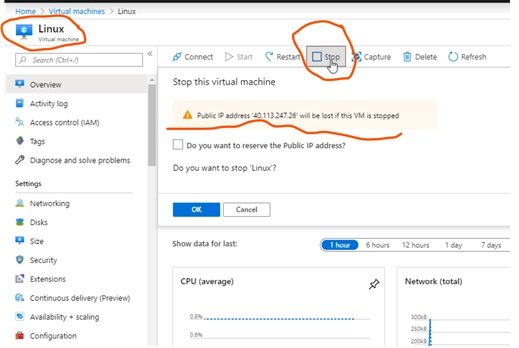
Public IP addresses can be used in the following resources:
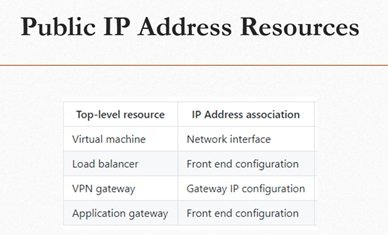
- VM
- Public Load Balancer – Internet facing, it is called virtual IP address
- Public IP address attached to load balancer is called virtual IP, traffic hits the virtual IP and load balancer distributes the traffic. Front end configuration performed at load balancer. Back end configuration at VMs.
- VPN Gateways: it is used in site to site vpn setup.
- Application Gateway (Layer 7 Load Balancer and WAF), it has front end configuration, it is a load balancer of layer 7.
- LAB:
-
- Public IP address is a resource in azure, you create a resource first and than assign IP addresses range in it.

- Enter resource name, select version, sku, DNS name, Subscription, RG, Location.
- SKU: Matching SKUs used in load balancer and public IP resources. If load balancer's SKU type is basic than your IP address will be from basic and if load balancer is standard than ip will be from standard.
- If either SKU is different than thre will be no communication.
Basic:
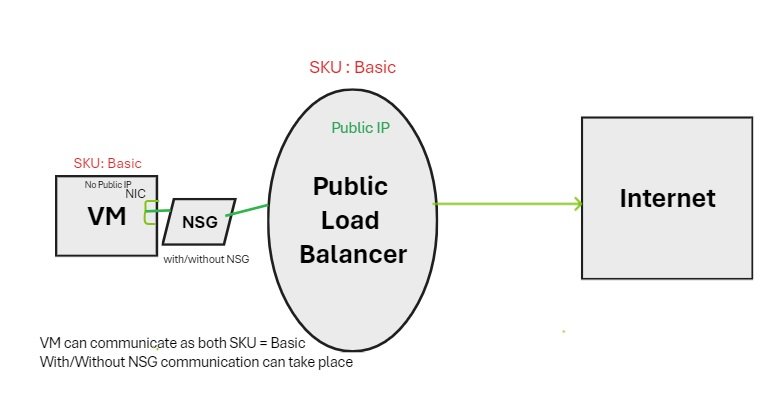
- Assigned with the static or dynamic allocation method.
- NSG is recommended but optional.
- Assigned to any azure resource that can be assigned a public IP.
- IP address are zone specific. Do not support availability zone scenario.
- Public_IP_Address8.jpg
Standard:
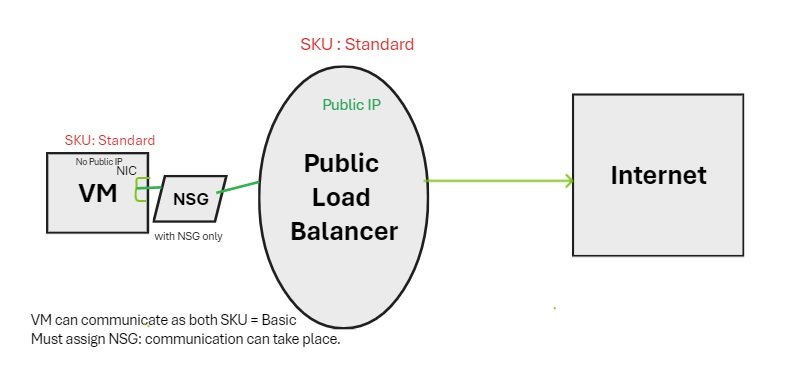
- Assigned with Static allocation method and explicitly allow the desired inbound traffic.
- NSG must be assgined
- Zone redundant by default.
-
- IP Blade Management:

- Associate: You can associate avilable public IP to a resource.
- Disassociate: remove associated public IP of a resource.
- Move: Ip resource move to another location
- Delete: IP Resource can be deleted.
- Change RG:
- Change Subscription:
- Change Tag:
- Activity Log:
- Access Control (IAM):
- Tags:
- Settings:
- Static or Dynamic Assignment of public IP to resoruces are depend on SKU type selection.
- Public IP will be assigned from azure ip address pool. if you want to create your own public ip addresses pool then configure public IP prefixes.
- Public IP address can be created during resource creation of can be pre configured.
- Dynamic: IP address will be released when resource is stop and a new IP will be assigned to resource when start.
- Static: IP address will be assigned permanently.
- Create public IP address:
- select subscription:
- Resource group: star-RG
- Region: uk south
- Name: star-pubicIP
- IPV4 or IPV6 configuration: if ipv4 is choosen the public IP cab assigned to VM or load balancer. If IPv6 is selected then it can be assigned to load balancer only.
- SKU: standard or Basic (if you select SKU type basic then public IP can be assigned static or dynamic, if you select standard then only static IP can be assigned)
- Basic vs Standard
- Public_IP_Address8.jpg
- Public IP is assigned with basic sku all ports are open and you can get RDP connection. NSG is optional
- Public IP is assgined with standard sku all ports are closed and you cannot get RDP connection. it is secured. To access this VM configure NSG and configure rules and attach to subnet on which VM is created.
- Availability Zone: This option is only avaialble in standard SKU.
- No Zone: When you create public IP with no zone then azure will create public IP in any zone (1 or 2 or 3).
- Zone redundant: If this selected then public IP will be associated with all 3 zones, if any zone 1 or zone 2 or both zones are down then it can still be access from zone 3.
- Zone 1: if this is selected then public IP will be created in Zone 1
- Zone 2: if this is selected then public IP will be created in Zone 2
- Zone 3: if this is selected then public IP will be created in Zone 3
- Tier: Regional or Global: This option is only avaialble in standard SKU
- Global: whenever we create cross region load balancer then this option can be used.
- Regional:
- IP Address Assignment: Static IPs are assigned at the time the resource is created and released when the resource is deleted. Dynamic IPs are assigned when associating the IP to a resource and is released when you stop, restart, or delete a resource. Dynamic is only available for Basic SKU.
- Static or Dynamic: depend upon SKU selection. In case of dynamic public IP assignment
- Routing Preference: Microsoft Network or Internet
- Idle timeout = 4 minute (
- DNS Name Label:
- Domain Name Label Scope:
Network Interfaces:
- Create a network interface and attach it to a virtual machine. A network interface enables a virtual machine to communicate with Internet, Azure, and on-premises resources.
- When you create a network interface it required, Subscription, RG, Region, Vnet, Subnet,
- During creation of VM, Azure creates a network interface.
- Manage Network Interfaces:
- Overview:
- Activity Log:
- Access control (IAM):
- Tags:
- Settings:
- IP Configurations:
- DNS Servers
- NEtwork SEcurity Group
- Properties
- Locks
- Monitoring:
- Insights
- Alerts
- Metrics
- Diagnostic settings
- Automation:
- CLI /PS
- Tasks
- Export template
- Help
- Additional / Secondary NIC:
-
- You need multiple NIC for load balancer or firewall.
- You can change primary NIC to Secondary and Secondary to Primary NIC through powershell.
- Number of NIC can be attached to VM depending on VM size.
- VM should be in stopped or deallocation status to attach additional NIC if VM have only one NIC, If VM got more than 1 NIC cards than you can attach additional NIC while VM in running mode.
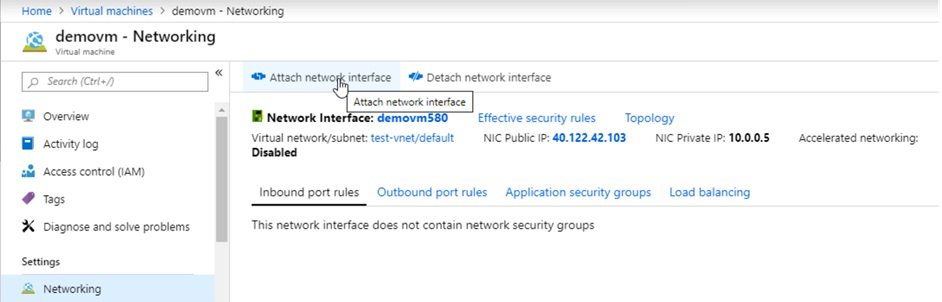
- Go to the VM on which you want to add additional NIC.
- Attach an existing one or create new.
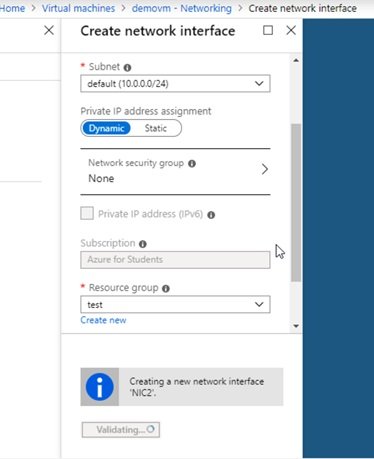
- VM/Settings/Networking and click attach network interface card.
- Give name, select subnet.
- Private IP: select dynamic or static (enter IP)
- NSG: select
- RG: select from list
- click create.
- both NIC can have different IP from different network range.
- Once NIC is created, now attached to a VM.
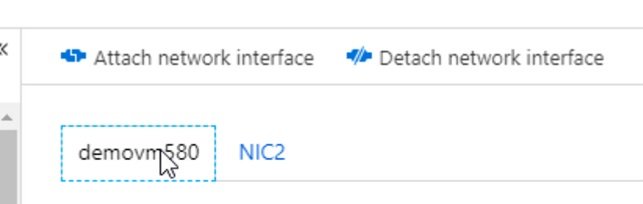
- Both NIC will be visible in VM.
Topology:

- There is one vnet and one subnet, three dots represents IP addresses and cube represents with VM, for VM demovm 2 NIC is attached.
-
- Reset NIC:
- Reset the network interface for Azure Windows VM to resolve issues when you cannot connect to Microsoft Azure Windows Virtual Machine (VM) after:
- You disable the default Network Interface (NIC). VM is in running mode but unable to connect. May be due to misconfiguration of IP address and it gets disconnected
- You manually set a static IP for the NIC.
- It can be reset through Azure portal or powershell.
- Through Portal:
- Change private IP of VM from dynamic to static.
- Change the IP address to different IP that is available in the subnet.
- The virtual machine will restart to initialize the new NIC to the system,
- Try to RDP, if successful, change the IP address back to its originally assigned.
- Through Powershell:
-
#Set the variables
$SubscriptionI = "<Subscription ID>"
$VM = "<VM Name>"
$ResourceGroup = "<Resource Group>"
$VNET = "<Virtual Network>"
$IP = "NEWIP"#Log in to the subscription
Add-AzAccount
Select-AzSubscription -SubscriptionId $SubscriptionId#Check whether the new IP address is available in the virtual network.
Test-AzureStaticVNetIP –VNetName $VNET –IPAddress $IP#Add/Change static IP. This process will not change MAC address
Get-AzVM -ServiceName $ResourceGroup -Name $VM | Set-AzureStaticVNetIP -IPAddress $IP | Update-AzVM
- Reset the network interface for Azure Windows VM to resolve issues when you cannot connect to Microsoft Azure Windows Virtual Machine (VM) after:
- Multi IP Assigned to NIC:
-
- Multiple IP addresses can assign to a single NIC, or add multiple NIC and assign IP address.
- One private IP address will be mapped with one public IP address, it will be one to one mapping.
- If you run multiple websites on a single server, where multiple site can be bind with ports, IP or host header/host based. If a traffic comes for a particular IP than goes to that server, different IP goes to different server.
- You may need multiple IP addresses for load balancer, firewall.
Lab: Add Multiple IP Address to a VM:
- Go to required VM, networking and click on NIC.
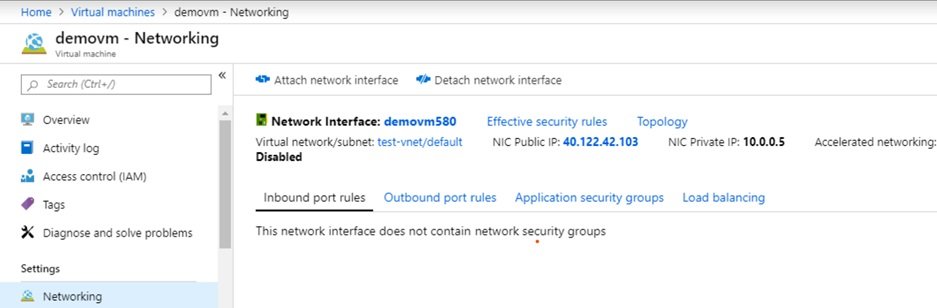
- Click on network interface.
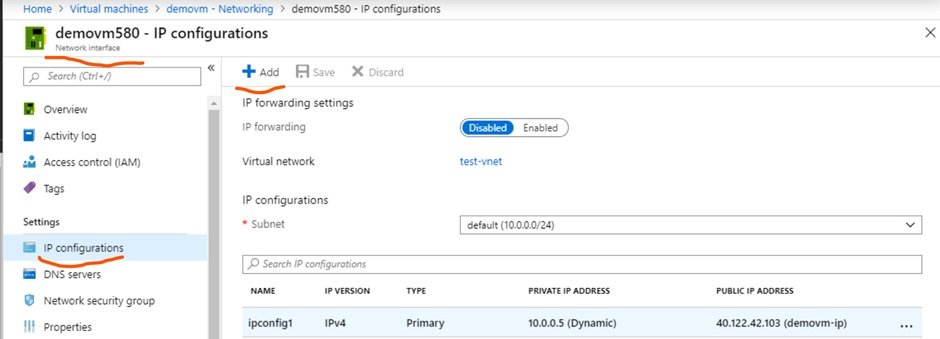
- click on IP configuration and clikc on Add to add additional IP.
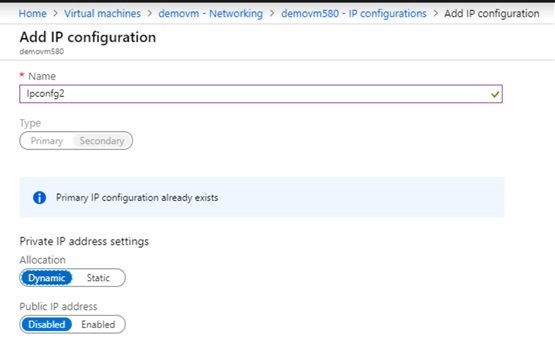
- Give name and it will be secondary as there is primary attached already during creation of VM, define static or dynamic public and private IP.
- You can keep private IP enable and public IP disable.
- Create public IP address:
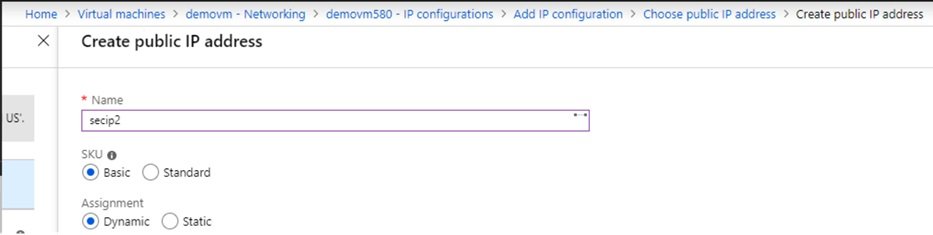
- Select SKU type and dynamic or static.
- Second NIC with public and private IP created.
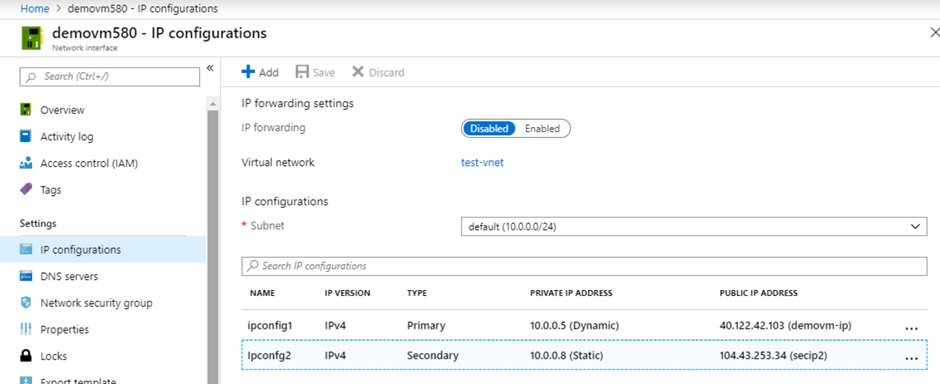
- If you check in the VM, secondary NIC is not visible. Because additional private IP address which is mapped with public IP is not configured in VM.
- If you have assigned multiple IP address on a single NIC, than in VM it will not be assigned automatically through DHCP. You must assign multiple IP address manually whenever you configure multiple IP addresses to single NIC.
- Go to VM TCP/IP properties, enter primary IP address details:
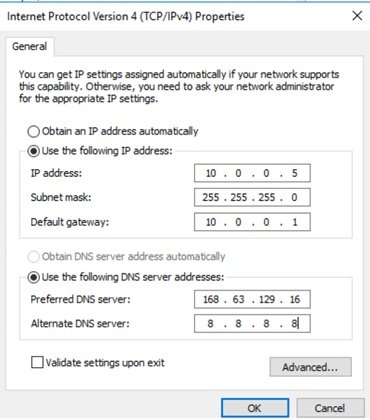
- 0.0.5 is the primary IP address, first address usually default gateway address of the subnet, enter your DNS server or azure DNS server 168.63.129.16. now click advanced and assigned secondary IP address.
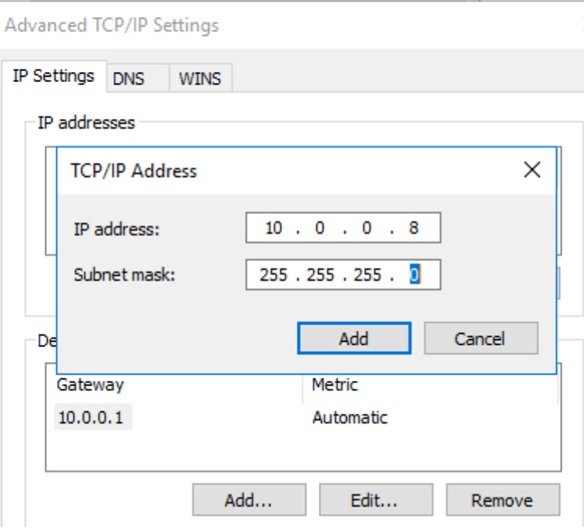
- Enter IP and subnet mask and click add.
- In other O/S, need to add IP addresses in the configuration file.

- Both IP addresses has been assigned. You can check secondary private IP is bind with public IP and working.
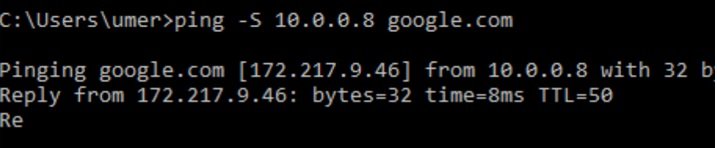
- Open command prompt and type: c:\ping -S 10.0.0.8 google.com
- -S (capital S, source IP), as we have two private IPs bind same NIC. Primary is 10.0.0.5 and secondary 10.0.0.8. by default ping uses primary IP.
- code
-
- Network Security Group-NSG: Check All Services\Networking\Network Security\NSG
- Application Security Group - ASG:
- Bastions: Check in All Services\Networking\Network Foundation\Bastions
Route Tables:
- Route tables are use to define routes between resources, below is an example
- more details: https://learn.microsoft.com/en-us/azure/virtual-network/virtual-networks-udr-overview
- Azure Firewall NAT rule configuration:
- User access to VM with private IP assigned via firewall with public IP assigned.
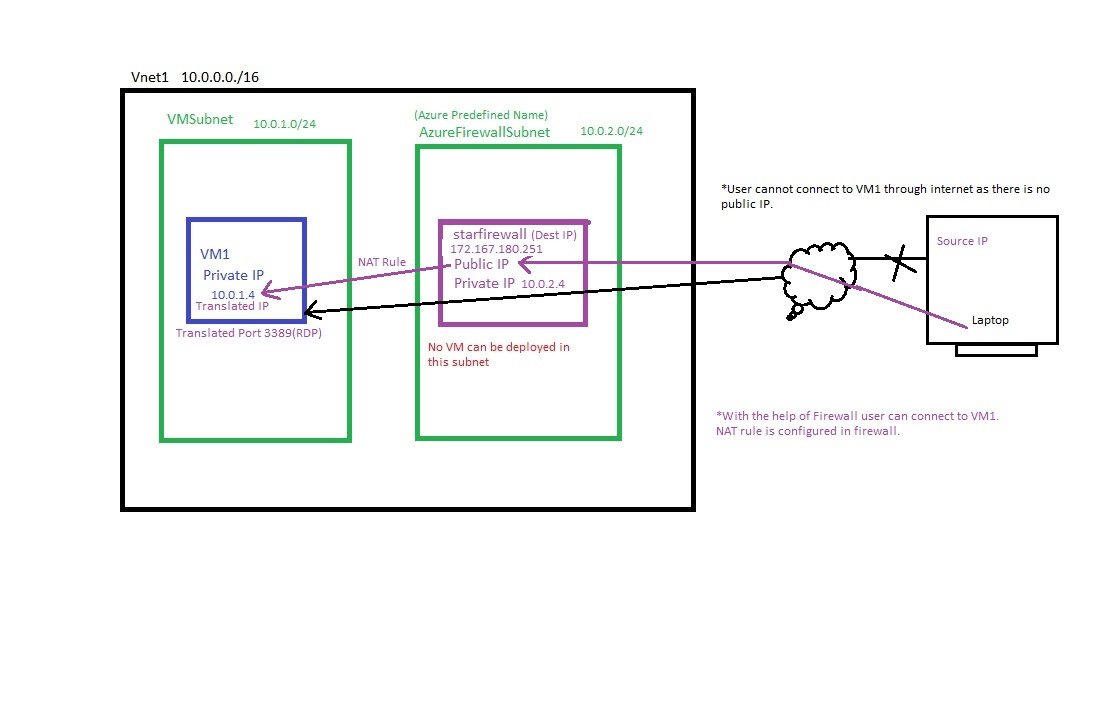
- 1) Create Vnet: Vnet1 (10.0.0.0/16), VMSubnet (10.0.1.0/14), AzureFirewallSubnet(10.0.2.0/24)
- 2) Create VM: VM1, VMSunet, Inbound port rules=none, publicIP=None, NSG=Basic, Review and Create.
- 3) Create Firewall: Go to All Services/Networking/Network Security/firewalls, click add+
- subscription: select subscription, Resource Group: star-RG
- Name: starfirewall
- Region: UK South
- Availability Zone: None, Zone1, Zone2, Zone3
- Firewall SKU: Basic, Standard, Premium (different features on different SKU and pricing)
- Firewall management: Use a Firewall Policy to manage this firewall, Use Firewall rules (classic) to manage this firewall.
- Virtual Network: Create new or select (Vnet1).
- Public IP Address: Add new, Name=starfirewall-IP, SKU=Standard, assignment=static.
- Review & Create.
- 4) NAT Rule Collection:
- Go to firewall/Settings/Rules (classic)/NAT Rule collection
- Add NAT Rule Collection: Name=NAT-collection1, priority=5000 (100 to 65000), lower gets priority. Action=Destination Network Address Translation (DNAT).
- Rules: Name=Rule1, Protocol=TCP, Source type=IP Address, Source=* or Enter IP address/es of client, Destination Address=Firewall-IP, Destination ports=3389 (RDP connection), Translated address=VM1 Private IP 10.0.1.4, Translated Port = 3389
- 5) Test connection:
- Take RDP and enter firewall public IP, it will connect to VM, enter credentials.
- 6) Internet access from VM1:
- Create a Route table and associate with VMSubnet so that VM1 can have internet.
- Search Route tables, create, select subscription, RG, Region and name=starRoute1, propagate gateway routes = yes and create.
- Go to Resource starRoute1/settings/Routes/+Add Name=firewallRoute1, Destination type=IP Addresses, Destination IP Address/cIDR Ranges=0.0.0.0/0, Next Hop Type=Virtual appliance, Next Hop address=10.0.2.4 (firewall private IP), save it.
- Click subnet and + associate , select virtual network = Vnet1 (star-RG), Subnet = VMSubnet and save it.
- Check internet can be accessed from VM1.
- Azure Firewall Block Internet Access:
- Restrict Internet on VM by defining Route Table.
- System defined Route:Microsoft has created, it allows internet access.
- User Defined Route: With user define route we can restrict internet access from VM.
- 1) Create Vnet: Vnet1 (10.0.0.0/16), VMSubnet (10.0.1.0/14), AzureFirewallSubnet(10.0.2.0/24)
- 2) Create VM: VM1, VMSunet, Inbound port rules=none, publicIP=None, NSG=Basic, Review and Create.
- 3) Create Firewall: Go to All Services/Networking/Network Security/firewalls, click add+
- subscription: select subscription, Resource Group: star-RG
- Name: starfirewall
- Region: UK South
- Availability Zone: None, Zone1, Zone2, Zone3
- Firewall SKU: Basic, Standard, Premium (different features on different SKU and pricing)
- Firewall management: Use a Firewall Policy to manage this firewall, Use Firewall rules (classic) to manage this firewall.
- Virtual Network: Create new or select (Vnet1).
- Public IP Address: Add new, Name=starfirewall-IP, SKU=Standard, assignment=static.
- Review & Create.
- 4) NAT Rule Collection:
- Go to firewall/Settings/Rules (classic)/NAT Rule collection
- Add NAT Rule Collection: Name=NAT-collection1, priority=5000 (100 to 65000), lower gets priority. Action=Destination Network Address Translation (DNAT).
- Rules: Name=Rule1, Protocol=TCP, Source type=IP Address, Source=* or Enter IP address/es of client, Destination Address=Firewall-IP, Destination ports=3389 (RDP connection), Translated address=VM1 Private IP 10.0.1.4, Translated Port = 3389
- 5) Test connection:
- Take RDP and enter firewall public IP, it will connect to VM, enter credentials.
- 6) Internet access from VM1:
- Create a Route table and associate with VMSubnet so that VM1 can have internet.
- Search Route tables, create, select subscription, RG, Region and name=starRoute1, propagate gateway routes = yes and create.
- Go to Resource starRoute1/settings/Routes/+Add Name=firewallRoute1, Destination type=IP Addresses, Destination IP Address/cIDR Ranges=0.0.0.0/0, Next Hop Type=Virtual appliance, Next Hop address=10.0.2.4 (firewall private IP), save it.
- Click subnet and + associate , select virtual network = Vnet1 (star-RG), Subnet = VMSubnet and save it.
- Check internet can be accessed from VM1.
- 7) To deny internet access:
- Go to Route Table
- Azure Firewall Website White Listing:
- Only defined websites can be access from VM and all other websites restricted.
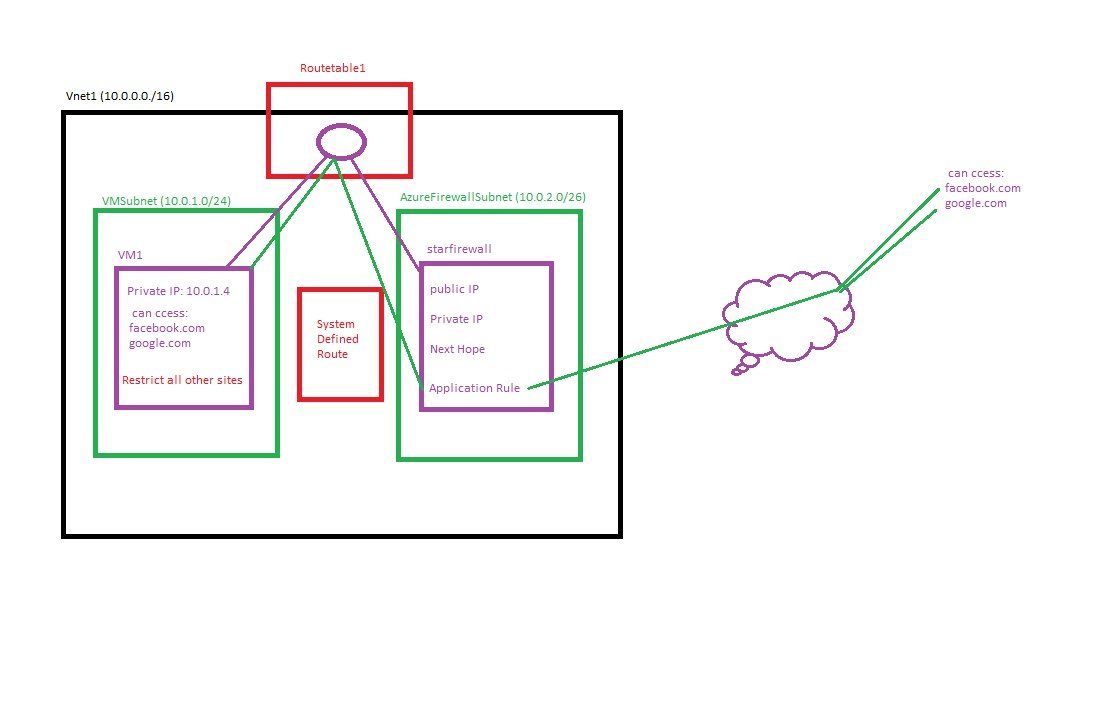
- 1) Create Vnet: Vnet1 (10.0.0.0/16), VMSubnet (10.0.1.0/14), AzureFirewallSubnet(10.0.2.0/24)
- 2) Create VM: VM1, VMSunet, Inbound port rules=none, publicIP=None, NSG=Basic, Review and Create.
- 3) Create Firewall: Go to All Services/Networking/Network Security/firewalls, click add+
- subscription: select subscription, Resource Group: star-RG
- Name: starfirewall
- Region: UK South
- Availability Zone: None, Zone1, Zone2, Zone3
- Firewall SKU: Basic, Standard, Premium (different features on different SKU and pricing)
- Firewall management: Use a Firewall Policy to manage this firewall, Use Firewall rules (classic) to manage this firewall.
- Virtual Network: Create new or select (Vnet1).
- Public IP Address: Add new, Name=starfirewall-IP, SKU=Standard, assignment=static.
- Review & Create.
- 4) Application Rule Collection:
- Go to firewall/Settings/Rules (classic)/Appliation Rule collection
- Add NAT Rule Collection: Name=Rule1, Protocol=TCP, Source type=IP Address, Source=* or Enter IP address/es of client, Destination Address=Firewall-IP, Destination ports=3389 (RDP connection), Translated address=VM1 Private IP 10.0.1.4, Translated Port = 3389
- Add Application Rule Collection: Name=apprule-collection1, priority=400(100 to 65000), lower gets priority. Action=Allow (allowing some websites).
- Rules Target FQDNs: Name=Rule2, Source type=IP Address, Source=* ,ProtocolLport= http:80, https:443, Target FQDNs=*.google.com,*.facebook.com
- 5) Internet access from VM1:
- Create a Route table and associate with VMSubnet so that VM1 can have internet.
- Search Route tables, create, select subscription, RG, Region and name=starRoute1, propagate gateway routes = yes and create.
- Go to Resource starRoute1/settings/Routes/+Add Name=firewallRoute1, Destination type=IP Addresses, Destination IP Address/cIDR Ranges=0.0.0.0/0, Next Hop Type=Virtual appliance, Next Hop address=10.0.2.4 (firewall private IP), save it.
- Click subnet and + associate , select virtual network = Vnet1 (star-RG), Subnet = VMSubnet and save it.
- 6) Test website connection /restriction from VM.
- Connect to VM1 and open browser and access google.com, facebook.com (get access) all other websites will not open.
- Route Servers:
Private Link
- Private Link Overview
- Private Endpoints:
- Pending Connections
- Private Link Services
- Network Security Perimeters
- Active Connections
DNS
- DNS Overview:
- DNS Private Resolvers:
- Azure DNS private resolver bridges on-premises DNS namespaces with private DNS zones hosted on Azure DNS without the burden of deploying VM-based custom DNS servers. You can resolve DNS queries from on-premises networks and do conditional forwarding to on-premises DNS zones.
- Code
- Public DNS Zones: Check Networking\Network Foundation\DNS Zones
Components of DNS: Domanin Register+ Nameserver + DNS records+Hosting

- Register a domain through a Registrar: Nameserver + DNS records+Hosting with Registrar
- A registrar (like GoDaddy, Namecheap, one.com, Hostinger) checks with the central registry (Top Level Domain).
- The Registrar will record the domain in a TLD registry (e.g.,
.com, .co.uk, .netregistry). - Nameservers/Authoritative: Registrar will provide Name servers: It resolves name to IP or IP to name, it is called authritative DNS server.
- Example: nameserver of Hostinger
- ns1.dns-parking.com
- ns2.dns-parking .com
- Add DNS Records
- Example:
A record → 192.168.1.10(public website IP)MX record → mail serverDomain Registration Process:
DNS Name Resolution work flow
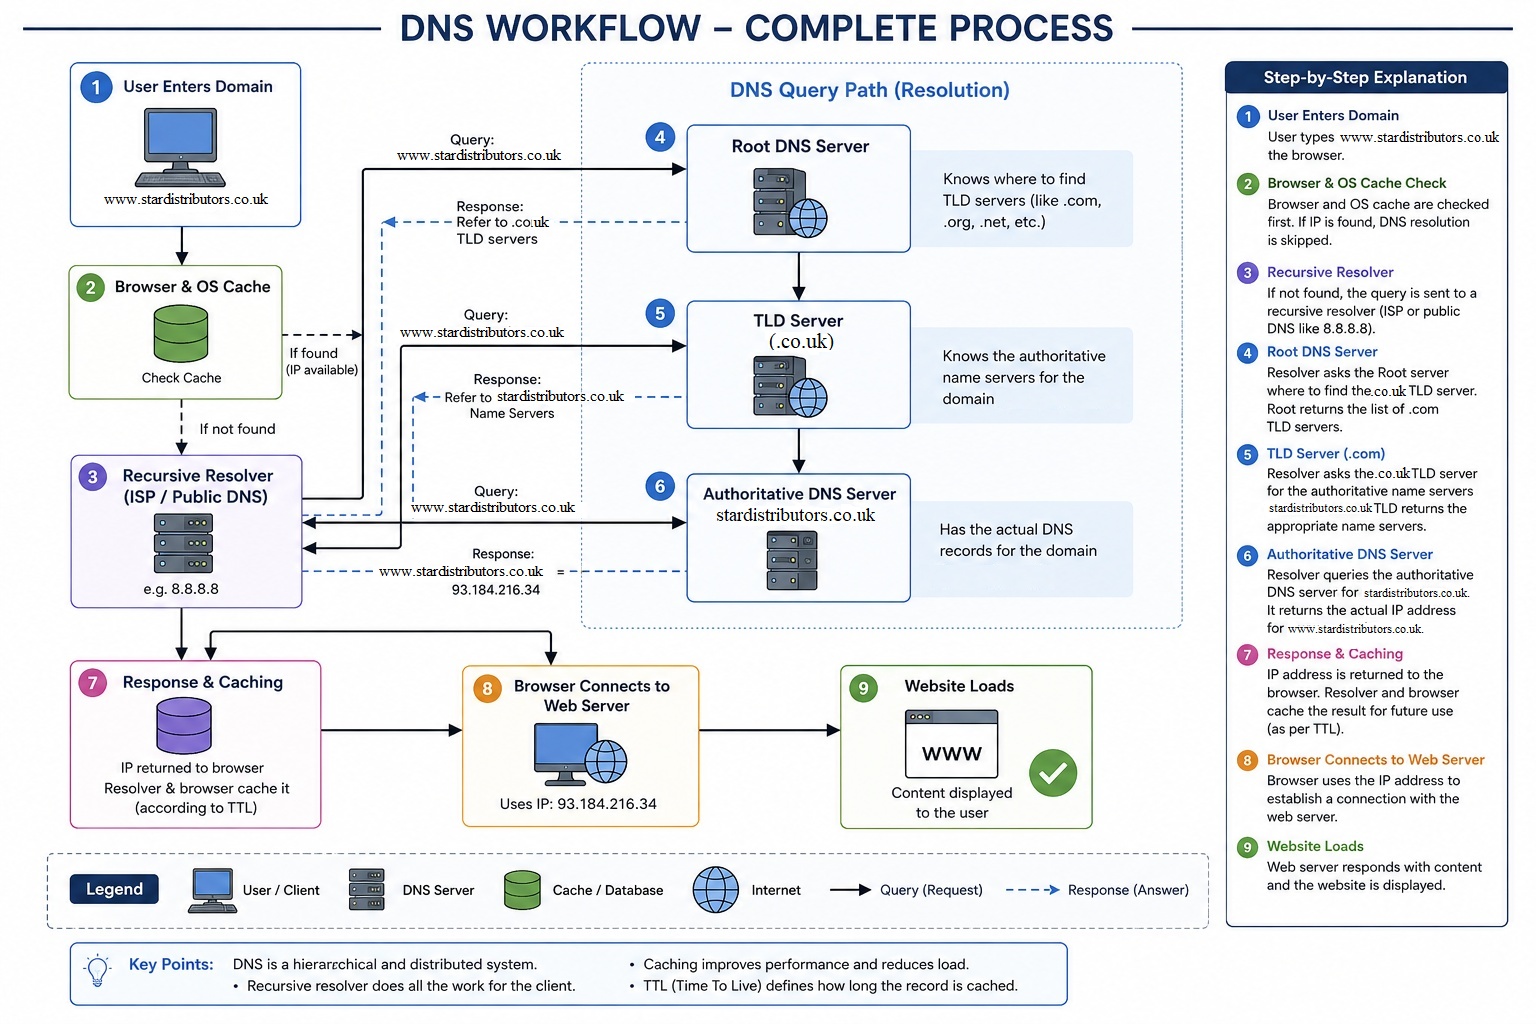
- 1. User access domain:
- 2. Checks local cache (browser + OS): If there is no entry found than it goes to Recursive Resolver.
- 3. Recursive Resolver (ISP or public DNS like Google, Cloudflare etc..): It checks recursive cache, if there is noenty found than query goes to Root hint(.)
- 4. Root Hint DNS Server: It check the records and query for .co.uk and it points to the correct TLD server (.com, or .co.uk or .org etc)
- 5. TLD (Top Level Domain) DNS Server: It has the record of registed domain (registrar made an entry while domain registration) and points to authoritative nameserver.
- 6. Authoritative Nameserver or DNS Server (Registrar or on-prem, Azure DNS Zone): DNS server has DNS records which point to Host name via A Record, it returns IP of host server.
- 7. Browser connects to Host server: Website loads using returned IP of Hosting server.
DNS Zone: Using DNS of Azure (Nameserver + DNS records + Hosting)
- Search DNS Zone and click create.
- select subscription, RG,
- Name= stardistributors.co.uk
- Review and create.
- Once it is created, go to resource/DNS management/recordsets and copy nameservers.
- ns1-06.azure-dns.com.
- ns2-06.azure-dns.net.
- ns3-06.azure-dns.org.
- ns4-06.azure-dns.info.
- Login to authoritative DNS server and go to DNS Nameservers and click change to custom nameservers
- add the above copied nameservers of Azure. (remove . at the end)
- ns1-06.azure-dns.com
- ns2-06.azure-dns.net
- Now click DNS Records and select txt record for verification and ownership confirmation.
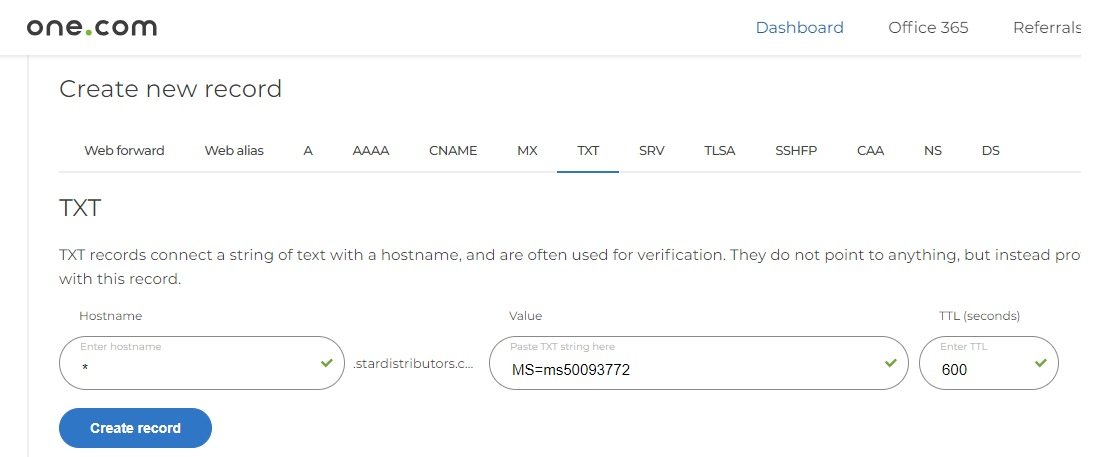 go daddy
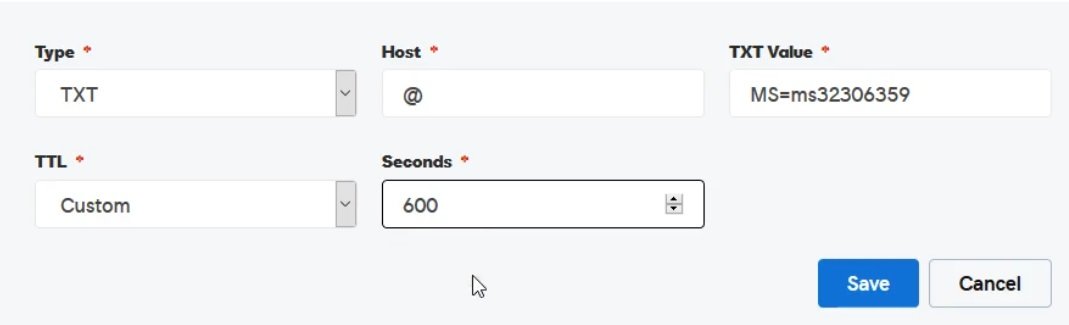
-
After adding txt record go back to azure and click verify and once it is verified custom domain is configured.
-
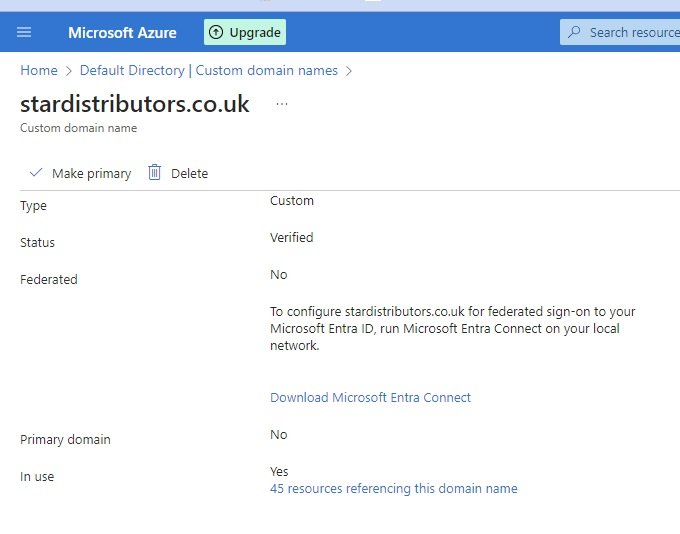
- You can make this custom domain as primary.
- Private DNS Zones: Check Networking\Network Foundation\Private DNS Zones
- Traffic Managers
- DNS Security Policies
- Monitoring and Management
- Go to Network Watchers: Check Networking\Monitor\Network Watchers
- Virtual Network Managers
- Overview
- Hybrid Connectivity
- Communications Gateways
- Connections
- Express Route Circuits
- Express Route Traffic Collectors
- Local Network Gateways
- Mobile Networks
- Peering Services
- Peerings (Peering connection check in vnet)
- Virtual Network Gateways
- Virtual Wans
- Network Security
DDoS
- Azure provide DDoS security protection for Vnet.
- Basic protection can be used free of cost for vnet security.
- You need to define Standard DDoS protection plan and will cost depend on your plan.
- You can not disable this service.
- code
Firewall
- It is use to control incoming and outgoing traffic, which can be implement at vnet level.
- A sepearate subnet for firewall has to be created and it will not allow to create other resources like VM in this subnet.
- A public & Private IP is assigned to Firewall.
- A predefined subnet name AzureFirewallSubnet will assign to this Firewall subnet which cannot be changed.
- You can access the VM with Private IP through Firewall public IP defining NAT rule in Firewall, it will translate private IP to Public IP
- Overview
- Firewall Manager
- Azure Firewalls
- Azure Fiewall Policies
- WAF+DDoS
- Web Application Firewalls
- DDoS Protection
- Secure your resources
- Application Delivery Platforms
- Help
- Support + Troubleshooting
Difference between NSG Vs Azure Firewall:
- They both use to control traffic.
- Azure Firewall is a managed, intelligent network security service (Layers 3-7) providing centralized, deep packet inspection, threat intelligence, and FQDN filtering. Network Security Groups (NSGs) are free, stateful packet filters (Layers 3-4) that control traffic at the subnet or NIC level using basic 5-tuple rules (IP, port, protocol)
Lab: Firewall is configure to control inbound and outbound traffic and Restrict internet access.
- A separate subnet is created for firewall which is used to control traffic and this subnet cannot be use to create VMs.
- Azure Firewall NAT rule configuration:
- User access to VM with private IP assigned via firewall with public IP assigned.
- 1) Create Vnet: Vnet1 (10.0.0.0/16), VMSubnet (10.0.1.0/14), AzureFirewallSubnet(10.0.2.0/24)
- 2) Create VM: VM1, VMSunet, Inbound port rules=none, publicIP=None, NSG=Basic, Review and Create.
- 3) Create Firewall: Go to All Services/Networking/Network Security/firewalls, click add+
- subscription: select subscription, Resource Group: star-RG
- Name: starfirewall
- Region: UK South
- Availability Zone: None, Zone1, Zone2, Zone3
- Firewall SKU: Basic, Standard, Premium (different features on different SKU and pricing)
- Firewall management: Use a Firewall Policy to manage this firewall, Use Firewall rules (classic) to manage this firewall.
- Virtual Network: Create new or select (Vnet1).
- Public IP Address: Add new, Name=starfirewall-IP, SKU=Standard, assignment=static.
- Review & Create.
- 4) NAT Rule Collection:
- Go to firewall/Settings/Rules (classic)/NAT Rule collection
- Add NAT Rule Collection: Name=NAT-collection1, priority=5000 (100 to 65000), lower gets priority. Action=Destination Network Address Translation (DNAT).
- Rules: Name=Rule1, Protocol=TCP, Source type=IP Address, Source=* or Enter IP address/es of client, Destination Address=Firewall-IP, Destination ports=3389 (RDP connection), Translated address=VM1 Private IP 10.0.1.4, Translated Port = 3389
- 5) Test connection:
- Take RDP and enter firewall public IP, it will connect to VM, enter credentials.
- 6) Internet access from VM1:
- Create a Route table and associate with VMSubnet so that VM1 can have internet.
- Search Route tables, create, select subscription, RG, Region and name=starRoute1, propagate gateway routes = yes and create.
- Go to Resource starRoute1/settings/Routes/+Add Name=firewallRoute1, Destination type=IP Addresses, Destination IP Address/cIDR Ranges=0.0.0.0/0, Next Hop Type=Virtual appliance, Next Hop address=10.0.2.4 (firewall private IP), save it.
- Click subnet and + associate , select virtual network = Vnet1 (star-RG), Subnet = VMSubnet and save it.
- Check internet can be accessed from VM1.
- Azure Firewall Block Internet Access:
- Restrict Internet on VM by defining Route Table.
- System defined Route:Microsoft has created, it allows internet access.
- User Defined Route: With user define route we can restrict internet access from VM.
- 1) Create Vnet: Vnet1 (10.0.0.0/16), VMSubnet (10.0.1.0/14), AzureFirewallSubnet(10.0.2.0/24)
- 2) Create VM: VM1, VMSunet, Inbound port rules=none, publicIP=None, NSG=Basic, Review and Create.
- 3) Create Firewall: Go to All Services/Networking/Network Security/firewalls, click add+
- subscription: select subscription, Resource Group: star-RG
- Name: starfirewall
- Region: UK South
- Availability Zone: None, Zone1, Zone2, Zone3
- Firewall SKU: Basic, Standard, Premium (different features on different SKU and pricing)
- Firewall management: Use a Firewall Policy to manage this firewall, Use Firewall rules (classic) to manage this firewall.
- Virtual Network: Create new or select (Vnet1).
- Public IP Address: Add new, Name=starfirewall-IP, SKU=Standard, assignment=static.
- Review & Create.
- 4) NAT Rule Collection:
- Go to firewall/Settings/Rules (classic)/NAT Rule collection
- Add NAT Rule Collection: Name=NAT-collection1, priority=5000 (100 to 65000), lower gets priority. Action=Destination Network Address Translation (DNAT).
- Rules: Name=Rule1, Protocol=TCP, Source type=IP Address, Source=* or Enter IP address/es of client, Destination Address=Firewall-IP, Destination ports=3389 (RDP connection), Translated address=VM1 Private IP 10.0.1.4, Translated Port = 3389
- 5) Test connection:
- Take RDP and enter firewall public IP, it will connect to VM, enter credentials.
- 6) Internet access from VM1:
- Create a Route table and associate with VMSubnet so that VM1 can have internet.
- Search Route tables, create, select subscription, RG, Region and name=starRoute1, propagate gateway routes = yes and create.
- Go to Resource starRoute1/settings/Routes/+Add Name=firewallRoute1, Destination type=IP Addresses, Destination IP Address/cIDR Ranges=0.0.0.0/0, Next Hop Type=Virtual appliance, Next Hop address=10.0.2.4 (firewall private IP), save it.
- Click subnet and + associate , select virtual network = Vnet1 (star-RG), Subnet = VMSubnet and save it.
- Check internet can be accessed from VM1.
- 7) To deny internet access:
- Go to Route Table
- Azure Firewall Website White Listing:
- Only defined websites can be access from VM and all other websites restricted.
- 1) Create Vnet: Vnet1 (10.0.0.0/16), VMSubnet (10.0.1.0/14), AzureFirewallSubnet(10.0.2.0/24)
- 2) Create VM: VM1, VMSunet, Inbound port rules=none, publicIP=None, NSG=Basic, Review and Create.
- 3) Create Firewall: Go to All Services/Networking/Network Security/firewalls, click add+
- subscription: select subscription, Resource Group: star-RG
- Name: starfirewall
- Region: UK South
- Availability Zone: None, Zone1, Zone2, Zone3
- Firewall SKU: Basic, Standard, Premium (different features on different SKU and pricing)
- Firewall management: Use a Firewall Policy to manage this firewall, Use Firewall rules (classic) to manage this firewall.
- Virtual Network: Create new or select (Vnet1).
- Public IP Address: Add new, Name=starfirewall-IP, SKU=Standard, assignment=static.
- Review & Create.
- 4) Application Rule Collection:
- Go to firewall/Settings/Rules (classic)/Appliation Rule collection
- Add NAT Rule Collection: Name=Rule1, Protocol=TCP, Source type=IP Address, Source=* or Enter IP address/es of client, Destination Address=Firewall-IP, Destination ports=3389 (RDP connection), Translated address=VM1 Private IP 10.0.1.4, Translated Port = 3389
- Add Application Rule Collection: Name=apprule-collection1, priority=400(100 to 65000), lower gets priority. Action=Allow (allowing some websites).
- Rules Target FQDNs: Name=Rule2, Source type=IP Address, Source=* ,ProtocolLport= http:80, https:443, Target FQDNs=*.google.com,*.facebook.com
- 5) Internet access from VM1:
- Create a Route table and associate with VMSubnet so that VM1 can have internet.
- Search Route tables, create, select subscription, RG, Region and name=starRoute1, propagate gateway routes = yes and create.
- Go to Resource starRoute1/settings/Routes/+Add Name=firewallRoute1, Destination type=IP Addresses, Destination IP Address/cIDR Ranges=0.0.0.0/0, Next Hop Type=Virtual appliance, Next Hop address=10.0.2.4 (firewall private IP), save it.
- Click subnet and + associate , select virtual network = Vnet1 (star-RG), Subnet = VMSubnet and save it.
- 6) Test website connection /restriction from VM.
- Connect to VM1 and open browser and access google.com, facebook.com (get access) all other websites will not open.
Lab
- Code
Lab
- Code
Hub Spoke firewall architecture with terraform deployment
- Code
Lab: Create firewall and NAT rule so that VM with private IP can be acess from Internet.
- Create Network: RG: star-RG1, CIDR range 10.0.0.0/16, two subnets: star-subnet1 (10.0.1.0/24) & AzureFirewallSubnet (10.0.2.0/26).
- It can also be created in existing virtual network/settings/firewall.
- Reserved IP Addresses:
- Whenever you create a subnet 5 IP addresses are reserved by Azure.
- First Address x.x.x.0 is network address
- Last Address x.x.x255 is Broadcast Address.
- Address x.x.x.1 for Azure Default Gateway.
- Address x.x.x.2 & x.x.x.3 for mapping Azure DNS to Vnet.
- Azure supported smalled subnet will x.x.x.x /29 and that leaves 3 bit for host and the largest is x.x.x.x /8.
- Firewall subnet: choose subnet purpose = Azure Firewall, Name will automatically selected = AzureFirewallSubnet, Enter subnet range 10.0.2.0/26
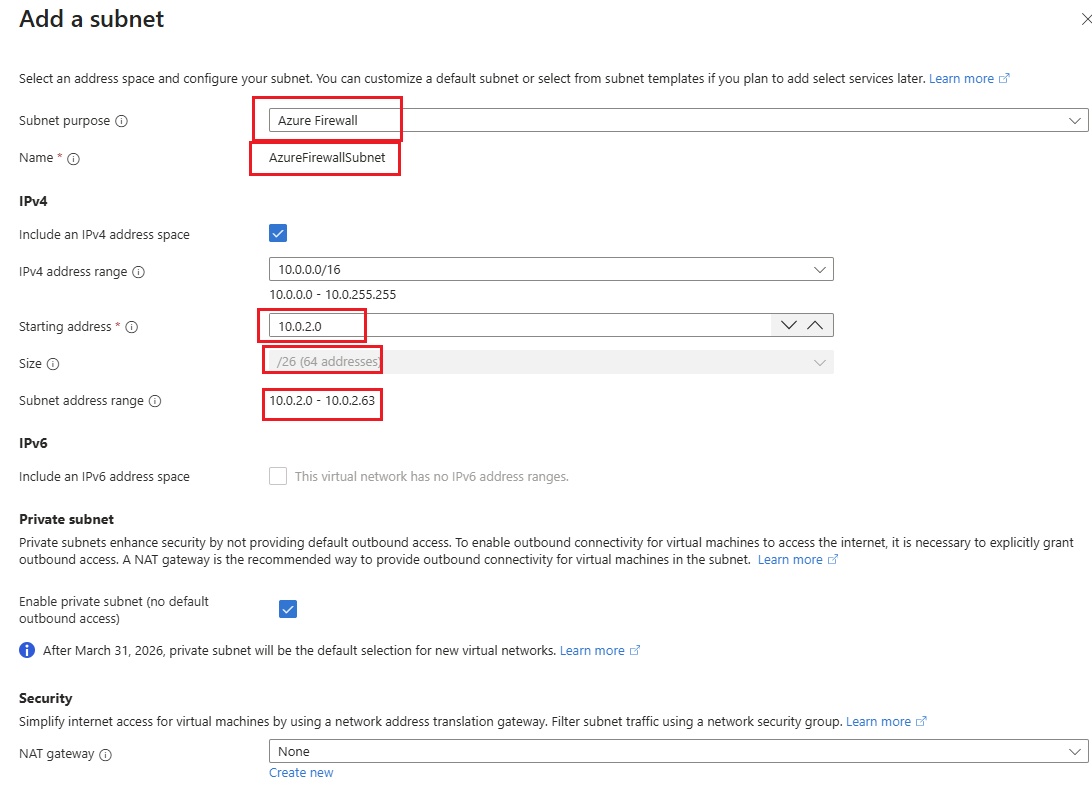
- Create Firewall: Go to All services/Networking/Network Security/Firewalls/Create.Create Azure Firewall.
- Basic
- Subscription: FreeTier
- Resource Group: star-RG1
- Instance details
- Name: star-firewall
- Region: Central India
- Firewall SKU
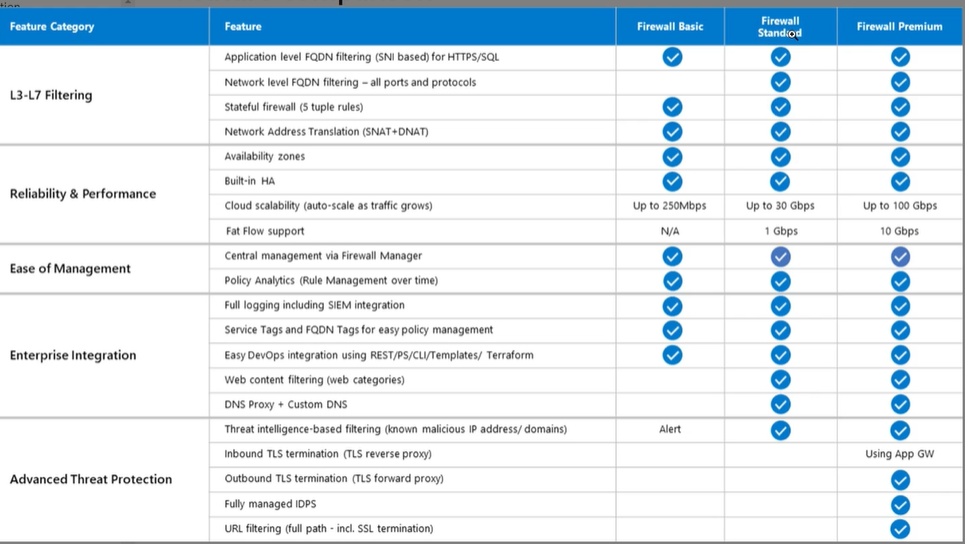
- Basic: There will be no Firewall management option.
- Standard: Firewall Management available: Select
- Use a firewall policy to mnage this firewall
- Use firewall rules (classic) to manage this firewal: select
- Firewall Policy
- Select Standard policies or Basic Policies or create new policy.
- Premium: There will be no Firewall management option.
- Firewall Policy
- Select Premium policies, Standard policies or Basic Policies or create new policy.
- Premium firewalls support additional capabilities, such as SSL termination and IDPS. Additional costs may apply.Learn more
- Choose a virtual network: create new or use existing: select star-vnet1
- Note: Force Tunneling requires this virtual network have a subnet named AzureFirewallManagementSubnet. (unselct Enable Firewall Management NIC in the next section)
- Public IP Address: Add new (star-firewall-pubIP) or select any existing one. SKU=standard and static with zone-redundant by default.
- Review + Create
- Create a VM in star-subnet1 with no public IP, allow RDP 3389,Basic NSG, public inbound ports = None, Review and create.
- firewall_vm.jpg
- This VM cannot be access as there is no public IP assign.
- To access either configure point to site, site to site or express route or configure NAT rule in firewall and access with firewall public IP.
- Create NAT rule in firewall so that VM with private IP can be access with internet.
- Manage Firewall:
- Overview:
- Activity log:
- Tags:
- Diagnose and solve problems:
- Resource Visualizer
- Settings
- DNS:
- Rules (Classic): Create a NAT rule to translate public to private IP
- NAT rule collection:
- +Add NAT rule collection
- Enter name: Firewall-NAT-Rule
- Priority: Enter number
- Rules

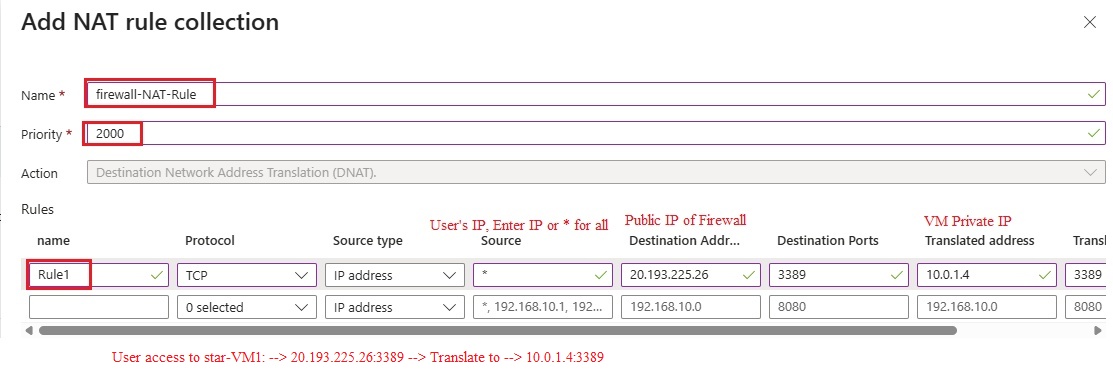
- Network rule collection:
- Applicatin rule collection:
- Public IP configuration:
- Public IP
- Edit public IP: 20.193.225.26
- Add a public IP
- Learned SNAT IP Prefixes:
- Scaling options:
- Threat intelligence:
- Firewall Manager:
- Maintenance:
- Properties:
- Locks:
- Monitoring
- Metrics:
- Diagnostic settings:
- Logs:
- Wrokbooks:
- Automation
- CLI/PS:
- Tasks:
- Export Template
- Help
- Test the connection: Access the star-VM1 through firewall public IP (20.193.225.26), open remote desktop connection and enter 20.193.225.26. check nsg of star-vm1 inbound rule 3389 is allowed configured. During creation of VM we have selected standard nsg but not defined 3389 inbound rule.
Lab: Block Internet Access through Firewall
- Code
Lab: HUB & SPOKE Firewall
- Code
- IP Groups
NSG (Network Security Group)

- Built in distributed layer 4 (Transport layer, ports listening, it means IP, Port and protocol can be used) statefull firewall, it is a network security feature. It is configure to filter inbound / outbound traffic for azure resources.
- Statefull firewall: The rule for inbound / outbound traffic either allowed / deny, the response to that request will be automatic as it maintain the session table. Suppose a user request to access your webserver which you allowed in your rule, the response to that query to access the webpage will be automatic to user which does not need to have outbound entry in the rule. Source port could be between 1025 to 65535 and destination port will be 80 or 443, request generated from 1025 to 65535 port to port 80 to access web page. In response to query from port 80 to 1025 t 65535 port will be automatic.
- Stateless firewall: Inbound and outbound rules need to be define for any request. Suppose a user request to access your webserver which you allowed/deny in your rule, the response to that query to access/deny the webpage will not be automatic to user, an outbound rule is also need to define.
- NSG can apply to subnet and VM NIC as well, same nsg can apply to both or either one.
- NSG is optional service which may or may not be applied.

- NSG applied on subnet level and NIC (VM) level, When NSG applied on both so the rule will be same on both level. If two different NSG applied on subnet level and VM level than rule need to define on both NSG, in that case low priority rule will take precedence.
- In subnet 1, VM1 has both NSG applied on subnet and VM level, VM2 there is no NSG. In subnet2 in VM3 NSG applied on VM level only. In subnet3 there is no NSG on subnet or VM level.
- There is one explicitly deny entry in the NSG rule, which denies all request by default so you create the rule if need to allow any specific traffic.
- Rules created using source port, source IP, destination port and destination IP and protocol.
- Priority rules can be define between 100 to 4096, lower number has more priority. If a rules is define for both deny and allow than low priority number will take precedence. Suppose you define allow traffic rule on subnet, if you want to deny a particular IP than create a rule of deny with lower priority number so that this IP will be denied first than high priority number will take effect.
- NSG is Region specific. Whichever region you created NSG than it can be used with resources of that region only.
- One NSG can be attached with one NIC.
- One subnet can have only one NSG. Same NSG can be attached to multiple vms or subnets.
- Well known ports: 1 to 1024
- Un well known ports: 1025 to 65535
- Create NSG:
- Go to All Services\Networking\Network Security\Network Security Group or All Services\Networking\Network Foundation\Virtual Network\NSG
- Create +
- Basics
- Subscription: Free-Tier
- Resource Group: star-RG1
- Name: star-NSG1
- Region: Central India
- Review + Create. Once created configure rules.
- Manage/Configure NSG Blade:
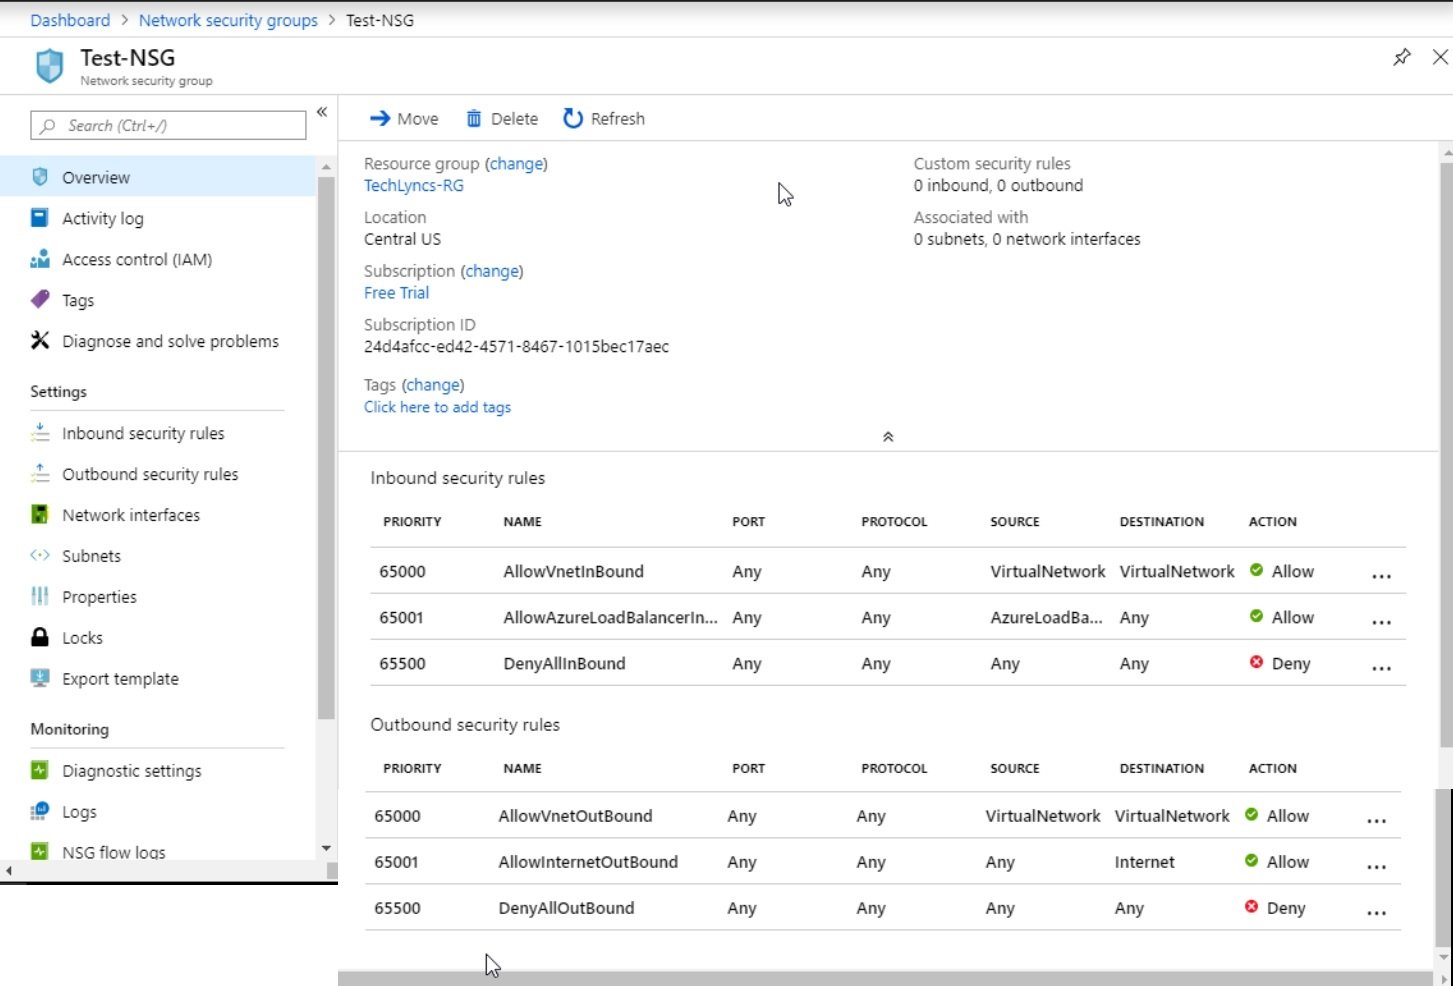
- Overview:
- Move: Move to another RG, Move to another subscription, Move to another Region.
- Resource Group: Change: You can change RG.
- Delete: Delete NSG
- Location: Current location of NSG
- Subscription: Change subscription
- Custom Securiy rules: How many custom rules are created.
- Associated with: NSG associated with subnets and NIC.
- Subscription ID:
- Tags: change tag:
- Inbound security rules: By default 3 rules created.
- Outbound security rules: By default 3 rules created.
- Activity Log:
- Code
- Access Control (IAM):
- Code
- Tags:
- Code
- Diagnose and Solve Problem:
- Code
- Settings:
- Inbound Security Rules:
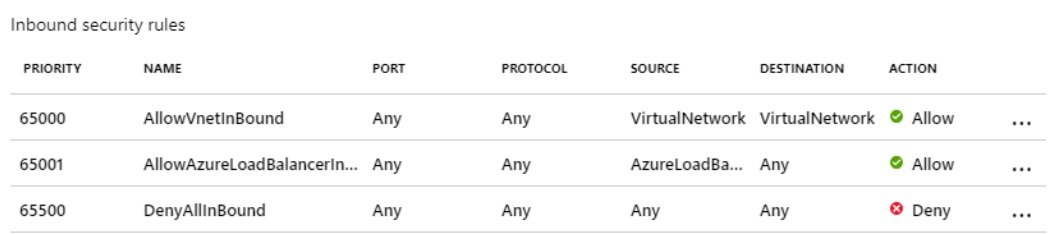
- By default, when a Network Security Group (NSG) is created, three inbound security rules are automatically generated. These rules control incoming network traffic to resources associated with the NSG.
- AllowVnetInbound: This rule allows inbound traffic originating from resources within the same Virtual Network (VNet), all peered virtual networks, virtual network gateway. Due to this rule all vms/resources can communicate with each other within the Vnet.
- AllowAzureLoadBalancerInbound: This rule allows inbound traffic from Azure Load Balancers. Azure Load Balancers distribute incoming network traffic across multiple virtual machines or services, making this rule essential for load-balancing scenarios. It monitors the vm's health check to send traffic, it uses the source IP address 168.63.129.16 to monitor vm's health check. You do not need to define allow rule for incoming traffic from load balancer.
- DenyAllInbound: This rule is a default "deny" rule that blocks all incoming traffic except the above two rules. It acts as a security measure to ensure that, by default, no unauthorized incoming traffic is permitted. Administrators must create additional rules to allow traffic from external sources.
- Administrators can customize these rules by adding or modifying security rules to meet the specific security requirements of their environment.
- Custom rules can be created to allow or deny traffic using source port, source Ip, Destination Port, Destination IP and protocol allowed or denied for incoming traffic.
- Outbound Security Rules:
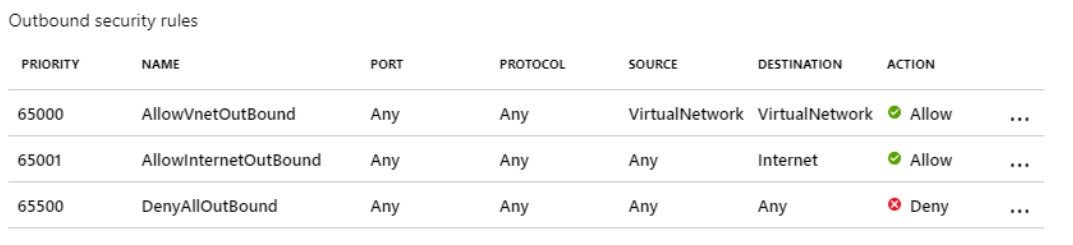
- By default, three outbound security rules are created. These rules help define the communication allowed or denied from resources within the associated virtual network. The three default outbound security rules are:
- AllowVnetOutBound: This rule allows all outbound traffic from resources within the Vnet to the internet and other resources outside the virtual network. It typically has a Priority (e.g., 65000) to ensure it gets evaluated last, allowing other more specific rules to take precedence of lower pririty.
- AllowInternetOutBound: It allows internet access in all resources of associated Vnet. If you have not assigned public IP to resources but still they can get internet with this rule, to overcome this create another rule with lower priority number. Ibound internet traffic is denied.
- DenyAllOutBound: It deny all outbound traffic except the above two rules. its priority number is 65500 while the above two rules has lower number which takes precedence.
- Service tags: It represents a group of IP addresses. you cannot create your own service tags. In source and destination either you can define * = all or specific IP address or Service tag which contain group of IPs.
- Example, virtualnetwork Tag: whatever CIDR ranges define in Vnet including all subnets, the rule will apply to all Vnet.
- Network Interfaces:
- Associate: You can associate/Disassociate Network Interfaces to NSG.
- Subnets:
- Associate: You can associate/Disassociate subnet to NSG.
- Inbound Security Rules:
- Properties:
- It displays RG, Subscription Name, Subscription ID, Location and NSG (Resource) ID.
- Locks:
- It shows locks applied to NSG
- Monitoring:
- Alerts:
- Diagnostics Settings:
- Logs:
- NSG Flow Logs
- Automation:
- CLI / PS
- Tasks (Overview):
- Export Template:
- Help:
- Lab: Create a VM without defining Network Security Group:
- create a VM and do not define NSG.
- Download RDP and try to access and it failes as there is no RDP 3389 port configured.
- Lab: NSG with allow inbound rule 3389 and applied at subnet level:
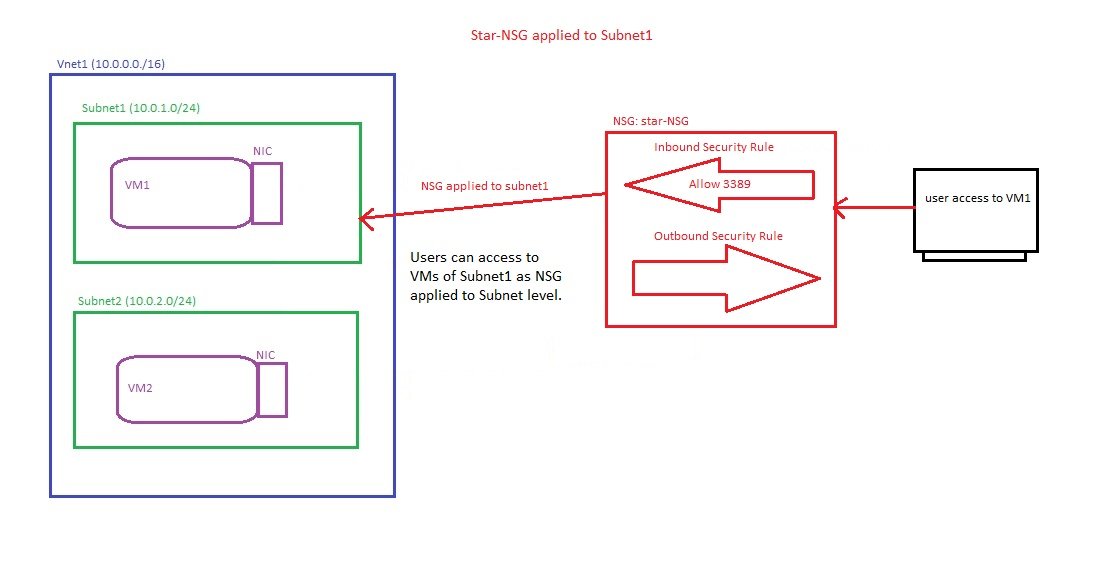
- Search for network security group or go to All services/Networking/Network Security/Network Security Group and click create.
- Subscription: select subscription
- Resource Group: select /create RG
- Name: star-NSG
- Region: UK South
- Review and create.
- Go to resource and define inbound rules to allow RDP (3389 port).
- Assign NSG to subnet1, VM created in subnet 1 can be accessed.
- Lab: Two NSG with one allowed 3389 at subnet level and another denied at NIC level.
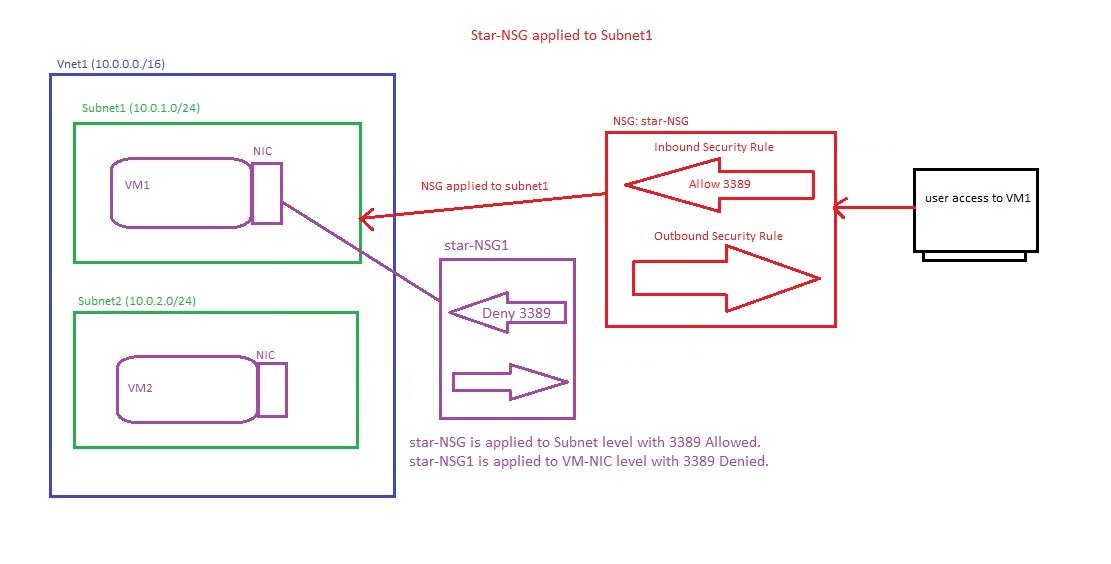
- Deny will take precedence when both NSG applied.
- When a user try to access VM1 then star-NSG will communicate with star-NSG1 and access will be denied.
- user can access to VM2 as 3389 is allowed at subnet level.
- Lower priority number will take effect.
- Go to resource and define inbound and outbound rules to allow RDP (3389 port).
- Assing the star-NSG to VM and try to access with RDP: There are two ways:
- Go to VM/Network settings/select NIC (VM1592)/Network Security Group and select the NSG from list and save it. or
- Go to Networking/Network security/Network Security Group/click star-NSG / Network Interface /Associate/select NIC (VM1592) save it.
- Lab: NSG with outbound rule denied Internet Access:
- In the above cases, internet can be accessed.
- Create outbound rule to restrict internet access.
- go to star-NSG (associated with subnet), select outbound security rules and create new rule and deny internet with low priority number.
- Lab: NIC NSG Options- None, Basic & Advanced:
- When you select ports to access VM through internet then in networking tab define NSG.
- Create a VM by selecting Inbound port rules (RDP, HTTP)
- Go to networking tab and here you can select NIC network security group with three options:
- None: If you select none than virtual machine is exposed to the public and there is no security. (All ports on this virtual machine may be exposed to the public internet. This is a security risk. Use a network security group to limit public access to specific ports. You can also select a subnet that already has network security groups defined or remove the public IP address.)
- Basic: If you select basic then you have two options: None or Allow selected ports. (This will allow all IP addresses to access your virtual machine. This is only recommended for testing. Use the Advanced controls in the Networking tab to create rules to limit inbound traffic to known IP addresses. )
- Advanced: If you select this option then you can create new NSG or associate an existing NSG.
- Code
ASG (Application Security Group)

- It is a logical container in which multiple VMs/ NIC grouped, this group will be used as source or destination in NSG.
- It is a part of security resource. ASG handles the complexity of explicit of IP addresses and multiple rule sets.
- ASG will be used along with NSG, it cannot be use separately.
- The reason to make ASG is that IP addresses of VM/NIC get changed and rule applies on the basis of source IP /destination IP will get affected.
- All NIC used in an ASG must be within the same VNet.
- If ASG are used in source and destination, they must be within the same VNet.
- You can assign multiple ASG to a VM.
- Lab: as per above diagram
- Create a Vnet (Vnet1), subnet (Subnet1) , NSG (master-NSG) allow 3389 and associate with subnet1.
- Create a vm (webserver) with public IP and associate with NSG.
- Create a VM (dbserver) with no public IP and associate with NSG.
- Create 2 ASG: search application security groups and click create. select RG, name (ASG-webserver), Region (uk south). Review + create, create (ASG-dbserver).
- Attach webserver to ASG-webserver and dbserver to ASG-dbserver (go to VM / Setting /Networking / Application Security Group/ Configure the application security group/select from the list and save. Perform for dbserver as well.
- Restrict ASG-dbserver to access internet: Go to master-NSG/settings/Outbound security rules/+add (source =application security group, select ASG-dbserver, Source port ranges (*), Destination=select service tag( select Internet), service=custom, Destination port ranges=80, 443 protocol=any, Action = Deny, Pririty=510, Name=denyinternetfromdbserver and create.
- check dbserver1/settings/networking/outbound port rules and it reflect here.
- check webserver1/settings/networking/outbound port rules and it reflect here as well it will not deny internet access as source =ASG-dbserver. webserver1 is not a member of ASG-dbserver on which internet deny rule applied.
- Testing: connect to webserver1 with public IP and check internet access. and to check interent on dbserver, connect from webserver1 to dbserver1 with private IP using rdp. no internet.
- Create a security rule so that rdp cannot be taken from webserver to dbserver:
- Go to master-NSG/settings/networking/inbound security rule/+add (source=application security group (ASG-webserver), Destination = Application security group, services=RDP protocl tcp, Actoin=deny, priority=400, name = denyRDP)
- Testing: Connect to webserver and rdp with dbserver private IP and connection will not established.
- code
- Web Application Firewall Policies (WAF)
- Load Balancing
Application Gateways (LB on layer 7)
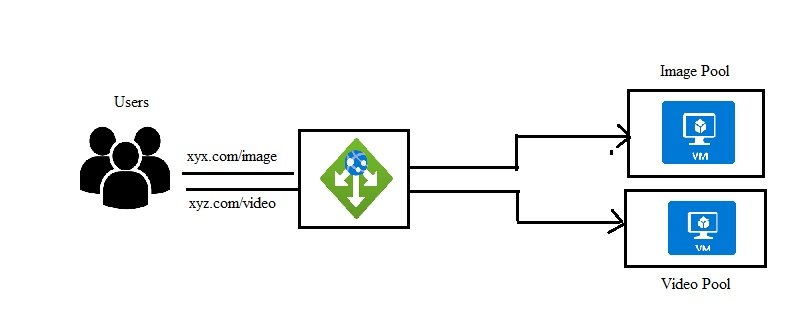
- Azure Application Gateway documentation
- Azure Application Gateway is a web traffic load balancer that enables you to manage traffic to your web applications.
- It works as Load Balancer, Application Gateway distributes traffic on content based/path based like in URL www.abc.com/videos and www.abc.com/Audios, it distributes the traffic accordingly.
- It works on layer 7 where as Load Balancer works on layer 3-4, traffic will be distributed on th e basis of IP address and port number.
- Azure application gateway has autoscaling features and based on web traffic, it can scle up or down VMs based on traffic load. Autoscaling helps in removing the dependency on the deployment size during provisioning.
- Fault resiliency: It has zone redundancy as multiple availability zones offers fault resiliency.
- URL path based routing, based on the URL path of request routed to the different servers or backed pools.
- It has static IP associated with a gateway.
- Application gateway has support for web application firewall(WAF), which provides centralized protection to blok the security thread.
- LB + WAF. It provides load balancing & Web Application Firewall : It has 3 tier: Basic, Standard v2, WAF v2.
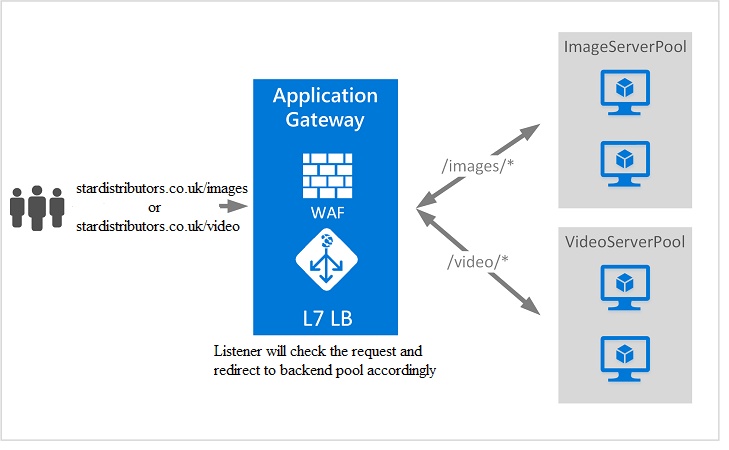
- It provides the following features:
- Content based routing: It distribute the traffic to endpoint based on URL path and send traffic according to path: www.abc.com/videos : here it will send traffic to videos section and www.abc.com/Audios it will send to audios seciton.
- SSL off loading /SSL Termination: It encrypt and decrypt the data
- End to End SSL Termination:
- HTTP to HTTPS: It uses these two protocols.
- Multisite hosting: it supports multisite hosting.
- Cookies bases session affinity:
- Connection Draining:
- Azure Application Gateway works with Microsoft Web Apps:
- Host-based routing: Route traffic based on hostname/domain name,
- Path-based routing: Route traffic based on path www.abc.com/videos : here it will send traffic to videos section and www.abc.com/Audios it will send to audios seciton.
- Multi-site hosting: Route traffic based on different site: way2cloud.co.uk & stardistributors.co.uk, Rotue the traffic according to request.
- Work flow & Components of Application Gateway.
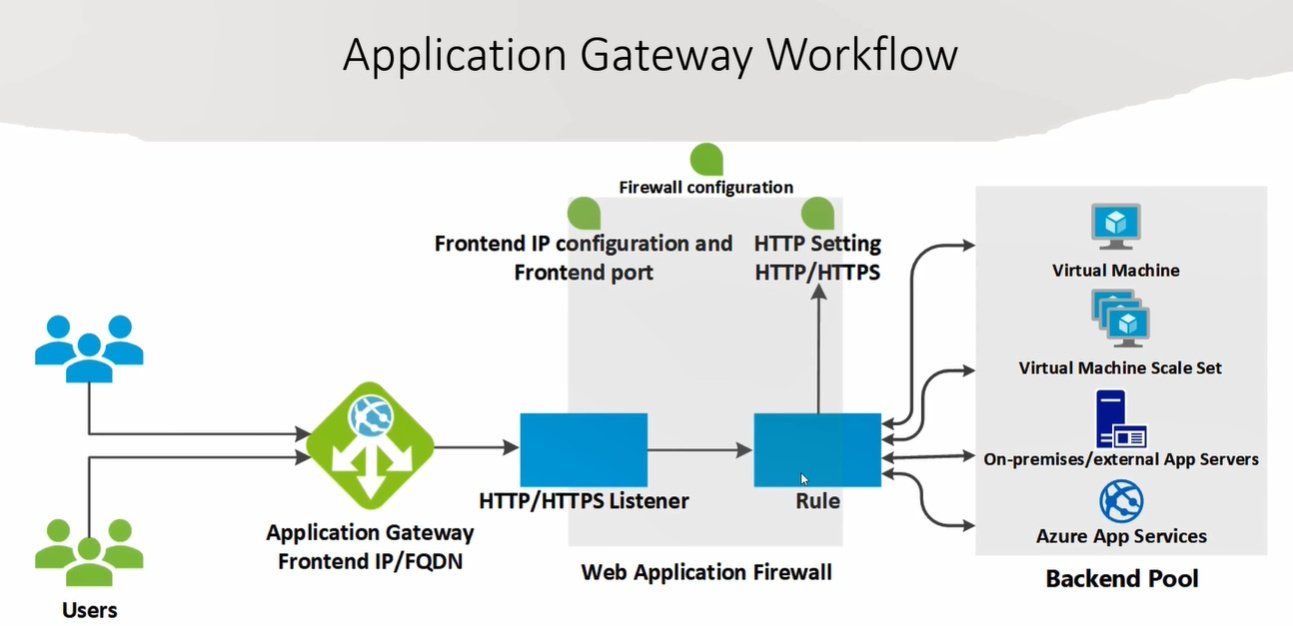
- Frontend IP:
- Application gateway can be use for internal/external load balancer, public IP is used to external load balancing
- Backend pool:
- Web server VMs/web app is added to backend pool. There are various target types: IP address or FQDN/VM/VMSS/App Services.
- Backend settings:
- you defie protoco http or https (need TLS authentication) along with cookie-based affinity or session affinity, connection draining, request time-out and host name override and custom probe.
- Listeners:
- It is created for frontend IP address with port and routing rule is associated with it. You can use Basic or muti site.
- Routing Rules:
- Listener and backpool are defined.
- HTTP/HTTPS settings:
- Health Probes:
- On which port application gateway should monitor the health of backend target.
- Lab: Create Application Gateway with Host/domain Based Routing:
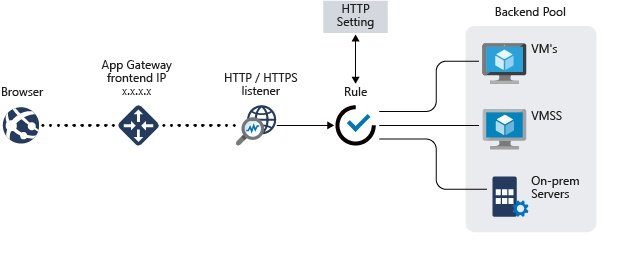
- Before a client send a request to an appliction gateway (https://www.stardistributors.co.uk), it resolves the domain name of the application gateway by using a Doman Name System (DNS) server.
- The Azure DNs returns the IP address to the client, which is the frontend IP addrss of the appication gateway.
- The appliction gateway accepts incoming traffic on one or more listeners. A listener is a logical entity that checks for connection requests. It's configured with a frontend IP address, protocol and port number for connections from client to the application gateway.
- If a web applicaiton firewll (WAF) is in use, the application gateway checks the request headers and the body, if present, against WAF rules. This action determines if the request is valid request or a security threat. If the request i svalid, it's routed to the backend. If the request is not valid and WAF is in prevention mode, it's blocked as a security threat. If it's in Detection mode, the request is evaluated and logged, but still forwarded to the backend server.
- Create Vnet and VMs:
- Resource Group: star-RG1
- Virtual Network: Vnet1 (10.0.0.0/16), subnet-VM (10.0.1.0/24), subnet-AG (10.0.10.0/24),
- Security Group: star-NSG, allow inbound rules for 3389,80,443 ports.
- Two Virtual Machines in subnet-VM namely VM-image & VM-video, install IIS (login to servers and go to C:\inetpub\wwwroot and change iisstart to index.html) or create a web app
- Create Application Gateway:
- Go to All services/Networking/Load Balancer / Application Gateway/ Create
- Basics:
- Subscription & Resource Group : star-RG
- Name: star-AG
- Region: UK South
- Tier: Basic, Standard V2, WAF2:
- Enable Autoscaling: yes/No
- Instance count: 1, Enter based on requirement
- Availability Zone: 1,2,3 (select check boxes), AG will be deployed on selected zones.
- IP Address type: IPv4 or both IPv4 & IPv6
- HTTP2: HTTP/2 protocol support is available to clients that connect to application gateway listeners only. The communication to backend server pools is over HTTP/1.1. Disabled
- WAF Policy: Choose a WAF Policy from the selected subscription and location.You can also create a new WAF policy. (wafpolicy1)
- Frontend:
- Public (Add new: AGPublicIP), SKU=Standard, Assignent = Static
- Private
- Both
- Backends:
- Add a backendpool:
- name:ImageServerPool
- Targets: you will have 4 options [IP addres or FQDN, virtual machine, VMSS, App Services] Virtual Machine, image2 (In LB there is only two options, VM & VMSS)
- Add a backendpool
- name:VideoServerPool
- Targets:you will have 4 options [IP addres or FQDN, virtual machine, VMSS, App Services] Virtual Machine, video2 (In LB there is only two options, VM & VMSS)
- Configuration:
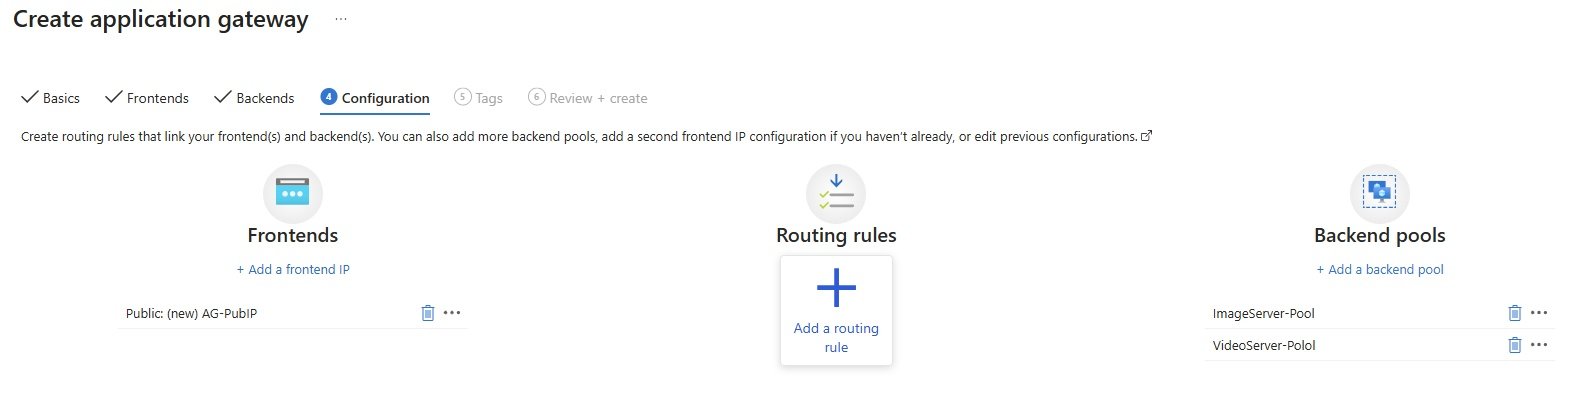
- Routing Rules:
- Add a Routing Rule:
- Rule Name = AGRule1
- Priority = 1, Rule priority defines the order in which the rules are processed.
- Listener:
- A listener “listens” on a specified port and IP address for traffic that uses a specified protocol. If the listener criteria are met, the application gateway will apply this routing rule. We are instructing listener if public ip with http protocol on port 80 then send traffic to backend target.
- Listener Name: AGListener1
- Frontend IP: Public IPv4,
- Protocol: HTTP, HTTPS
- Port: 80, 443
- Listener Type: Basic, Multi site
- Custom Error Pages: Bad Gateway - 502 Enter HTML file URL, Forbidden - 403, Enter HTML file URL, click for more status codes.
- Backend targets:
- Add backend pool:
- Name: AGbackednpool
- Target type: virtual machine:
- Add both vms
- Rule:
- Rule name: AGRule1
- Priority: 1
- Listener: AGListener1
- Backend Targets:
- AGbackendpool, HTTP1
- Tags: Enter tag details.
- Review+Create (takes 15 to 20 Minutes)
- Testing:
- Go to application gateway, copy public ip, paste it in browser, traffic will be send to both vms one by one using round robin method.
- Lab: Path based Routing with Application Gateway & VMs running webserver:
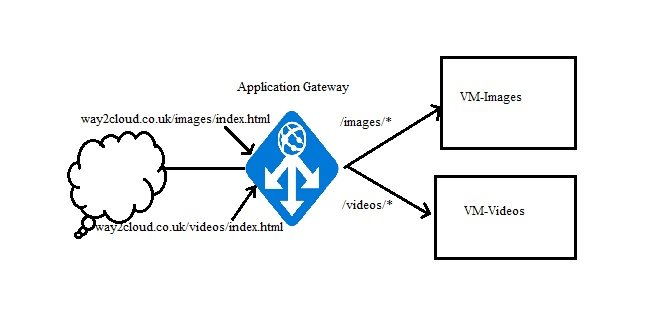
- Create Vnet and VMs:
- Resource Group: star-RG1
- Virtual Network: Vnet1 (10.0.0.0/16), subnet-VM (10.0.1.0/24), subnet-AG (10.0.10.0/24),
- Security Group: star-SG, allow 3389,80,443 ports.
- Two Virtual Machines in subnet-VM namely image1 & video1, install IIS and make two html pages (login to servers and go to C:\inetpub\wwwroot and change iisstart)
- Create application gateway: Go to All services/Networking/Load Balancer / Application Gateway/ Create
- Basics:
- Subscription & Resource Group : star-RG
- Name: star-AG
- Region: UK South
- Tier: Basic, Standard V2, WAF2
- Enable Autoscaling: yes/No
- Instance count: 1, Enter based on requirement
- Availability Zone: 1,2,3 (select check boxes), AG will be deployed on selected zones.
- IP Address type: IPv4 or both IPv4 & IPv6
- HTTP2: HTTP/2 protocol support is available to clients that connect to application gateway listeners only. The communication to backend server pools is over HTTP/1.1. Disabled
- WAF Policy: Choose a WAF Policy from the selected subscription and location.You can also create a new WAF policy. (wafpolicy1)
- Configure Virtual Network: Vnet1, subnet-AG
- Frontend:
- Public (Add new: AGPublicIP), SKU=Standard, Assignent = Static
- Private
- Both
- Backends:
- Add a backendpool:
- name:ImageServerPool
- Targets: you will have 4 options [IP addres or FQDN, virtual machine, VMSS, App Services] Virtual Machine, image2 (In LB there is only two options, VM & VMSS)
- Add a backendpool
- name:VideoServerPool
- Targets:you will have 4 options [IP addres or FQDN, virtual machine, VMSS, App Services] Virtual Machine, video2 (In LB there is only two options, VM & VMSS)
- Configuration:
- Routing Rules:
- Add a Routing Rule:
- Rule Name = AGRule1
- Priority = 1, Rule priority defines the order in which the rules are processed.
- Listener:
- A listener “listens” on a specified port and IP address for traffic that uses a specified protocol. If the listener criteria are met, the application gateway will apply this routing rule. We are instructing listener if public ip with http protocol on port 80 then send traffic to backend target.
- Listener Name: AGListener1
- Frontend IP: Public IPv4,
- Protocol: HTTP, HTTPS
- Port: 80, 443
- Listener Type: Basic, Multi site
- Custom Error Pages: Bad Gateway - 502 Enter HTML file URL, Forbidden - 403, Enter HTML file URL, click for more status codes.
- Backend targets:
- Add backend pool:
- Name: AGbackednpool
- Target type: virtual machine:
- Add both vms
- Rule:
- Rule name: AGRule1
- Priority: 1
- Listener: AGListener1
- Backend Targets:
- AGbackendpool, HTTP1
- Tags:
- Review+Create (takes 15 to 20 Minutes)
- Testing: Go to application gateway, copy public ip, paste it in browser, traffic will be send to both vms one by one.
- Lab: Path based routing with Application Gateway using Web Apps and private endpoints:
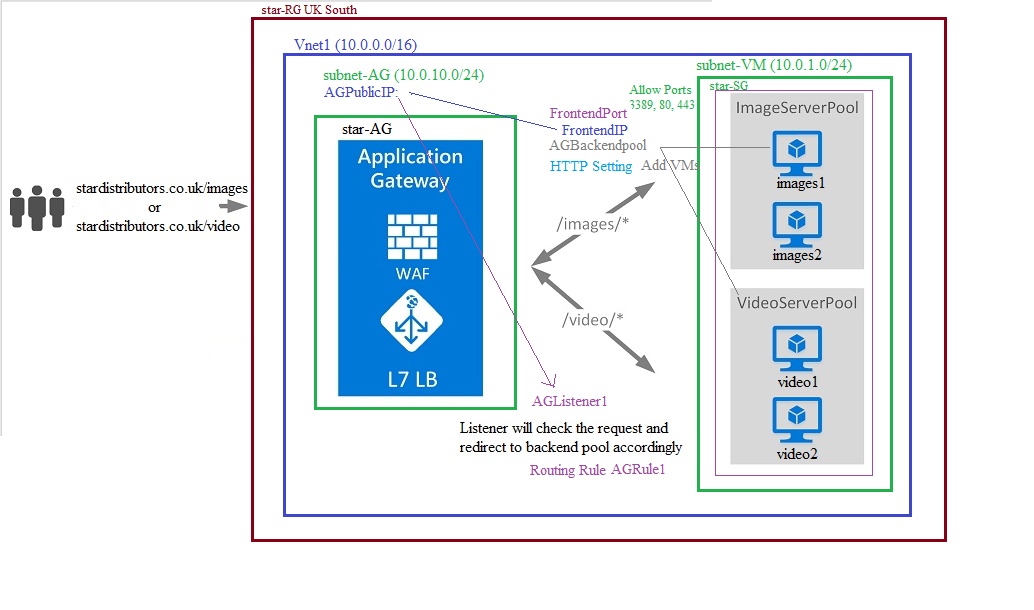
- Create Vnet, 2 App-Plan, 2 Webapps, Application Gateway, Service Endpoints :
- Resource Group: star-RG1 in Central India
- Virtual Network: star-Vnet1 (10.0.0.0/16), VM-Subnet (10.0.1.0/24), AG-Subnet (10.0.2.0/24), Pvtendpnt(10.0.3.0/24)
- Security Group: star-SG, allow 3389,80,443 ports.
- App Service Plan: Premium V3
- Two Web Apps: images & videos, Make changes to distinguish in html pages. Click Development tools\App Service Editor\edit and change\right click and create folder images and change hostingstart.html to index.html and move file in the folder. <h2>Welcome to Way2Cloud Images</h2>, do same for Videos. When you access you will get: Yoou do not have permission to view this directory or page. because we have creaed folder and moved file inside. now you access with images.azurewebsies.net\images\index.htm & video1.azurewebsies.net\video1\index.htm
- Create application gateway: Go to All services/Networking/Load Balancer / Application Gateway/ Create
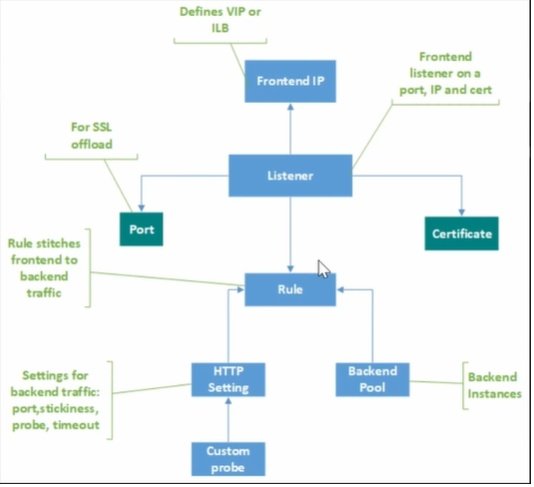
- Basics:
- Subscription & Resource Group : star-RG
- Name: star-AG
- Region: UK South
- Tier: Basic, Standard V2, WAF2:
- Enable Autoscaling: yes/No
- Instance count: 1, Enter based on requirement
- Availability Zone: 1,2,3 (select check boxes), AG will be deployed on selected zones.
- IP Address type: IPv4 or both IPv4 & IPv6
- HTTP2: HTTP/2 protocol support is available to clients that connect to application gateway listeners only. The communication to backend server pools is over HTTP/1.1. Disabled
- WAF Policy: Choose a WAF Policy from the selected subscription and location.You can also create a new WAF policy. (wafpolicy1)
- Configure Virtual Network: Vnet1, subnet-AG
- Frontend:
- Public (Add new: AGPublicIP), SKU=Standard, Assignent = Static
- Private
- Both
- Backends:
- Add a backendpool:
- name:star-backendpool-images
- Targets: you will have 4 options [IP addres or FQDN, virtual machine, VMSS (virtual machine scale set), select App Services = images
- Add a backendpool
- name:star-backendpool-video1
- Targets:you will have 4 options [IP addres or FQDN, virtual machine, VMSS, App Services], select App Services = video1
- Configuration:
- Routing Rules:
- Add a Routing Rule:
- Rule Name = star-AGRule1
- Priority = 1, Rule priority defines the order in which the rules are processed.
- Listener:
- A listener “listens” on a specified port and IP address for traffic that uses a specified protocol. If the listener criteria are met, the application gateway will apply this routing rule. We are instructing listener if public ip with http protocol on port 80 then send traffic to backend target.
- Listener Name: star-AGListener1
- Frontend IP: Public IPv4
- Protocol: HTTP, HTTPS, TCP, TLS
- Port: 80, 443
- Listener Type: Basic, Multi site
- Custom Error Pages: Bad Gateway - 502 Enter HTML file URL, Forbidden - 403, Enter HTML file URL, click for more status codes.
- Click Backend targets: Choose a backend pool to which this routing rule will send traffic. You will also need to specify a set of Backend settings that define the behavior of the routing rule.
- Target type: Backendpool or Redirection.
- Add backend pool: choose from drop down star-backendpool-images
- Backend settings: Add new
- application_gateway_backendsetting1.jpg
- Backend settings name = star-backend-settingsimages
- Backend protocol: Http or Https
- Backend port: 80 or 443
- Additional backend settings
- Cooki-based affinity: Enable or Disable
- Connection draining: Enable or Disable
- Dedicated backend connection: Enable or Disable
- Request time-out (seconds) = 20
- Override backend path:
- Override hostname
- By default, the Application Gateway sends the same HTTP host header to the backend as it receives from the client. If your backend application/service requires a specific host value, you can override it using this setting.
- Override with new host name: yes / no
- If select yes
- Code
- Create custom probes: yes or No
- If selected yes
- Code
- Add
- Path-based routing: You can route traffic from this rule's listener to different backend targets based on the URL path of the request. You can also apply a different set of Backend settings based on the URL path.
- Add multiple targets to create a path-based rule: As we have two web apps (images & video1), need to configure both so Application Gateway can send traffic to related endpoint target based on URL.
- Target type: Backend pool or Redirection
- Path = /images/*
- Target name = images and choose star-backend-settingsimages
- Backend target = choose star-backendpool-images
- Add
- Target type: Backend pool or Redirection
- Path = /images/*
- Target name = images and choose star-backend-settingsvideo1
- Backend target = choose star-backendpool-images
- Add
- Tags:
- Review+Create (takes 15 to 20 Minutes)
- Testing: Go to application gateway.

- copy public ip, paste it in browser:
- Error: 502 Bad Gateway
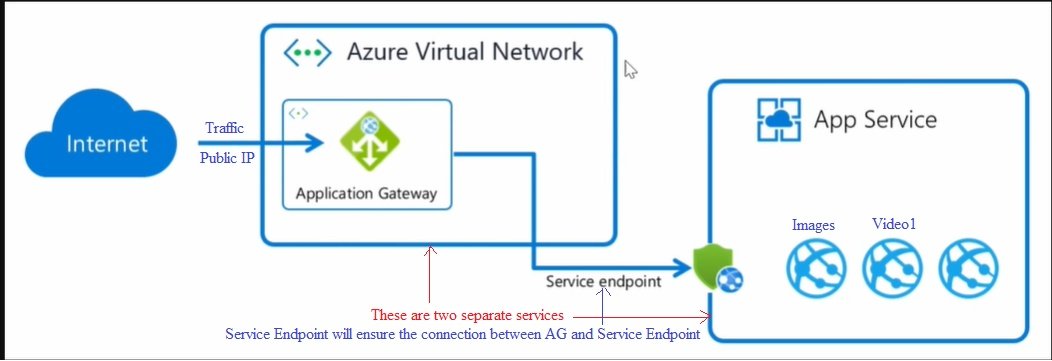
- Check backend health: Unhealthy (Received invalid status code: 404 in the backend server’s HTTP response. As per the health probe configuration, 200-399 is the acceptable status code. Either modify probe configuration or resolve backend issues. To learn more visit - https://aka.ms/StatusCodeMismatch.)
- Go to viertual network (sar-Vnet1)\Service Endpoints:
- +Add, service=Microsoft.web, Subnets=Subnet-AG
- Add: This will Route the traffic from Star-Vnet1 to Web app service through Microsoft Backbone network.
- Make sure status = Succeeded.
- Go to App Services\images\copy default domain, images.azurewebsites.net and paste it in browser
- Error: You do not have permission to view this directory or page.
- If we enter url images.azurewebsites.net\images\index.html then it will reach the destination. here we got two destination and required an intelligent load balancer to redirect the request.
- video1.azurewebsites.net\video1\index.html
- There is no point to expose these web apps to public, we are configuring Application gateway.
- Go to App Services\images\settings\networking: Inbound traffic configuration/Outbound traffic Configuration.
- Inbound traffic configuration:
- Public network access: Enabled with no access restrictions
- Click enabled with no access restrictions (It means the web app is enabled to access with public network), click

- Choose Enabled from select virtual networks and IP addresses. (Here we are defining to access the web apps with virtual networks.
- Site acess rules:
- Main site: You can define lists of allow/deny rules to control traffic to your site. Rules are evaluated in priority order. If no created rule is matched to the traffic, the "Unmatched rule action" will control how the traffic is handled.Learn more
- Unmatched rule action: Allow/Deny
- +Add: To add Vnet through which traffic will reach to web app through microsoft backbone network. It will allow traffic from vnet to app service using service endpoint.
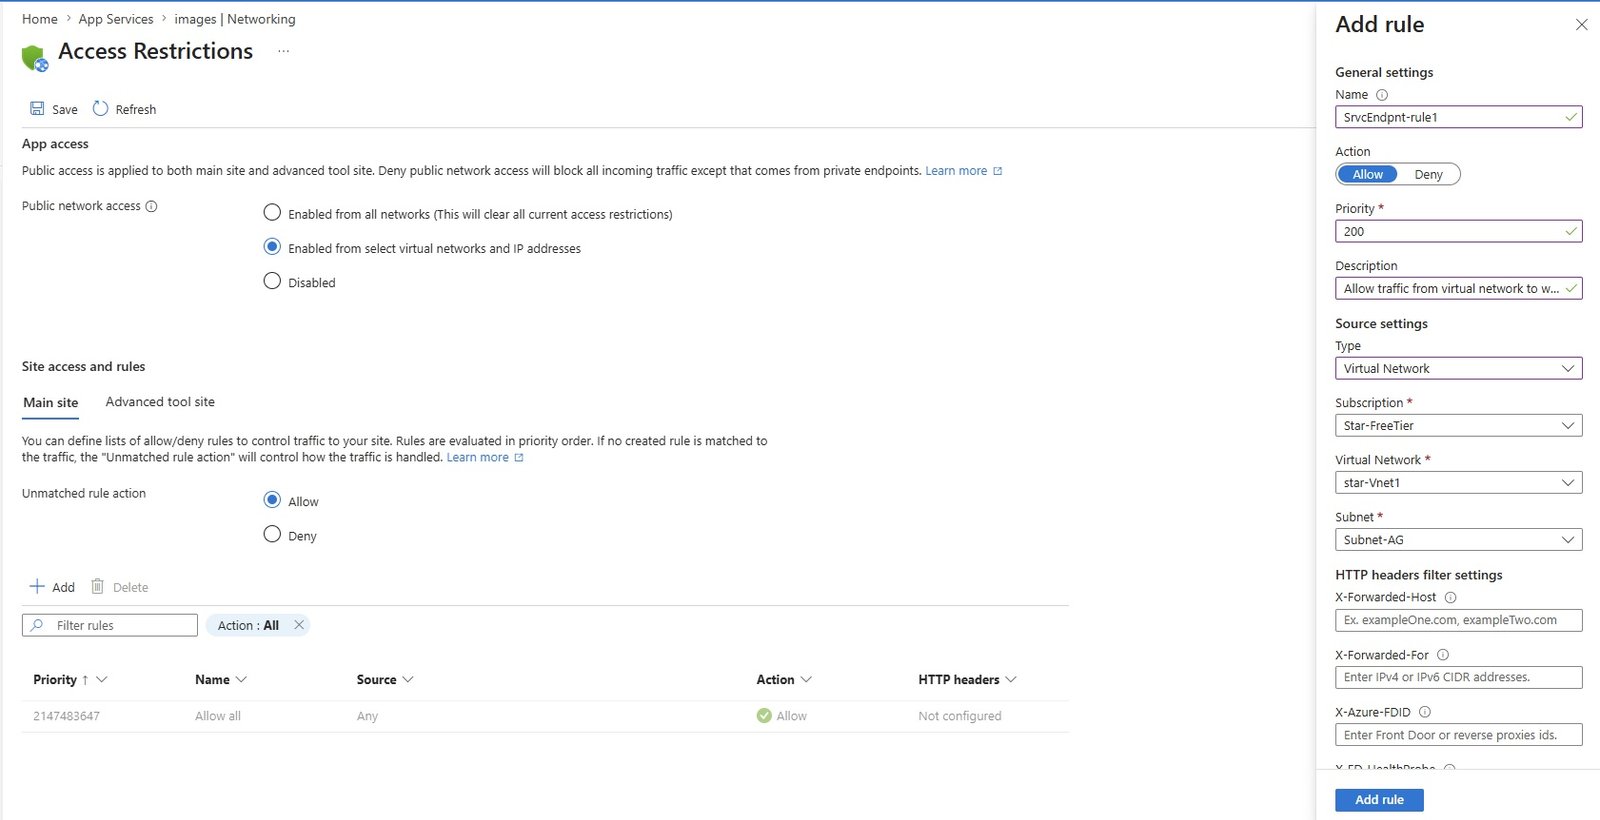
- Traffic will allow from vnet to servie endpoint and all other traffic will be denied.
- save
- Perform the above for service endpoint for video1.
- Click enabled with no access restrictions (It means the web app is enabled to access with public network), click
- Choose Enabled from select virtual networks and IP addresses. (Here we are defining to access the web apps with virtual networks.
- Site acess rules:
- Main site: You can define lists of allow/deny rules to control traffic to your site. Rules are evaluated in priority order. If no created rule is matched to the traffic, the "Unmatched rule action" will control how the traffic is handled.Learn more
- Unmatched rule action: Allow/Deny
- +Add: To add Vnet through which traffic will reach to web app through microsoft backbone network. It will allow traffic from vnet to app service using service endpoint.
- Traffic will allow from vnet to servie endpoint and all other traffic will be denied.
- save
- App Assigned address: Not configured
- Private endpoints: 0 private endpoints
- Inbound addresses: 5.172.219.121
- Public network access: Enabled with no access restrictions
- Outbound traffic configuration:
- Virtual network integration: Not configured
- Hybrid connections: Not configured
- Outbound DNs: Default (Azure-Provided)
- Outbound addresses: List of IPs
- copy and paste images.azurewebsites.net in browser.
- Error: 403 -Forbidden: The web app you have attempted to reach has blocked your access.
- Go to Application gateway and check backend health, still unhealthy
- Click health probe: Click + Add (It will continuously monitor the health status of backend targets, it will update to application gateway and AG will only send the traffic when target is healthy)selet both
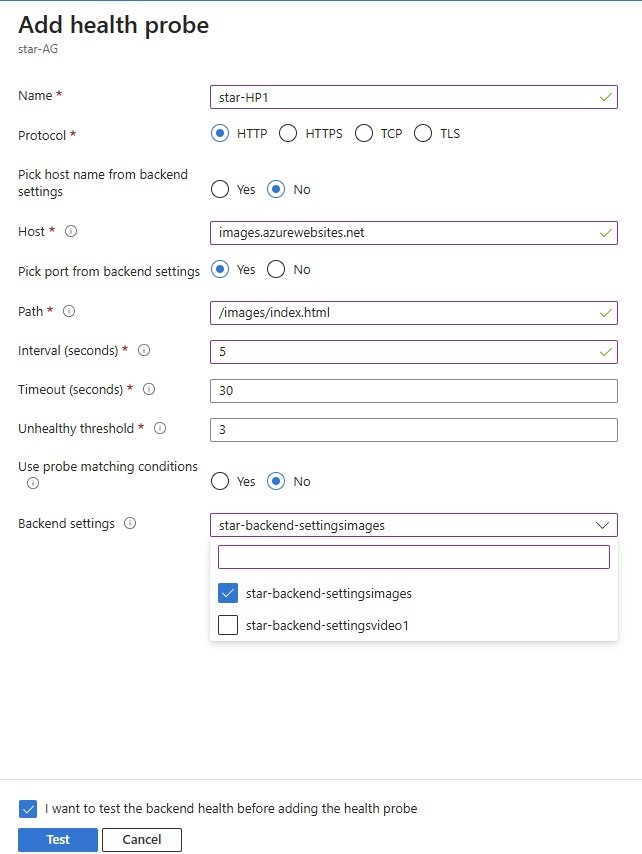
- Click test
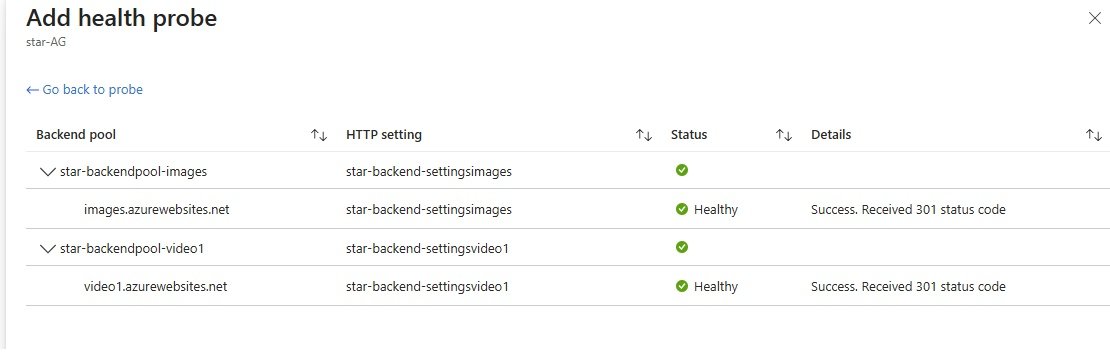
- Go to Application Gateway\Monitoring\Backend health and both will be in healthy status.
- Copy application gateway public IP and paste in browser:
- Error:
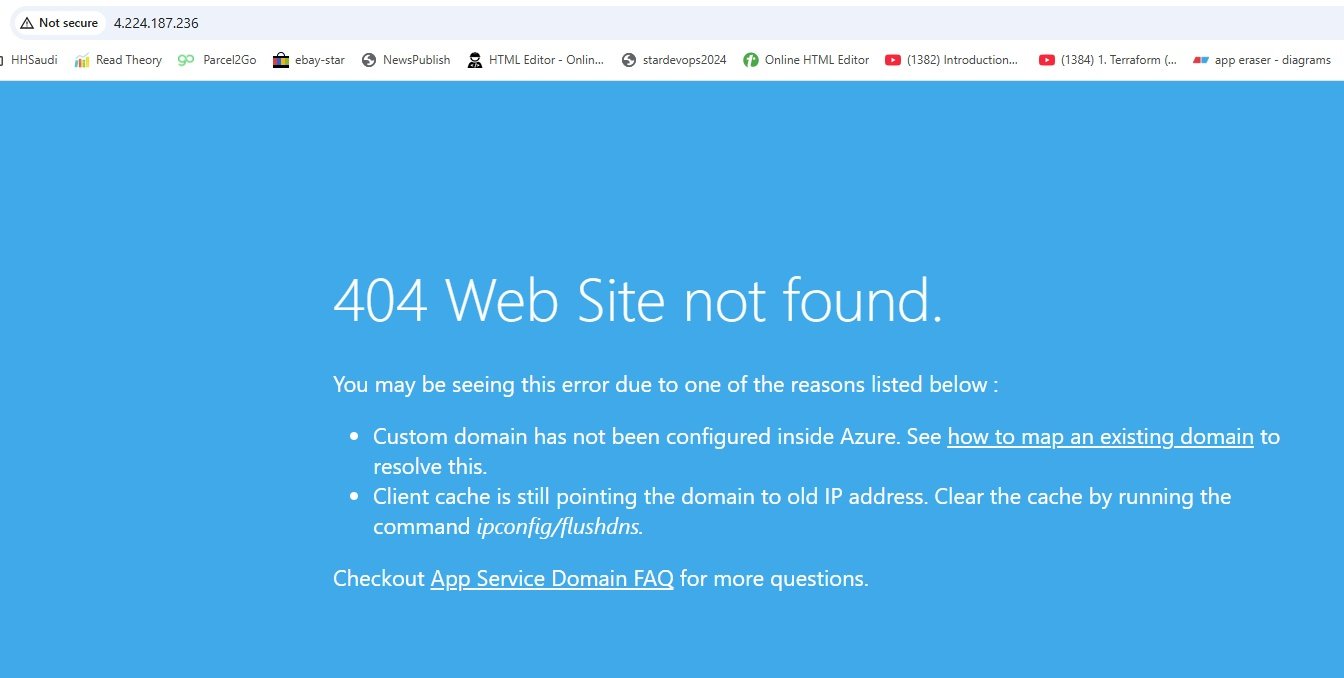
- Application gateway is sending hte request to host header(IP).
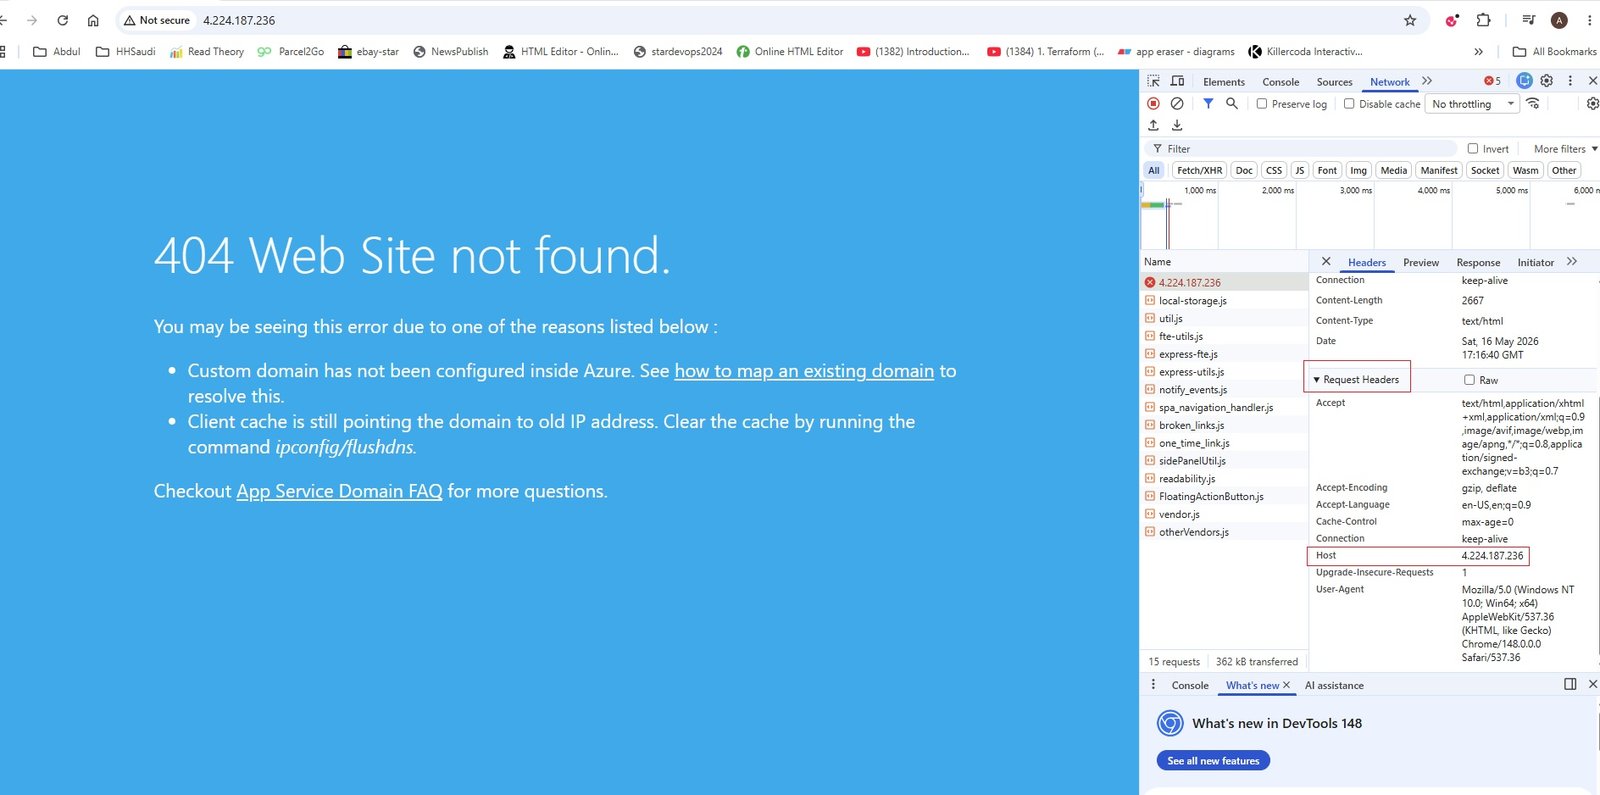
- Go to Application Gateway/Settings/Backend settings/star-backend-settingsimages
- Override with new host name = click yes
- Select Pick host name from backend target.
- Go to Application Gateway/Settings/Backend settings/star-backend-settingsvideo1
- Copy AG public IP and paste it in browser: 4.224.187.236/images/index.html
- Multi Site hosting with Application Gateway using Web Apps and private endpoints:
- Code
- Code
- Application Gateway Blade:
- Custom Domain Binding with http:
- Access the application with domain name instead of public IP of Application Gateway.
- Open browser and ener public IP and it will redirect to backend vm.
- Create DNS zone in Azure.
- way2cloud.co.uk

- copy and paste nameservers in registrar (fasthosts.co.uk)
- click varify.
- Create record for application gateway
- click record set, Create Acord.
- copy appliation gatewy public IP.
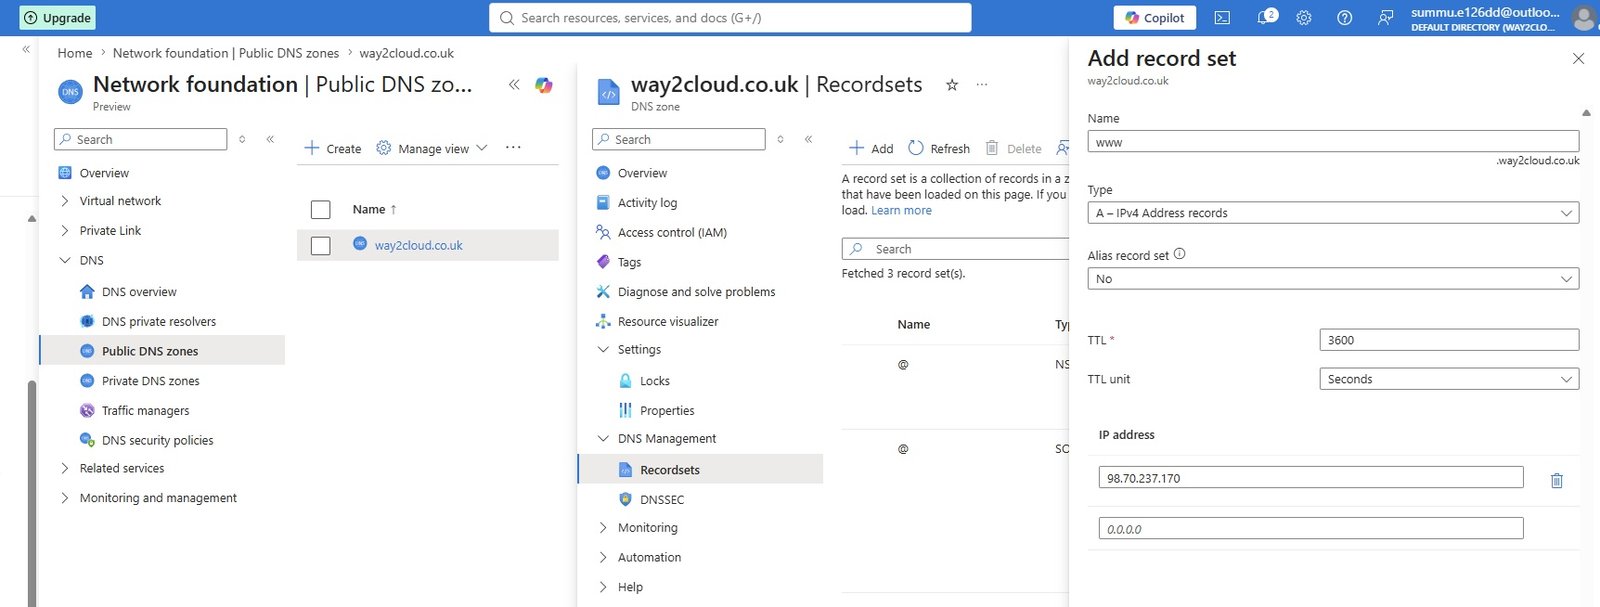
- www.way2cloud.co.uk A record mapped with application gateway public IP.
- Open browser and type www.way2clouc.co.uk and it will open the application configured on Attend server
- Custom Domain Binding with https: Required SSL certificate.
- Integration of SSL certificate.
- Go to appliation gateway and open listener and choose https.
Load Balancers:

- Azure Load Balancer is used for high availability. The load balancer mainly distributes the traffic across a set of identical servers which are combined in availability set.
- It is a Layer 4 load balancer which distributes the traffic across either VMs or cloud services.
- Traffic control (Port Forwarding): You can control the flow of the traffic by specifying that the inbound traffic that will come on a specific port will be directed to a specific port internally. For example, if you have an incoming request for the web server on port 80 on the public endpoint, but the web server behind the load balancer is configured to listen on port 3315, you can control that, as Azure Load Balancer supports port forwarding.
- Types of Load Balancer:
- Basic:
- Mainly the basic load balancer does provide traffic distribution for the applications providing higher availability and better network performance. Considering that it detects the health state of the instances across which it distributes the traffic to make sure that the traffic is being distributed to the proper instances. Basic Availability Set is required.
- Standard:
- The standard load balancer provides better resiliency and scalability. It can serve upto 1000 VM.
- Public LB:
- The public load balancer is also called an internet-facing load balancer. As its name implies, it is mainly used to load balance the requests coming from the internet. For example, all of the incoming traffic to the load balancer public IP address via a specific port will be mapped to the VMs in the backend, to their private IP and the port number.
- Internnal LB:
- Unlike the internet-facing load balancer, this one is mainly designed for distributing the traffic across a specific subnet within a virtual network.
- Intranet app running on Azure IaaS, for which you want to distribute traffic across the VMs on which the app is built.
- Cross-premises Azure virtual network, so that if you have a site-to-site VPN, you can have an internal load balancer set on a virtual network and distribute the incoming traffic from on-premises across the backend VMs.
- Non internet-facing machines. For example, you may have some virtual machines that do not have internet access, and you want to distribute the traffic across them.
- Basic:
- Availability Set (AS):
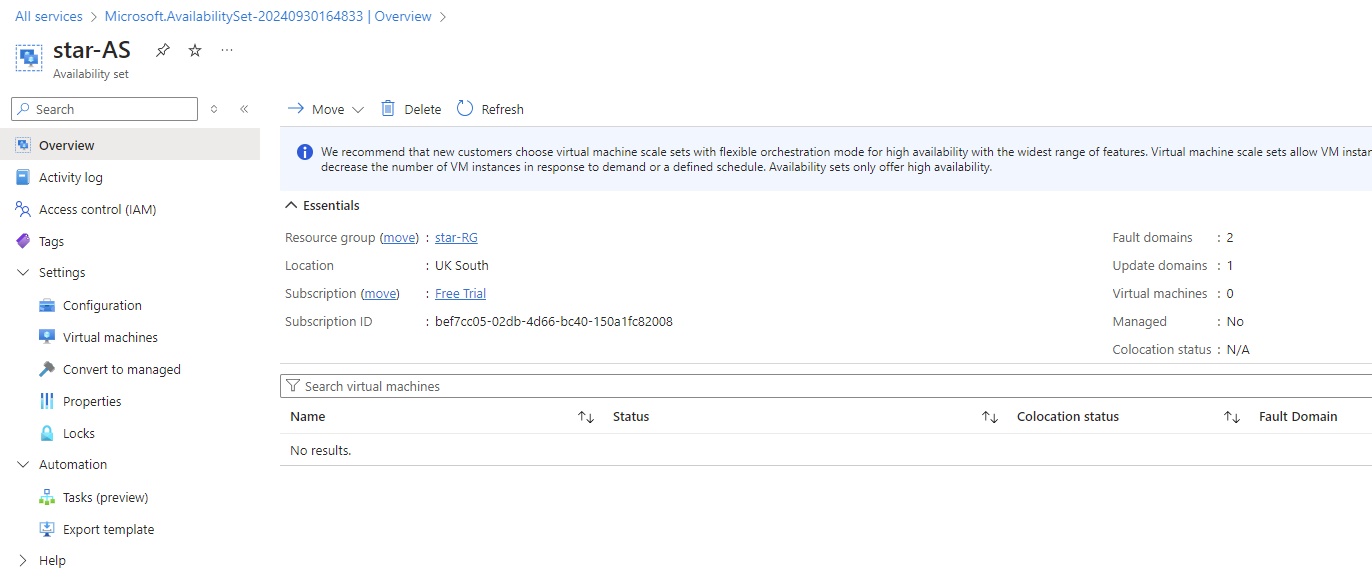
- You can assign Availability set while creating VM only, For Basic LB Availability set is mandatory while for standard it is not. We create availability set to make sure VM are replicated in different Racks and zones of azure.
- Once a VM is created without adding to Availability set than it cannot be added after VM creation. You have to delete the VM by keeping Disk and NIC and recreate.
- Load Balancer workflow:
- Load_Balancer_working.jpg
Create a Basic Public Load Balancer: Basic LB retired on 30 Sept 2025
- Step 1: Create VMs and Availability Set:
- Create 2 VMs (VM1, VM2), select availablity set star-AS, windows 2016, Port 80 443 RDP, Vnet1 (10.0.1.0/24)
- Connect to created VMs and install IIS. Make changes to html file to distinguish at C:\inetpub\wwwroot\iisstart
- Availability Set: It is required in Basic Load Balancer.
- Create New:
- Subscription: select subscription
- RG: star-RG
- Name: star-AS
- Region: UK South
- Fault Domains: select 1 to 3 (3)
- Update Domains: select 1 to 20 (3)
- Use managed disks: No / Yes (Aligned)
- Advanced:
- Proximity Placement Group:
- Tag:
- Review & Create:
- Create New:
- Attach both VMs to availability set.
- Step 2: Create a Basic Load Balancer:
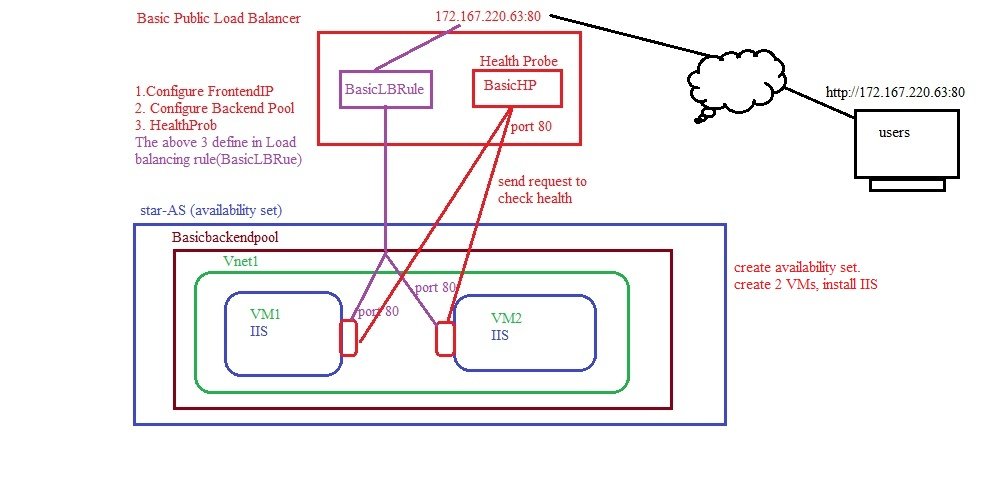
- Basics:
- Subscription & RG: Enter required field
- Name: Basic-LB
- Region: UK South
- SKU: Basic
- Type: Public/Internal
- Tier: Regional
- Frontend IP Configuration:
- +Add frondend IP Configuration
- Name: BasicFrontendIP
- IP Version: IPv4
- Public Ip Address: Create new (Name=BasicPublicIP, SKU=Basic, Tier=Regional, Assignment: Dynamic/Static)
- Backend Pools:
- + Add a backend pool
- Name=Basicbackednpool
- Virtual Network=Vnet1
- Ip Configuration: IP configurations associated to virtual machines and virtual machine scale sets must be in same location as the load balancer and be in the same virtual network.
- Health Probes:Health probes are used to check the status of a backend pool instance. If the health probe fails to get a response from a backend instance then no new connections will be sent to that backend instance until the health probe succeeds again.
- + Add
- Name: BasicHP
- Protocol: Load Balancer send the message to backend pool machines to check the healthy status using TCP protocol on port 80, if LB receives reply than it consider as healthy and traffic will be send to these machines.
- TCP:
- HTTP:
- Port: 80
- Interval (seconds):5 (LB will send the request every 5 secons to check the statuf of backend pool machines)
- Used by:
- Inbound rules: A load balancer rule is used to define how incoming traffic is distributed to the all the instances within the backend pool. A load-balancing rule maps a given frontend IP configuration and port to multiple backend IP addresses and ports. An example would be a rule created on port 80 to load balance web traffic.
- + Add a Load Balancing Rule:
- Name: BasicLBRule
- IP Version: IPv4
- Frontend IP address: BasicFrontendIP(Dynamic)
- Backend Pool: Basicbackendpool
- Protocol: TCP/UDP
- Port: 80 (front end port), To access the website customer hit port 80 or 443
- Backen port: 80 (backend port), redirect customer request to backend pool of port 80
- Health Probe: BasicHP
- Session Persistence:Session persistence specifies that traffic from a client should be handled by the same virtual machine in the backend pool for the duration of a session. "None" specifies that successive requests from the same client may be handled by any virtual machine. "Client IP" specifies that successive requests from the same client IP address will be handled by the same virtual machine. "Client IP and protocol" specifies that successive requests from the same client IP address and protocol combination will be handled by the same virtual machine.
- None
- Client IP
- Client IP and Protocol
- Idle Timeout (Minutes): 4
- Enable Floating IP: checkbox
- + Add an Inbound NAT Rule:
- + Add a Load Balancing Rule:
- Outbound Rules: An outbound rule allocates source network access translation (SNAT) ports from Frontend IP addresses to a backend pool for outbound connections to the internet.
- + Add an outbound rule
- Tags:
- Review+Create
- Add/Remove VMs in Load Balancer:
- Go to VMs and select desired VM and click Network/Settings/Load Balancing/Add Load Blancing/Load Balancing Options choose LB/Backend pool/Click on backendpool. select VM and remove. New or existing pool and choose.
- You can add VM to LB while creating VM in Networking tab.
- Test: Open any browser and access with Load Balancer public IP. It will perform round robin and distribute traffic between VMs.
- Step 1: Create VMs and Availability Set:
Create a Standard Public Load Balancer:
- Go to All Services/Networking/Load Balancing/Load Balancer/Create standard load balancer
- In case of standard LB, NSG need to be configured as ports are not open. (star-NSG)
- Basics
- Subscription: select
- RG: star-RG
- Name: star-LB
- Region: UK South
- SKU:
- Standard (Distribute traffic to backend resources) : Select
- Gateway (Directo traffic to network virtual appliances):
- Basic (Basic LB retired on 30 Sept 2025)
- Type:
- Public: a public IP will be assigned to Load Balancer: select
- Internal: a private IP will be assigned to Load Blancer
- Tier:
- Regional: select
- Global (cross regional)
- FrontEnd IP Configuration:
- A frontend IP configuration is an IP address used for inbound and/or outbound communication as defined within load balancing, inbound NAT, and outbound rules.
- + Add a frontend IP configuration: It will be public / Internal IP address which will be depend on selection of type.
- Name: FrontendIP
- IP Version:IPv4
- Virtual network: star-vnet1
- Subnet: choose star-subnet (10.0.1.0/24)
- Assignment: Dynamic/static
- Availability Zone: No Zone, Zone-redundant, 1,3,2
- Backend Pool:
- It is a pool of VMs in which traffic will be distributed, add all VMs with its private IP addresses.
- + Create Back End Pool:
- Name: star-backend-pool
- virtual network: Vnet1 (only one Vnet can be attached)
- Backend Pool Configuration: NIC or IP
- When you choose IP, Private IP addresses of your VMs appeared, select required VMs.
- Inbound Rules:
- A load balancing rule distributes incoming traffic that is sent to a selected IP address and port combination across a group of backend pool instances. The load balancing rule uses a health probe to determine which backend instances are eligible to receive traffic.
- + Add a Load Balancing Rule:
- Name: LB-Rule1
- IP Version: IPv4
- Frontend IP address: select from list (FrontendIP)
- Backend Pool: select form list (star-backend-pool)
- Protocol: TCP/UDP
- Port: 80
- Backend Port: 80
- Health Probe: The selected probe is used by this rule to determine which virtual machines in the backend pool are healthy and can receive load balanced traffic. It checks the status of VMs to send the traffic. create (HealthProbe),
- Health Probe: The selected probe is used by this rule to determine which virtual machines in the backend pool are healthy and can receive load balanced traffic. It checks the status of VMs to send the traffic. create (HealthProbe),
- Session Persistence:
- None:
- Client IP:
- Client IP & Protocol:
- Idle Timeout Minutes: Keep a TCP or HTTP connection open without relying on clients to send keep-alive messages.
- Enable TCP Reset: checkbox
- Enable Floating IP: Checkbox (Without Floating IP, Azure exposes a traditional load balancing IP address mapping scheme for ease of use (the VM instances' IP). Enabling Floating IP changes the IP address mapping to the Frontend IP of the load balancer to allow for additional flexibility)
- Outbound source network address translation (SNAT): Configures outbound SNAT for the instances in the backend pool to use the public IP address specified in the frontend.
- Recommended (Use outbound rules to provide backend pool members access to the internet
- Use default port allocation to provide backend pool members with a minimal set of SNAT ports. This is not recommended because it can cause SNAT port exhaustion.
- Session Persistence:
- + Add an Inbound NAT rule:
- Name: LB-NAT-Rule1
- Type: Inbound NAT rules can be configured by sending traffic to an individual VM or a set of machines in a backend pool.
- Azure virtual machine: select
- Backend pool:
- Target Virtual Machine: select from list (star-backend-pool)
- Frontend IP Address: select from the list (LB-FrontIP)
- Frontend Port: 80
- Service Tag:select from the list
- Backend Port: enter
- Protocol:
- TCP
- UDP
- Enable TCP Reset:
- Idle timeout (minutes): 4
- Enable Floating IP: checkbox
- + Add Outbound Rules:
- Name: LBRule2
- IP Version: IPV4
- Frontend IP Address: select from the list
- Protocol:
- All
- TCP
- UDP
- Idle timeout(minutes): 4 to 100
- TCP Reset
- Enabled
- Disabled
- Backendpool: select from the list
- Port Allocation: Azure automatically assigns the number of outbound ports to use for source network address translation (SNAT) based on the number of frontend IP addresses and backend pool instances.
- Manually choose number of outbound ports
- Use the default number of outbound ports
- Choose by:
- Ports per instance
- Maximum numbr of backend instances
- Tags:
- Review & Create:
- Health Probe: The selected probe is used by this rule to determine which virtual machines in the backend pool are healthy and can receive load balanced traffic. It checks the status of VMs to send the traffic. create (HealthProbe),
- Create 2 VMs (VM1, VM2), virtual machine scale set (VMSS), windows 2025, Port 80 443 RDP, Vnet1 (10.0.1.0/24), assign to star-NSG (SSH and HTTP allowed)
- Test: open browser and enter LB public IP.
Create Gateway Load Balancer:
- Go to All Services/Networking/Load Balancing/Load Balancer/Create
- Basics:
- Subscription: select
- RG: star-RG
- Name: Gateway-LB
- Region: UK South
- SKU:
- Standard : Select
- Gateway:
- Basic (retiring soon 2025)
- Type:
- Internal: a private IP will be assigned to Load Blancer (only option)
- Tier:
- Regional: only option
- FrontEnd IP Configuration: A frontend IP configuration is an IP address used for inbound and/or outbound communication as defined within load balancing, inbound NAT, and outbound rules.
- + Add a frontend IP configuration: It will be public / Internal IP address which will be depend on selection of type.
- Name: FrontendIP
- IP Version:IPv4
- virtual network: Vnet1
- Subnet: LBSubnet
- Assignment: Dynamic/Static
- Availability Zone: None, Zone redundant (1,2,3)
- BackEnd Pool: It is a pool of VMs in which traffic will be distributed, add all VMs with its private IP addresses.
- + Create Back End Pool:
- Name: GatewayBackendPool
- virtual network: Vnet1 (only one Vnet can be attached)
- Backend Pool Configuration: NIC or IP
- Choose Private IP addresses of your VMs (if it has been created)
- Gateway Load Balancer Configuration:
- Protocol : VXLAN
- Type:
- Internal and External
- Internal
- External
- Internal Port: 10800
- Internal Identfier: 800
- External Port: 10801
- External Identifier: 801
- IP Configuration: IP configurations associated to virtual machines and virtual machine scale sets must be in same location as the load balancer and be in the same virtual network.
- Inbound Rules: A load balancing rule distributes incoming traffic that is sent to a selected IP address and port combination across a group of backend pool instances. The load balancing rule uses a health probe to determine which backend instances are eligible to receive traffic.
- + Add a Load Balancing Rule:
- Name: LBRule1
- IP Version: IPv$
- Frontend IP address: select from list
- Backend Pool: select form list
- Protocol: TCP/UDP
- Port: 80
- Backend Port: 80
- Health Probe: The selected probe is used by this rule to determine which virtual machines in the backend pool are healthy and can receive load balanced traffic. It checks the status of VMs to send the traffic. create (HealthProbe),
- Session Persistence:
- None:
- Client IP
- Client IP & Protocol
- Idle Timeout Minutes: Keep a TCP or HTTP connection open without relying on clients to send keep-alive messages.
- Enable TCP Reset: checkbox
- Enable Floating IP: Checkbox (Without Floating IP, Azure exposes a traditional load balancing IP address mapping scheme for ease of use (the VM instances' IP). Enabling Floating IP changes the IP address mapping to the Frontend IP of the load balancer to allow for additional flexibility)
- Outbound source network address translation (SNAT): Configures outbound SNAT for the instances in the backend pool to use the public IP address specified in the frontend.
- Recommended (Use outbound rules to provide backend pool members access to the internet
- Use default port allocation to provide backend pool members with a minimal set of SNAT ports. This is not recommended because it can cause SNAT port exhaustion.
- + Add an Inbound NAT rule:
- Name: NATRule1
- Type:
- Azure virtual machine
- Backend pool
- Target Virtual Machine: select from list
- Frontend IP Address: select from the list
- Frontend Port: 80
- Service Tag:select from the list
- Backend Port: enter
- Protocol:
- TCP
- UDP
- Enable TCP Reset:
- Idle timeout (minutes): 4
- Enable Floating IP: chckbox
- + Add a Load Balancing Rule:
- + Add Outbound Rules:
- Name: LBRule2
- IP Version: IPV4
- Frontend IP Address: select from the list
- Protocol:
- All
- TCP
- UDP
- Idle timeout(minutes): 4 to 100
- TCP Reset
- Enabled
- Disabled
- Backendpool: select from the list
- Port Allocation: Azure automatically assigns the number of outbound ports to use for source network address translation (SNAT) based on the number of frontend IP addresses and backend pool instances.
- Manually choose number of outbound ports
- Use the default number of outbound ports
- Choose by:
- Ports per instance
- Maximum numbr of backend instances
- Tags:
- Review & Create:
- Create 2 VMs (VM1, VM2), select availablity set star-AS, windows 2016, Port 80 443 RDP, Vnet1 (10.0.1.0/24)
- Test:
Edit Load Balancer:
- Overview:
- Activity Log:
- Access Control (IAM):
- Tags:
- Diagnose & Solve Problems:
- Settings:
- Front End IP Configuration:
- BackEnd Pools: starBackEndPool (attached VM11, VM12) (only 2 options available, VM or VMSS)
- Health Probes:
- It checks the health of VMs of backend pool to send the traffic accordingly, it check regularly to make sure traffic can be send to healthy VMs.
- Add health probe:
- Name: star_healthprobe
- Procotol: TCP / HTTP / HTTPS
- Port : 80
- Intervel (second): 5
- Load Balancer check the health by sending message using port 80 to backend pool VMs, if it did not get response then send after 5 seconds again, after 4 failure request it declare VM as unhealthy and no traffic will be redirected to this VM.
- Load Balancing Rules: It redirects the request come to LB public IP to backend pool
- Name:StarFrontEnd
- IP Version:IPV4 / IPv6
- Front IP Address: 85.210.58.138 (starfrontend-IP)
- Protocol: TCP / UDP
- Port: 80
- Backend Port: 80
- Backend Pool: starBackEndPool (attached VM11, VM12)
- Health Probe: star_HealthProbe
- Session Persistence: None, IP, IP + Protocol
- Inbound NAT Rules:
- Outbound Rules:
- Properties:
- Logs:
- Monitoring:
- Insights:
- Diagnostic Settings:
- Logs:
- Alerts:
- Metrics:
- Automation:
- CLI / PS
- Tasks:
- Export Templates:
- Help:
Traffic Manager:
- Overview:
- Azure Traffic Manager DNS based load balancer, It provides IP address to client to connect to websites, web apps etc. It works on Application layer (layer 7) of OSI model.
- With Azure Traffic Manager, you are not distributing your traffic across a VNet or a set of VMs, but you are distributing the traffic across multiple Azure data centers and multiple regions across the world.
- It distributes the traffic using different routing method.
- It continuous monitor endpoint health and provide failover in case endpoint is fail.
- Azure Traffic Manager supports various endpoints, such as cloud services, App Services, and even public IP addresses that can be associated with VMs, Load Balancers, and so on. Also it can be used with non-Azure endpoints, either in other clouds or in your on-premises environment.
- Azure Traffic Manager uses intelligent DNS to specify the fulfilling endpoint. Traffic manager works as DNS which perform name resolution and provide IP address to client to make connection but it also perform which routing method used and in which end point it send traffic and if endpoint fail then send traffic to another endpoint etc.. Traffic Manager receive client query from DNS and it not only distribute the traffic to endpoint but it checks the routing method used and send traffic to the related endpoint.
- It checks the rules and analyse before sending traffic like source location, Destination location etc..
- It is best used where your application is hosted in multiple locations or servers and it will decide where to send traffic.
- Traffic Manager provides IP address to client after analysis and then client directly connected with application or server or endpoint without mediator(traffic manager). It means traffic will not pass through traffic manager like load balancer. It does not act as proxy or gateway as it works at DNS level and provide IP address to client and client directly connected with endpoint or server.
- Azure Traffic Manager (ATM) and in AWS is called Route53 and there is GSLB (Global Server Load Balancing) also available from various providers in hardware or VM format. There are some providers are selling box which works at DNS level for load balancing.
- You can perform latency, failover and route the client request to nearest endpoint for better performance and low latency and high availability.
- If you are performing upgrade, make changes in your application then traffic manager will not distribute traffic to that endpoint until it finish.
- Endpoint could be Azure endpoint(azure webapp, azure public IP, azure load balancer or azure application gateway, azure VM) or it could be external endpoint in another cloud service or on premises server.
- Local DNS will keep records in cache until TTL time expired until that time query will not goes to traffic manager. It gives inaccurate result as cache keep records until TTL expire and if a query comes then it give IP to client from cache, in case TTL is still alive and endpoint is failed then still local DNS will provide same IP address from cache as cache is not updated. When query come to traffic manager then it will provide healthy endpoint IP address and cache will get updated, so keep TTL is min.
- How Azure Traffic Manager & DNS Works:
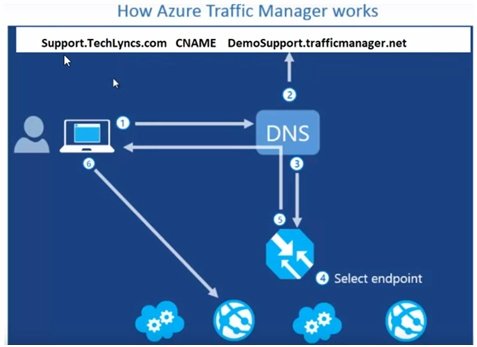 or
or 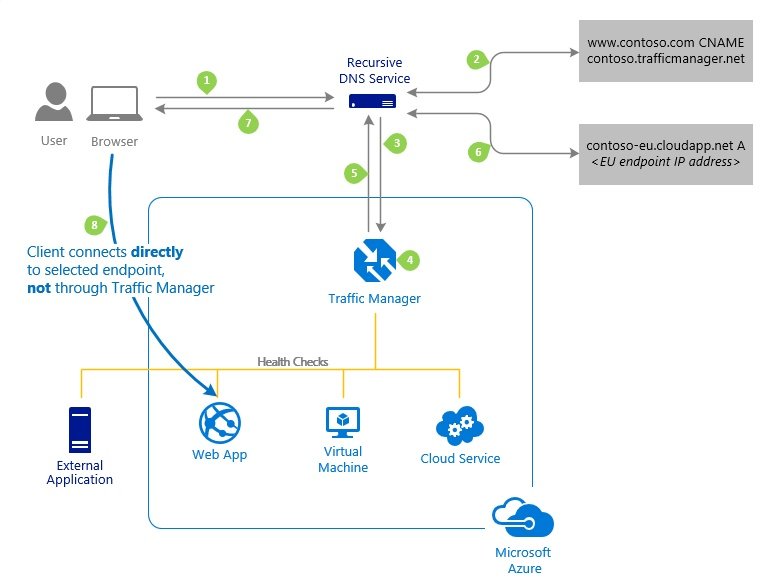
- Step1: client request goes to local DNS server (Active directory server), if it cannot resolve then query goes to root hint and from there it goes to top level domain and from top level domain to authoritative domain where it contain host records.
- Step2: query forwarded to traffic Manager through CNAME record
- Step3 : Query comes to Traffic manager profile.
- Step4: Traffic manager will analyse and select endpoint on the basis of routing method.
- Step5: Traffic manager will send selected IP address to client via DNS
- Step6: client make direct connection with endpoint
- Components of Azure Traffic Manager:
- Traffic Manager Profile: azure endpoint, external endpoint, nested endpoint, profile
- Traffic Manager Endpoints: it could be Apps VMs, App Gateway, LB
- Routing Method: priority, performance, geographic, weighted, multivalue, subnet
- CNAME record entry in Authoritative DNS Server:
- Distributing traffic based on Priority routing method:
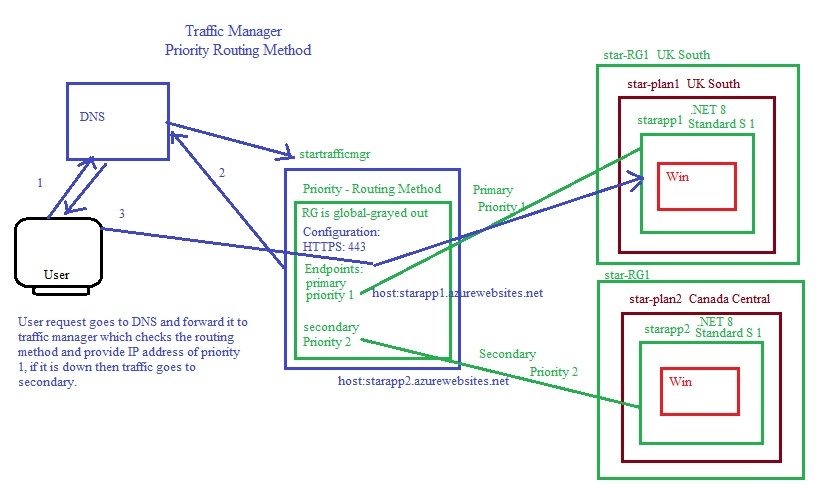
- Create Traffic Manager profile using Prority routing method
- Go to All Services/Networking/Load Balancer/Traffic Manager create
- Name: startrafficmgr
- Routing Method: Priority
- Subscription & Resource Group:
- Resource Group Location: Grayed out as Traffic Manager is not location specific.
- Endpoints: Create 2 Web App in two different regions as primary and failover, if primary is down then traffic goes to failover (secondary application).
- Deployment: Go to web app blade/development tools/App Service Editor/open editor/WWWROOT/
- Traffic Manager Profile Configuration:
- Go to Traffic Manager Blade/Settings/Configuration
- Routing Method: Priority
- Endpoint moitor settings: HTTPS
- Port: 443
- Path: /
- Custom Header Settings:
- Endpoints: +Add
- Type: Azure endpoint
- Name: primary
- Target resource type: App Service
- Target resource: starapp1
- priority : 1
- Customer Header Settings: host: copy and paste url from app1
- +Add (add second app)
- Type: Azure endpoint
- Name: secondary
- Target resource type: App Service
- Target resource: starapp2
- priority : 1
- Customer Header Settings: host: copy and paste url from app2
- Test: copy url from traffic manger overview and paste it in browser: Traffic goes to priority 1 site (starapp1), disable starapp1 and now traffic goes to secondary.
- Distributing traffic based on Performance routing method:
- Create Traffic Manager profile using performance routing method
- Distributing traffic based on Geographic routing method:
- Distributing traffic based on Weighted routing method:
- Distributing traffic based on Multivalue routing method:
- Distributing traffic based on Subnet routing method:
- Overview:
- Load Balancing - help me choose
Load Balancer VS Application Gateway:
- Both use for load balancing
- Load balancer works at layer 4 (transport layer) and Application Gateway is layer 7 (Application layer). It distributes the traffic on the basis of IP address and port number.
- Layer 4 LB distribute the traffic on IP basis uses Five tuple hash based routing while Application Gateway distributes on content based like in URL www.abc.com/videos and www.abc.com/Audios, it distributes the traffic accordingly.
- Application gateway has more features and smart, it gives firewall functions. It protects from external attacks.
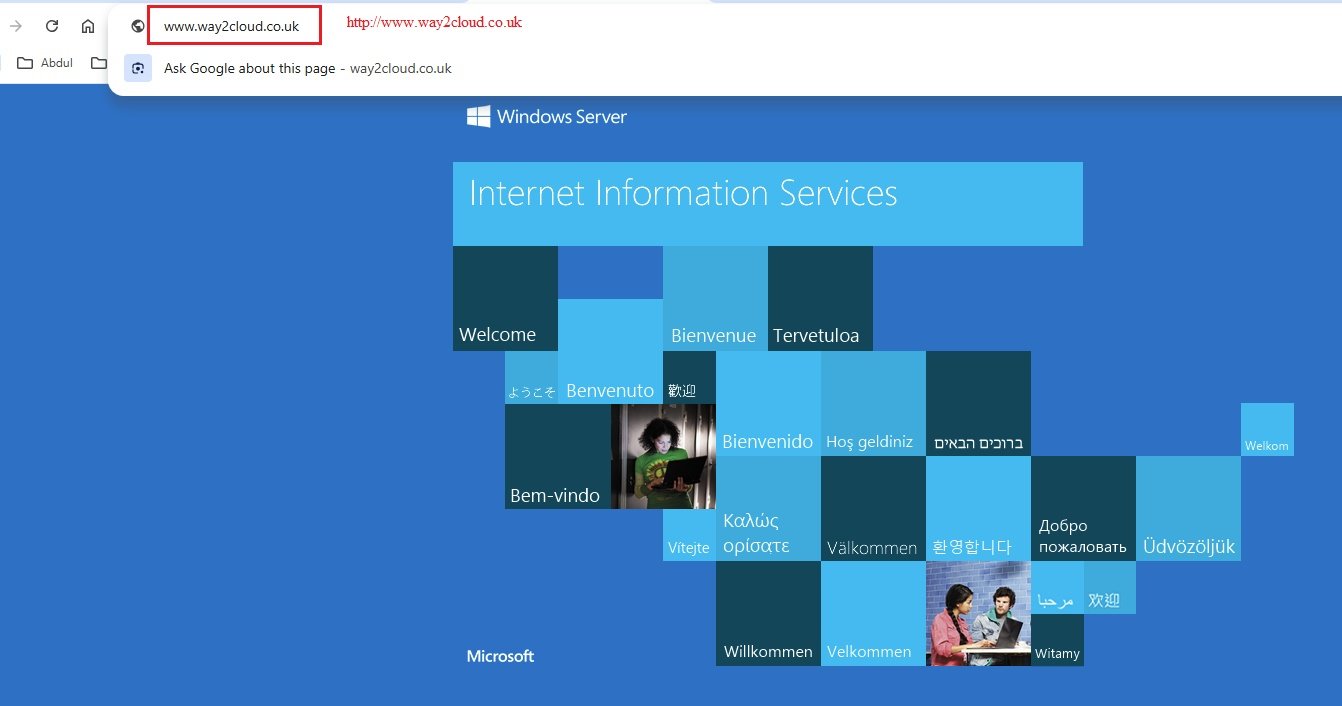
- Content Delivery
- Front Door & CDN Profiles
- Microsoft Connected Cache for Internet Service Providers
- Monitoring
- Monitor
- Network Watcher
- Additional Networking Services
- NGINXaas
Videos
- Azeem
- Vnet Introduction
- Vnet Lab1
- Vnet Lab2
- NSG1
- NSG2
- Reset NIC
- Additional NiC
- Add Secondary IP Address to NIC
- IP Addressing
- Outbound connection scenario
- Vnet to Vnet
- Point to Site
- Site to Site
- DNS
- Load Balancer1
- Loadb Blancer2
- Port Forwarding (NAT Rule)
- Service Endpoint1
- Service Endpoint2
- Service Endpoint3
- Sanjay
- Ravi
- Azeem
Compute
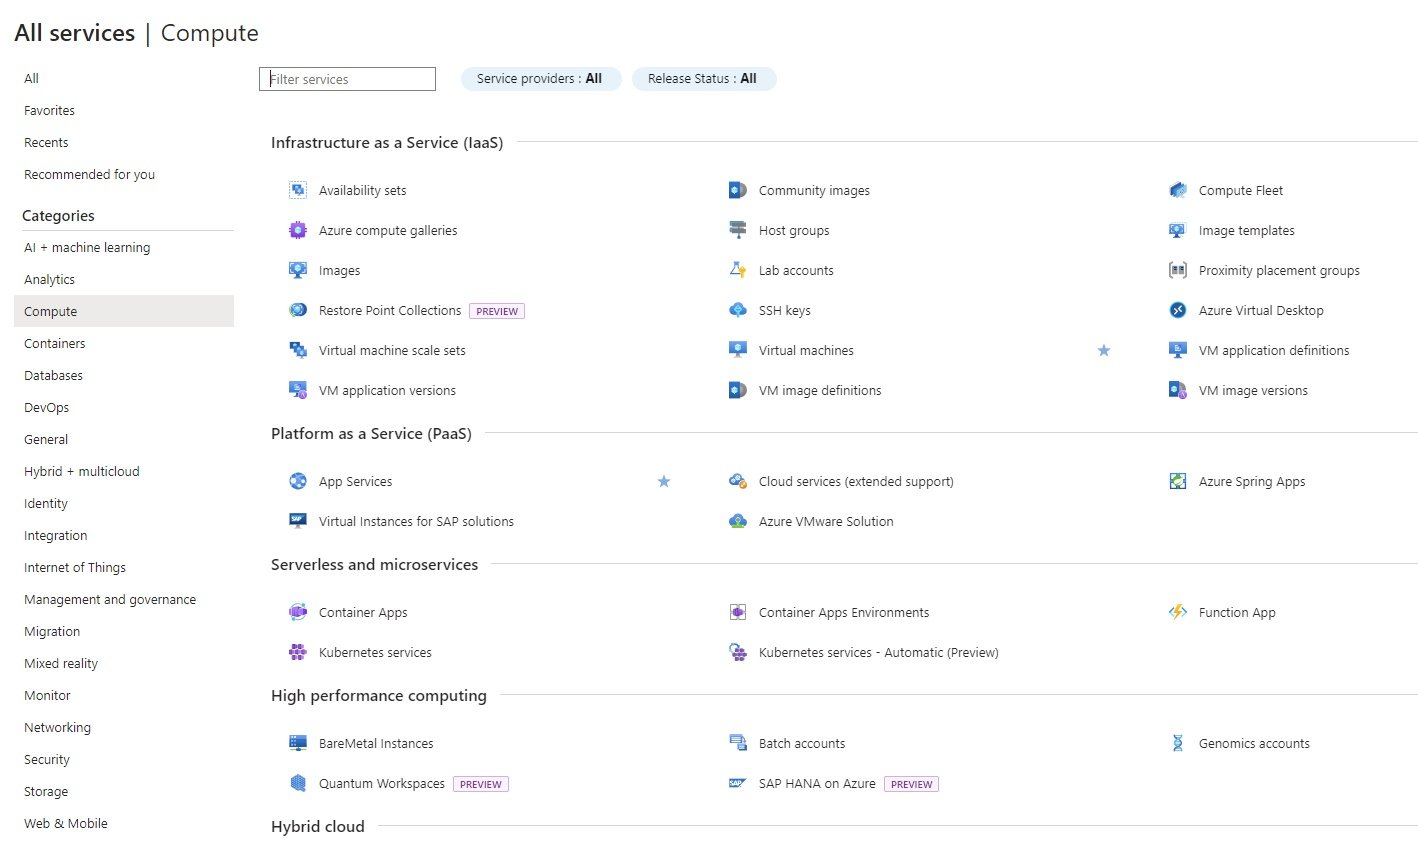
- In compute section following are different services in which we create resources.
- Infrastructure as a Service (IaaS):
Availability Sets \ Availability Zone \ Regional Pair
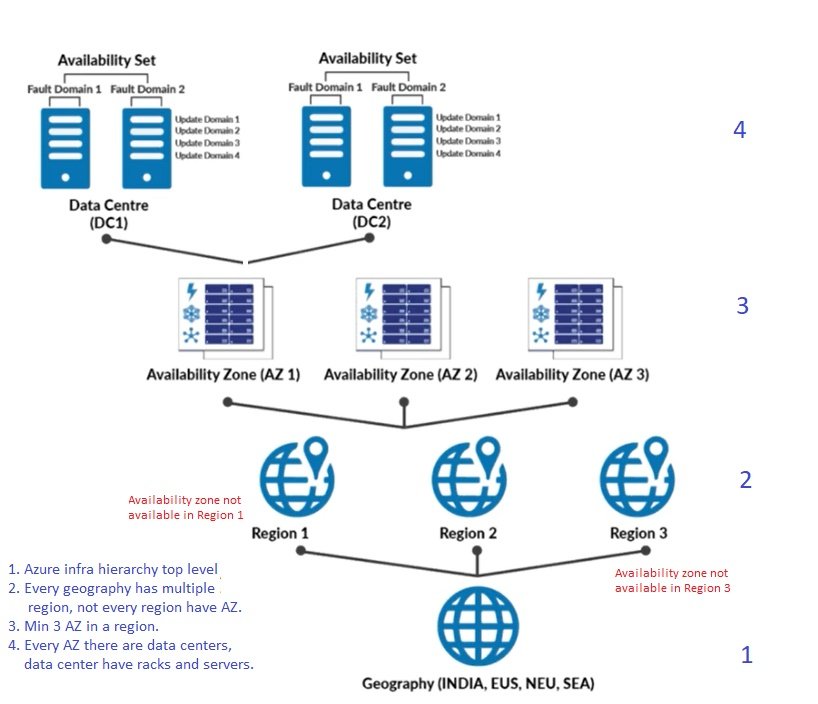
- Azure Redundancy/ Clustering: These services are part of compute resource. It is use to make sure services are available on any hypothetical situation like, natural disaster, human interference or hardware failure. To make resources available at all times, Azure provides Availability zone and Availability sets and Regional pair.
- High Availability through Availability zone (Datacenter level failure protection): High availability can be achieved at data center level. Configure the service on more than one data center so that if any data center crashed than service is still available from other data center. For load distribution you can create multiple identical resources VM and installed web application. Keep these VM's in different zones and instead of keeping them in same zone.
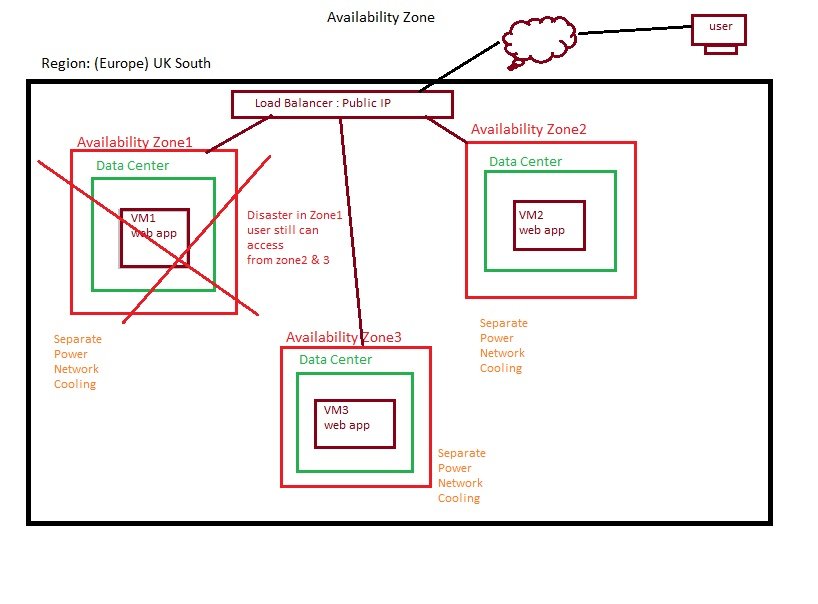
- Redundancy at data centre level, There will be separate physical availability zones within a Azure Region. There will be 3 availability zones in a region. It gives 99.99% SLA. Every zone have its own power supply, cooling, ups etc.
- If a resource in one zone is not avilable due to power failure, network failure or cooling failure or other disaster then application still accessible from another zone.
- Every region will have min 3 zones so you can create resources in these zones to make resilient.
- It works same in case of storage acccount and selected zone redundancy then data will be stored in selected availability zones.
- Services that support Availability zones:
- VM (Linux, Windows), VM Scale set, Managed Disks, Load Balancer, Piblic IP, Zone-redundant storage, SQL Database, Events Hubs, Service Bus, VPN Gateway, Express Route, Application Gateway
- High Availability through Availability Set (Within a datacenter): High availability of recource can be achieved within a data center where any hardware, power or cooling failure or any planned/unplanned maintenance.
- It is a logical grouping, it is the feature of compute section.it is use to grouping the server to get 99.95% SLA otherwise Microsoft offers 99.9% SLA. It provides redundancy / clustering within a single data center, if that data center got crashed than there will be no service, to overcome this azure also provide availability zone where it keeps copy of VM in different zones. It is available at server lever where configuration of servers could be similar or different. When one server is not available than another server should provide service. You cannot define availability set once VM is created. Need to recreate VM .
- In a datacenter there are lots of Racks and each rack has multiple servers in which we create resource.
- To get high availability within a datacenter we create availability set in which each rack is called fault domain.
- each fault domain has its own power and network connection but cooling is provided on data center level.
- If you select 3 fault domain means you will be assgin 3 racks.
- downtime can occur in case of power failure, network failure or maintenance (planned / unplanned). some time in maintenance they required to reboot servers and during that period a downtime will occur.
- Fault Domain:
- Microsoft combined group of servers at their data center which shares common power supply, cooling, ups and other hardware related resources. It make sure the service is available in the event of hardware failure, power supply or rack failure, Azure will keep copies of your server in different fault domain and update domain in the datacenter. By default you can have 2 fault domain and can extend to 3. FD0, FD1 or FD2. Suppose if you have 6 VM where fault domain be like FD0, FD1, FD0, FD1, FD0, FD1.
- update domain: it is a logical collection of servers from different fault domain.
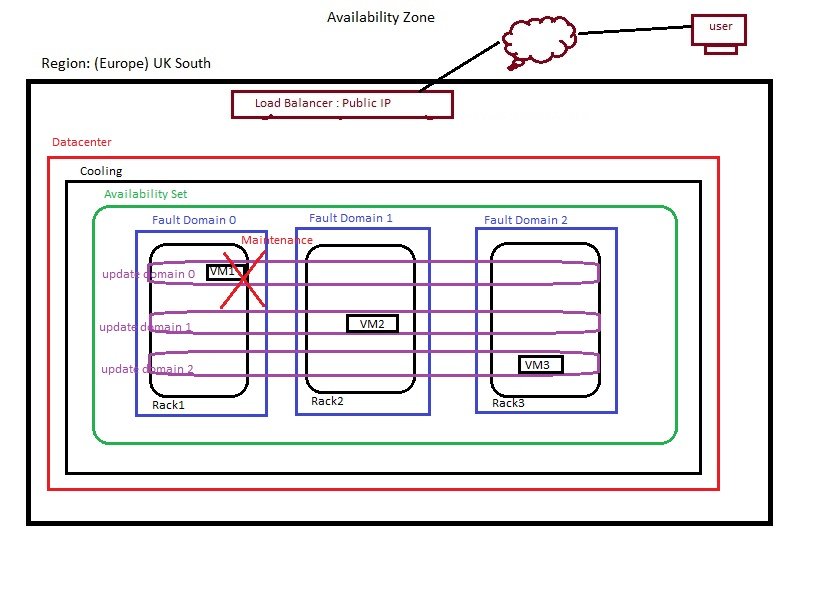
- You can create max 3 fault domain and 20 update domains,
- Microsoft will perform maintenance on one update domain at a time and after 30 minutes it will start on second update domain.
- Virtual machines deployed on Microsoft's physcial server using hypervisor and which may need updating and patching. During update or patching by Microsoft it is required to restart server, there will be downtime until server is up, to make sure service is available at all times server copies will be available in different rack. For example hypervisor which runs on these hardware and required patching and update. You can have 5 Update Domain by default and can stretch to 20, UD0 to UD4. Thosse servers lies in that fault domain or update domain may get impacted only.
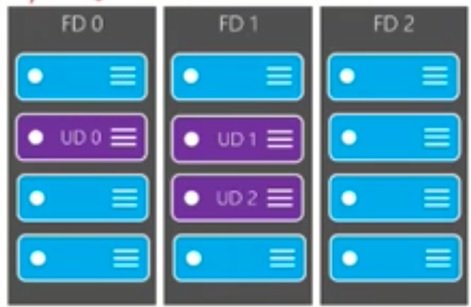 Region level:
 -
Example of fault domain and update domain count:
There will be 2-3 fault domain and 5-20 update domains in any availability set, how it calculate as follows:
1 VM: there will be 1 fault domain and 1 update domain. (FD0 and UD0)
2 VM: 2 fault domain and 2 update domain.(FD0, FD1 and UD0, UD1)
3 VM: 2,1 fault domain and 3 update domain.(FD0,FD1,FD0) and (UD0,UD1,UD2)
4 VM : 2,2 fault domain and 4 update domain (FD0,FD1,FD0,FD1) and (UD0,UD1,UD2,UD3)
5 VM: 2,2 fault domain and 4,1 update domain (FD0,FD1,FD0,FD1,FD0) AND (UD0,UD1,UD2,UD3,UD4,UD0) et...
- Requirement: Resource Group, Availability Set and VM should be in the same location / Region. Microsoft needs to update or patching their hardware and software regularly, it required to reboot the hardware or system so there will be a downtime and to avoid Microsoft offer availability set to make sure services are available during hardware failure or during software updates to maintain SLA. In availability set Azure provides fault and update domain, It is Microsoft infrastructure to provide redundancy where in their data center there are several racks and each rack is supplied by common resources like power supply, ups, sockets etc.. the following fault domain and update domain is maintained by Microsoft.
- Availability set can only be choose at creation of VM, AS cannot be changed. Need to delete and change.
- Redundancy at VM level.
- Grouping of multiple identical virtual machines in one set to provide high availability, it is the feature of compute services.
- Microsoft needs to update or patching their hardware and software in the data center regularly and it required reboot so there will be a downtime. To reduce downtime Microsoft offer availability set to make sure services are available during hardware failure or during software updates to maintain SLA. In availability set Azure provides fault and update domain, It is Microsoft infrastructure to provide redundancy where in their data center there are several racks and each rack is supplied by common resources like power supply, ups, sockets etc..
- It is a logical grouping and the feature of compute section which make sure service is available all the times.
- It provides redundancy / clustering within a single data center. if that data center got crashed than there will be no service, to overcome this azure also provide availability zone where it keeps copy of VM in different zones
- Microsoft offers 99.9% SLA for VM with HDD disk and will get 99.95% SLA with SSD disk and availability set and 99.99% with availability zone.
- Availability set must be created before or during VM creation. If not created than delete and recreate the VM.
- Requirement: Availability set, VM and RG must be in the same region/location.
- LAB Availability Set:
- create a RG(star-RG1) in central US
- create a virtual network (star-vnet), 10.0.0.0./16 with subnet(AS1, 10.0.0.0./24), first create virtual network, during VM creation if you create virtual network than it will not allow to choose same vnet while creating second VM.
- create availability set (star-as1) in Region central US with 3 fault domain and 3 update domain (it offers in central US).
- create 3 vm's (star-vm1, star-vm2, star-vm3) using above created availability set (star-as1).
- Availability set will assign which fault domain and update domain should vm be created (user cannot choose).
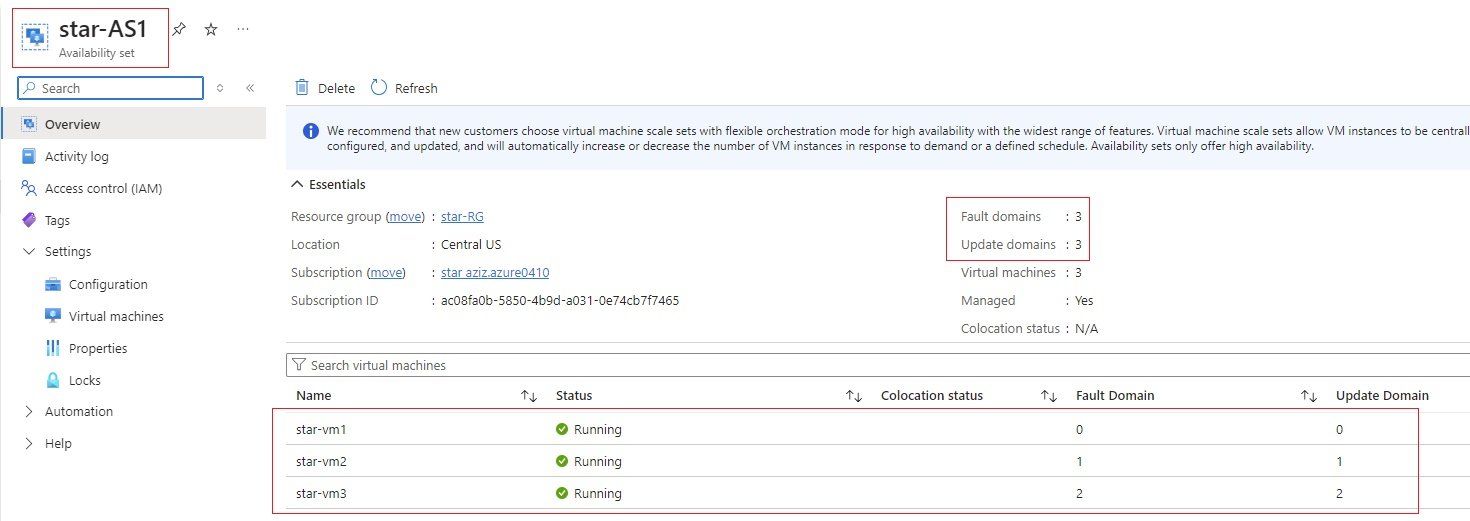
- Go to availability set and check each VM to which fault and update domain it is created.
- star-vm1 is assgined in fault domain 0 & update domain 0, star-vm2 is assigned in fault domain 1 & upate domain1, star-vm3 is assigned in fault domain 2 & update domain 2
- Regional Pair: In case the entire region is unavailable then azure provides Georaphical Redundancy Service where your resources are replicated with another region.
- Community Images
- Compute Fleet
- Azure Compute galleries
- Host Groups
- Image Templates
Images
- You make an image of a VM in which you have installed all required applications, software, updates, features so that this image can be used to deploy a VM with these configurations and settings.
- Generalise the VM by running sysprep which removes your personal account and security information, and then prepares the machine to be used as in image. select Enter system Out-of_box Experience and shutdown.
- Sysprep is not reversable.
- After running sysprep machine will not work properly, it is better to take a backup (snapshot or recovery service vault) of vm, create a new vm using backup and run sysprep and generalise.
- Capturing image creates .vhd or .vhdx file to use as template to deploy pre configured VMs.
- VM Capture is not used for backup purpose but it is used to create template of a VM. Microsoft provides different methods for VM backup.
- Custom images are used in creating scale set where more than one identical VM is created.
- Go to a VM and overview you can see capture button.
- Requirement: Capture button is visible/available only when VM is created with managed disk only.
- Lab:
- Go to required VM and click capture.

- Zone Resiliency: Enable this service, if you want to keep image copy in different zones.
- Type the virtual machine name: Enter the name of your virtual machine of which taking image.
- click create, image will be stored in market place \ image \ shared images. It will keep in the same region.
- Sysprep on Linux machine:
- Lab Accounts
- Proximity Placement groups
- Restore Point Collections
- SSH Keys
- Azure Virtual Desktop
Virtual Machine Scale Sets:
VM Scale Sets Overview:
- Azure will create identical VMs with option to scale in and scale out.
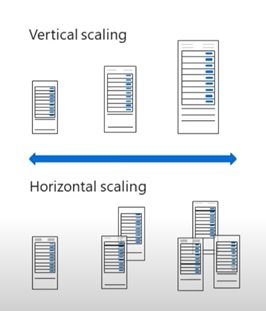
- There are two types of scaling:
- Horizontal Scaling (VMs added/removed): Scale in (reduce) and scale out (increase), you define threshold values in scaling options to execute scaling. When CPU utilization increases / decreases then VMs will be added or removed. When you have more than one identical servers than you need a load balancer to access application. Load balancer distributed the traffic among servers.
- Vertical Scaling (Hardware Resources increase/decrease): Hardware resources scale up and scale down.
- Configuration of Scaling:
- Manual Scale: When threshold values reaches to define values then you will perform scaling manually.
- Custom Autoscale: When threshold values reaches to define values than azure will perform scaling automatically.
- In one scale set you can create upto 1000 VMs.
- In scale set all VMs are identical with same configuration and application, first create a vm with all required configuration and application/softwares deployed and create an image. Now deploy VM and scale set using this image so that every time when scale set need to add a new VM in the scale set it will use this image to make all VMs identical.
- When you have more than one VM and their application can be accessed with load balancer which distributes the traffic among them.
- You can create a VM standalone or part of scale set.
- Mostly used in web servers where you have ecommerce running.
- You should have load balancer to access these VMs.
- Code
Creating VM Scale Sets through Portal using image:
- Step 1: Create a Vnet, Subnet1, SG with Allow port 3389,80 and attach with Subnet1, VM & Install all required applications(IIS):
- Through Portal: check in VM section
- Through Script:
- Create a windows virtual machine using powershell.
- Launch Azure Cloud Shell / windows power shell and login to azure:
- To open the Cloud Shell, just select Open Cloudshell from the upper right corner of a code block. You can also launch Cloud Shell in a separate browser tab by going to https://shell.azure.com/powershell Select Copy to copy the code blocks, paste them into the Cloud Shell, and press enter to run the them.
- Create a resource group.
- New-AzResourceGroup -Name 'ScaleSet-RG' -Location 'UK South'
- Create virtual machine
- New-Vm `
-ResourceGroupName 'ScaleSet-RG' `
-Name 'star-webserver' `
-Location 'East US' `
-Image 'MicrosoftWindowsServer:WindowsServer:2019-datacenter-azure-edition:latest' `
-VirtualNetworkName 'Star-Vnet' `
-SubnetName 'Star-Subnet' `
-SecurityGroupName 'Star-SecurityGroup' `
-PublicIpAddressName 'Star-IpAddress' `
-OpenPorts 80,3389 - When prompted, provide a username and password to be used as the sign-in credentials for the VM:
- New-Vm `
- Install web server (IIS).
- Logon to the server created above.
- open power shell and run the following.
-
#Install IIS server role.
Install-WindowsFeature -name Star-WebServer -IncludeManagementTools#Remove default html file
Remove-Item c:\inetpub\wwwroot\iisstart.htm#Add a new html file that display server name
Add-Content -Path "C:\inetpub\wwwroot\iisstart.htm" -Value $("Welcome from " + $env:computername)
- Step 2: Create Golden/Master Image of the above VM so it can be use for scaling.
- Generalise this server by running sysprep tool.
- Go to command prompt with administrative permission of IIS server.
- Go to c:\users\user cd %windir%\system32\sysprep
- Run sysprep and select Generalise check box and select shutdown.
- It will generalise and remove any configuration which is related with this VM only, so system can make multiple copies using the image.
- VM will be in stopped state.
- Capture Image of this VM.
- Through GUI:
- Go to virtual machine to which you want to take image or capture.
- click capture image.
- Give Name for this image along with Resource group(use existing or give new RG name), uncheck delete this virtual machine after creating the image. Click create.
- Now it will stop the virtual machine from running state and take capture.
- After creating an image if you want to start VM, then go to VM and start the VM, if you have unchecked delete after creating the image.
- To check the created image: Go to market place, shared images.
- Through script:
- Through GUI:
- Generalise this server by running sysprep tool.
- Step 3: Create a standard Public Load Balancer, Backend pool, Health Probe, Load Balancer Rule, attach VMs to Backend pool
- check in networking section
- Step 4: Create storage account, container and upload install_iis.ps1
- check in networking load balancer section.
- Step 5: Create VM Scale Set using Master Image.
- Manual scaling:
- Go to market place, shared images and select the custom image and during VM creation create scale set.
- Go to compute \ virtual machine scale set and click new.
-
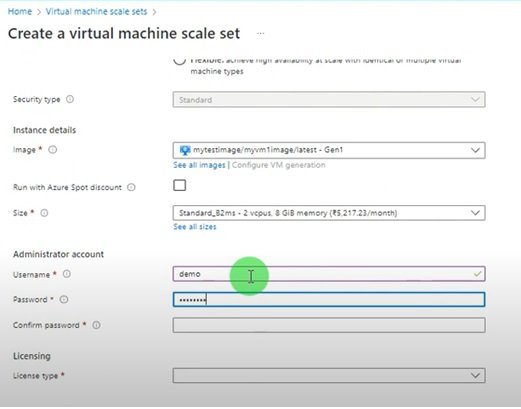
-
Enter required fields.
- Disk: enter details
- Networking: allow public IP
-
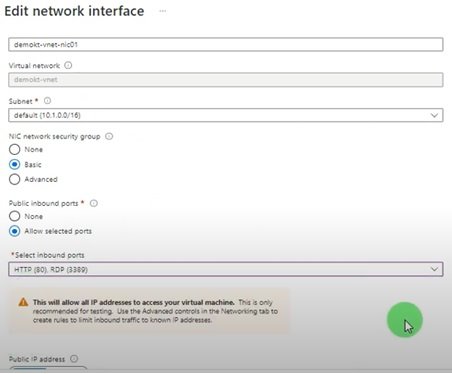
- Scaling:
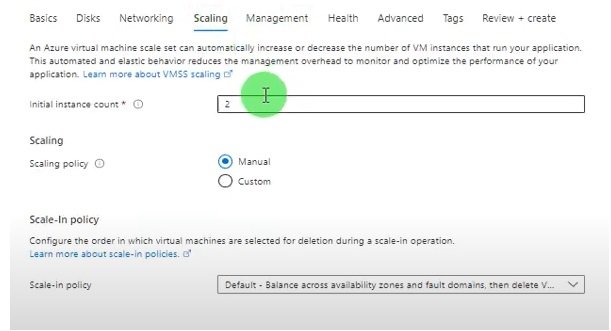
- Enter instance count.
- Scaling policy:
- Manual
- Custom
- Management:
- Health:
- Advanced:
- Tags:
- Create
- Scaling Configuration: go to scale set and edit scaling section.
-
-
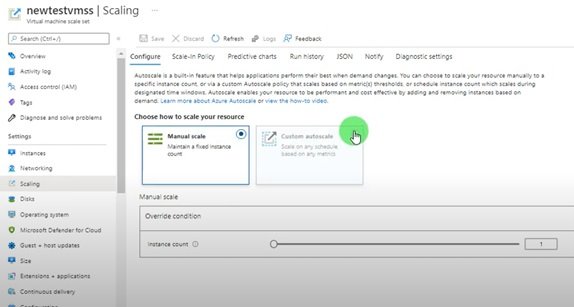
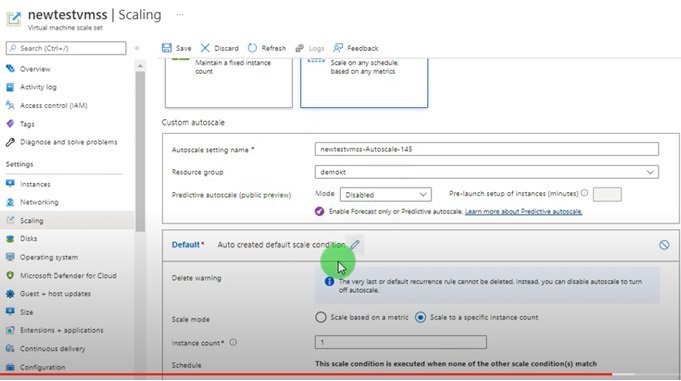
- Enter required details:
- select scale based on a metrics:
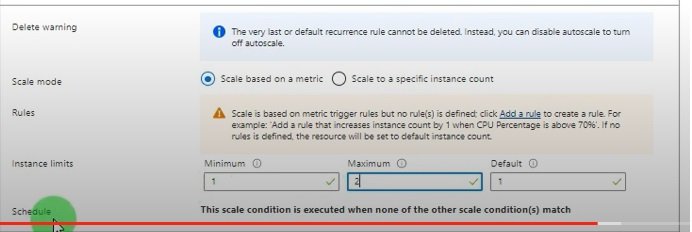
- Enter min, max and default numbers.
- Click on add a rule.
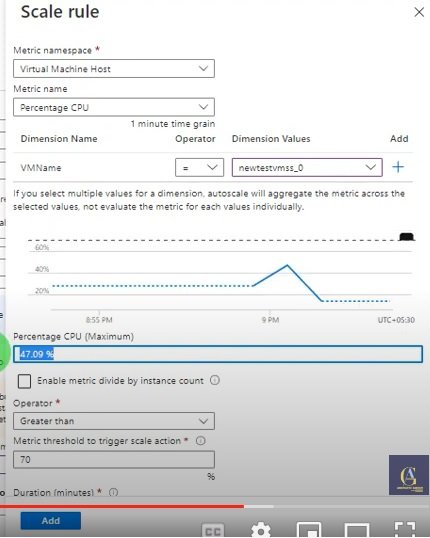
- Create profile:
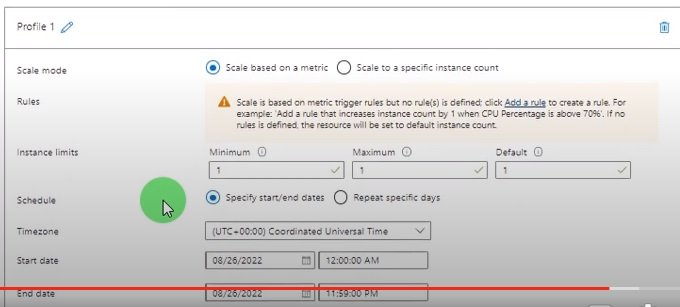
- Increase CPU utilization to check horizontol scaling:
- Run the following script in the VM created.
-
paste the following text into a vbs file:
Dim goal
Dim before
Dim x
Dim y
Dim i

goal = 2181818

Do While True
before = Timer
For i = 0 to goal
x = 0.000001
y = sin(x)
y = y + 0.00001
Next
y = y + 0.01
Loop
-
- Open a txt file and save as name.vbs and run in the command prompt
- right click file and click more options and choose to run on command prompt.
- now check the CPU utilization, goes high.
- Custom Autoscaling.
- Manual scaling:
- Step 1: Create a Vnet, Subnet1, SG with Allow port 3389,80 and attach with Subnet1, VM & Install all required applications(IIS):
Creating VM Scale Sets through portal using scale sets to deploy 2 VMs Manually:
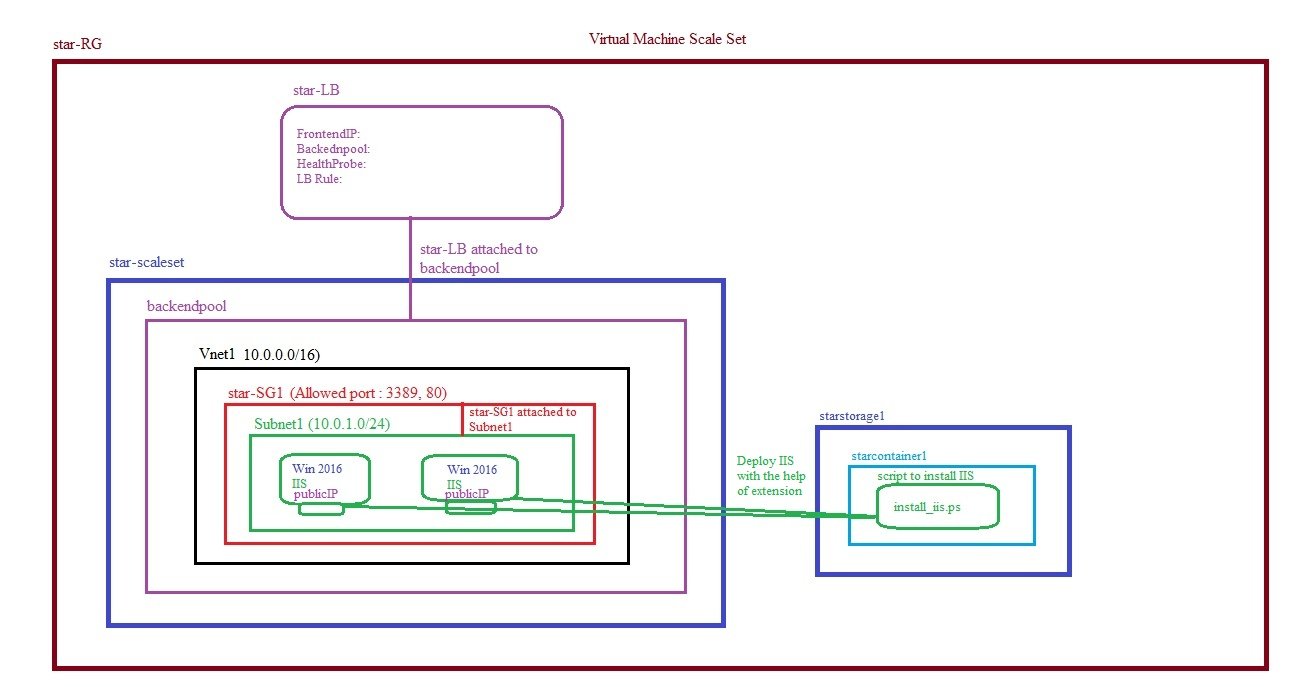
- Step1: Create a vnet, Subnet
- Vnet1 (10.0.0.0/16)
- Subnet1 (10.0.1.0/24)
- Step 2: Create Load Balancer, FrontendIP, Backendpool, Inbound Rule, Healthprobe
- star-LB (sku=standard, type = public, Tier = Regional)
- FrontendIP (IPv4, LBPublicIP (standard, Regional))
- backendpool(Vnet1), No Vms are attaching in the target as it will be done through scaleset.
- LBRule1 (attach FrontendIP & backendpool)
- starHP (port 80, backend port 80)
- Step 3: Create Network Security Group (star-SG1), Inbound security rule allowed 3389, 80. Associate star-SG1 to Subnet1.
- star-SG1
- Inbound Security Rule Allowed 3389, Priority 100, Allowed 80, Priority 200
- Associate star-SG1 with Subnet1
- Step 4: Create Storage Account, Container, upload script
- starstorage1 (Standard, LRS)
- starcontainer1
- upload blob install_iis.ps1
- Step 5: Create Scale Set
- star-scaleset
- Orchestration Mode: Uniform (Automatic upgrade: it applies to all instances if we make any changes in scale set)
- security type: Standard
- Scaling: Manually update the capacity
- Instance count: 2 (two vms will be created and attached with backednpool)
- Image: Windows server 2016
- Size: Standard_B1s
- Administrator account:
- Networking:
- virtual network: Vnet1
- Network Interface: NIC for the instances created in virtual machine scale set, to assign public IP to VMs click edit and Enabled public IP address.
- Load balancing, Azure load balancer: select star-LB, backend pool.
- Management:
- Upgrade policy: Automatic (if any changes made in instance which will update automatically in all other instances, it only supports with uniform option which was selected in orchestration mode)
- Advanced: Extension +Add and search custom scription extension and select, browse script file (script has been uploaded in step4, which will be use to install IIS in instances)
- Review & Create
- Step 6: Testing
- Go to virtual machine scale set and check instances, click any instance and copy pubic IP, paste it in browser to display IIS default page.
- Upgrade policy: Automatic
- Go to load balancer: Backednpool: check both instances appear, FrontendIP, copy and paste IP in browser.
Virtual Machines
When VM is created following resources are also created.
- VM
- Disks: OS & Temp Disk: When you create a VM, a O/S disk is created with VM's name, this disk can be viewed in All Services/storage/Block storage/disks. A temp disk is also created and the data in this stored temporarily.
- NIC:
- Private & Public IP: Linked to NIC
- Network Security Group: Linked to NIC
- Delete VM: with/without resources
- Go to All Services/VM/select VM from the list and click delete (it will only delete VM without other resources)
- Go to All Services/VM/click on VM to go into VM blade and select delete, it will give options to select which other resources also need to delete.
Create a windows VM through GUI web portal
- Login in to portal: portal.azure.com and provide credentials.
- Go to all Services/Compute/Virtual Machine/Create a Virtual Machine
- Enter details, * is required field
- Basics:Create a virtual machine that runs Linux or Windows.
- Subscription*
- Resource Group*
- Virtual Machine Name* : Enter VM name
- Region*: select region from drop down list to which VM should be created.
- Availability Options:
- No Infrastructure redundancy required:
- Availability Zone:
- Virtual Machine scale set:
- Availability Set:
- Zone Options:
- Self-selected zone: Choose up to 3 availability zones, one vm per zone
- Azure-selected zone: Let Azure assign the best for your needs.
- Availability Zone *: you can select multiple zones, selecting multiple zones will create one VM per zone.
- Zone1
- Zone2
- Zone3
- Security Type:
- Standard: The basic level of security for your virtual machines.
- Trusted launch virtual machines: Protects against persistent and advanced attached on Gen 2 virtual machines with configurable features like secure boot and virtual platform module (vTPM).
- Confidential virtual machines: On top of Trusted launch, Confidential virtual machine offers higher confidentiality and integrity guaranteed with hardware-based trusted execution environment.
- Image *:
- select image form the drop down
- click see all images and click my images for your custom images.
- Capture VM Image:
- Go to virtual machine to which you want to take image or capture.
- Click capture: Image, Restore.
- Subscription, RG, Region.
- Share image to Azure compute gallery: yes, share it to a galllery as a VM image version, No capture only a managed image.
- Automatically delete this virtual machine after creating the image: check box (if you select this than vm will be deleted after image capture).
- Gallery details:
- Target Azure compute gallery: create new or select.
- Operating system state:
- Generalized: VMs created from this image require hostname, admin user, and other VM related setup to be completed on first boot.
- Specialized: VMs created from this image are completely configured and do not require parameters such as hostname and admin user/password.Sysprep: existing configuration can be removed
- windows:
- Linux:
-

- Capturing a virtual machine image will make the virtual machine unusable. This action can not undone.
- Target VM image definition:
- Version Details: 1.0
- Replication:
- Review & Create. (VM will be stopped during image capture)
- In Azure compute gallery check the image.
- VM architecture: It is processor architecture,
- x64:
- Arm64 : it is disabled in windows image, it work with linux images.
- Run the azure sport discount: check box (Azure offers unused capacity on reduced price but it is not secure as VMs can be deleted by azure.
- capacity only: Your virtual machine will be evicted when Azure's excess capacity disappears.
- Price and capacity: Your virtual machine will be evicted when Azure's excess capacity disappears, or costs exceed your specified max price.
- Eviction policy: Your virtual machine will be evicted when Azure's excess capacity disappears, or costs exceed your specified max price.
- Stop/Deallocate
- Delete
- Size *: select size of image
- Enable Hibernation: check box
- Administrator Account * : To access windows VM, you will Need to provide administrator's credentials, In linux you will have an option to use admin credentials or SSH using private & public key. Check linux vm for details.
- username
- Password
- confirm password
- Inbound port rules: It works as a firewall, Select which virtual machine network ports are accessible from the public internet. you can specify more limited or granular netowrk access on the Networking tab.
- Public inbound ports * : None, Allow selected ports (when you click it allow to select from inbound ports),
- Inbound ports *: select one or more ports (HTTP (80), HTTPS (443), SSH (22), RDP (3389))
- Licensing: Save up to 49% with a license you already own using azue hybrid benefit.
- Would you like to use existing server license: check box
- Disks:
- Disk Options:
- OS Disk Type: O/S disk is created with VM's name, this disk can be viewed in All Services/storage/disks. Temp disk is also created, data stored in the disk will be removed when VM is restared.
- premium SSD
- Standard SSD
- Standard HDD
- Delete with VM: when check box is selected, when VM is deleted then disk will be deleted as well.
- Key management: Platform managed key, customer managed key,
- OS Disk Type: O/S disk is created with VM's name, this disk can be viewed in All Services/storage/disks. Temp disk is also created, data stored in the disk will be removed when VM is restared.
- Encryption Type:
- (Default) Encryption at-rest with a platform-managed key: Data in the disk will be encrypted and key is managed by Microsoft.
- Azure disk storage encryption automatically encrypts your data stored on Azure managed disks (OS and data disks) at rest by default when persisting it to the cloud.
- Encrypt at host: check box
- Enable Ultra Disk compatability: check box
- Data disk for VM:
- Create Data disk and attached with VM1. The size of the VM determines the type of storage you can use and the number of data disks allowed. Go to VM/Disks and created or attach a disk.
- There are two ways to create disk
- Method 1:
- Go to VM/disk and click create and attach a data disk.
- Method 2:
- Go to All Services/storage/Disks/create a disk.
- Go to VM and attach disk.
- Connect to VM and open file explorer, if disk is not visible then go to disk management and select the disk and create volume and format with NTFS and assign drive letter.
- Detached from VM1 and attached to VM2.
- Go to VM1/Settings/Disk/select the disk and click detach at the end.
- Go to VM2/settings/disk and click attach an existing disk and select the disk and save it.
- Disk Options:
- Networking: When creating a virtual machine, a network interface will be created for you.
- virtual network: create new or select from existing
- Public IP: create new or select from existing
- NIC network security group:
- None
- Basic
- Advanced.
- Public inbound ports *: None, allow selected ports then it will enable inbound ports.
- Inbound ports *: select one or more ports (HTTP (80), HTTPS (443), SSH (22), RDP (3389))
- Outbound ports: by default all outbound ports are enabled (internet).
- Delete NIC when vm is deleted: check box
- Enable accelerated networking: check box
- Load Balancing:
- None
- Azure load balancer
- Application gateway.
- Management:
- Identity : Enable system assigned managed identity: check box
- Microsoft Entra ID (Login with Microsoft Entra ID): check box: RBAC role assignment of Virtual Machine Administrator Login or Virtual Machine User Login is required when using Microsoft Entra ID login
- Auto-shutdown: check box
- Backup: Enable backup : check box
- Site Recovery: Enable disaster recovery: check box
- Guest OS updates : enable hotpatch : check box
- Patch orchestration options :
- Automatic by OS: Windows Automatic Updates. Best for scenarios where interrupting workloads for patching isn't issue.
- Azure orchestrated: Orchestrates patches across availability sets. Best for workload availability.
- Manual updates: Turns off windows automatic updates, install patches manually or pick a different solution.
- Image default: uses the imag's default patch option.
- Monitoring:
- Alerts (Enable recommened alert rules): check box
- Diagnostics (Boot diagnostics):
- Enable with managed storage account
- Enable with custom storge account
- Disable
- Enable OS guest diagnosts: check box
- Health (Enable application health monitoring: check nox
- Advanced:
- Extensions (Extensions provide post-deployment configuration and automation) : select an extension to install
- VM Applications (VM applications contain application files that are securely and reliably downloaded on your VM after deployment. In addition to the application files, an install and uninstall script are included in the application. You can easily add or remove applications on your VM after create): select a vm application to install
- Custom data (Pass a script, configuration file, or other data into the virtual machine while it is being provisioned. The data will be saved on the VM in a known location.
- Custom data: enter script
- User data (Pass a script, configuration file, or other data that will be accessible to your applications throughout the lifetime of the virtual machine. Don't use user data for storing your secrets or passwords.: Enable user data (check box)
- Performance NVMe (Enable capabilities to enhance the performance of your resources.): check box
- Host (Azure Dedicated Hosts allow you to provision and manage a physical server within our data centers that are dedicated to your Azure subscription. A dedicated host gives you assurance that only VMs from your subscription are on the host, flexibility to choose VMs from your subscription that will be provisioned on the host, and the control of platform maintenance at the level of the host.)
- Host Group: select host group if it is defined
- Capacity reservations (Capacity reservations allow you to reserve capacity for your virtual machine needs. You get the same SLA as normal virtual machines with the security of reserving the capacity ahead of time.)
- None:
- Proximity Placement group (Proximity placement groups allow you to group Azure resources physically closer together in the same region)
- select from the list
- Tags : Name, Value, Resource
- Review+create: it will review and create.
- Access Windows VM:
- open downloaded RDP and enter public IP, username & password.
Create a windows VM install IIS using VM Extension (with powershell script).
- During the VM creation in advanced tab you can select and install extensions which allows post-deployment installation and configuration,
- Installing IIS server with Extension:
- Create a new VM and enter all required detials and in Advanced tab search custom script extension.
- Browse script file:
- create a notepad file (install_iis.ps1) and paste this script to install IIS: Install-WindowsFeature -name web-server -IncludeManagementTools .
- upload this file on storage account.
- + storage account to create storage account and give name starstorage1, account kind = storage (general purpose v1), performance = standard, Replication = LRS, Location =UK South, Resource Group = star-RG and click ok
- click on star-storage1, click + container to create a container, name = starcontainer1, and click on starcontainer1 and upload the file.l
- Review & create.
- To check : copy public IP and paste it in browser.
Create a windows VM through Powershell
Create a windows VM through Terraform
Create a linux VM through GUI web portal
- Login in to portal: portal.azure.com and provide credentials.
- Go to all Services/Compute/Virtual Machine/Create a Virtual Machine
- Enter details, * is required field
- Basics:Create a virtual machine that runs Linux or Windows.
- Subscription* (Free Trial)
- Resource Group* (star-RG)
- Virtual Machine Name* : VM1
- Region*: (UK South): select region from drop down list to which VM should be created.
- Availability Options:
- No Infrastructure redundancy required:
- Availability Zone:
- Virtual Machine scale set:
- Availability Set:
- Zone Options:
- Self-selected zone: Choose up to 3 availability zones, one vm per zone
- Azure-selected zone: Let Azure assign the best for your needs.
- Availability Zone *: you can select multiple zones, selecting multiple zones will create one VM per zone.
- Zone1
- Zone2
- Zone3
- Security Type:
- Standard: The basic level of security for your virtual machines.
- Trusted launch virtual machines: Protects against persistent and advanced attached on Gen 2 virtual machines with configurable features like secure boot and virtual platform module (vTPM).
- Confidential virtual machines: On top of Trusted launch, Confidential virtual machine offers higher confidentiality and integrity guaranteed with hardware-based trusted execution environment.
- Image *:
- select image form the drop down
- click see all images and click my images for your custom images.
- VM architecture: It is processor architecture,
- x64:
- Arm64 : it is disabled in windows image, it work with linux images.
- Run the azure sport discount: check box (Azure offers unused capacity on reduced price but it is not secure as VMs can be deleted by azure.
- capacity only: Your virtual machine will be evicted when Azure's excess capacity disappears.
- Price and capacity: Your virtual machine will be evicted when Azure's excess capacity disappears, or costs exceed your specified max price.
- Eviction policy: Your virtual machine will be evicted when Azure's excess capacity disappears, or costs exceed your specified max price.
- Stop/Deallocate
- Delete
- Size *: select size of image
- Enable Hibernation: check box
- Administrator Account * - Authentication type: There are two authentication types available, password or SSH public key.
- Password based authentication:
- username
- Password
- confirm password
- Key pair:
- It is a combination of public key + private key where azure keep public key and user downloads private key.
- Azure do not store private key, if lost then need to generate new key. 3 options avilable (new key generate, use existing key generated by azure earlier, use existing key generated by user using putty gen)
- When all remaining fields entered and click create, system will generate new key pair and give option to download private key. If private key is not downloaded and later it cannot be downloaded.
- Covert .pem to .ppk:
- keypair1.pem will be downloaded, SSH with putty required .ppk and putty gen can be use to convert .pem to .ppk
- open putty gen (when you download and install putty than putty gen is also installed)
- click on Conversions and import key (browse to downloaded .pem file)
- click on save private key and enter file name and select type .ppk
- Generate new Kay pair:
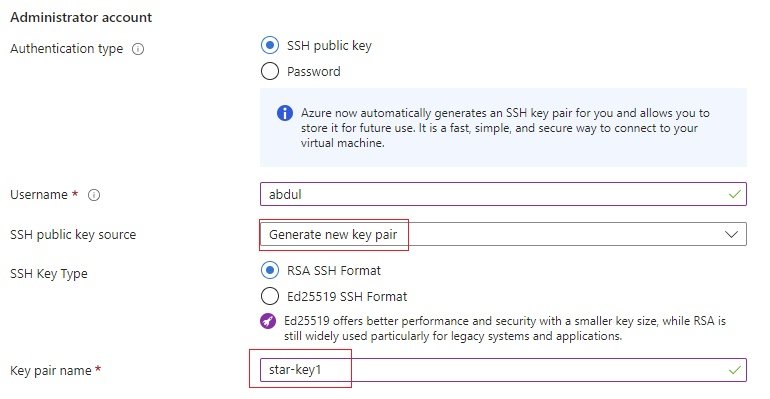
- Enter key pair name (starkey1) and download it in your laptop, When you try to access this VM through any ssh app, provide private key.
- Use existing key stored in Azure: select this option if a key is aleady genrated
- Use existing public key: (generated by user)
- Generate Public key: In this method user will generate both public and private key using putty gen.
- open puttygen and click generate, it will generate public key, copy and paste.
- click save private key and save it in your computer.
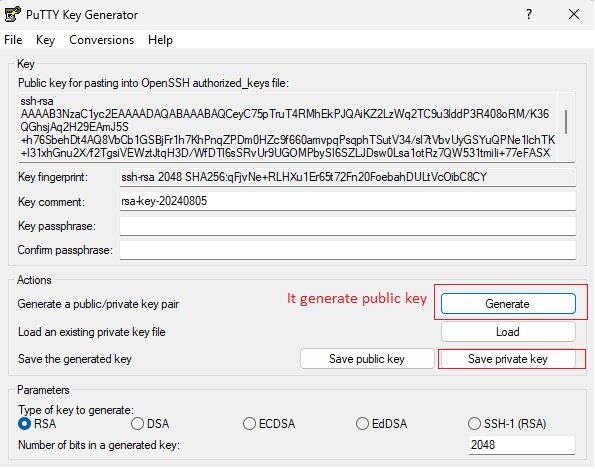
- For authentication with SSH private key authenticate with public key and establish connection.
- Enter this public key in Azure.
- Password based authentication:
- Inbound port rules: It works as a firewall, Select which virtual machine network ports are accessible from the public internet. you can specify more limited or granular netowrk access on the Networking tab.
- Public inbound ports * : None, Allow selected ports (when you click it allow to select from inbound ports),
- Inbound ports *: select one or more ports (HTTP (80), HTTPS (443), SSH (22), RDP (3389))
- Licensing: Save up to 49% with a license you already own using azue hybrid benefit.
- Would you like to use existing server license: check box
- Disks: Azure VMs have one operating system disk and a temporary disk for short-term storage. You can attach additional data disks. The size of the VM determines the type of storage you can use and the number of data disks allowed.
- VM Disk encryption: Azure disk storage encryption automatically encrypts your data stored on Azure managed disks (OS and data disks) at rest by default when persisting it to the cloud.
- Encrypt at host: check box
- OS disk:
- Disk size: select size from list
- OS disk type * (premium SSD, Standard SSD, Standard HDD, etc..),
- Delete with VM: check box
- Key management: Platform managed key, customer managed key,
- Enable Ultra Disk compatability: check box
- Data Disks: You can add and configure additional data disks for your virtual machine or attach existing disks. This VM also comes with a temporary disk.
- Create and attach a new disk.
- Attach an existing disk
- Networking: When creating a virtual machine, a network interface will be created for you.
- virtual network: create new or select from existing
- Public IP: create new or select from existing
- NIC network security group:
- None
- Basic
- Advanced.
- Public inbound ports *: None, allow selected ports then it will enable inbound ports.
- Inbound ports *: select one or more ports (HTTP (80), HTTPS (443), SSH (22), RDP (3389))
- Outbound ports: by default all outbound ports are enabled (internet).
- Delete NIC when vm is deleted: check box
- Enable accelerated networking: check box
- Load Balancing:
- None
- Azure load balancer
- Application gateway.
- Management:
- Identity : Enable system assigned managed identity: check box
- Microsoft Entra ID (Login with Microsoft Entra ID): check box: RBAC role assignment of Virtual Machine Administrator Login or Virtual Machine User Login is required when using Microsoft Entra ID login
- Auto-shutdown: check box
- Backup: Enable backup : check box
- Site Recovery: Enable disaster recovery: check box
- Guest OS updates : enable hotpatch : check box
- Patch orchestration options :
- Automatic by OS: Windows Automatic Updates. Best for scenarios where interrupting workloads for patching isn't issue.
- Azure orchestrated: Orchestrates patches across availability sets. Best for workload availability.
- Manual updates: Turns off windows automatic updates, install patches manually or pick a different solution.
- Image default: uses the imag's default patch option.
- Monitoring:
- Alerts (Enable recommened alert rules): check box
- Diagnostics (Boot diagnostics):
- Enable with managed storage account
- Enable with custom storge account
- Disable
- Enable OS guest diagnosts: check box
- Health (Enable application health monitoring: check nox
- Advanced:
- Extensions (Extensions provide post-deployment configuration and automation) : select an extension to install
- VM Applications (VM applications contain application files that are securely and reliably downloaded on your VM after deployment. In addition to the application files, an install and uninstall script are included in the application. You can easily add or remove applications on your VM after create): select a vm application to install
- Custom data (Pass a script, configuration file, or other data into the virtual machine while it is being provisioned. The data will be saved on the VM in a known location.)
- Custom data: enter script
- User data (Pass a script, configuration file, or other data that will be accessible to your applications throughout the lifetime of the virtual machine. Don't use user data for storing your secrets or passwords.: Enable user data (check box)
- Performance NVMe (Enable capabilities to enhance the performance of your resources.): check box
- Host (Azure Dedicated Hosts allow you to provision and manage a physical server within our data centers that are dedicated to your Azure subscription. A dedicated host gives you assurance that only VMs from your subscription are on the host, flexibility to choose VMs from your subscription that will be provisioned on the host, and the control of platform maintenance at the level of the host.)
- Host Group: select host group if it is defined
- Capacity reservations (Capacity reservations allow you to reserve capacity for your virtual machine needs. You get the same SLA as normal virtual machines with the security of reserving the capacity ahead of time.)
- None:
- Proximity Placement group (Proximity placement groups allow you to group Azure resources physically closer together in the same region)
- select from the list
- Tags : Name, Value, Resource
- Review+create: it will review and create. (system will open a windows to download keypair)
- Access Linux VM:
- There are two authentication types, password or SSH. If SSH has been selected during vm creation then it generates private and public key.
- public key is linked with Azure VM and private key is located in user's computer, for authentication private key authenticate with public key and establish connection.
- change star-kay1.pem into .ppk file, open putty gen/conversion/import key and locate .pem and save the key in .ppk
- Open putty/MobaXterm and enter VM public IP, SSH/Auth/Browse and locate private key.
- Login as: enter the name privded during creation of VM. system will not ask for password if key pair method has been used. sudo su to get root account.
Create a linux VM through script
Create a linux VM through Terraform (check terraform \ azure resources \ VM)
Create a Linux VM through powershell
VM Blade
- Overview
- Connect: download rdp to connect
- start, stop ,restart, delete, refresh vm
- capture image & restore point
- open in mobile
- view complete details of VM configuration.
- Activity Log
- view all steps performed on this VM
- Access Control (IAM):
- Check access:
- View my access
- check access
- add role assignment
- view access to this resource (vm)
- view deny assignments
- New Permission management
- Role Assignments:
- All roles
- Job functions
- Privileged
- roles
- All
- Job function roles
- Privileged administrator roles
- Deny Assignments
- Classic administrators
- Check access:
- Tags:
- Name
- Value
- Diagnose and solve problem:
- common problems
- Troubleshooting tools
- Connect:
- You can download RDP
- it shows: admin user name, public IP address, ports
- More ways to connect: Bastion, Connect in Browser, Native SSH, Serial Console
- Networking:
- Network Settings:
- Attach network interface
- Detach network interface
- view topology
- Troubleshoot
- Network security group: link to security group
- Inbound / Outbound roles, create new rule.
- Load balancing: add load balancing
- application security groups: add application security groups
- network manager: create a network manager
- Network Settings:
- Settings:
- Disks:
- Capture Image:
- Go to virtual machine to which you want to take image or capture.
- Click capture: Image, Restore.
- Subscription, RG, Region.
- Share image to Azure compute gallery: yes, share it to a galllery as a VM image version, No capture only a managed image.
- Automatically delete this virtual machine after creating the image: check box (if you select this than vm will be deleted after image capture).
- Gallery details:
- Target Azure compute gallery: create new or select.
- Operating system state:
- Generalized: VMs created from this image require hostname, admin user, and other VM related setup to be completed on first boot.
- Specialized: VMs created from this image are completely configured and do not require parameters such as hostname and admin user/password.Sysprep: existing configuration can be removed
- windows:
- Linux:
-
- Capturing a virtual machine image will make the virtual machine unusable. This action can not undone.
- Target VM image definition:
- Version Details: 1.0
- Replication:
- Review & Create. (VM will be stopped during image capture)
- In Azure compute gallery check the image.
- Swap OS disk: O/S disk container operating system files and any application installed in the VM, for any reason if o/s disk is corrupt then it can be restore with O/S disk snapshot.
- Take snapshot of O/S disk: Go to all services/storage/object, file, and block storage/Disks/select disk and click create snapshot.
- Create a disk using snapshot: Go to disks and create, in source type select snapshot and select created disk snapshot in step 1.
- To perform swapping: Go to VM/settings/disks click swap OS disk., choose disk created in step2, enter VM name and click ok. It will stop VM and perform swapping.
- Start VM.
- Create and attach a new disk: Check in Storage/Disks.
- Attach existing disks: Check in Storage/Disks.
- Extensions + applications
- Add extensions
- Add VM Applications
- Operating system: view details of OS/ computer name, admin username, licensing etc.
- configuration
- advisor recommendations
- properties: Displays system properties
- Locks: add or remove locks
- Disks:
- Availability + scale:
- Size: change the size, if VM is running will be restarted.
- Availability + scaling: can add availability and scaling services.
- security:
- Identity:
- system assigned
- user assigned
- Microsoft defender for cloud
- Identity:
- Backup + disaster recovery:
- Backup: creae new backup vault
- Disaster recovery: can be replicate vm to another azure region for business continuity and disaster recovery needs.
- Restore point: create new restore point or restore.
- Operations:
- Auto-shutdown: Schedule to shutdown VM
- run command:
- Run powershell script
- Disable Network Level Authentication
- Disable windows update
- Enable admin account
- Enable EMS
- Enable Remote PS
- Enable windows update
- ipconfig
- RDP settings
- Reset RDP Cert
- Set RDP Port
- updates:
- Azure update manager
- Guest OS updates
- health monitoring: Enable application health monitoring
- configuration management: Enable
- policies:
- Assign policy
- inventory
- change tracking
- Monitoring:
- Insights
- Alerts:
- Setup recommended alert rules
- Metrics:
- add metrics
- Diagnostic settings
- Logs
- Workbooks
- Automation:
- Tasks (preview)
- Export template
- Help:
- Resource health
- Boot diagnostics: shows screen
- serial console: open serial console:
- reset password:
- Reset password
- Reset configuration only
- connection troubleshoot
- performance diagnostics
- VM inspector (preview)
- Redeploy + reapply
- support + troubleshooting
- Overview
Star/Stop VMs during Off-Hours- Automation
- Start/Stop virtual machine on a schedule time (start at 8AM and stop at 6PM)
- Go to portal and search start/stop VMs during Off-hours
- visualizes the start and stop of VM
- Alerts and email notification for VM state change
- Start/Stop virtual machine on a schedule time (start at 8AM and stop at 6PM)
Disks + images:
- Custom images:
- Disks:
- O/S disk of VM:
- When you create a VM, a O/S disk is created with the VM's name, this disk can be viewed in All Services/Storage/Disks.
- Create Manage, Detach & Attach Data Disk:
- Azure managed disks are block-level storage volumes that are managed by Azure and used with Azure virtual machines. Managed disks are like a physical disk in an on-premises server but, virtualized. The size of the disk and number of data disks allowe determines the type of VM selected. There are two ways to create disk.
- Method 1:
- Go to VM/disk and click create and attach a data disk.
- Method 2:
- Go to All Services/storage/Disks/create a disk. Go to VM and attach disk. Connect to VM and open file explorer, if disk is not visible then go to disk management and select the disk and create volume and format with NTFS and assign drive letter.
- Detached from VM1 and attached to VM2.
- Go to VM1/Settings/Disk/select the disk and click detach at the end.
- Go to VM2/settings/disk and click attach an existing disk and select the disk and save it.
- Create a managed Disk:
- Basics:
- Subscription: Pay as you go
- Resoruce Group: StarRG
- Disk Details:
- Disk Name: data_disk1
- Region: Uk South
- Availability zone: zone1
- Source type: None, Snapshot, Storage blob, Disk, Disk restore point, public image.
- Size: 10GB
- Encryption:
- Key management: platform-managed key, customer-managed key,
- Networking:
- Network Access: Enable public access from all networks, Disable public access and enable private access, Disable public and private access
- Advanced:
- Shared disk: yes/no (Allow this disk to be attached to two or more virtual machines, depending on storage type and disk size. When shared disk is enabled host caching is unavailable)
- On-Demandbursting: check box (Allow this disk to burst beyond original provisioned target up to 30,000 IOPS and 1,000 Mbps.)
- Performance plus: check box (Higher provisioned IOPS and throughput targets for Standard SSD, Standard HDD, or Premium SSD disks larger than 512 GiB. Performance plus upgrade is permanent and cannot be changed after the disk is created.)
- Data acess authentication mode: check box (Allow Data Access with Azure Active Directory Authentication for disk upload/export)
- Tags:
- Review+Create
- Azure managed disks are block-level storage volumes that are managed by Azure and used with Azure virtual machines. Managed disks are like a physical disk in an on-premises server but, virtualized. The size of the disk and number of data disks allowe determines the type of VM selected. There are two ways to create disk.
- Disk blade:
-
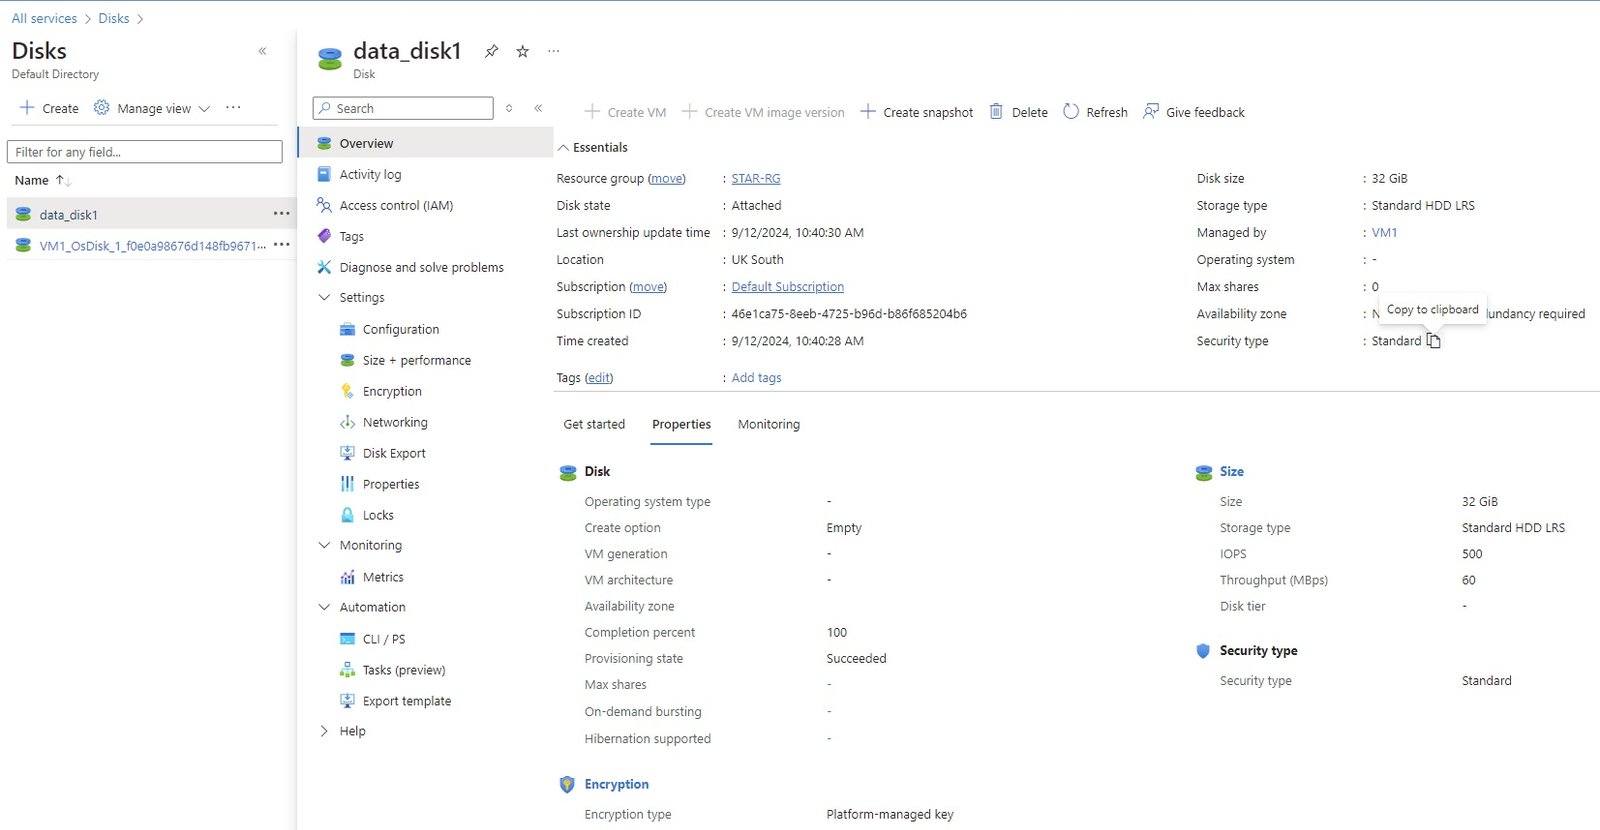
- Overview:
- Create VM:
- Create VM image version:
- Create snpshot:
- Delete:
- Activity log:
- Access control (IAM):
- Tags:
- Diagnose and solve problems:
- Resource visualizer:
- Settings:
- Configuration:
- Size+Performance:
- Encryption:
- Networking:
- Disk Export:
- Properties:
- Locks:
- Monitoring:
- Automation:
- Help
-
- Copy Data using AZCopy:
- Copy the data from local laptop to Azure storage or Azure storage to local laptop, storage account to storage account.
- Threre are many ways using GUI or Command Line to copy data, in GUI you can do by using Azure explorer.
- Command line by using AZCopy utility:
- Go to google and search AZ copy, download utility based on O/S. (windows 64 bit).
- Extract the downloaded folder.
- Set environment to use azcopy.exe ( copy azcopy.exe and go to windows/system32/paste it here.
- open cmd and execute azcopy.
- Go to folder/file to which need to copy/transfer.
- C:\Users\user\azcopy copy "C:\localpath" "Container URL/SAS Token" --recursive=true (to copy container url, go to container/properties and copy url, generate SAS token: Go to storage account/security + networking/shared access signature, scroll down and click Generae SAS and connection string, if it is grayed out, select Allowed resource types and try)
- example (C:\Users\Admin>azcopy copy "C:\Users\Admin\Desktop\star cloud\devops\azure\Storage\Images" "https://starstorage2.blob.core.windows.net/blobcontainer1/sv=2022-11-02&ss=bfqt&srt=sco&sp=rwdlacupiytfx&se=2024-09-12T20:09:42Z&st=2024-09-12T12:09:42Z&spr=https&sig=DpXG9wf9wKqnkvgDPHeMvuBb36RXzrrLxdhrhdgthHM%3D"=-REDACTED- --recursive)
- Authentication Error:
-
INFO: Scanning...
INFO: Autologin not specified.
INFO: Authenticating to destination using Azure AD
INFO: Any empty folders will not be processed, because source and/or destination doesn't have full folder supportJob 999f5f49-405c-8f41-5ee3-476974829fa3 has started
Log file is located at: C:\Users\Admin\.azcopy\999f5f49-405c-8f41-5ee3-476974829fa3.logINFO: Authentication failed, it is either not correct, or expired, or does not have the correct permission PUT https://starstorage2.blob.core.windows.net/blobcontainer1/sv=2022-11-02&ss=bfqt&srt=sco&sp=rwdlacupiytfx&se=2024-09-12T20:09:42Z&st=2024-09-12T12:09:42Z&spr=https&sig=-REDACTED-
--------------------------------------------------------------------------------
RESPONSE 403: 403 This request is not authorized to perform this operation using this permission.
ERROR CODE: AuthorizationPermissionMismatch
--------------------------------------------------------------------------------
<?xml version="1.0" encoding="utf-8"?><Error><Code>AuthorizationPermissionMismatch</Code><Message>This request is not authorized to perform this operation using this permission.
RequestId:8cd1509c-601e-007c-710c-05aed1000000
Time:2024-09-12T12:08:40.4260833Z</Message></Error>
--------------------------------------------------------------------------------INFO: Authentication failed, it is either not correct, or expired, or does not have the correct permission PUT https://starstorage2.blob.core.windows.net/blobcontainer1/sv=2022-11-02&ss=bfqt&srt=sco&sp=rwdlacupiytfx&se=2024-09-12T20:09:42Z&st=2024-09-12T12:09:42Z&spr=https&sig=-REDACTED-
--------------------------------------------------------------------------------
RESPONSE 403: 403 This request is not authorized to perform this operation using this permission.
ERROR CODE: AuthorizationPermissionMismatch
--------------------------------------------------------------------------------
<?xml version="1.0" encoding="utf-8"?><Error><Code>AuthorizationPermissionMismatch</Code><Message>This request is not authorized to perform this operation using this permission.
RequestId:25f2b890-d01e-0046-800c-05b4a9000000
Time:2024-09-12T12:08:40.4276234Z</Message></Error>
-------------------------------------------------------------------------------- - Solution:
- C:\Users\user\azcopy login --tenant-id "e4696de2-4007-4ec6-83c6-df5f635aeef2"
- It gives url and code, paste url in browser and enter code: (To sign in, use a web browser to open the page https://microsoft.com/devicelogin and enter the code DN777B7NF to authenticate).
- If error continues with authentication, make sure user have authentication to storage:
- Go to storage account/IAM, +add role assignment and search for Storage Blob Data Contributor & Storage Queue Data Contributor, select user (aziz.cloud2408@gmail.com) and save it. wait for some time
- rerun the above command.
-
- Temporary Disk:
- Code
- Swap O/S Disk:
- Code
- Snapshots:
- Code
- Disk encryption sets
- O/S disk of VM:
- Capacity + placement
- Related Services
- Monitoring+Operations
- Help
- Code
- Code
- VM Application definitions
- VM Application Versions
- VM Image definitions
- VM Image Versions
- Platform as a Service (Paas)
- App Services
- Cloud Services (extended support)
- Azure Spring Apps
- Virtual Instances for SAP Solutions
- Azure VMware Solution (discontinued)
- Serverless and Microservices:
Container Overview:
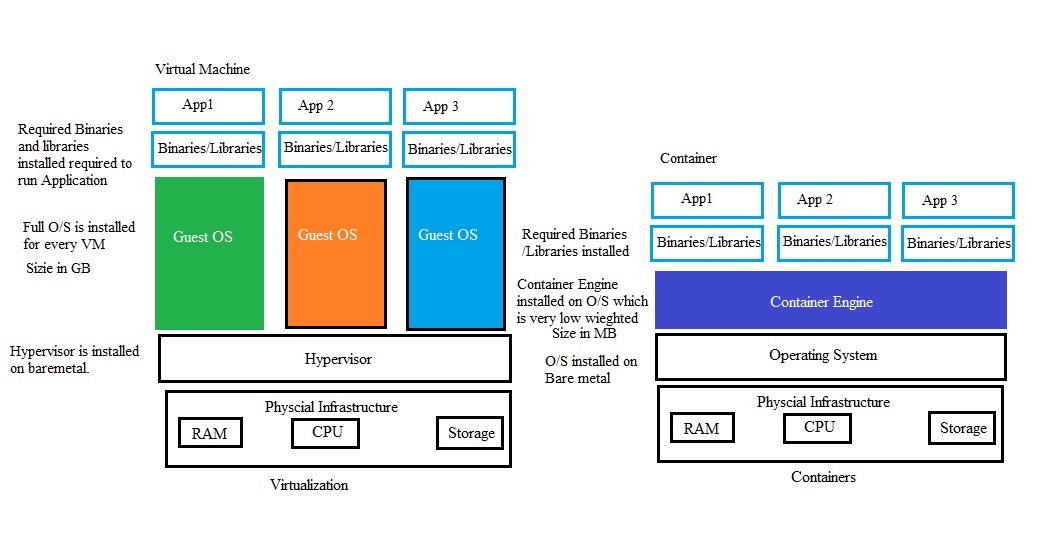
- In virtualization a hypervisor is intalled on bare metal or on operating system which virtualize and share the physical resources with guest o/s.
- operating sytem installed on hypervisor are heavy weight and take lot of physical resources. Application install on top of O/S which is required libraries/binaries from O/S.
- Applications does not required all binaries/libraries to run so to reduce usage containers has been introduced.
- In containers architecture an O/S in insalled on bare metal and a container Enginer (Docker) on top of O/S. This will be light weighted and min required libraries/binaries to run applications.
- Container is very small in size comapre to virtual machine.
- Installation of Docker on Linux (ubuntu):
- Create a linux (Ubuntu) VM.
- Connect to Ubuntu: open putty/MobaXterm
- $sudo su - (root user access)
- $apt update
- $sudo apt install docker.io
- $docker pull hello-world (only root user can access docker, assign permission to user)

- When you install docker a group is created with the name docker, whoever added to this group can run the docker commands, by default root user is added.
- When you create a user a group of is also created with the same name of user, this group is primary group to this user. you can add additional group to this user
- $sudo usermod -aG docker abdul (-a is used to assign as a secondary group, -A is use for primary group, G is used for group, docker is group, abdul is user), lof off and log on. or run $newgrp docker (it will add user to docker)
- Installation of Docker on Linux (Cent-OS):
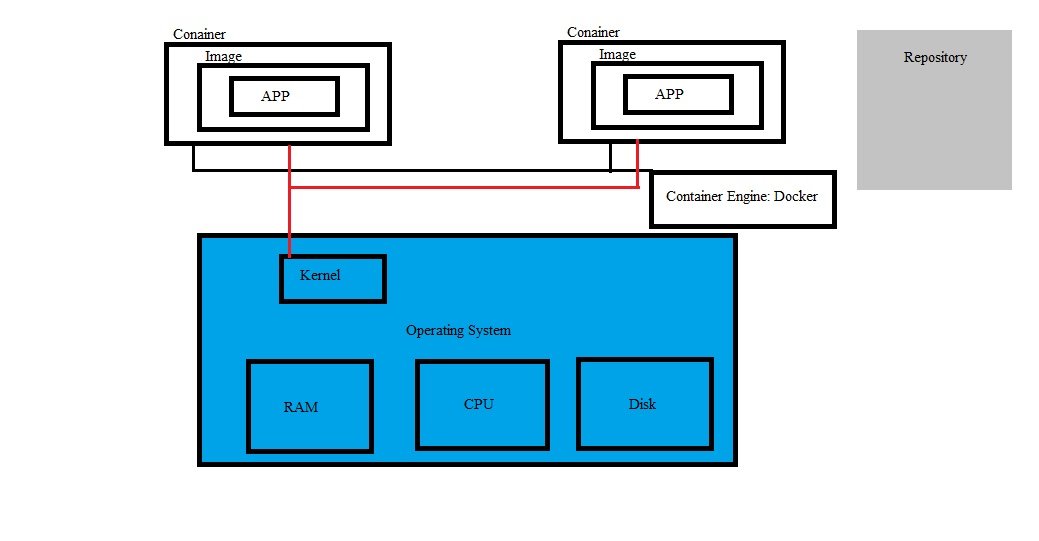
- Create a linux (Cent-Os) VM
- Connect to Cent-OS:
- Download Docker Repository:
- $dnf config-manager --add-repo https://download.docker.com/linux/centos/docker-ce.repo
- Check the repository of docker package.
- $dnf list docker-ce
- Install docker: https://www.linuxtechi.com/how-to/
- $dns install docker-cd --nobest -y
- Star Docker:
- $systemctl start docker
- $systemctl enable docker
- Create a container: When you create a container an image is required like when you create a VM an O/S is required.
- Images are available from various public repostories: Docker Hub https://hub.docker.com (required login details)
- It is an image not an operating system like in VM we use ISO to install O/S.
- connect container with repository:
- $docker login (enter docker hub login credentials)
- Download image (docker pull ubuntu)
- $docker pull ubuntu
- Create container:
- $docker container run ubuntu
- $docker container ls -a
- Container with Microsoft Azure:
- search for container instance or All Services/Container/Container Instances
- for further details go to containers in main listing.
- Container Apps
- Container Apps Environments
- Function App
- Kubernetes Services
- Kubernetes Services - Automatic
- High Performance Computing
- Baremetal Instances
- Barch Accounts
- Genomics accounts
- Quantum Workspaces
- SAP HANA on Azure
- Hybrid Cloud
- Azure Arc (Discontinued)
- Machines - Azure Arc
Security
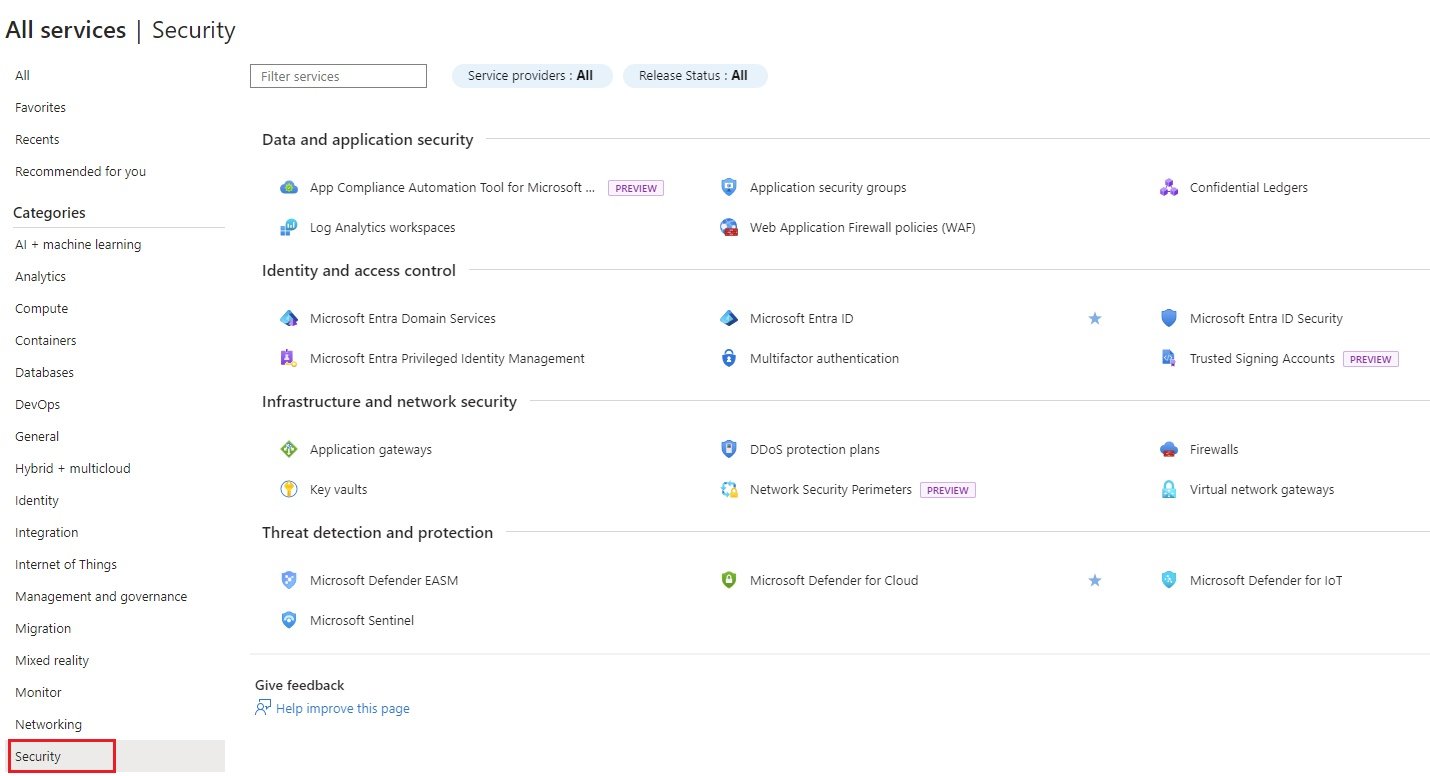
Data and application security
- App Compliance Automation Tool for Microsoft
- Application security groups
- Confidential Ledgers
- Log Analytics workspaces
- Web application Firewall Policies (WAF)
Identity and Access Control
- Microsoft Entra Domain Services
- Microsoft Entra ID
- Microsoft Entra ID Security
- Microsoft Entra Privileged Identity Management
- Multifactor Authentication
- Trusted Signing Accounts
Infrastructure and Network Security
- Application Gateways
- DDoS Protection Plans
- Firewalls
Key Vaults
- It is a cloud service that provides a secure store of secrets. You can securely store keys, passwords, certificates, and other secrets.
- Secrets Management - Azure Key Vault can be used to Securely store and tightly control access to tokens, passwords, certificates, API keys, and other secrets.
- Key Management - Azure Key Vault can be used as a Key Management solution. Azure Key Vault makes it easy to create and control the encryption keys used to encrypt your data.
- Certificate Management - Azure Key Vault lets you easily provision, manage, and deploy public and private Transport Layer Security/Secure Sockets Layer (TLS/SSL) certificates for use with Azure and your internal connected resources.
- LAB:
- Step 1: Create key vault
- Go to portal/ security / Infrastructure and Network Security / Key Vault: Create
- Basic:
- Subscription: select subscription
- Resource Group - star-RG
- key vault name: starkeyvault (name should be unique)
- Region: UK South
- Pricing Teir: Standard or Premium (can get enhanced security feature)
- Soft Delete : 90 days, (accidentally delete can be recovered in number of days)
- Purge protection: Enable / Disable (If enabled than any key vault deleted by mistake and soft delete is defined than during that period no one can delete vault permanently)
- Acces Configuration:
- To access a key vault in data plane, all callers (users or applications) must have proper authentication and authorization. Authentication establishes the identity of the caller. Authorization determines which operations the caller can execute
- permission Model: following 2 permission models available
- Azure Role based Control: management group/subscription/RG or keyvault level can be assigned
- vault access policy: we can set the permission for access key or certificate within key vault. (select user and edit permissions)
- Resource Access: Azure Virtual Machines for deployment, Azure Resource Manager for template deployment, Azure Disk Encryption for volume encryption.
- Networking:
- Enable public access: select check box
- Public Access: Allow access from : all networks, selected networks,
- Private Endpoint:
- Review & Create:
- Step 2: Manage keyvault: click on keyvault once deployed to manage and create objects within key vault.
- Overview:
- Activity Log:
- Tags:
- Diagnose & Solve Problems:
- Access policies: check user level permissions for key, secret and certificate.
- Events:
- Objects: The followings objects can be created in a key vault.
- Keys: Generates / Imports:
- Secrets: Generates / Imports:
- Upload options: Manual
- Name: vmpassword
- secret value: India123456789
- Content Type: optional
- Set Activation date: can set for future date
- Set Expiration date: enter expiry date for this secret
- Enabled: Yes/No
- Tags:
- Create: once deployed check details, can create different versions.
- Certificates: Generates / Imports:
- Settings:
- Access Configuration:
- Networking:
- Microsoft Defender for Cloud:
- Properties:
- Locks
- Monitoring:
- Alerts:
- Metrics:
- Diagnostic Settings:
- Logs:
- Insights:
- Workbooks
- Automation:
- CLI/PS
- Tasks:
- Export Templates:
- Help:
- code
- It is a cloud service that provides a secure store of secrets. You can securely store keys, passwords, certificates, and other secrets.
- Network Security Perimeters
- Virtual Network Gateways
Threat Detection and Protection
- Microsoft Defender EASM
- Microsoft Defender for Cloud
- Microsoft Defender for IoT
code
- code
- code
- code
code
- code
- code
- code
code
- code
- code
- code
Storage

- Hybrid and edge storage
Azure Edge Hardware Center
Azure Stack Edge / Data Box Gateway
- Block, File, Object storage (Storage Types:)
Disk Accesses:
- Code
Disk Encryption Sets:
- Code
Disks:
- Code
- Elastic SANs:
- Azure Native Qumulo Scalable File Service
- Azure NetApp Files
Snapshots:
- Create Disk Snapshot:
- Snapshot of data disk or O/S disk can be use to create an additional disk using snapshot.
- Go to All services/storage/object, file, and block storge/disks and select click the disk to which snapshot need to be created and click snapshot.
- Basics:
- Subscripton: select subscription
- RG: star-RG
- Instance Details:
- Name: data_disk1_snapshot1
- Region: grayed out because the disk data_disk1 is already in UK south region.
- Snapshot type: Incremental (Save on storage costs by making a partial copy of the disk based on the difference between the last snapshot.) or Full (Make a complete read-only copy of the selected disk.)
- Source type: Disk (grayed out)
- Source subscription: default subscription (grayed out)
- Source disk: data_disk1 (grayed out)
- Security type: Stanard (grayed out)
- VM Generation: Generation 1, Generation 2 (grayed out)
- VM Architecture: x64 (grayed out)
- Storage Type: Standard HDD, premium SSD, etc
- Encryption:
- key manageent: platform-managed key, customer-managed key, platform-managed and customer-managed keys
- Networking: Network access
- Eable pubic access from all networks.
- Disable public access and enable private access
- Disable public and private access
- Advanced: Data access authentication mode
- Enable data access authenticate mode: check box (Allow Data Access with Azure Active Directory Authentication for snapshot upload/export.)
- Tage, review and create
- Snapshot Blade:
-

- Overview:
- Create Disk:
- You can create a disk using snapshot. all files and folders will be copied to new disk from snapshot disk.
- Enter details which is similar as creating a new disk.
- copy snapshot:
- Delete:
- Delete snapshot
- Activity Log
- Access control (IAM)
- Tags
- Diagnose and solve problems:
- Settings:
- Encryption:
- Networking:
- snapshot export:
- Properties:
- Locks:
- Automation:
- CLI / PS
- Tasks:
- Export template
- Help
- VM Image Capture:
- Go to VM to which image need to be catpured. check in Compute/Virtual Machine.
-
- Create Disk Snapshot:
Storage Accounts:
Storage Overview
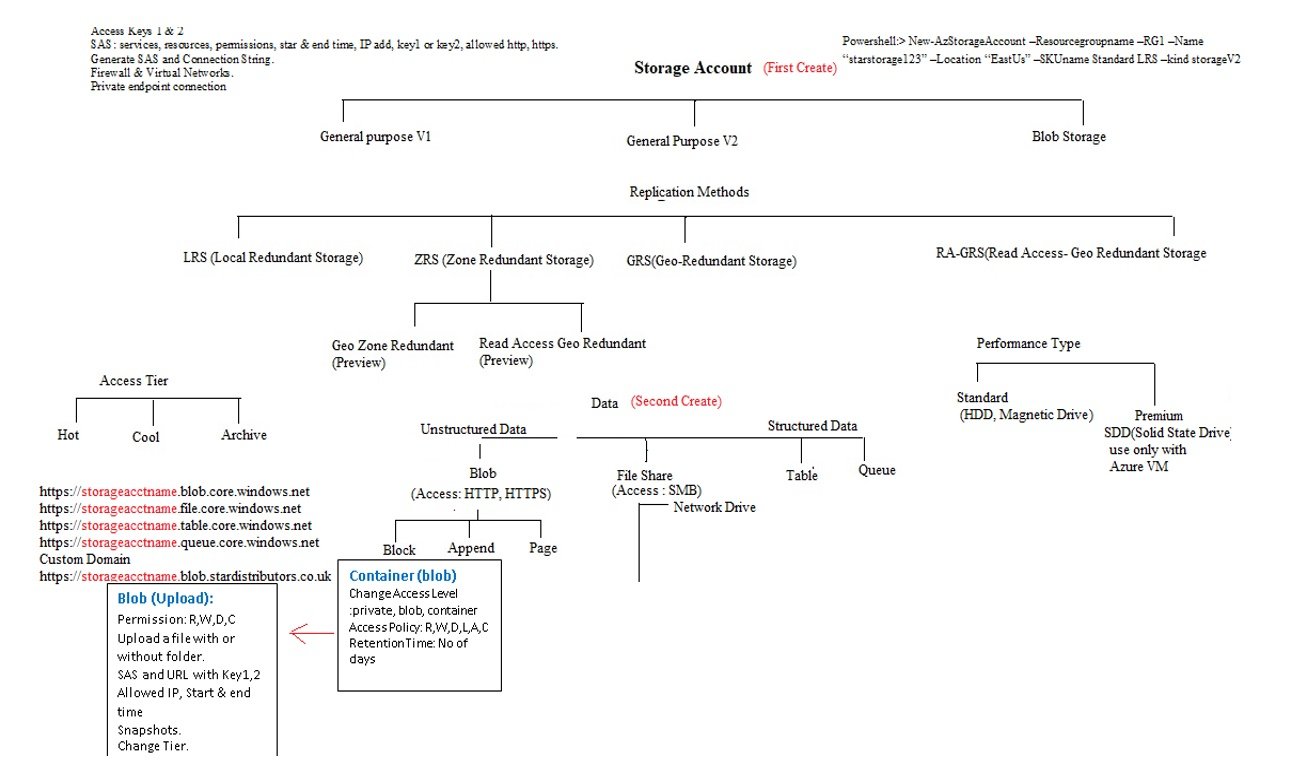
- Azure supports three types of storage:
- Block Storage:
- File Storge:
- Object Storage:
- Data types: Different type of data can be store in Azure storage.
- Structured Data: It is a fixed schema and data stored in tables rows & colums. Tables can not be edited rather another table will be created and linked.
- Semi-Structured Data: Data stored in Json format like key value pair. structure can be edited.
- UnStructured Data: Blob (container), any kind of data can be stored like images, doc, pdf, audio, video etc.
- Blob (Binary Large Object): Azure Blob Storage is an object storage solution provided by Microsoft Azure. It is designed to store vast amounts of unstructured data that can be accessed from anywhere in the world via HTTP or HTTPS. Blob Storage is optimised for storing large datasets and is widely used for serving images or documents directly to a browser, streaming video and audio, and backing up and archiving data.It has three types:
- Block Blob: files and documents, Size 200GB, These are ideal for storing text and binary data. Block blobs are made up of blocks of data that can be managed individually. They are the most common type of blob and are used for scenarios such as storing documents, images, and backups.
- Append Blob: Used by Azure for internal purpose. It is use for log files. Optimised for append operations, append blobs are used for logging applications. Data can only be added to the end of an append blob, making it suitable for scenarios where data needs to be appended sequentially.
- Page Blob: store disk VHD and attach to VM. Size 1TB: These are designed for random read/write operations and are used as the underlying storage for Azure Virtual Machine (VM) disks. Page blobs consist of pages, which are ranges of data identified by offset.
- File Share: It is like network file share (network drive) which is accessible with SMB (server message block) 3.0 protocol. It can be map as a drive in your local system where as blob cannot.
- Queue: used by developers, like credit card transaction where thousands of transaction takes place and which are in the queue and done one by one.
- Table: stored structured data
- Blob (Binary Large Object): Azure Blob Storage is an object storage solution provided by Microsoft Azure. It is designed to store vast amounts of unstructured data that can be accessed from anywhere in the world via HTTP or HTTPS. Blob Storage is optimised for storing large datasets and is widely used for serving images or documents directly to a browser, streaming video and audio, and backing up and archiving data.It has three types:
- Azure Storage workflow:
- Step 1: Create Storage Account:
- Step 2: Create Container (blob or folder):
- Step 3: Upload Data
- Performance type: Data are store on disk, azure offers standard & premium disk.
- Standard. It provides following type of services: It uses HHD drive (magnetic disk). It is use for less frequent use and large file storage.
- Container (Blob)/object based: unstructured data can be store, In AWS it is called S3.
- FileShare: File share (SMB), data can be shared with multiple instances.
- Queue: structured data can be store
- Table: structured data can be store
- Premium. It provides following types of services: It uses SSD drive (Solid State Disk).
- Block Blob + Append Blob:
- FileShare:
- Page Blob:
- Standard. It provides following type of services: It uses HHD drive (magnetic disk). It is use for less frequent use and large file storage.
- Account types:
- General Purpose V1: storage account is the oldest type of storage account. It offers storage for page blobs, block blobs, files, queues, and tables, but it is not the most cost-effective storage account type. It is the only storage account type that can be used for the classic deployment model. It doesn't support the latest features, such as access tiers.
- General Purpose V2: (V1 +Blob) It the newest type of storage account, and it combines the V1 storage with blob storage. It offers all the latest features, such as access tiers for blob storage, with a reduction in costs. Microsoft recommends using this account type over the V1 and blob storage account types.
- Blob: It support all V2 features except “page blob”.
- Storage Account Redundancy/Replication: Data that is stored in Azure is always replicated to ensure durability and high availability. This way, it is protected from unplanned and planned events, such as network or power outages, natural disasters, and terrorism. It also ensures that, during these types of events, your storage account still meets the SLA. Data can be replicated within the same data center, across zonal data centers within the same region and across different regions. These replication types are named:
LRS-Locally Redundant Storage
ZRS-Zone Redundant Storage
GRS-Geo Redundant Storage
GZRS- Geo Zone Redundant Storage:
- Access Tiers: Hot, Cool and Archive: Access Tier is supported in V2 and Blob, V1 does not support.
- Hot: The hot access tier is most suitable for storing data that's accessed frequently and data that is in active use.
- Cool: The cool access tier is the most suitable for storing data that is not accessed frequently (less than once in 30 days).
- Archive: The archive storage tier is set on the blob level and not on the storage level. It has the lowest costs for storing data and the highest cost for accessing data compared to the hot and cool access tiers. This tier is for data that will remain in the archive for at least 180 days, and it will take a couple of hours of latency before it can be accessed. This tier is most suitable for long-term backups or compliance and archive data.
- Within a container(Folder), blobs(files) can be uploaded which can be access from any where with its URL.
- Storage account name should be unique because it convert into URL and every URL should be unique.
- Blob storage and general purpose V1 type can be upgraded to general purpose V2 without downtime.
- Storage accounts can be access with url http://storageaccountname.blob.core.windows.net. (file, table, que.core.windows.net) you can change to custom domain http://storageaccountname.blob.stardistributors.co.uk/rgname/filename (to define custom domain go to storage account and click custom domain and save) verify custom domain name by entering cname record in DNS.
- Data Copy: There are many ways you can copy data to blob storage: through portal, azure storage explorer. .NET PowerShell, CLI or REST API.
- Azure File Storage: You can create file shares in the cloud. You can access your files using the Server Message Block (SMB) protocol and it used port 445.
- Azure VM disk storage: The disks that are used for virtual machines are stored in Azure blob storage as page blobs. Azure stores two disks for each virtual machine: the actual operating system (VHD) of the VM, and a temporary disk that is used for short term storage. This data is erased when the VM is turned off or rebooted.
- Managed and Unmanaged Disk: During creation of VM storage account is created automatically in managed disk while in unmanaged disk you need to create manually.
- code
- Storage center
- storage_center.jpg
- Resources: Create storage
- It is a 3 step process.
Step 1: Create Storage Account
- First we create storage account than we create required storage like object, file, block
Mandatory fields:
- subscription,
- Resource Group,
- Storage account name,
- Region,
- Performance (standard/premium),
- Redundancy,
- acsess tier,
- public network access,
- Encryption type.
- Go to All Services/Storage/Storage center/+ Create
Basics:
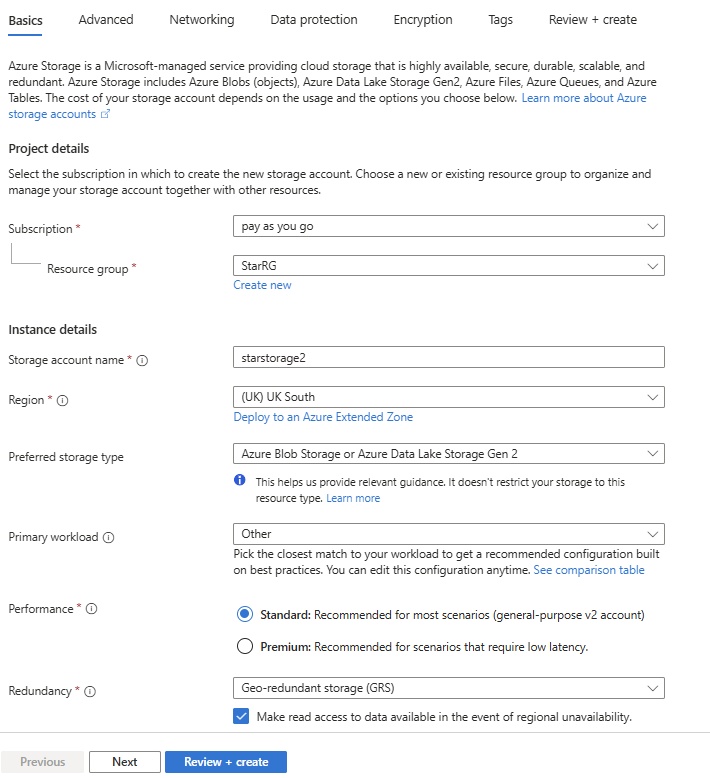
- Subscription = Free-Trial
- RG: star-RG,
- storage name=starstorage2
- Region=UK South (Storage account is region specific)
- Performance = Standard/Premium (Standard is usd for general-purpose v2 where all redundancy option available, Premium is use for Block Blobs, File share, page blobs, standard uses HDD disk while premium uses SSD disk)
- Redundancy= LRS, GRS, ZRS, GZRS ( select read access checkbox with GRS & GZRS)
Advanced:
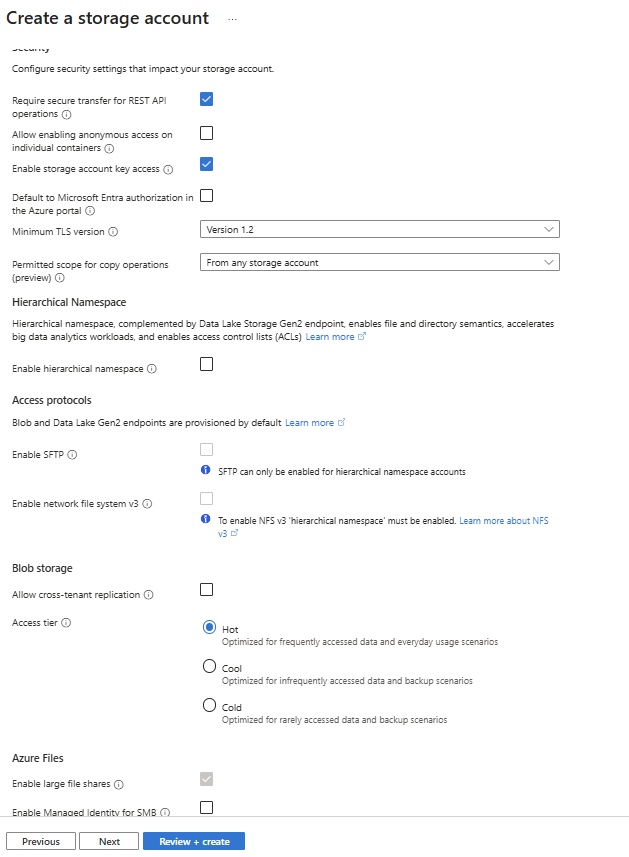
- Require secure transfer for REST API operations: checked
- Allow enabling anonymous access on individual containers: checked
- Enable storage account key access: checked
- Default to Microsoft Entra authorization in the Azure Portal: check box
- Premium TLS Version: Verion 1.0, 1.1, 1.2
- Permitted scope for copy operations: From any storage account, From storage accounts in the same Microsoft Entra Tenant, From storage accounts that have endpoint to the same virtual network.
- Hierarchical Namespace: Hierarchical namespace, complemented by Data Lake Storage Gen2 endpoint, enables file and directory semantics, accelerates big data analytics workloads, and enables access control lists (ACLs)
- Enable hierarchical namespace: check box
- Access protocols: Blob and Data Lake Gen2 endpoints are provisioned by default.
- Enable SFTP: check box
- Enable network file system v3: check box
- Blob Storage: Allow cross-tenant replication: check box
- access tier: The account access tier is the default tier that is inferred by any blob without an explicitly set tier. The hot access tier is ideal for frequently accessed data, the cool access tier is ideal for infrequently accessed data, and the cold access tier is ideal for rarely accessed data. The archive access tier can only be set at the blob level and not on the account.
- Hot: Optimized for frequently accessed data and everyday usage scenarios
- Cool: Optimized for infrequently accessed data and backup scenarios
- Cold: Optimized for rarely accessed data and backup scenarios
- Azure Files: Enable large file shares: Check box
Networking:
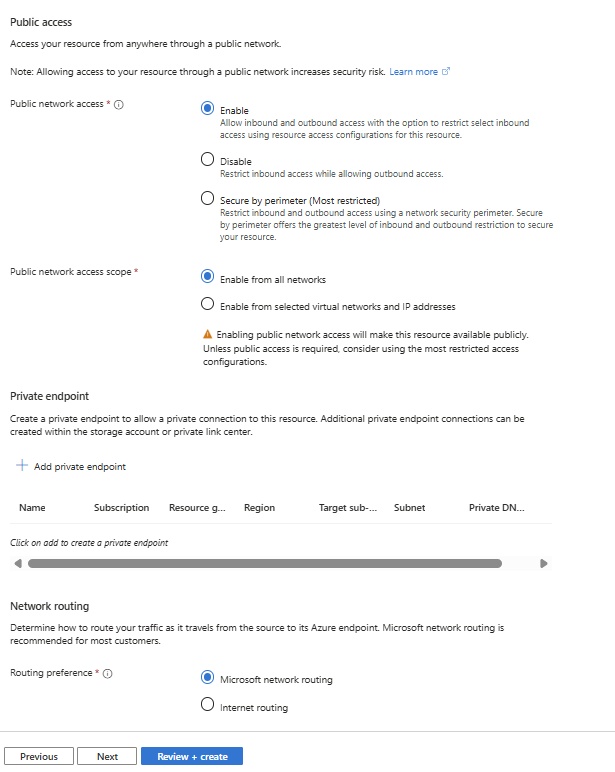
- Network Connectivity: You can connect to your storage account either publicly, via public IP addresses or service endpoints, or privately, using a private endpoint.
- Enable public access from all networks, Enable public acess from selected virtual networks and IP addresses, Disable public acess and use private access.
- Enable public access from selected virtual networks and IP addresses
- Disable public access and use private access.
- Virtual networks: Only the selected network will be able to access this storage account
- Virtual network subscription:
- Pay as you go
- Virtual network: select or create new
- IP Addresses: Allow select public internet IP addressess to access your resource. + Add your client IP address (your public IP address).
- Private endpoint: Create a private endpoint to allow a private connection to this resource. Additional private endpoint connections can be created within the storage account or private link center. +Add private endpoint.
- Network routing: Determine how to route your traffic as it travels from the source to its Azure endpoint. Microsoft network routing is recommended for most customers.
- Routing preference: Microsoft network routing, Internet routing.
Data Protection:
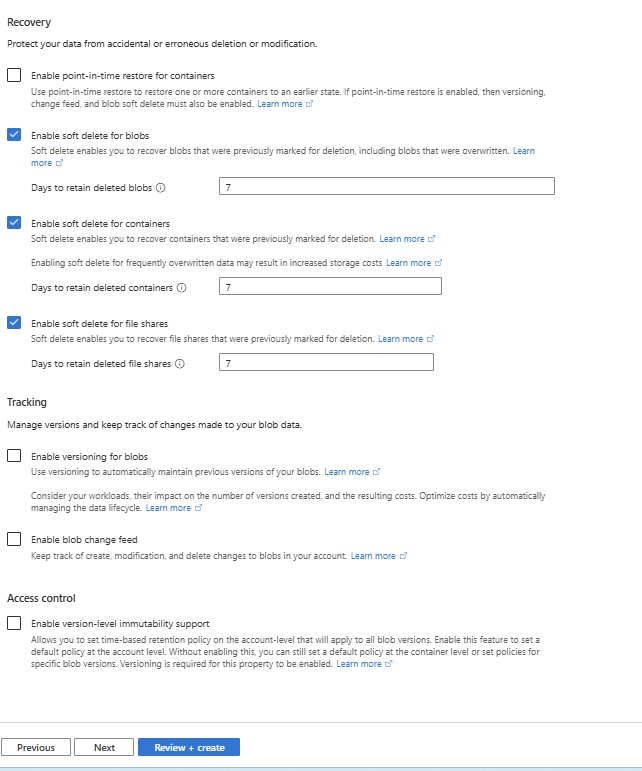
- Recovery: Protect your data from accidental or erroneous deletion or modification.
- Enable point-intime restore for container: check box (Use point-in-time restore to restore one or more containers to an earlier state. If point-in-time restore is enabled, then versioning, change feed, and blob soft delete must also be enabled).
- Enable soft delete for blobs: check box (Soft delete enables you to recover blobs that were previously marked for deletion, including blobs that were overwritten)
- Days to retain deleted blobs: 7
- Enable soft delete for containers: check box (Soft delete enables you to recover containers that were previously marked for deletion)
- Days to retain deleted blobs: 7
- Enable soft delete for file shares: check box (Soft delete enables you to recover file shares that were previously marked for deletion.)
- Days to retain deleted blobs: 7
- Tracking: Manage versions and keep track of changes made to your blob data.
- Enable versioning for blobs:check box (Use versioning to automatically maintain previous versions of your blobs)
- Enable blob change feed: check box (Keep track of create, modification, and delete changes to blobs in your account).
- Access control: Enable version-level immutability support: check box (Allows you to set time-based retention policy on the account-level that will apply to all blob versions. Enable this feature to set a default policy at the account level. Without enabling this, you can still set a default policy at the container level or set policies for specific blob versions. Versioning is required for this property to be enabled).
Encryption:
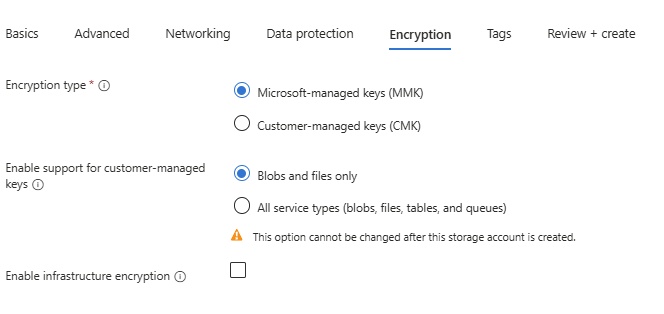
- Encryption type:
- Microsoft-managed keys (MMK)
- Customer-managed keys (CMK)
- Enable support for customer-managed keys:
- Blobs are files oly
- All service types (blobs, files, tables, and queues)
- Enable infrastructure encryption: check box (By default, Azure encrypts storage account data at rest. Infrastructure encryption adds a second layer of encryption to your storage account’s data.)
- Tags:
- Review+Create.
Step 2: Create Containers (Its like Folder, Object sotrage, File storage, Block storage), from storage center blade or from Storage Account Blade:
Overview:
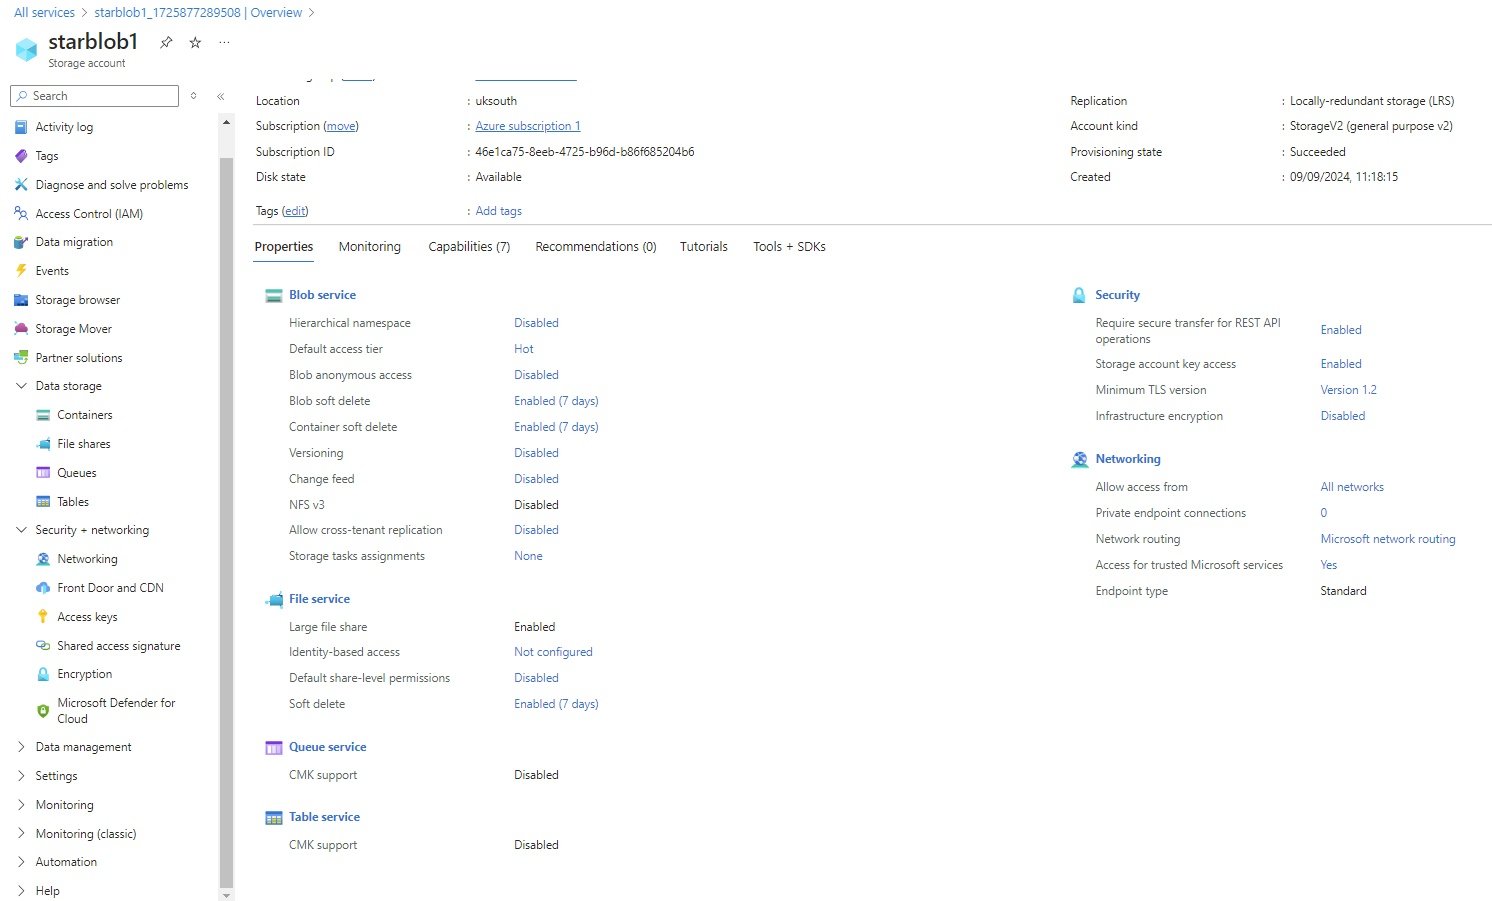
- Upload:
- Open in Explorer:
- Delete:
- Move:
- Open in Mobile:
- CLI/PS
Properties:You can edit the following fields:
- Blob service:
- Hierarchical namespace:
- Default access tier:
- Blob anonymous access:
- Container soft delete:
- Versioning:
- Change feed:
- NFS v3:
- allow croos-tenant replication:
- Storage tasks assignments:
- File service:
- Large file share:
- identity-based access:
- Default share-level permissions:
- Soft delete:
- Queue Service:
- CMK support
- Table Service:
- CMK support
- Security:
- Require secure transfer for REST API operations:
- Storage account key access:
- Minimum TLS version:
- Infrastructure encryption:
- Networking:
- Public network access:
- Public netowrk access scope:
- private endpoint connections:
- Networking routing:
- Endpoint type:
- Monitoring:
- Capabilities:
- Recommendations:
- Tutorials:
- Tools + SDKs
- Activity Log:
- Tags:
- Diagnose and solve problems:
- Access Control (IAM):
- Data Migration:
- Events:
- Storage Browser:
- Storage Mover:
Data Storage:
Containers ( Earlier called blob, its like a disk):
- A container is like a directory in which you store files.
- A storage account can include an unlimited number of containers, and a container can store an unlimited number of blobs. Container name must be lowercase.
- +Container to create new
- Name=starcontainer1
- Anonymous Access level= (Private no anonymous access, Blob anonymous read access for blob(file), Container anonymous read access for container and blobs), blob is like a folder.
- Advanced:
- Encryption scope:
- Upload blob: browse file and upload.
- Advanced:
- Blob type: Block blob, Append blob, page blob (select one)
- Block size: 4mb (if block blob is selected in the above option, change upto 100 MB)
- Access tier: Hot (change for other)
- Upload to Folder: If a folder exist than enter here so file will be uploaded in that folder.
- Encryption Scope: Use existing default container scope, choose an existing scope.
- Retention policy: No retention, choose custom retention period.
- click upload: abc.txt, abc.jpeg
- select code.txt:
- Overview:
- Versions:it shows versions of file.
- Snapshots: take snapshot of file. If need to restore than select the snapshot and click promote.
- Edit: you can edit file and save.
- Generate SAS:
- select abc.jpeg:
- Overview: copy URL and paste it in browser which gives error (This XML file does not appear to have any style infomation associated with it. The document tree is shown below. The container permission was Privateno anonymous access selected. Change access level of container (images) to blob (anonymous read access for blobs only), now this file can access through browser over internet.
- Versions:it shows versions of file.
- Snapshots: take snapshot of file.
- Edit:
- Generate SAS: In change access level we have only read permissions. To give user change/write permission select file and click Generate SAS.
- Signing method: Account key, user delegation key
- signing key: key1, key2
- stored access policy:
- Permissions:
- Start and expiry date/time: define
- Allowed IP address: enter user's public IP address
- Allowed protocols: https only, https & http
- Generate SAS:
File Shares:
- + File Sare
- Name=starfileshare1,
- Access tier=Transaction optimized, Hot, Cool, Backup: Vault name, RG, Backup policy, upload blob(files)
Queues:
- +Container, Queue name=starqueue1, upload blob(files)
Tables:
- +Container, Table Name=startable1, upload blob (files).
- Security+networking:
- Networking:
- Front Door and CDN:
- Access keys: It generates the keys and user will have full access to all storage accounts (read, write, delete).
- Shared access signature:
- Encryption:
- Microsoft Defender for cloud:
- Data Management:
- Storage tasks:
- Redundancy: LRS, click drop down and change redundancy.
- storage endpoints: all 6 primary endpoints
- Primary Blob service endpoint: https://storagname.blob.core.windows.net/
- Primary File Service Endpoint: https://storagname.file.core.windows.net/
- Primary Queue Service Endpoint:https://storagname.queue.core.windows.net/
- Primary Table Service Endpoint: https://storagname.table.core.windows.net/
- Primary Azure Data Lake Storage file system endpoint: https://storagname.dfs.core.windows.net/
- Primary static website endpoint: https://storagname.z13.web.core.windows.net/
- change LRS to GRS and save it. There will be 6 primary endpoints, seconday is standby and it will get active when you click prepare for failover.
- change GRS to RA-GRS and save it. There will be 12 primary endpoints, read and write endpoints can be use separately.
- Data Protection:
- Object replication:
- Blob inventory:
- Static website:
- lifecycle management:
- Azure AI Search:
- Settings:
Configuration: you can enable or disable the following storage account services:
- Secure Transfer required : Enable /Disable
- Allow Blob anonymous access: Enable/Disable
- Allow storage account key access: Enable/Disable
- Allow recommended upper limit for shared access signature (SAS) expirty intervane: Disable/Enable
- Default to Microsoft Entra authorization in the Azure Portal: Enable/Disable
- Minimum TLS version:
- Permitted scope for copy operation: from any storage account, from storage accounts in the same Microsoft Entra Tenant, From storage accounts tha have a private endpoint to the same virtual network.
- Blob access tier: Hot, Cool
- Large Files Share: Enable/Disable
- Data Lake Gen2 upgrade:
- Resoure sharing(CORS):
- Advisor recommendations:
- Endpoints:
- Locks:
- Monitoring:
- Insights:
- Alerts:
- Workbooks:
- Diagnostic settings:
- Logs:
- Monitoring (Classic)
- Metrics(Classic):
- Diagnostic settings (classic):
- Usage(classic):
- Automation:
- Tasks:
- Export template
- Help
Step 3: Upload documents.
- Code
- Overview
- Get started
- Summary
- All storage resources
- Object storage
- Blob Storage
- File storage
- Block storage
- Data management
- Migration
- Partner solutions
- Managemnt services
- Policy
- Help
LAB: Create Blob (Binary Large Object) Storage, Queue, Table
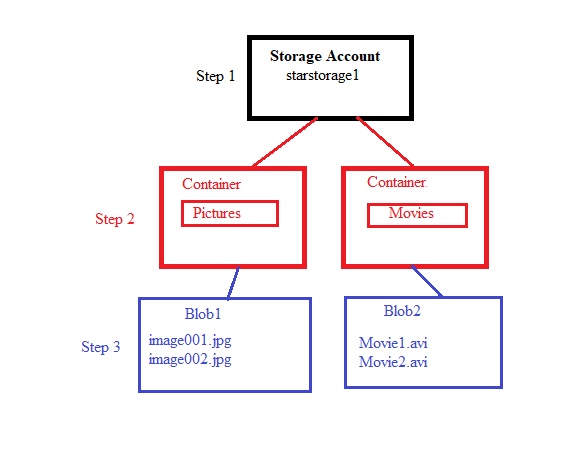
- Step1: Create a storage account (Blob): Its an object storage
- Go to All Services/Storage/Object,file,and block storage/Storage Accounts/+ Create
- Basics:
- Subscription & RG: star-RG,
- storage name=starstorage1
- Region=UK South
- Performance = Standard or Premium (Blob and file share can be created with Standard or Premium, standard uses HDD disk while premium uses SSD disk)
- Redundancy= LRS only if performance is standard
- Advanced:
- Require secure transfer for REST API operations: checked
- Allow enabling anonymous access on individual containers: checked
- Enable storage account key access: checked
- Default to Microsoft Entra authorization in the Azure Portal: check box
- Premium TLS Version: Verion 1.0, 1.1, 1.2
- Permitted scope for copy operations: From any storage account, From storage accounts in the same Microsoft Entra Tenant, From storage accounts that have endpoint to the same virtual network.
- Hierarchical Namespace: Hierarchical namespace, complemented by Data Lake Storage Gen2 endpoint, enables file and directory semantics, accelerates big data analytics workloads, and enables access control lists (ACLs)
- Enable hierarchical namespace: check box
- Access protocols: Blob and Data Lake Gen2 endpoints are provisioned by default.
- Enable SFTP: check box
- Enable network file system v3: check box
- Blob Storage: Allow cross-tenant replication: check box
- access tier: The account access tier is the default tier that is inferred by any blob without an explicitly set tier. The hot access tier is ideal for frequently accessed data, the cool access tier is ideal for infrequently accessed data, and the cold access tier is ideal for rarely accessed data. The archive access tier can only be set at the blob level and not on the account.
- Hot: Optimized for frequently accessed data and everyday usage scenarios
- Cool: Optimized for infrequently accessed data and backup scenarios
- Cold: Optimized for rarely accessed data and backup scenarios
- Azure Files: Enable large file shares: Check box
- Networking:
- Network Connectivity: You can connect to your storage account either publicly, via public IP addresses or service endpoints, or privately, using a private endpoint.
- Enable public access from all networks, Enable public acess from selected virtual networks and IP addresses, Disable public acess and use private access.
- Enable public access from selected virtual networks and IP addresses
- Disable public access and use private access.
- Virtual networks: Only the selected network will be able to access this storage account
- Virtual network subscription:
- Pay as you go
- Virtual network: select or create new
- IP Addresses: Allow select public internet IP addressess to access your resource. + Add your client IP address (your public IP address).
- Private endpoint: Create a private endpoint to allow a private connection to this resource. Additional private endpoint connections can be created within the storage account or private link center. +Add private endpoint.
- Network routing: Determine how to route your traffic as it travels from the source to its Azure endpoint. Microsoft network routing is recommended for most customers.
- Routing preference: Microsoft network routing, Internet routing.
- Data Protection:
- Recovery: Protect your data from accidental or erroneous deletion or modification.
- Enable point-intime restore for container: check box (Use point-in-time restore to restore one or more containers to an earlier state. If point-in-time restore is enabled, then versioning, change feed, and blob soft delete must also be enabled).
- Enable soft delete for blobs: check box (Soft delete enables you to recover blobs that were previously marked for deletion, including blobs that were overwritten)
- Days to retain deleted blobs: 7
- Enable soft delete for containers: check box (Soft delete enables you to recover containers that were previously marked for deletion)
- Days to retain deleted blobs: 7
- Enable soft delete for file shares: check box (Soft delete enables you to recover file shares that were previously marked for deletion.)
- Days to retain deleted blobs: 7
- Tracking: Manage versions and keep track of changes made to your blob data.
- Enable versioning for blobs:check box (Use versioning to automatically maintain previous versions of your blobs)
- Enable blob change feed: check box (Keep track of create, modification, and delete changes to blobs in your account).
- Access control: Enable version-level immutability support: check box (Allows you to set time-based retention policy on the account-level that will apply to all blob versions. Enable this feature to set a default policy at the account level. Without enabling this, you can still set a default policy at the container level or set policies for specific blob versions. Versioning is required for this property to be enabled).
- Encryption:
- Encryption type:
- Microsoft-managed keys (MMK)
- Customer-managed keys (CMK)
- Enable support for customer-managed keys:
- Blobs are files oly
- All service types (blobs, files, tables, and queues)
- Enable infrastructure encryption: check box (By default, Azure encrypts storage account data at rest. Infrastructure encryption adds a second layer of encryption to your storage account’s data.)
- Tags:
- Review+Create.
- Step2: Storage Blade: Create containers (like folder) for Blob Storage, File Share, Queue, Table: Go to storage account
- Overview:
- Upload:
- Open in Explorer:
- Delete:
- Move:
- Open in Mobile:
- CLI/PS
- Activity Log:
- Tags:
- Diagnose and solve problems:
- Access Control (IAM):
- Data Migration:
- Events:
- Storage Browser:
- Storage MoverL
- Data Storage:
- Containers( Earlier called blob, its like a disk):
- +Container to create new
- Name=starcontainer1
- Anonymous Access level= (Private no anonymous access, Blob anonymous read access for blob(file), Container anonymous read access for container and blobs), blob is like a folder.
- Advanced:
- Encryption scope:
- Upload blob: browse file and upload.
- Advanced:
- Blob type: Block blob, Append blob, page blob (select one)
- Block size: 4mb (if block blob is selected in the above option, change upto 100 MB)
- Access tier: Hot (change for other)
- Upload to Folder: If a folder exist than enter here so file will be uploaded in that folder.
- Encryption Scope: Use existing default container scope, choose an existing scope.
- Retention policy: No retention, choose custom retention period.
- click upload: abc.txt, abc.jpeg
- select code.txt:
- Overview:
- Versions:it shows versions of file.
- Snapshots: take snapshot of file. If need to restore than select the snapshot and click promote.
- Edit: you can edit file and save.
- Generate SAS:
- select abc.jpeg:
- Overview: copy URL and paste it in browser which gives error (This XML file does not appear to have any style infomation associated with it. The document tree is shown below. The container permission was Privateno anonymous access selected. Change access level of container (images) to blob (anonymous read access for blobs only), now this file can access through browser over internet.
- Versions:it shows versions of file.
- Snapshots: take snapshot of file.
- Edit:
- Generate SAS: In change access level we have only read permissions. To give user change/write permission select file and click Generate SAS.
- Signing method: Account key, user delegation key
- signing key: key1, key2
- stored access policy:
- Permissions:
- Start and expiry date/time: define
- Allowed IP address: enter user's public IP address
- Allowed protocols: https only, https & http
- Generate SAS:
- File Shares: +Container, Name=starfileshare1, Access tier=Transaction optimized, Hot, Cool, Backup: Vault name, RG, Backup policy, upload blob(files)
- Queues: +Container, Queue name=starqueue1, upload blob(files)
- Tables: +Container, Table Name=startable1, upload blob (files).
- Containers( Earlier called blob, its like a disk):
- Security+networking:
- Networking:
- Front Door and CDN:
- Access keys: It generates the keys and user will have full access to all storage accounts (read, write, delete).
- Shared access signature:
- Encryption:
- Microsoft Defender for cloud:
- Data Management:
- Storage tasks:
- Redundancy: LRS, click drop down and change redundancy.
- storage endpoints: all 6 primary endpoints
- Primary Blob service endpoint: https://storagname.blob.core.windows.net/
- Primary File Service Endpoint: https://storagname.file.core.windows.net/
- Primary Queue Service Endpoint:https://storagname.queue.core.windows.net/
- Primary Table Service Endpoint: https://storagname.table.core.windows.net/
- Primary Azure Data Lake Storage file system endpoint: https://storagname.dfs.core.windows.net/
- Primary static website endpoint: https://storagname.z13.web.core.windows.net/
- change LRS to GRS and save it. There will be 6 primary endpoints, seconday is standby and it will get active when you click prepare for failover.
- change GRS to RA-GRS and save it. There will be 12 primary endpoints, read and write endpoints can be use separately.
- Data Protection:
- Object replication:
- Blob inventory:
- Static website:
- lifecycle management:
- Azure AI Search:
- Settings:
- Configuration: you can enable or disable the following storage account services:
- Secure Transfer required : Enable /Disable
- Allow Blob anonymous access: Enable/Disable
- Allow storage account key access: Enable/Disable
- Allow recommended upper limit for shared access signature (SAS) expirty intervane: Disable/Enable
- Default to Microsoft Entra authorization in the Azure Portal: Enable/Disable
- Minimum TLS version:
- Permitted scope for copy operation: from any storage account, from storage accounts in the same Microsoft Entra Tenant, From storage accounts tha have a private endpoint to the same virtual network.
- Blob access tier: Hot, Cool
- Large Files Share: Enable/Disable
- Data Lake Gen2 upgrade:
- Resoure sharing(CORS):
- Advisor recommendations:
- Endpoints:
- Locks:
- Configuration: you can enable or disable the following storage account services:
- Monitoring:
- Insights:
- Alerts:
- Workbooks:
- Diagnostic settings:
- Logs:
- Monitoring (Classic)
- Metrics(Classic):
- Diagnostic settings (classic):
- Usage(classic):
- Automation:
- Tasks:
- Export template
- Help
- Overview:
- code
- code
LAB: Create Block+Append Blob
- Step1: Create a storage account:
- Basic:
- Go to All Services/Storage/Object, file,, and block storage/Storage Accounts/+ Create
- select subscription, RG=star-RG, storage name=starstorage3, Region=UK South,
- Performance = Premium
- Redundancy= LRS
- Advanced:
- Require secure transfr for REST API operations: checked
- Allow enabling anonymous access on individual containers: checked
- Enable storage account key access: checked
- Networking:
- Enable public access from all networks, Enable public acess from selected virtual networks and IP addresses, Disable public acess and use private access.
- Review & Create.
- Step2: Storage Blade: Create containers for Blob Storage, File Share, Queue, Table: Go to storage account
- Overview:
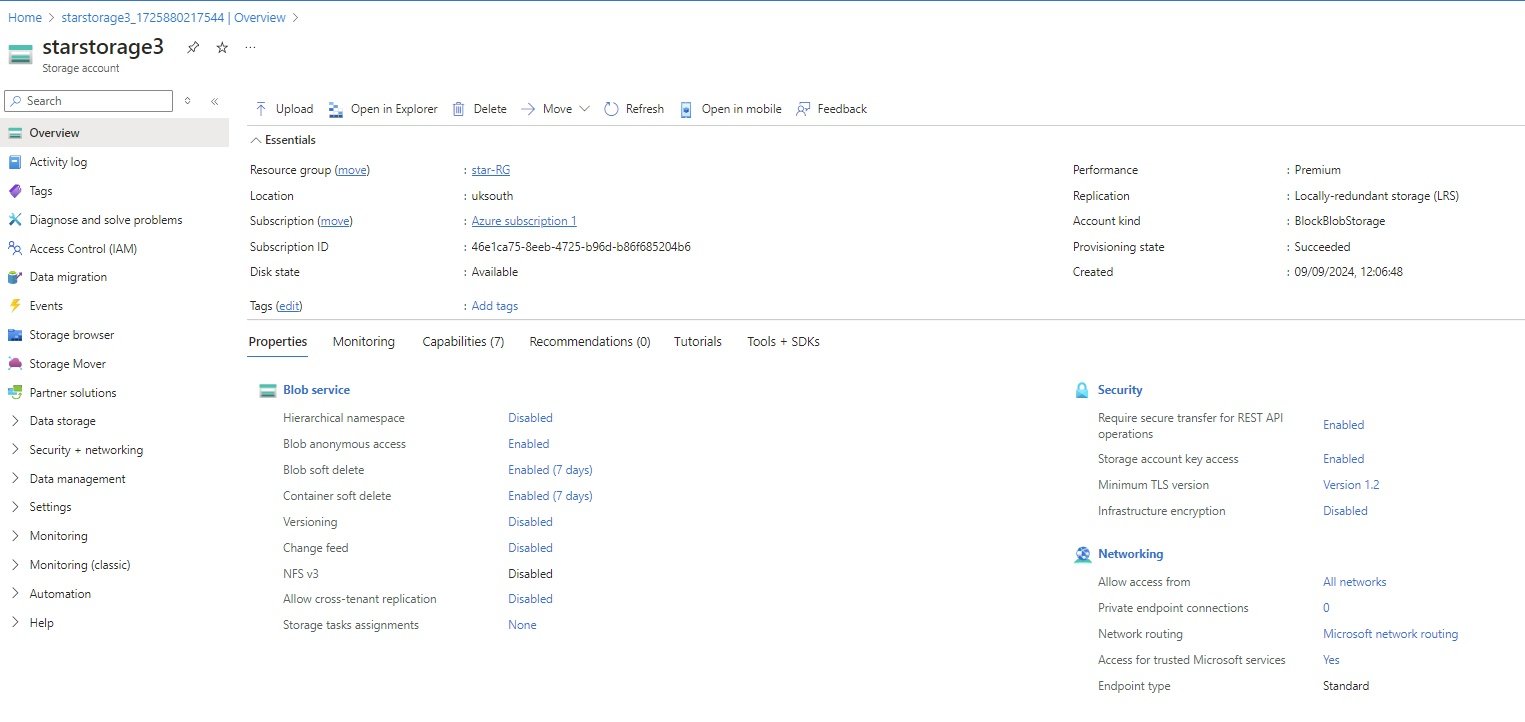
- Upload:
- Open in Explorer:
- Delete:
- Move:
- Open in Mobile:
- CLI/PS
- Activity Log:
- Tags:
- Diagnose and solve problems:
- Access Control (IAM):
- Data Migration:
- Events:
- Storage Browser:
- Storage MoverL
- Data Storage:
- Containers: +Container, Name=blockblobcontainer1, Anonymous Access level= (Private no anonymous access, Blob anonymous read access for blob(file), Container anonymous read access for container and blobs), upload blob(file)
- Security+networking:
- Networking:
- Front Door and CDN:
- Access keys:
- Shared access signature:
- Encryption:
- Microsoft Defender for cloud:
- Data Management:
- Storage tasks:
- Redundancy:
- Data Protection:
- Object replication:
- Blob inventory:
- Static website:
- lifecycle management:
- Azure AI Search:
- Settings:
- Configuration: you can enable or disable the following storage account services:
- Secure Transfer required : Enable /Disable
- Allow Blob anonymous access: Enable/Disable
- Allow storage account key access: Enable/Disable
- Allow recommended upper limit for shared access signature (SAS) expirty intervane: Disable/Enable
- Default to Microsoft Entra authorization in the Azure Portal: Enable/Disable
- Minimum TLS version:
- Permitted scope for copy operation: from any storage account, from storage accounts in the same Microsoft Entra Tenant, From storage accounts tha have a private endpoint to the same virtual network.
- Blob access tier: Hot, Cool
- Large Files Share: Enable/Disable
- Data Lake Gen2 upgrade:
- Resoure sharing(CORS):
- Advisor recommendations:
- Endpoints:
- Locks:
- Configuration: you can enable or disable the following storage account services:
- Monitoring:
- Insights:
- Alerts:
- Workbooks:
- Diagnostic settings:
- Logs:
- Monitoring (Classic)
- Metrics(Classic):
- Diagnostic settings (classic):
- Usage(classic):
- Automation:
- Tasks:
- Export template
- Help
- Overview:
- code
- code
- Step1: Create a storage account:
LAB: Create Page Blob
- Step1: Create a storage account:
- Basic:
- Go to All Services/Storage/Object, file,, and block storage/Storage Accounts/+ Create
- select subscription, RG=star-RG, storage name=starstorage4, Region=UK South,
- Performance = Premium
- Redundancy= LRS
- Advanced:
- Require secure transfr for REST API operations: checked
- Allow enabling anonymous access on individual containers: checked
- Enable storage account key access: checked
- Networking:
- Enable public access from all networks, Enable public acess from selected virtual networks and IP addresses, Disable public acess and use private access.
- Review & Create.
- Step2: Storage Blade: Create containers for Blob Storage, File Share, Queue, Table: Go to storage account
- Overview:
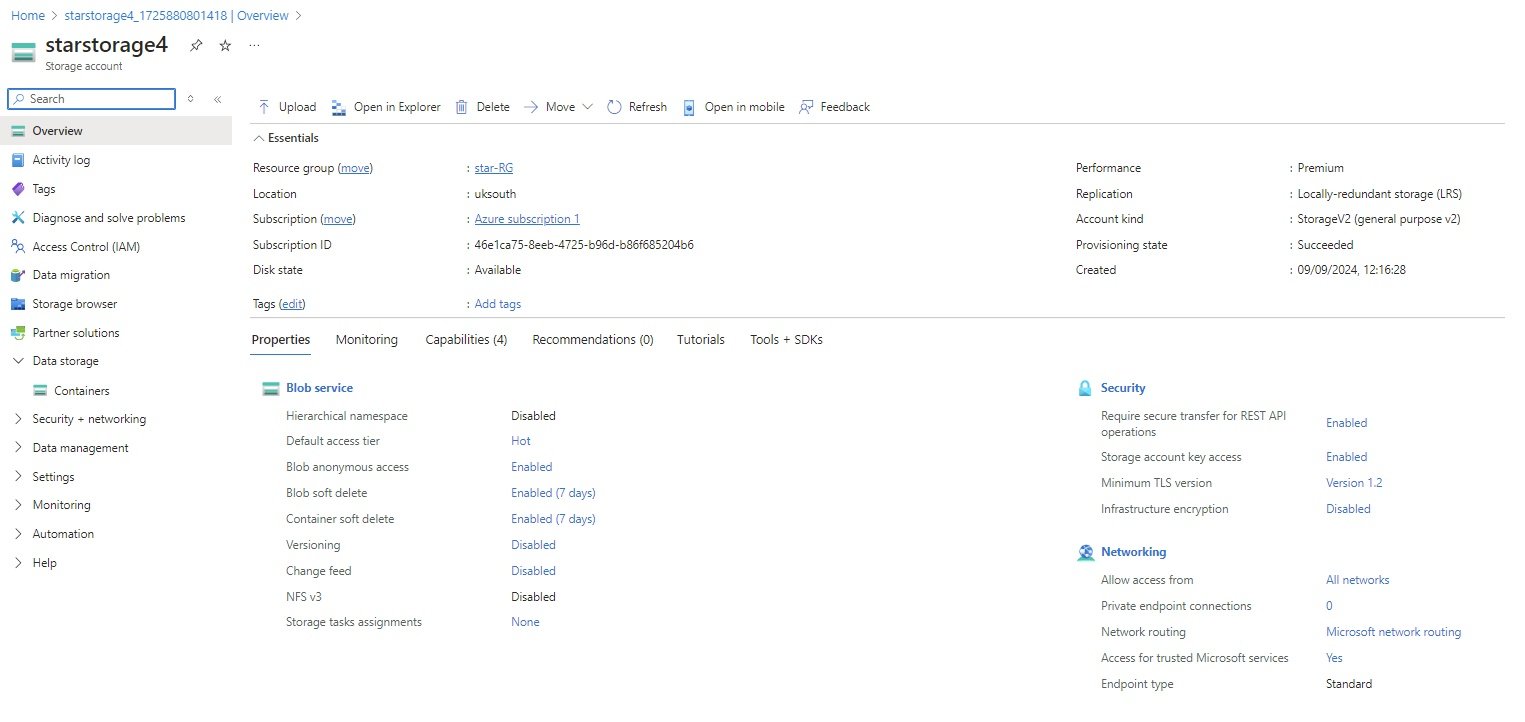
- Upload:
- Open in Explorer:
- Delete:
- Move:
- Open in Mobile:
- CLI/PS
- Activity Log:
- Tags:
- Diagnose and solve problems:
- Access Control (IAM):
- Data Migration:
- Events:
- Storage Browser:
- Storage MoverL
- Data Storage:
- Containers: +Container, Name=pageblobcontainer1, Anonymous Access level= Private no anonymous access, upload blob(file)
- Security+networking:
- Networking:
- Front Door and CDN:
- Access keys:
- Shared access signature:
- Encryption:
- Microsoft Defender for cloud:
- Data Management:
- Storage tasks:
- Redundancy:
- Data Protection:
- Object replication:
- Blob inventory:
- Static website:
- lifecycle management:
- Azure AI Search:
- Settings:
- Configuration: you can enable or disable the following storage account services:
- Secure Transfer required : Enable /Disable
- Allow Blob anonymous access: Enable/Disable
- Allow storage account key access: Enable/Disable
- Allow recommended upper limit for shared access signature (SAS) expirty intervane: Disable/Enable
- Default to Microsoft Entra authorization in the Azure Portal: Enable/Disable
- Minimum TLS version:
- Permitted scope for copy operation: from any storage account, from storage accounts in the same Microsoft Entra Tenant, From storage accounts tha have a private endpoint to the same virtual network.
- Blob access tier: Hot, Cool
- Large Files Share: Enable/Disable
- Data Lake Gen2 upgrade:
- Resoure sharing(CORS):
- Advisor recommendations:
- Endpoints:
- Locks:
- Configuration: you can enable or disable the following storage account services:
- Monitoring:
- Insights:
- Alerts:
- Workbooks:
- Diagnostic settings:
- Logs:
- Monitoring (Classic)
- Metrics(Classic):
- Diagnostic settings (classic):
- Usage(classic):
- Automation:
- Tasks:
- Export template
- Help
- Overview:
- code
- code
- Step1: Create a storage account:
LAB: Create File Share, File sync, Data recovery from file share
- Step1: Create a storage account: Go to Storage Center/Blob Storage/Create
- Basic:
- Go to All Services/Storage/Object, file,, and block storage/Storage Accounts/+ Create
- select subscription, RG=star-RG, storage name=starstorage5, Region=UK South,
- Performance = Standard or Premium (File share can be created on both, difference is standard uses magnetic HDD disk while Premium uses SSD disk)
- Redundancy= LRS
- Advanced:
- Require secure transfer for REST API operations: checked
- Allow enabling anonymous access on individual containers: checked
- Enable storage account key access: checked
- Networking:
- Enable public access from all networks, Enable public acess from selected virtual networks and IP addresses, Disable public acess and use private access.
- Review & Create.
- Step2: Storage Blade: Create containers for File Share: Go to storage account
- Overview:
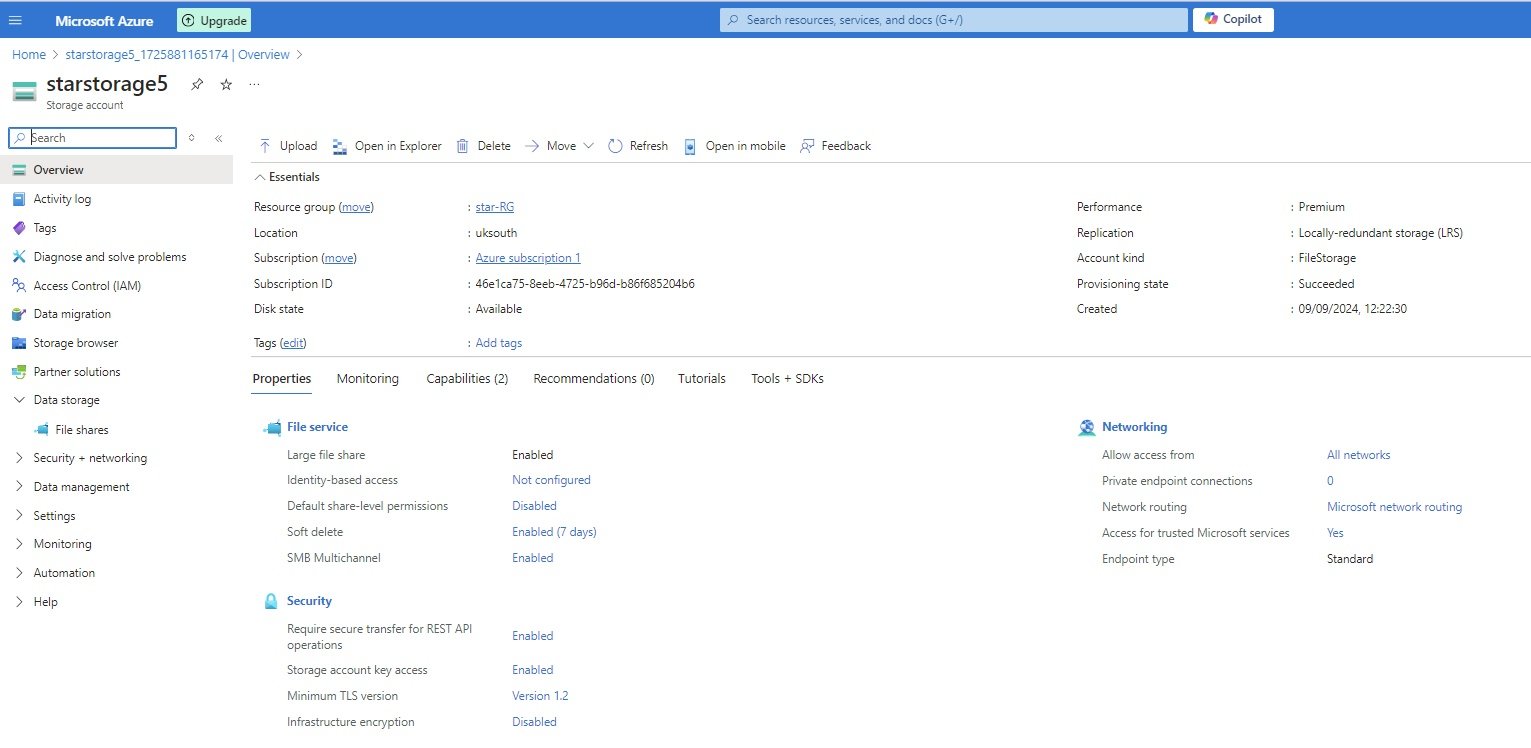
- Upload:
- Open in Explorer:
- Delete:
- Move:
- Open in Mobile:
- CLI/PS
- Activity Log:
- Tags:
- Diagnose and solve problems:
- Access Control (IAM):
- Data Migration:
- Events:
- Storage Browser:
- Storage MoverL
- Data Storage:
- If Premium is selected in performance option than only File Share appear here.
- If standard is selected in perforance option than Container, file shares, queues, tables appear here, click file share and +file share, Name=starfileshare, provisioned capacity = 1024GB, Backup, upload blob(file)
- Security+networking:
- Networking:
- Front Door and CDN:
- Access keys:
- Shared access signature:
- Encryption:
- Microsoft Defender for cloud:
- Data Management:
- Storage tasks:
- Redundancy:
- Data Protection:
- Object replication:
- Blob inventory:
- Static website:
- lifecycle management:
- Azure AI Search:
- Settings:
- Configuration: you can enable or disable the following storage account services:
- Secure Transfer required : Enable /Disable
- Allow Blob anonymous access: Enable/Disable
- Allow storage account key access: Enable/Disable
- Allow recommended upper limit for shared access signature (SAS) expiry intervane: Disable/Enable
- Default to Microsoft Entra authorization in the Azure Portal: Enable/Disable
- Minimum TLS version:
- Permitted scope for copy operation: from any storage account, from storage accounts in the same Microsoft Entra Tenant, From storage accounts tha have a private endpoint to the same virtual network.
- Blob access tier: Hot, Cool
- Large Files Share: Enable/Disable
- Data Lake Gen2 upgrade:
- Resoure sharing(CORS):
- Advisor recommendations:
- Endpoints:
- Locks:
- Configuration: you can enable or disable the following storage account services:
- Monitoring:
- Insights:
- Alerts:
- Workbooks:
- Diagnostic settings:
- Logs:
- Monitoring (Classic)
- Metrics(Classic):
- Diagnostic settings (classic):
- Usage(classic):
- Automation:
- Tasks:
- Export template
- Help
- Overview:
- Step 3: Access to file share:
- Go to file share and click connect, select from Windows Linux macOS.
- copy script from selected O/S,
- Method 1:
- Create a windows or linux vm and login, paste the script in notepad.
- copy the file share path from script, for example \\starstorage5.file.core.windows.net\starfileshare
- win +R and paste the file share path and enter
- Enter credentials (in the script user and password is mentioned). port 445
- Method 2:
- open powershell, paste script and enter. enter credentials.
- Network drive will be mapped, open windows explorer and check
- File Share Settings/Blade:
- Go to All Services/storageaccount/File Share.
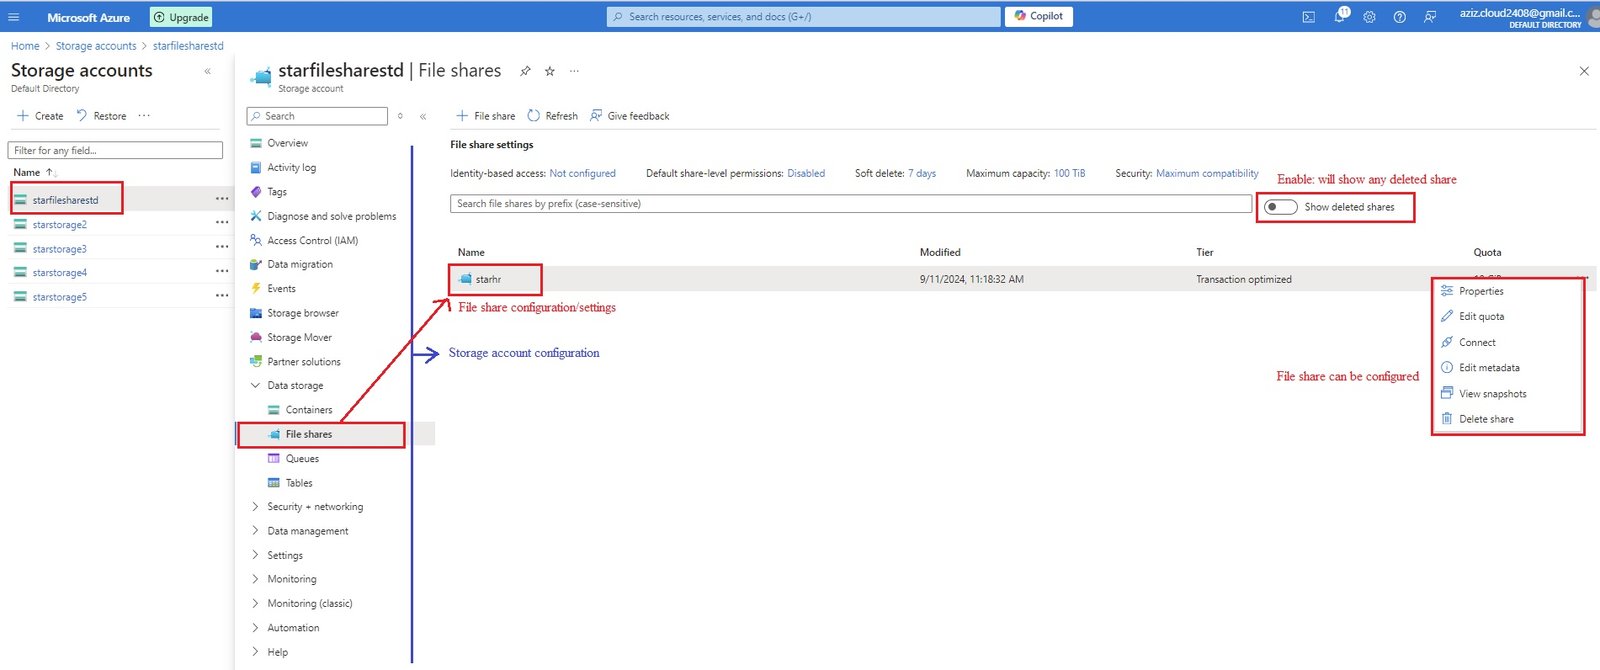
- Following settings can be done for file share:
- Properties: It gives overview/details of file share.
- Add directory: create / delete directory in file share.
- Connect: Script to connect to a directory within a file share.
- Soft Delete: it is retention period where deleted item can be recovered. you can set from 1 day to 365 days.
- Delete share: starhr
- Enable show deleted share: deleted share (starhr) will appeared.
- To restore: click three dots and click undelete.
- Click on three dots to peform the following
- Edit Quota: Increase/decrease quota for the file share. Max can assign 100 TB.
- Connect: Script to connect to entire file share on windows, linux, macOS.
- meta data:
- Snapshot: Add snapshots or restore to previous snapshots.
- take a snapshot of current time.
- delete any file: files can be deleted not, directory with files in it can not be deleted.
- restore deleted files: Go to snapshot taken earlier, select file and click three dots and click restore.
- Delete file share: It will delete file share including all its contents.
- Backup: Data can be recovered from Azure Recovery service vault.
- File Sync:
- Data sync from Azure storage account to on prem disk automatically.
- Configure Azure file sync service.
- code
- Step1: Create a storage account: Go to Storage Center/Blob Storage/Create
LAB: Create file share with Kerberos Authentication method. HH
- Create Storage:
- Basic
- storage_kerberos1.jpg
- Advanced
- storage_kerberos2.jpg
- Networking
- storage_kerberos3.jpg
- Data protection
- storage_kerberos4.jpg
- Security
- storage_kerberos5.jpg
- Encryption
- storage_kerberos6.jpg
- Tags
- storage_kerberos7.jpg
- Review + Create
- Create File storage & Configure Identity-based access.
- Enable Microsoft Entra Kerberos authentication for hybrid and cloud only identities on azure files
- Disable MFA on the storage account
- Go to storage account created above, select to get into
- Under Data storage click Classic file shares/click + classic file share
- You can configure Identity-based acess before creating file share or after. To create before click Identity-based access: Not configure in Essentials area.
- Create identity-based access
- When you enable Microsoft Entra Kerberos authentication, users can access Azure file shares by using Kerberos authentication.
- storage_kerberos8.jpg
- Enable an identity source: you have three options
- Active Directory Doamin Services (ADDS).
- Microsoft Entra Domain Services: Hybrid
- Microsoft Entra Kerberos: online only
- click on Microsoft Entra Kerberos, set up
- select check box Microsoft Entra Kerberos and save it.
- storage_kerberos10.jpg
- Set share-level permissions: Permissions are two type, share-level for all authenticated identities and granular Directory or file level sharing. Usually default share-level assign to all authenticated identies and perform granular level on Windows ACL (Access conrol list) level permissions. Click Enable and Save it. Chose from list
- storage_kerberos11.jpg
- After you enable an identity source on your storage account, you must do one of the following tasks to access the file share:
- Set a default share-level permission that applies to all authenticated users and groups.
- Assign built-in Azure RBAC roles to users and groups.
- Configure custom roles for Entra identities, and assign access rights to file shares in your storage account.
- For more information, see Configure directory-level and file-level permissions.
- + classic file share
- storage_kerberos12.jpg
- Identity-based access and default hare-level permission is configured in the above step. now + classc file share
- Basics
- storage_kerberos13.jpg
- Backup: If dont required uncheck
- storage_kerberos14.jpg
- Review+Create
- Access file share to upload/download files.
- There are multiple ways to access:
- Connect:
- Click connect and copy script and open powershell in your computer and run.
- storage_kerberos15.jpg
- Microsoft Azure Storage Explorer.
- Download and install Azure Storage Explorer.
- Code
- Create Storage:
Code
- Code
- Code
Code
- Code
- Code
Code
- Code
- Code
Code
- Code
- Code
Code
- Code
- Code
- Storage Browser:
- select a storage account to begin.
- Subscription : Free-Trial or choose yours
- Storage Account: starstorage2 or from list
- Microsoft Azure Storage Explorer:
- Access the storage from your computer using tool Azure Storage Explorer
- Download the Azure Store Explorer. Download / windows x64
- Storage Migration:
- Azure Data Box
- Storage Movers
- Additional storage Services
- Data Lake Storage Gen1
- HPC Caches
- Azure Managed Lustre
- Storage Sync Services
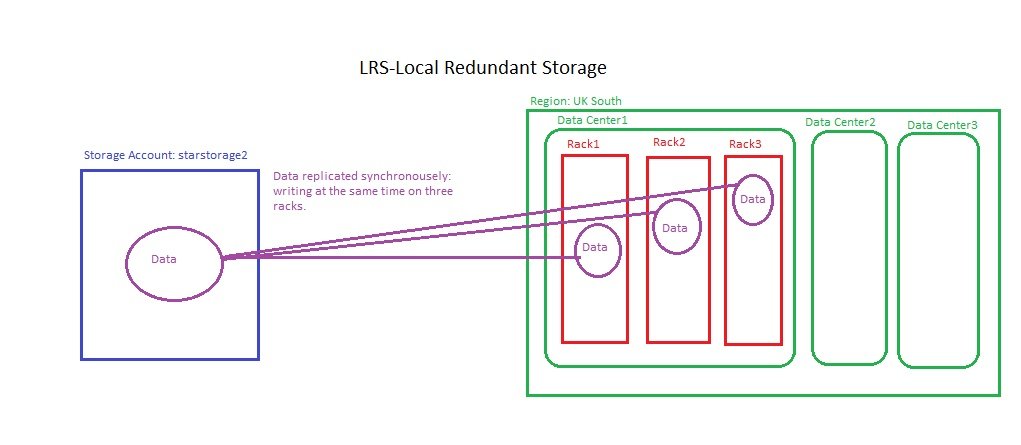
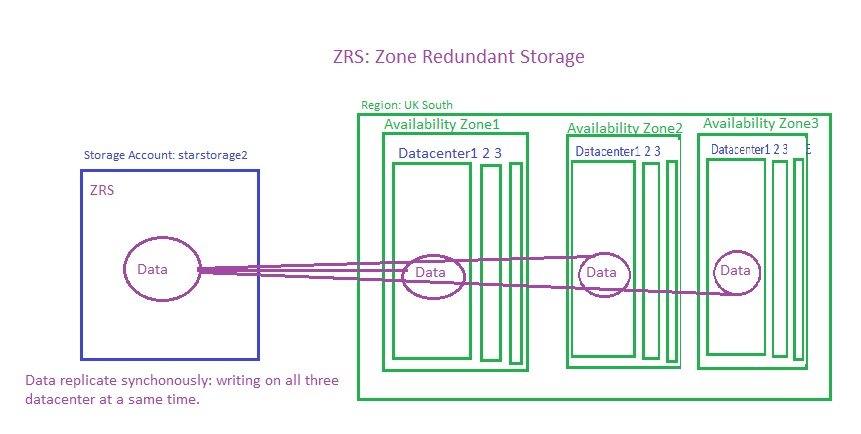

Identity - Entra ID
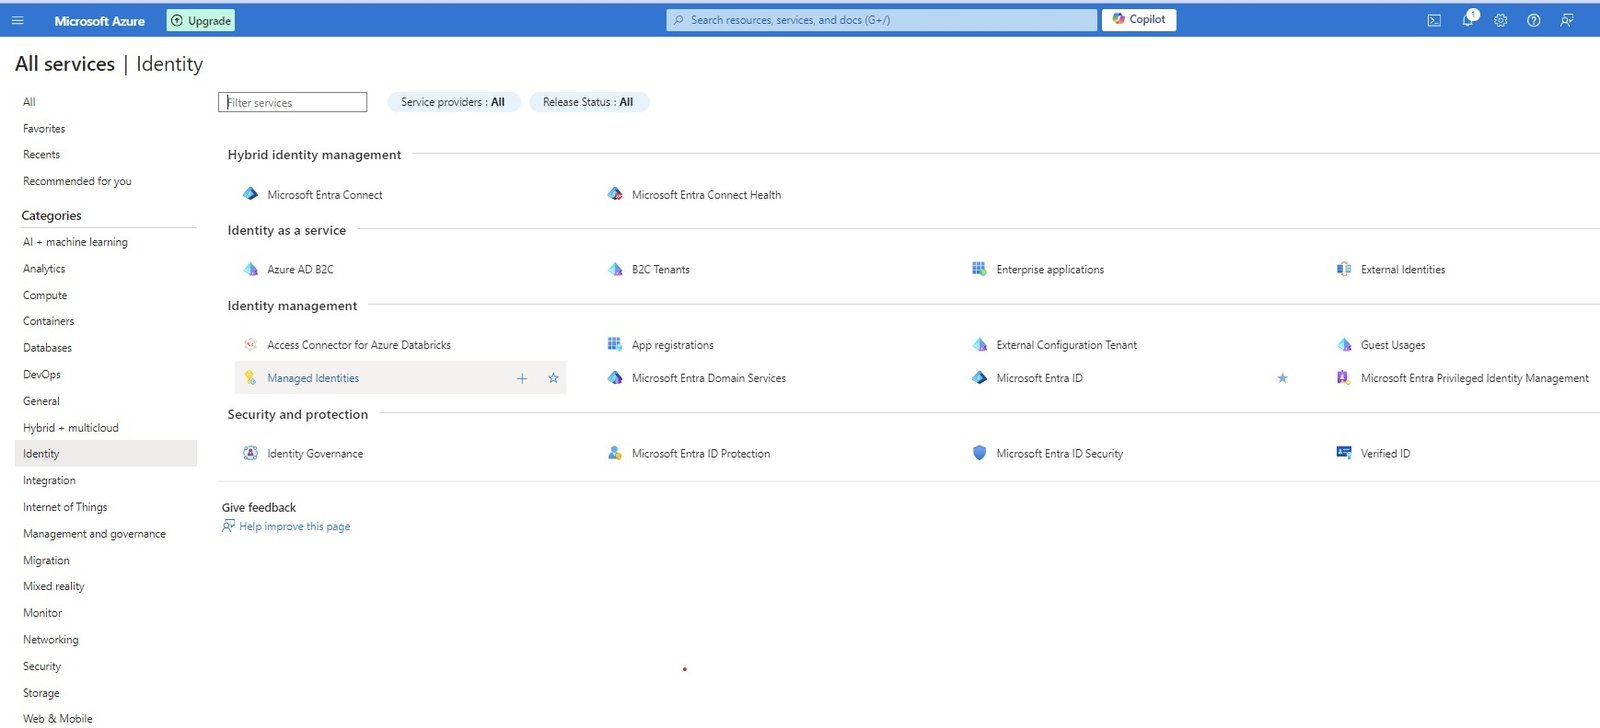
- Login to Entra ID: https://entra.microsoft.com
Overview:
- To access servies on Azure, it is required to create an account using your email address. Once acount is create it creates a user in Azure Active Directory with default directory and domain.
- Hierarchy of Azure Account:
- Default Directory(tenant), Default Domain, Defualt Subscription: Azure creates a defualt directory which represents as tenant, default domain (azizazure0410gmail.onmicrosoft.com) and a default subscription.
- Create additional Tenant or directory:
- To create addional tenant must have P1 or P2 license, or Entra ID option will be grayed out.
- Go to All Services/Identity/Microsoft Entra Id/Manage tenants/+ Create
- select a tenant type: Microsoft Entra ID, Azure AD B2C (Provide highly customizable sign-in and other identity management experiences for your external facing applications.)
- Configuration: Organization name=BestGift4u, Initial domain name=bg4u (bg4u.onmicrosoft.com: should be unique)
- Region: UK South.
- To create any resource in the above tenant, you must have a subscription. Either create a new subscription or move from another tenant, when you move from another tenant than all its resources will also be moved.
- Create additional Subscription: Default directory will have default subscription. You can create multiple subscription within a default directory/additional directory or tenant.
- To create additional subscription, go to subscription click +Add. Priciing for each subscription is maintained separately. Resource group is created in subscription.
- Move subscription: Go to subscription and click change directory, select the new directory to which subscrption to be attached.
- Configure Custom Domain : Integrate with Active Directory to get company domain and when you create users in AD than their suffix will be your company domain.
- Create additional Tenant or directory:
- Switch Directory: When you have multiple directory/tenant, you can switch by going to account on right hand at top corner and switch directory or from Entra ID.
- Users of a Directory/Tenant: User created in one directory/tenant will not reflect in another directory/tenant.
- Microsoft Entra Connect: It is used to sync on prem ADDS users with Azure AD which is called hybrid identity.
- Query: Azure AD uses Rest API over HTTP or HTTPS for query while ADDS uses LDAP (Light Weight Directory Access Protocol)
- Authentication:
- ADDS uses kerberos for authentication.
- Azure AD uses SAML, WS-Federation, Open ID-Connect
- Authorization: OAuth for authorization in Azure AD. Third party services like Facebook, google, yahoo etc..
- No nesting: Users and groups are created in a flat structure. There are no OU (Organizational Units) or GPO (Group Policy Objects) in Azure AD.
- Hybrid identity management
Microsoft Entra Connect
- code
- code
- code
Microsoft Entra Connect Health
- code
- code
- code
- Identity as a service
Azure AD B2C
- code
- code
- code
B2C Tenants
- code
- code
- code
Enterprise applications
- code
- code
- code
External identities
- code
- code
- code
- Identity Management
Acces Connector for Azure Databricks
- code
- code
- code
App registrations
- code
- code
- code
External Configuration Tenant
- code
- code
- code
Guest Usages
- code
- code
- code
Managed Identities
- code
- code
- code
Microsoft Entra Domain Services
- code
- code
- code
Microsoft Entra ID
- Entra ID Blade: All Serives/Identity/Identity Management/Microsoft Entra ID
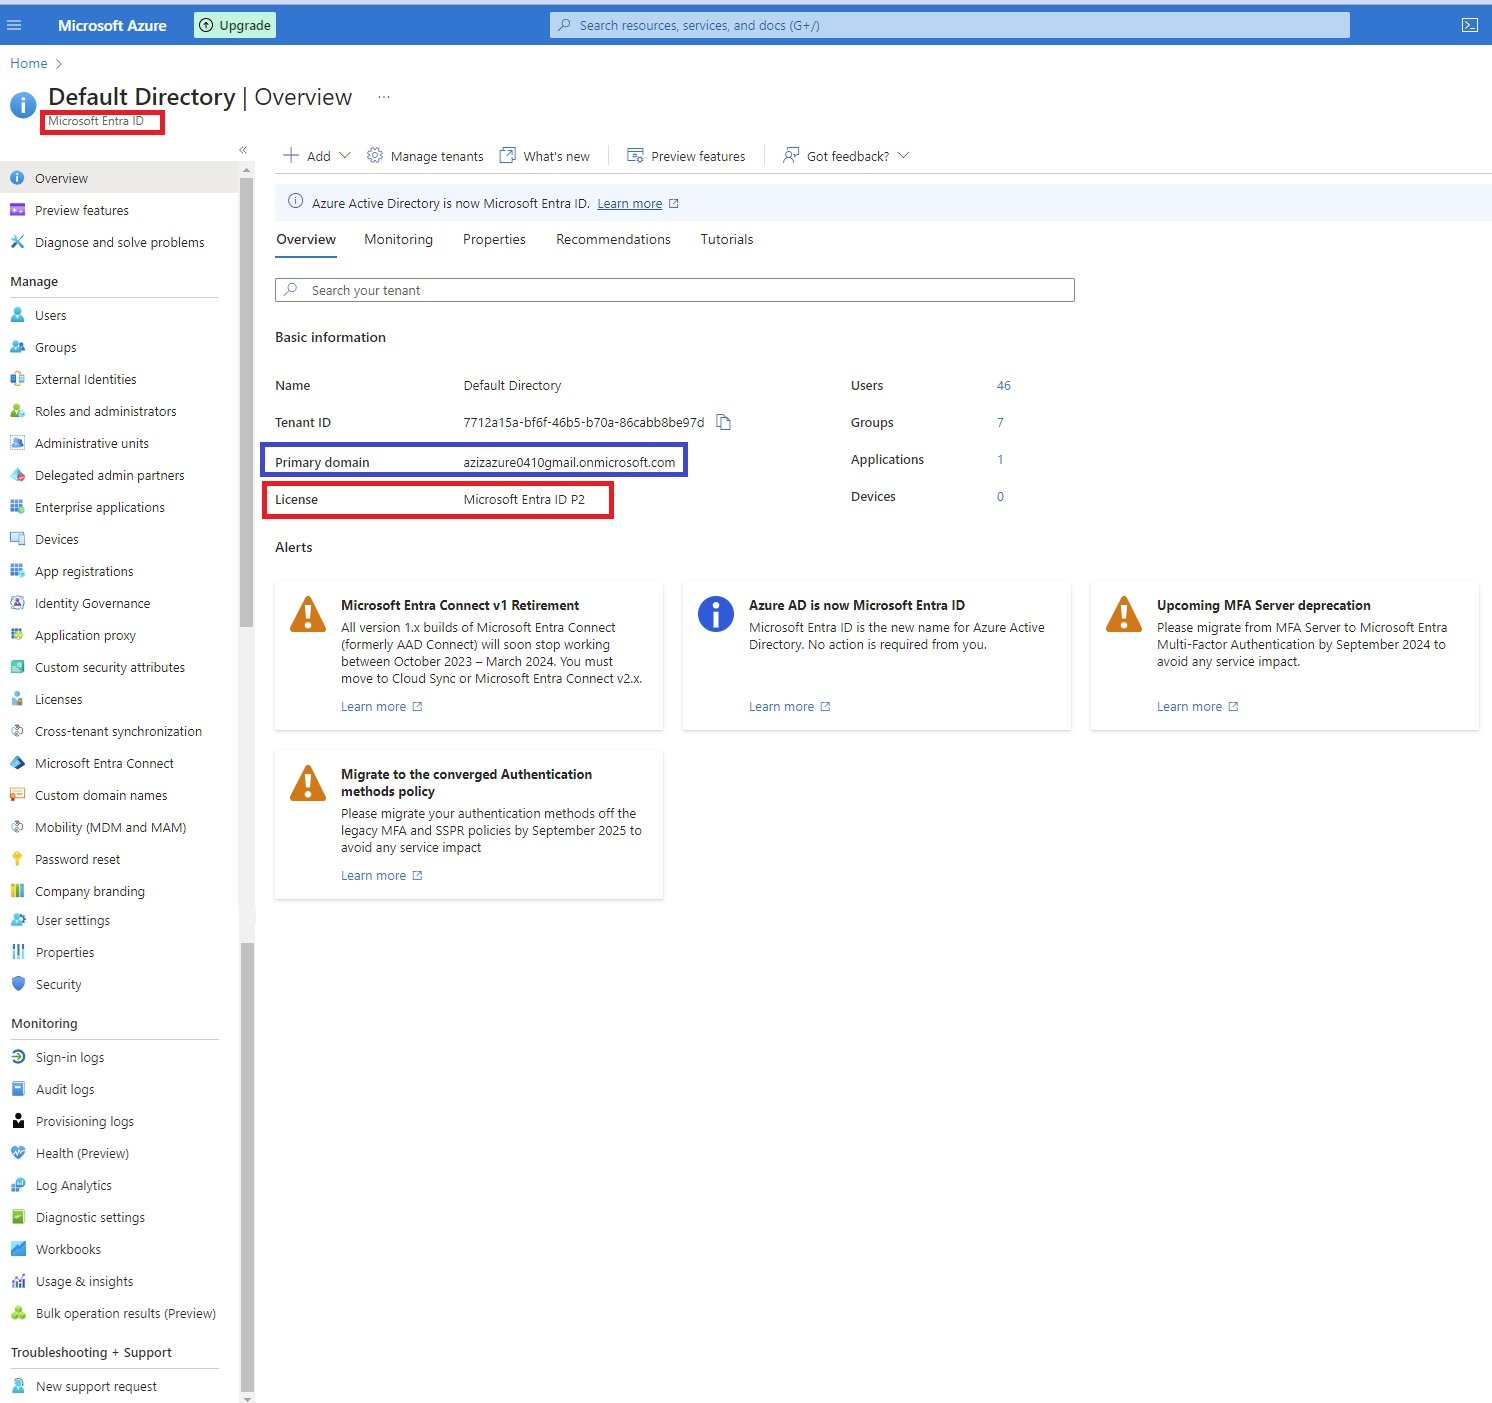
- Overview:
- Add: users, group, Enterprise application, app registration
- Manage Tenants: Create new tenant.
- preview Feature:
- Dianose & Solve Problems:
- Preview Features:
- Diagnose and solve problems:
- Manage:
Users:
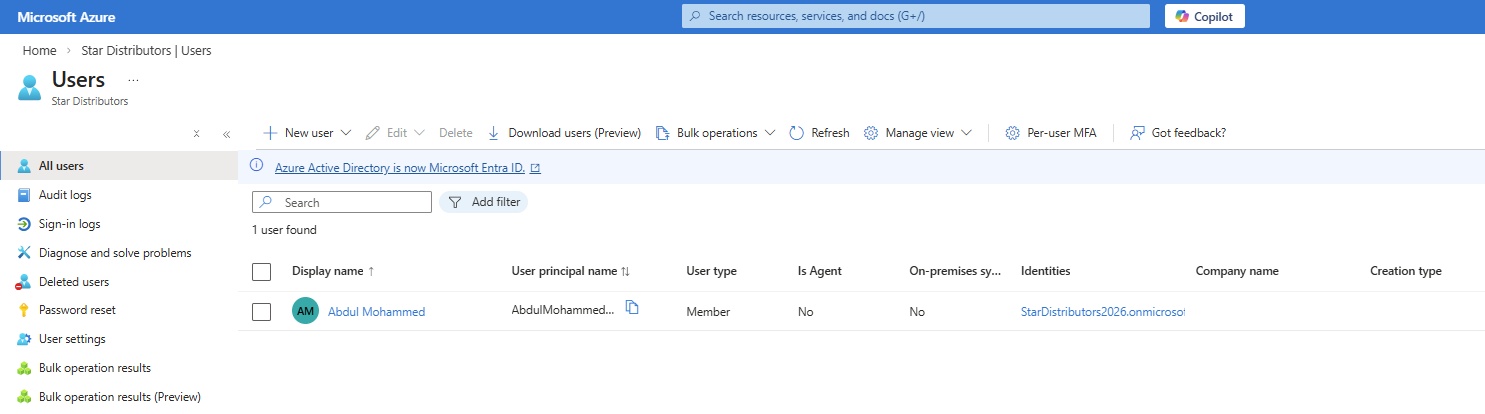
- All users: list of all users.
- Download users: All users will be downloaded in .csv format.
- Bulk operations: Bulk create, Bulk invite, Bulk delete.
- You can create multiple users by using csv file. First download csv template and fill the required fields and upload it to create bulk users.
- Bulk Create: Create bulk users.
- Download csv file.
- Enter fields.
- Upload csv file.
- Bulk Invite: Invite bulk users.
- Bulk Delete: Delete bulk users.
- Bulk Create: Create bulk users.
- Download Users: Download all users in .csv file.
- You can create multiple users by using csv file. First download csv template and fill the required fields and upload it to create bulk users.
Per-user MFA:
- It is an additional security for user login apart from username and password, once MFA is enabled and during sign-in a user is prompted for an additional form of identification. Authentication methods can be added from user/Authentication methods/Add authentication methods, list of approved authentication methods are listed. This list is configured in
- call to phone: call will receive and ask to click particular key on phone.
- Text message to phone: code will text to phone.
- Notification through Mobile App: Request to enter given number on phone app.
- Verification code from mobile app or hardware token: code generated on app or hardware token to enter.
- Enable MFA: Go to Entra ID/Users and click per-user MFA.

- Select the required user to
- Enable MFA
- Disable MFA
- Enforce MFA
- User MFA settings:
- Required selected users to provide contact methods again: When user login next time then user need to complete MFA process from beginning. it is used when user lost phone, change handset or number.
- Delete all existing apps password generated by the selected user: When Entra ID is integrated with other applications and user stored credentials, it will delete all stored password and need to enter again.
- Restore multifactor authentication on all remembered devices. When user activate MFA and used remember this device as a trusted devie. It will delete all trusted device and user has to perform MFA on all linked devices.
- This is Legacy MFA and SSPR (Self Service Password Reset) settings, we have the blade in the Azure portal/Entra ID/password reset/authentication method, where we can configure the SSPR methods.:
- unselect all options from here and enable from authentication method. If you are using Hardware OATH tokens than do not uncheck "Verification code from mobile app or hardware token" from the legacy MFA portal.Service settings of MFA:
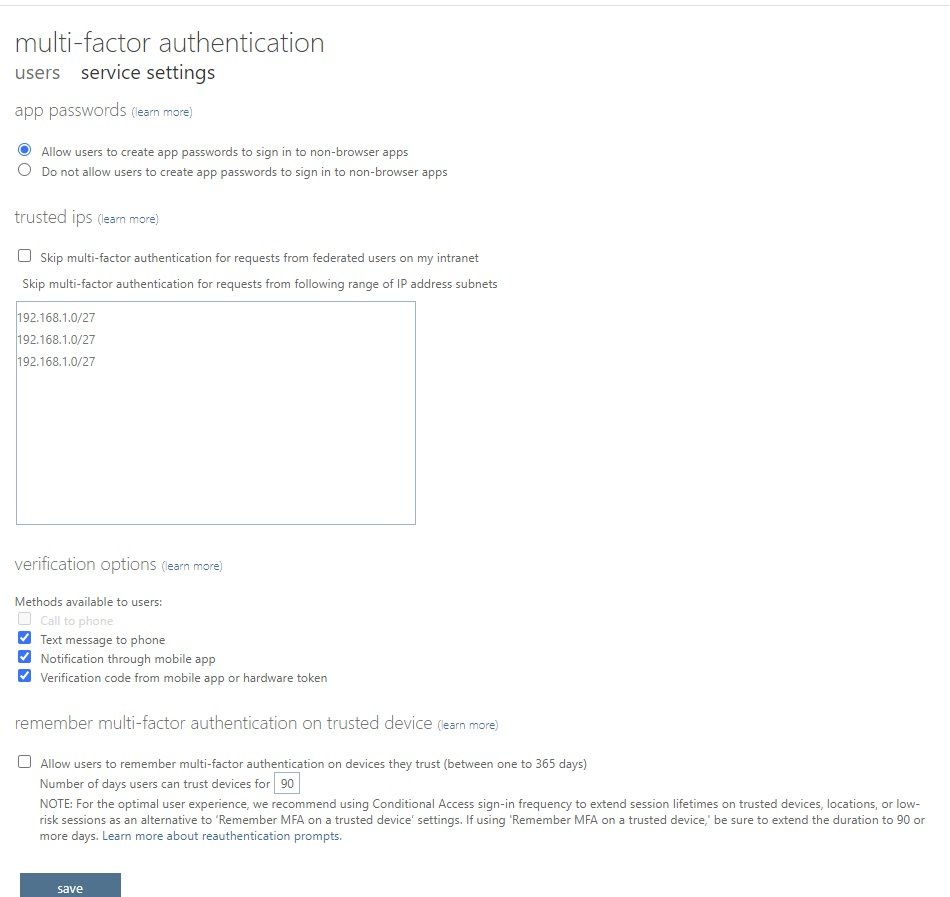
- Authentication Method in Password Reset:

- Allow users to create app passwords to sign in to non-browser apps.
- Do not allow users to create app passwords to sign in to non-browser apps.
- Trusted IPs: Skip multi-factor authentication for requests from federated users (user authentication perform at on-prem federation server) on my intranet. Enter IP or Range of IP to which MFA will skip.
- Verfication methods: call, txt, code on phone or app.
- Remember multi-factor authentication on trusted device.
- select check box and enter number of days 1 to 365 days (30 days)
- when user login with this option, given number of days device will be treated as trusted device and any subsquent login on this device during that period MFA will not prompt to enter code.
- Having trouble? Sign in another way. click this option
- You will have two options: Approve a request on my Microsoft Authenticaor app or Use a verification code from my mobile app as both options are related with mobile authentication app.
- If you choose verification code from my mobile app then you need to open Authenticator app and code generated on mobile should enter here. code will change in 30 seconds by default
- It is an additional security for user login apart from username and password, once MFA is enabled and during sign-in a user is prompted for an additional form of identification. Authentication methods can be added from user/Authentication methods/Add authentication methods, list of approved authentication methods are listed. This list is configured in
+ New user, Edit user, External User
- Users created at Entra ID level, only Entra ID Roles can be assigned to user. If you want to assign roles at Azure resource level (RBAC) go to resource and go to IAM and assign roles. Two options:
- 1. Create new user: create a new internal user in your organization. OR
- 2. Invite external user: Invite an external user to collaborate with your organization.
- 1. Create a new internal user in your organization:
- Basic: Identity:
- user principal name: enter name of a user @ xyzonmicrosoft.com or customdomain
- Mail nickname: Derive from user principal name (check box select) or enter manually.
- Display name: Enter user displayname
- Password: Enter manually or auto-generate
- Account enabled: check box (If not checked, this user will be blocked from signing in. This can be updated after user creation.)
- Properties:
- First name:
- Last name:
- User type: Member, Guest
- Job Information: Job title, Company name, Department, Employee ID,Employee Type, Employee hire date, Office location.
- Manager: + Add manager
- Contact information:
- Address, mobile, email, otemails, fax number:
- Parental Controls: Age group, Consent provided for minor
- Setings: usage location.
- Assignments:
- + Add administrative unit: It is similar to OU (organizational unit in Active Directory)
- + Add group
- +Add role (select the Entra ID roles, users with this role cannot perform any task on Azure resources but only Entra ID resources)
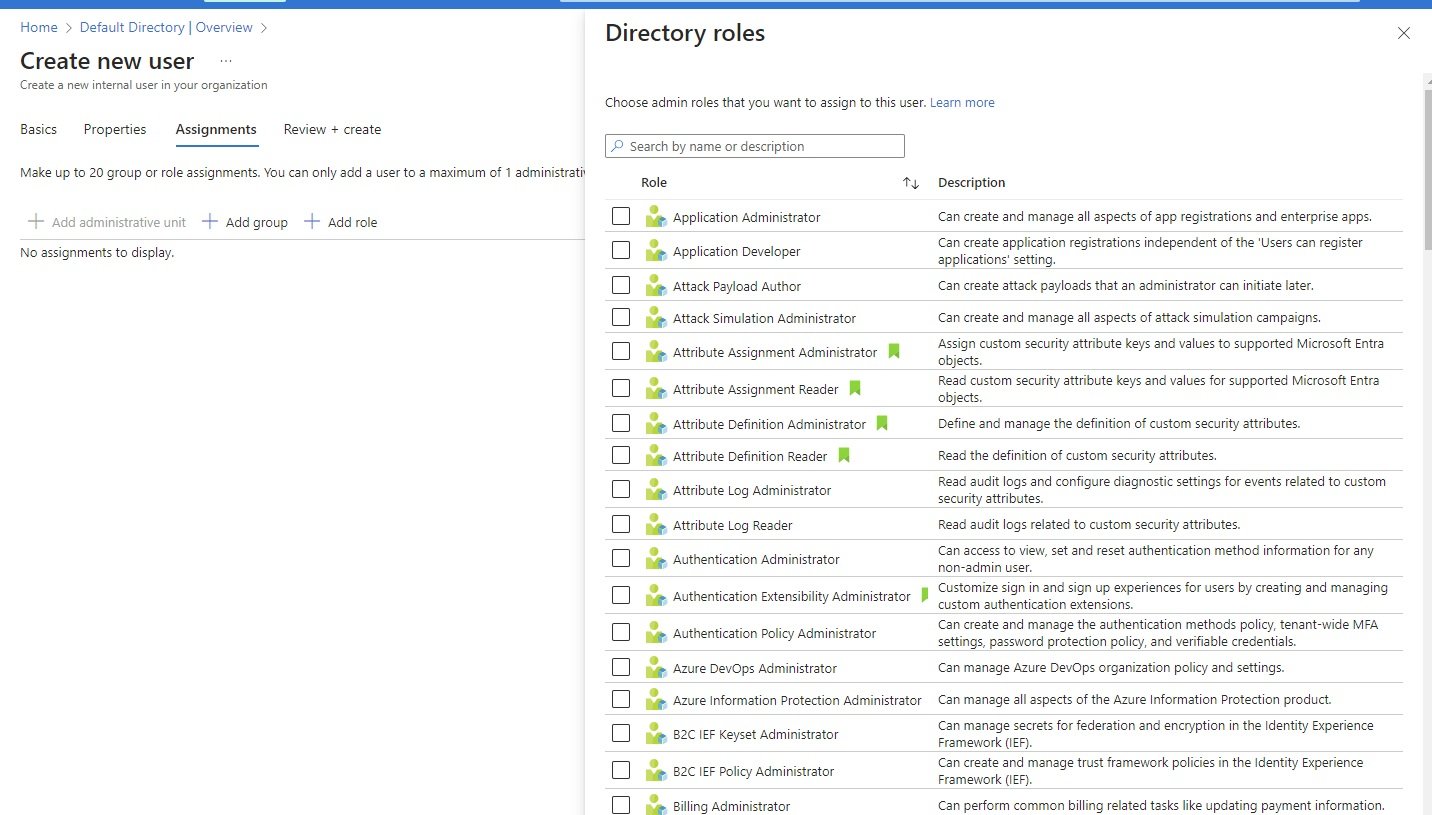
- Search Global Administrator and add to user.
- Create user.
- User Login:
- portal.azure.com
- User is unable to perform any task as no roles has been assigned.
- Assign RBAC role to user to perform task on Azure Resources:
- Users need to perform azure resources task then they must assign roles from RBAC. Give user permission on RG.
- Go to RG on which you want to give access to user.
- Click Acces Contro (IAM)
- Add a role assignment
- Role = select a role from drop down (owner=full access, contributor, Reader etc..)
- Assign access to Azure AD user, group or service principal
- Select user , click save
- Login with user and perform task on resurces on RG.
- You can give access on subscription level then go to subscription and access control (IAM) and add.
- User Configuration/Edit:
- Click on any user:
- Overview:
- Edit Properties: Click any user to change user's properties:
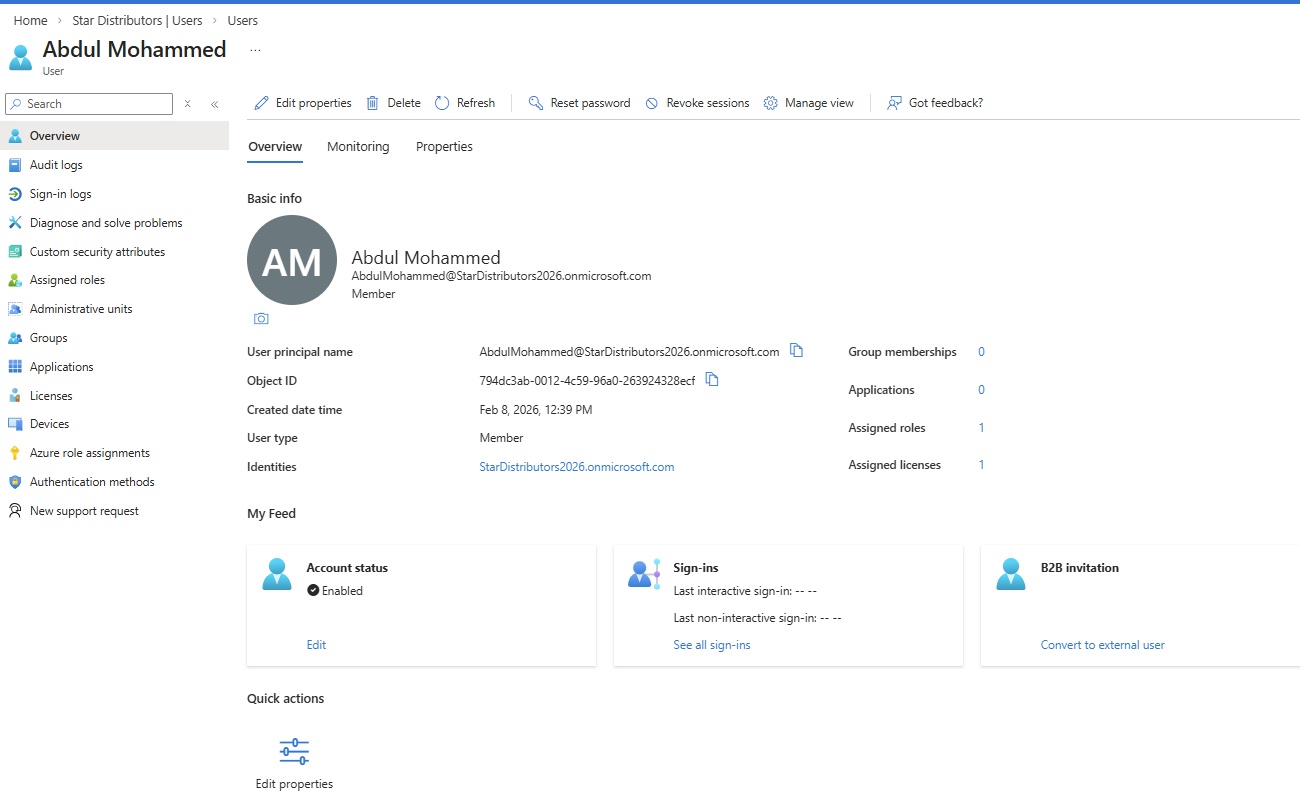
- Overview:
- Account Status: Enabled
- MFA status: capable with N authentication methods.
- Edit properties: To change user identity: Display name, first or lastname, user principal name, user type (member/guest)
- Job information: enter job related details, job title, company name, dept, employee ID, Employee hire date, office location, Manager, sponsors
- contact information: enter contact details, address,
- parental controls: Age group, Consent provided for minor
- Settings: Account enabled (check box), Usage location = uk
- On-premises:
- Delete: delete user
- Reset Password: 'abdul@StarDistributors2026.onmicrosoft.com' will be assigned a temporary password that must be changed on the next sign in. To display the temporary password, click 'Reset password'.
- Revoke Sessions: This will revoke all sessions for the user "Abdul Aziz", requiring the user to re-sign in from all devices.
- Audit Logs: It will show all activities performed on user account for 24 hours, 7 days, 1 month or custom date and time interval.
- Sign-in-Logs: It will display users all login activity for 24 hours, 7 days, 1 month or custom date and time interval.
- Diagnose and solve problems: failed logins
- Custom Security attributes:
- Assigned roles:
- Administrative units: It is similar to Organizational Unit in Active Directory.
- Groups:
- Applications:
- Licenses:
- It will display the licenses has been assigned to user.
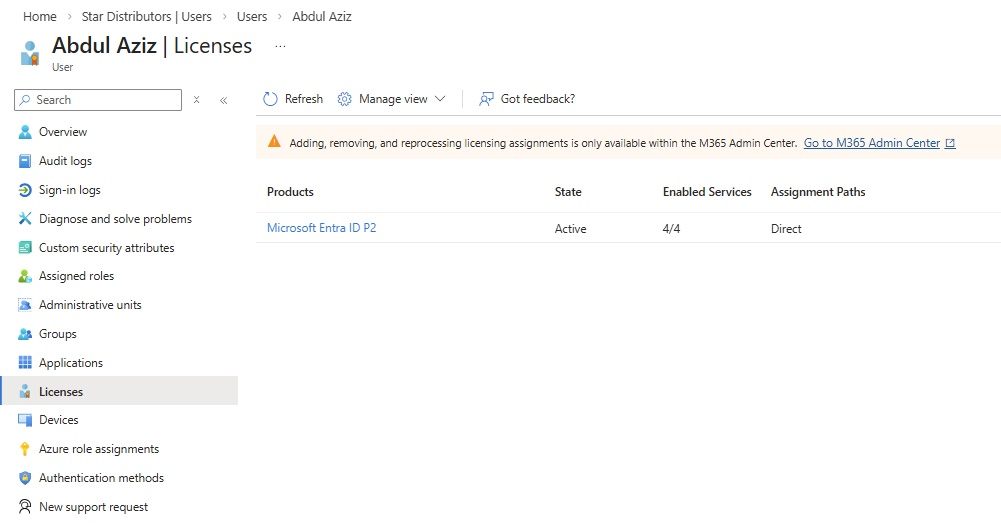
- Now user licenses are managed in M365 admin center.
- Devices:
- Azure role assignments:
- Authentication methods: Add or remove user MFA authentication methods.
- Add authentication methods: choose from list
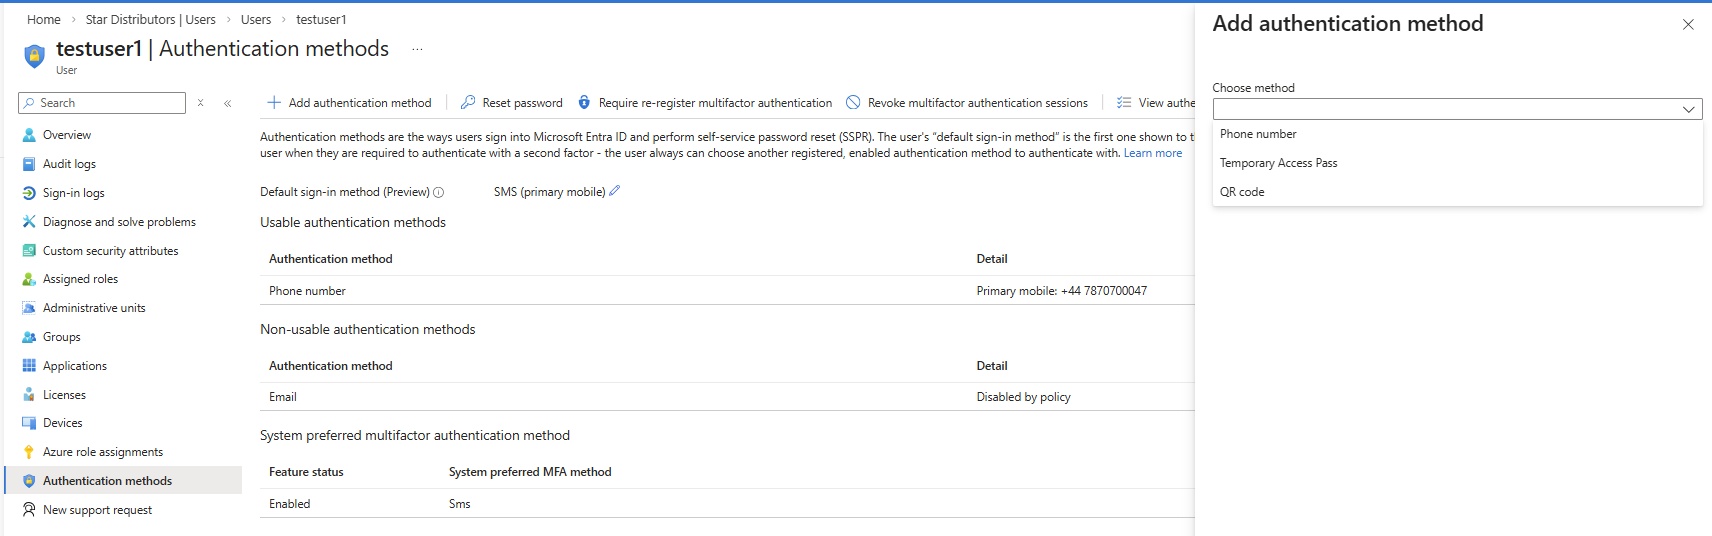
- Set default authentication method: choose a default method,
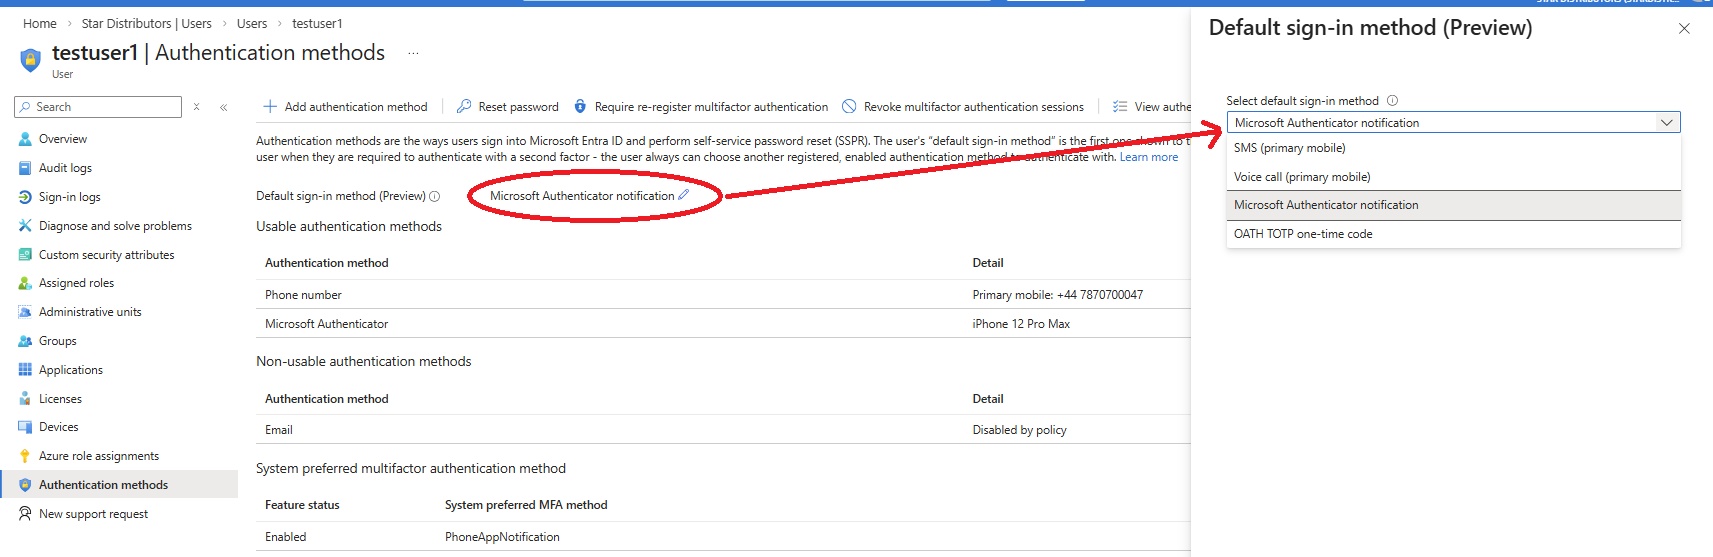
- It can also be done from user's microsoft account/security info.
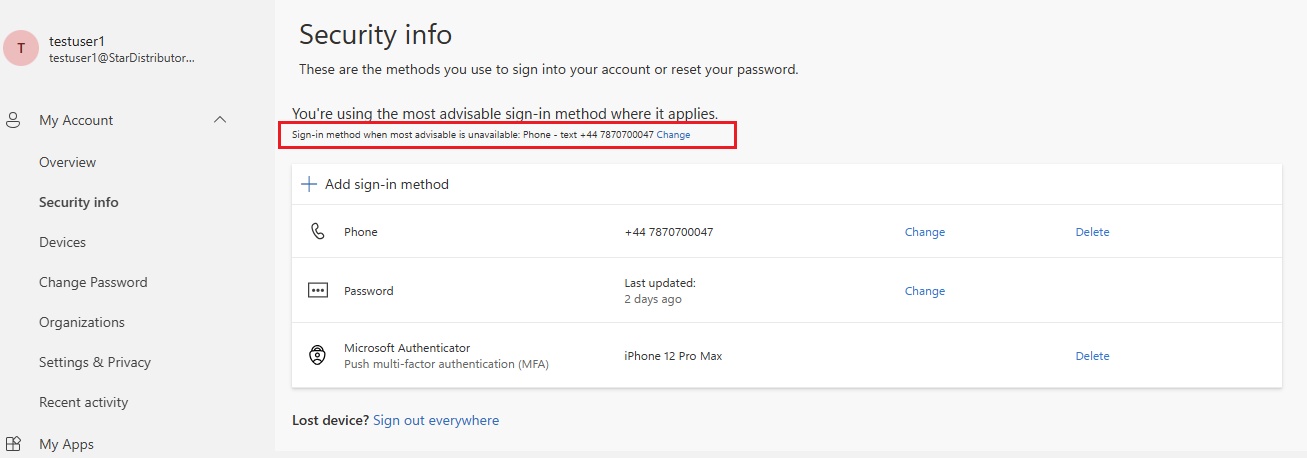
- Reset password: The user 'testuser1@StarDistributors2026.onmicrosoft.com' will be assigned a temporary password that must be changed on the next sign in. To display the temporary password, click 'Reset password'.
- Passwordless authentication method:
- You can set with the following methods.
- Require-re-register multifactor authentication: if user changed mobile handset or lost handset or change method.
- Revoke multifactor authentication sessions: This clears remembered MFA states, requiring users to perform MFA on their next sign-in.
- New Support request;
- 2. Invite External User:
- Invite an external user to collaborate with your organization. Inviting contractors/support service providers on your azure.
- select external user and give user email (aziz27uk@gmail.com),
- enter user details and save it.
- user will receive an email to login to azure portal.
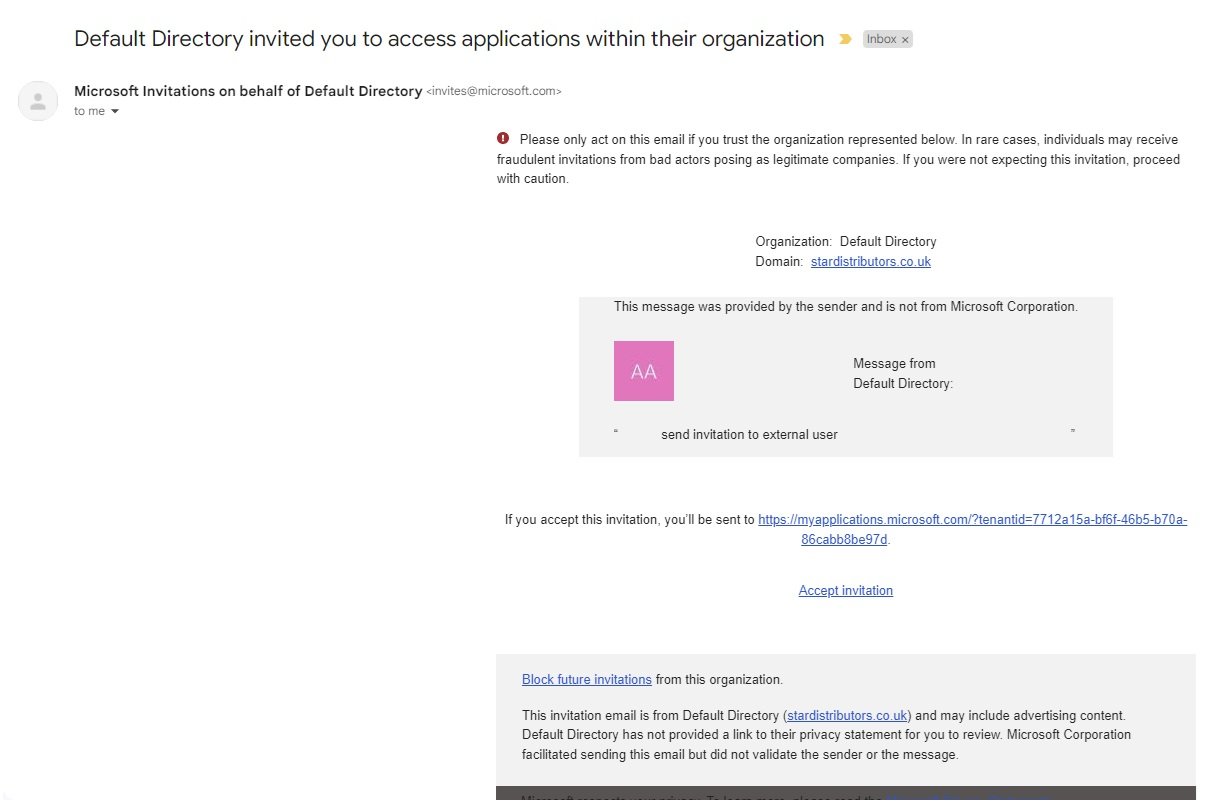
- click on invitation link and create a password. For authentication Azure will send code in another email. accept concern to login to portal.
- You will be redirected to myapps.microsoft.com portal
- When user logged in with their email address will get the apps or services.
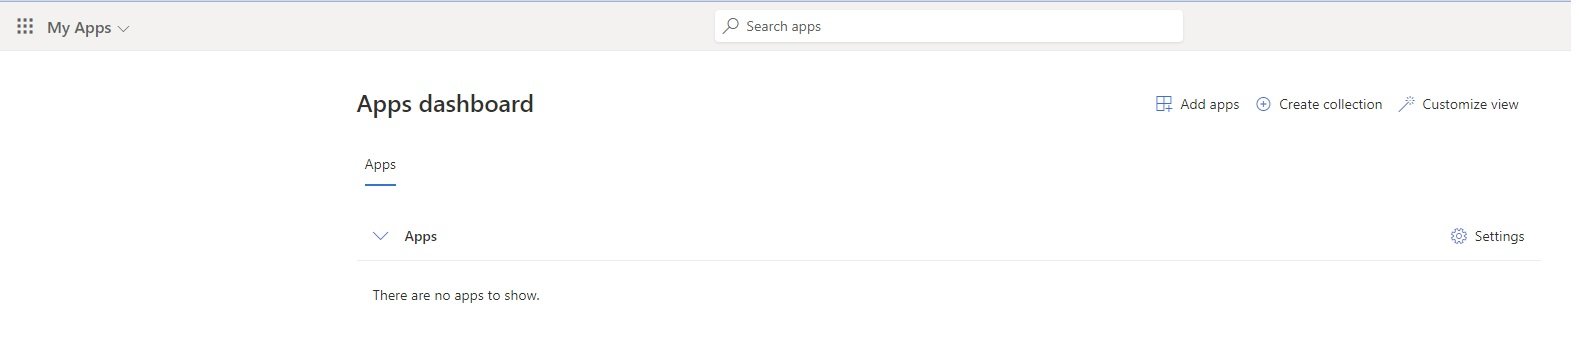
- user has not been assigned to any apps, nor for any azure resource.
- Users created at Entra ID level, only Entra ID Roles can be assigned to user. If you want to assign roles at Azure resource level (RBAC) go to resource and go to IAM and assign roles. Two options:
- Audit Logs:
- Sign-in Logs:
- Diagnose and solve problems: Failed sign-ins.
- Deleted users: Bulk restore, Delete permanently, Restore users, users are permanently deleted automatically 30 days after they are deleted.
- Password reset:
- User Settings:
- Bulk operation results:
- New support request:
Groups:
- Overview: Gives basic information of all groups
- Total groups
- Dynamic groups:
- M365 groups
- Cloud groups:
- Security groups:
- on-premises groups
- Alerts
- New group: Create new group
- Download groups:
- All Groups: list of all groups.
- + New Group: Create new group
- Group type:
- security: Security groups are used to give group members access to applications, resources and assign licenses. Group members can be users, devices, service principals, and other groups.
- Microsoft 365 : Microsoft 365 groups are used for collaboration, giving members access to a shared mailbox, calendar, files, SharePoint site, and so on. Group members can only be users.
- Group Name: IT-Admins (Enter name of the group.)
- Group description: Enter description.
- Membership type: Select dynamic or assigned membership for the group
- Owners: select user as owner of the group.
- Go to group to add members:
- Members: add members to this group.
- Create.
- Group type:
- Deleted groups:
- Delete permanently: select group and delete permanently before 30 days grace period.
- Restore group: select the group and restore. (30 days after original deletion, groups are permanently deleted).
- Diagnose and solve problems:
- Settings:
- General:
- Expiration:
- Naming Policy:
- Activity:
- Privileged identity management:
- Access reviews:
- Audit logs:
- Bulk operation results
- Troubleshooting + support
- Group Configuration:
- Click a group for configuration and editing.
- IT-Admin (earlier created)
- Manage:
- Properties: change group name, description.
- Members: Add members, Remove members.
- Owners: Add oweners, Remove owners.
- Roles & Administrators: Administrative roles are used for granting access for privileged actions in Microsoft Entra ID. We recommend using these built-in roles for delegating access to manage broad application configuration permissions without granting access to manage other parts of Microsoft Entra ID not related to application configuration.
- Administrative units: Assign to Adinistrative unit
- Group memberships: Add memberships, Remove Memberships
- Applications:
- Licenses: Adding, removing, and reprocessing licensing assignments is only available within the M365 Admin Center. Go to M365 Admin Center
- Azure role assignments:
- Activity:
- Privileged identity management: Microsoft Entra Privileged Identity Management (PIM) enables just-in-time (JIT) access to the ownership or membership of the group. Required P2 license.
- Access reviews:
- Audit Logs:
- Bulk operation results:
- Troubleshooting + support
- Overview: Gives basic information of all groups
- External Identities:
- Roles and administrators:
- Administrative units:
- It is similar to Organizational Unit (OU) in Active Directory.
- Delegated admin partners:
- Enterprise applications:
- Devices:
- App registrations:
- Identity Governance:
- Required license to access Identity governance or PIM(Privileged Identity Management).
- Application Proxy:
- Custom Security attributes:
- Licenses:
- You can buy required licenses.
- P1 (Premium 1) an P2 (Premium 2) licnese is required for most advance configuration in Entra ID.
- Cross-tenant synchronization:
Microsoft Entra Connect/ Azure AD Connect:
- Entra Connect provides comminication/sync between Azure Entra ID and on-prem Active Directory.
- LAB:
- Install ADDS:
- Install and configure Active Directory on VMWare Workstation or install a vm on Azure. (stardistributors.local or stardistributors.co.uk)
- Create some groups and users in AD.
- Download and install Entra ID connect on Member sever (server connected with DC).
- https://www.microsoft.com/en-us/download/details.aspx?id=47594
- Error: Incorrect versio of TLS: click on please refer to this document, and scroll down to view an script, copy and run in powershell which will open TLS 1.2
- open Entra ID connect.
- It required a user with global administrator role in Azure Entra. create a user. open portal.azure.com and login with this user.
- Local admin with enterprise admin group. create a user and add to member of enterprise admin

- Domains should be verified in order to sync on-prem AD with Azure Entra ID.
- Any UPN that contains a non-routable domain such as domain.local will only be synchronized with xyz.onmicrosoft.com domain.
- stardistributors.local in non-routable domain. click on customize, it will ask to install required components:
- Specify a custom installation location.
- Use an existing SQL Server.
- User an existing service account.
- Specify custom sync groups.
- Import synchronization settings.
- Do not select and click install.
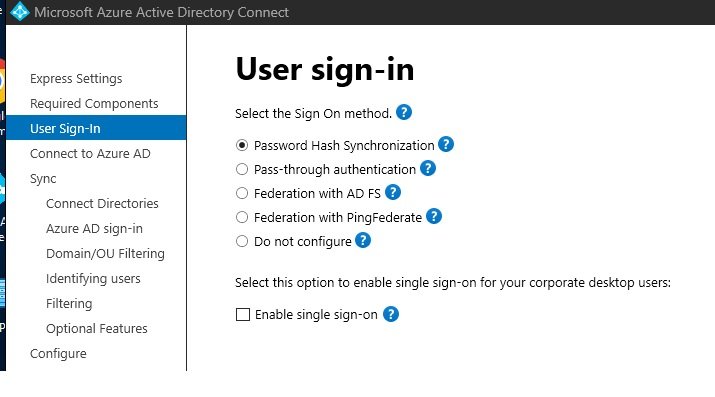
- Select user sign-in method:
- Password Hash Synchronization:
- It uses SHA256 or 512 (Hashing Algorithm): it converts plain text into Hash format.
- users name and Hash password will sync to Azure Entra ID.
- When user want to access applications on azure than users authentication performed at Azure Entra ID.
- Passwords will sync every 2 minutes.
- Pass-Through Authentication:
- Password remain at on-prem and user authentication will be done at on-prem AD.

- Performing the pass through authentication using above on-prem DC where password hash synchronization was configured.
- Double click azure AD connect and click configure, select Change user sign-in.
- Enter Connect to Azure AD: enter user credentials who got global adminsitrator role. (adconnect@azizazure0410gmail.onmicrosoft.com)
- Select the Sign On Method: pass-through authentication.
- Enter domain administrator account.
- ready to configure, click configure. installation complete
- run/appwiz.cpl (programs and features), Microsoft Entra ID Connect Authentication Agent is installed. It performs steps 5,6,7,8,9
- Go to portal.azure.com/EntraID/EntraId connect/Overview/user sign-in : passthrough authentication Enabled.
- If both password hash and pass-through synchronization is enabled, run microsoft entra connect, select configure, select customze synchronization options, on the optional features clear password hash synch.
- Federation with AD FS:
- User's authentication will be done through federation server.
- Federation with PingFederate:
- Do not Configure:
- Enable Single Sign On:
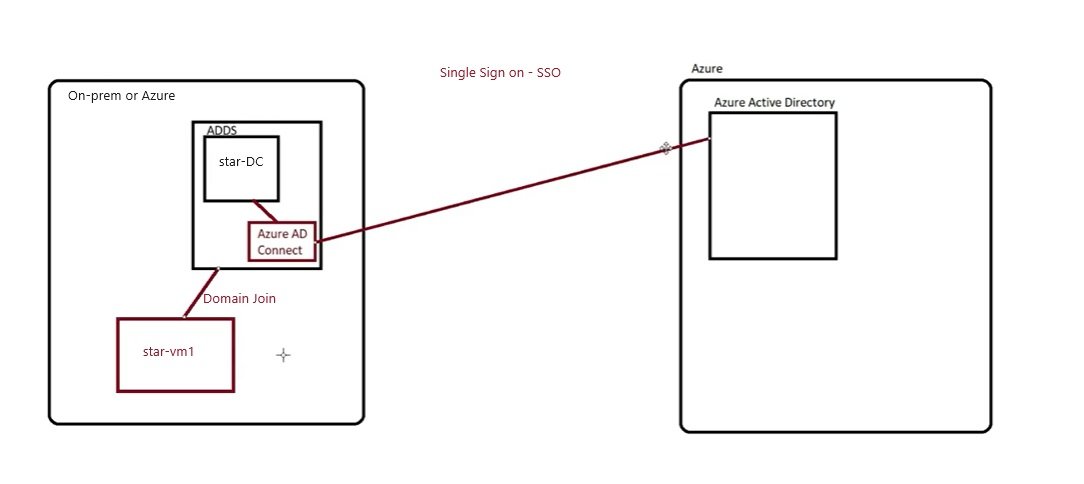
- Double click azure AD connect and click configure, select Change user sign-in.
- Enter Connect to Azure AD: enter user credentials who got global adminsitrator role. (adconnect@azizazure0410gmail.onmicrosoft.com)
- Select Enable single sign-on.
- enter a domain administrator account configure your on-premises forest for use with single sign-on.
- Ready to configure: it will start synchronization process and enable single sign-on.
- SSO configuration: Performed above at Azure AD connect and now perform in Group policies in DC.
- Group policy managent in DC, edit default domain policy or create new.
- user configuration/policy/administrative templates/windows components/internet explorer/internet control panel/security page and select site to zone assignment list. Enable the policy and enter the following values.
- value name: The Azure AD URL where the kerberos tickets are forwarded. value(Data): 1 indicates the intranet zone. the result looks like this (value name:https://autologon.microsoftazuread-sso.com)
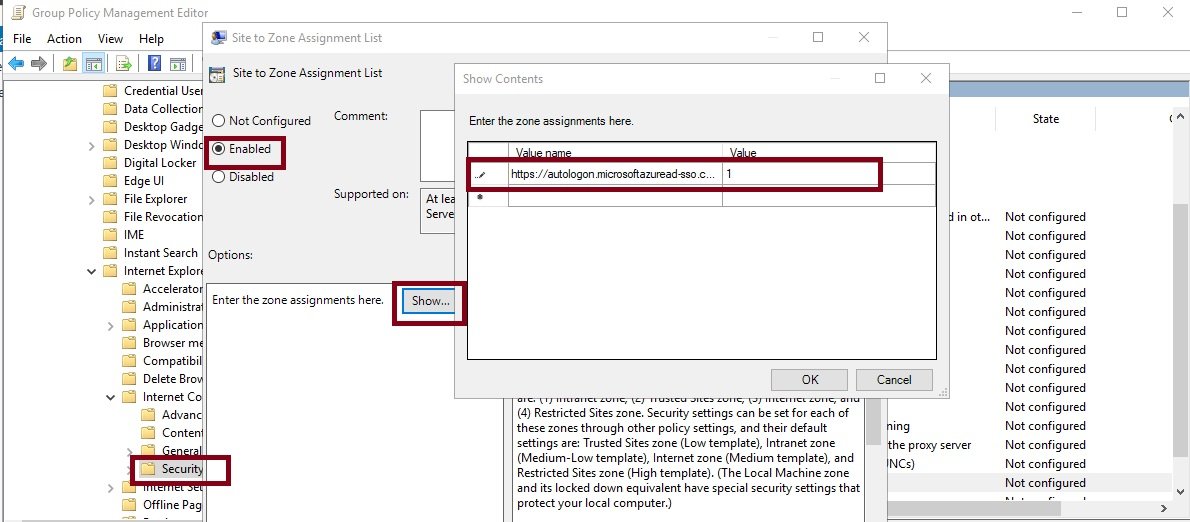
- User configuration/policy/administrative templates/windows components/internet explorer/internet control panel/security page/Intranet Zone and click Allow updates to status bar via script. Enable, apply and ok.
- user configuration/preferences/windows settings/registry, right click and new registry item, enter the following values.
- key path: Software\Microsoft\Windows\CurrentVersion\Internet\Settings\ZoneMap\Domains\Microsoftazuread-sso.com\autologon
- Value name:https
- Value type: REG_DWORD
- Value data: 00000001

- apply and ok
- To test, go to star-vm1 and login with any AD user and open browser and go to portal.office.com. it will not ask for password.
- user configuration/policy/administrative templates/windows components/internet explorer/internet control panel/security page and select site to zone assignment list. Enable the policy and enter the following values.
- Password Hash Synchronization:
- Select password Hash Synchronization and continue.
- Connect to Azure AD: Enter Azure global administrator credentials.
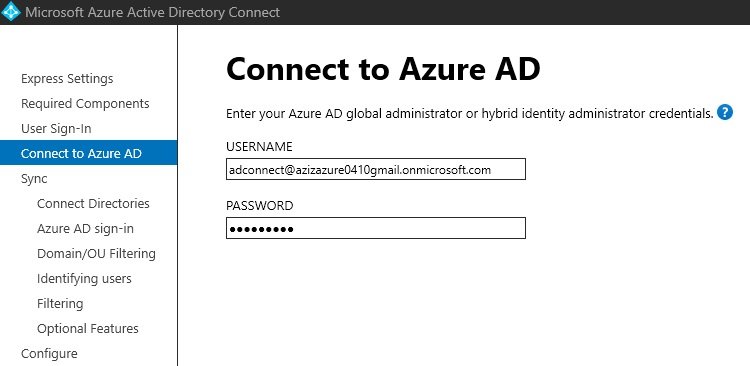
- It will verify credentials.
- Connect on-prem Active Directory or forest.
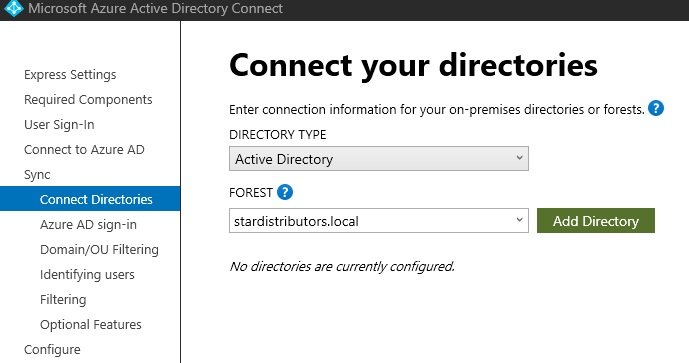
- Forest is stardistributors.local, click add directory. enter user credentials with enterprise administrator rights.
- It will prompt to provide AD forest account. This account will be use for directory synchronization. create new or provide existing one.
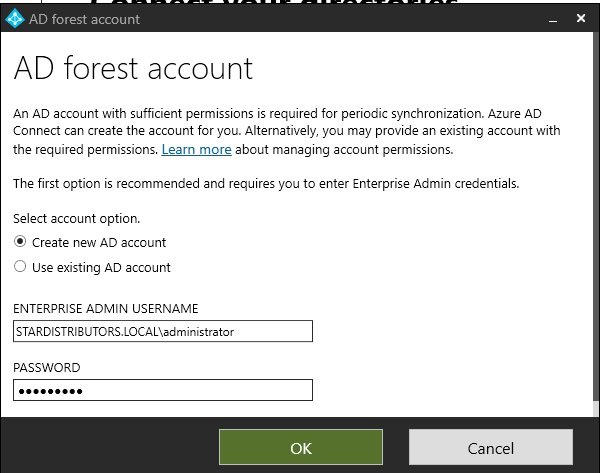
- Directory has been added. Continue, a warning sign will appear that domain is non routable, select check box continue without matching all UPN suffix and continue.
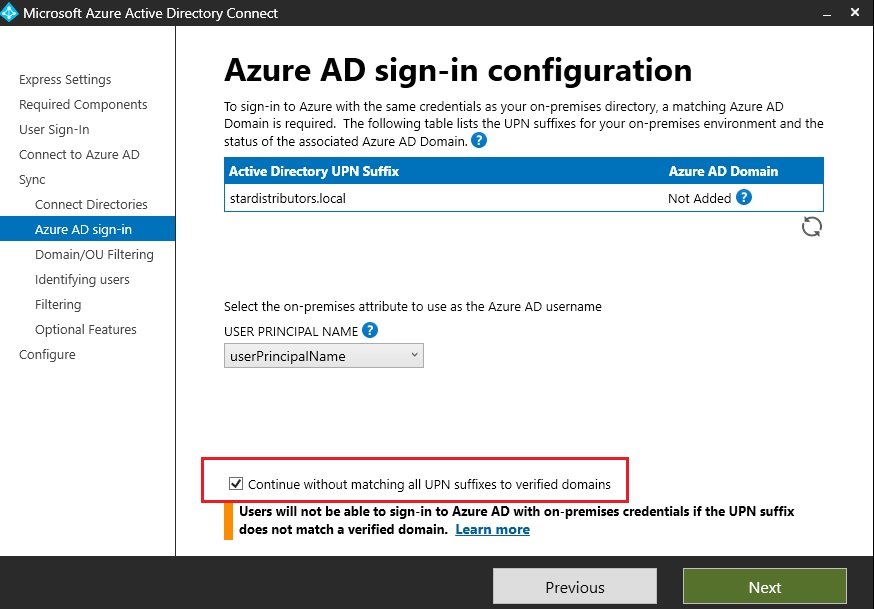
- Domain and OU filtering: select desire OU check box to which you want to synch with azure Entra ID. some groups and users created.
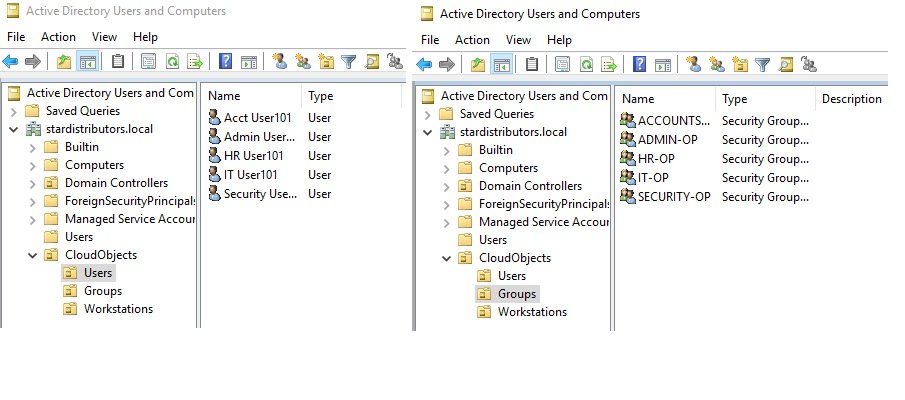
- select OU and sub OU which need to sync, on-prem OU is created CloudObjects.
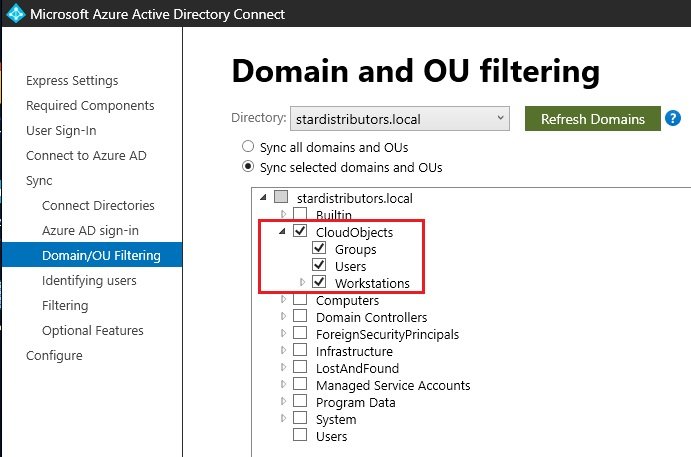
- Uniquely identifying your users: leave as it is and continue. Define how to differentiate users of on-prem and azure.
- Filter users and device, continue.
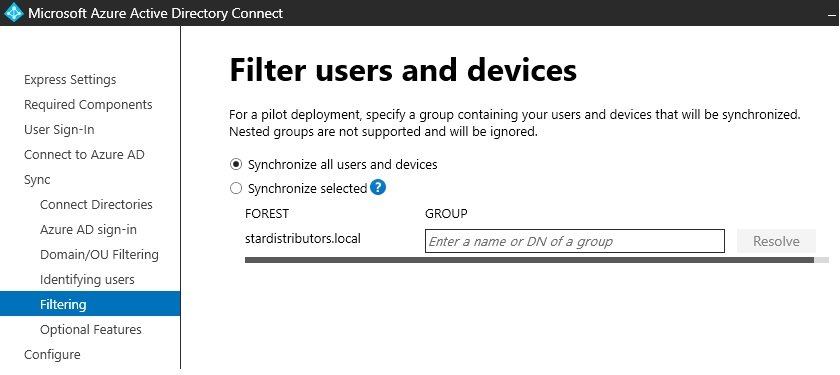
- synchronize all users and devices or selected.
- Optional Features.

- select exchange if it is installed,
- select password writeback: if a user change password at azure than it will reflect at on-prem AD.
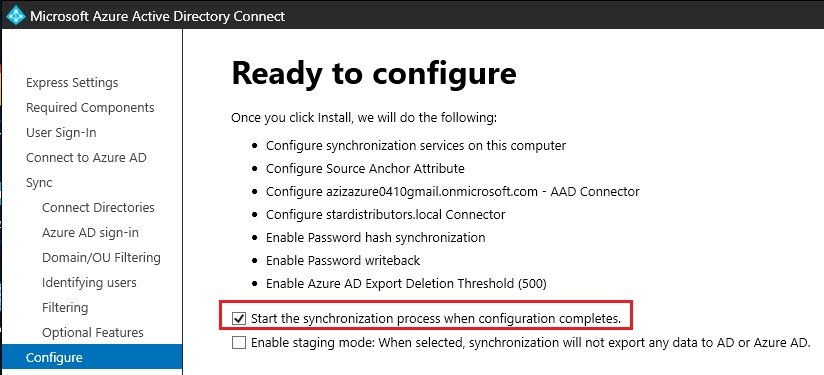
- select check box and install. It will install Azure AD connect on on-prem Active Directory.

- To Check deployed configuration in Entra ID Connect.
- in DC double click Entra ID connect, click configure and in additional task.
- Privacy Settings.
- View or export current configuration: shows current configuration.
- Customize Synchronization options.
- Configure device options
- Refresh directory schema.
- Configure staging mode.
- Change user sing-in
- Manage Federation
- Troubleshoot.
- in DC double click Entra ID connect, click configure and in additional task.
- Go to azure Entra ID and check users and groups.
- Overview: you can check Microsoft Entra ID connect enabled and sync.
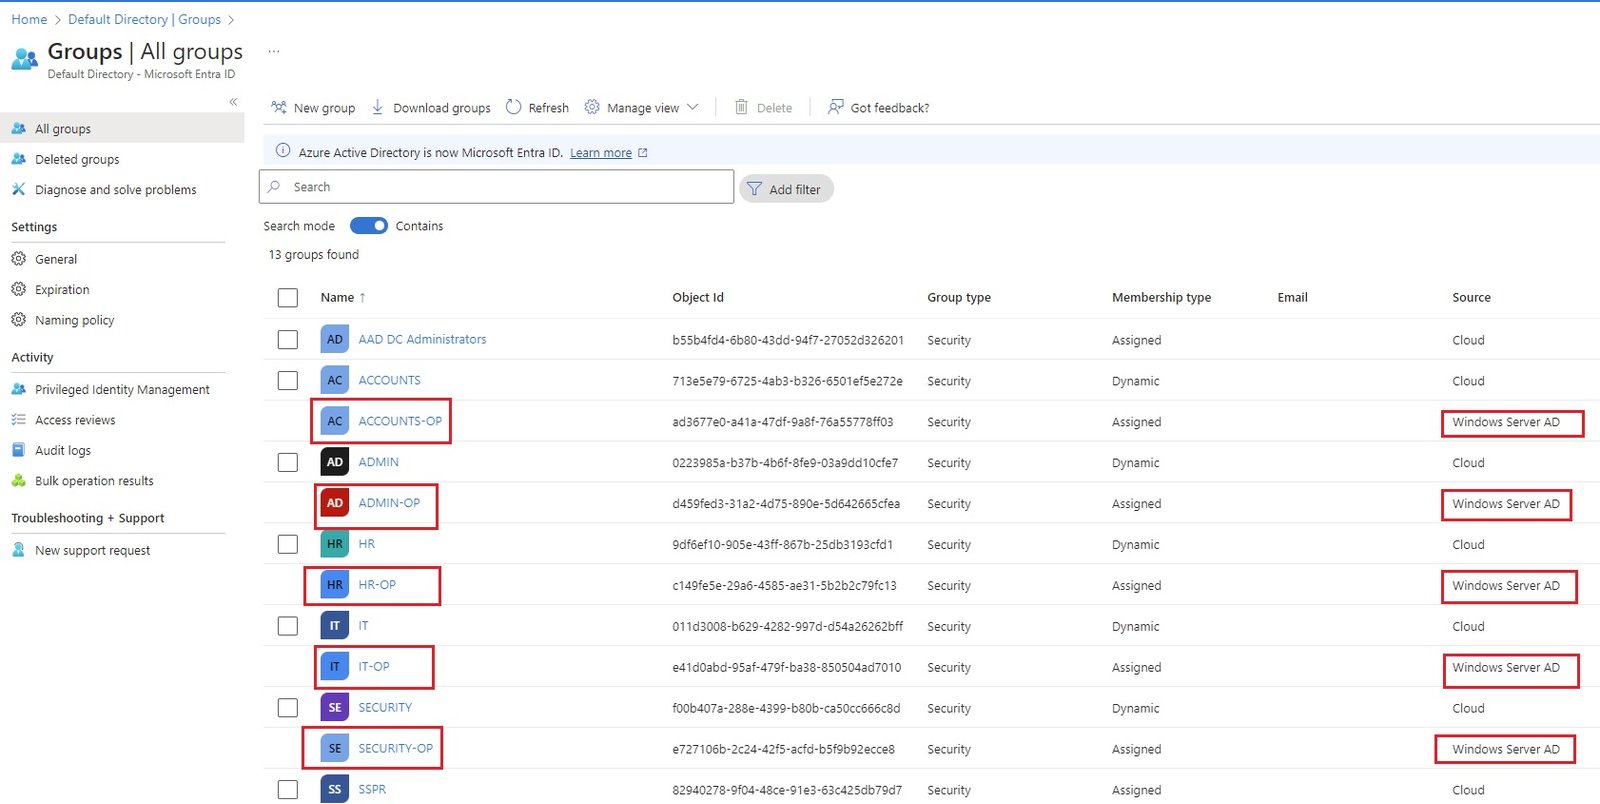
- Groups and users are sync.
- Go to on-prem AD and open synchronization service.
- Entra connect Health: You can monitor health of Active Directory on prem through azure entra ID.
- Install agent on AD connect server: https://aka.ms/aadchaddagent
- click configure now and it will register with Azure Entra ID, Enter credentials to login to Azure who got global administrator role. Powershell runs.
- Agent registration completed successfully. agent is registered with on prem ADDS.
- To monitor go to https://aka.ms/aadconnecthealth and it will redirect to azure portal. or on azure portal search Mircosoft Entra Connect health.
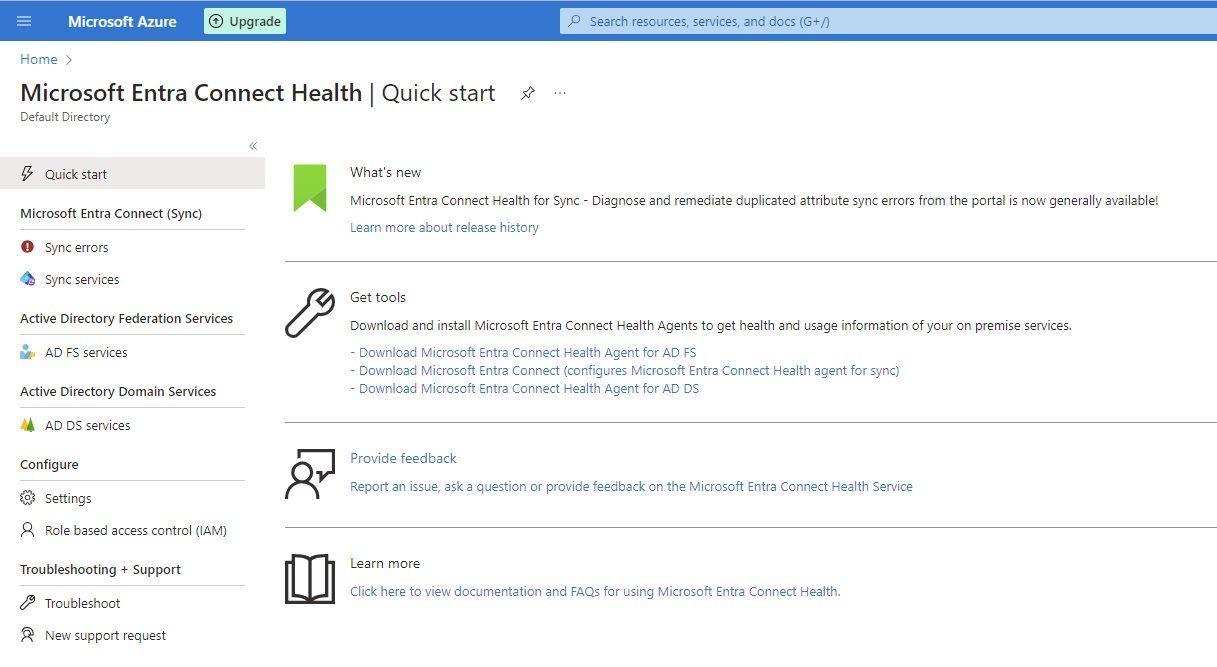
- Click on AD DS services in Active directory domain services: You can check complete health of on prem ADDS.
- Install agent on AD connect server: https://aka.ms/aadchaddagent
Custom domain names:
- When you create an account using email with azure it creates a default directory/tenant and a default doman azizcloud2408gmail.onmicrosoft.com
- you can add custom domain
- + Add custom domain:
- Go to Entra ID of required directory and go to custom domain names.
- click add custom domain name, enter domain name.
- To Verify the ownership of domain, add txt or MX record in the Authoritative DNS server (one.com/godaddy etc is authoritative DNS).
-
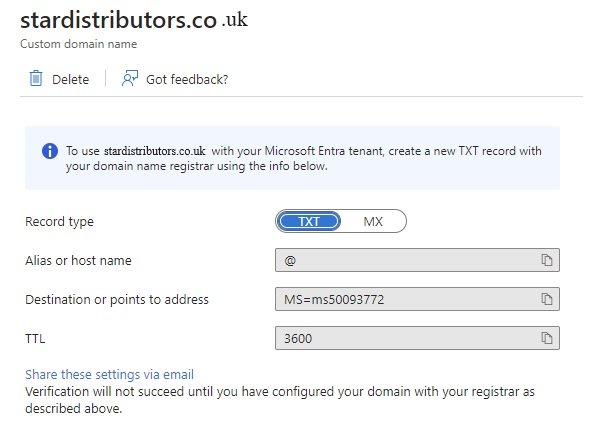
- Create DNS zone in Azure:
- Search DNS Zone and click create.
- select subscription, RG,
- Name= stardistributors.co.uk
- Review and create.
- Once it is created, go to resource/DNS management/recordsets and copy nameservers.
- ns1-06.azure-dns.com.
- ns2-06.azure-dns.net.
- ns3-06.azure-dns.org.
- ns4-06.azure-dns.info.
- Login to authoritative DNS server and go to DNS Nameservers and click change to custom nameservers
- add the above copied nameservers of Azure. (remove . at the end)
- ns1-06.azure-dns.com
- ns2-06.azure-dns.net
- Now click DNS Records and select txt record for verification and ownership confirmation.
-
go daddy
-
After adding txt record go back to azure and click verify and once it is verified custom domain is configured. -
- You can make this custom domain as primary.
- Mobility (MDM and WIP):
- Password reset:
- password_reset1.jpg
- Properties:
- Self Service Password reset enable, These settings only apply to end users in your organization. Admins are always enabled for self-service password reset and are required to use two authentication methods to reset their password.
- Selected: You need to select a group in which all users of that group can do password reset.
- All: All users can do password reset.
- Authentication methods: You can select 1 or 2 number of methods required a user to reset password. if 1 is selected then user need to provide one security to reset password.
- User Settings:
- Properties:
Security: Conditional access, Identity protection, Authentication methods, MFA
- Goes to same section of All services/Identity/Security and protection/Microsoft Entra ID Security (check below in security and protection)
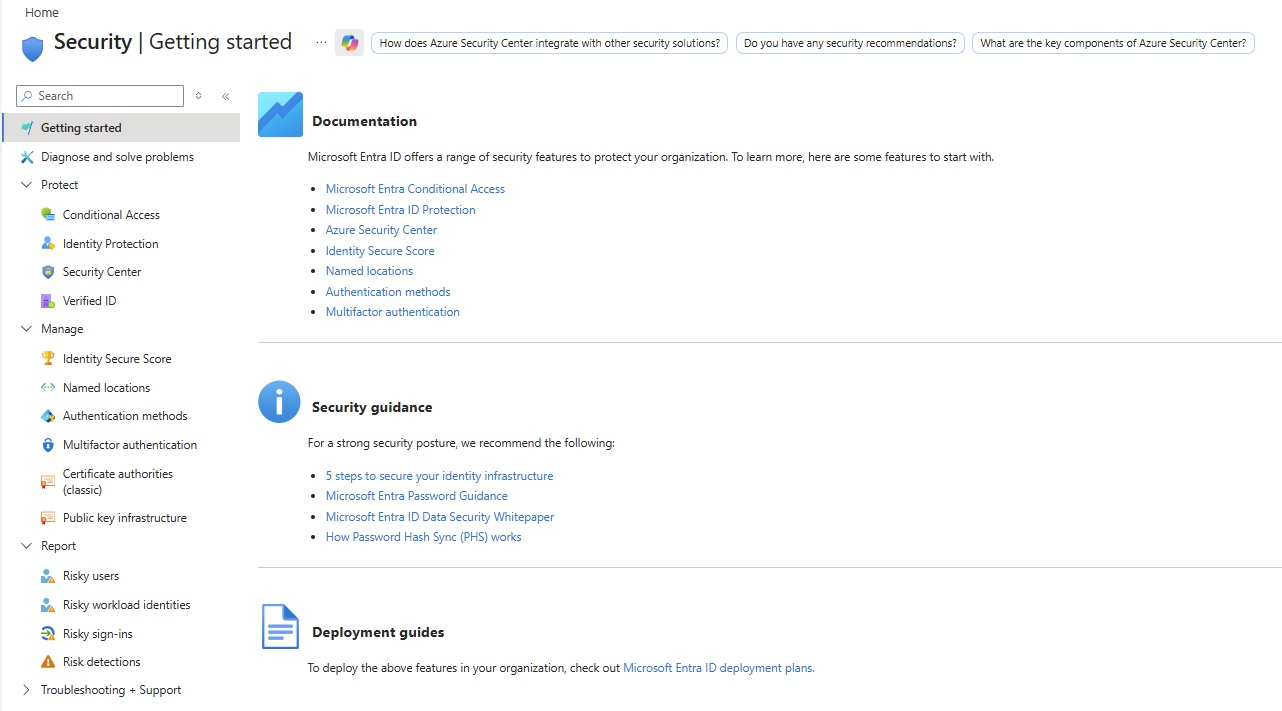
- Protect:
Conditional Access: Define policies for MFA

- Dashboard:
- Protect:
- Conditional Acces:
- Policies: New Policy, New policy from template, upload policy file
- Manage:
- Named locations:
- Custom controls
- terms of use:
- VPN connectivity:
- Authentication contexts
- Authentication strengths:
- Classic policies:
- Monitoring:
- Sign-in Logs:
- Audit Logs:
- User Risk Policy:
- Sign-in risk policy:
- Multifactor Authentication registration policy
- Conditional Acces:
- Report:
- Risky agents (Preview)
- Risky Users
- Risky workload identities
- Risky sign-ins
- Risk detections
- Settings
- Usrs at risk detected alerts
- Weekly digest
- Settings.
- Troubleshooting + Support
Identity protection:
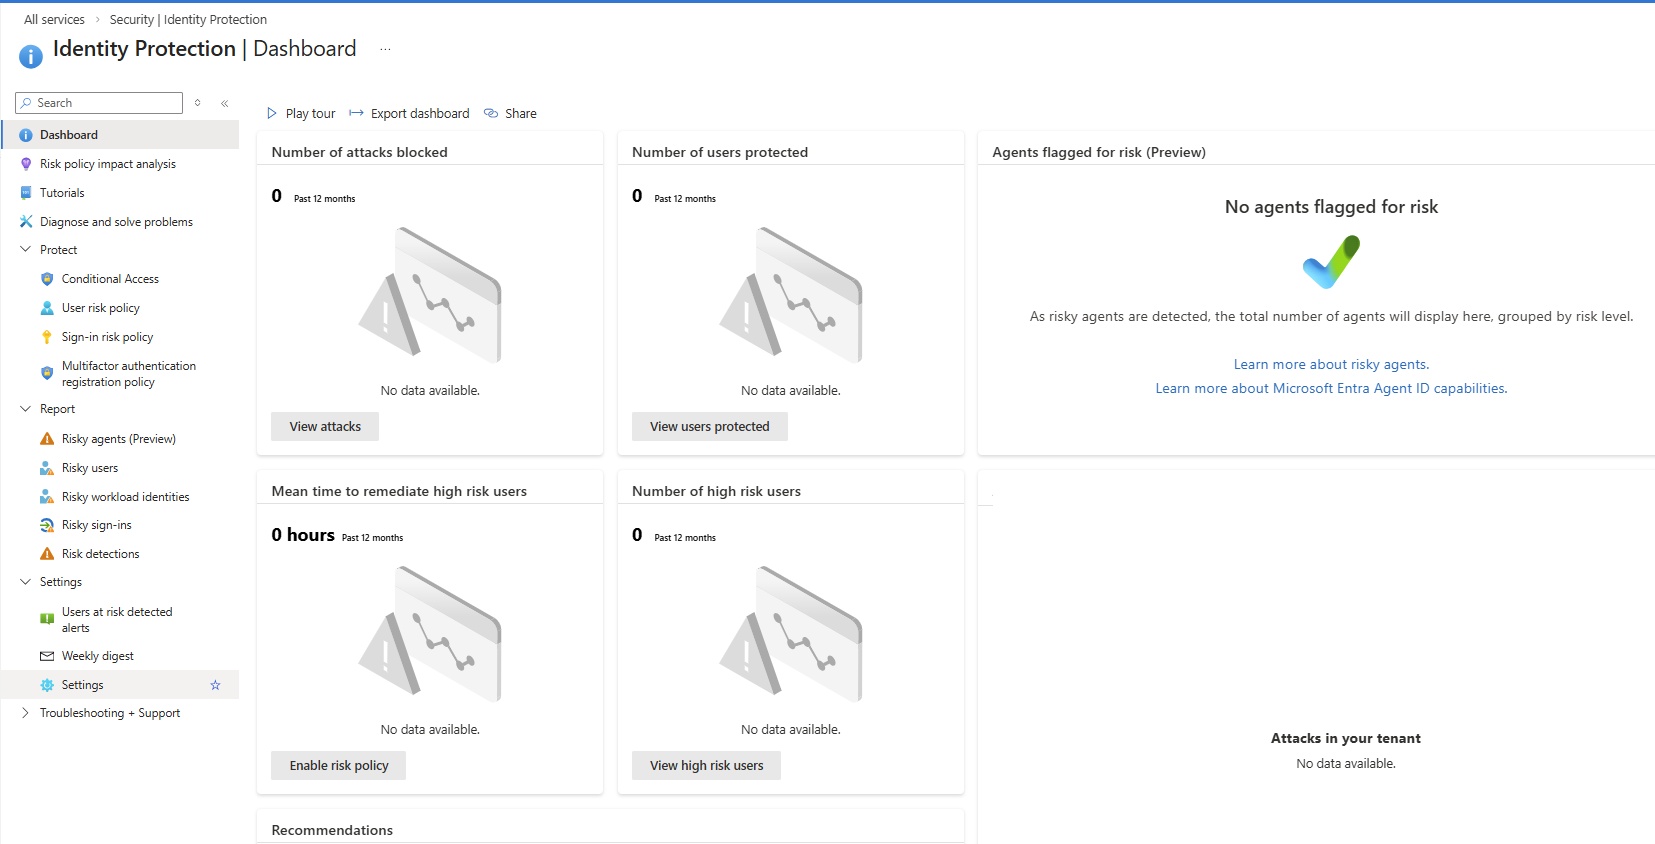
- Protect user account from external attach. It is an automatic process where it automatically detects the threat/risk and fix the issue automatically.
- We can apply three kind of policy in identity protection:
- User Risk Policy:
- It is related with user password is compromised. Microsoft provides leads credential service where it detects any passwords has been compromised. If any password matches with compromised password then a restriction will apply on user account. Either block the user or request user to change password.
- Search for Azure Identity protection/User Risk policy.
- The legacy risk policies configured in Microsoft Entra ID Protection will be retired on October 1, 2026. To manage/modify it, migrate to conditional access.
- Assignment: You can select policy should be assign to all users or particular users/group. You can select include or exclude option for users.
- User Risk:
- Controls/Access:
- Sign-in Risk Policy:
- MFA Registration Policy:
- User Risk Policy:
- Security Center:
- Verified ID:
- Manage:
- Identity Secure Score
- Named Locations:
Authentication methods: Configure or add new methods.
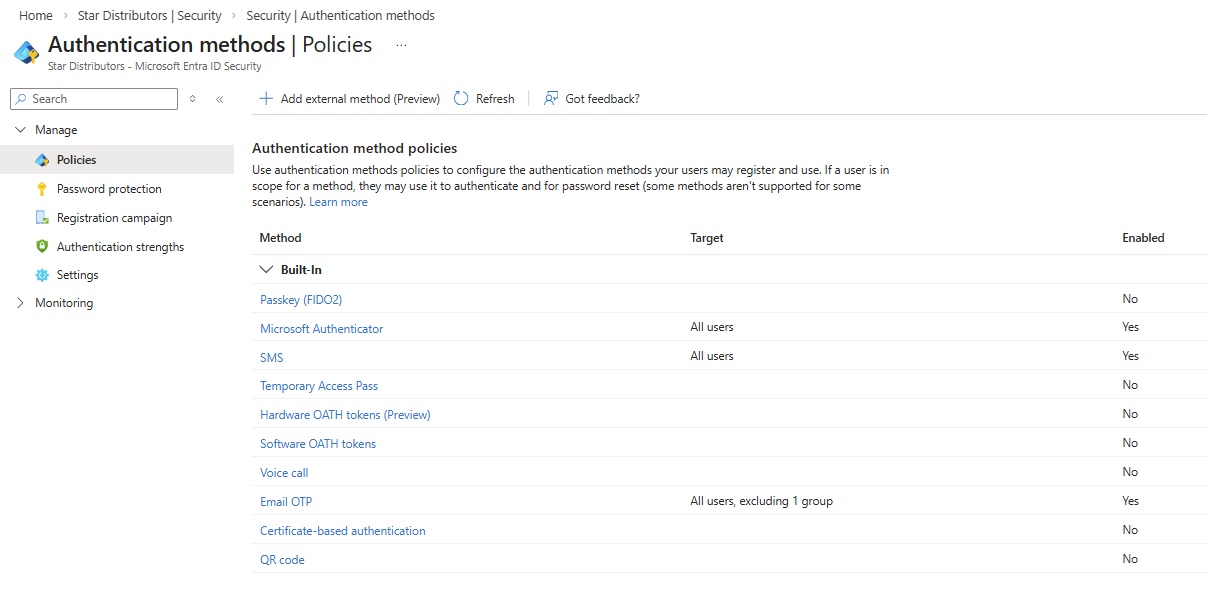
- Policies:
- You can add/remove authentication methods for MFA.
- Add external method:
- Passkey (FIDO2):
- User does not required password for login and security keys are use for authentication.
- It is based on public/private key technology. Entra ID will have public key and FIDO2 will have private key.
- Either you do finger scan or enter code on your laptop and private key send authentication messages to public key and it validates.
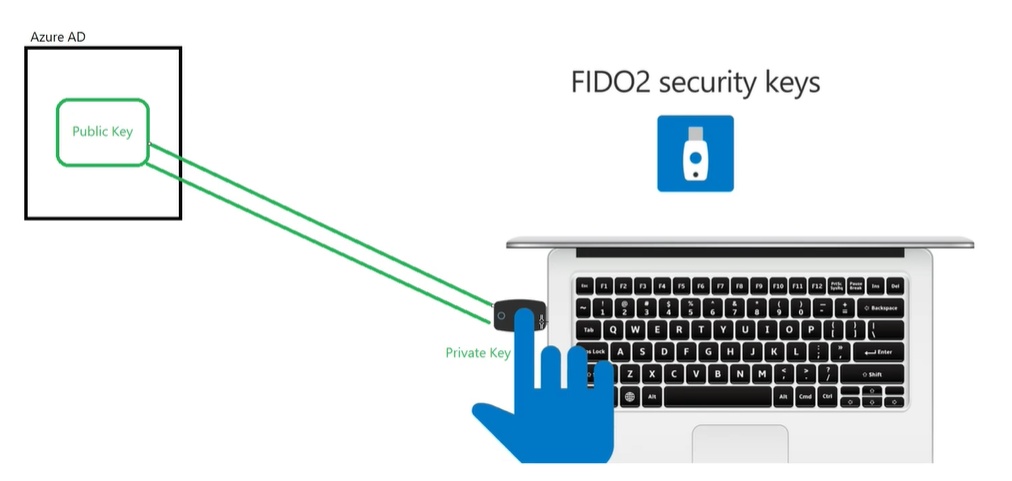
- Pre requisite:
- Azure AD multi-factor authentication enabled.
- Enable combined security information registration, mostly enabled by default in new tenant, go to Entra Id/user settings/user features and click manage user feature settings.
- Compatible FIDO2 security key device.
- WebAuthN requires windows 10 version 1903 or higher.
- Configuration:
- Refer techlearning.spayee.com/Microsoft 365 identity and services/Module 5/Manage authentication
- click Passkey(FIDO2)
- No password is used.
- Microsoft Authenticator:
- Click on Microsoft Authenticator to configure.
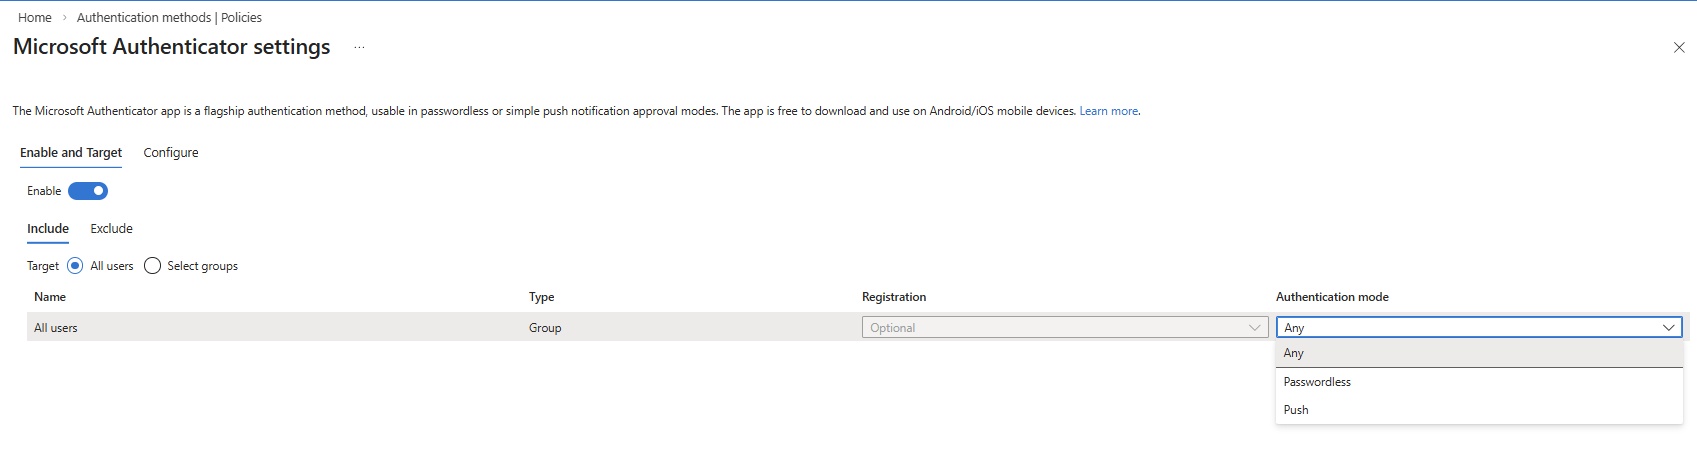
- You an enable / disable, Include /Exclude group of users.
- Configure:

- Microsoft Authenticator on companion applications:
- SMS:
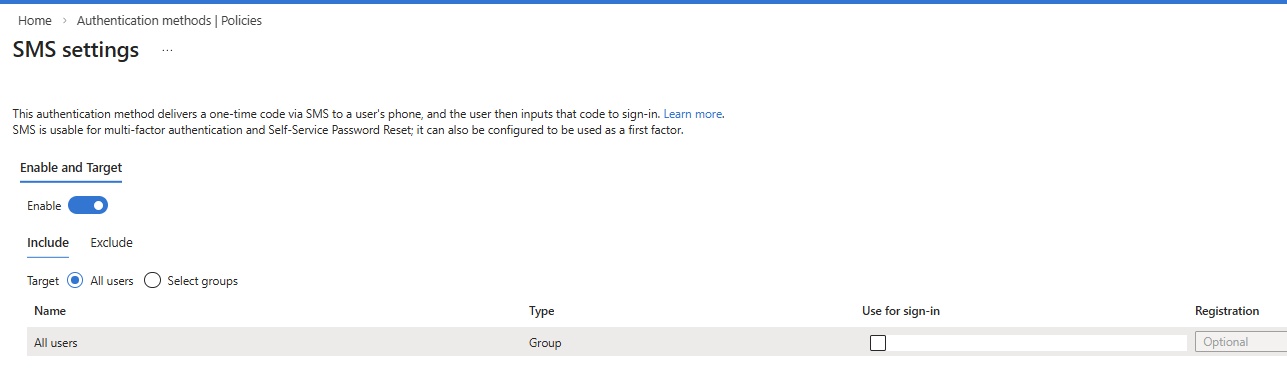
- You an enable / disable, Include /Exclude group of users.
- TemporaryAccess Pass:
- It is used in password less authentication (FIDO2), users will use hardware devices which generates the code.
- To add the authentication methods user required to login to their account using password, instead we generate the temp password and user will use at authentication stage.
- Once login users will add passwordless authentication method and further logins will not required passwords.
- Hardware OATH tokens:
- Software OATH tokens:
- Voice Call:
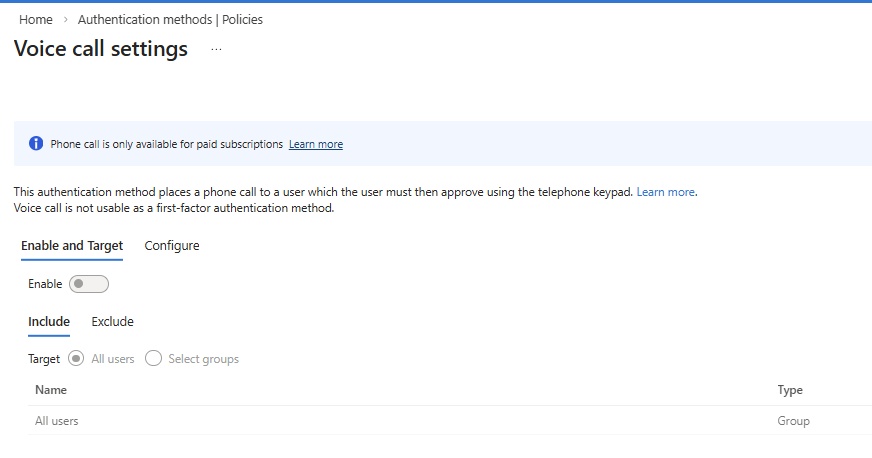
- You an enable / disable, Include /Exclude group of users.
- Email OTP:
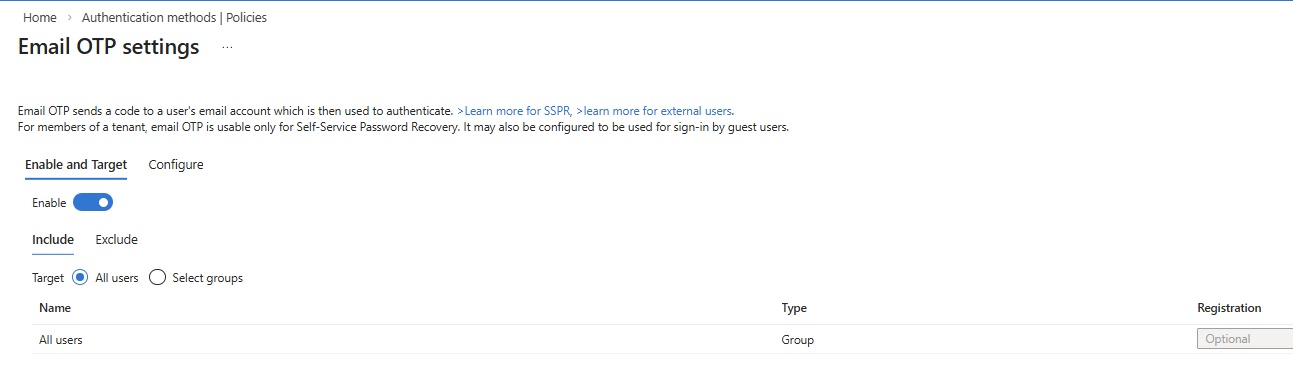
- You an enable / disable, Include /Exclude group of users.
- Configure:
- Allow external user to use email OTP: Default , Enable, Disable
- Certificae-based authentication
- QR code:
- QR code authentication is a simple and fast authentication method for frontline workers. To use it, you need both a QR code and PIN
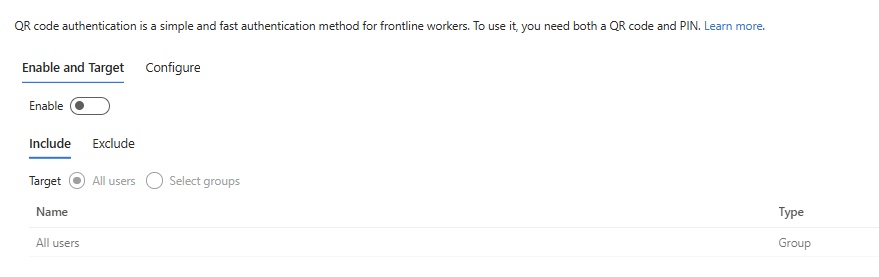
- Configure:
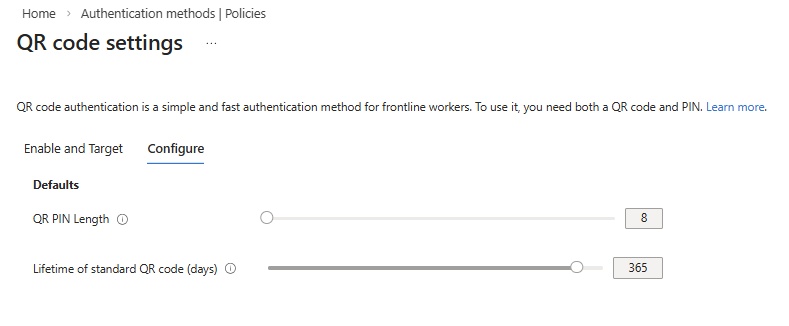
- Password Protection:

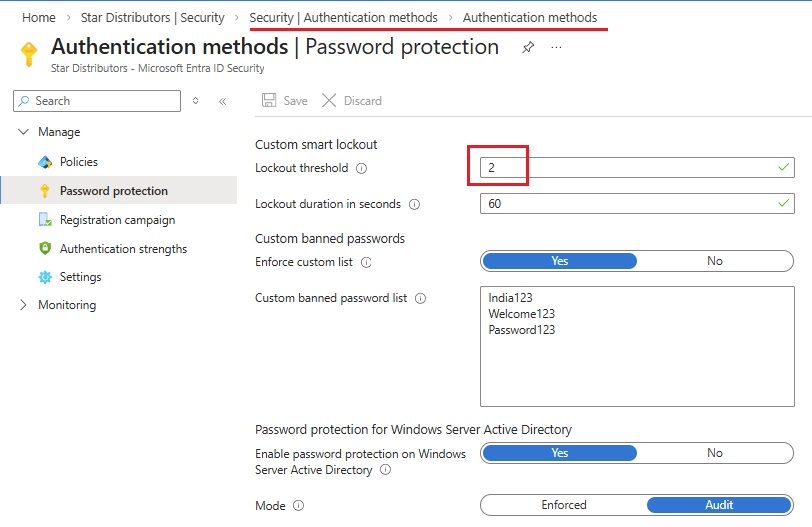
- Lockout threshold: 10 (10 failed logon attempt will result account lock)
- Lockout duration in seconds: 60 (after 60 seconds account unlocked and user can re attempt to enter password)
- Custom banned passwords: Enforce custom list: Click yes and enter list of passwords which are banned. if user use the banned word in the password will get error.
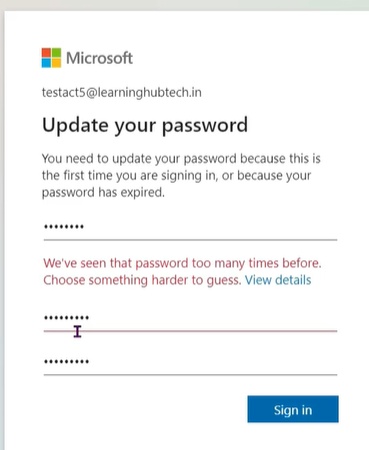
- Password protection for windows server active direcory: Enable password protection on windows: yes/no (Mode = Enforced or Audit), user cannot use banned password in windows server active directory as well, for this we need to install an agent on windows server. If audit is selected then user can use banned word in the password and it appears in audit, if enforced is selected then user cannot use banned word in password.
- Registration campaign:
- Start a registration campaign that prompts users to set up more secure authentication methods.
- Authentication strengths: Authentication strengths determine the combination of authentication methods that can be used.
- After failed wrong passwords, account is locked.
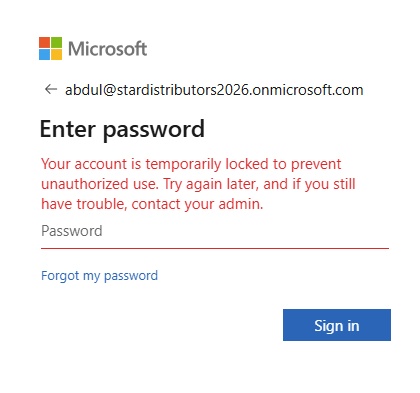
- Authentication Strength:
- Code
- Settings:
- Report suspecious activity: Allows users to report suspicious activities if they receive an authentication request that they did not initiate. This control is available when using the Microsoft Authenticator app and voice calls. Reporting suspicious activity will set the user's risk to high. If the user is subject to risk-based Conditional Access policies, they may be blocked.
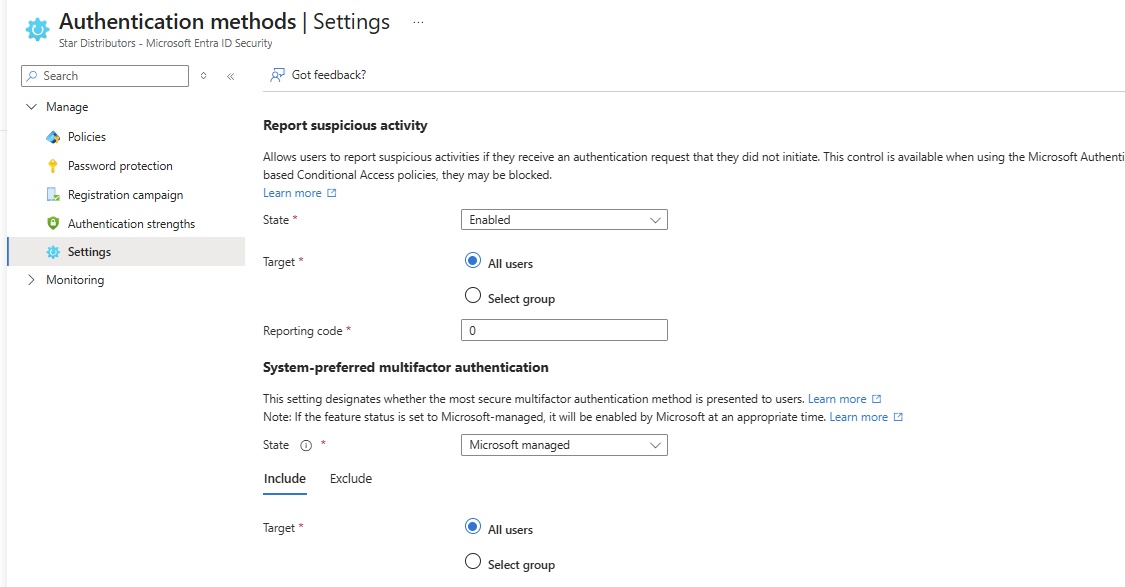
- Reporting Code =0 or any defined with #
- When someone trying to login using your credentials, MFA sends code on app or phone or call you, if you receive call and you were not trying to login and looks it is suspecious then on your mobile you type 0# then an account automatically will be locked.
Multifactor Authentication:
- Settings:
- Account Lockout: These settings often apply only to users authenticating via PIN or specific legacy MFA methods and are not designed for modern app-based authentication.
-
- OATH tokens:
- It is a physical device which generates token, configure this device with its serial number, secret key etc and save it in .csv file and upload it.
- In mobile app authentication a code is generated in mobile while here a code is generated in device. To get started, select the Upload button above and choose a .csv file. This file should contain the secret keys for the OATH tokens you wish to use. The columns in the file should be: "upn, serial number, secret key, time interval, manufacturer, model".
- Phone call settings:
- Microsoft calls you for MFA and you can define on your phone which number should appear so that user will understand it is a call from Microsoft for MFA authentication.
- It accept US number only.
- Troubleshooting+support
- Certificate authorities:
- public key infrastructure:
- Report:
- Risky users:
- Code
- Risky workload identities:
- Code
- Risky sing-ins:
- Code
- Risky detections.
- Code
- Troubleshooting+Support
- Monitoring:
- Sign-in Logs:
- Audit Logs:
- Provisioning Logs:
- Health:
- Log Analytics:
- Diagnostic settings:
- workbooks:
- usage & insights
- Bulk operation results:
- Troubleshooting + Support
- New support request
Microsoft Entra Priviledged Identity Management
- code
- code
- code
- Security and Protection
Identity Governance
- code
- code
- code
Microsoft Entra ID Protection
- Security Center
- Verified ID:
- Manage:
- Identity Secure Score
- Named Locations:
- Authentication methods: You can add/remove authentication methods for MFA like
- Add external method:
- Policies:
- Passkey (FIDO2)
- Microsoft Authenticator:
- SMS:
- TemporaryAccess Pass:
- Hardware OATH tokens:
- Software OATH tokens:
- Voice Call:
- Email OTP:
- Certificae-based authentication
- QR code:
- Password Protection:
- Lockout threshold: 10
- Lockout duration in seconds: 60 (after 60 seconds user can re attempt to enter password)
- Custom banned passwords:
- Enforce custom list: Click yes and enter list of passwords which are banned.
- Password protection for windows server active direcory: Enable password protection on windows: yes/no (Mode = Enforced or Audit)
- Registration campaign: Start a registration campaign that prompts users to set up more secure authentication methods.
- Authentication strengths: Authentication strengths determine the combination of authentication methods that can be used.
- After failed wrong passwords, account is locked.
- Settings:
- Report suspecious activity: Allows users to report suspicious activities if they receive an authentication request that they did not initiate. This control is available when using the Microsoft Authenticator app and voice calls. Reporting suspicious activity will set the user's risk to high. If the user is subject to risk-based Conditional Access policies, they may be blocked.
- Reporting Code =0 or any defined with #
- When someone trying to login using your credentials, MFA sends code on app or phone or call you, if you receive call and you were not trying to login and looks it is suspecious then on your mobile you type 0# then an account automatically will be locked.
- Multifactor Authentication:
- Settings:
- OATH tokens: It is a physical device which generates token, configure this device with its serial number, secret key etc and save it in .csv file and upload it. In mobile app authentication a code is generated in mobile while here a code is generated in device. To get started, select the Upload button above and choose a .csv file. This file should contain the secret keys for the OATH tokens you wish to use. The columns in the file should be: "upn, serial number, secret key, time interval, manufacturer, model".
- Phone call settings: Microsoft calls you for MFA and you can define on your phone which number should appear so that user will understand it is a call from Microsoft for MFA authentication. It accept US number only.
- Troubleshooting+support
- Certificate authorities:
- public key infrastructure:
- Report:
- Risky users:
- Risky workload identities:
- Risky sing-ins:
- Risky detections.
Microsoft Entra ID Security (same as Entra ID/Security, check full details there)
- Protect:
- Conditional Access:
- Identity Protection:
- Security Center:
- Verified ID
- Manage:
- Identity Secure Score:
- Authentication methods:
- Multifactor authentication:
- Certificate authorities:
- Public key infrastructure:
- Report:
- Risky users:
- Risky workload identities:
- Risky sing-ins
- Risk detections
- Troubleshooting + Support
Verified ID
- code
- code
- code
old data
-
Identity ( Entra ID/Active Directory):
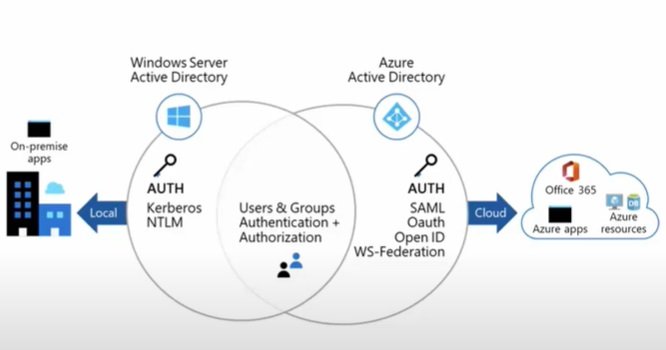
- When you create an account on Azure using email address, it creates a user in Azure Active Directory.
- Default Directory and Default Domain:
- Azure creates a defualt directory which represents as tenant or domain using account email. (azizazure0410gmail.onmicrosoft.com)
- Configure custom domain and integrate with Active Directory to get company domain and when you create users in AD than their suffix will be your company domain.
- Azure Entra Connect or Azure AD Connect:
- It is used to sync on prem ADDS users with Azure AD which is called hybrid identity.
- Query:
- Azure AD uses Rest API over HTTP or HTTPS for query while ADDS uses LDAP (Light Weight Directory Access Protocol)
- Authentication:
- ADDS uses kerberos for authentication.
- Azure AD uses SAML, WS-Federation, Open ID-Connect
- Authorization: OAuth for authorization in Azure AD. Third party services like Facebook, google, yahoo etc..
- No nesting: Users and groups are created in a flat structure. There are no OU (Organizational Units) or GPO (Group Policy Objects) in Azure AD.
Configure/Manage Azure Entra ID Blade:
- Go to Microsoft Entra ID.
Manage:
Users: MFA, Password Reset, user configuration,
- All Users :
- Create New User: Users created at Entra ID level, only Entra ID Roles can be assigned to user. If you want to assign roles at Azure resource level (RBAC) go to resource and go to IAM and assign roles.
- Basic:create a new internal user in your organization.
- Enter user principal name and select domain (custom domain).
- Enter password manually or auto generated.
- Account enabled: select checkbox
- Properties:
- Enter user related information, job information, contact information, location etc..
- Assignment:
- Add group: select group to which this user will be added.
- Add Role: click to add Active Directory roles to user. (If you do not define role than user will be created with no roles and when user logged in he cannot view resources)
- or without role logged in
- Login with this user:
- portal.azure.com
- User without roles assigned cannot view any blade of any resources, user can only view Entra ID blade.
- select Global Administrator: higher permission level. Review and create. When user logged in with this role, user can view all resurces blades.
- Basic:create a new internal user in your organization.
- Invite External User: Invite an external user to collaborate with your organization. Inviting contractors/support service providers on your azure.
- select external user and give user email (aziz27uk@gmail.com),
- enter user details and save it.
- user will receive an email to login to azure portal.
- click on invitation link and create a password. For authentication Azure will send code in another email. accept concern to login to portal.
- You will be redirected to myapps.microsoft.com portal
- When user logged in with their email address will get the apps or services.
- user has not been assigned to any apps, nor for any azure resource.
- Create New User: Users created at Entra ID level, only Entra ID Roles can be assigned to user. If you want to assign roles at Azure resource level (RBAC) go to resource and go to IAM and assign roles.
- Bulk Operations: You can create multiple users by using csv file. First download csv template and fill the required fields and upload it to create bulk users.
- Bulk Create: Create bulk users.
- Download csv file.
- Enter fields.
- Upload csv file.
- Bulk Invite: Invite bulk users.
- Bulk Delete: Delete bulk users.
- Bulk Create: Create bulk users.
- Download Users: Download all users in csv file.
- Per-User MFA (Multi Factor Authentication):
- During sign-in a user is prompted for an additional form of identification apart from username and password. Verification options are:
- call to phone: call will receive and ask to click particular key on phone.
- Text message to phone: code will text to phone.
- Notification through Mobile App: Request to enter given number on phone app.
- Verification code from mobile app or hardware token: code generated on app or hardware token to enter.
- Enable MFA: Go to Entra ID/Users click per-user MFA, enable a single or bulk users.
- select the required user to enable MFA or click bulk update to enable bulk user MFA. For bulk update download .csv file and make entries and upload it.

- click enable or select manage user settings:
- Required selected users to provide contact methods again.
- Delete all existing apps password generated by the selected user.
- Restore multifactor authentication on all remembered devices.
- Service settings of MFA:
- This is Legacy MFA and SSPR (Self Service Password Reset) settings, we have the blade in the Azure portal/Entra ID/password reset/authentication method, where we can configure the SSPR methods.:
- unselect all options from here and enable from authentication method. If you are using Hardware OATH tokens than do not uncheck "Verification code from mobile app or hardware token" from the legacy MFA portal.
- Authentication Method in Password Reset:
- Allow users to create app passwords to sign in to non-browser apps.
- Do not allow users to create app passwords to sign in to non-browser apps.
- Trusted IPs: Skip multi-factor authentication for requests from federated users (user authentication perform at on-prem federation server) on my intranet. Enter IP or Range of IP to which MFA will skip.
- Verfication methods: call, txt, code on phone or app.
- Remember multi-factor authentication on trusted device.
- select check box and enter number of days 1 to 365 days,
- when user login with this option, given number of days device will be treated as trusted device and any subsquent login on this device during that period MFA will not prompt to enter code.
- Manage advanced settings and view reports Go to the portal
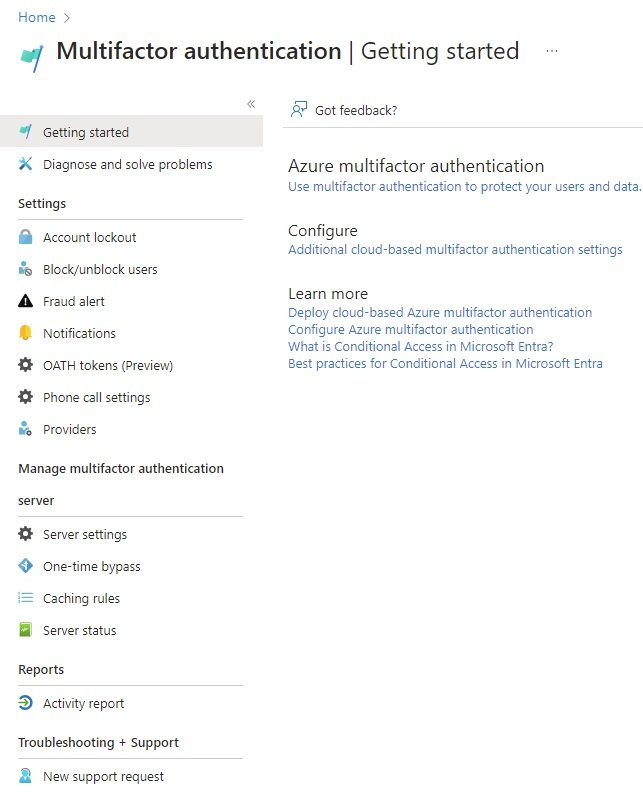
- Account Lockout:
- Block/Unblock users:
- Fraut Alert:
- Notifications:
- OATH Tokens:
- Phone Call Settings:
- Server: As of July 1, 2019, Microsoft will no longer offer multifactor authentication server for new deployments and trial tenants. New customers who would like to require multifactor authentication from their users should use cloud-based Azure multifactor authentication. Click here for more information.
- Server Settings:
- One-Time Bypass:
- Caching Rules:
- Server Status:
- Reports:
- Activity Reports:
- During sign-in a user is prompted for an additional form of identification apart from username and password. Verification options are:
- Delete:
- Audit Logs: Search for any kind of activity performed in the given time period in Active Directory.
- Sign-in Logs: shows list of users who logged in.
- Diagnose & Solve Problems: Guidance for any problems or create support request with Azure Support.
- Manage:
- Delete users: Shows list of users deleted for selected time and period.
- Password Reset: Can perform various tasks.
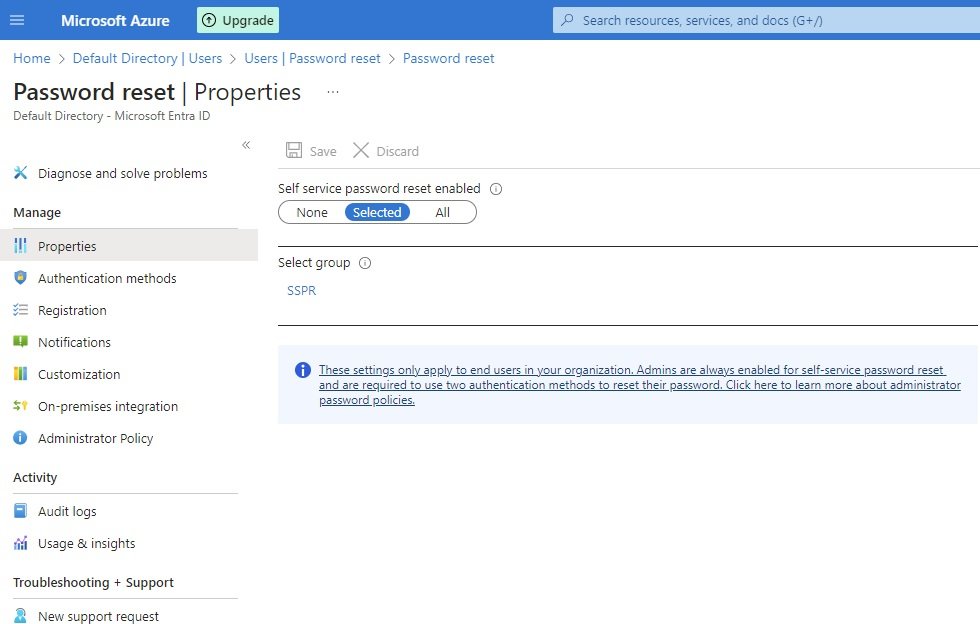
- SSPR - Self Service Password Reset Enable: Users can reset their passwords without the help of anyone. It is a password reset service (forgot) not a password change service. These settings are for users only while administrators are able to reset passwords by default. Options are
- None: user cannot reset passwords.
- Selected: you select a group and all users of that group can reset passwords by themselves.
- All: all users are able to reset their passwords.
- Pre-requisite:
- MFA should be enabled to user.
- Azure AD Premium license assign to user.
- User should be a memeber of Azure AD Group. (only one group can be selected at a time).
- Authentication method : Authentication Methods for SSPR (Self Service Password Reset) and Signin can now be managed in one converged policy in authentication method.
- Number of methods required to reset: 1 or 2: users can reset passwords by their own using the following methods., These users must be in group to which password reset is enabled.
- Defines the number of alternate methods of identification a user in this directory must have to reset to their password.
- methods 1: Users can use mobile app code, email, SMS and security questions.
- methods 2: Users can mobile app code, email, SMS security questions and mobile app notification, office phone.
- Registration: users are required to re-register after x number of days for thier authentication.
- Notifications:
- Notify users on password rese: Users will receive an email notifying them when their own password has been reset via self service password reset.
- Notify all admins when other admin reset their password: Global administrator will receive an email when other administrators reset their own password.
- Customization:
- Customize help desk link: Designates whether or not the "Contact your administrator" link that normally allows users to contact a service administrator directly is overridden to point to a custom location. Enter link.
- On-Premises Integration: Password write back. when a user change password on portal will sync with on-premises password and update there.

- Administrator Policy: Policy applied to administrators for resetting their passwords.
- Usage and Insight:
- Users capable of Azure Multifactor Authentication: it shows how many users of your organization are using MFA.
- Users capable of passwordless authentication: it shows how many users of your organization are using passwordless service.
- Users capable of Self Service password reset: it shows how many users of your organization are using self service password reset service.
- User Settings:
- Default user role permission:
- user can register applications: yes/No (Default user role can create applications?)
- Restrict non-admin users from creating tenants: yes/no
- Users can create security groups : yes/no
- Guest user access:
- Guest users have same access as members.
- Guest users have limited access to properties and memberships of directory objects.
- Guest users access is restricted to properties and memberships of their own directory objects (most restrictive)
- Administration center:
- Restrict access to Microsoft Entra ID administration center
- LinkedIn Account restriction: Allow users to connect their work or school account with LinkedIn
- Show keep user signed in: The Microsoft Entra ID sign-in flow gives users the option to remain signed in until they explicitly sign out. This doesn’t change Microsoft Entra ID session lifetime but allows sessions to remain active when users close and reopen their browser. Set this to “no” to hide this option from your users.
- Default user role permission:
- External Users:
- Guest users have the same access as members (most inclusive)
Guest users have limited access to properties and memberships of directory objects
Guest user access is restricted to properties and memberships of their own directory objects (most restrictive) - Anyone in the organization can invite guest users including guests and non-admins (most inclusive)
Member users and users assigned to specific admin roles can invite guest users including guests with member permissions
Only users assigned to specific admin roles can invite guest users
No one in the organization can invite guest users including admins (most restrictive) - Enable guest self-service sign up via user flows: yes/no
- Allow external users to remove themselves from your organization (recommended).
- Cross-tenant access settings are also evaluated when sending an invitation to determine whether the invite should be allowed or blocked. Learn more.
Allow invitations to be sent to any domain (most inclusive)
Deny invitations to the specified domains
Allow invitations only to the specified domains (most restrictive)
- Guest users have the same access as members (most inclusive)
- Bulk Operation Results: it gives details of any bulk operation performed.
- Authenetication Methods policy:
- User Settings for MFA: Once MFA enabled to users, they will receive the messge More Information Required.

- Click Next. Download MFA authentication app on your mobile
- Iphone users: go to App store and search Microsoft Authenticator and download.
- Android users: Go to Play store and download.
- After installing app on mobile, open it. add an account and select work or school account and click Scan QR Code.
- Click next on browser,

- Click next to setup your account.

- Scan this QR code in Mobile App and continue, this will setup Authenticator app and linked with your account.
- Now enter the code appeared on mobile in the browser.
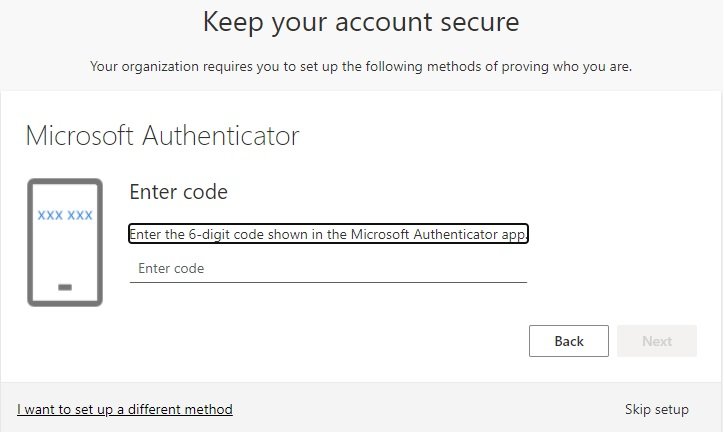
- It will verify the code and setup will complete.
- Configuration completed, Microsoft Authentifcation app is linked with user account.
- Now login again:
- yes: it will reduce to ask code on this device.
- No: It will prompt to enter code, open app and enter it.
- Try signout and sign in again.
- Reset password by user: it-user10@stardistributors.co.uk is a member of SSPR group on which user reset password is enabled.
- Enter username and in password click forgot my password.

- enter the character in the picture and next.
- If SSPR is not enabled and user tried to click forgot password and after entering capching will get this message.
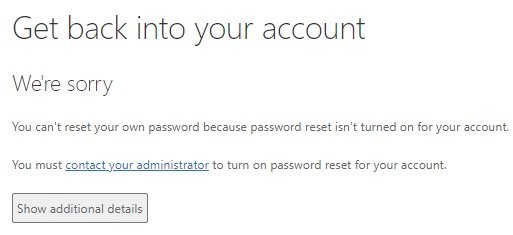
- When click contact your administrator will get following message.

- Open authenticator app and it generates code, enter here and click next.
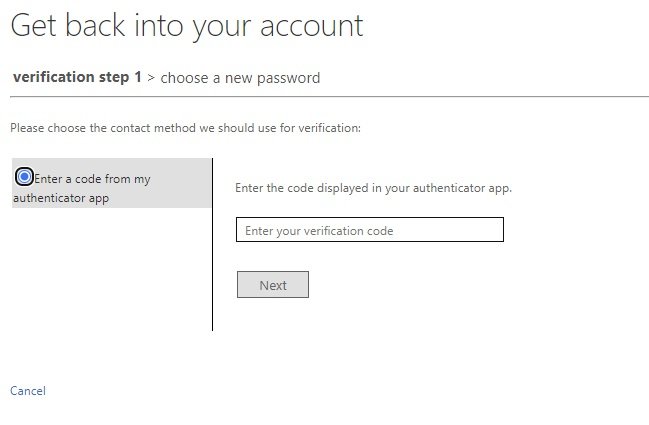
- Enter new password.
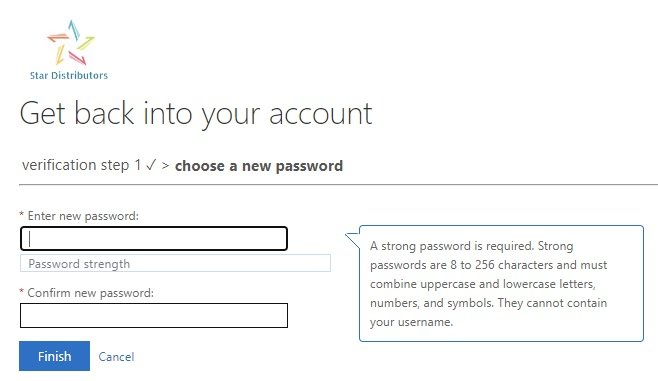
- Password has been changed by user.
User Blade/settings: Perform configuration and settings for a user.
- Click on a user.

- Overview:
- Edit properties:
- Deleted users: If the account has been deleted by accidentally, restore deleted account. Deleted users stays 30 days in suspended mode than will be deleted permanetly and no one can restore it.
- In Entra ID blade/ users click deleted users. select the required deleted user and click restore user, all its properties including license will also be restored.. You can also delete user account permanently before 30 days.
- User must have these roles to restore deleted user account: Global Administrator, User administrator, Partner Tier 1 Support, Partner Tier 2 Support.
- You can also perform bulk restore, downlaod csv file and define which users need to restore.
- Reset Password: To reset user password, go to user blade and click reset password, a temp password will be generated and user required to change password at logon. This service is different than password reset on Entra ID main blade. Password reset is use for SSPR (Self service password reset)
- Revoke Sessions:
- Account Status: enable
- B2B Invitation: Convert to External user.
- Audit Logs:
- Sign-in Logs:
- Diagnose & Solve Problems:
- Manage:
- Custom Security Attributes:
- Assigned Roles: It will show roles assigned to this user.
- Add Assignment: Click Add assignment to add role to this user.
- Eligible Assignment: It is part of PIM (Privileged Identity Management), user need to activate the eligible role to use it.
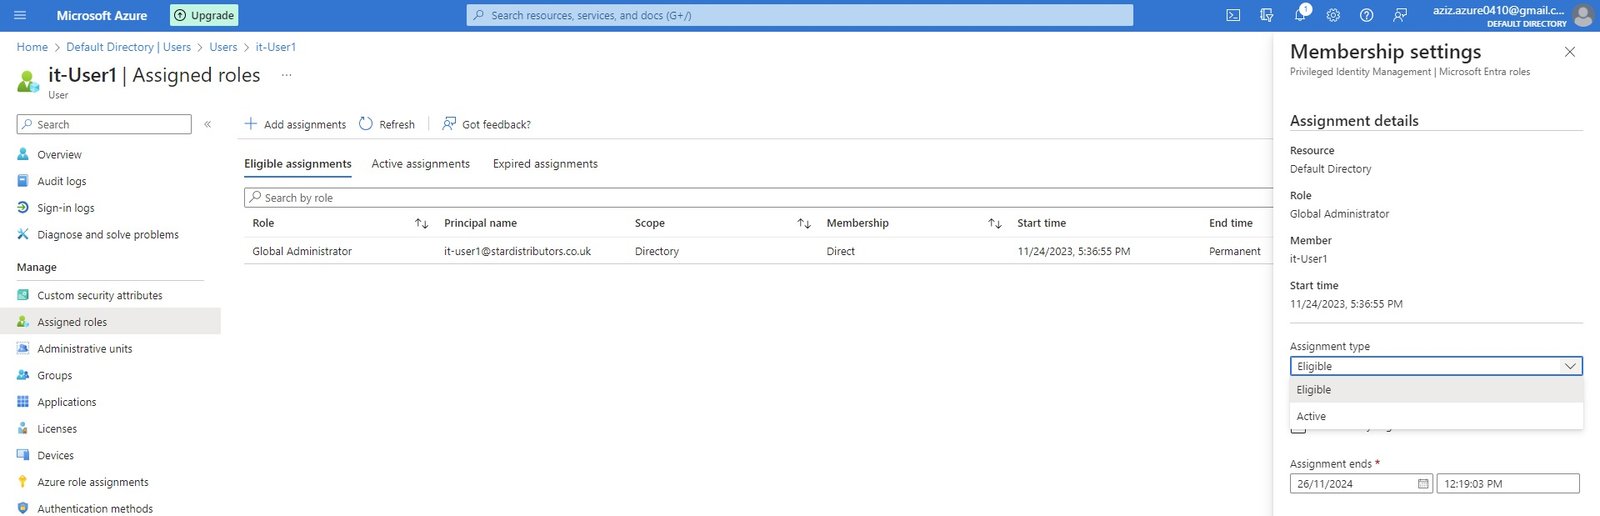
- Some administrative/cruicial Roles will only be used occassionally or to keep secure for misusing, roles will be assigned to users but it will not be active.
- Whenever user need to access this role, he request to activate and role will be active for given time.
- Roles can be assigned for short to long period and until that period roles are in eligible state.
- Assignment type: Eligible (need to be activated) or Active (user can access anytime)
- Active Assignment: Roles are active and user can use it.
- Expired Assignment: Any roles are expired, specially eligible role assignment duration is expired will be displayed here.
- Administrative Units:
- Groups:
- Applications:
- Licenses: Once you create an account in Azure portal, it creates a free Azure Entra ID license and creates a default directory. Some Entra ID features can be accessed with free license but required P1 or P2 license for other features.
- For example Identity governance (Entitlement management and Privileged Identity Management) required License.
- Available licenses for Entra ID:
- Free license:
- O365 License: Free, E1, E3, E5, F1 and F3
- Entra ID P1 and Entra ID P2 (Premium P1 and Premium P2).
- License to users can be assigned from here or from user blade, user's location in user's profile must be define to assign a license.
- License can also be assigned to groups, license will be assgined to all members of this group.
- Devices:
- Azure Role Assignments: The list of the Azure Resources roles assigned to user.
- Authentication Methods: You can set or revoke multi factor authentication settings for this user.
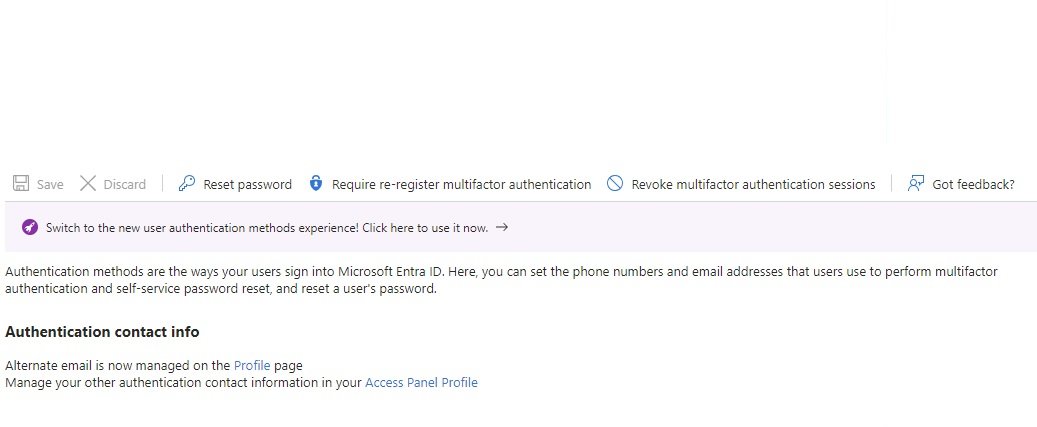
- Reset password: User password can be reset, a password will be generated, pass it to user and user need to change the password at login.
- Authentication Contact info: change user mobile phone number, enter alternate phone, Email.
- Require Re-register multi factor authentication: user will be prompted to re register multi factor authentication process from beginning.
- Revoke multi factor authentiction session: When user login there is an option to remember my days for x days, this option can be define in service settings in multifactor authentication, it will be treated as trusted device and will not ask for authentication code for that many days. You can revoke this service from here.
- All Users :
Groups:
- All Groups: New Group Create
- Group type:
- Security:
- Office 365:
- Group Name & Group Description: Enter details.
- Microsoft Entra Roles can be assigned to group: select Yes/No
- Membership type: if selected microsoft entra role to group no,
- Assigned: users will be added to groups manually.
- Dynamic User: users will be added to groups automatically by defining query.
- add dynamic query

- Save it, go to groups and check users with the above query will be added.
- Dynamic Device: devices will be assigned to groups automatically by defining criteria.
- Owners: enter ownership to groups.
- Members: select users for the group.
- Group type:
- Deleted Groups:
- Diagnose & Solve Problems:
- Settings:
- General:
- Expiration:
- Naming Policy:
- Activity:
- Piviledged Identity Management:
- Access Reviews:
- Audit Logs:
- Bulk Operation Results:
- All Groups: New Group Create
- External Identities:
- Roles & Administrators:
- Roles to manage Azure Entra ID resource only.
- If you assign a role at Entra ID, than user can perform task at Entra ID level only, you should assign a role at subscription level or resource level to work at that level.
- Global Administrator: Manage all administrative featue at Entra ID level. Assign administrative roles to others and can reset password to all other administrators.
- User Administrator: Create and mange users and groups, change password for users,
- Billing Administrator: Purchase and manage subscription,
Administrative units: https://learn.microsoft.com/en-us/entra/identity/role-based-access-control/administrative-units
- By default there will be one Global administrator to manage all AD services, user administrator can perform administrative tasks related with users.
- Suppose organization have departments (Accounts, HR, Admin, Security, etc) and each department has several groups and members. all these are managed in Entra ID.

- You want to delegate user administrators to manage different departments and its groups and members. it-user2 can manage Accounts and HR department and it-user3 can manage Admin and security departments.
- An administrative unit can contain only users, groups, or devices.
- How to delegate it-user2 and it-user3 to mange particular groups and users of departments.
- In administrative unit click add
- Give name of unit (acct-hr)
- Select role (user administrator) and select it-user2 for assignment.
- Review and create,
- perform the above steps for (admin-sec) and choose it-user3
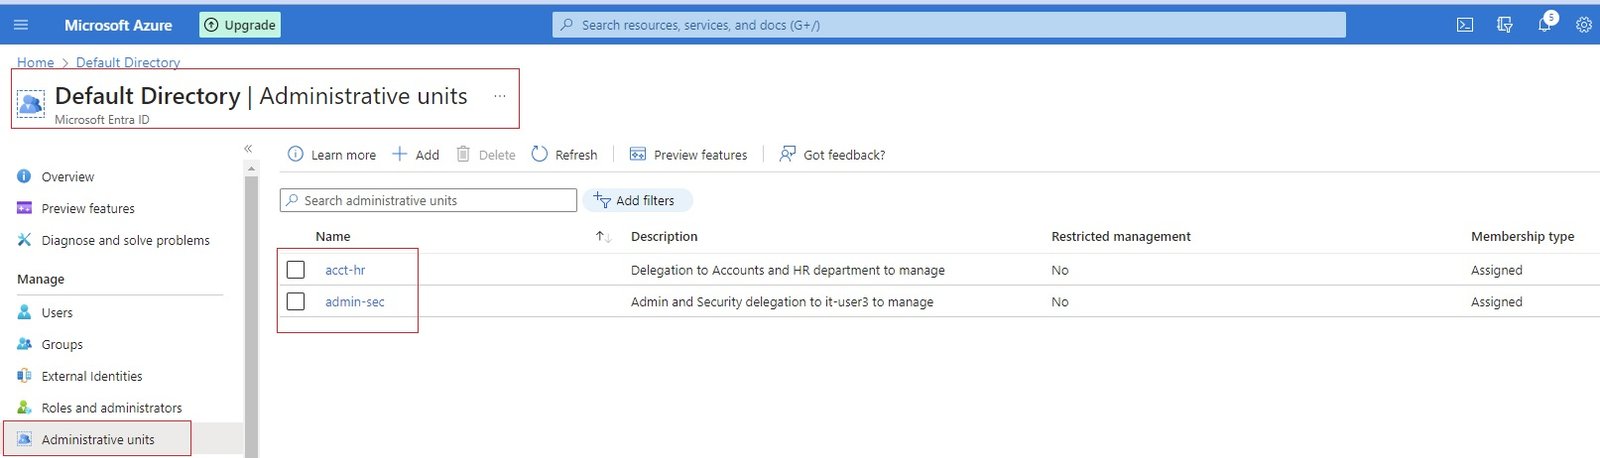
- Login with it-user2 and it-user3, they can only manage assigned/delegated units.
- Delegated Admin Partners:
- Enterprise Applications:
- Devices:
- App Registrations:
- Identity Governance:
- Application Proxy:
- Custom Security Attributes:
- Licenses:
- Cross-tenant Synchronization:
Microsoft Entra ID Connect: https://entra.microsoft.com/
- Install ADDS: Install and configure Active Directory on VMWare Workstation or install a vm on Azure. (stardistributors.local or stardistributors.co.uk)
- Create some groups and users in AD.
- Download and install Entra ID connect on AD. https://www.microsoft.com/en-us/download/details.aspx?id=47594
- open Entra ID connect.
- Domains should be verified in order to sync on-prem AD with Azure Entra ID.
- Any UPN that contains a non-routable domain such as domain.local will only be synchronized with xyz.onmicrosoft.com domain.
- stardistributors.local in non-routable domain. click on customize, it will ask to install required components:
- Specify a custom installation location.
- Use an existing SQL Server.
- User an existing service account.
- Specify custom sync groups.
- Import synchronization settings.
- Do not select and click install.
- Select user sign-in method:
- Password Hash Synchronization:
- It uses SHA256 or 512 (Hashing Algorithm): it converts plain text into Hash format.
- users name and Hash password will sync to Azure Entra ID.
- When user want to access applications on azure than users authentication performed at Azure Entra ID.
- Passwords will sync every 2 minutes.
- Pass-Through Authentication:
- Password remain at on-prem and user authentication will be done at on-prem AD.
- Performing the pass through authentication using above on-prem DC where password hash synchronization was configured.
- Double click azure AD connect and click configure, select Change user sign-in.
- Enter Connect to Azure AD: enter user credentials who got global adminsitrator role. (adconnect@azizazure0410gmail.onmicrosoft.com)
- Select the Sign On Method: pass-through authentication.
- Enter domain administrator account.
- ready to configure, click configure. installation complete
- run/appwiz.cpl (programs and features), Microsoft Entra ID Connect Authentication Agent is installed. It performs steps 5,6,7,8,9
- Go to portal.azure.com/EntraID/EntraId connect/Overview/user sign-in : passthrough authentication Enabled.
- If both password hash and pass-through synchronization is enabled, run microsoft entra connect, select configure, select customze synchronization options, on the optional features clear password hash synch.
- Federation with AD FS:
- User's authentication will be done through federation server.
- Federation with PingFederate:
- Do not Configure:
- Enable Single Sign On:
-
- Double click azure AD connect and click configure, select Change user sign-in.
- Enter Connect to Azure AD: enter user credentials who got global adminsitrator role. (adconnect@azizazure0410gmail.onmicrosoft.com)
- Select Enable single sign-on.
- enter a domain administrator account configure your on-premises forest for use with single sign-on.
- Ready to configure: it will start synchronization process and enable single sign-on.
- SSO configuration: Performed above at Azure AD connect and now perform in Group policies in DC.
- Group policy managent in DC, edit default domain policy or create new.
- user configuration/policy/administrative templates/windows components/internet explorer/internet control panel/security page and select site to zone assignment list. Enable the policy and enter the following values.
- value name: The Azure AD URL where the kerberos tickets are forwarded. value(Data): 1 indicates the intranet zone. the result looks like this (value name:https://autologon.microsoftazuread-sso.com)
- User configuration/policy/administrative templates/windows components/internet explorer/internet control panel/security page/Intranet Zone and click Allow updates to status bar via script. Enable, apply and ok.
- user configuration/preferences/windows settings/registry, right click and new registry item, enter the following values.
- key path: Software\Microsoft\Windows\CurrentVersion\Internet\Settings\ZoneMap\Domains\Microsoftazuread-sso.com\autologon
- Value name:https
- Value type: REG_DWORD
- Value data: 00000001
- apply and ok
- To test, go to star-vm1 and login with any AD user and open browser and go to portal.office.com. it will not ask for password.
- user configuration/policy/administrative templates/windows components/internet explorer/internet control panel/security page and select site to zone assignment list. Enable the policy and enter the following values.
- Password Hash Synchronization:
- Select password Hash Synchronization and continue.
- Connect to Azure AD: Enter Azure global administrator credentials.
- It will verify credentials.
- Connect on-prem Active Directory or forest.
- Forest is stardistributors.local, click add directory. enter user credentials with enterprise administrator rights.
- It will prompt to provide AD forest account. This account will be use for directory synchronization. create new or provide existing one.
- Directory has been added. Continue, a warning sign will appear that domain is non routable, select check box continue without matching all UPN suffix and continue.
- Domain and OU filtering: select desire OU check box to which you want to synch with azure Entra ID. some groups and users created.
- select OU and sub OU which need to sync, on-prem OU is created CloudObjects.
- Uniquely identifying your users: leave as it is and continue. Define how to differentiate users of on-prem and azure.
- Filter users and device, continue.
- synchronize all users and devices or selected.
- Optional Features.
- select exchange if it is installed,
- select password writeback: if a user change password at azure than it will reflect at on-prem AD.
- select check box and install. It will install Azure AD connect on on-prem Active Directory.
- To Check deployed configuration in Entra ID Connect.
- in DC double click Entra ID connect, click configure and in additional task.
- Privacy Settings.
- View or export current configuration: shows current configuration.
- Customize Synchronization options.
- Configure device options
- Refresh directory schema.
- Configure staging mode.
- Change user sing-in
- Manage Federation
- Troubleshoot.
- in DC double click Entra ID connect, click configure and in additional task.
- Go to azure Entra ID and check users and groups.
- Overview: you can check Microsoft Entra ID connect enabled and sync.
- Groups and users are sync.
- Go to on-prem AD and open synchronization service.
- Entra connect Health: You can monitor health of Active Directory on prem through azure entra ID.
- Install agent on AD connect server: https://aka.ms/aadchaddagent
- click configure now and it will register with Azure Entra ID, Enter credentials to login to Azure who got global administrator role. Powershell runs.
- Agent registration completed successfully. agent is registered with on prem ADDS.
- To monitor go to https://aka.ms/aadconnecthealth and it will redirect to azure portal. or on azure portal search Mircosoft Entra Connect health.
- Click on AD DS services in Active directory domain services: You can check complete health of on prem ADDS.
- Install agent on AD connect server: https://aka.ms/aadchaddagent
- Install ADDS: Install and configure Active Directory on VMWare Workstation or install a vm on Azure. (stardistributors.local or stardistributors.co.uk)
Custom Domain Names:
- Go to Entra ID of required directory and go to custom domain names.
- click add custom domain name, enter domain name.
- Verify the ownership of domain, add txt or MX record in the Authoritative DNS server (one.com is authoritative DNS).
- Go to authoritative DNS server and add txt record.
go daddy - click verify and once it is verified custom domain is configured.
- you can make this custom domain as primary.
- Mobility (MDM and MAM):
- Password Reset: Redirect to users/password settings.
- Company Branding:
- User Settings:
- Properties:
Security: Perform additional security feature, click on required field.
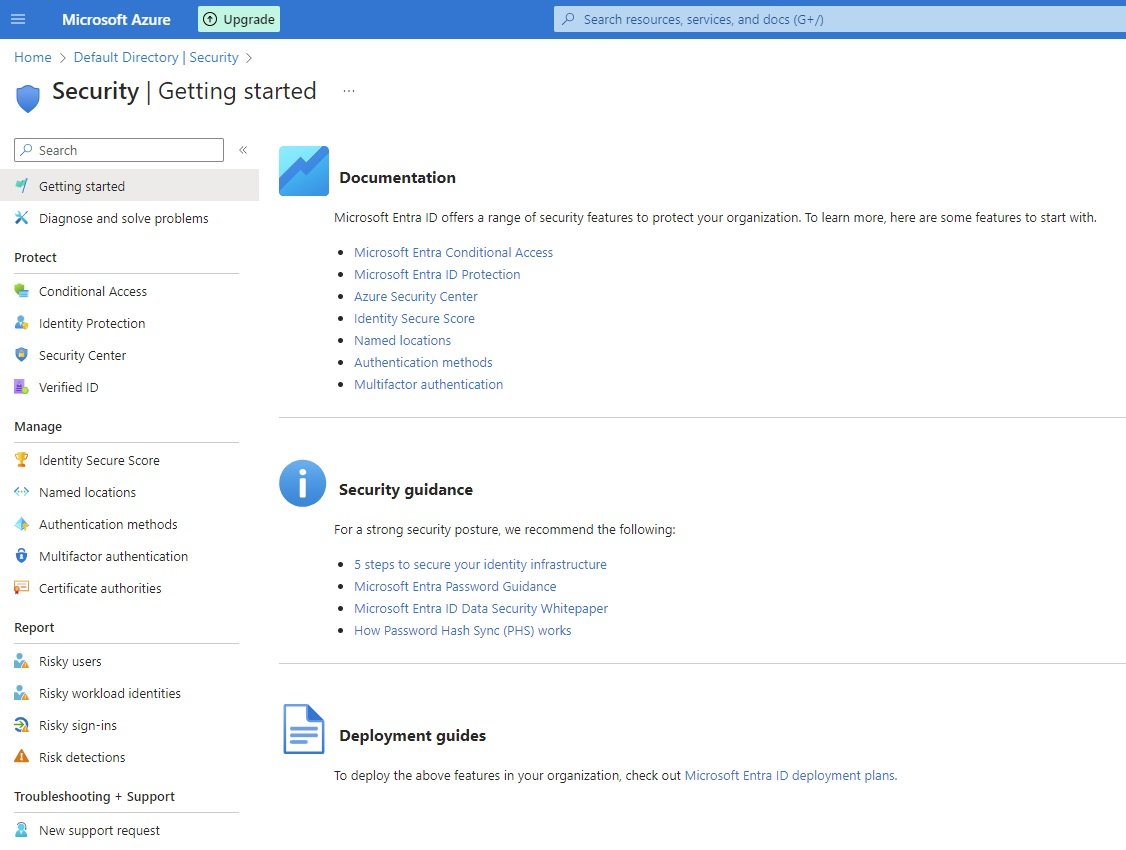
- Protect:
- Conditional Access: Users will get access when conditions satisfied.
- user can access O365 when conditions met.
- Location: if location of user is India, he can access using his credentials to access application.
- IP: certain IP address range an access.
- Device: Windows O/S of the device can access. Domain joined device.
- Scenario: user from uk south cannot access O365 application.
- Go to azure portal and search Microsoft Entra Conditional Access.
- In Manage click named location: Countries Location, IP Ranges Location.
- Enter countries location: name=uk, country selected united kingdom
- Click on new policy:
- Give policy name: location deny policy
- Assignment: select all or requied users.
- Cloud app or actions:
- select on which app this policy should apply. select Zoom.
- Conditions:
- user risk
- sign in risk
- device platform
- location : select UK
- Client Apps:
- Filter for devices:
- Access Controls: Block access, Grant Access (select requirements)
- Disable security defaults in order access policy get affected. (if required)
- Go to properties in the main section and right hand side go to manage conditional access and disable default security.
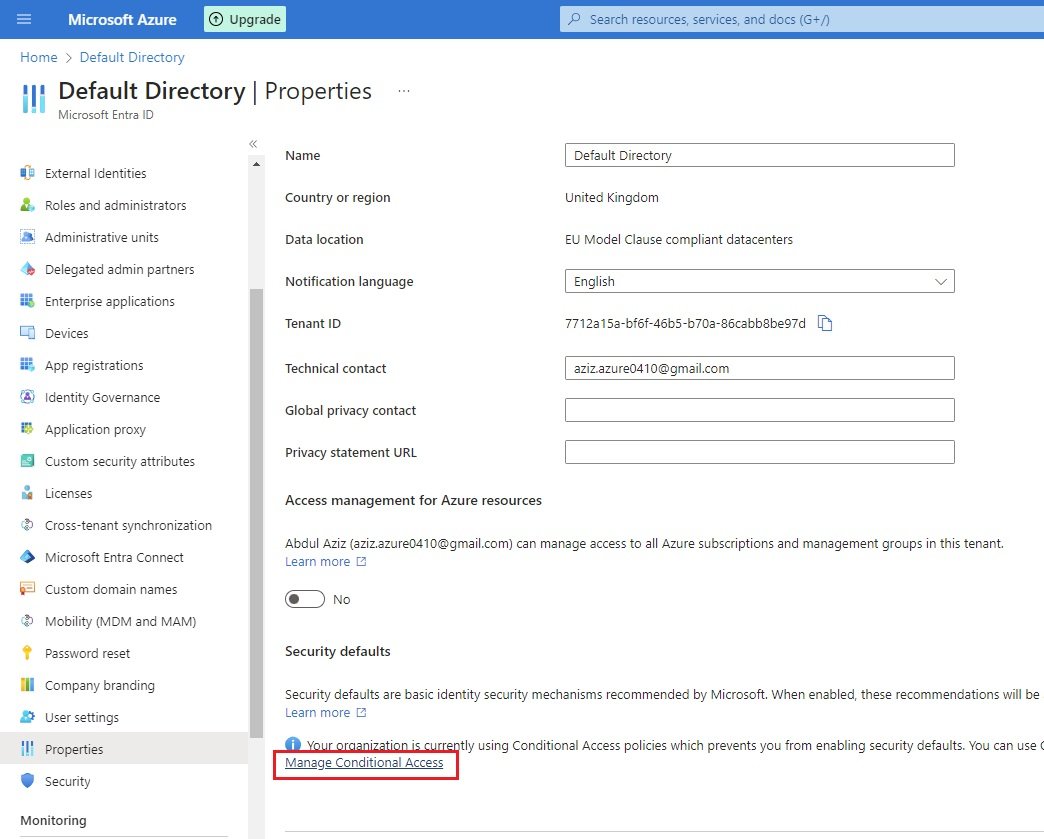
- Make no changes if organization using conditional access policy.
- Test it: login with the selected user on myapplications.microsoft.com (user is unable to access zoom)
- Identity Protection: user (Identity) account protection from external attacks. you can search azure portal Microsoft Entra ID Protection.
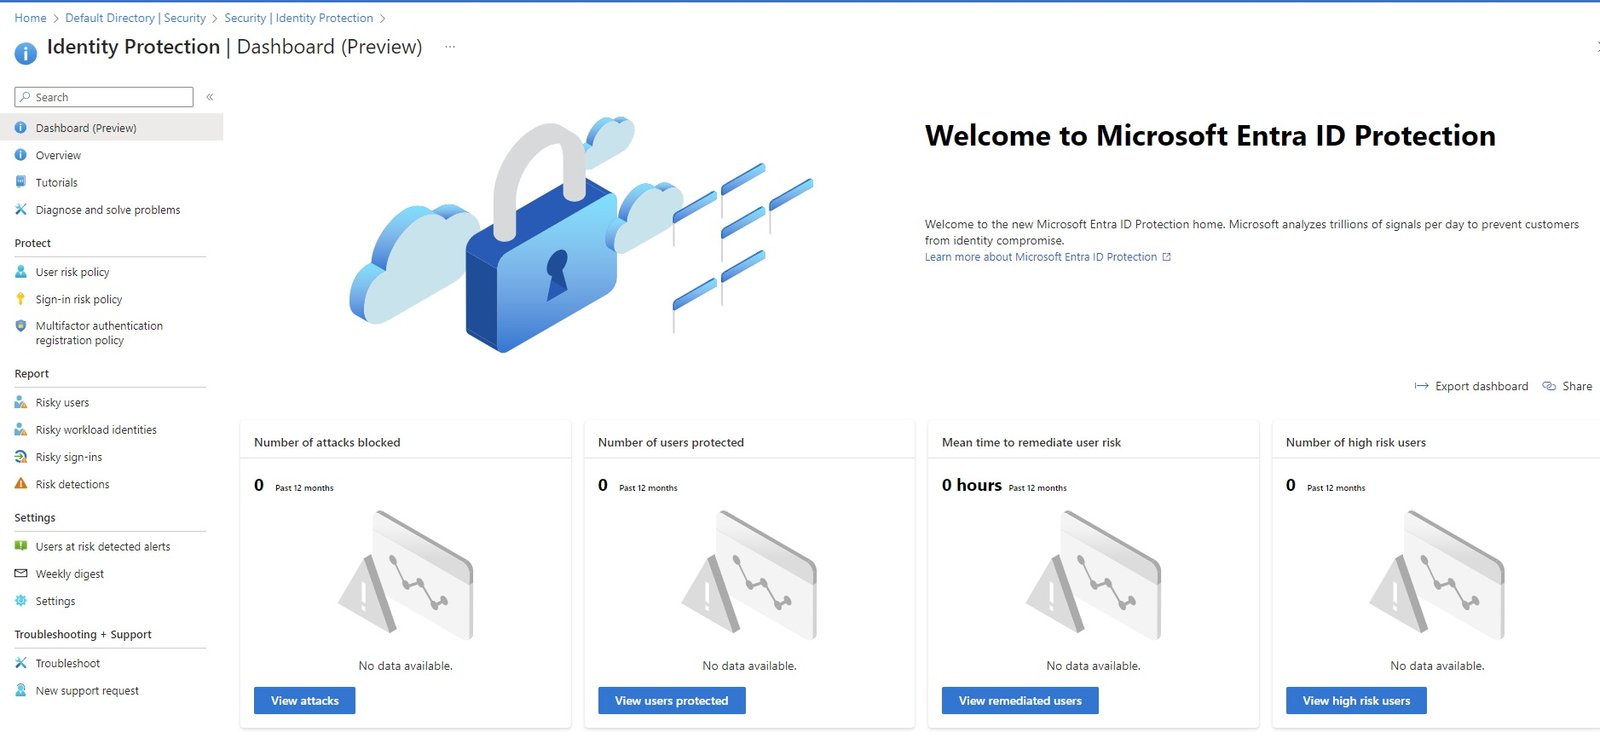
- Microsoft Azure automatically detects the risk and remediate.
- User risk policy:
- If a user's password is hacked/compromised than either you can block this user or request to change the password to login and continue.
- Assign policy to all users or selected users, user risk (Low and above, medium and above, high), Controls (Block user, change password).
- Policy enforcement: Enable and save it take effect.
- Sign-in Risk Policy: suppose a user login from india and within a few minutes same login is attempted from USA. Attempt to login with anonymous username & password or using IP address.
- Assign policy to all users or selected users, user risk (Low and above, medium and above, high), Controls (Block user, change password).
- Policy enforcement: Enable and save it take effect.
- Download tor browser and open browser and go to portal.azure.com. enter user name and password than it will block as tor browser do not pass user credentials. blank user credentials will be risk and user will be either blocked or request to change password defined in the policy.
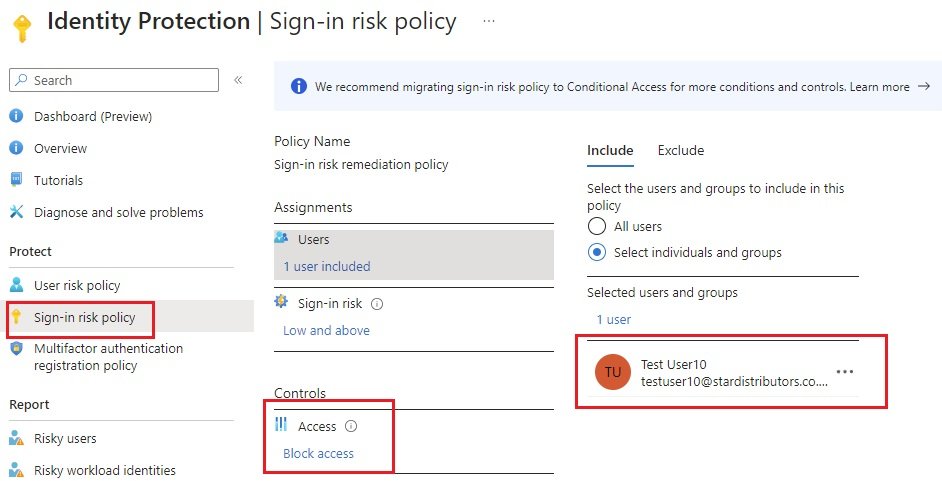
- open tor browser and go to portal.azure.com and login with test-user10.
- Enter user details.

- MFA Registration Policy: When you enable this policy it force all or selected users to register for MFA for login. users will not be allowed to login without MFA registration.

- Users force to configure MFA.
- Reports:
- Risky Users: Shows list who are at risk.
- Risky Workload Identities:
- Risky Sign-ins: List of risky sign in
- Risk Detections:
- Settings:
- Users at risk detected Alerts: risky users detected will be notified via email, define email address.
- Settings: Allow on-premises password change to reset user risk.
- Conditional Access: Users will get access when conditions satisfied.
- Security Center:
- Verified ID:
- Manage:
- Identity Secure Score:
- Named Locations:
- Authentication Methods:
- MFA-Multifactor Authentication: Advance security features of MFA can be configure. These settings are only for MFA not related with user password.

- Account Lockout: Temporarily lock accounts in the multifactor authentication service if there are too many denied authentication attempts in a row. This feature only applies to users who enter a PIN to authenticate.
- Number of multifactor authentication denials to trigger account lockout: 3 If a user enter 3 times wrong MFA code than user account will be locked.
-
- Minutes until account is automatically unblocked: 5 After 5 minutes account will be unblocked so user can enter correct code to continue.
- Block/Unblock Users: A blocked user will not receive multifactor authentication requests. Authentication attempts for that user will be automatically denied. A user will remain blocked for 90 days from the time they are blocked. To manually unblock a user, click the “Unblock” action. suppose a user lost phone and cannot use phone for authentication. until user replaces phone within 90 days, this user will be added in locked user and MFA will not be requested. Re registration will not work if a user is in blocked users.
- Fraud Alert: Allow your users to report fraud if they receive a two-step verification request that they didn't initiate.
- ON/OFF Allow users to submit fraud alert.
- ON/OFF Automatically block users who reported fraud.
- Notifications: Fraud alert notification will received through email by default identity administrator. You can add additional user.
- OATH Tokens: Physical devices will generate tokens/codes. To get started, select the Upload button and choose a .csv file. This file should contain the secret keys for the OATH tokens you wish to use. The columns in the file should be: "upn, serial number, secret key, time interval, manufacturer, model".
- Phone Call Settings: One of the method in MFA will receive a call on your mobile, If you want call should come from particular number can enter here. This number must be from US number. Office phone with extension can also be used but the number should include with extension. If there is no number define than Microsoft default numbers will appear. Number of failed attempts to press required key on your phone can also be set here. phone call record message in different language can also set here.
- Providers:
- Server: As of July 1, 2019, Microsoft will no longer offer multifactor authentication server for new deployments and trial tenants. New customers who would like to require multifactor authentication from their users should use cloud-based Azure multifactor authentication. Click here for more information.
- Report:
- Certificate Authorities:
- Report:
- Risky Users.
- Risky Workload Identities.
- Risky Sign-Ins.
- Risk Detections.
Monitoring:
- Sign-in Logs:
- Audit Logs:
- Provisioning Logs:
- Health:
- Log Analytics:
- Diagnostic Settings:
- Workbooks:
- Usage & Insights:
- Bulk Operation Results:
Troubleshooting + Support:
- New Support Request
Microsoft Entra Domain Services:
- On-Prem ADDS:
- When you install Active Directory domain services (ADDS) on windows server than it become DC (Domain Controller).
- For authentication it uses LDAP, Kerberos or NTLM services.
- Application installed on a server and joined domain and this application uses on-prem ADDS for user authentication.
- If you want to deploy this application on cloud, possible deployments are:
-
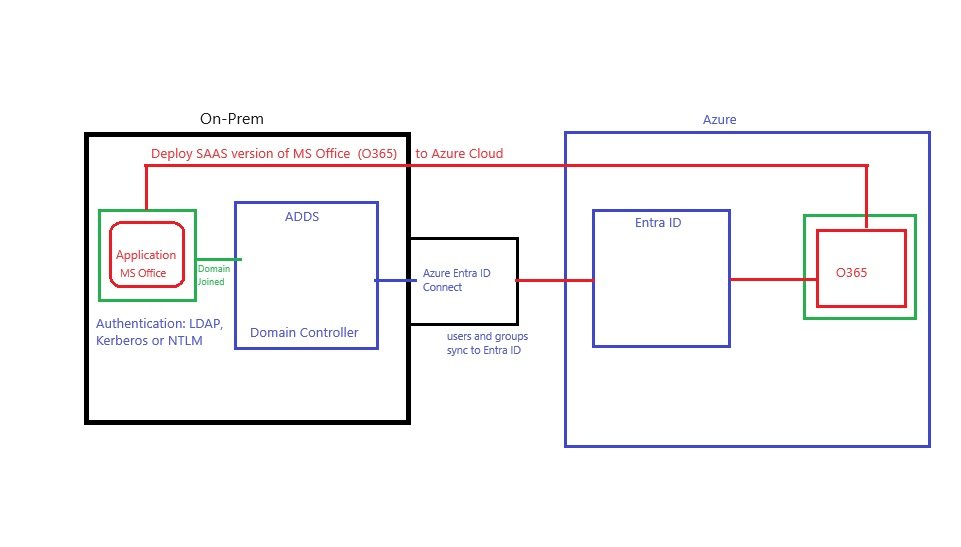
- Take SAAS version of that application and deploy on Azure. Deploy Azure Entra ID Connect at on-prem and sync users to azure Entra ID. Integrate SAAS application with Entra ID. Users can login directly to Application using Entra ID authentication Method.
- Rewrite the application as legacy application uses authentication method is not supported on azure cloud.
- Lift and Shift:

- In this method you install Azure Active Directory domain services which is similar to on-prem Active directory which supports authentication LDSP, Kerberos, NTLM, domain join, Group Policy and DNS.
- Virtual Network: aadds-vnet
- Subnet: aadds-subnet
- 2 domain controllers: 2 virtual machines created (
- 2 DNS for name resolution which replicates and provide redundancyt.
- a load balancer: Backend pool created (10.0.0.4, 10.0.0.5), click on link, it shows 2 virtual machines. click on Front End (Public IP address).
- NSG: aadds-nsg: inbound and outbound rules are created, to access VM than create a rule for , already a rule is created buth that is for specific service.
- Azure ADDS integrates with Azure Entra ID.
- Users from on-prem sync with Azure Entra ID with the help of Azure Entra ID Connect and than sync from Entra ID to Azure Active Directory Domain Services. It is uni directional sync only from Entra ID to Azure ADDS.
- Move on-prem application on cloud and domain joined.
- In this method you install Azure Active Directory domain services which is similar to on-prem Active directory which supports authentication LDSP, Kerberos, NTLM, domain join, Group Policy and DNS.
-
- Azure Entra ID:
- Entra Id (Active Directory) is managed by Microsoft in Azure.
- For authentication it uses SAML, OAuth, Open ID Connect and WS-Federation.
Lab: Microsoft Entra Domain Services:
- On Azure Portal search Microsoft Entra Domain Services and click create.
Basics:
- select subscription,
- RG (star-ADDS),
- Custom domain name: stardistributors.co.uk
- region: UK West
- sku: standard, Enterprise, Premium
Networking:
- Virtual Network: aadds-vnet (new)
- Subnet : aadds-subnet (10.0.0.0/24) (subnet should contain 192.168.0.0/16, 172.16.0.0/12 or 10.0.0.0/8)
Administration:
- AAD DC Administrators: group will be created, you can add a user to this group to manage azure entra domain services.
- Notification: Enter emails to those who will be notified for any change on domain services. (Global administrator and member of AAD DC Admiistrator group)
Synchronization:
- type: all or cloud-only (Microsoft Entra Domain Services provides a one-way synchronization from Microsoft Entra ID to the managed domain. In addition, only certain attributes are synchronized down to the managed domain, along with groups, group memberships, and passwords).
- Synchronization filter: filter by group entitlements (select group)
Security settings:
- TLS 1.2 only mode: enable/disable
- NTLM v1 Authentication: Enable/Disable
- NTLM password synchronization: Enable/Disable
- Password Synchronization from on-premises: Enable/Disable
- Kerberos RC4 Encryption: Enable/Disable
- Kerberos Armorning : Enable/Disable
- LDAP Signing: Enable/Disable
- LDAP Channel Binding: Enable/Disable
Review and create: it will take 1/2 hr to 2 hr. Once deployment is succeeded, check it.
- Go to Microsoft Entra Domain services and click created domain.
Overview:
- check status is running, wait until it shows running.
- Activity Log:
- Access Control (IAM):
Settings:
- Properties: public Ip Address, DNS addresses,
Configure DNS IP address in Virtual Network:
- Go to virtual network (aadds-vnet)/DNS servers/custom (add both IPs: 10.0.0.4 & 10.0.0.5)
Create a VM and join domain: Whenever a virtual machine join the domain, it first contact the DNS server, configuration of DNS is done in above step.
- Enter required fields and deploy in the same virtual network.
- connect vm (create inbound rule 3389) in aadds-nsg.
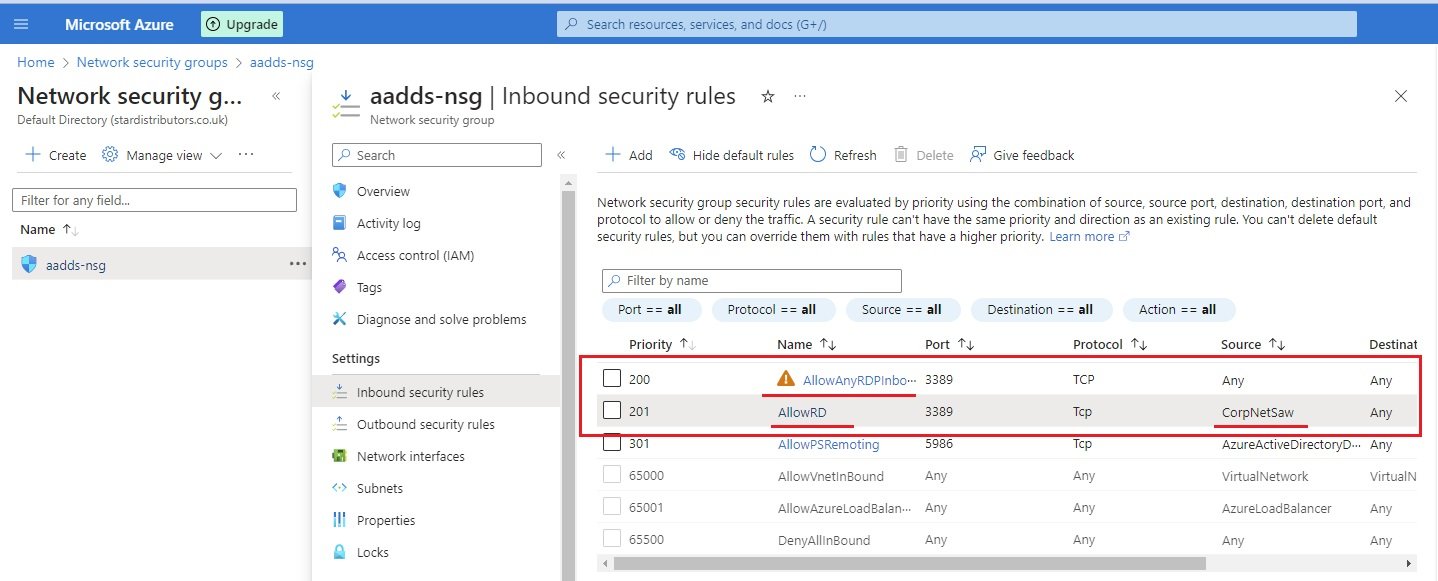
- Download RDP and login.
- perform domain join. it will ask to enter name and password of an accunt with permission to join domain.
- Go to Entra ID/ Groups / AAD DC Administrators and add a user (it-user1@stardistributors.co.uk)
RBAC- Role Based Access Control:
- Roles are assigned to users to perform certain task at different level. Management group level, subscription level, RG level or Resources level.
- A role assignment consist of three elements: Security Principal + Role Definition + Scope
- Security Principal = To whom you want to give permission (Object). users, groups, service Principal (service account),managed identity & applications.
- Role Definition = Collection of permissions. What permissions you want to give. It is jason based documentation. It define the operation that can be performed like, read, write and delete.
- Scope = where it should apply (Management group level, subscription level, RG level or Resources level).
Lab:
- Login in to azure portal with administrative rights.
- Go to scope (management group, subscription, Resource Group or Resources)
- Go to Access Control (IAM) and click Add role assignment.
- select the role to assign to user (Roles will be available for that scope)
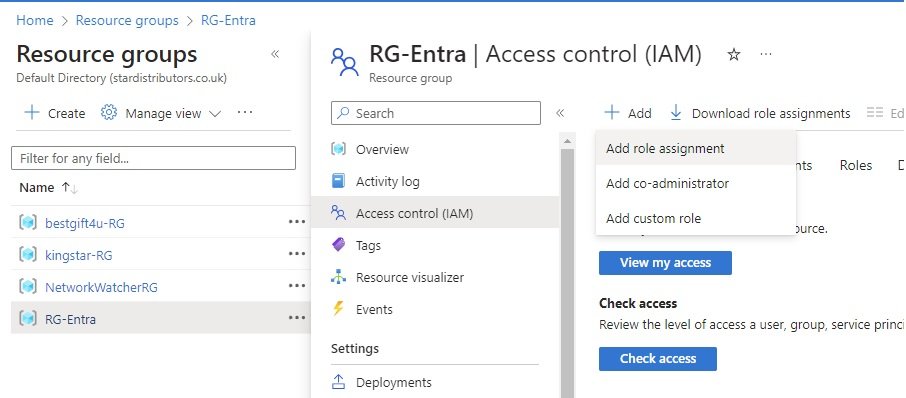
- select role from job assignment role or select priviledged administrative roles for (owner, contributor, user access administrator, RBAC administrator, Access review operator service role).

- select user, group, service identity or managed identity to whom assign this role.
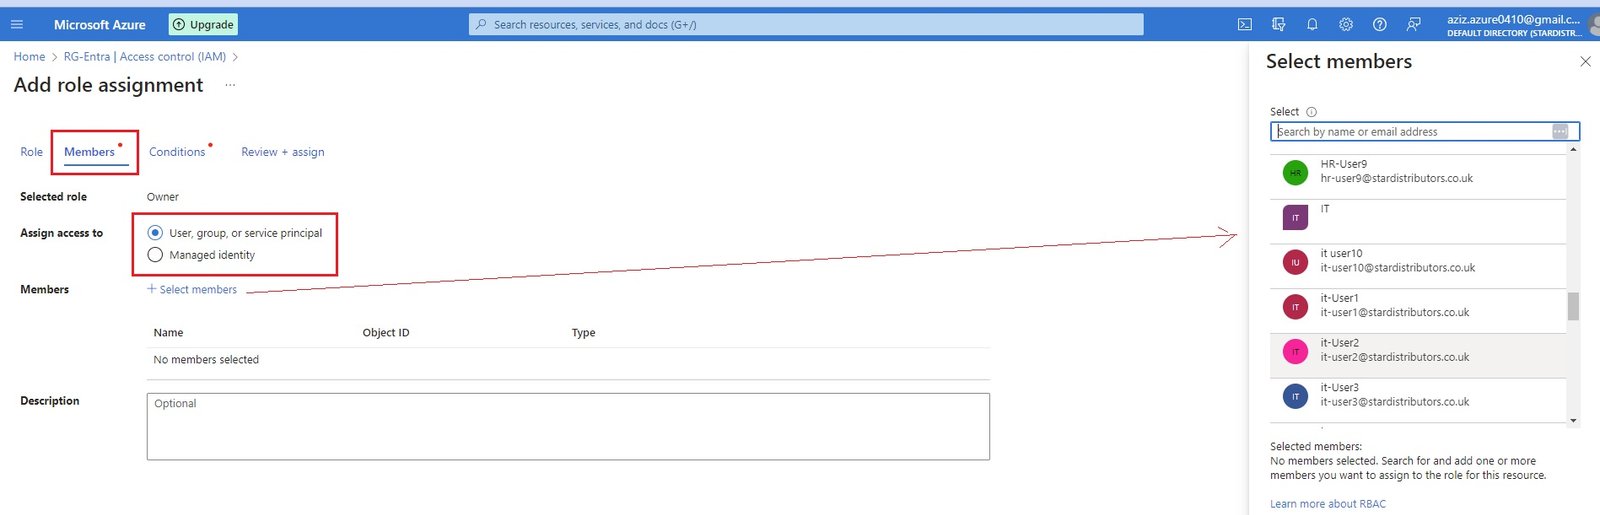
- Conditions:
- Constrained: You can apply some conditions/limit to this user although you have selected owner role. Add constrain and select any role which the user cannot perform.
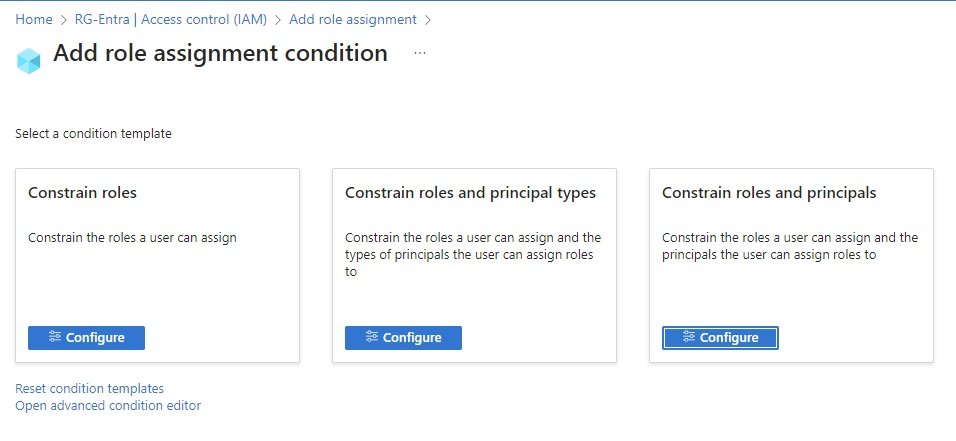
- Not Constrained: No conditions can be applied.
- Review and create.
- code
- code
-
MFA - Multifactor Authentication
- It is a process in which users are prompted during the sing-in process for additional form of identification.
- Different Authentication methods can be used:
- Microsoft Authenticator App:
- SMS:
- OATH Hardware Token:
- OATH Software Token:
- FIDO2 Security key: hardware device like USB with finger print, attach to computer and will generate code.
- Windows Hello: Fingerprint or face scan can be configure.
- Voice Call:
- MFA can be configure in Azure Entra ID or Microsoft 365 admin center:
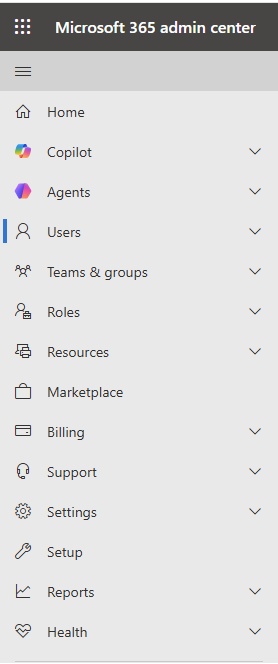
- Go to admin.cloud.microsoft.com and login.
- Go to Users/Active users and click Multi-Factor Authentication.
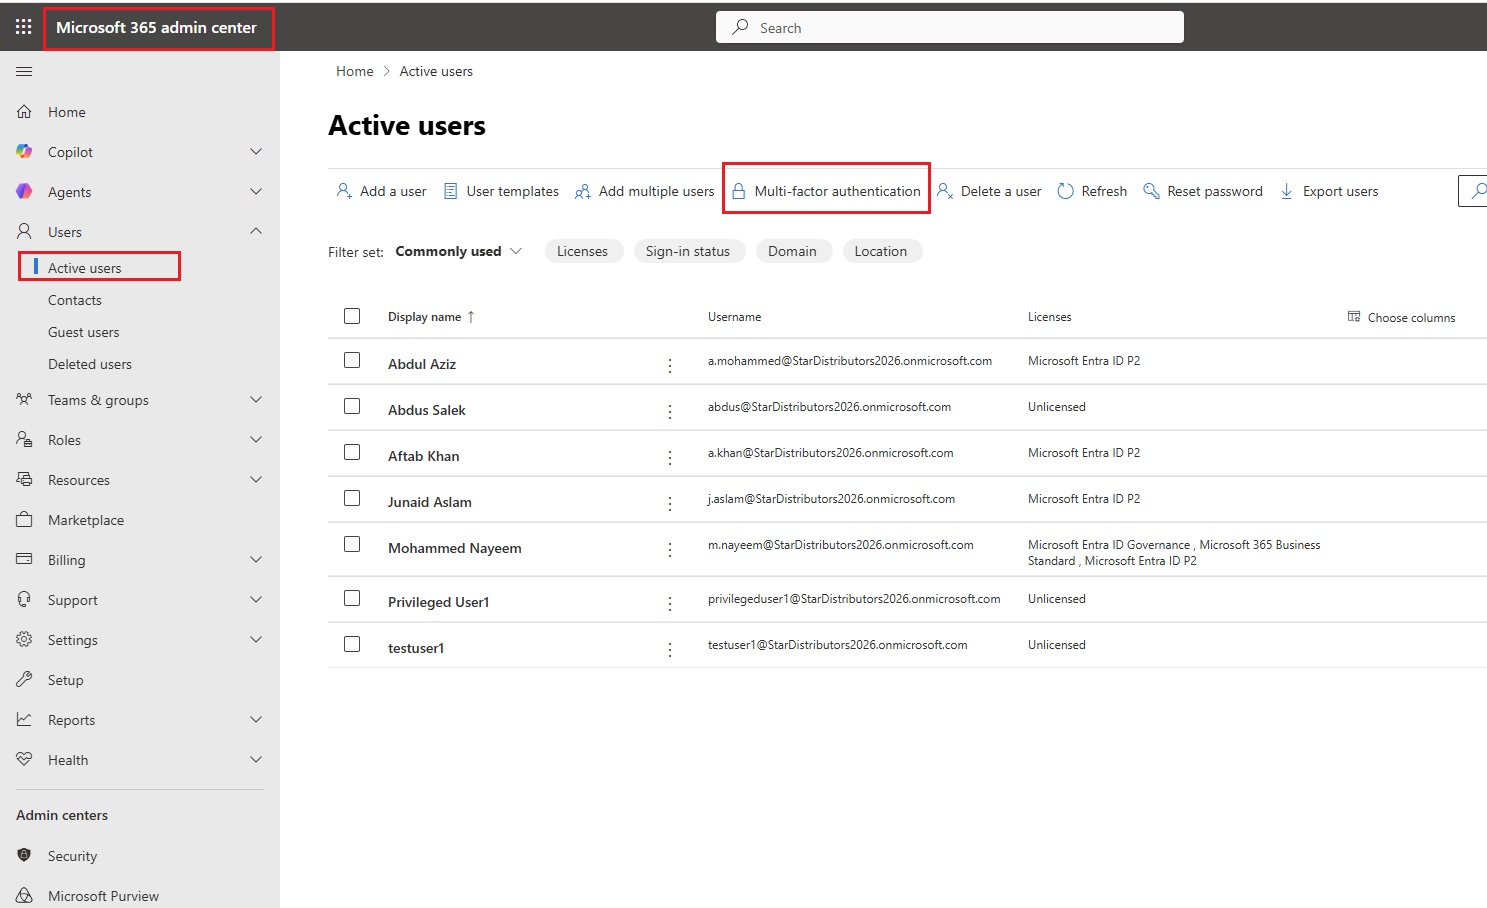
- Configure Multifactor Authentication (MFA), first time
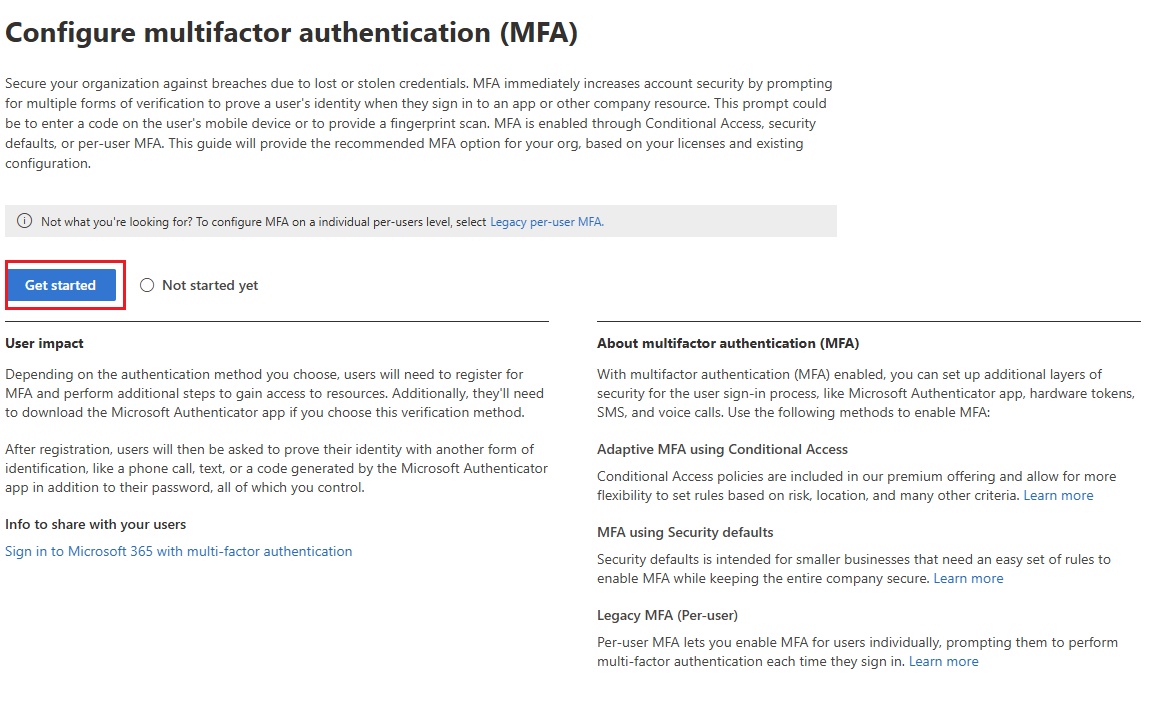
- Clcik on get started. Enforce multifactor authentication.
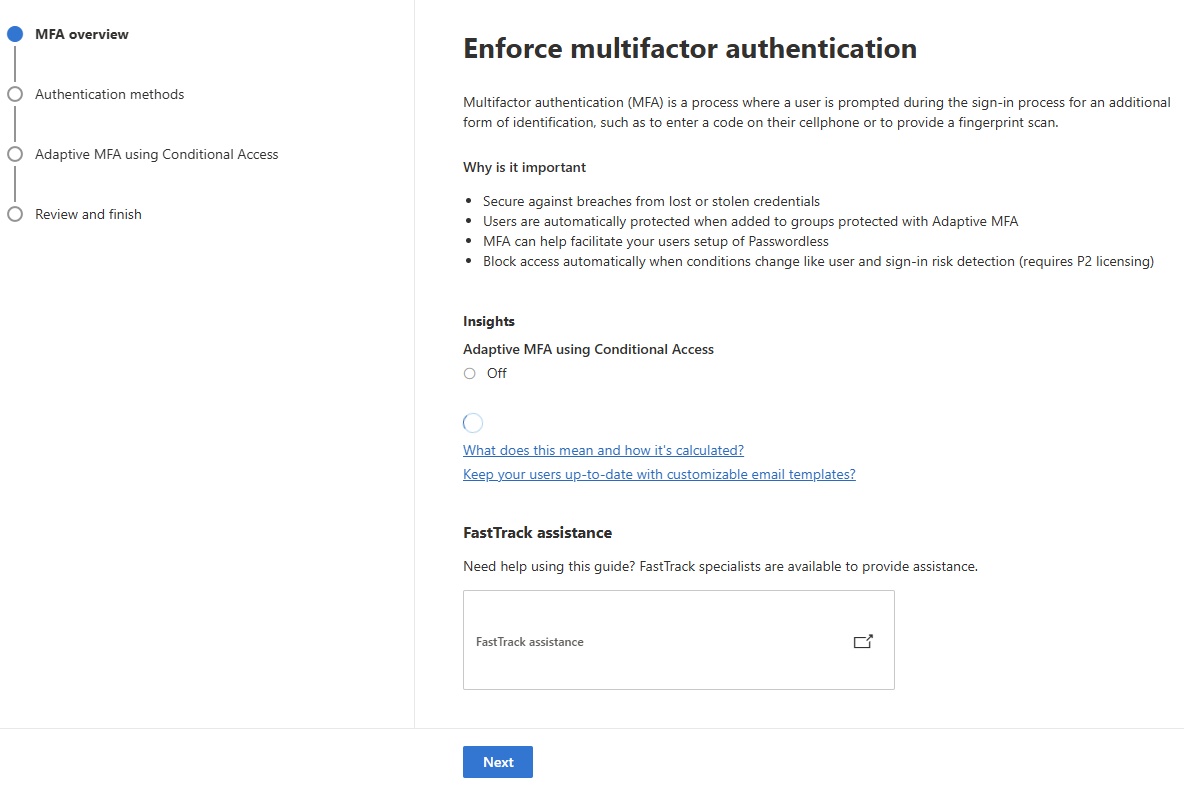
- Choose authentication method or organization.
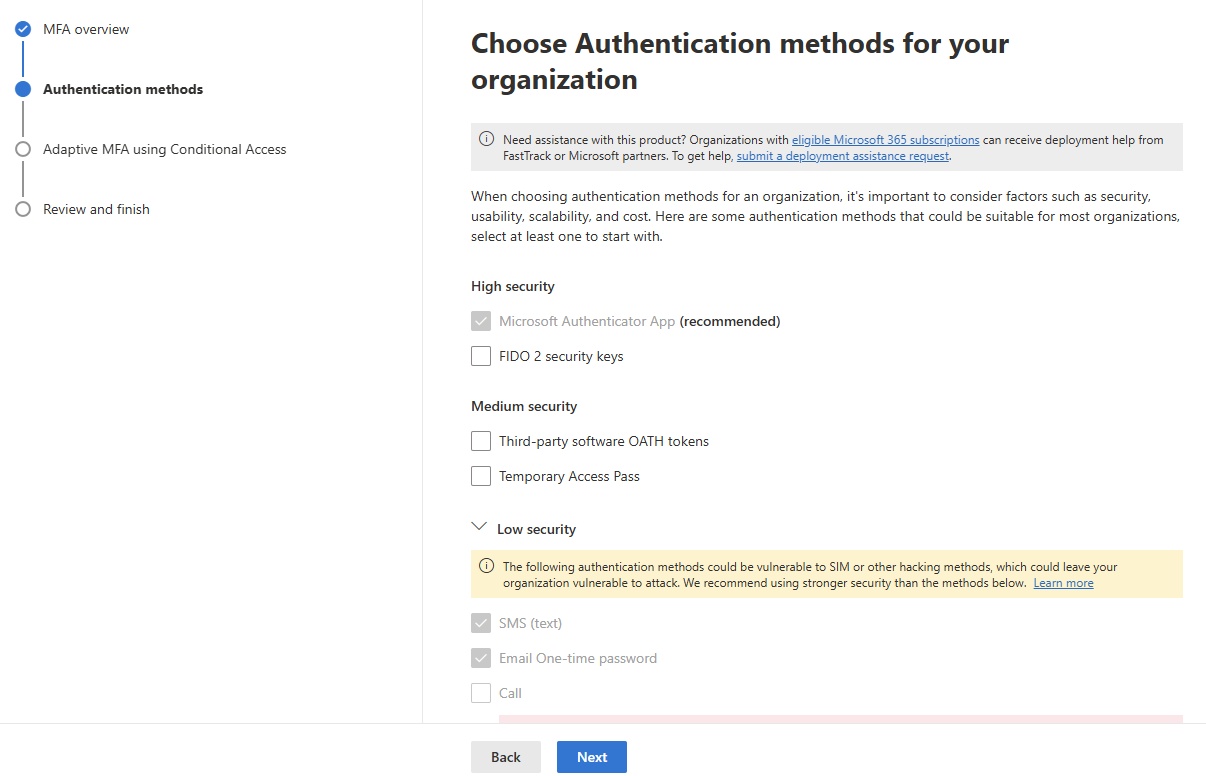
- In the above it was already defined in Entra ID.
- Configure adaptive MFA using Conditional Access
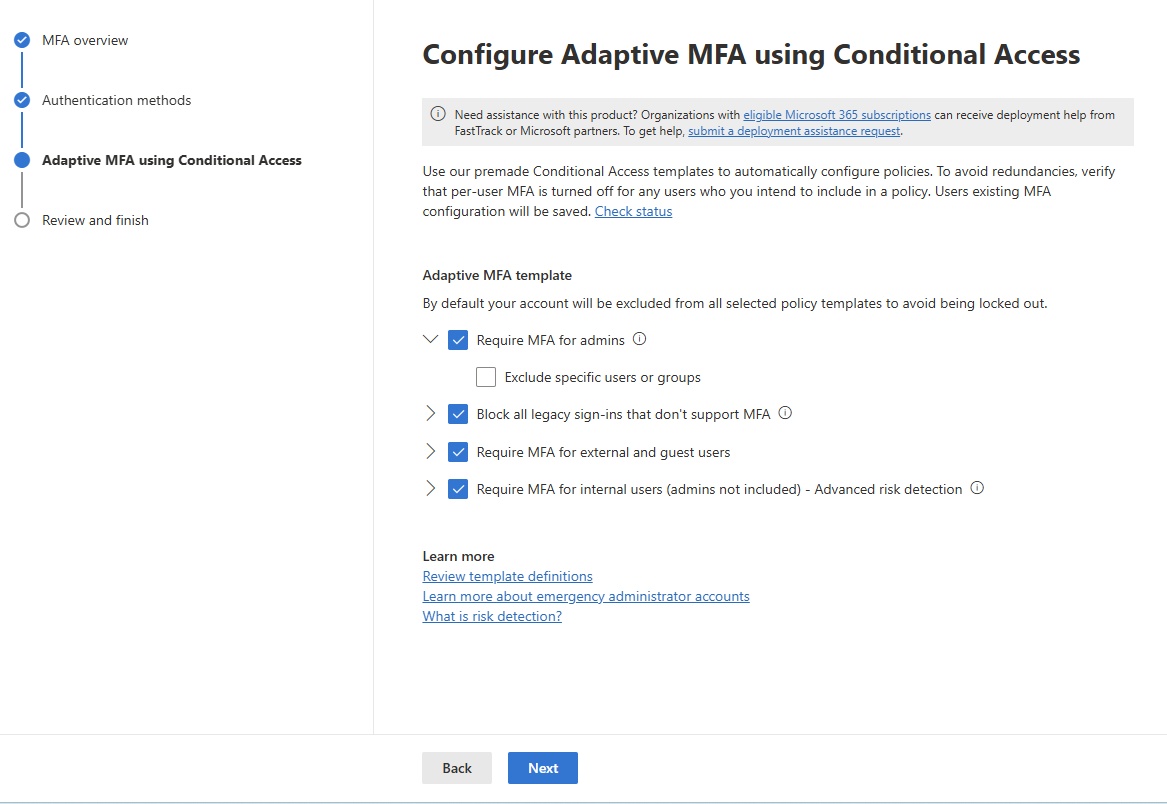
- Review and finish.
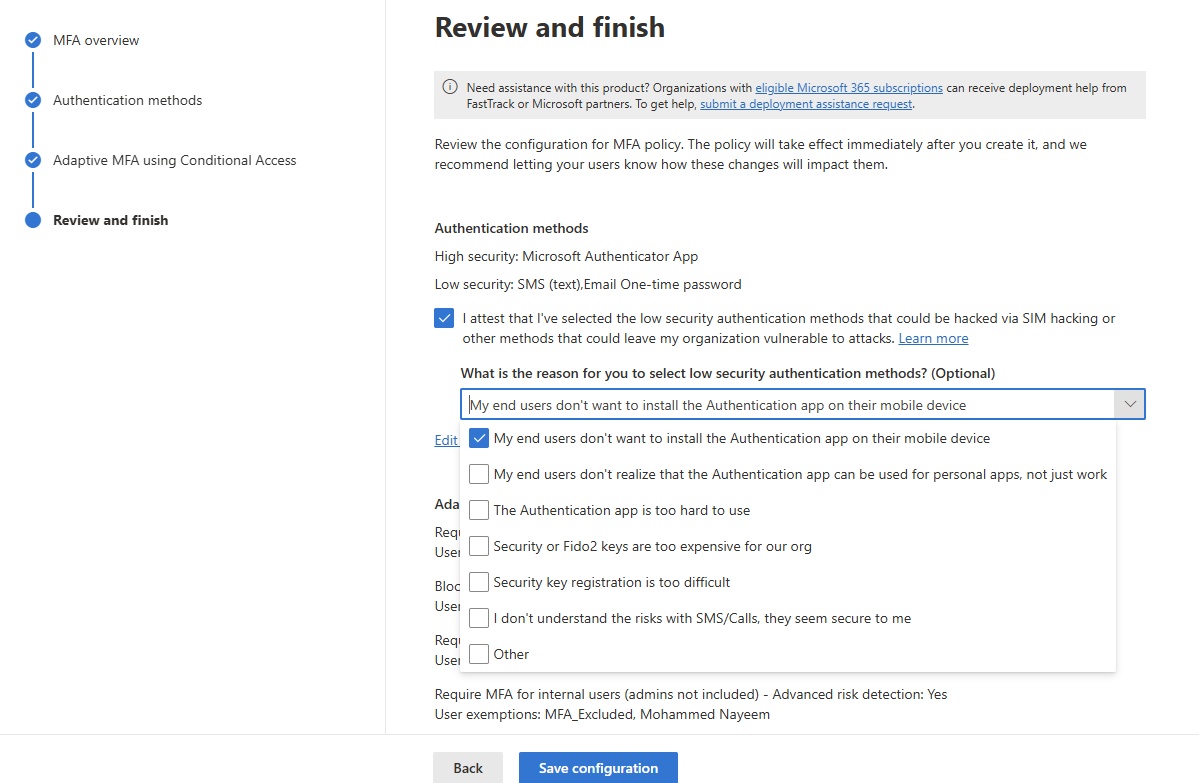
- User's MFA Management. (Per user MFA)
- Go to Active users/select a user.
- Scroll down and select multifactor authentication, click manage multifactor authentication
- It will open per uer multifactor authentication in Microsoft Entra Admin Center.
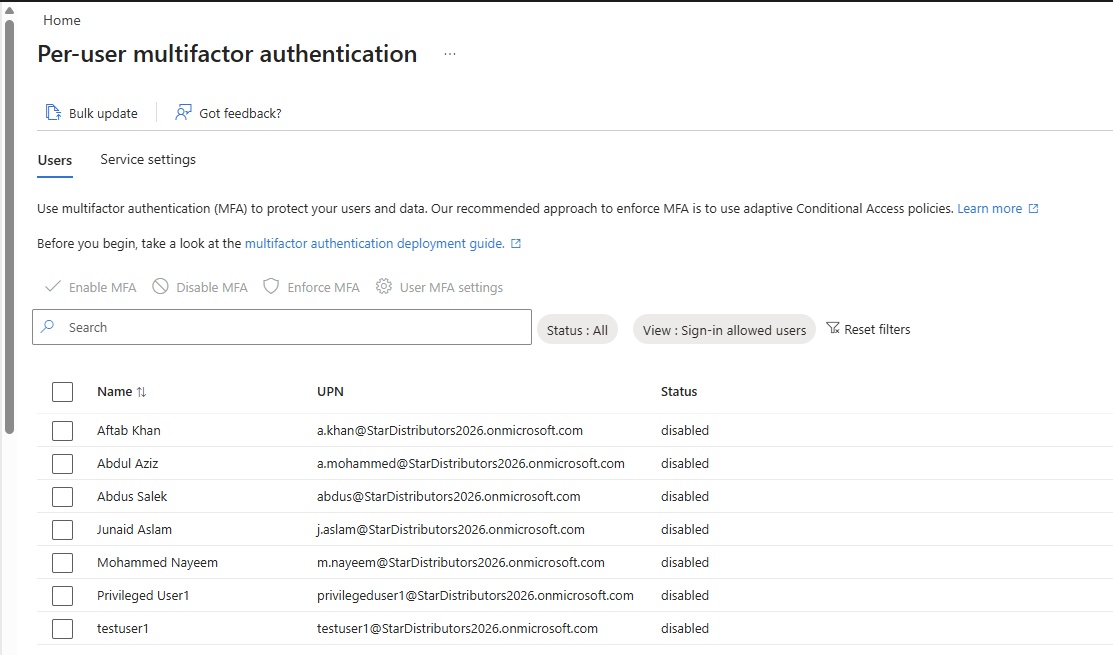
- select a user and you can do:
- Enable MFA:
- Disable MFA:
- Enforce MFA:
- User MFA settings:
- Service settings:
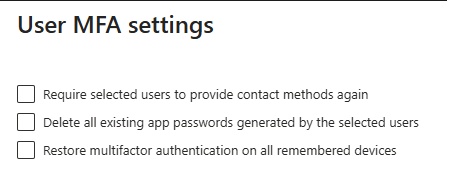
- Other Admin Centers in Microsoft 365 admin center:
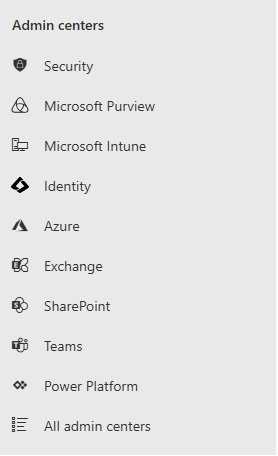
- If you click other admin links it will redirect to different relevant Microsoft portals.
- Security: It will redirect to Mirosoft Defender Portal
- Microsoft Purview: Redirect to Microsoft Purview portal.
- Microsoft Inture: Redirect to Microsoft Intune admin center
- Identity: Redirect to Microsoft Entra admin center.
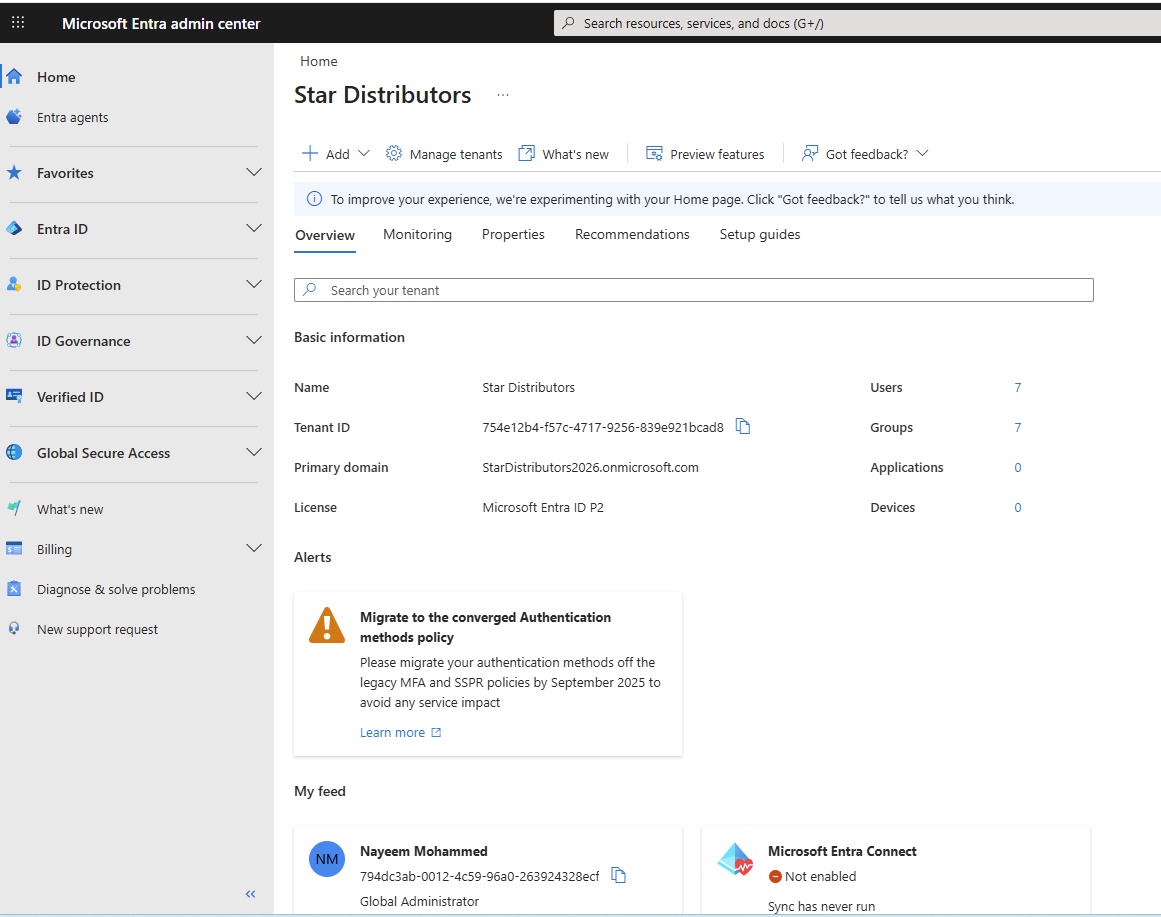
- Entra agents
- Favourites:
- Entra ID:
- MFA in Entra Admin Center: Go to entra.microsoft.com
- Link to Entra ID portal.
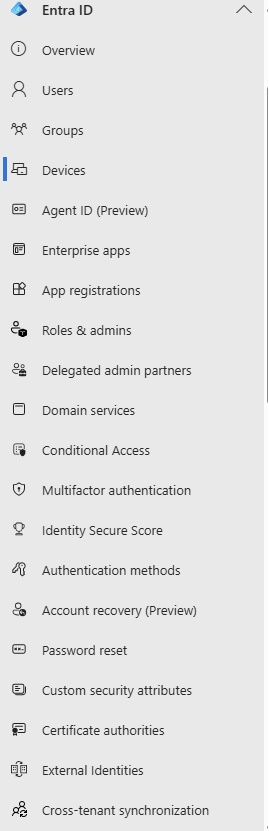
- ID Protection:
- ID Governance:
- Verified ID:
- Global Secure Access:
- Billing:
- Licenses: License page
- Trials: Free trial activation
- Diagnose & solve problems:
- Azure: Redirect to Microsoft Azure Portal.
- Exchange:
- SharePoint:
- Teams:
- Power Platform:
- All Admin Centers:
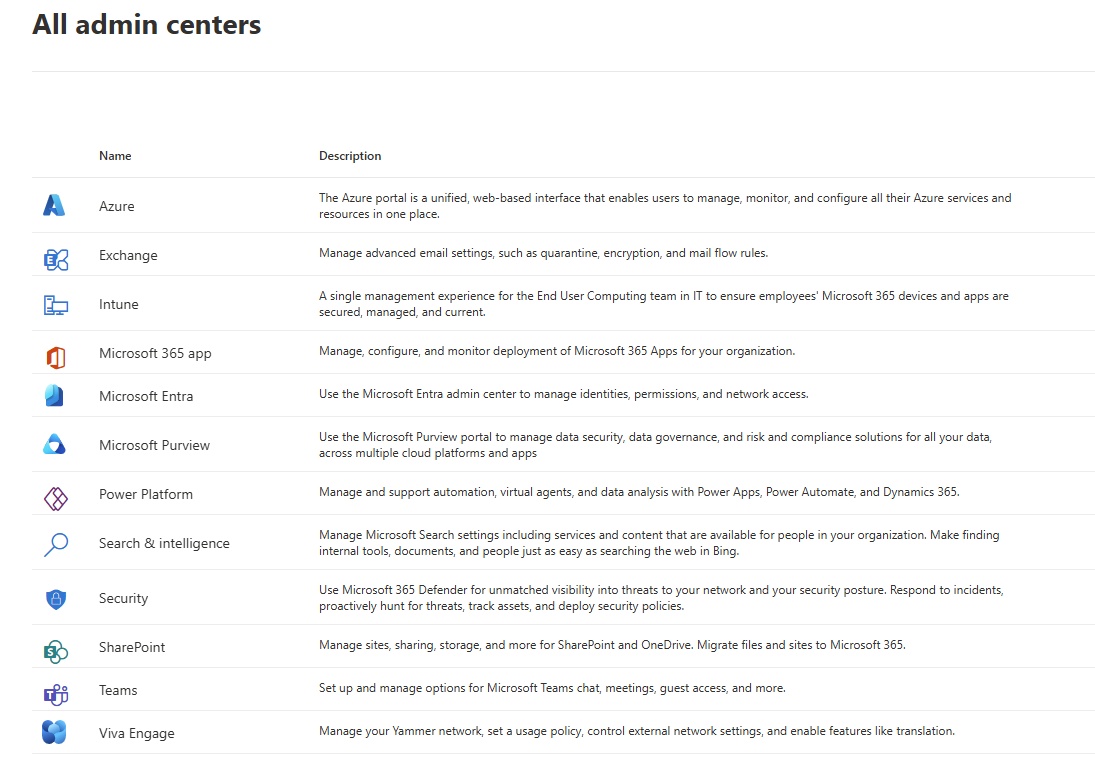
- MFA in Entra ID:
- Per User MFA in Entra ID:
- It is configure at user level.
- Login to azure porta with portal.azure.com and enter credentials.
- Go to Manage/Users and click per user MFA.
- You can Enable/Disable/Enforce MFA, user MFA settings and perform service settings.
- The same can also be done in MFA in Microsoft 365 admin center. check user's MFA management.
- Enable MFA:
- Once enabled a user at next login need to provide additional authentication details.
- Either Microsoft Authenticator app or Text depends on Authentication methods for user has been defined.
- To check which authentication methods has been defined for user: Go to Entra ID/users/select user/authentication method.
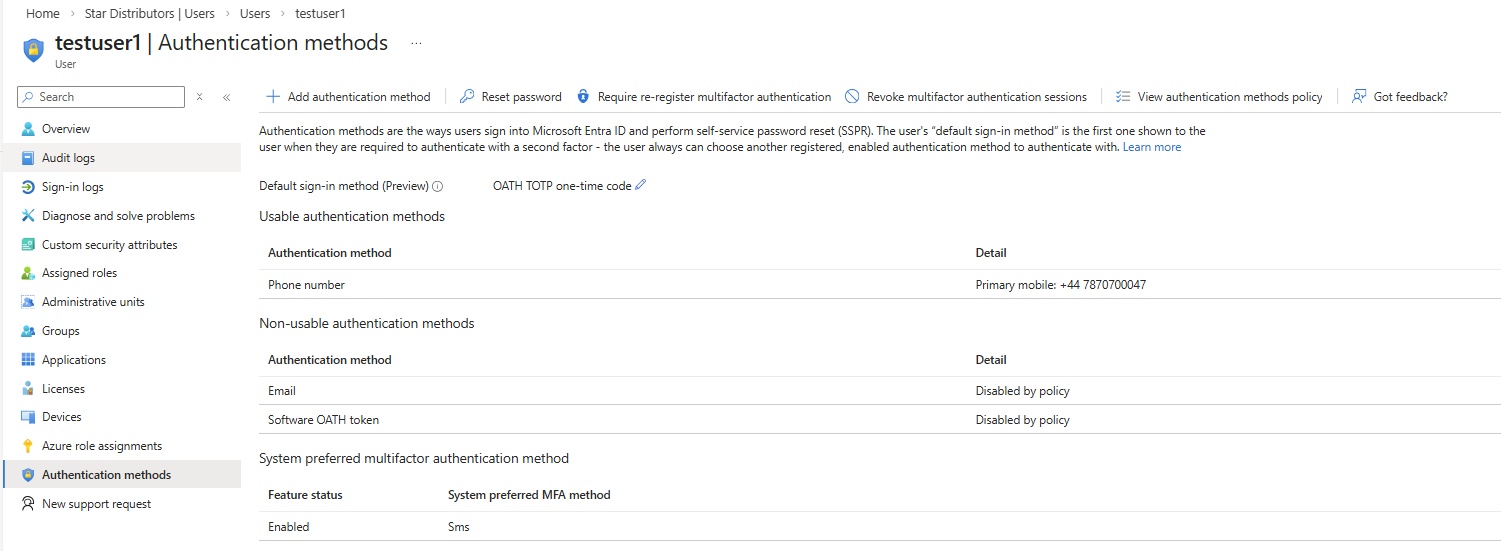
- Add additional method: select and choose from list.
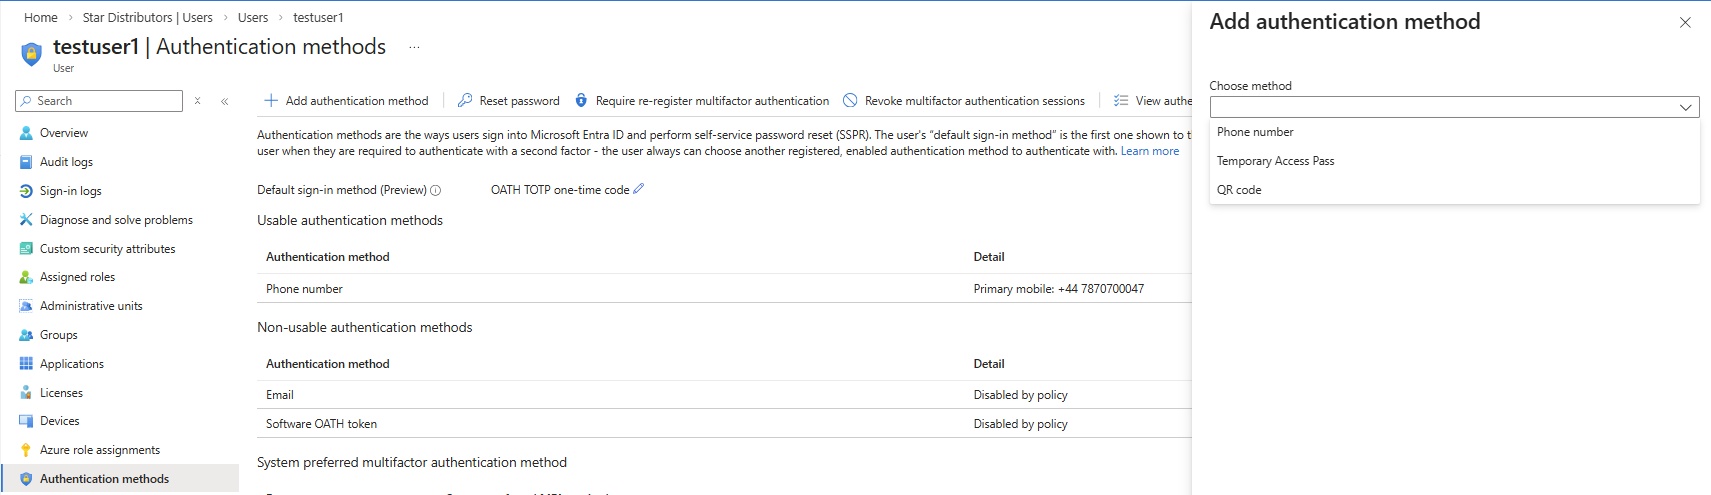
- Allowed methods are configured in Entra ID/Security/authentication methods/ enable the required method.
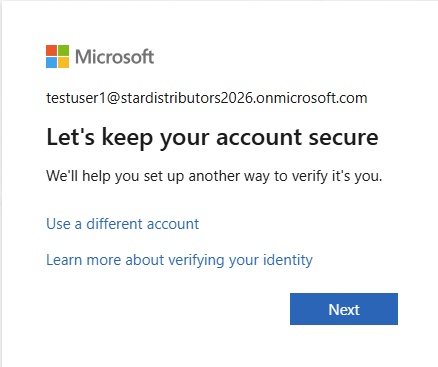
- two methods are allowed for user, either App or click setup different way to sign in (SMS).
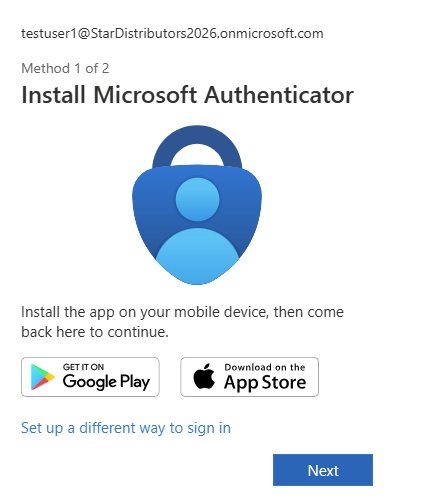
- choose one to perform MFA.
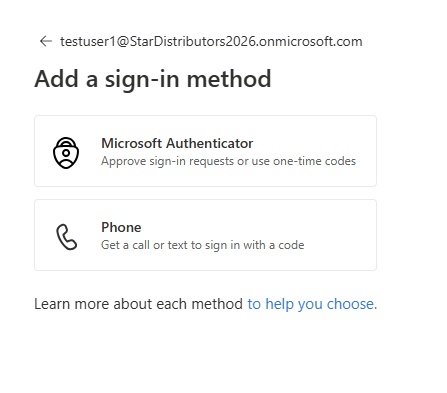
- Microsoft Authenticator App.
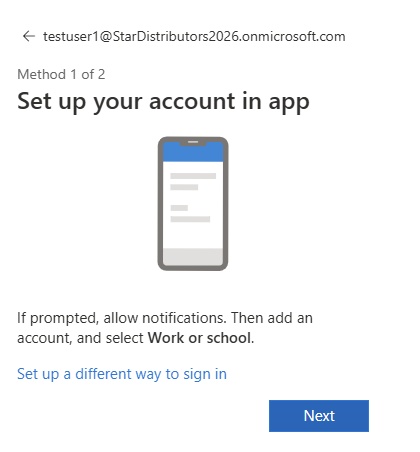
- Install Microsoft Authenticator in your mobile--> open app--> click + to add, select work or school option--> select scan QR code and scan the code.
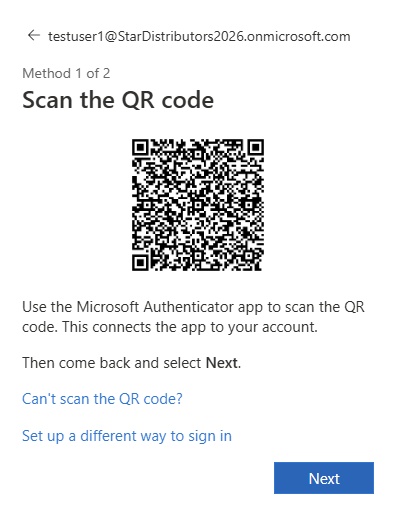
- Disable MFA: Disable MFA for a particular user.
- Enforce MFA: You can enforce a user to setup MFA.
- User MFA settings:
- Service settings:
- User add authentication method or change details like phone number or email address:
- user login to microsoft account: https://myaccount.microsoft.com/
- Enter credentials:
- Go to Security info and click update info
- select add sign in method and choose.
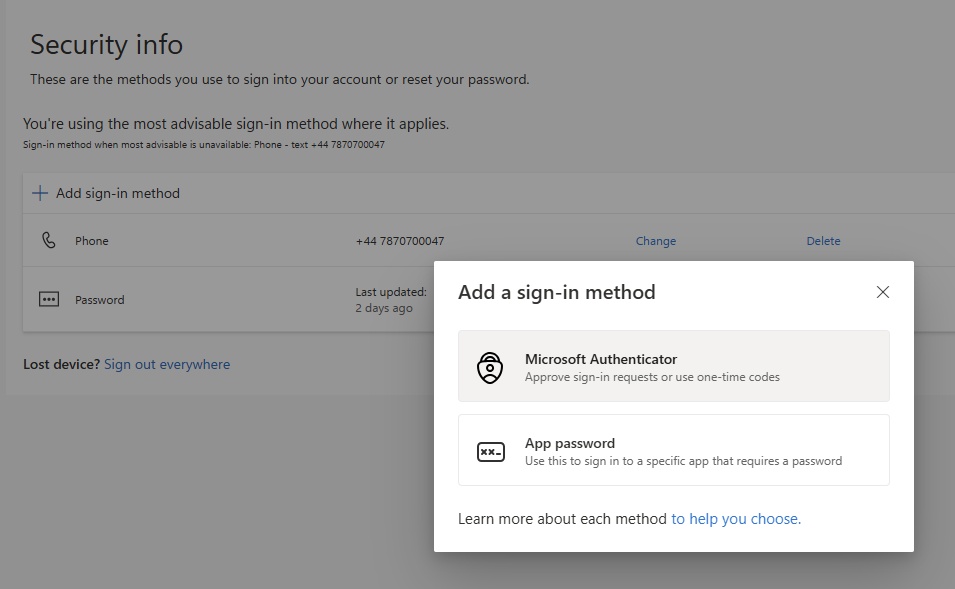
- Enter required details.
- Security Default in Entra ID:
- It is configure at system level where authentication method will impose all users.
- Go to Entra Id / properties /scroll down and select security default: you can disable.
- If security default is disabled then company need to use Conditional Acces method for multifactor authentication.
- Conditional Access in Entra ID:
- Identity Protection in Entra ID:
- Per User MFA in Entra ID:
- code
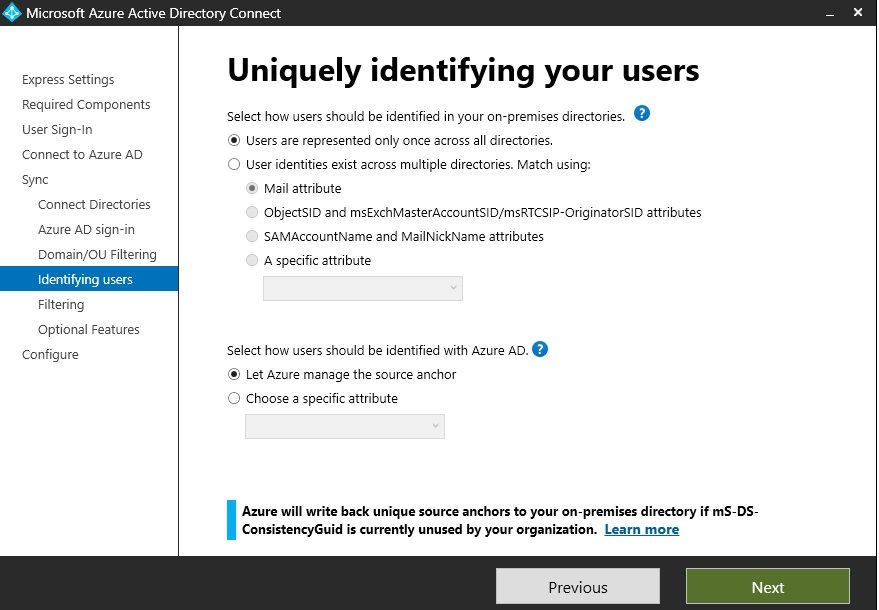
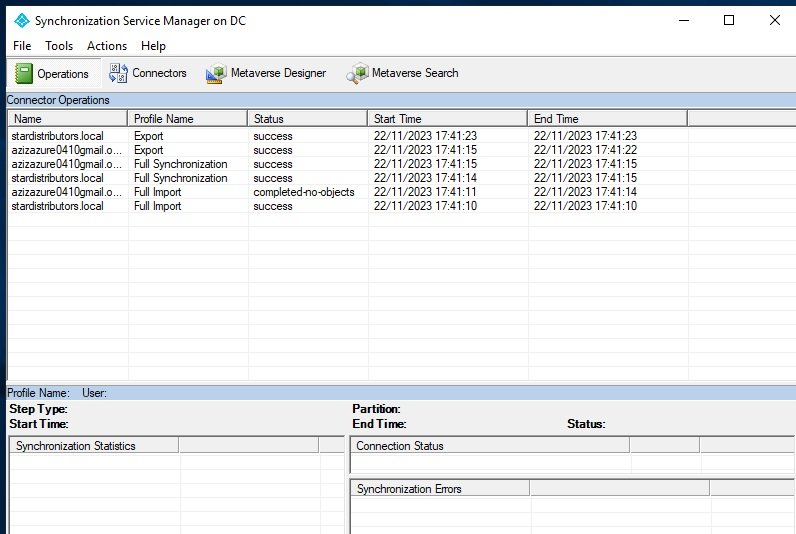
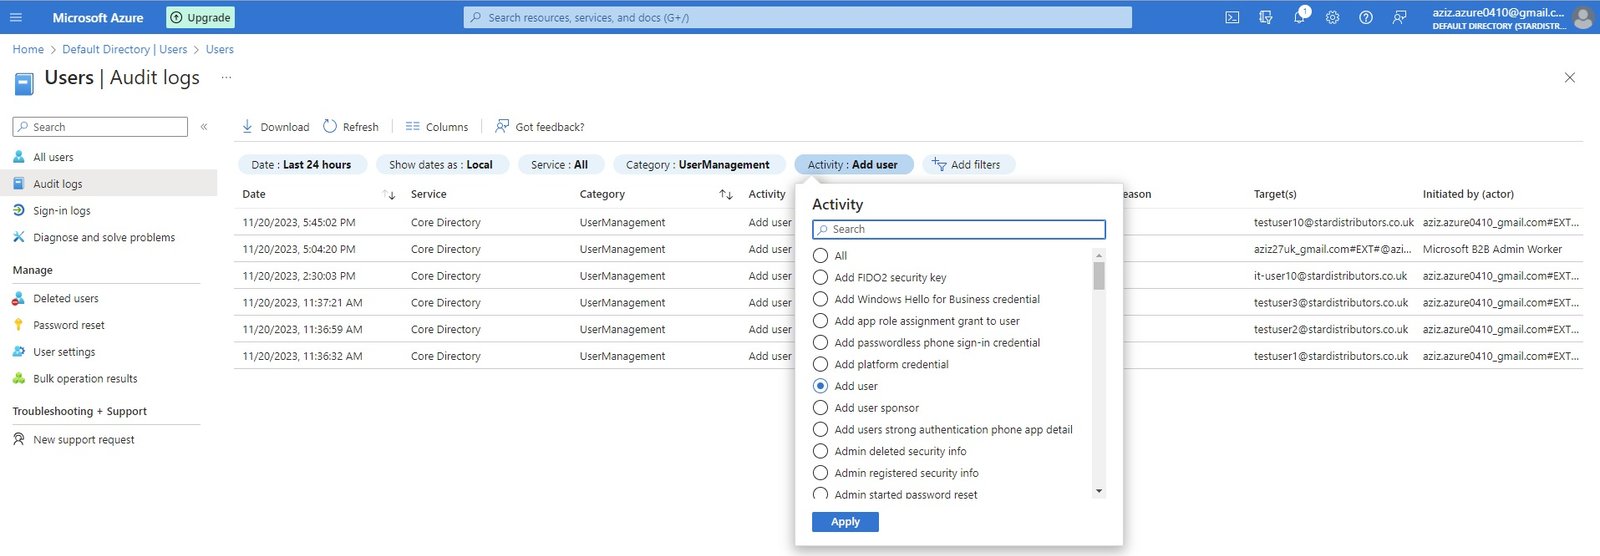
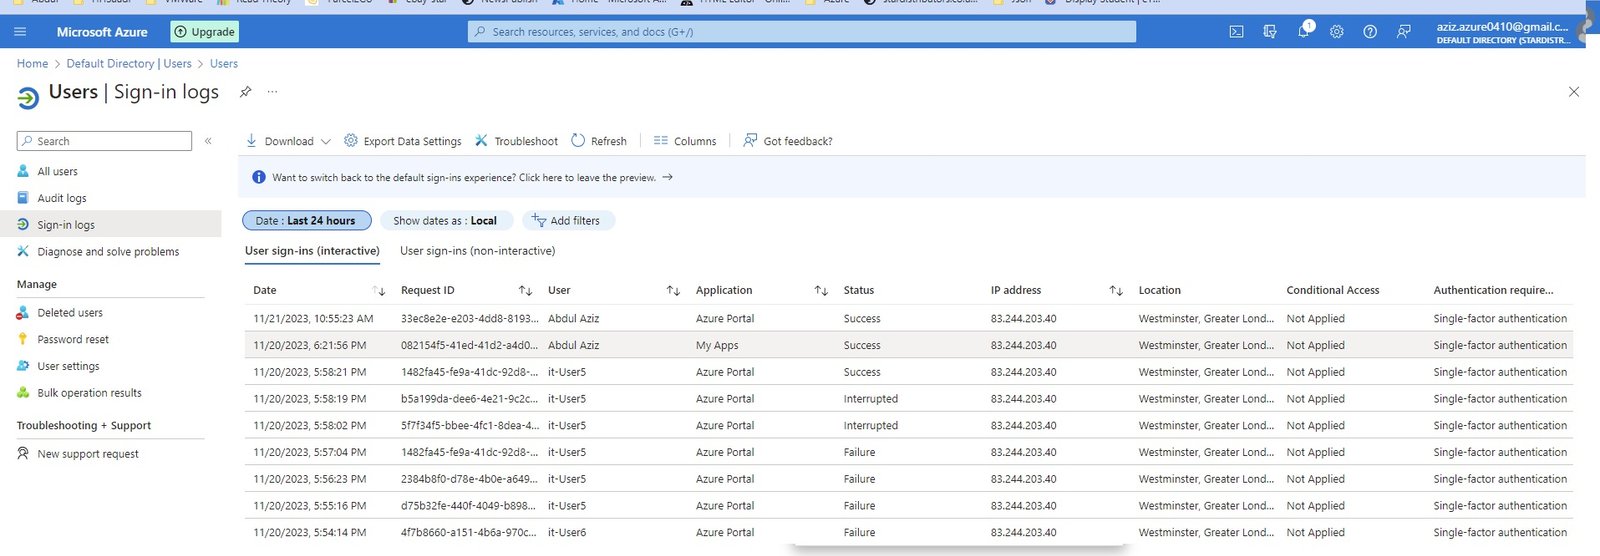
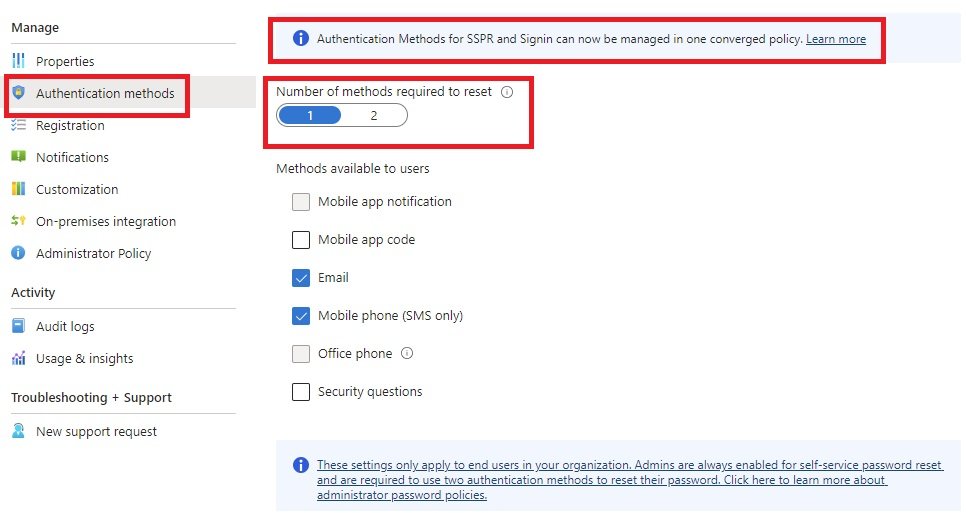

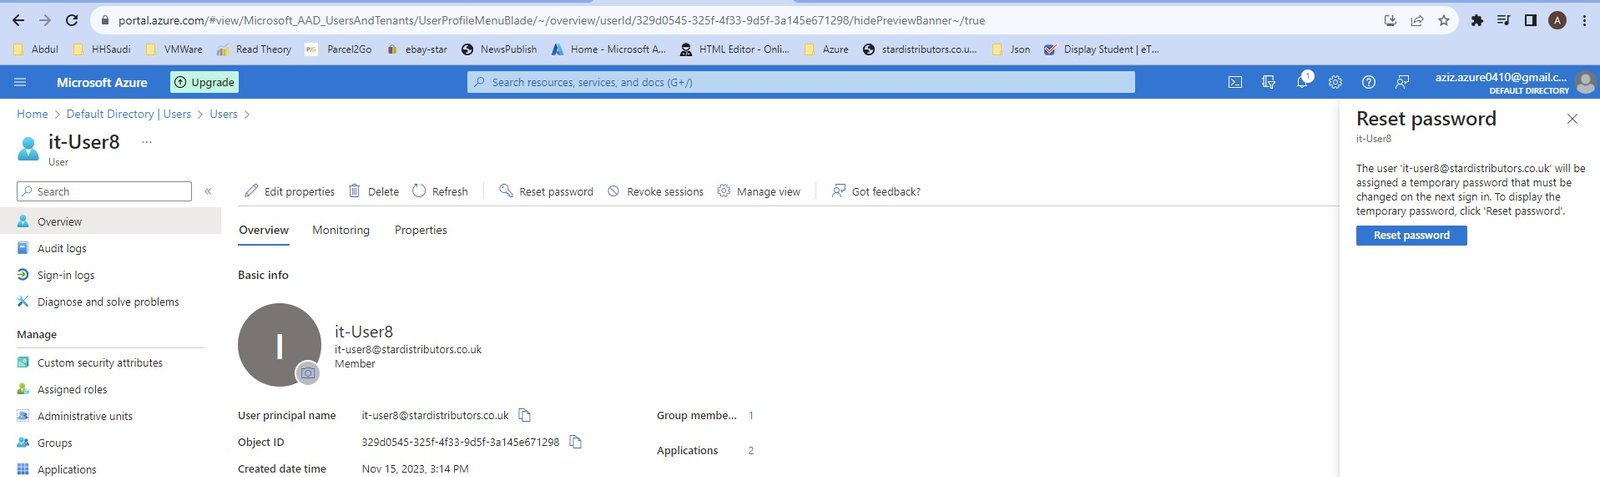

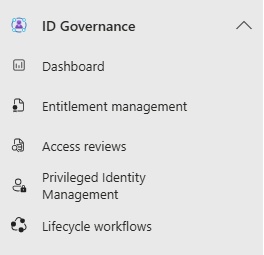
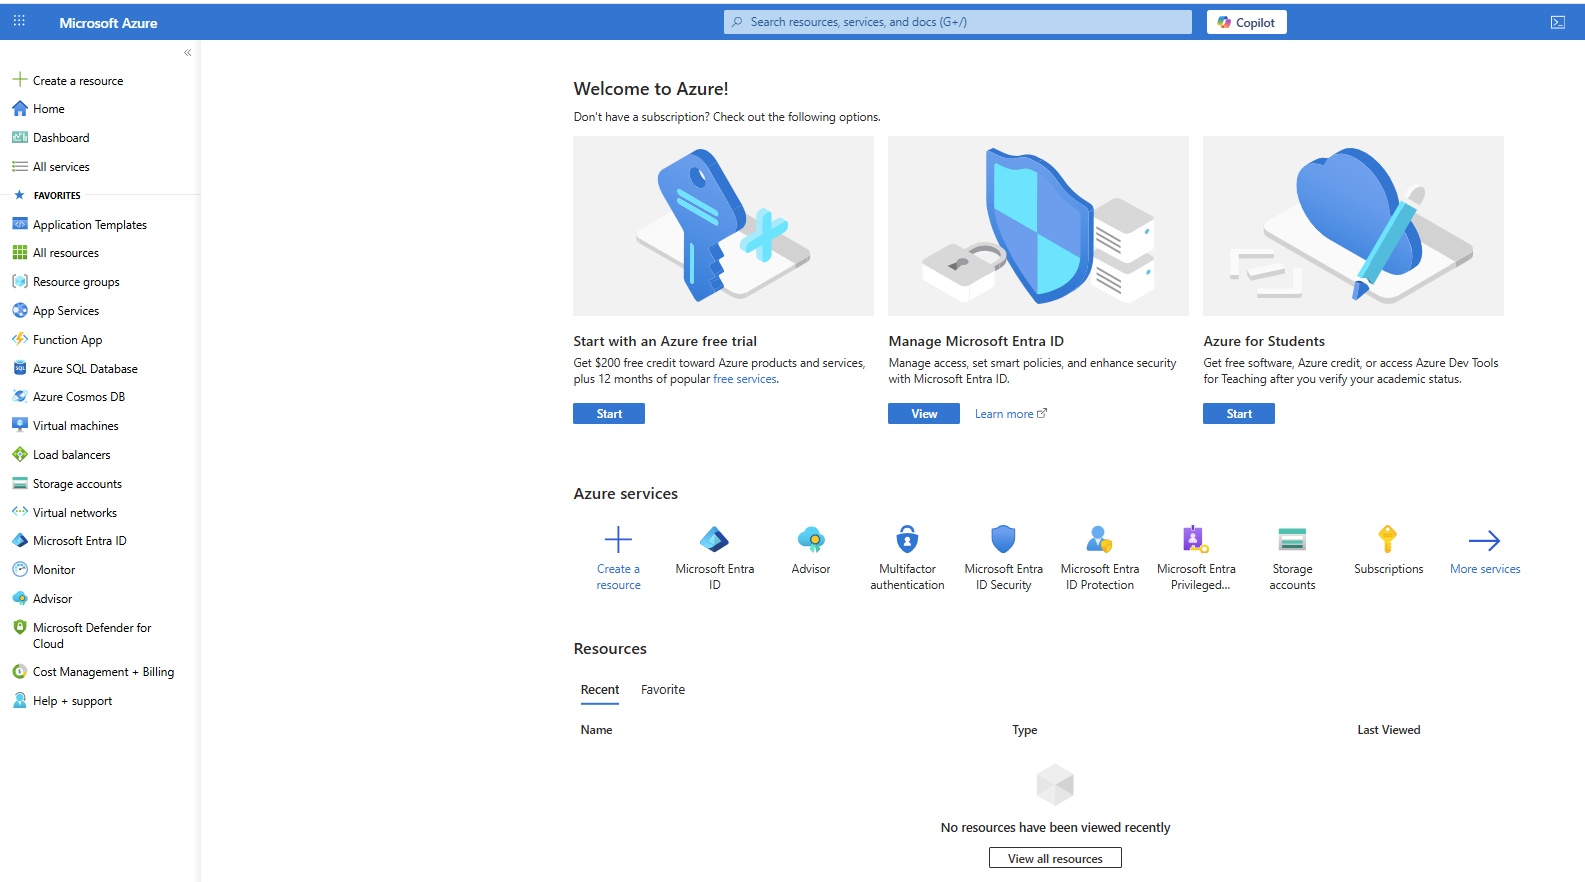
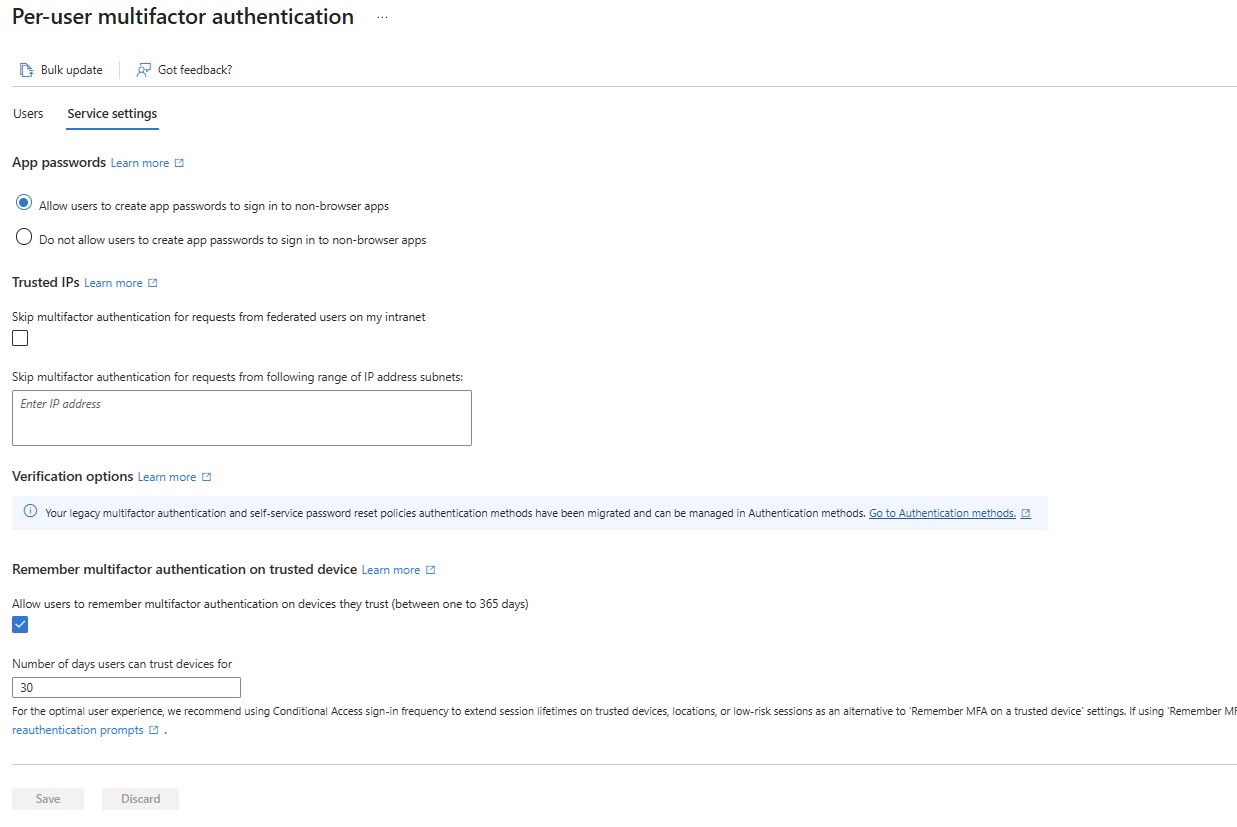
Database
Database Services
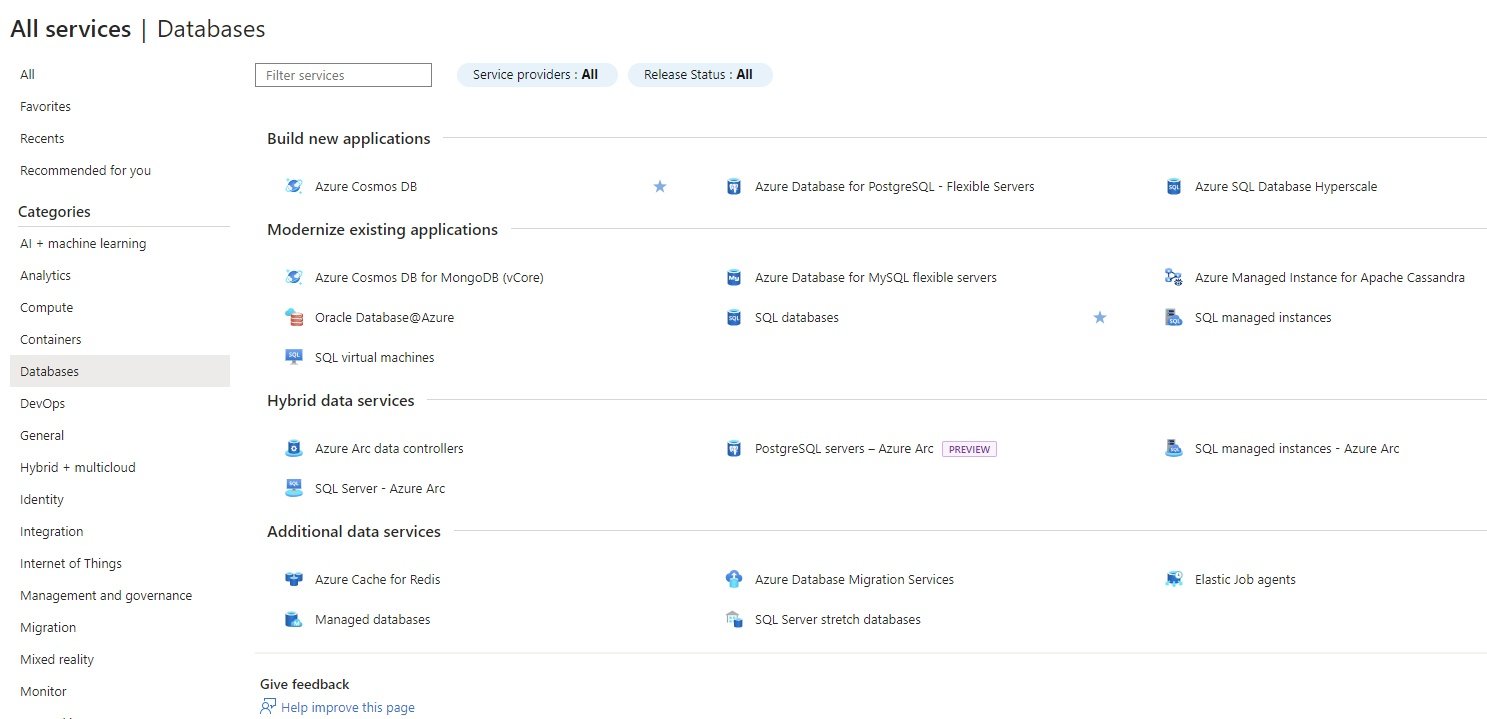
- Build new applications:
- Azure Cosmos DB
- AzureDatabase for PostgreSQL - flexible servers
- Azure SQL Database Hyperscale
- Modernize existing applications
- Azure Cosmos DB for MongoDB (vCore)
- Azure Database for MySQL flexible servers
- Azure Managed Instance for Apache Cassandra
- Oracle Database@Azure
- SQL Database:
- Azure SQL Database is fully managed platform as a service (PaaS) database engine.
- It handles most of the database managemet functions such as upgrading, patching, backups, and monitoring without user involvement.
- Creating Azure SQL Server and Database:
- SQL server & database can be created separately or during creation of database can create SQL server.
- Search for SQL Database / All Services/Databases/Modernize existing applications/SQL databases and click create.
- Basics:
- Subscription & RG: pay as you go, star-RG
- Database Name: stardb1
- Server: Create new
- name=stardbserver1
- Region: UK South
- Authentication method: Select your preferred authentication methods for accessing this server. Create a server admin login and password to access your server with SQL authentication, select only Microsoft Entra authentication Learn more using an existing Microsoft Entra user, group, or application as Microsoft Entra admin Learn more , or select both SQL and Microsoft Entra authentication.
- Use Microsoft Entra-only authentication: Set Microsoft Entra Admin
- Use both SQL and Microsoft Entra authentication: Set Microsoft Entra Admin & Server admin login = abdul, password = xxxxxx
- Use SQL authentication: Server admin login = abdul, password = xxxxxx
- Want to use SQL elastic pool: Elastic pools provide a simple and cost effective solution for managing the performance of multiple databases within a fixed budget. An elastic pool provides compute (eDTUs) and storage resources that are shared between all the databases it contains. Databases within a pool only use the resources they need, when they need them, within configurable limits. The price of a pool is based only on the amount of resources configured and is independent of the number of databases it contains.
- Workload Environment: Development or Production
- Compute + Storage: click configure database
- Service Tier = vCore-based purchasing model, DTU-based purchasing model (choose model).
- computer tier: Provisioned (Compute resources are pre-allocated. Billed per hour based on vCores configured. ) or Serverless(Compute resources are auto-scaled. Billed per second based on vCores used)
- Compute Hardware: choose hardware configuration
- vCore: select
- Data max sizeL depend on vCore selection.
- Backup storage redundancy:
- locally-redundant backup storage
- zone-redundant backup storage
- Geo-redundant backup storage
- Geo-Zone-redundant backup storage.
- Networking:
- Network connectivity: Choose an option for configuring connectivity to your server via public endpoint or private endpoint. Choosing no access creates with defaults and you can configure connection method after server creation.
- No access, Public endpoint, Private endpoint.
- connection policy: Configure how clients communicate with your SQL database server.
- Default:Uses Redirect policy for all client connections originating inside of Azure (except Private Endpoint connections) and Proxy for all client connections originating outside Azure
- Proxy: All connections are proxied via the Azure SQL Database gateway
- Redirect: Clients establish connections directly to the node hosting the database
- Encrypted connections: This server supports encrypted connections using Transport Layer Security (TLS). For information on TLS version and certificates, refer to connecting with TLS/SSL.
- TLS 1.0, TLS 1.1, TLS 1.2, TLS 1.3
- Network connectivity: Choose an option for configuring connectivity to your server via public endpoint or private endpoint. Choosing no access creates with defaults and you can configure connection method after server creation.
- Security: Protect your data using Microsoft Defender for SQL, a unified security package including vulnerability assessment and advanced threat protection for your server
- Enable Microsoft Defender for SQL: Protect your data using Microsoft Defender for SQL, a unified security package including vulnerability assessment and advanced threat protection for your server.
- Ledger: Ledger cryptographically verifies the integrity of your data and detects any tampering that might have occurred.
- Server identity: Use system assigned and user assigned managed identities to enable central access management between this database and other Azure resources.
- Transparent data encryption key management: Transparent data encryption encrypts your databases, backups, and logs at rest without any changes to your application. To enable encryption, go to each database. Database level settings if enabled, will override the server level setting.
- Additional settings:
- Data Source: Start with a blank database, restore from a backup or select sample data to populate your new database.
- None:
- Backup
- Sample
- Database collation: Database collation defines the rules that sort and compare data, and cannot be changed after database creation. The default database collation is SQL_Latin1_General_CP1_CI_AS
- Maintenance window: Select a preferred maintenance window from the drop-down. During maintenance, databases remain available, but some updates may require a failover. The system default maintenance window (5pm to 8am) limits most activities to this time, but urgent updates may occur outside of it. To ensure all updates occur only during the maintenance window, select a non-default option
- Data Source: Start with a blank database, restore from a backup or select sample data to populate your new database.
- Tags
- Review + Create:
- SQL Managed instances
- SQL virtual machines
- Hybrid data services
- Azure ARc data controllers
- PostgreSQL servers - Azure Arc
- SQL Managed instances - Azure Arc
- SQL Server - Azure Arc
- Additional data services
- Azure Cache for Redis
- Azure Database Migration Services
- Elastic job agents
- Managed databases
- SQL Server stretch databases
Create Azure SQL Server & Database & Blade with Portal.
- Azure SQL Database is fully managed platform as a service (PaaS) database engine.
- It handles most of the database managemet functions such as upgrading, patching, backups, and monitoring without user involvement.
- Creating Azure SQL Server and Database:
- SQL server & database can be created separately or during creation of database can create SQL server.
- Search for SQL Database / All Services/Databases/Modernize existing applications/SQL databases and click create.
- Basics:
- Subscription & RG: pay as you go, star-RG
- Database Name: stardb1
- Server: Create new
- name=stardbserver1
- Region: UK South
- Authentication method: Select your preferred authentication methods for accessing this server. Create a server admin login and password to access your server with SQL authentication, select only Microsoft Entra authentication Learn more using an existing Microsoft Entra user, group, or application as Microsoft Entra admin Learn more , or select both SQL and Microsoft Entra authentication.
- Use Microsoft Entra-only authentication: Set Microsoft Entra Admin
- Use both SQL and Microsoft Entra authentication: Set Microsoft Entra Admin & Server admin login = abdul, password = xxxxxx
- Use SQL authentication: Server admin login = abdul, password = xxxxxx
- Want to use SQL elastic pool: Elastic pools provide a simple and cost effective solution for managing the performance of multiple databases within a fixed budget. An elastic pool provides compute (eDTUs) and storage resources that are shared between all the databases it contains. Databases within a pool only use the resources they need, when they need them, within configurable limits. The price of a pool is based only on the amount of resources configured and is independent of the number of databases it contains.
- Workload Environment: Development or Production
- Compute + Storage: click configure database
- Service Tier = vCore-based purchasing model, DTU-based purchasing model (choose model).
- computer tier: Provisioned (Compute resources are pre-allocated. Billed per hour based on vCores configured. ) or Serverless(Compute resources are auto-scaled. Billed per second based on vCores used)
- Compute Hardware: choose hardware configuration
- vCore: select
- Data max sizeL depend on vCore selection.
- Backup storage redundancy:
- locally-redundant backup storage
- zone-redundant backup storage
- Geo-redundant backup storage
- Geo-Zone-redundant backup storage.
- Networking:
- Network connectivity: Choose an option for configuring connectivity to your server via public endpoint or private endpoint. Choosing no access creates with defaults and you can configure connection method after server creation.
- No access, Public endpoint, Private endpoint.
- connection policy: Configure how clients communicate with your SQL database server.
- Default:Uses Redirect policy for all client connections originating inside of Azure (except Private Endpoint connections) and Proxy for all client connections originating outside Azure
- Proxy: All connections are proxied via the Azure SQL Database gateway
- Redirect: Clients establish connections directly to the node hosting the database
- Encrypted connections: This server supports encrypted connections using Transport Layer Security (TLS). For information on TLS version and certificates, refer to connecting with TLS/SSL.
- TLS 1.0, TLS 1.1, TLS 1.2, TLS 1.3
- Network connectivity: Choose an option for configuring connectivity to your server via public endpoint or private endpoint. Choosing no access creates with defaults and you can configure connection method after server creation.
- Security: Protect your data using Microsoft Defender for SQL, a unified security package including vulnerability assessment and advanced threat protection for your server
- Enable Microsoft Defender for SQL: Protect your data using Microsoft Defender for SQL, a unified security package including vulnerability assessment and advanced threat protection for your server.
- Ledger: Ledger cryptographically verifies the integrity of your data and detects any tampering that might have occurred.
- Server identity: Use system assigned and user assigned managed identities to enable central access management between this database and other Azure resources.
- Transparent data encryption key management: Transparent data encryption encrypts your databases, backups, and logs at rest without any changes to your application. To enable encryption, go to each database. Database level settings if enabled, will override the server level setting.
- Additional settings:
- Data Source: Start with a blank database, restore from a backup or select sample data to populate your new database.
- None:
- Backup
- Sample
- Database collation: Database collation defines the rules that sort and compare data, and cannot be changed after database creation. The default database collation is SQL_Latin1_General_CP1_CI_AS
- Maintenance window: Select a preferred maintenance window from the drop-down. During maintenance, databases remain available, but some updates may require a failover. The system default maintenance window (5pm to 8am) limits most activities to this time, but urgent updates may occur outside of it. To ensure all updates occur only during the maintenance window, select a non-default option
- Data Source: Start with a blank database, restore from a backup or select sample data to populate your new database.
- Tags
- Review + Create:
- Database Blade: After creation of server and database, firewall will restrict user to access. Need to enter user IP address to allow access to database.
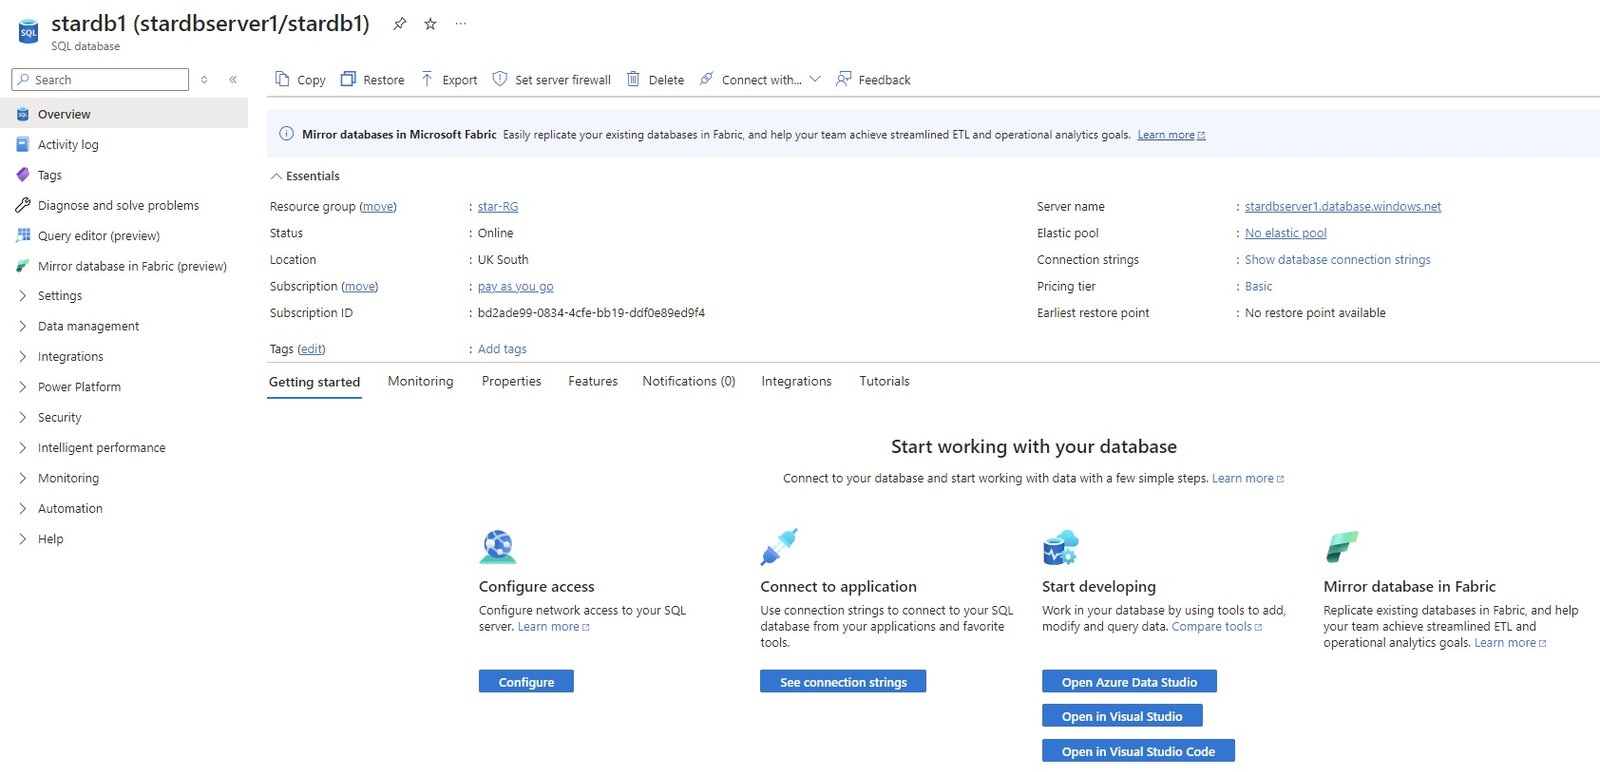
- Overview:
- Activity Log:
- Tags:
- Diagnose and solve problems:
- Query editor:
- SQL server authentication: enter login details:
- Error:
- Solution: Public Network is denied. Go to Server blade/Networking/selected networks: Firewall Rules (check more details in server blade, enter client ip address).
- create a database:
-
CREATE TABLE Persons (FirstName varchar(255) CHECK (len(FirstName)>3 AND len(FirstName)<50),LastName varchar(255),Age int CHECK (Age<=130));
- run query, a table is created.
- Insert values in table:.
-
INSERT INTO Persons (FirstName, LastName, Age)VALUES ('Abdul','Aziz', 35);
- highlight these lines and run
- View the data:
- SELECT * FROM Persons;
-
- Mirror database in Fabric
- Settings:
- Data management:
- Integrations:
- Power Platform:
- Security
- Intelligent performance:
- Monitoring:
- Automation:
- Help
- SQL Server Blade:
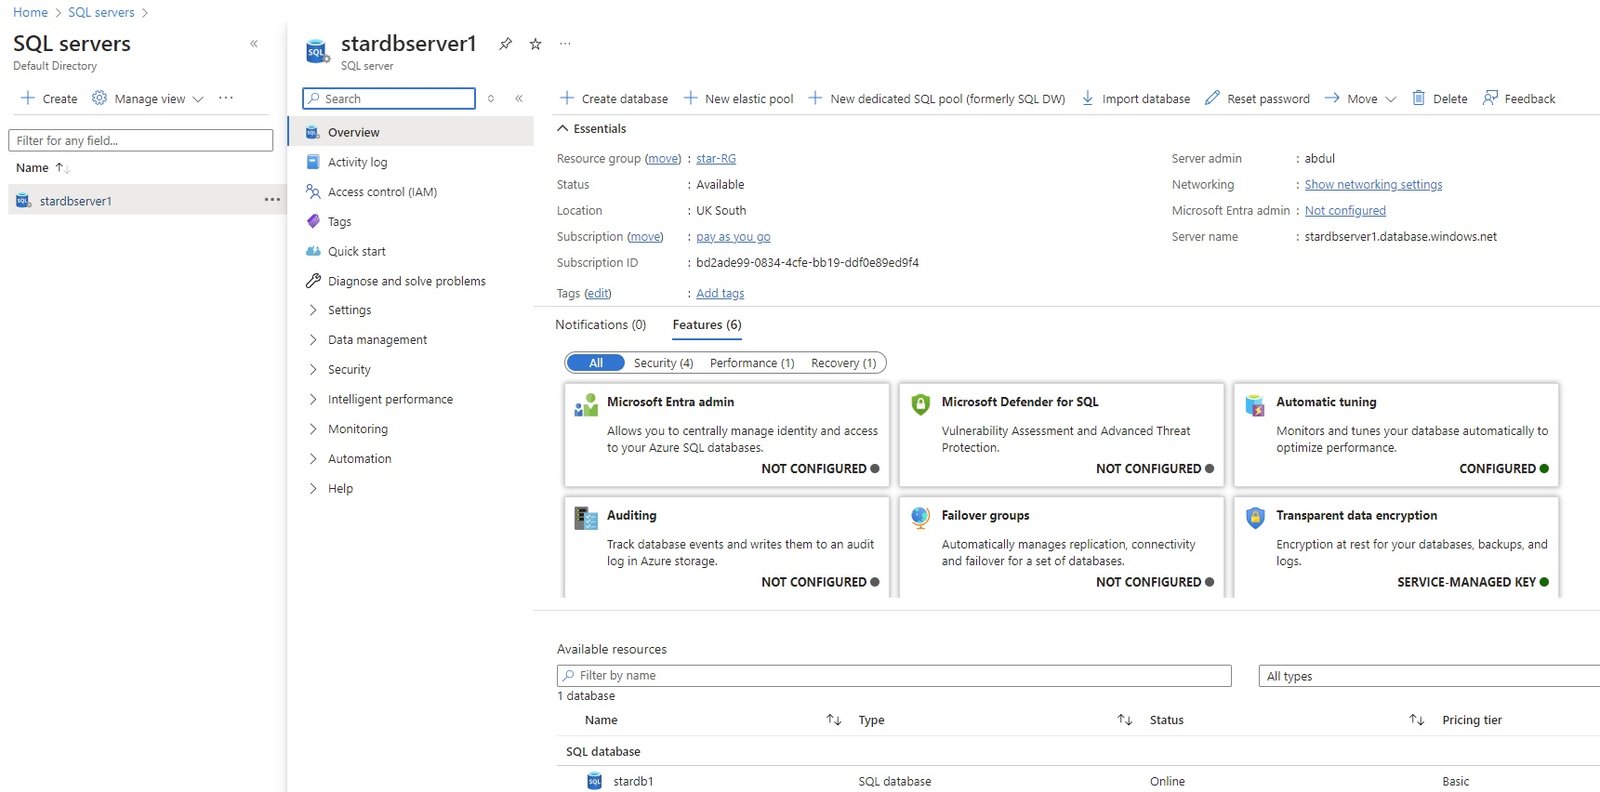
- Overview:
- Activity Log:
- Access control (IAM)
- Quick start
- Diagnose and solve problems:
- Settings:
- Data management:
- Security:
- Netowrking:
- Public Access: Disable or Selected networks (Connections from the IP addresses configured in the Firewall rules section below will have access to this database. By default, no public IP addresses are allowed.)
- Virtual networks:
- Add a virtual network rule:
- Firewall rules:Add your client IPv4 address (x.x.x.x), Add a firewall rule.
- Add your client IPv4: enter rule name, start IPv4, End IPv4 and save it. now user can able to access database.
- Virtual networks:
- Private Access : Private endpoint connections
- Connectivity: Outbound networking, Connection policy, Encryption in transit.
- Public Access: Disable or Selected networks (Connections from the IP addresses configured in the Firewall rules section below will have access to this database. By default, no public IP addresses are allowed.)
- Microsoft Defender for Cloud:
- Transparent data encryption:
- Identity:
- Auditing:
- Netowrking:
- Intelligent performance:
- Monitoring:
- Automation:
- Help:
Create Service Endpoint
- End Point make connection between two azure services privately.
- Some azure services required internet in order to access them, like storage, database etc..
- You do not provide Public IP to your applicaiton VMs but need access to storage or database.
- Azure provides service endpoints which makes communication using private IP address of you VM to connect to these services.
storage account access with VM1 using private IP with the help of Microsoft Backbone Private Network.
- Go to All Services/Networking/Vnet/Manage Vnet/manage subnet or service endpoint
- Create a vnet (Vnet1 10.0.0.0./16), subnet (subnet1 10.0.1.0/24),
- Create a VM (VM1) in subnet1
- Create a Service endpoint at subnet1:
- Go to All Services/Networking/Vnet/subnet1 and in service endpoints and from list select Microsoft.storage and save it.
- Service endpoints are available for the following Azure services and regions.
- Azure Storage (Microsoft.Storage)
- Azure SQL Database(Microsoft.Sql)
- Azure Synapse Analytics (Microsoft.Sql)
- Azure Database for PostgreSQL Server (Microsoft.Sql)
- Azure Database for MySQL server (Microsoft.Sql)
- Azure Database for MariaDB (Microsoft.Sql)
- Azure Cosmos DB (Microsoft.AzureCosmosDB)
- Azure Key Vault (Microsoft.KeyVault)
- Azure Servie Bus (Microsoft.ServiceBus)
- Azure Event Hubs(Microsoft.EventHub)
- Azure Data Lake Store Gen 1(Microsoft.AzureActiveDirectory)
- Azure App Service (Microsoft.Web)
- Azure Cognitive Services (Microsoft.CognitiveServices)
- check service endpoint status = succeeded.
- Create a storage Account:
- Go to storage Account/+ Add
- Subscription: select subscription
- RG: star-RG
- Storage Accont name: starstorage2
- Region: UK South
- Performance: standard
- Redundancy: Geo-Redundant storage (GRS), Review and create.
- Create Container: Go to storage created and go to data storage and create container
- name=starcontainer and upload a file. (.doc)
- Access to storage account from laptop using internet:
- on laptop download, install and launch azure storage explorer, connect using sign in with azure (enter credentials) and go to storage accounts/starstorage1/starcontainer/uploaded file displayed.
- Cancel access storage account through internet:
- Go to storage account/security+networking/networking/public network access=Enabled from selected virtual networks and IP addresses, select virtual network (vnet1) and subnet = subnet1. save it. Now storage account cannot be accessed through internet but can be access from VM1.
- Access to storage account through VM using internet:
- Connect to VM using RDP and public IP.
- install Microsoft Azure Storage Explorer in VM and open it.
- Connect Azure storage explorer with Azure account, in explorer click open connect dialog and provide azure account details. select subscription and select azure and enter credentials.
- select check box default directory and it will load subscription. reauthenticate with credentials.
- Browse storage account.
- Access to storage account through service endpoint:
- Connect to VM, open azure storage explorer, click open connect dialog and select subscription and enter credentials.
- click explorer and expand azure subscription to find storagecontainer.
Access SQL Database with VM1 using private IP with the help of Microsoft Backbone Private Network.
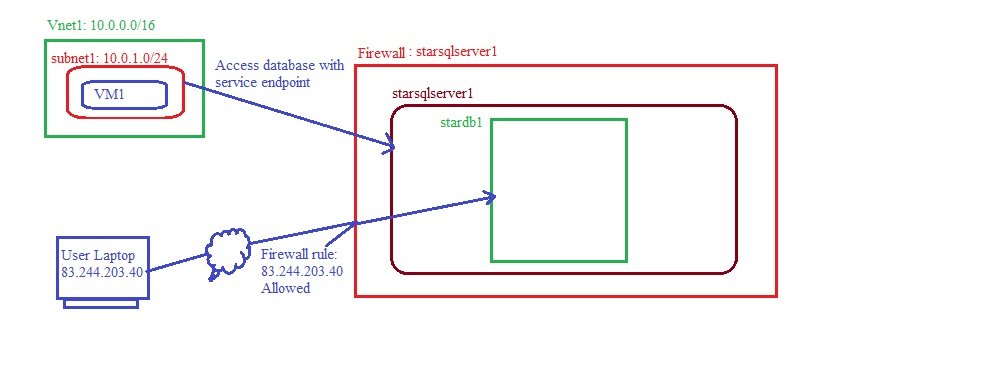
- Create a RG (star-RG), Vnet1(10.0.0.0/16), subnet1(10.0.1.0/24)
- Create VM (VM1) in Subnet1
- Create mssql server(starsqlserver1), database (stardb1).
- Create service endpoint for subnet1 to access mssql.
- Add Virtual networks in starsqlserver1
- code
code
- code
- code
- code
code
- code
- code
- code
code
- code
- code
- code
code
- code
- code
- code
Migration
Landing Zone
- code
- code
- code
code
- code
- code
- code
code
- code
- code
- code
code
- code
- code
- code
code
- code
- code
- code
code
- code
- code
- code
code
- code
- code
- code
Container
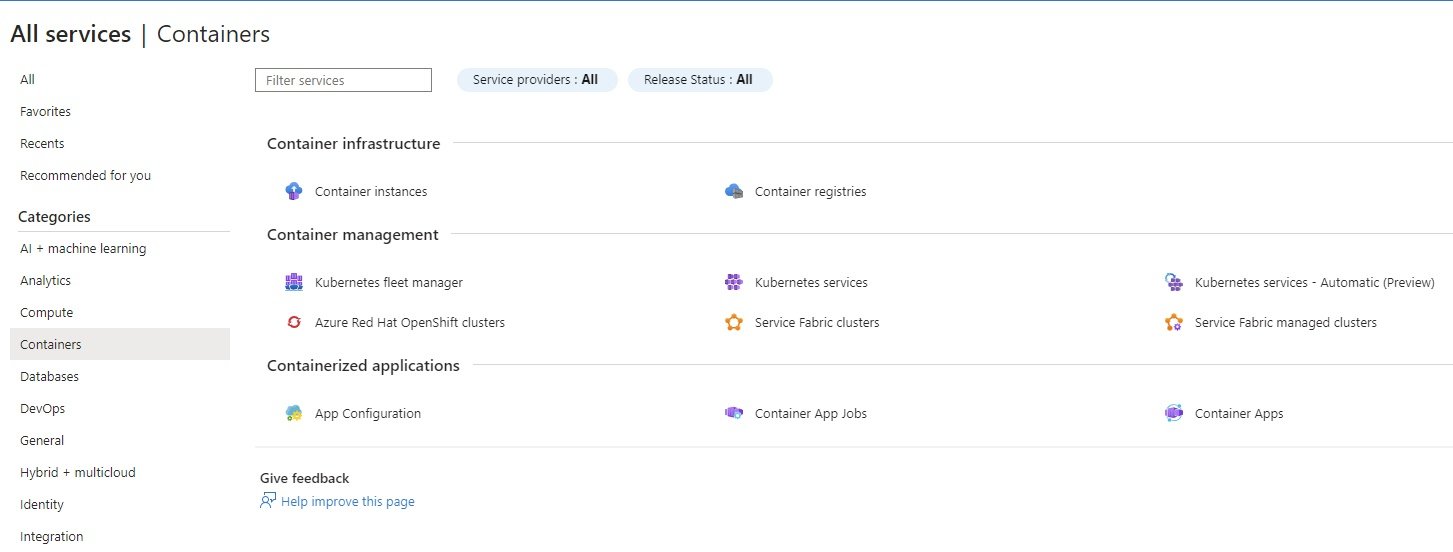
- Container Infrastructure:
Container Instances
- Add container:
- Basic:
- Subscription: select subscription
- RG: star-RG
- Container Details:
- Container Name: starcontainer1
- Region: UK south
- Availability Zone: None, 1 2 3
- SKU: Standard, Confidential (Standard SKU is available for all regions. Confidential SKU is only available for specific regions.)
- Image Source: Quick Start Images, Azure Container Registry, Other Registry (select for docker hub)
- Public, Private (personal customized repository)
- image = testcontainers/helloworld (search required image in docker hub (it is a simple Node.js application used to demonstrate deployment to azure container instances), or select quickstart Images and select mcr.microsoft.com/azuredocs/aci-helloworld:latest
- In other linux based installation, we open terminal and login to docker hub and download image and run the image, here it is not required this stop
- O/S Type: Windows , Linux (container engine installed on O/S)
- Size: select size of hardware for VM on which O/S will be installed and on top of O/S image will be installed.
- Networking:
- Networking type:
- Public: will create a public IP address for your container instance.
- Private: will allow you to choose a new or existing virtual network for your container instance.
- None: will not create either a public IP or virtual network. You will still be able to access your container logs using the command line.
- DNS name lebel: starcontainer1
- DNS name label scope reuse: A deterministic hash of your selected customer specific data will be auto generated and added as a DNS name label to your container instance’s FQDN. This hash prevents malicious subdomain takeover and ensures that the FQDN can only be reused within the selected scope (Tenant, Subscription, RG, No reuse, Any reuse)
- ports: 80 tcp
- Advanced:
- Restart policy: on Failure, Always, Never
- Review + create. (In background azure will create a VM, install O/S, install docker and install image).
- Access container: Go to resource and copy public IP. open browser and access with public IP or DNS.
- code
- Add container:
Container Registries
- code
- code
- code
- Container Management:
Kubernetes Fleet Manager
- code
- code
- code
Kubernetes Services
- AKS - Azure Kubernetes Service Cluster:
- Create AKS Cluster: Go to All Services/Container/Container Management/Kubernetes Services/Create Kubernetes Cluster.
- click for deployment of Azure kubernetes service cluster: https://learn.microsoft.com/en-us/azure/aks/learn/quick-kubernetes-deploy-portal?tabs=azure-cli
- Basics:
- Project Details:
- Subscription: Select the Azure subscription you want to use for this AKS cluster.
- RG: star-RG
- Cluster details:
- Cluster Preset Configuration: Production standard, Dev/Test, Production Economy, Production Enterprise.
- Kubernetes Cluster Name: starkubclus1
- Region: UK South
- Availability Zones: 1, 2, 3
- AKS Pricing Tier: Free, Standard, Premium (different pricing with different services availability)
- Kubernetes Version: different versions (default)
- Automatic Upgrade:
- Node Security channel type:
- Authentication and Authorization:
- Node Pools:
- Primary node pool: Default system node pool created by Azure and it is linux based which cannot be changed.
- additional node pool: click + and add custom node/worker node in which VMs get created.
- Enable Virtual Node:
- Networking: Create a kubernetes cluster Vnet,
- Integrations:
- Monitoring:
- Advanced:
- Tags:
- Review & Create:
- Connect to the cluster:
- Kubectl: You use the Kubernetes command-line client, kubectl, to manage Kubernetes clusters. kubectl is already installed if you use Azure Cloud Shell. If you're using Cloud Shell, open it with the >_ button on the top of the Azure portal. If you're using PowerShell locally, connect to Azure via the Connect-AzAccount command. If you're using Azure CLI locally, connect to Azure via the az login command
- Install Azure CLI on your PC, open command prompt and run C:/az login --tenant tenantID (enter credentials).
- C:/az aks get-credentials --resource-group star-RG --name starkubclus1 (Merged "starkubclus1" as current context in C:\Users\Admin\.kube\config)
- kubectl get nodes
- Deloy application:
- You use a manifest file to create all the objects required to run the AKS Store application. A Kubernetes manifest file defines a cluster's desired state, such as which container images to run. The manifest includes the following Kubernetes deployments and services.
- In cloud shell open editor and create a file $code azure-vote1.yaml and paste the code and save it.
- run the command: kubectl apply -f aks-store-quickstart.yaml
- check: kubectl get pods, kubectl service store-front --watch (it will display load balancer IP)
- store-front LoadBalancer 10.0.100.10 20.62.159.19 80:30025/TCP 4h5m
- open browser and paste IP
- AKS - Azure Kubernetes Service Cluster:
Kubernetes Services (Automatic)
- code
- code
- code
Azure RedHat OpenShift Clusters
- code
- code
- code
Service Fabric Clusters
- code
- code
- code
Service Fabric Managed Clusters
- code
- code
- code
- Contanerized Applications
App Configuration
- code
- code
- code
Container App Jobs
- code
- code
- code
Container Apps
- code
- code
- code
Web & Mobile
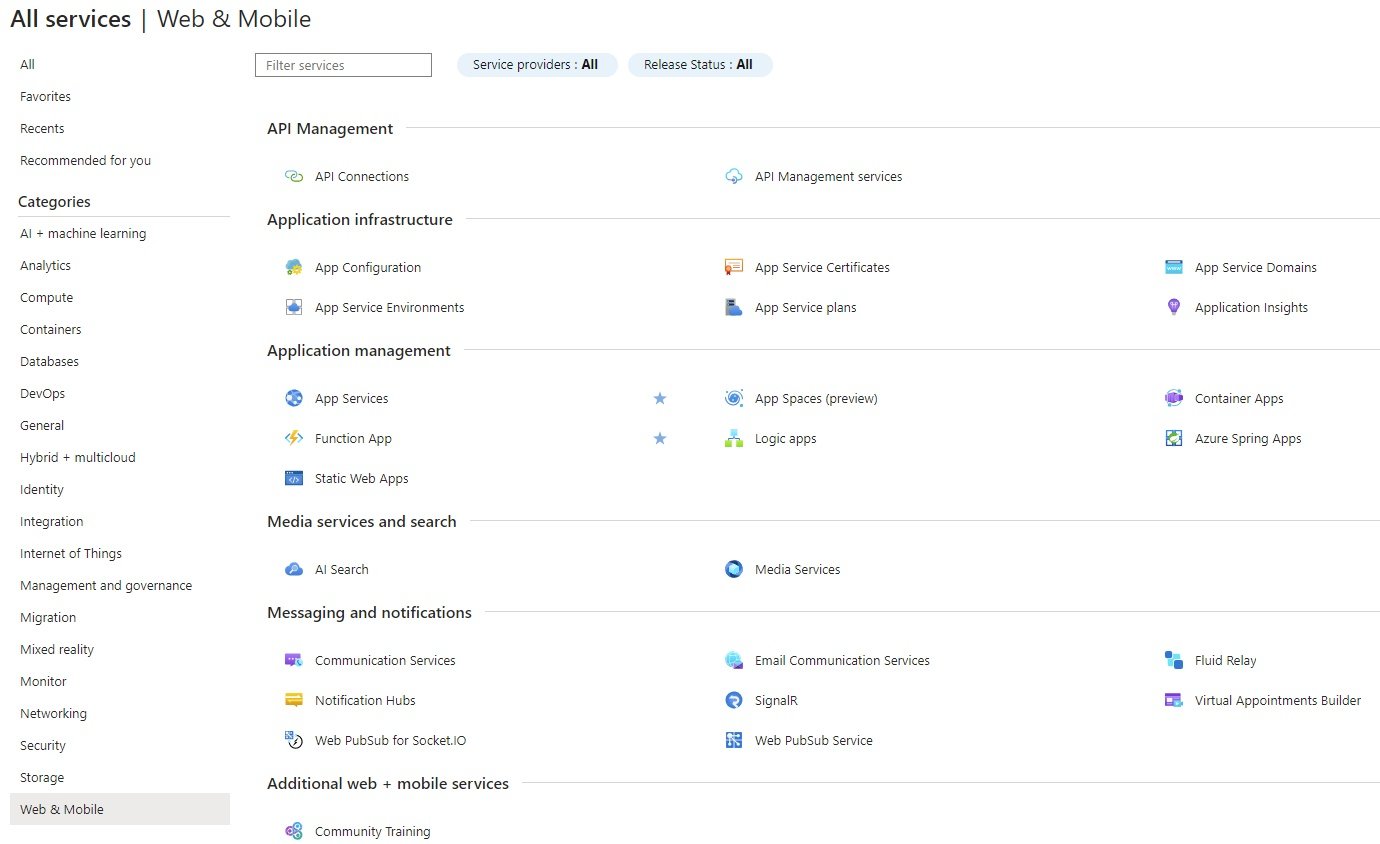
Overview
- code
- code
- API Management
API Connections
- API Connection allows you to easily connect to hundreds of services from Logic Apps.
API Management Services
- Hybrid and multi-cloud management, observability, and discovery platform for APIs across all environments.
- Application Infrastructure
App Configuration
- Azure App Configuration lets you centrally manage application configuration and feature flags in the cloud. Create a resource today to be able to manage your configuration as code, propagate changes without having to redeploy, and easily integrate configuration with CI/CD processes.
App Service Certificates
- App Service Certificates allow you to purchase, manage, and deploy SSL/TLS certificates for your web applications.
- You can purchase SSL/TSL certificates.
App Service Domains
- Azure App Service Domain simplifies the process of purchasing, managing, and renewing custom domain names for your web applications.
- Domains can also be purchased from name registrar like one.com, go daddy, hostinger etc..
App Service Environments
- code
- code
- code
App Service Plans
- Windows or Linux: Different plans for windows or linux based applications are available. Plans provide compute resources in which we host/deploy web apps.
- Go to All Services/Web & Mobile/Application Infrastructure/App Service Plans/Create +
- Basics:
- Subscription, RG: Select subscription, star-RG
- App service Plan Name: starwinplan1 / starlinuxplan1
- Operating System: Linux or Windows
- Region: UK South
- Price Plan : App Service plan pricing tier determines the location, features, cost and compute resources associated with your app.
- Free F1: 60 CPU Minutes/Day included
- Shared D1: 60 CPU Minutes/Day included
- Basic B1: ACU 100, Memory 1.75 GB, vCPU:1
- Standard S1: ACU 100, Memory 1.75 GB, vCPU:1
- Premium V3 P0V3: ACU 195, Memory 4 GB, vCPU:1
- Premium V3 P1V3: ACU 195, Memory 8 GB, vCPU:2
- Premium V3 P1MV3: ACU 195, Memory 16 GB, vCPU:2
- Zone Redundancy: Enabled / Disabled (It is available in premium price plan only, The min app service plan instance will be 3)
- Tags:
- Review + Create:
- Basics:
- App Service Plan Blade:
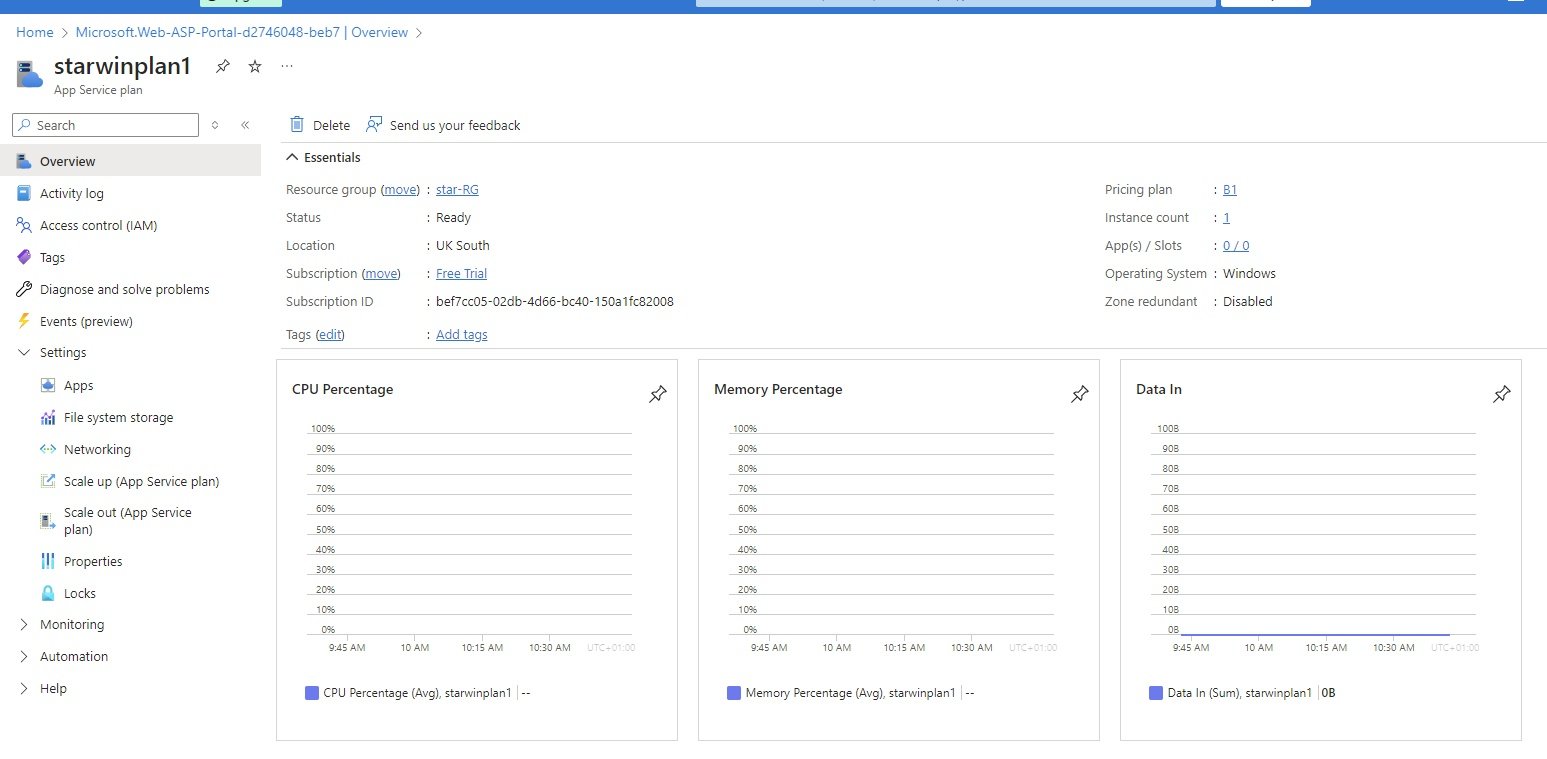
- Overview:
- Delete: Delete app plan
- Resource Group: star-RG
- Pricing Plan: B1 (pricing plan selected)
- Instance Count: list of web apps deployed in this web app plan
- Activity Log:
- Access Control (IAM):
- Tags:
- Diagnose solve problem:
- Events:
- Settings:
- Apps: List of apps deployed in this plan
- File system storage: Space used in this plan
- Networking: Vnet Integration, Hybrid Connections
- Scale Up: Change Instance hardware configuration, B1 to lower or higher configuration
- Scale Out: Change service plan
- Properties:
- Locks: Add / Remove Lock
- Monitoring:
- Alerts:
- Metrics:
- Logs:
- Diagnostic Settings:
- Automation:
- Tasks
- Export Template
Application Insights:
- Create an Application Insights resource to monitor your live web application. With Application Insights, you have full observability into your application across all components and dependencies of your complex distributed architecture. It includes powerful analytics tools to help you diagnose issues and to understand what users actually do with your app. It's designed to help you continuously improve performance and usability. It works for apps on a wide variety of platforms including .NET, Node.js and Java EE, hosted on-premises, hybrid, or any public cloud.
- Create Application Inisghts app: Azure Application Insights is an extensible Application Performance Management (APM) service that provides developers with deep insights into their web applications' performance, availability, and usage.
- When Applicaiton Insights is enabled, instance for application insight and instance for workspace will be created. It will be integrated with app service instance.
- Monitoring data received from app instance will be stored in workspace, and workspace is integrated with application insight instance. You need to create another instance for workspace.
- Once the app service is created, go to Monitoring/Application Insights.
- When you create web app in Monitoring tab Application Insights is Enabled by default. An instance is created.
- click Turn on Application Insights.
- Link to an Application Insights resource.
- Your app will be connected to an auto-created Application Insights resource: starapp1
Instrumentation key will be added to App Settings. This will overwrite any instrumentation key value in web app configuration files. - New resource (starapp1) & Log Analytics Workspace will be created. click apply.
- Go to Resource Group and check an application insight instance is created, another DefaultWorkspace instance is also created in DefaultResourceGroup-SUK.
- Create:
- Subscription, RG: Select subscription, star-RG
- Name: starAppInsight
- Region: UK South
- Workspace Details:
- subscription: select
- Log Analytics Workspace: starLogAnalyticsWorkspace
- Once it is created, it can be configure/maintian in Web App Blade/Monitoring/Application Insight.
- Application Management
App Services:
- App Hosting Services. Any Apps created should be hosted in order for users to access it. It can be done many ways like Create VM install IIS/Apache, install runtime stack and install App or use Azure App services (Platform as a service).
- Azure provide App services to host your App where it is managed by Azure. Microsoft azure take care of hosting environment such as security, load balancing, autoscaling, and automated management.
- App hosting is three stage process:
- Stage 1: Create App Service Plan
- Stage 2: Create App Service Instance (compute resources).
- Stage 3: Deployment of App Service (Manually or CI/CD)
Deployment of Linux based App:
- Create App Service Plan:
- It provides compute resources for the App. Web App created will be hosted using app service plan.
- It can be created in advance or during creation of web app service. check in All Services/WEb & Mobile/Application Infrastructure/App Service Plans.
- Create App Service Instance: To deploy application first need to create app service instance. starapp1
- Go to All Services/Web & Mobile/Application Management/App Services and create Web App
- Basics:
- Subscription: select from list
- Resource Group: star-RG
- Instance name: starapp1.azurewebsites.net
- Publish: Code, Container, Static WebApp
- Code: If code is selected than you will define runtime stack & OS, which depends on what language is used to create webapp.
- Docker Container: In case docker container selected than in virtual machien a container is created, application will be deployed on container and for this we deploy image, image contain code, runtime, system tools, system libraries and settings.
- Static Webapp: static conents can be host.
- Runtime Stack: If you select code in the above then select runtime stack. (PHP 8.2)
- Operating System : Linux
- Region: UK South
- Pricing Plan: select from the list if already creatd or create new (B1).
- Zone redundancy: when you select pricing plan premium then able to select zone redundancy.
- Database:
- Create a database: check box
- Deployment of App Service Manually: Code
- Continuous deployment settings: Enable /Disable,
- Github Settings: Github account, Organization, Repository, Branch
- Authentication Settings: Disable/Enable
- Networking:
- Enable Public Access: On / Off
- Enable Network Injection: On / Off
- Monitor + Secure:
- Enable Application Insights: No / Yes
- Microsoft Defender for Cloud: Enable defender for App Service: check box
- Tags:
- Review & Create: (It will deploy App Service and App Service Plan and create resource, click resource to manage)
- Deployment:
- Quickstart:
- Deployment slots:
- Apps are deployed on production deployment slot for users to access. changes on live apps will result in downtime and impace the users.
- Azure provide other deployment slots where you can make changes and test it than move it to production slot for users.
- create a deployment slot:
- Go to App Services blade/Deployment/Deployment slots/create
- Name = dev
- Clone settings from = define web app name (it will clone into dev slot)
- Check there will be two slots and traffic on one slot is 100% on production slot.
- Make changes in apps in your local folder.
- Go to Deployment center and deploy the site, use manual deployment using FTP. (check below Deployment Center)
- note down, username, password.
- Open filezilla and paste username, password and Quickconnect. copy files to Remote site.
- Go to deployment slot and click swap so dev slot will be swap to production.
- Deployment Center:
- Deployment of App Manually using FTPS credentials:
- Go to App service created /Deployment Center/ FTPS Credentials
- Download ftp/ftps tool (FileZilla) in your PC and install it in order to connect to Azure webapp service to upload files.
- Download a website template: In google search download sample website and select any template and download it. Extract it.
- click on FTPS credentials: URL, username and password and paste it in filezilla and quickconnect.
- Transfer files to remote site: /site/wwwroot
- Go to web apps/overview copy url and paste it in browser.
- Error: Could not connect to server: Go to overview/configuratio/ ftp state = All allowed or ftps allowed
- Deployment of App Continuously: CI/CD with Github, Bitbucket, Local Git, Azure Repos
- Use these details while creating webapp(publish=code, Runtime stack=.NET 8.0, O/S=Windows)
- Install visual studio 2022 in local PC:
- create new project
- select ASP.NET Core Web App
- Enter solution name = starwebapp3 and define location
- Enter Target framework = .NET 8.0
- Create.
- Github:
- Enter credentials of Github
- Create repository startest1.(https://github.com/stardistributors/startest1.git)
- Push project files/code to Github repository:
- In visual studio, Go to Git/Create Git Repository/existing remote/paste URL in remote URL.
- Push and create, check in github
- Go to webapp/deployment/deployment center/Settings/source: select CI/CD=Github
- Enter github credentials. and select org, repository, branch
- Create App Service Plan:
Deployment of Windows Based App:
- Create App Service Plan: It provides compute resources for the App. It can be created in advance or during creation of web app service. check in All Services/WEb & Mobile/Application Infrastructure/App Service Plans.
- Create App Service Instance: To deploy application first need to create app service instance. starapp1
- Go to All Services/Web & Mobile/Application Management/App Services and create Web App
- Basics:
- Subscription: select from list
- Resource Group: star-RG
- Instance name: starapp2.azurewebsites.net
- Publish: Code, Container, Static WebApp
- Runtime Stack: If you select code in the above then select runtime stack. (.NET 8.0)
- Operating System : windows
- Region: UK South
- Pricing Plan: select from the list if already creatd or create new (B1).
- Zone redundancy: when you select pricing plan premium then able to select zone redundancy.
- Database: Once database is enabled, a new VNet and related networking resources will be created automatically
- Create a database: check box (depending on price plan)
- Deployment of App Service Continuosly: Github, Bitbucket, Azure Repos, Dockerhub,
- Continuous deployment settings: Enable /Disable
- Github Settings: Github account, Organization, Repository, Branch
- click authorize and provide github account details.
- Authentication Settings: Disable/Enable
- Choose if you would like to allow basic authentication to deploy code to your app.
- Continuous deployment settings: Enable /Disable
- Networking:
- Enable Public Access: On / Off
- Enable Network Injection: On / Off
- Monitor + Secure:
- Enable Application Insights: No / Yes
- Microsoft Defender for Cloud: Enable defender for App Service: check box
- Tags:
- Review & Create: (It will dploy App Service and App Service Plan and create resource, click resource to manage)
- Deployment:
- Quickstart:
- Deployment slots:
- Apps are deployed on production deployment slot for users to access. changes on live apps will result in downtime and impace the users.
- Azure provide other deployment slots where you can make changes and test it than move it to production slot for users.
- create a deployment slot:
- Go to App Services blade/Deployment/Deployment slots/create
- Name = dev
- Clone settings from = define web app name (it will clone into dev slot)
- Check there will be two slots and traffic on one slot is 100% on production slot.
- Make changes in apps in your local folder.
- Go to Deployment center and deploy the site, use manual deployment using FTP. (check below Deployment Center)
- note down, username, password.
- Open filezilla and paste username, password and Quickconnect. copy files to Remote site.
- Go to deployment slot and click swap so dev slot will be swap to production.
- Deployment Center:
- Deployment of App Manually using FTPS credentials:
- Go to App service created /Deployment Center/ FTPS Credentials
- Download ftp/ftps tool (FileZilla) in your PC and install it in order to connect to Azure webapp service to upload files.
- Download a website template: In google search download sample website and select any template and download it. Extract it.
- click on FTPS credentials: URL, username and password and paste it in filezilla and quickconnect.
- Transfer files to remote site: /site/wwwroot
- Go to web apps/overview copy url and paste it in browser.
- Error: Could not connect to server: Go to overview/configuratio/ ftp state = All allowed or ftps allowed
- Deployment of App Continuously: CI/CD with Github, Bitbucket, Local Git, Azure Repos
- Use these details while creating webapp(publish=code, Runtime stack=.NET 8.0, O/S=Windows)
- Install visual studio 2022 in local PC:
- create new project
- select ASP.NET Core Web App
- Enter solution name = starwebapp3 and define location
- Enter Target framework = .NET 8.0
- Create.
- Github:
- Enter credentials of Github
- Create repository startest1.(https://github.com/stardistributors/startest1.git)
- Push project files/code to Github repository:
- In visual studio, Go to Git/Create Git Repository/existing remote/paste URL in remote URL.
- Push and create, check in github
- Go to webapp/deployment/deployment center/Settings/source: select CI/CD=Github
- Enter github credentials. and select org, repository, branch
- Deployment of App Manually using FTPS credentials:
Deployment of ASP .NET core Web App using Continuous Deployment:
- image
- Creation of Web App & Web App Plan:
- Go to All Services/Web & Mobile/Application Management/App Services/Create Web App: starwebapp1
- Publish: Code (code will be deployed) or Container (image will be used to deploy)
- Runtime stack: .NET 8.0
- Operating System: Windows
- Region: UK South
- App Service Plan: starwinplan1 (B1)
- Review & Create.
- Create a repository in Github:
- Login to Github with credentials
- Create a repository: starwebapp1 and keep it as public
- copy URL of repository: https://github.com/stardistributors/starwebapp1.git
- Developers create code, commit locally and push it to central repository GitHub:
- Open visual studio 2022/ create a new project and select ASP.NET Core Web App (template)
- Project name = starwebapp1, select location and solution name = starwebapp1
- Target framework (Runtime stack defined in webapp) = select .NET 8.0
- Create, project from template will be created and all source code will be generated.
- Push Source code from visual studio to GitHub:
- In visual studio / Git/ create Git Repository/ Existing Remote and paste the copied GitHub repository URL here.
- This will initialize a local git repository for starwebapp1 and push code to remote repository.
- click create and push.
- In Github refresh so code will be reflect there.
- Deploy and Build code - Deployment Continuously:
- Go to web app starwebapp1 / Deployment / Deployment Center / Settings /Source select Github in CI/CD.
- Select organization, repository, Branch and click save.
- Go to overview and copy URL
- Open Browser and paste URL to Acces web app.
- Change in source code:
Web App Blade:
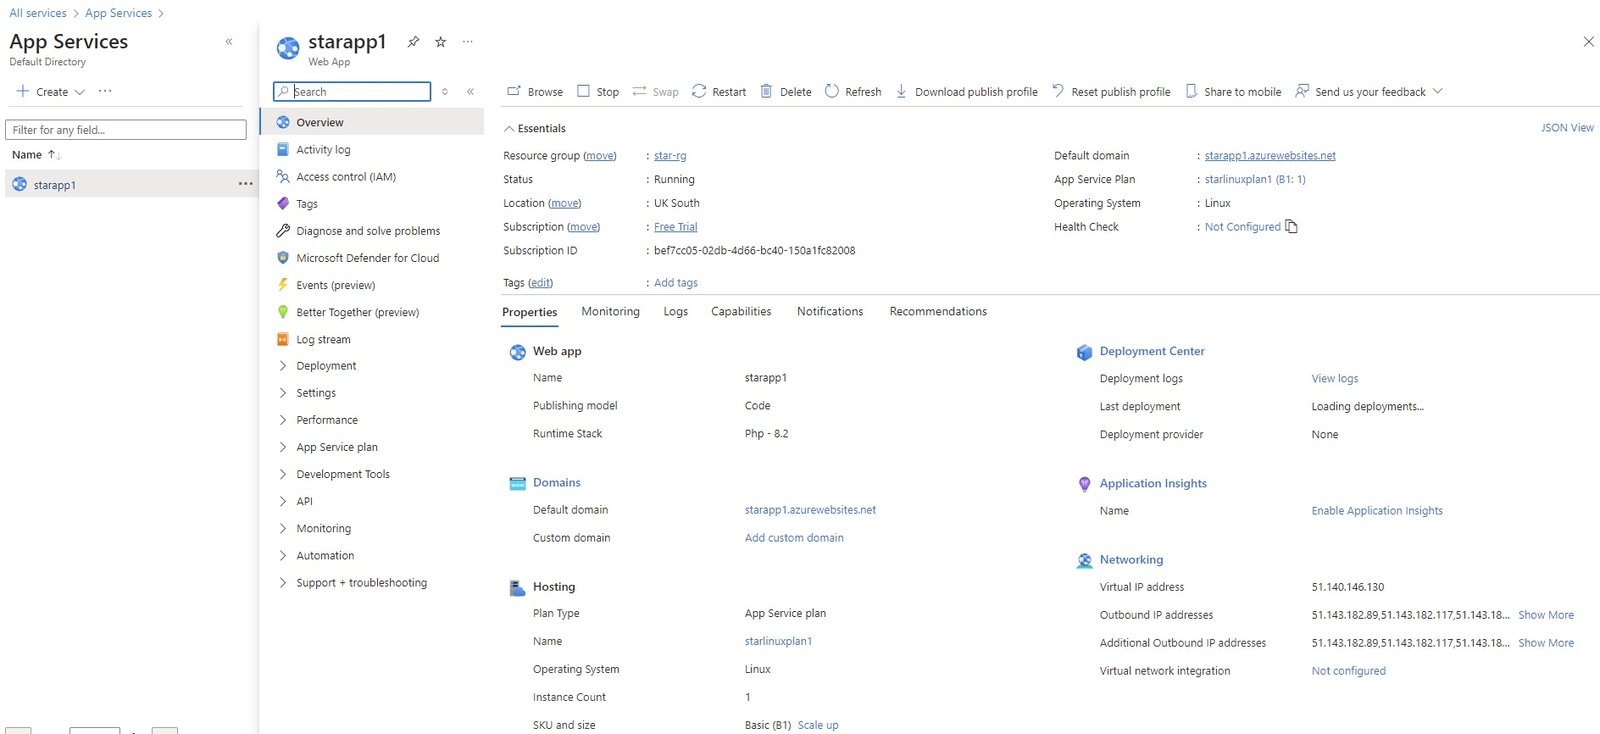
- Overview:
- Browse:
- Stop:
- Swap:
- Restart:
- Delete:
- Get Publish Profile:
- Reset publish profile:
- share to mobile:
- URL:
- App Service Plan:
- FTP/deployment username:
- FTP hostname:
- FTPS hostname:
- Activity Log:
- Access Control (IAM):
- Tags:
- Diagnose and solve problems:
- Microsoft defender for cloud:
- Events
Deployment:
- Quickstart:
- Deployment slots:
- Apps are deployed on production deployment slot for users to access. changes on live apps will result in downtime and impace the users.
- Azure provide other deployment slots where you can make changes and test it than move it to production slot for users.
- create a deployment slot:
- Go to App Services blade/Deployment/Deployment slots/create
- Name = dev
- Clone settings from = define web app name (it will clone into dev slot)
- Check there will be two slots and traffic on one slot is 100% on production slot.
- Make changes in apps in your local folder.
- Go to Deployment center and deploy the site, use manual deployment using FTP. (check below Deployment Center)
- note down, username, password.
- Open filezilla and paste username, password and Quickconnect. copy files to Remote site.
- Go to deployment slot and click swap so dev slot will be swap to production.
- Deployment Center:
- Deployment of App Manually using FTPS credentials:
- Go to App service created /Deployment Center/ FTPS Credentials
- Download ftp/ftps tool (FileZilla) in your PC and install it in order to connect to Azure webapp service to upload files.
- Download a website template: In google search download sample website and select any template and download it. Extract it.
- click on FTPS credentials: URL, username and password and paste it in filezilla and quickconnect.
- Transfer files to remote site: /site/wwwroot
- Go to web apps/overview copy url and paste it in browser.
- Error: Could not connect to server: Go to overview/configuratio/ ftp state = All allowed or ftps allowed
- Deployment of App Continuously: CI/CD with Github, Bitbucket, Local Git, Azure Repos
- Use these details while creating webapp(publish=code, Runtime stack=.NET 8.0, O/S=Windows)
- Install visual studio 2022 in local PC:
- create new project
- select ASP.NET Core Web App
- Enter solution name = starwebapp3 and define location
- Enter Target framework = .NET 8.0
- Create.
- Github:
- Enter credentials of Github
- Create repository startest1.(https://github.com/stardistributors/startest1.git)
- Push project files/code to Github repository:
- In visual studio, Go to Git/Create Git Repository/existing remote/paste URL in remote URL.
- Push and create, check in github
- Go to webapp/deployment/deployment center/Settings/source: select CI/CD=Github
- Enter github credentials. and select org, repository, branch
- Settings:
- Configuration:
- Authentication:
- Application Insights:
- Identity:
- Backups:
- Custom Domains:
- Certificates:
- Networking:
- Scale UP (App Service Plan):
- Scale OUT (App Service Plan):
- WebJobs:
- Service Connector:
- Locks:
- Performance:
- Load Testing:
- App Service Plan:
- App Service Plan:
- Quotas:
- Change App Service Plan:
- Development Tools:
- SSH:
- Advanced Tool:
- API:
- API Management:
- API Definition:
- CORS:
- Monitoring:
- Alerts:
- Metrics:
- Logs:
- Advisor Recommendations:
- Health Check:
Application Insights:
- Create an Application Insights resource to monitor your live web application. With Application Insights, you have full observability into your application across all components and dependencies of your complex distributed architecture. It includes powerful analytics tools to help you diagnose issues and to understand what users actually do with your app. It's designed to help you continuously improve performance and usability. It works for apps on a wide variety of platforms including .NET, Node.js and Java EE, hosted on-premises, hybrid, or any public cloud.
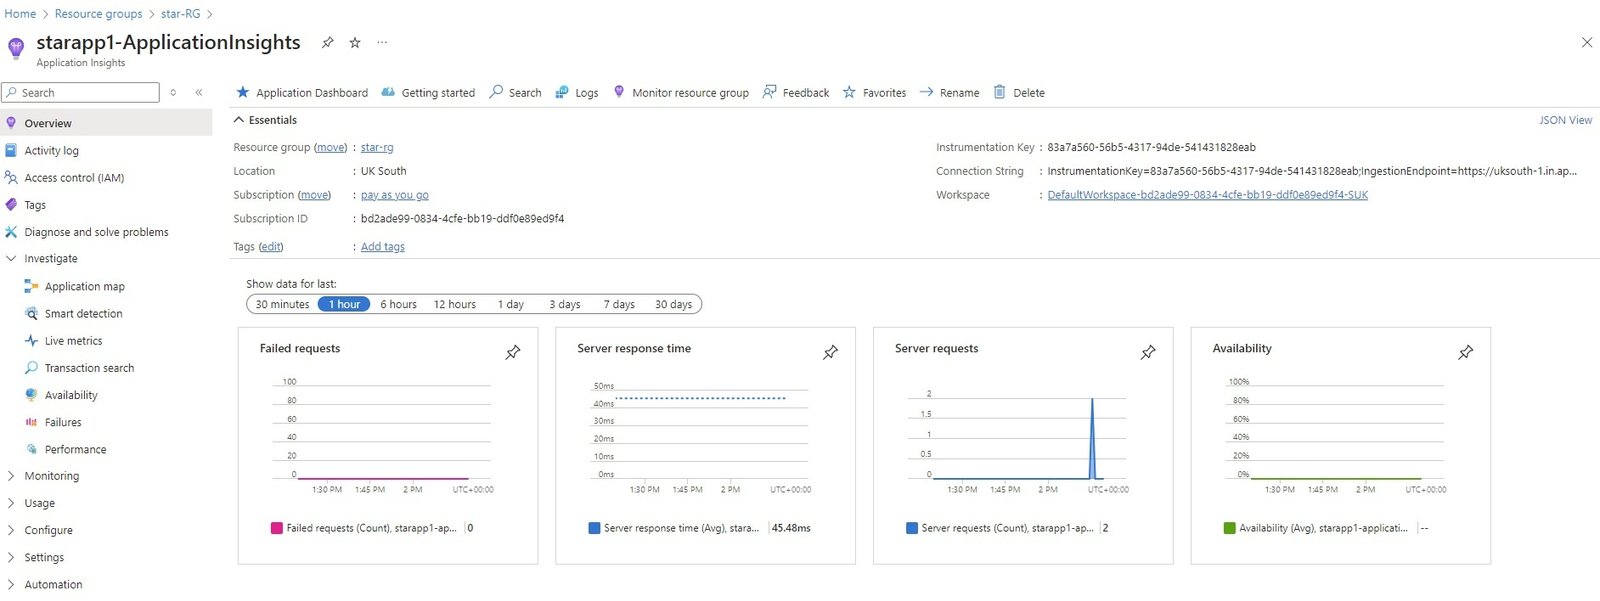
- Overview:
- Activity Log:
- Tags:
- Diagnose and solve problems:
- Investigate:
- Application map:
- Smart Detection:
- Live Metrics:
- Transaction search:
- Availability:
- Failures:
- Performance:
- Monitoring:
- Alerts:
- Metrics:
- Diagnostic settings:
- Logs:
- Workbooks
- Usage:
- Users:
- Sessions:
- Events:
- User Flows:
- Cohorts:
- more
- Configure:
- Properties:
- Smart detection settings:
- Network Isolation:
- Usage and estimated costs:
- API Access:
- Work Items
- Settings:
- Locks:
- Automation:
- CLI/PS
- Tasks
- Export Teplate
- Help
- Diagnostic Settings:
- App Service Logs:
- Automations:
- Tasks:
- Export Template:
- Support + Troubleshooting:
App Spaces
- code
- code
- code
Container Apps
- Simplify the deployment and scaling of your containerized applications with Container App, a serverless solution offering auto-scaling, managed infrastructure, and robust security.
- code
Function App
- code
- code
- code
Logic Apps
- code
- code
- code
Azure Spring Apps
- code
- code
- code
Static Web Apps
- code
- code
- code
- Media Services and search
AI Search
- code
- code
- code
Media Services
- code
- code
- code
- Messaging and notifications
Communication Services
- code
- code
- code
Email Communication Services
- code
- code
- code
Fluid Relay
- code
- code
- code
Notification Hubs
- code
- code
- code
SignalR
- code
- code
- code
Virtual Appointments Builder
- code
- code
- code
Web PubSub for Socket.IP
- code
- code
- code
Virtual Desktop
code
- code
- code
- code
code
- code
- code
- code
code
- code
- code
- code
code
- code
- code
- code
code
- code
- code
- code
code
- code
- code
- code
code
- code
- code
- code
ASR - Azure Site Recovery
code
- code
- code
- code
code
- code
- code
- code
code
- code
- code
- code
code
- code
- code
- code
code
- code
- code
- code
code
- code
- code
- code
code
- code
- code
- code
ARM Template
Azure Resource Manager Template
- ARM is use to implement infrastructure as code, you can reuse the code to create infrastructure again and again.
- ARM templates are JavaScript Object Notation (JSON) files that define the infrastructure and configuration for your deployment. The template uses a declarative syntax.
- ARM templates are idempotent, which means you can deploy the same template many times and get the same resource types in the same state. If the resource is already exist and you deploy the code than it will create duplicate.
- Resource Manager also has built-in validation. It checks the template before starting the deployment to make sure the deployment succeeds.
- You can also integrate your ARM templates into continuous integration and continuous deployment (CI/CD) tools like Azure Pipelines,
code
- code
- code
- code
code
- code
- code
- code
code
- code
- code
- code
code
- code
- code
- code
code
- code
- code
- code
code
- code
- code
- code
DevOps
code
- code
- code
- code
code
- code
- code
- code
code
- code
- code
- code
code
- code
- code
- code
code
- code
- code
- code
code
- code
- code
- code
code
- code
- code
- code
HH Project
- Architecture Diagram
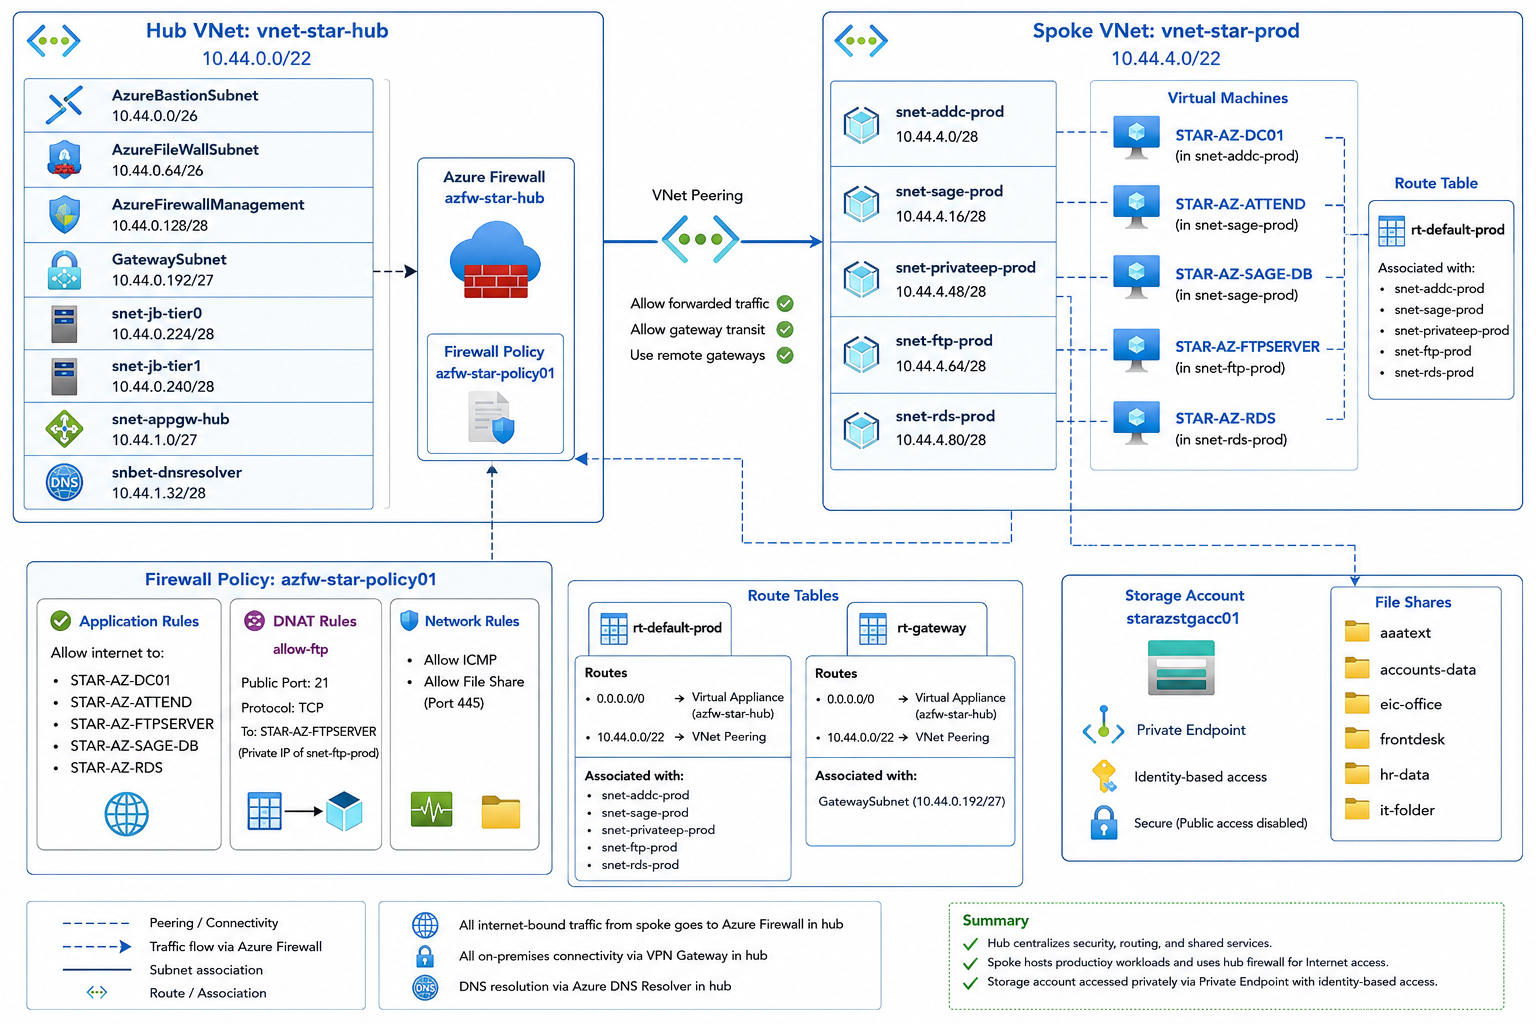
Enterprise Account
- code
- code
- code
Management Group
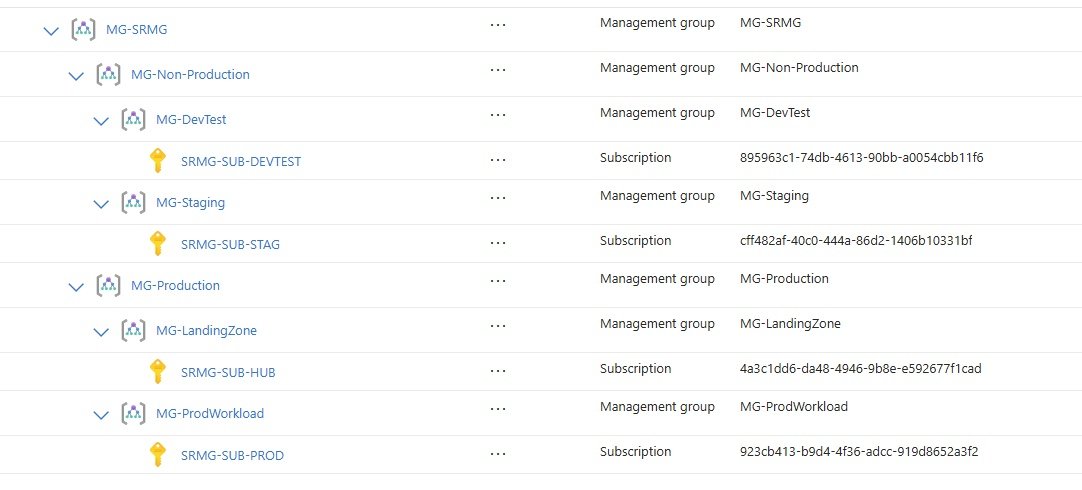
- An Azure Management Group is a container that helps you organize and manage multiple Azure subscriptions together. It allows you to apply governance, access control, and policies at a higher level so they automatically inherit down to subscriptions and resources.
- For example, if your company has separate subscriptions for Development, Testing, and Production, you can place them all under one management group and apply a single security policy to all of them.
- Key benefits:
- Centralized management of multiple subscriptions.
- Apply Azure Policy and Role-Based Access Control (RBAC) across many subscriptions.
- Create a hierarchy that reflects your organization's structure.
- Policies and permissions are inherited by child management groups and subscriptions.
- MG-STAR (Tenant Root Group)
│
├── MG-Non-Production
│ ├── MG-DevTest --> STAR-SUB-DEVTEST (Subscription)
│ ├── MG-Staging --> STAR-SUB-STAG (Subscription)
│
└── MG-Production
├── MG-LandingZone --> STAR-SUB-HUB
└── MG-ProdWorkLoad --> STAR-SUB-PROD - Default (Tenant Root) Management Group:
- When an Azure tenant is created, Azure automatically creates a root management group at the top of the hierarchy. This is commonly called the Tenant Root Group and serves as the default parent for all other management groups and subscriptions.
- Characteristics:
- Automatically created by Azure.
- There is only one Tenant Root Group per Azure tenant.
- All management groups and subscriptions ultimately exist beneath it.
- You cannot delete it.
- It is typically used for organization-wide governance.
- Inheritance:
- If you assign a security policy at the Tenant Root Group (MG-STAR), it is inherited by all child management groups, subscriptions, resource groups, and resources unless specifically overridden where allowed. If you assign a policy only to the MG-Production, it affects the MG-LandingZone and MG-ProdWorkLoad but not on MG-NonProduction.
Subscriptions
- An Azure Subscription is a logical container used to provision and manage Azure resources. It is also the unit for billing, access control, and quotas.
- Example: Imagine Azure is a shopping mall:
- Azure Tenant = The entire mall
- Management Group = A floor of the mall (used to organize shops)
- Azure Subscription = An individual shop with its own budget and manager
- Resource Group = A section inside the shop
- Resources = The actual products (VMs, databases, storage, etc.)
- Azure Hierachy:
- Azure AD Tenant (Microsoft Entra ID)
│
└── Tenant Root Management Group
│
├── Management Group: Production
│ ├── Subscription A
│ │ ├── Resource Group: WebApp-RG
│ │ │ ├── Virtual Machine
│ │ │ ├── Storage Account
│ │ │ └── SQL Database
│
└── Management Group: Development
└── Subscription B
└── Resource Group: Dev-RG
└── App Service
- Azure AD Tenant (Microsoft Entra ID)
- Key characteristics:
- Each subscription has its own billing account.
- A subscription can contain multiple resource groups.
- Resource groups can contain multiple Azure resources.
- Access permissions can be assigned at the subscription level and inherited by lower levels.
- Policies and governance settings applied at a management group can be inherited by subscriptions beneath it.
- code
- code
Network Foundation | Virtual networks
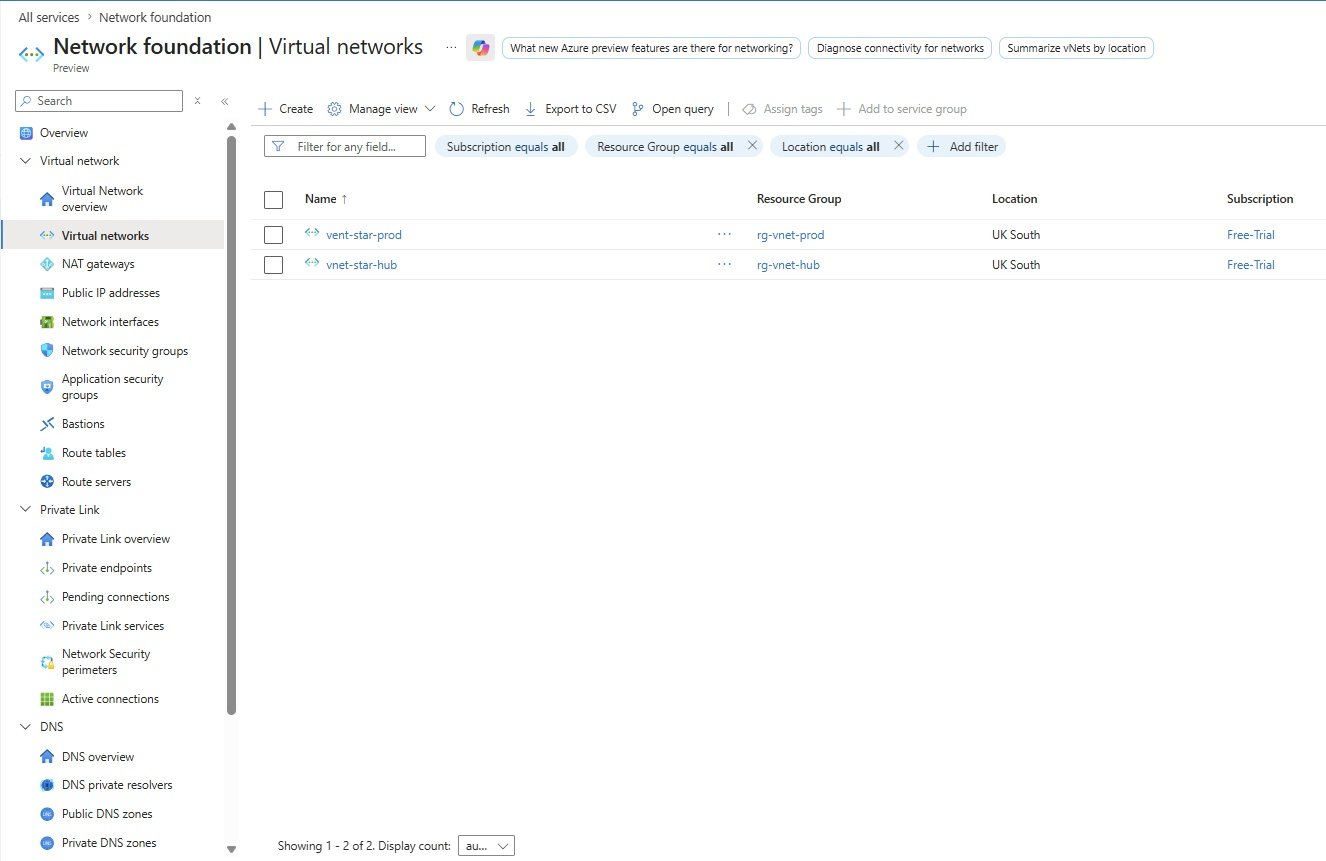
Virtual Networks
Create vnet-star-hub
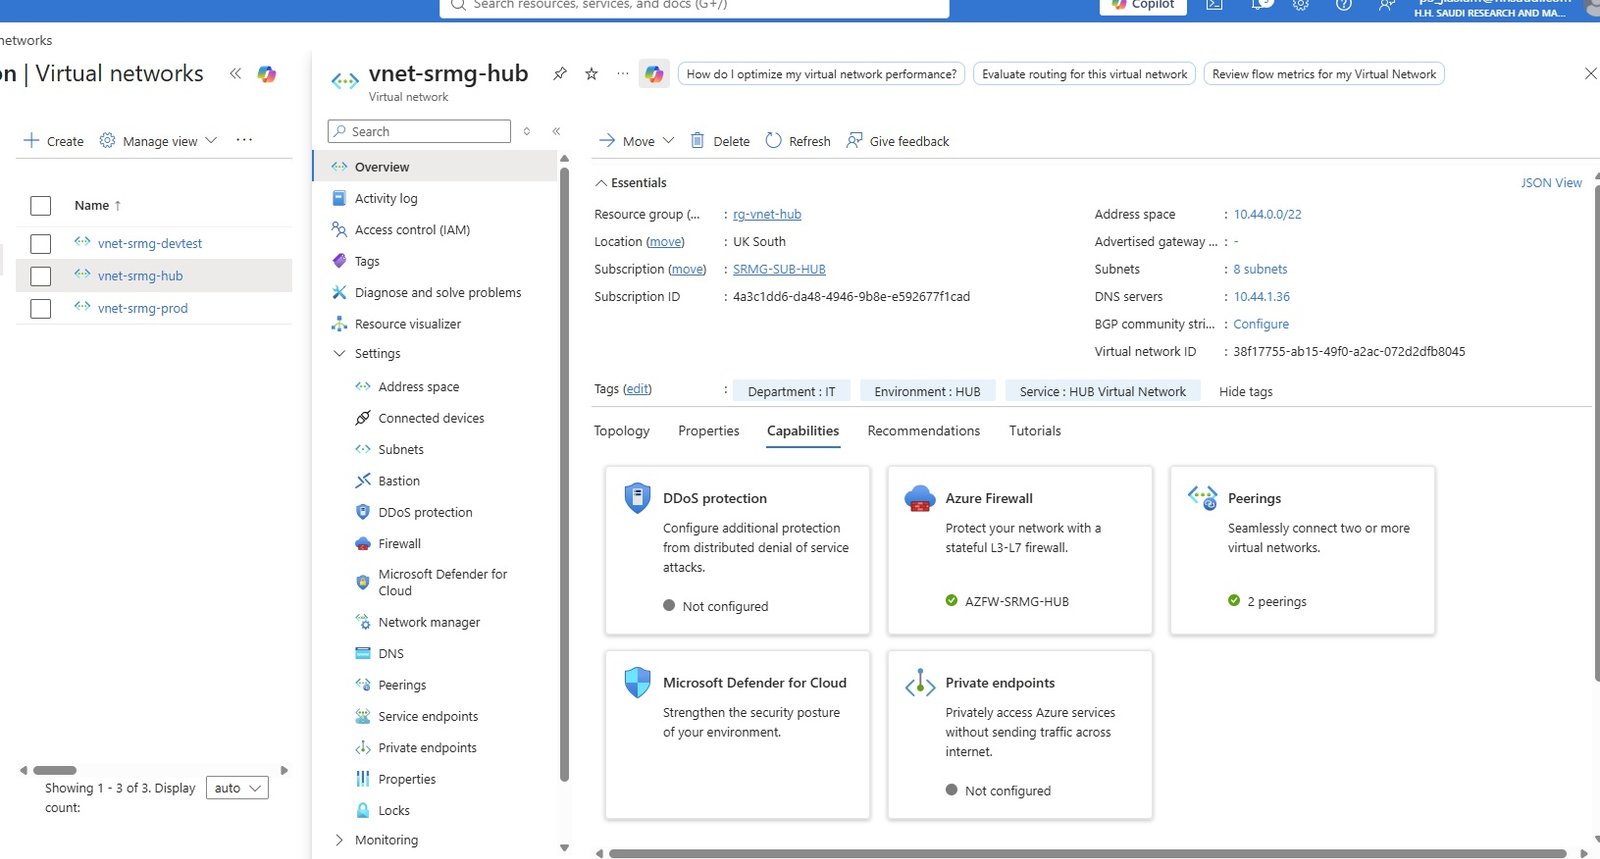
- Go to All Services/Networking/Network foundation/Virtual networks/+Create
- Basic
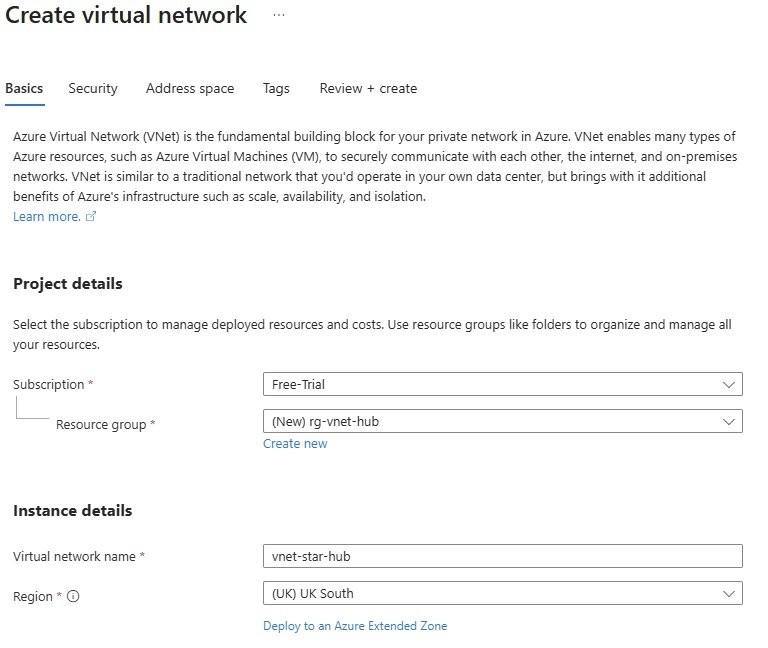
- Security: keep default
- Address space & Subnets
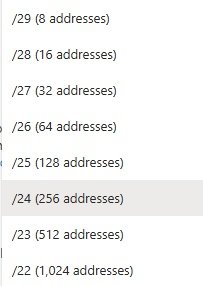
- AzureBastionSubnet: Name= Choose AzureBastionSubnet, 10.44.0.0/26 (64 addresses), Range will be 10.44.0.0-10.44.0.63, Enable private subnet (no default oubound access Checked).
- AzureFirewallSubnet: Name= Choose AzureFirewallSubnet, 10.44.0.64/26 (64 addresses), Range will be 10.44.0.64-10.44.0.127, Enable private subnet (no default oubound access Checked).
- AzureFirewallManagementSubnet (Forced Tunneling) - Name= Choose AzureFirewallManagementSubnet, 10.44.0.128/26 (64 addresses), Range will be 10.44.0.128-10.44.0.191, Enable private subnet (no default oubound access Checked).
- GatewaySubnet (Default name): Name= Choose GatewaySubnet, 10.44.0.192/27 (32 addresses), Range will be 10.44.0.192-10.44.0.223, Enable private subnet (no default oubound access Checked).
- snet-jb-tier0 (Custom name): Name= snet-jb-tier0, 10.44.0.224/28 (16 addresses), Range will be 10.44.0.224-10.44.0.239, Enable private subnet (no default oubound access Checked).
- snet-jb-tier1 (Custom name): Name= snet--jb-tier1, 10.44.0.240/28 (16 addresses), Range will be 10.44.0.240-10.44.0.255, Enable private subnet (no default oubound access Checked).
- snet-appgw-hub (Custom name): Name= snet-appgw-hub, 10.44.1.0/27 (32 addresses), Range will be 10.44.1.0-10.44.1.31, Enable private subnet (no default oubound access Checked).
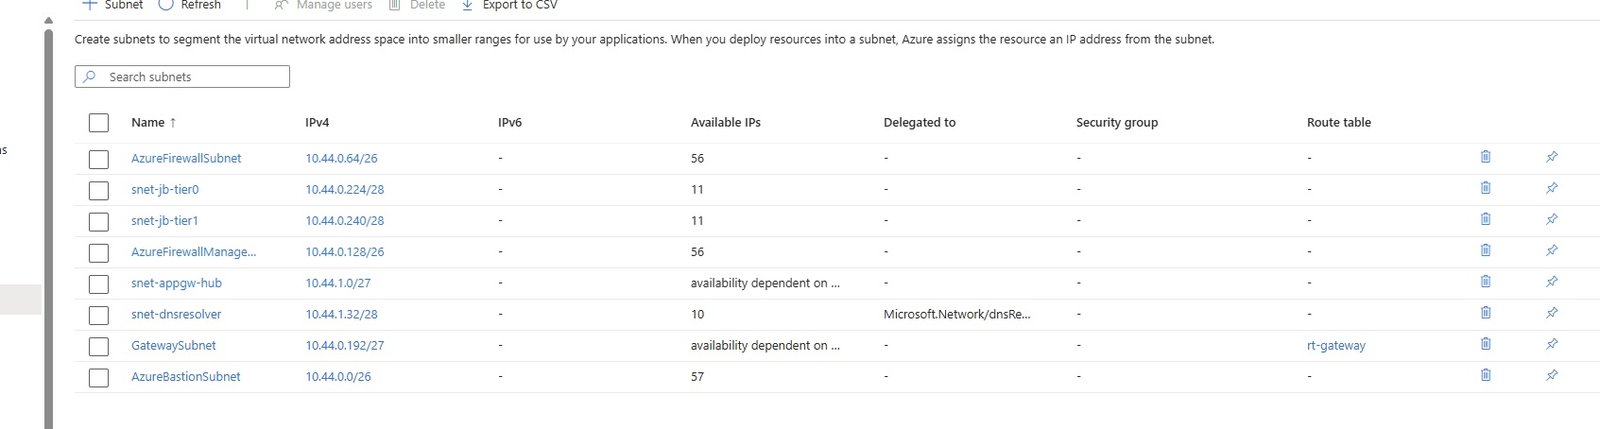
- Tags
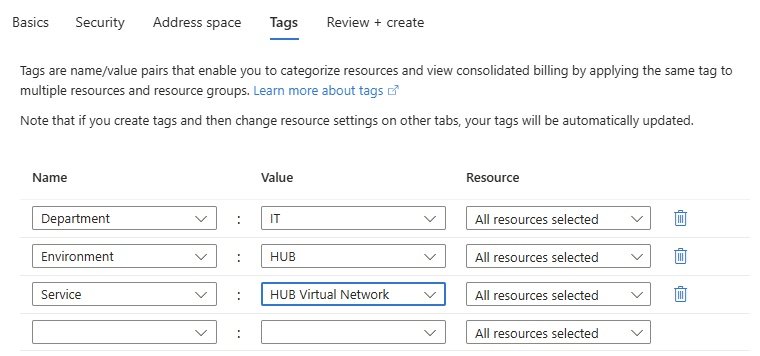
- Review + Create
Edit vnet-star-hub
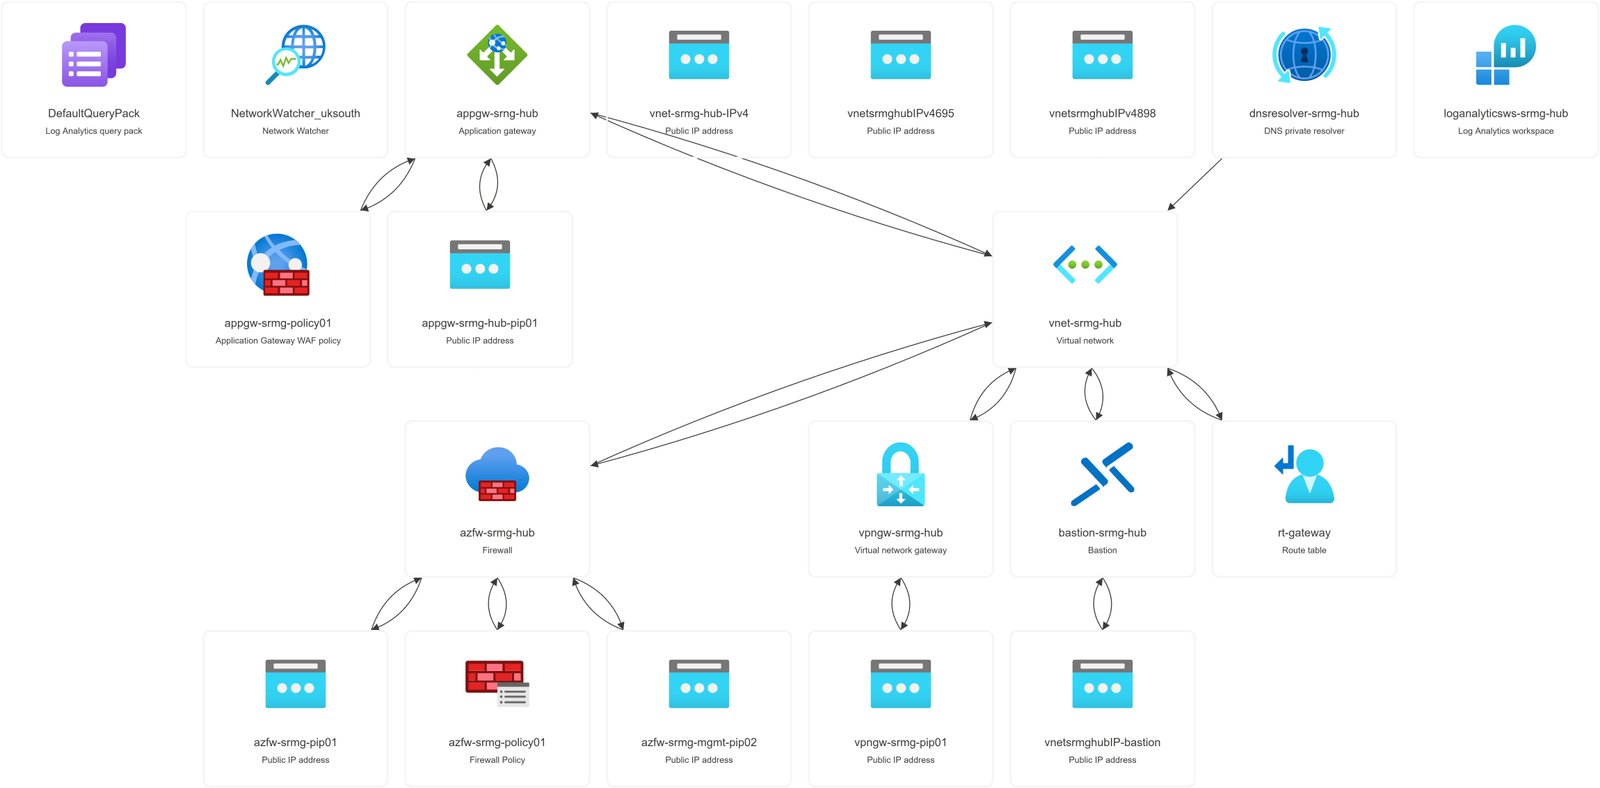
- Settings
- Address space
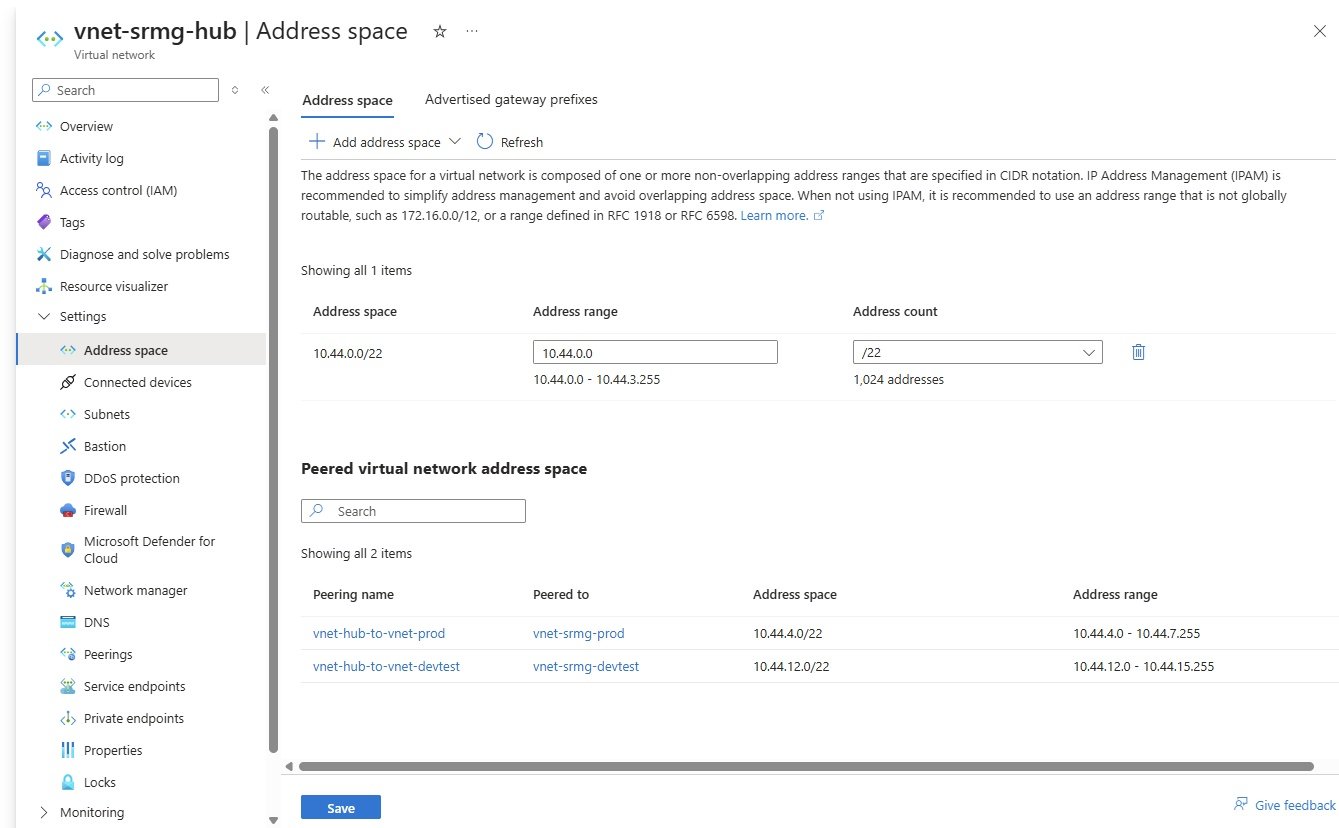
- Subnets:
- Bastion:
- DDoS protection:
- Firewall:
- Microsoft Defender for cloud:
- Network Manager:
- DNS:
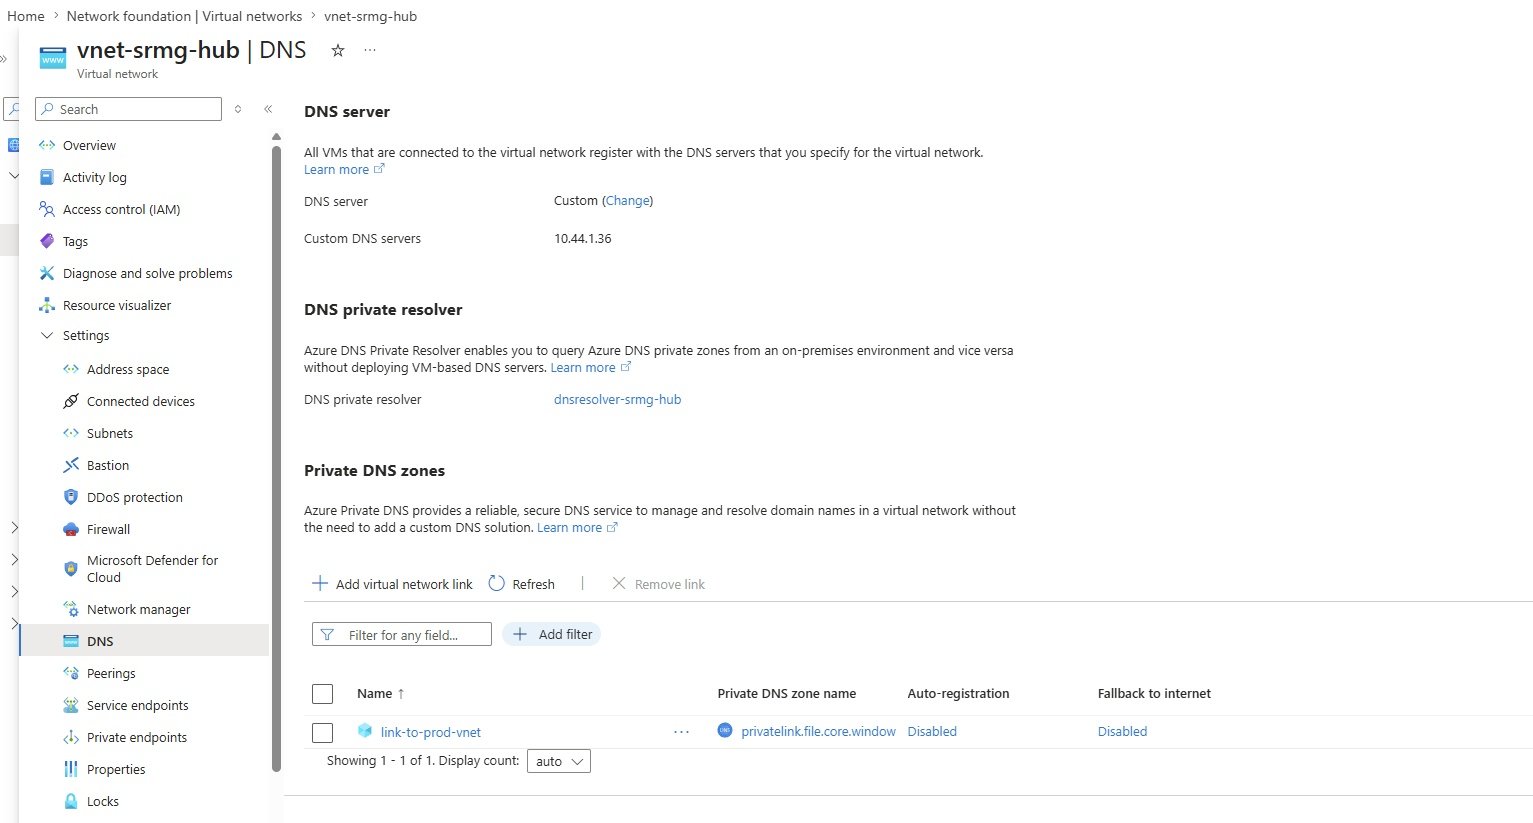
- Peerings:
- Service endoints
- Provate endoints
- Properties:
- Locks:
- Code
Create vnet-star-prod
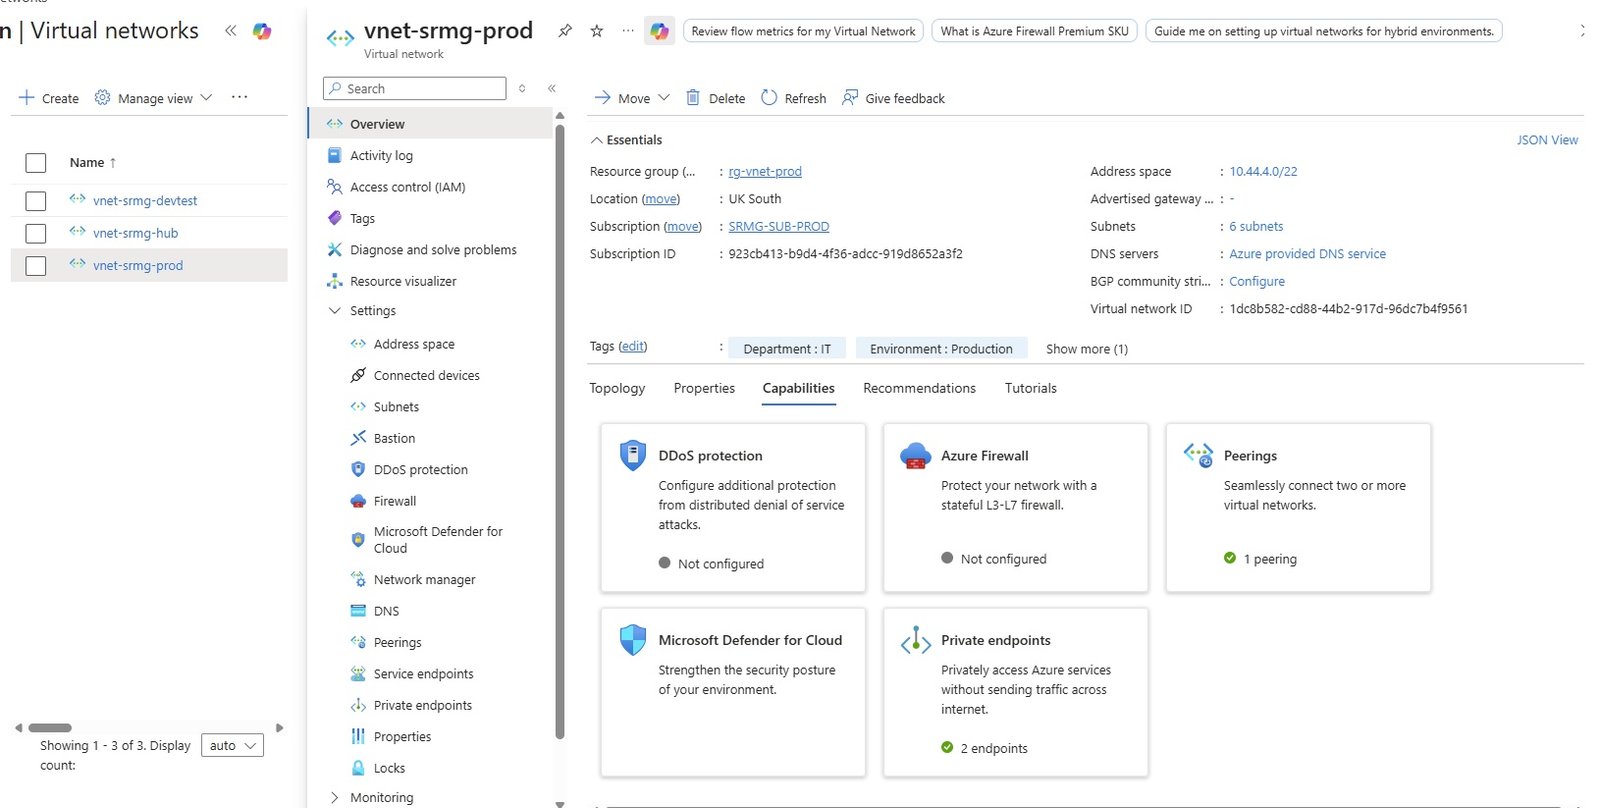
- Go to All Services/Networking/Network foundation/Virtual networks/+Create
- Basic
- Security: keep default
- Address space & Subnets
- snet-addc-prod: Name= snet-addc-prod, 10.44.4.0/28 (16 addresses), Range will be 10.44.4.0-10.44.4.15, Enable private subnet (no default oubound access Checked).
- snet-sage-prod: Name= snet-sage-prod, 10.44.4.16/28 (16 addresses), Range will be 10.44.4.16-10.44.4.31, Enable private subnet (no default oubound access Checked).
- snet-attend-prod: Name= snet-attend-prod, 10.44.4.32/28 (16 addresses), Range will be 10.44.4.32-10.44.4.47, Enable private subnet (no default oubound access Checked).
- snet-privateep-prod: Name= snet-privateep-prod, 10.44.4.48/28 (16 addresses), Range will be 10.44.4.48-10.44.4.63, Enable private subnet (no default oubound access Checked).
- snet-ftp-prod : Name= snet-ftp-prod, 10.44.4.64/28 (16 addresses), Range will be 10.44.4.64-10.44.4.79, Enable private subnet (no default oubound access Checked).
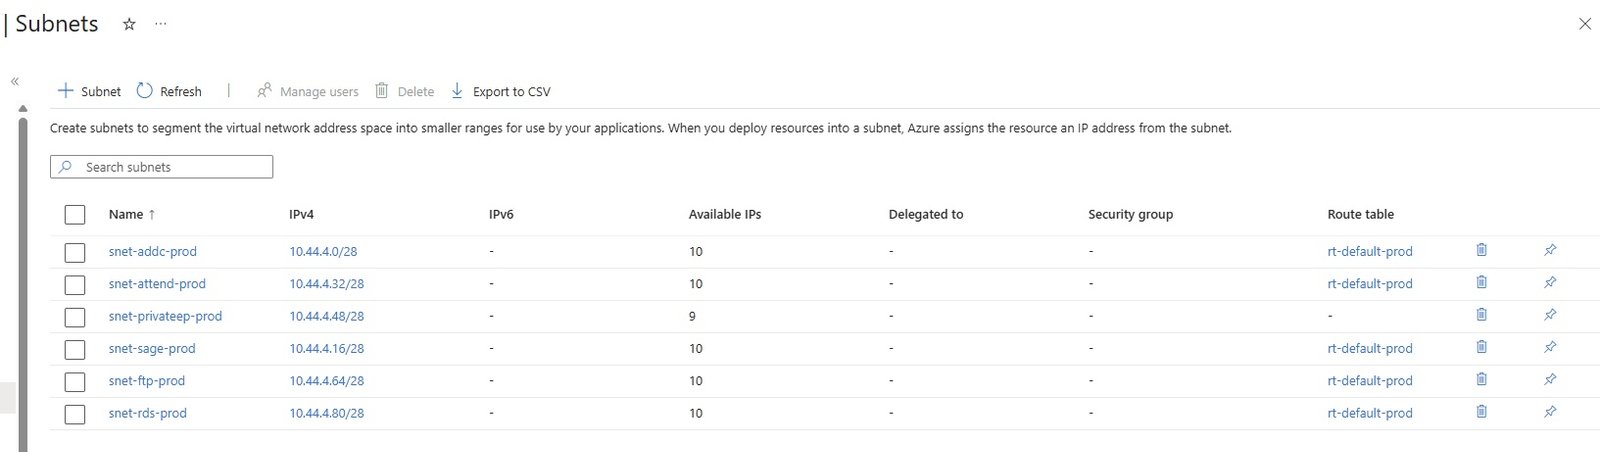
- Tags
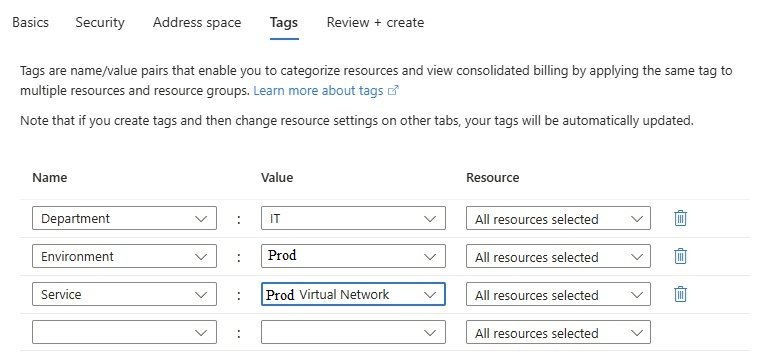
- Review + Create
Edit vnet-star-prod
- Settings
- Address space
- Subnets:
- Bastion:
- DDoS protection:
- Firewall:
- Microsoft Defender for cloud:
- Network Manager:
- DNS:
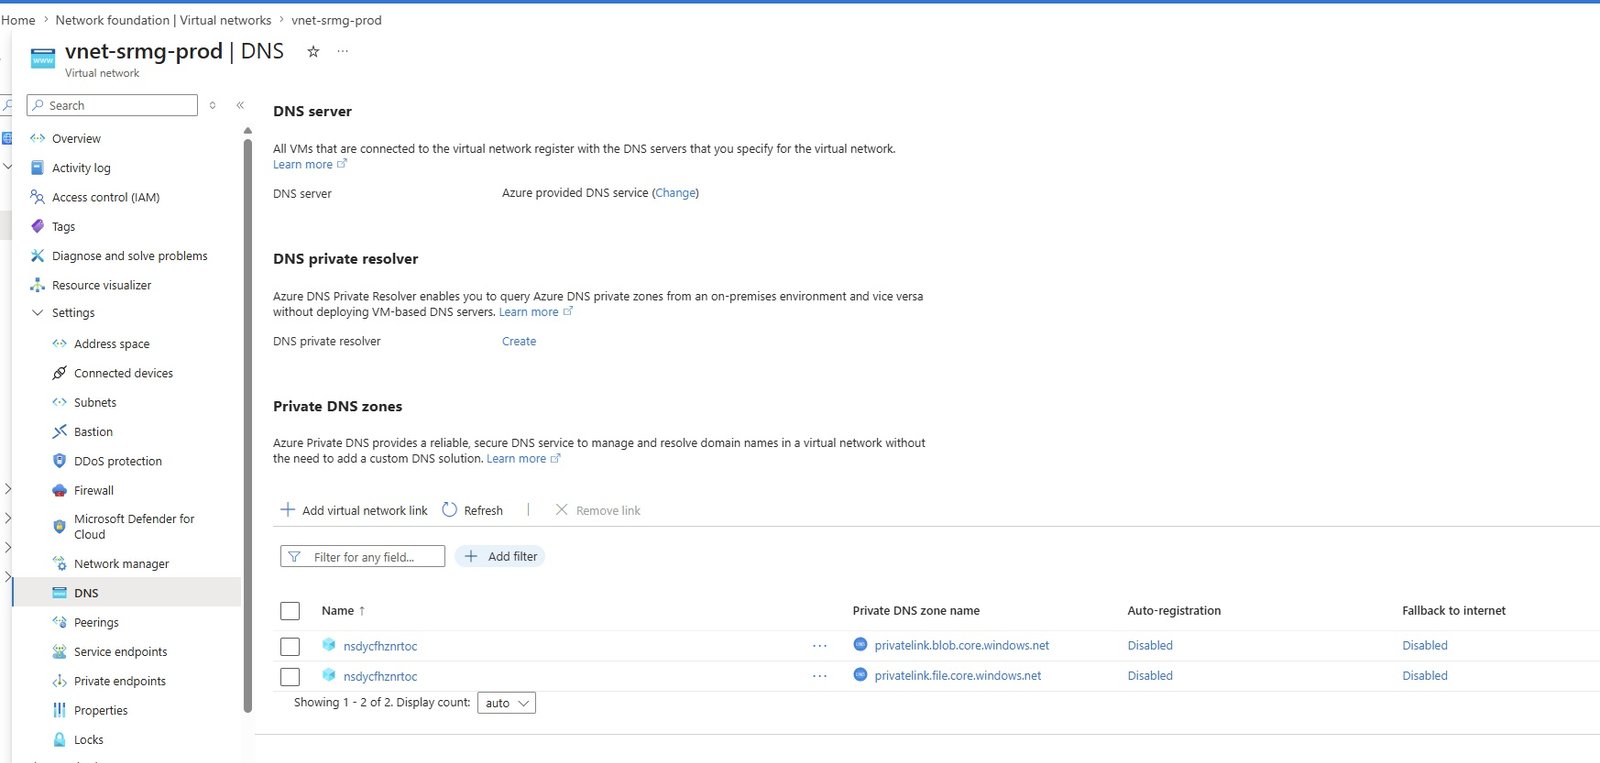
- Peerings:
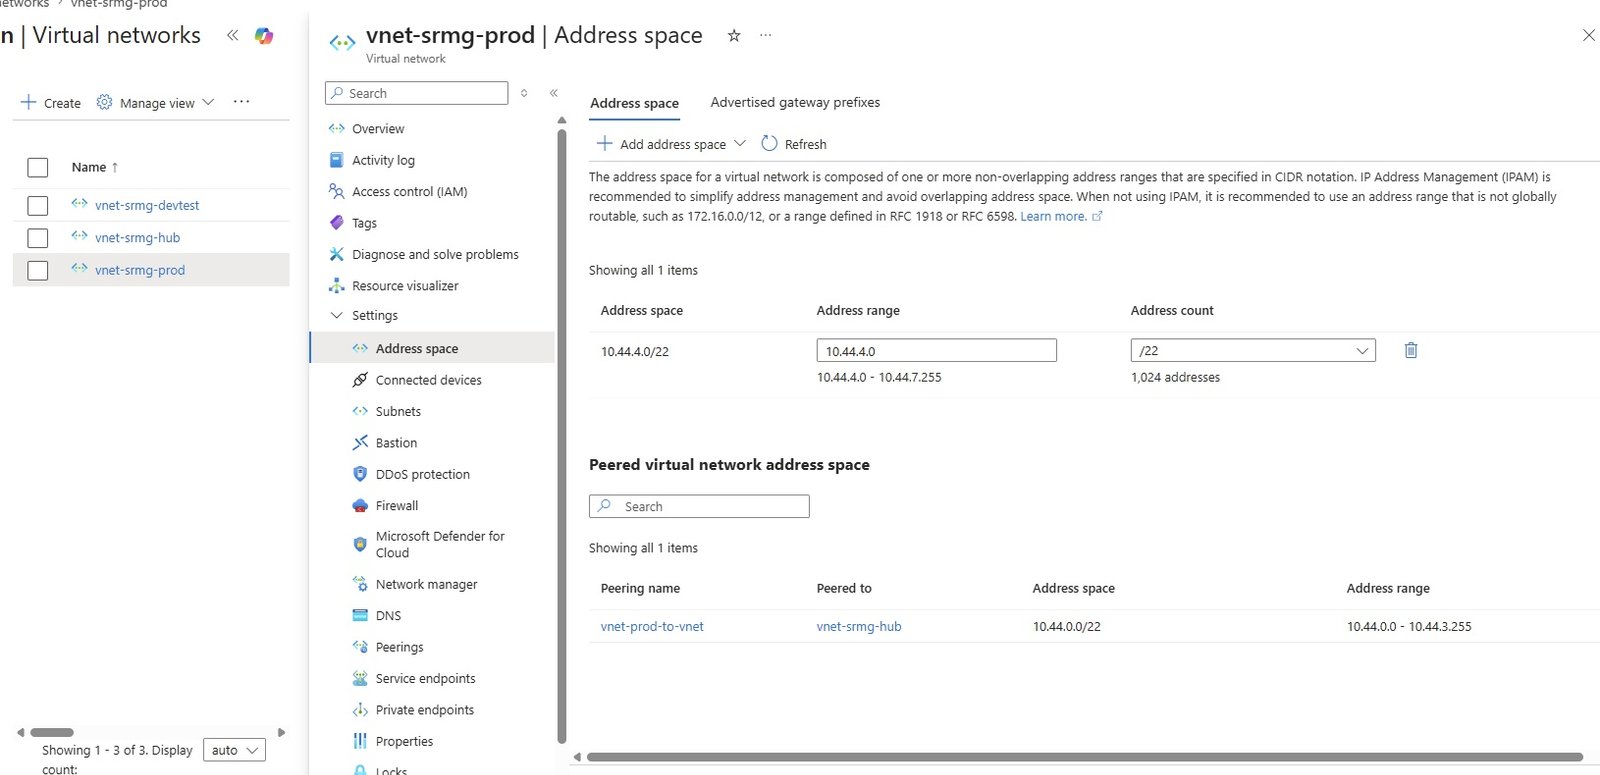
- Service endoints
- Provate endoints
- Properties:
- Locks:
- Code
- vnet-star-stag
- vnet-star-devtest
- NAT gateways:
- Public IP Addresses:
- Network Interfaces:
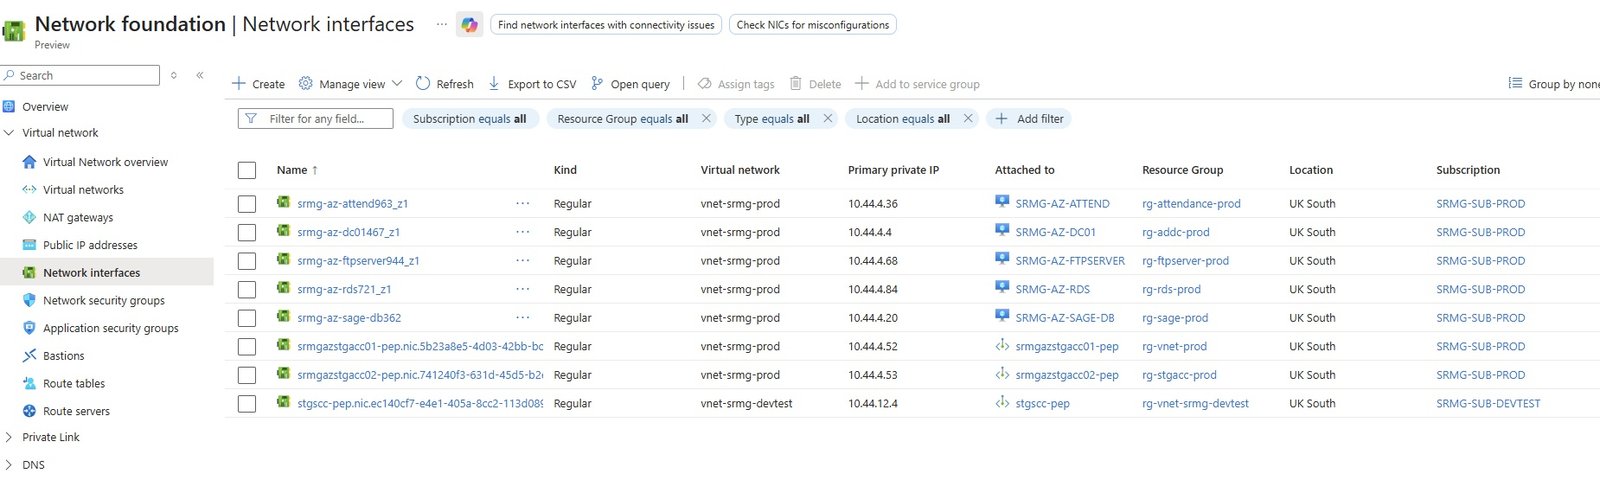
- 5 NICS are created and attached with 5 VMs.
- 1 NIC is creaed and attached with storage acount private endpoint(srmgazstgacc01-pep)
- 1 NIC is creaed and attached with storage acount private endpoint(srmgazstgacc02-pep), this sorage account is creaed for testing purpose only.
- 1 NIC is created and attached with storae account private endpoint (stgacc-pep), created for testing purpose in vnet-srmg-devtest.
- Network Security Groups:
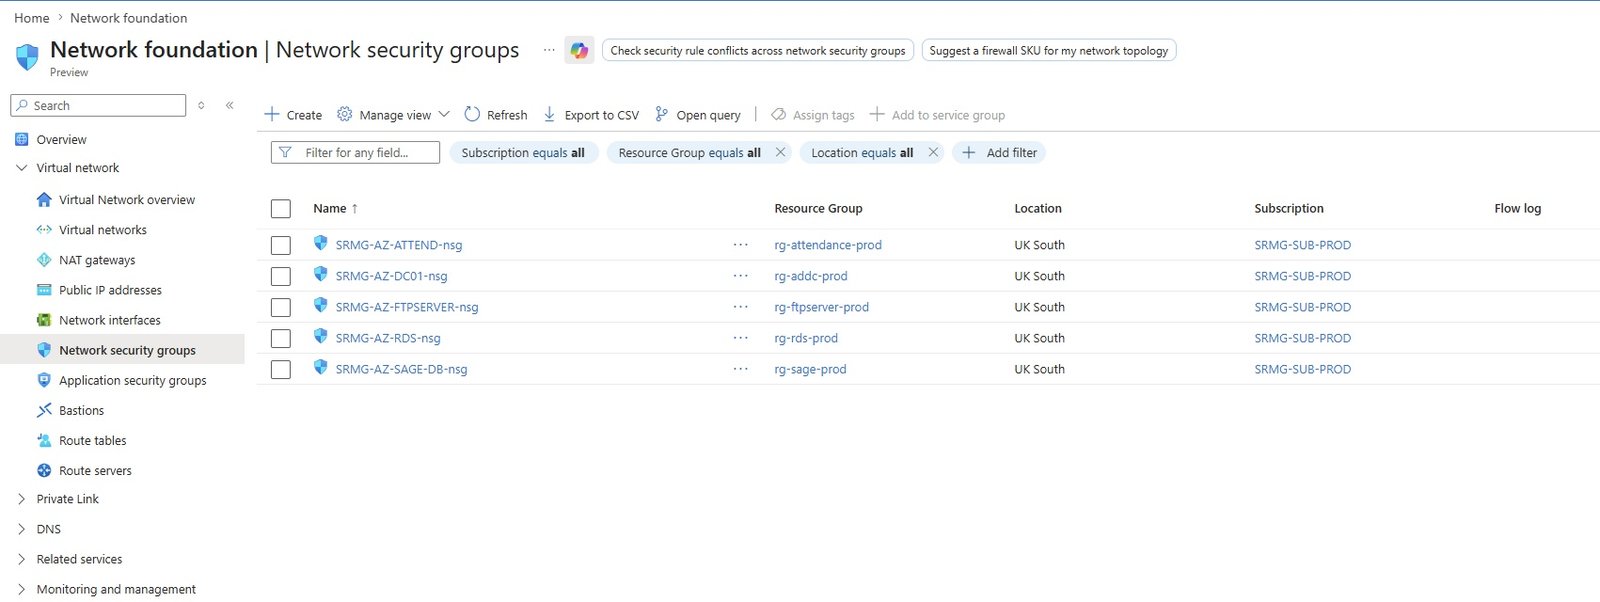
- 5 NSGs are created and attached with 5 VMs.
- Application Security groups:
- Bastions:
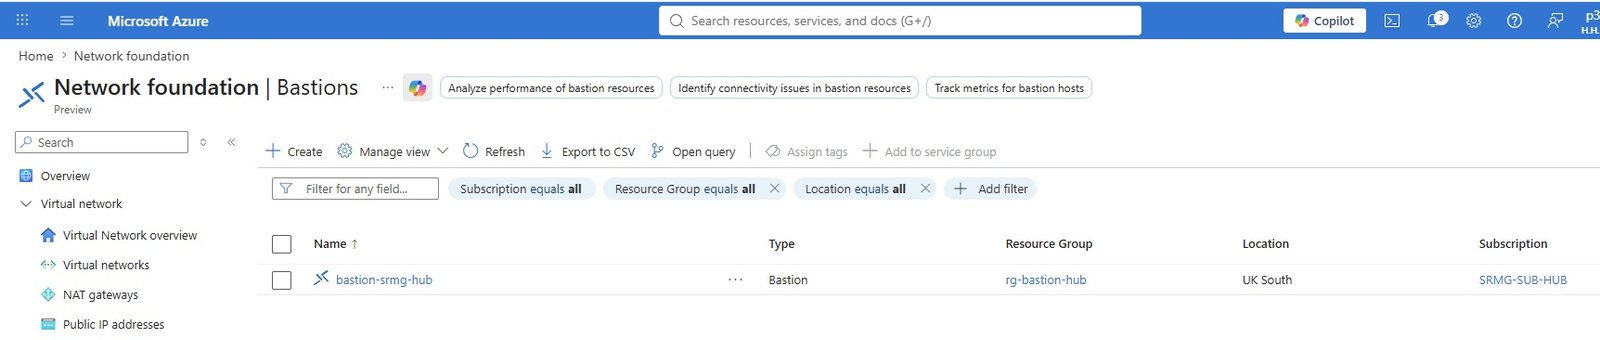
- Bastion host is created to access the VMs.
- VMs does not have public IP and there is no RDP allowed rule in NSG.
- Bastion will open https and connect to VMs using its private IP, Bastion has RDP access by default and session will open in a browser.
- RDP is PAAS service which cannot be stop and start, it is chargeable and should delete if not needed and recreated when need to access VMs.
- Route tables:
- In Azure, routing controls how network traffic moves between subnets, VNets, the internet, and on-premises networks.
- When you create a subnet, by default azure creates system routes which allows traffic to communicate with other resources whithin a subnet and it allows internet by default. System routes are is not visible normally unless you create a routing table and assing routing table to subnet. By default there is no routing table created in a vnet.
- System Define Routes (SDR):
- By default no Routing Table is created, to view system routes, first creae a routing table and assign with subnets.
- Go to Hub or Prod vnets and click Routing tables. No Routing table.
- Create a routing tables for Hub and Prod vnets.
- Go to All Services/Network Foundation/Route Tables/Create
- Subscription: SRMG-SUB-PROD
- Resource Group: rg-vnet-prod
- Name: rt-default-prod
- Tags: Department=It, Environment=HUB, Servie=Route Table
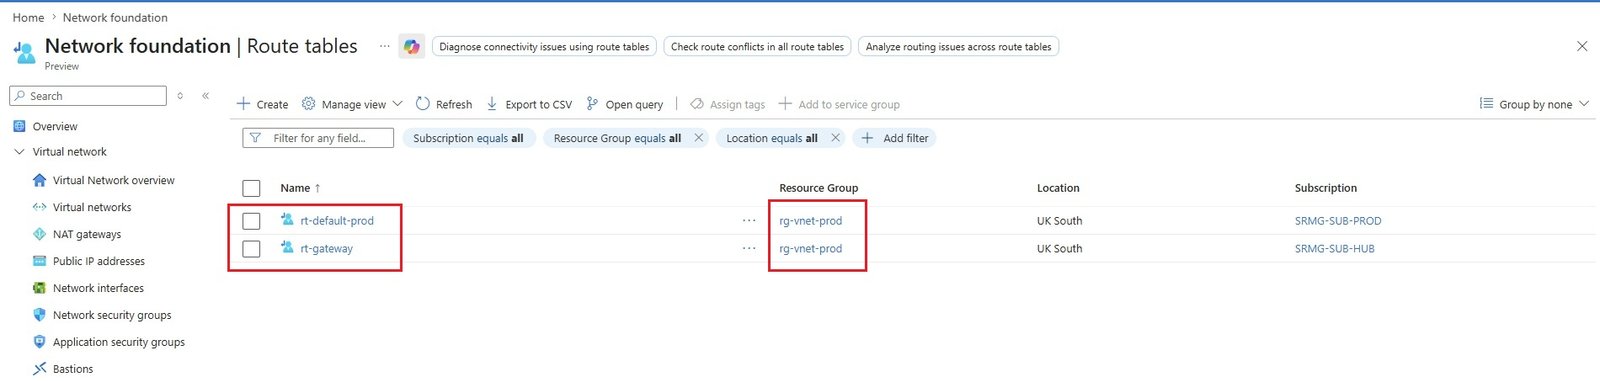
- Go to rt-default-prod routing table.
- HH_RouteTable1.jpg
- Routing table is an empty table, which first need to associate with subnet.
- Subnet Association:
- Go to Subnets/+Associate
- Virtual network: vnet-star-prod
- subnet: snet-addc-prod.
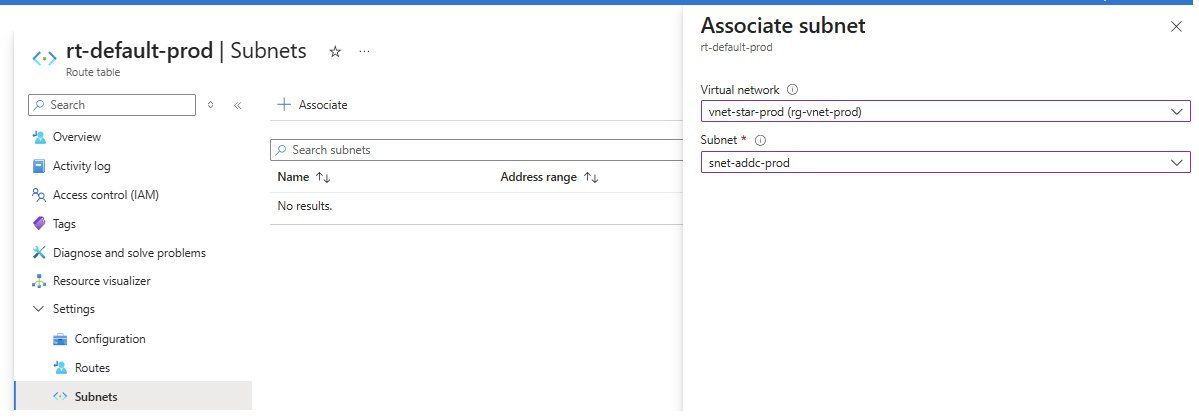
- Associate to all subnets.
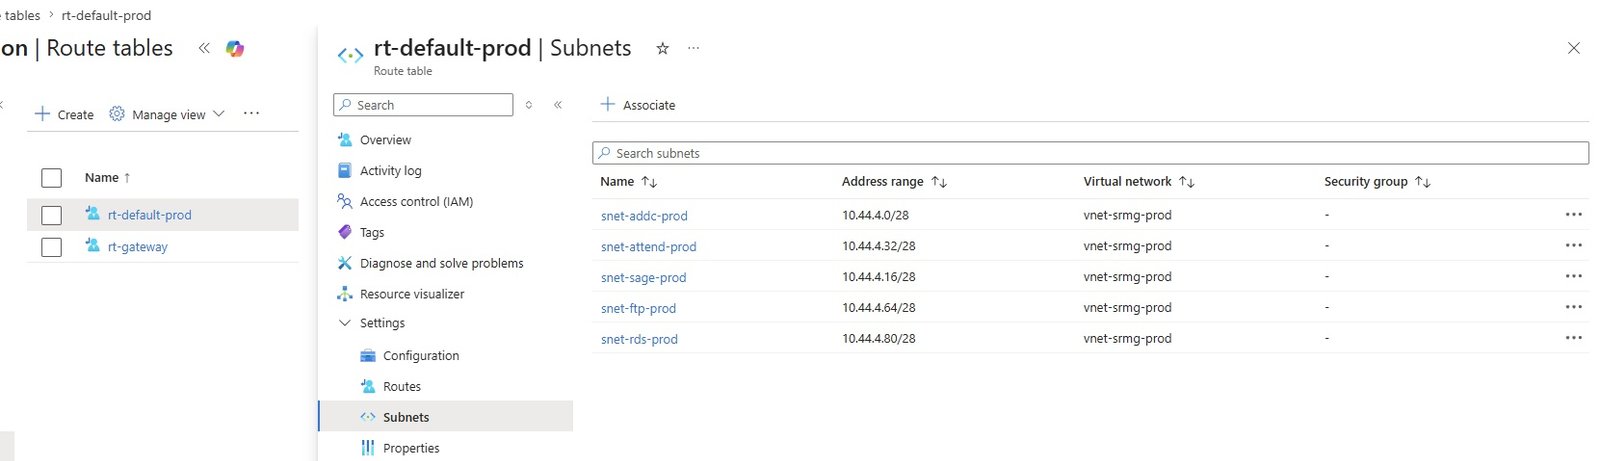
- Subnets are associated but there is no system define route is visible
- To view system defined routes, create a VM in any subnet and assign public IP with RDP allowed.
- STAR-AZ-SAGE-DB.jpg
- Go to Route table/rt-default-prod/Help/Effective routes
- HH_RouteTable2.jpg
- click Effective routes, select subnet = snet-sage-prod, Network Interface=star-az-sage-db406 (NIC attached to Sage VM)
- HH_RouteTable3.jpg
- First Active route is to communicate with any resource of this CIDR range 10.44.4.0/22, communicating with other resources within same Vnet.
- Second Active route is to communicate with any IP using internet. The VM will have internet access.
- The remaining routes next hop type is none, traffic further will not go.
- Create Azure firewall:
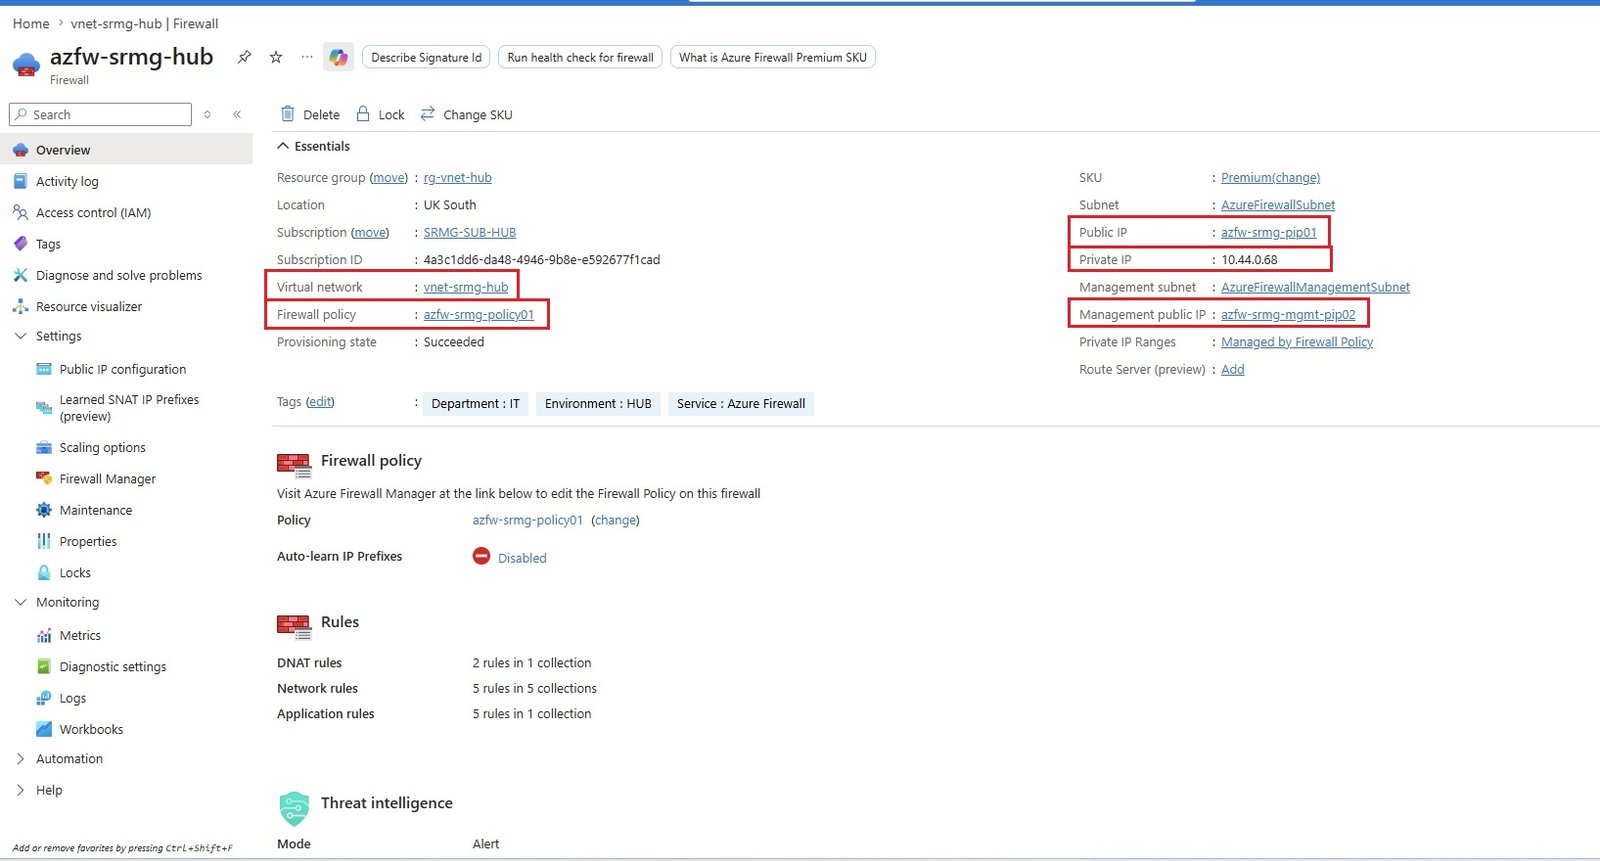
- Firewall should be creatd in the existing resource group rg-vnet-hub
- Copy private IP 10.44.0.68
- User Defined Routes (UDRs):
- All traffic should pass through Firewall(virtual appliances)
- Go to settings/Routes/Add
- Entered firewall IP address in Next hop address of virtual appliance
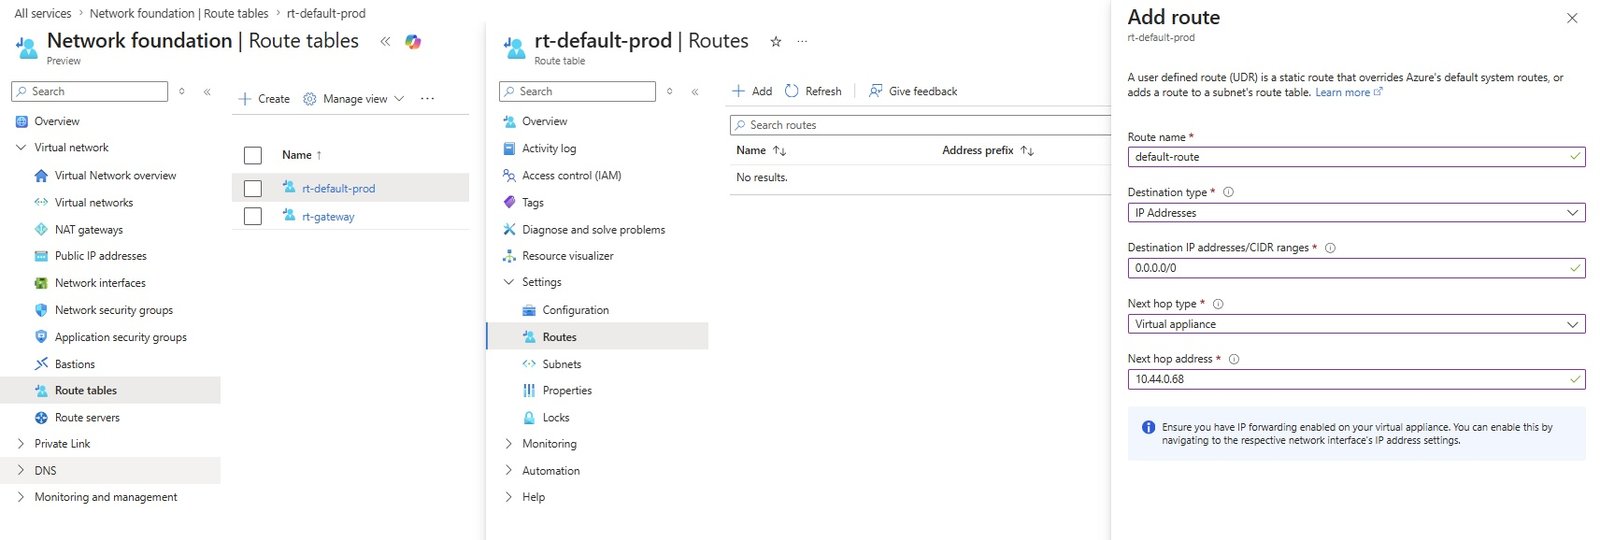
- Route name = default-route (All Trafic through firewall)
- Destination type: IP Addresses / Service Tag
- Destination IP Addresses/CIDR ranges = 0.0.0.0/0 (traffic from this subnet going to anywhere 0.0.0.0/)
- Next hop type = virtual network gteway/virtual network/internet/virtual appliance/None (virtual appliance is firewall), traffic should go with this hop
- Next hop address: 10.44.0.68 (private IP of Firewall), traffic should pass through firewall.
- Once you save the rule, now the traffic will come to firewall from VM instead it was going directly to internet.
- Remote connection will also be disconnected as we do not have define RDP rule in firewall.
- There is no internet in the VM as traffic is at firewall, we need to create a rule in firewall to allow traffic to got to internet but for security reason we do not define public IP.
- Go to Firewall and define the following rules.
- We define DNAT rule so that private IP of VM will translate into Firewall public IP and VM will have internet.
- Rule Collection:
- DNAT rule: It is configure for Incoming Ingress traffic. RDP 3389
- HH_DNAT_Rule3.jpg
- An Azure DNAT (Destination Network Address Translation) rule is a rule that translates traffic arriving at a public IP and forwards it to a specific private IP address and port inside your Azure virtual network.
- Go to firewall\azfw-star-hub\Firewall Policy: click azfw-star-policy01
- Rules\DNAT rules\Add a rule collection.
- Name:
- Rule collection type:
- Priority:
- Rule collection action:
- Rule collection group:
- Rules:
- Name:
- Source type:
- Source:
- Protocol:
- Destination ports:
- Destination firewall ip:
- Translated type:
- Translated address or:
- Translated port
- HH_DNAT_Rule1.jpg
- HH_DNAT_Rule2.jpg
- Save it.
- copy public ip of firewall 20.219.13.162 and enter in Remote Desktop Connection and Check VM is getting RDP.
- Make sure Peering between hub and prod has been done as firewall is configured in hub-vnet and sage server is in Prod-vnet.
- Network Rule: Outgoing traffic, allow ports like 80, 443, 445 (SMB).
- port http:80, https:443 can be define in application rule.
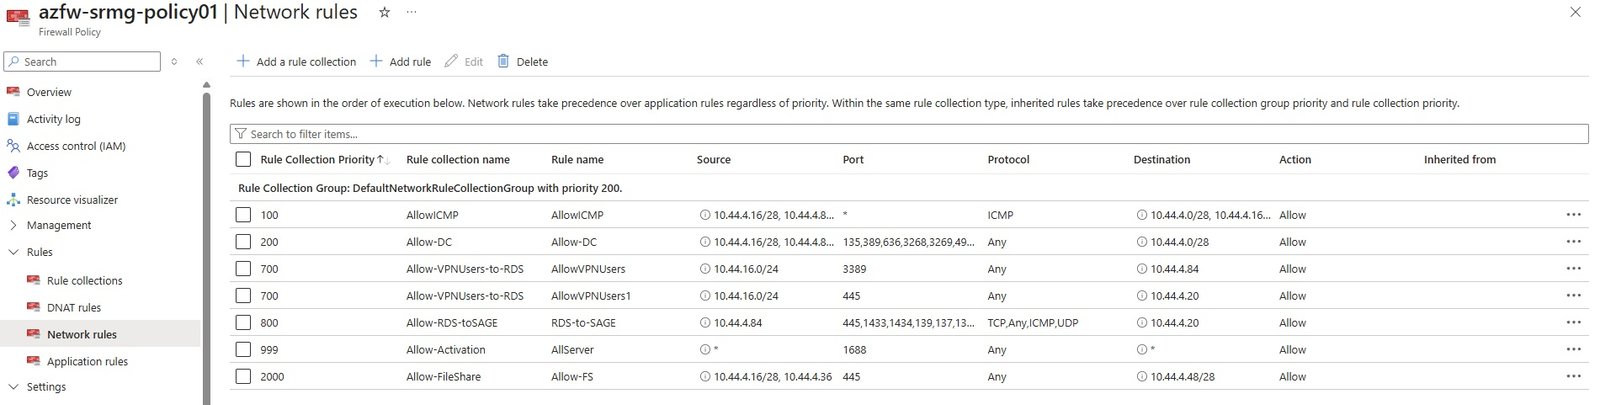
- Application Rule: Allow browsing http or https port (Internet).
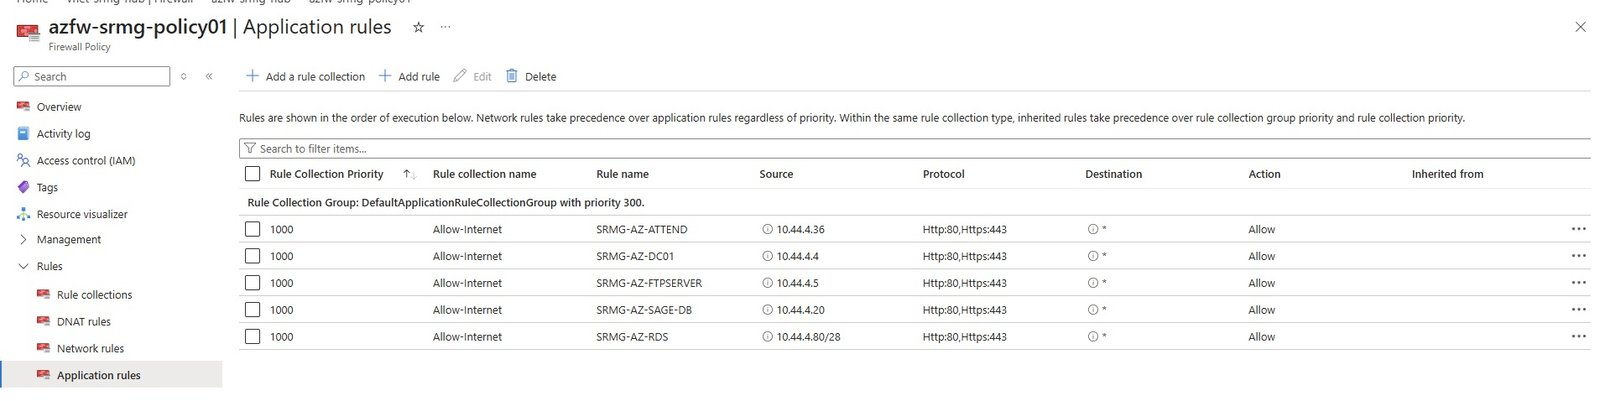
- Allow Internet on Sage Server
- HH_Application_Rule2.jpg
- Add a rule collection
- Name:Allow-internt-to-Sage
- Rule Collection type: Network/Application/DNAt
- Priority: 1000
- Rule collection action: Allow /Deny
- Rule collection group: DefaultApplicationRuleCollectionGroup
- Rules
- Name: Allow-Internet-Sage
- Source type: IP address /IP Group
- Source: 10.44.4.20 (Private IP of Sage Server)
- Protocol: http, https
- TLS inspection:
- Destination type: FQDN/FQDN tags/Web Categories
- Destination: *
- HH_Application_Rule1.jpg
- Check internet in the VM
Private Link
- Private Link Overview
- Private endpoints:
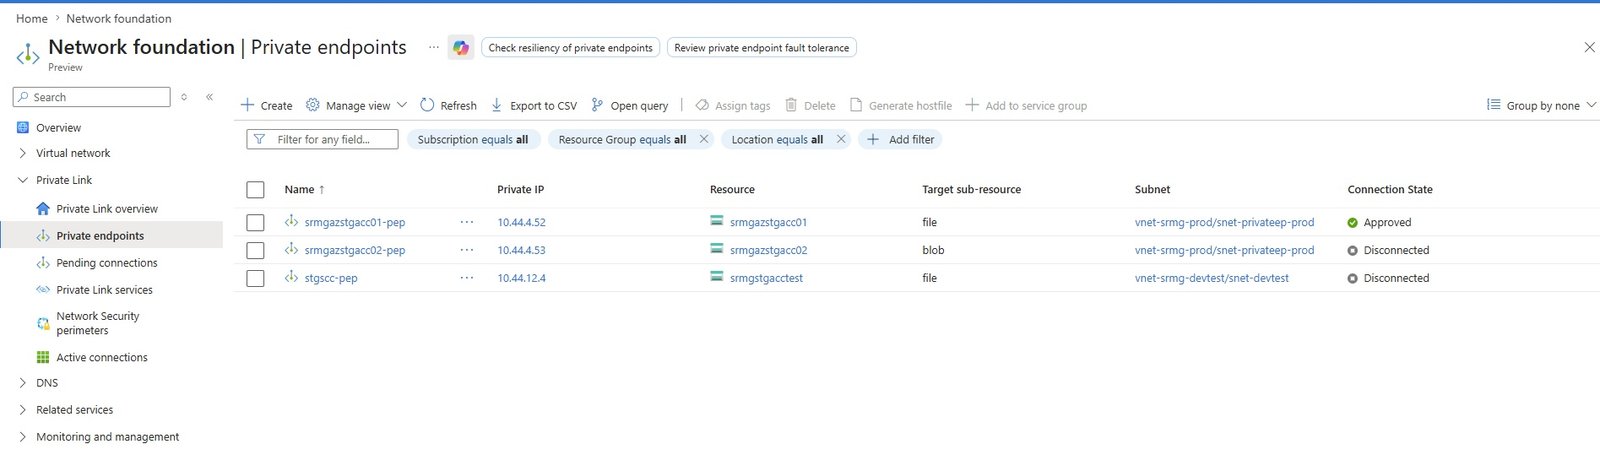
- Create subnet in Prod virtual network
- snet-privateep-prod: Name= snet-privateep-prod, 10.44.4.48/28 (16 addresses), Range will be 10.44.4.48-10.44.4.63, Enable private subnet (no default oubound access Checked).
- Assing this subnet to storage account so that it will assing a private ip address from this CIDR range.

- An IP is assinged to starazstgacc01
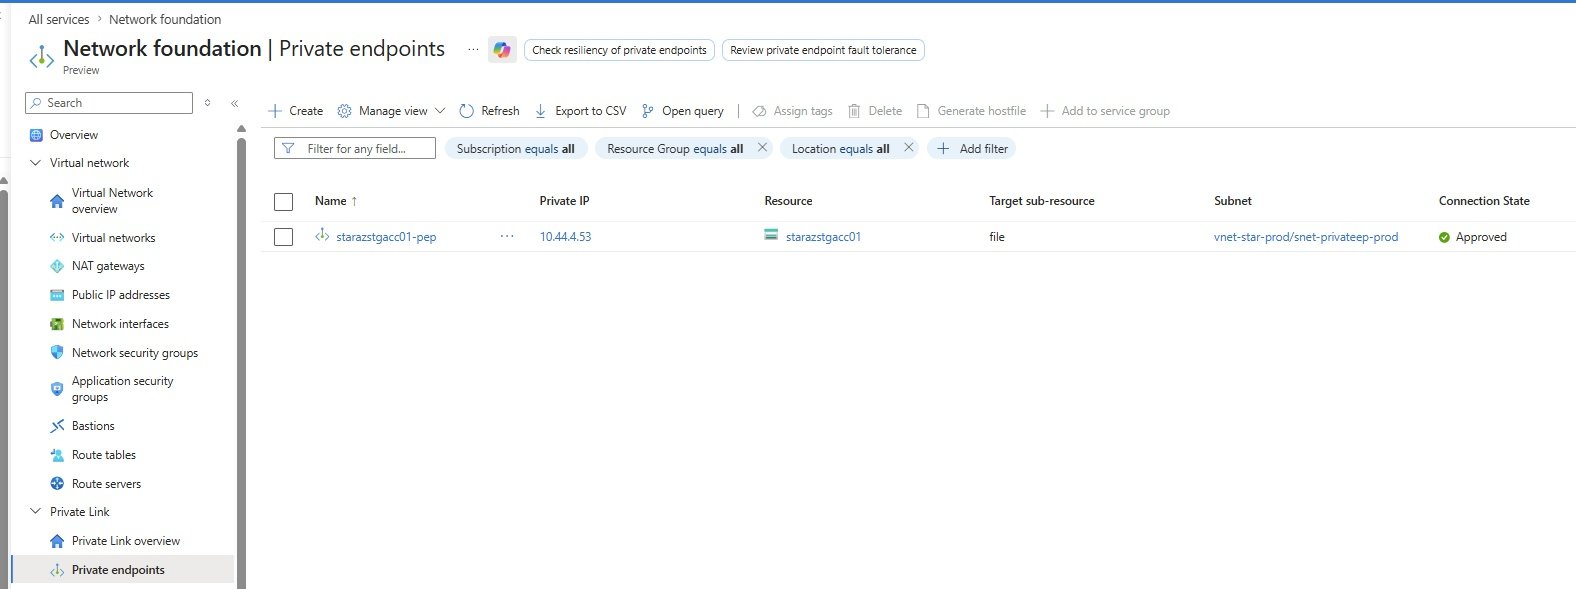
- Pending connections
- Private link services:
- Network Security perimeters
- Active connections
DNS
- DNS Overview
- DNS private resolvers
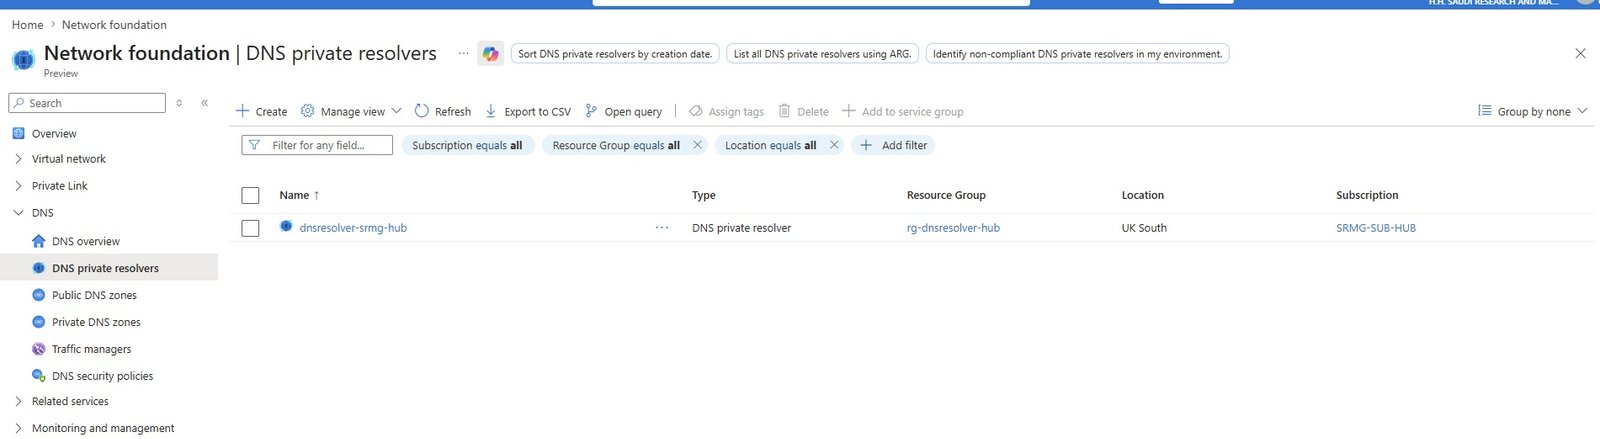
- Go to DNS private Resolver and create.
- Basics
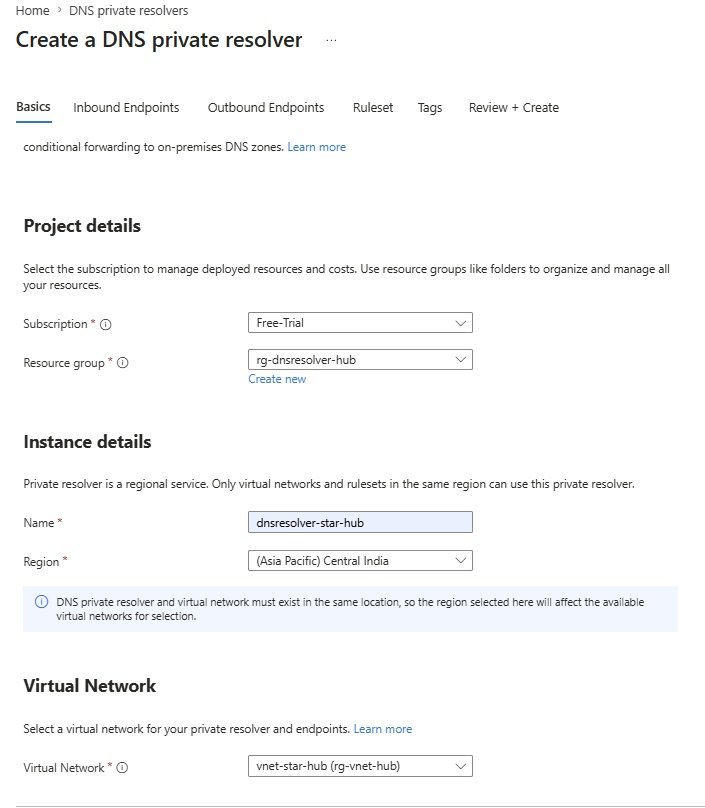
- Inbound Endpoints: Add an endpoint
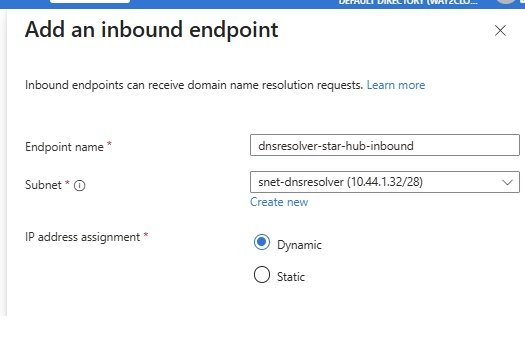
- Outbound Endpoints: Not Configure
- Ruleset: Not Configure
- Tag: Deptartment= IT, Environment=HUB, service = DNS Resolver
- Review+Create
- Go to created dns resolver/Inbound endpoint
- 10.44.1.36
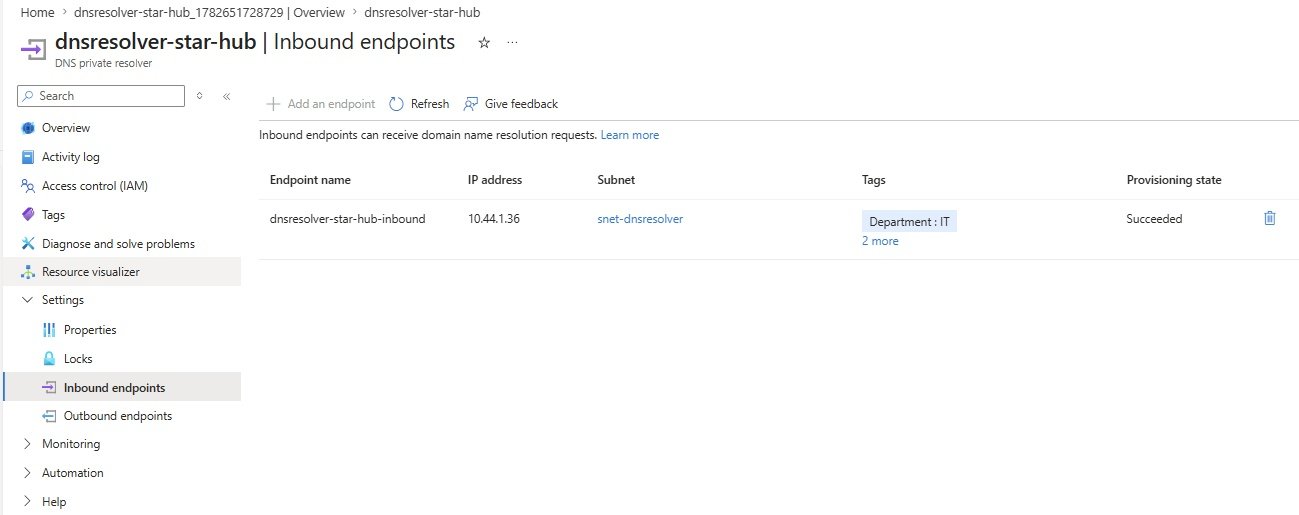
- Public DNS zones
- Create DNS for way2cloud.co.uk
- Subscription: STAR-SUB-HUB
- Resource Group: rg-dns-hub
- Name: way2cloud.co.uk
- Tags: Department=IT, Environment=HUB, Srvice=Public DNS
- public_DNS1.jpg
- Recordsets
- public_DNS2.jpg
- Private DNS zones
- Private DNS zone:
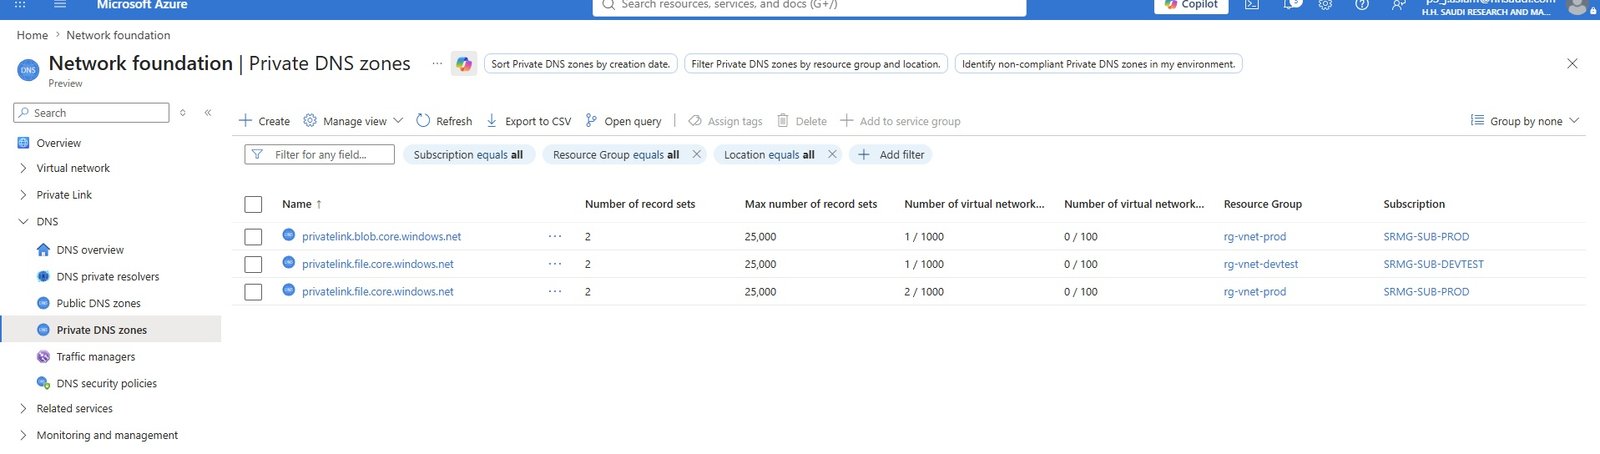
- privatelink.file.core.windows.net is created
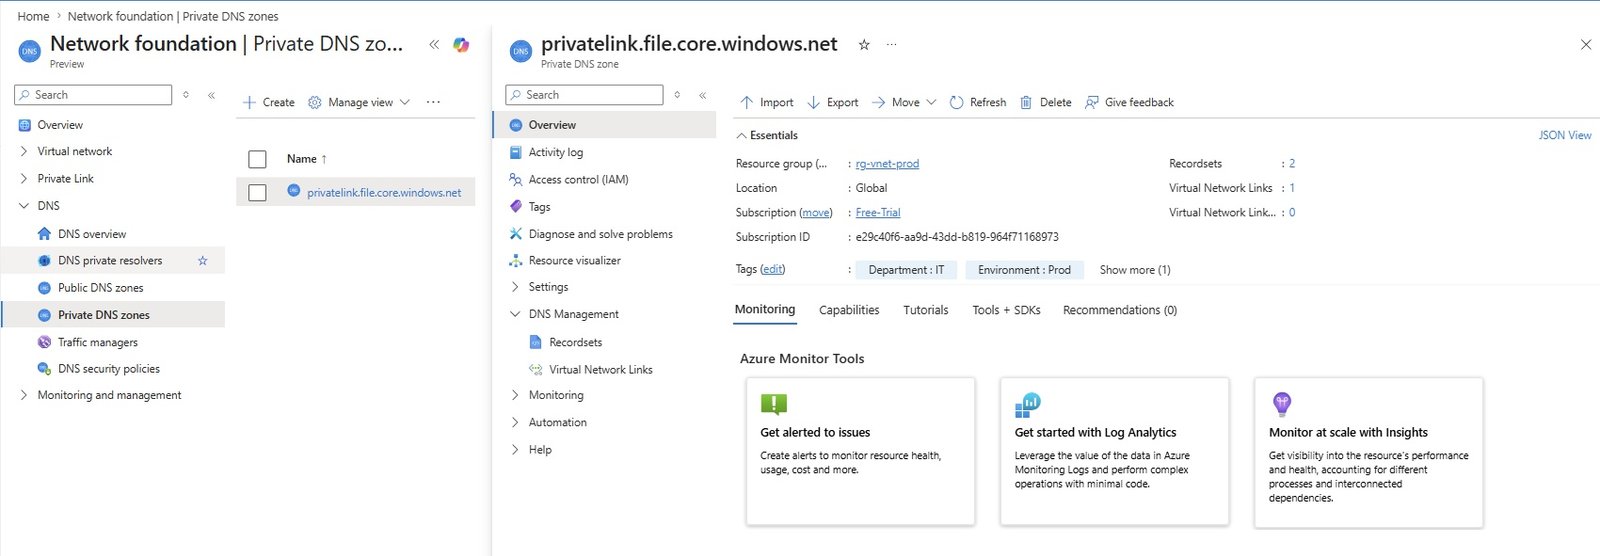
- click recorsets
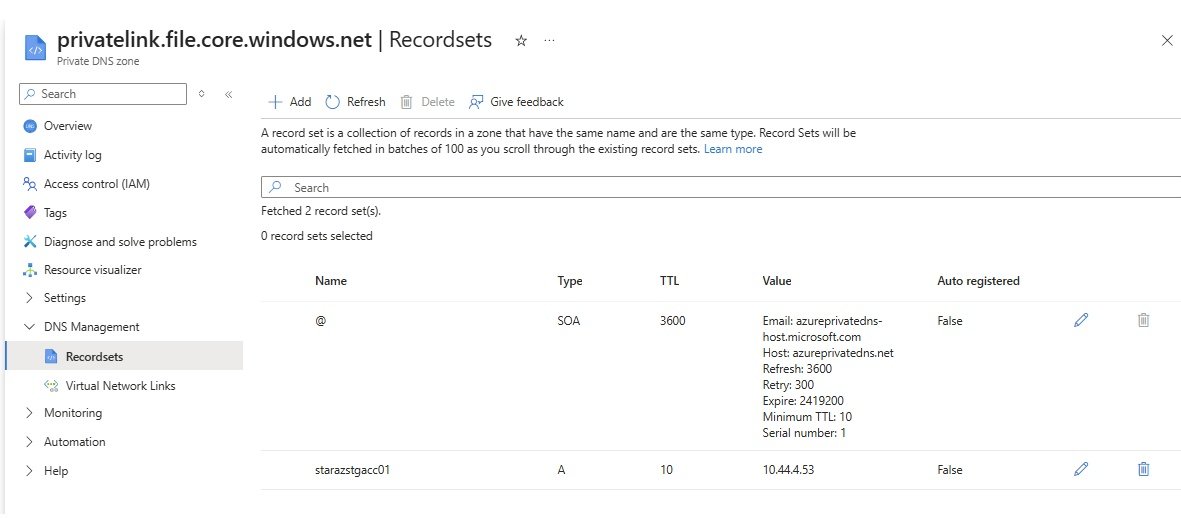
- virtual network links
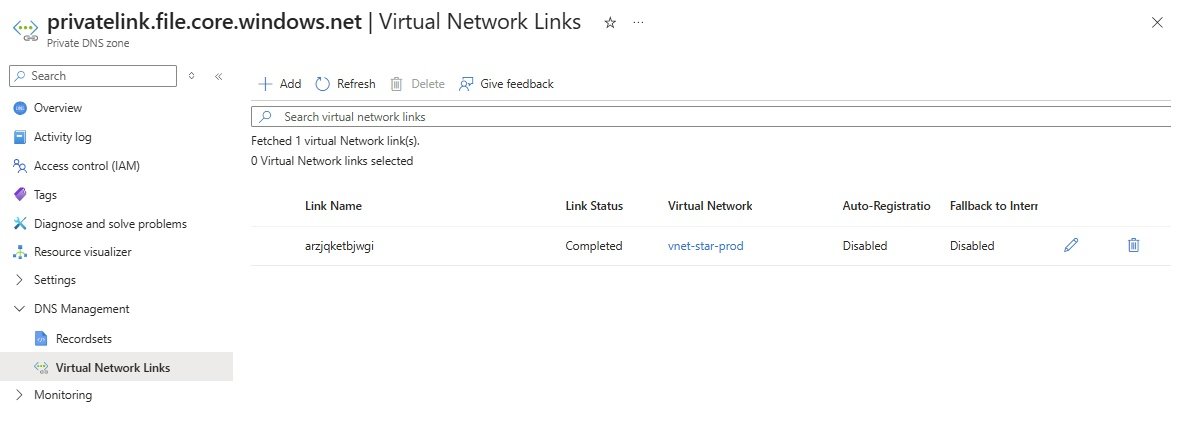
- Add virtual network links to hub vnet
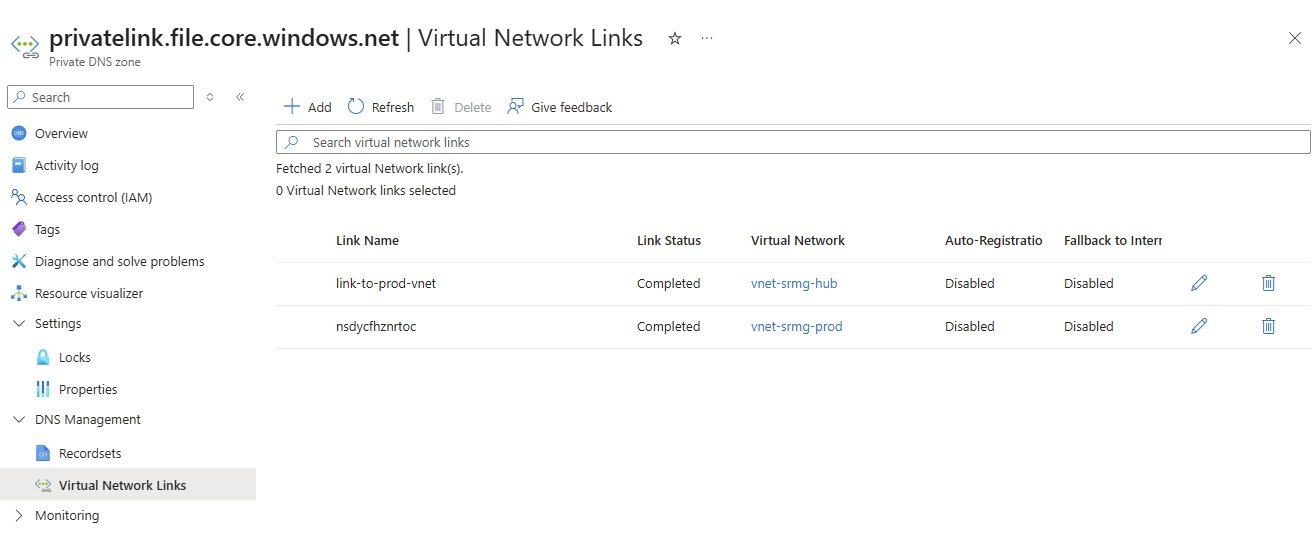
- Traffic managers
- DNS security policies
Monitoring and management
- Go to Network Watcher
- Virtual network managers
Bastion Host or RDP
- code
- code
- code
Firewall
- Create Firewall:
- Firewall Public IP:
- azfw-srmg-pip01 (Public IP)
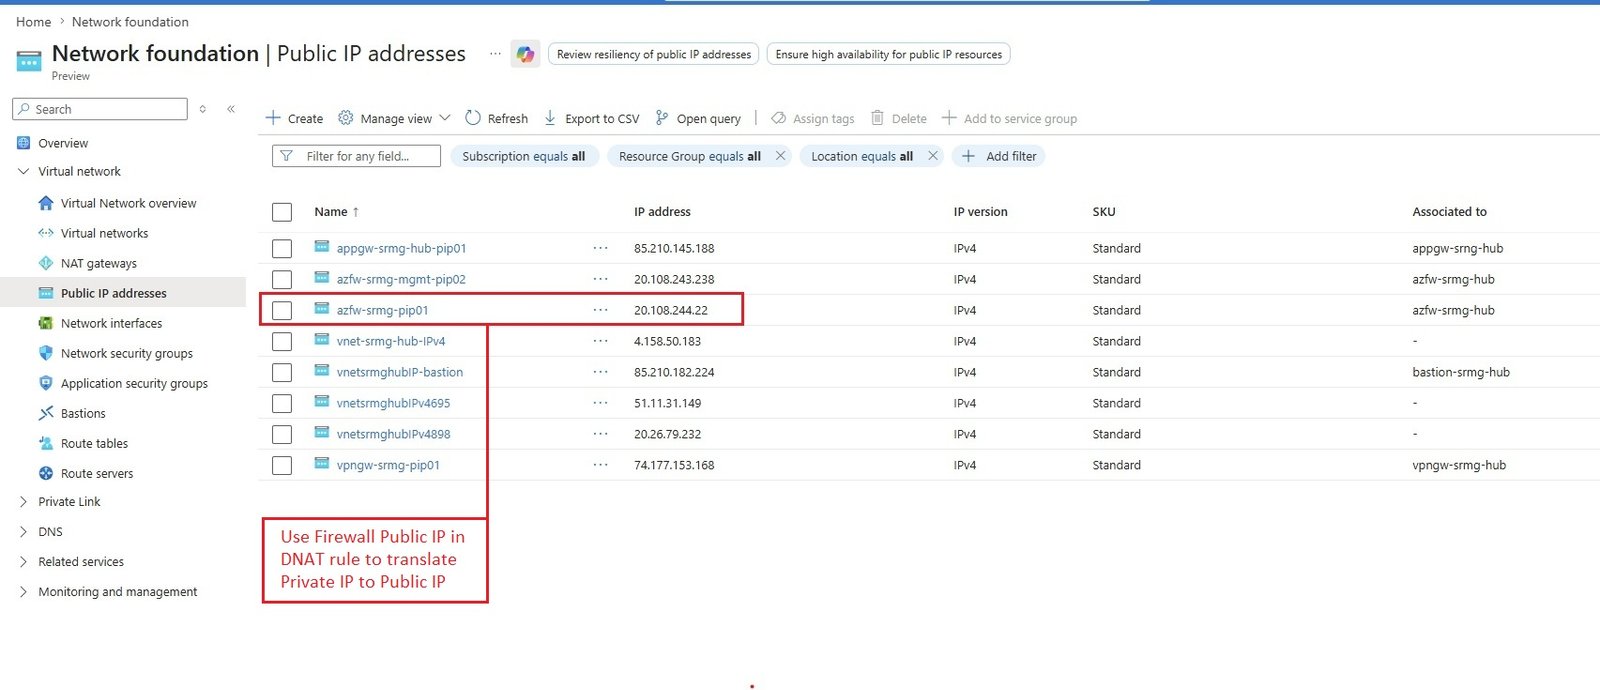
- Firewall Policy (azfw-srmg-policy01)
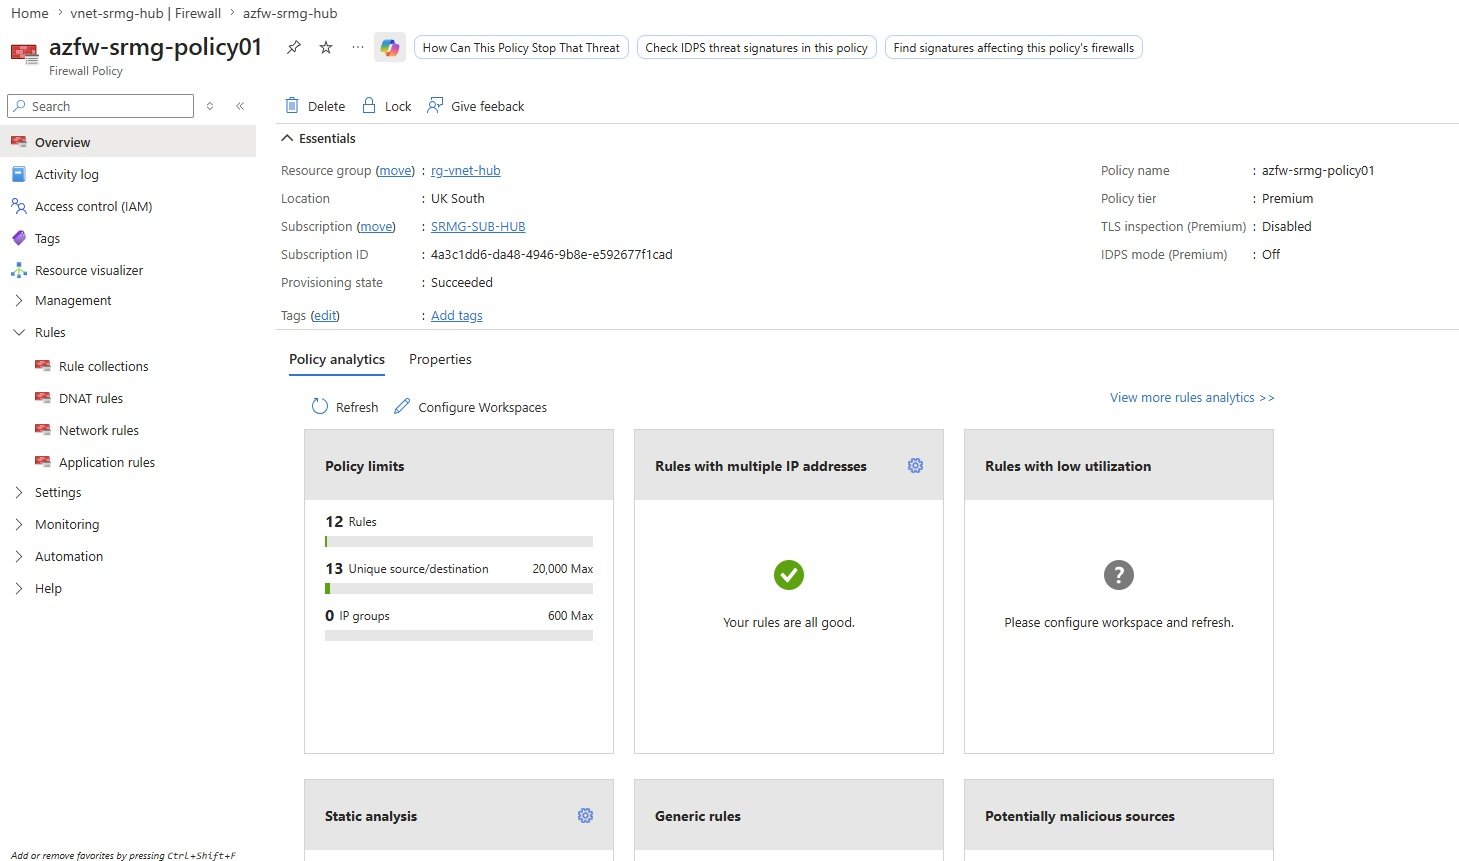
- Rule collections:
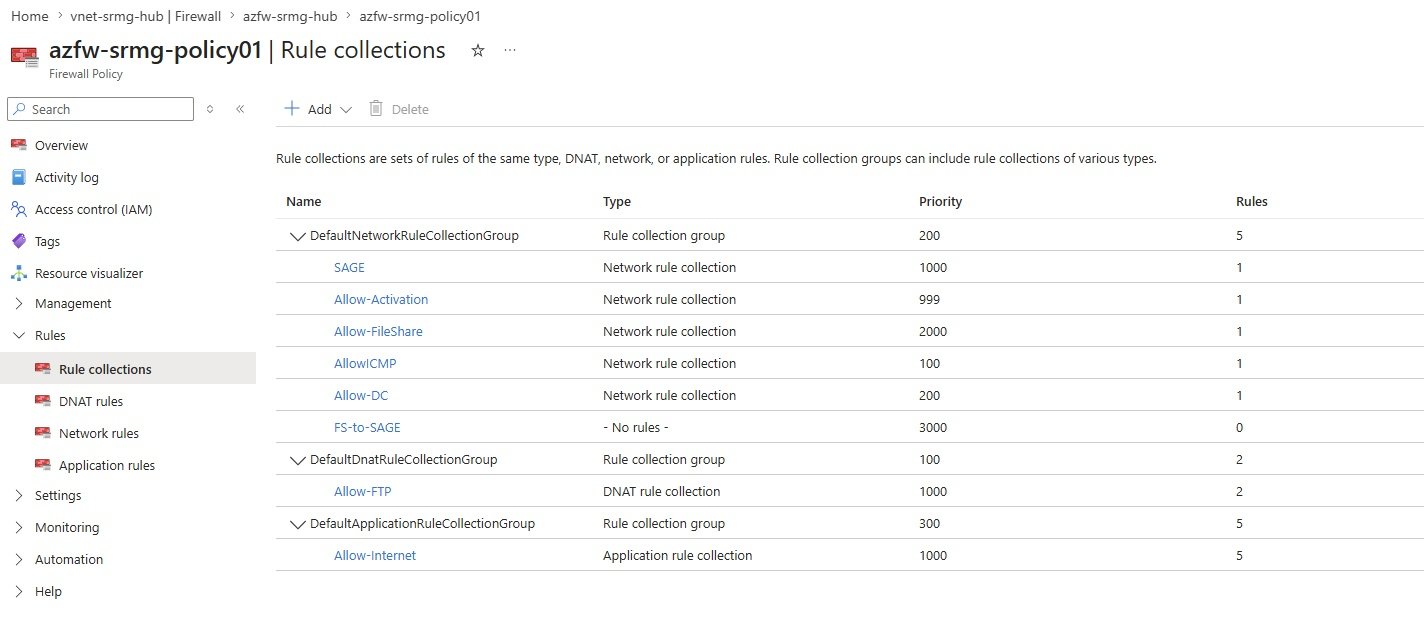
- DNAT rules:
- An Azure DNAT (Destination Network Address Translation) rule is a rule that translates traffic arriving at a public IP and forwards it to a specific private IP address and port inside your Azure virtual network.
- DNAT (Destination Network Address Translation) is used for incoming (inbound) traffic.
- When someone connects to the public IP, the DNAT rule tells Azure exactly which VM and port should receive the traffic.
- How DNAT Works:
- Internet User
│
▼
Public IP: 20.100.10.5
│
▼
Azure Firewall
│
DNAT Rule
If destination = 20.100.10.5:3389
│
▼
Translate to
10.0.2.4:3389
│
▼
Azure VM
- Internet User
- Example 1 – Allow Remote Desktop (RDP)
- Suppose you have:
- Azure Firewall Public IP: 20.100.10.5
- VM Private IP: 10.0.2.4
- RDP Port: 3389
- Create a DNAT rule:
- | Setting Value
| Source Your public IP (recommended) or Any
| Protocol TCP
| Destination IP 20.108.244.5 (Firewall public IP)
| Destination Port 3389
| Translated Address 10.44.4.20 (Sage server private IP)
| Translated Port 3389 (Sage server port) - When you connect to: 20.108.244.5:3389
- Azure Firwall changes the destination to: 10.44.4.20:3389
- DNAT vs SNAT:
- DNAT_vs_SNAT.jpg
- DNAT rule for FTP:
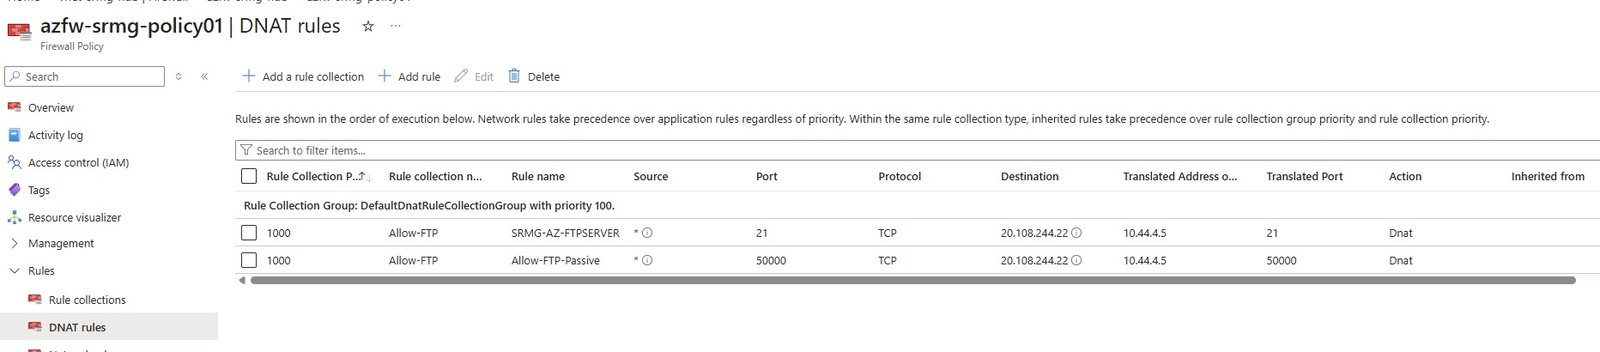
- Network Rules:
- Application Rules:
- Settings:
- Monitoring:
- Automation:
- Help:
VPN Gateway
- vpn_gateway1.jpg
- private_access_to_public_fileshare.pdf
Private Endpoint for account storage to access privately:
- A private IP will be assign to storage account from this subnet.
- A NIC will be created and assing IP to it.
- Private link will also be created.
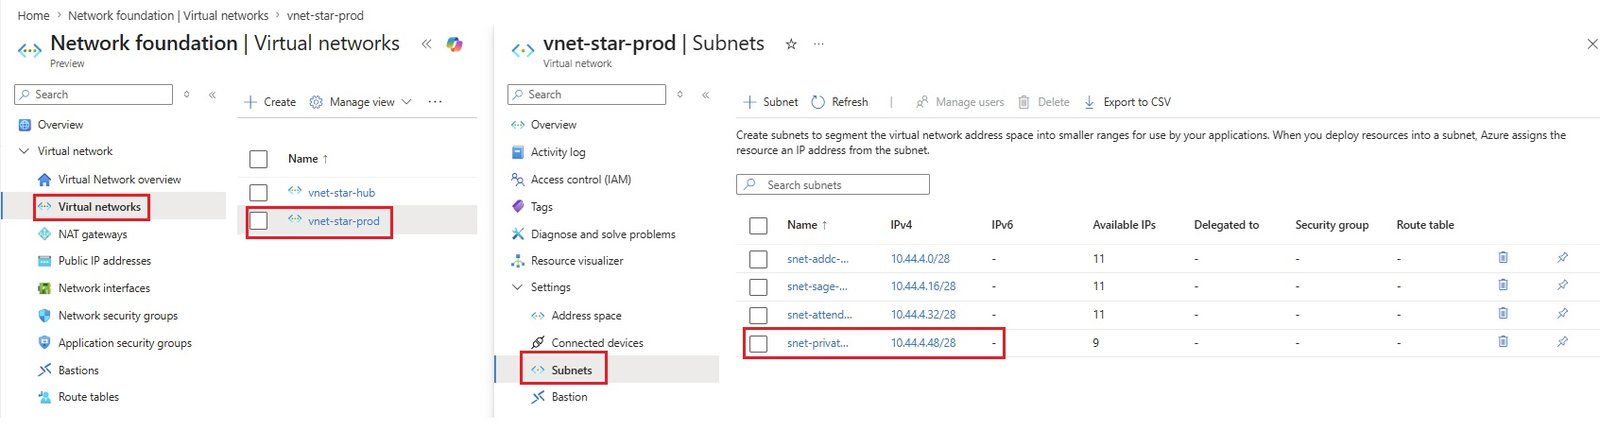
- Create a subnet in Prod Vnet
- Subscription = SRMG-SUB-PROD
- Networking Vnet= vnet-srmg-prod
- subnet = snet-privateep-prod (10.44.4.48 to 10.44.4.63)
Peering between vnet-hub & vnet-prod
- Create peering from vnet-star-hub to vnet-star-prod.
- Go to virtual network/vnet-star-hub/settings/peering/add
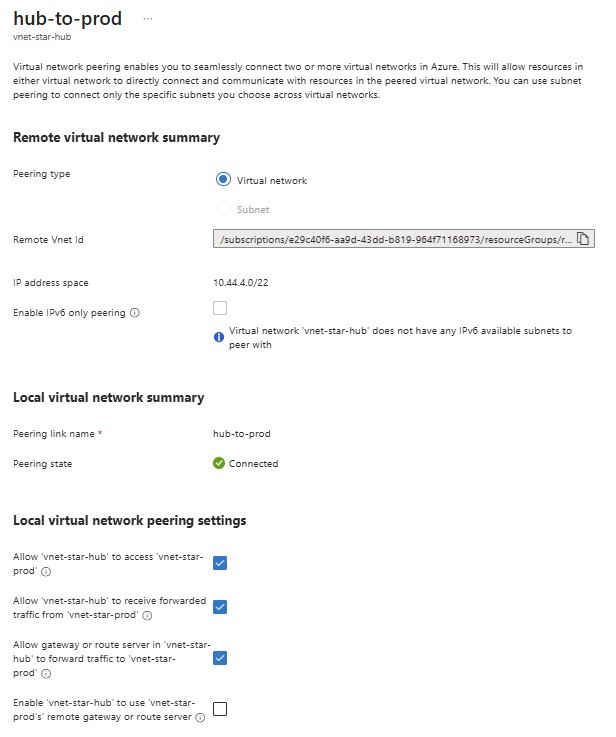
- Add prod to hub
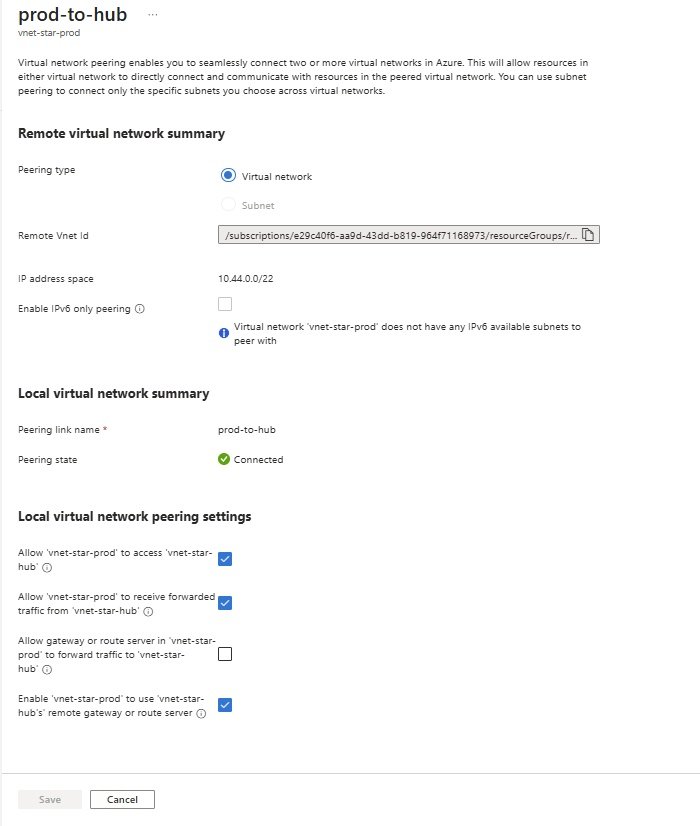
Azure VPN Gateway
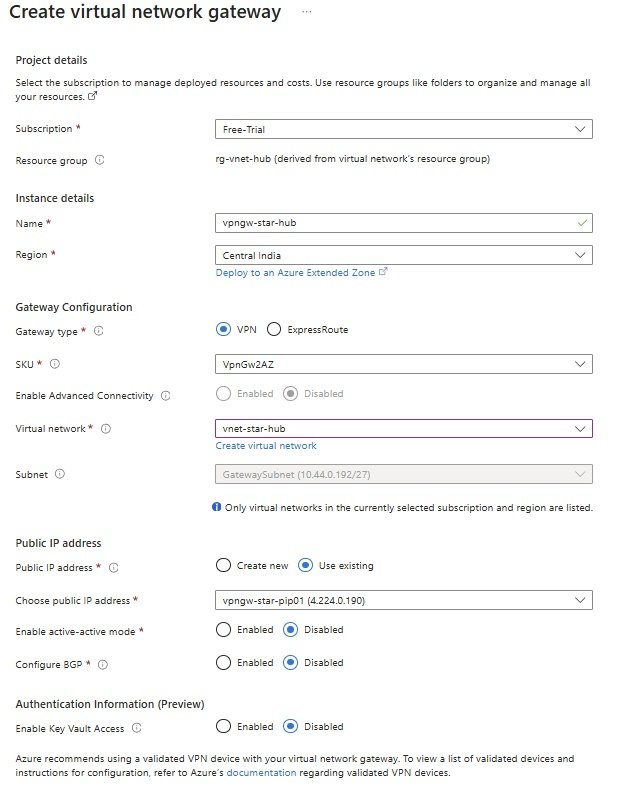
- Go to All services\Ntworking\Hybrid connectivity\Virtual network gateways\create
- Subscription = STAR-SUB-HUB
- Resource Grou= it will be selcted when you select virtual network in the following steps.
- Instance details
- Name: vpngw-star-hub
- Region: Central India
- Gateway Configuration
- Gateway Type: VPN
- SKU: VpnGw2AZ
- Virtual Network: vnet-star-hub
- Subnet: Automatically selected GatewaySubnet (10.44.0.192/27)
- Public IP Address: Create new
- Public IP address name: vpngw-star-pip01 (4.224.0.190)
- Enable active-active mode: Disabled
- ConfiguBGP: Disable
- Authentication Information
- Enable key vault acess: Disabled
- Tags
- Department = IT
- Environment = Hub
- Review + Create
- After creation, download VPN (it contain configuration file azurevpnconfig.xml)
Configure Point-to-Site
- Go to VPN gateway/settings/click Point-to-site-configuraiton
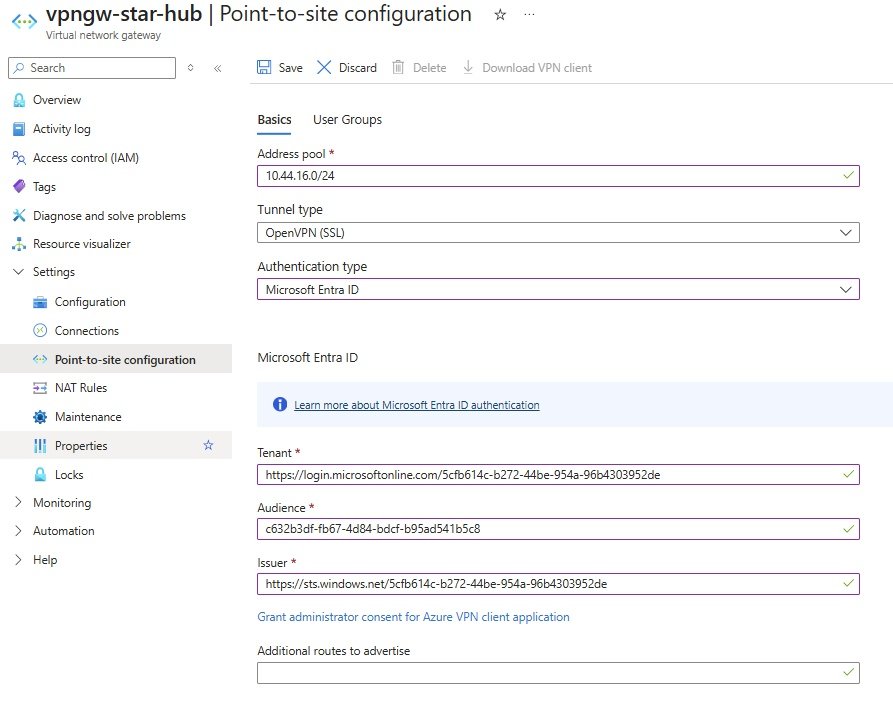
- Address pool: 10.44.16.0/24
- Tunnel type: OpemVPN(SSL)
- Authentication type: Microsoft Entra ID
- Tenant: https://login.microsoftonline.com/paste tenant ID (click gear icon on top bar)
- Audience: c632b3df-fb67-4d84-bdcf-b95ad541b5c8
- Issuer: https://sts.windows.net/{TenantID}/ paste tenant ID (click gear icon on top bar)
- save
Download VPN client
- your download uri is ready, click to download
Storage Account:
- create storage account
- starazstgacc01
- Create private endpoint
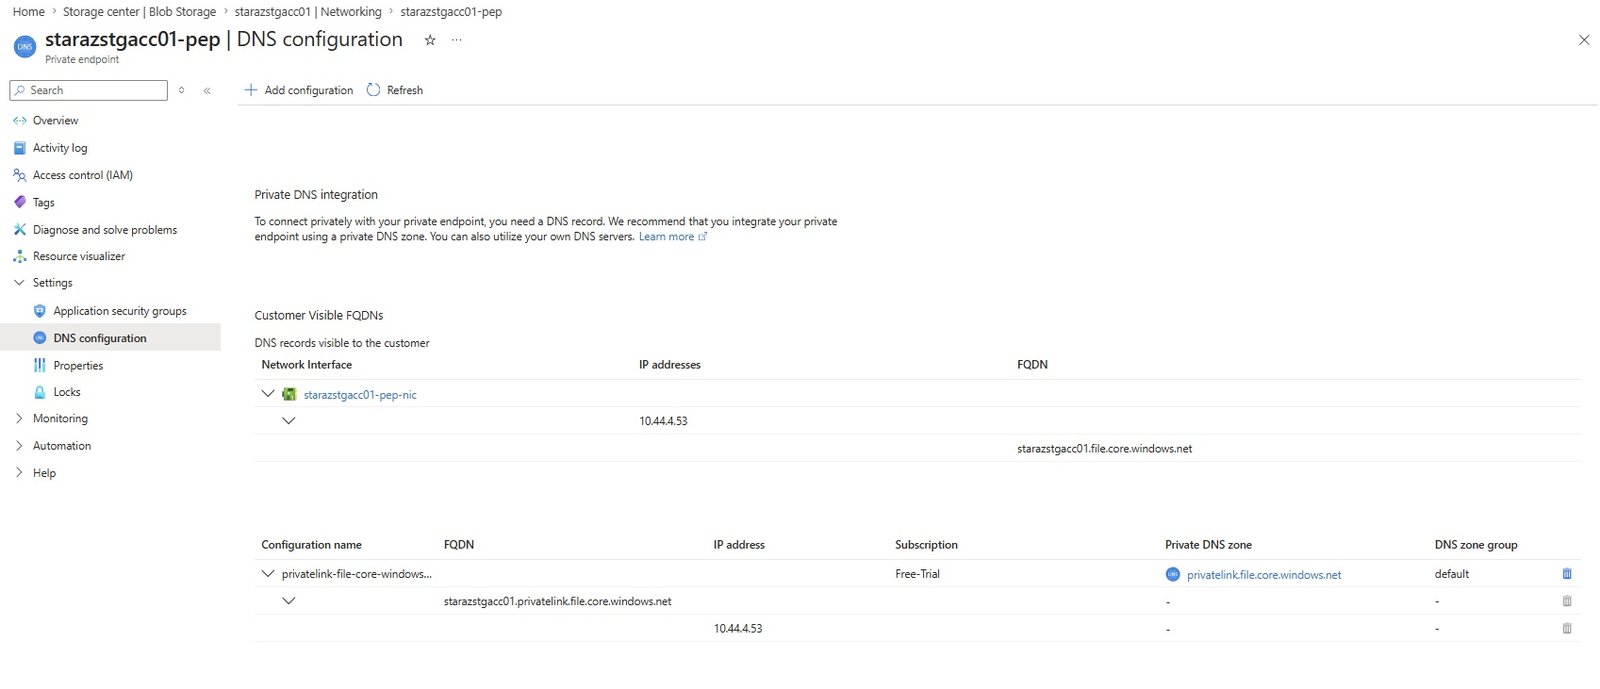
- Subs: STAR-SUB-Prod
- Resource Group: rg-vnet-prod
- Instance details
- Name: starazstgacc01-pep
- Network Interface Name: starazstgacc01-pep-nic (name will take automatically)
- Region : Cental India
- Resource
- Target sub-resource: file
- Virtual network:
- Virtual network: vnet-star-prod
- Subnet: snet-private-prod
- Private IP configuration: Dynamically allocate IP address
- DNS:
- Integration with priate DNS zone: yes
- private DNS zone: privatelink.file.core.windows.net
- Tags:
- Department = IT
- Environment = Prod
- Srvice = Private Endpoint
Assign file share permission to users:
- Go to storage account/Data storage/Classic file shares/select share folder/browse
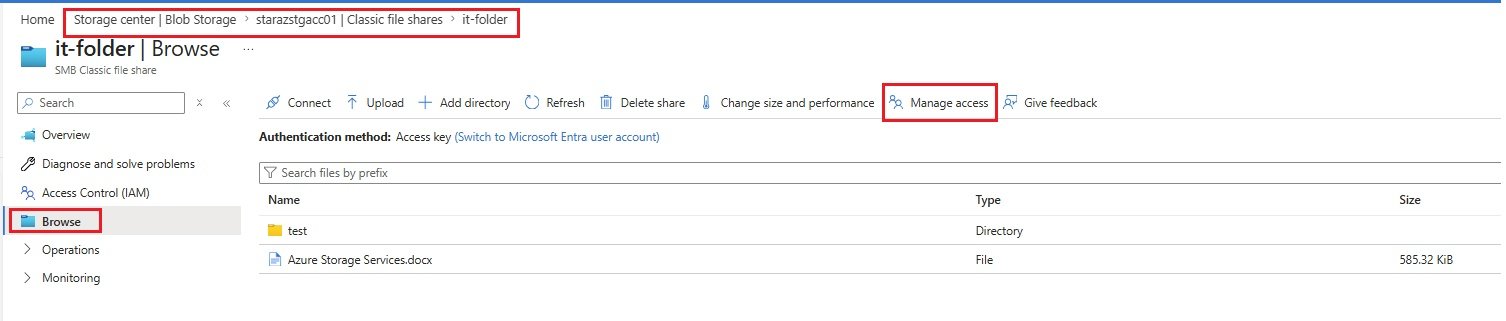
- click manage access
- Add Entra user/group
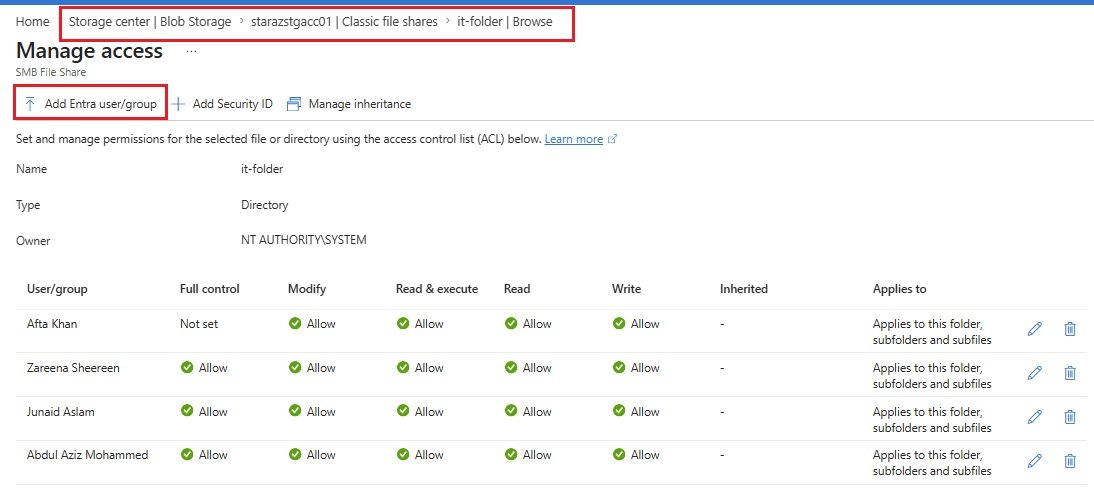
- search user and select
- once it is added in the list click edit button and give required permissions.
- Permissions are applied to:
- Applies to this folder
- Applies to this folder, subfolders and subfiles
- Applies to this folder and subfolders
- Applies to this folder and subfiles
- Applies to subfolders and subfiles
- Applies to subfolders
- Applies to subfiles.
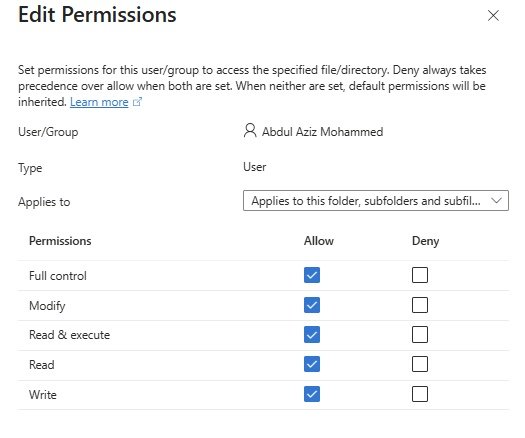
Check the DNS configuration of private end point
- Go to storage account/select storage account (starazstgacc01)/Secrity +networking/Netowrking/private endpoints/click starazstgacc01-pep
- Settings/DNS configuration
- starazstgacc01-pep-nic is created.
- 10.44.4.53 is assigned
- FQDN: starazstgacc01.file.core.windows.net
- Private DNS zone: privatelink.file.core.windows.net
Private DNS zones:
- Private DNS Zone:
- privatelink.file.core.windows.net is created
- click recorsets
- virtual network links
- Add virtual network links to hub vnet
Add vnet link
- Private DNS Zone and click privatelink.file.core.windows.net> virtual network links> add
- There was one link for vnet-star-prod
- Crate link for vnet-star-hub
- Link name: link-to-prod-vnet
- virtual network details: Subs: srmg-sub-hub, virtual network: vnet-srmg-hub
- Create.
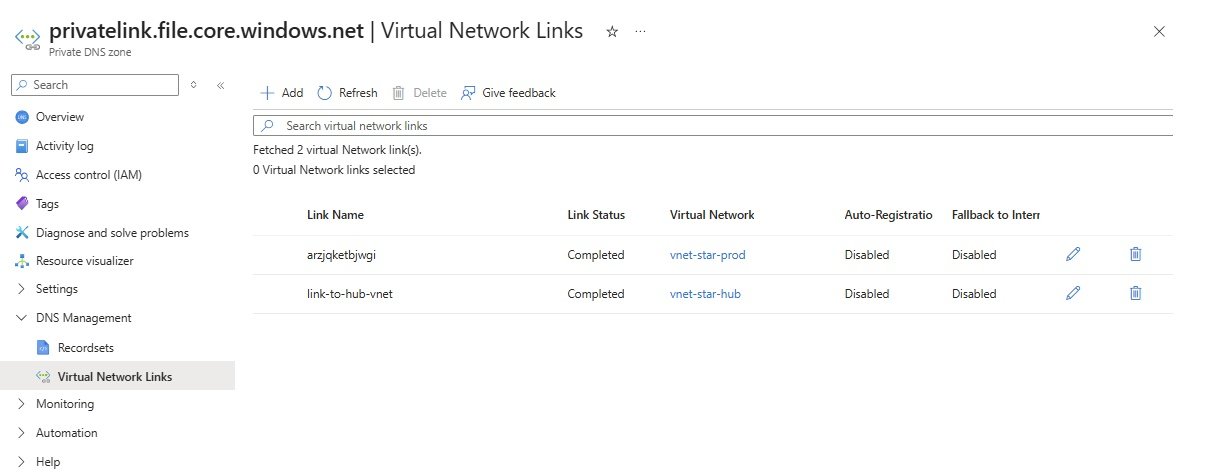
DNS private resolver:
- Go to DNS private Resolver and create.
- Basics
- Inbound Endpoints: Add an endpoint
- Outbound Endpoints: Not Configure
- Ruleset: Not Configure
- Tag: Deptartment= IT, Environment=HUB, service = DNS Resolver
- Review+Create
- Go to created dns resolver/Inbound endpoint
- 10.44.1.36
DNS settings:
- Go to vnet-star-hub/settings/DNS/change DNS server and choose Custom, paste IP 10.44.1.36 in 'Custom DNS Sever' and save.
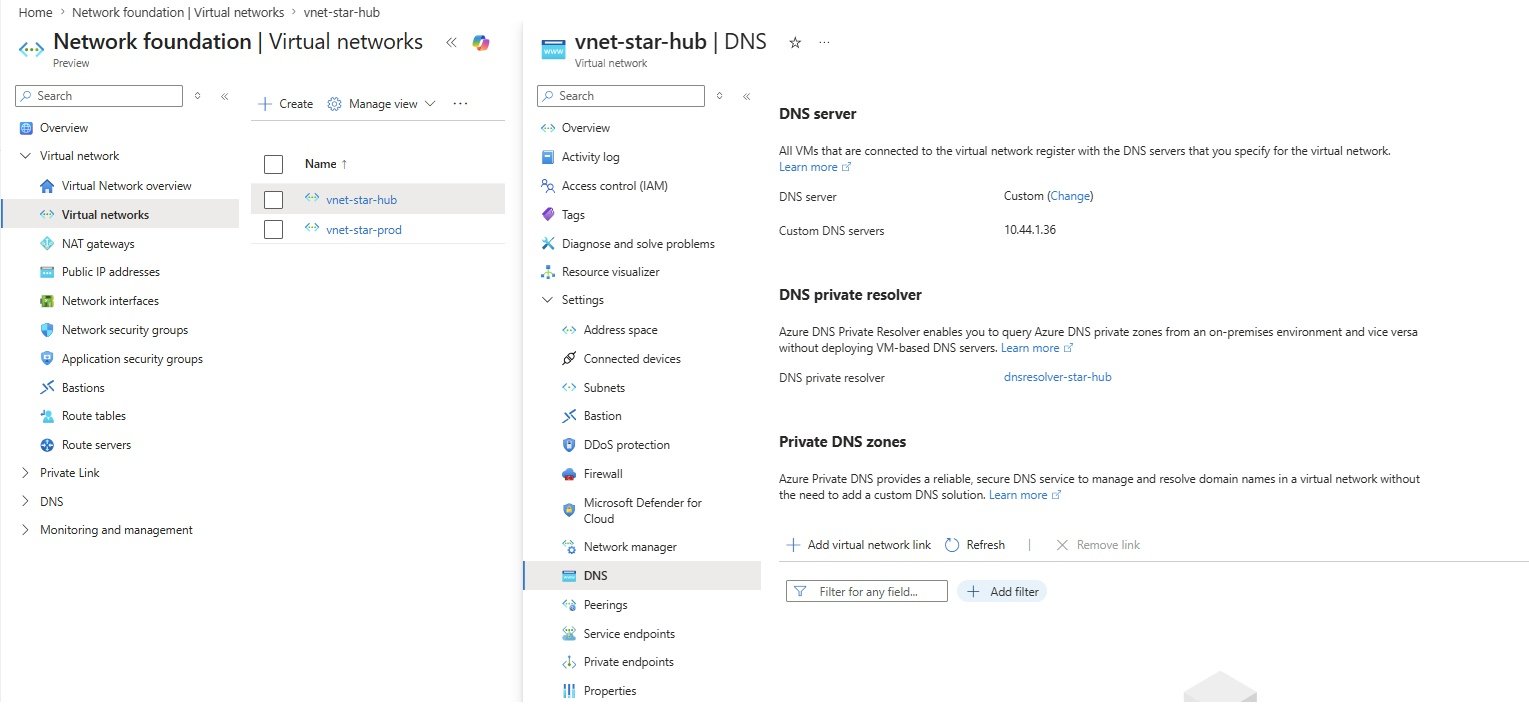
Client computer:
- Register the computer with Entra ID
- go to settings/accounts/Acess work or school/connect/select Koin this devie to Microsoft Entra Id, enter email address and password and click join.
- switch user and login with email address.
Download Azure VPN client from Microsoft Store
- Login with Entra ID credentials
- command prompt run: C:\
- click + sign and import configuration file, downloaded earlier.
Testing:
- open powershell in administrator mode and run registry command: reg add HKLM\SYSTEM\CurrentControlSet\Control\Lsa\Kerberos\Parameters /v CloudKerberosTicketRetrievalEnabled /t REG_DWORD /d 1
- open powershell in normal mode and run script:
- it wil connect z drive
Troubleshooting:
- Run powershell as administrator and rn
- ps C:\WINDOWS\system32> tnc 10.44.4.53 -Port 445
- Result:
- ComputerName: 10.44.4.53
RemoteAddress: 10.44.4.53
RemotePort: 445
SourceAddress: 10.44.16.3
TCPTestSucceeded: True
- Win+R and run \\10.44.4.53\it-folder
- window will open to enter credentils.
- copy and paste the script in normal powershell.
- error: cannot contact domain controller to service the authentication request.
- Test-NetConnection -ComputerName srmgazstgacc01.file.core.windows.net -Port 445
- ComputerName: starazstgacc01.file.core.windows.net
- RemoteAddress: 10.44.4.53
- RemotePort: 445
- InterfaceAlias: vnet-star-hub
- SourceAddress: 10.44.16.2
- TcpTestSucceeded: True
- tnc 10.44.1.36 -Port 53
- ComputerName: 10.44.1.36
- RemoteAddress: 10.44.1.36
- RemotePort: 53
- InterfaceAlias: vnet-star-hub
- SourceAddress: 10.44.16.2
- TcpTestSucceeded: True
- Resolve-DnsName srmgazstgacc01.file.core.windows.net -Server 10.44.1.36
- ComputerName: starazstgacc01.file.core.windows.net
- RemoteAddress: 10.44.4.53
- RemotePort: 445
- InterfaceAlias: vnet-star-hub
- SourceAddress: 10.44.16.2
- TcpTestSucceeded: True
- Run script so it will map z drive
- Error: The system cannot contact a domain controller to service the authenticatin request. Please try again later.
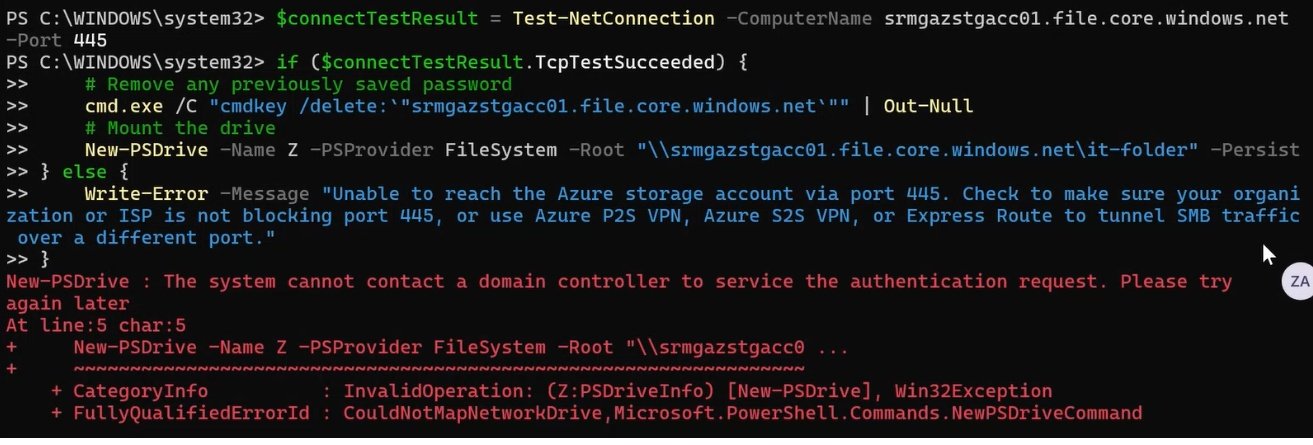
- Solution: Go to Entra ID/App registrations/All applications/click [Storage Account] starazstgacc01.file.core.windows.net/API perissions
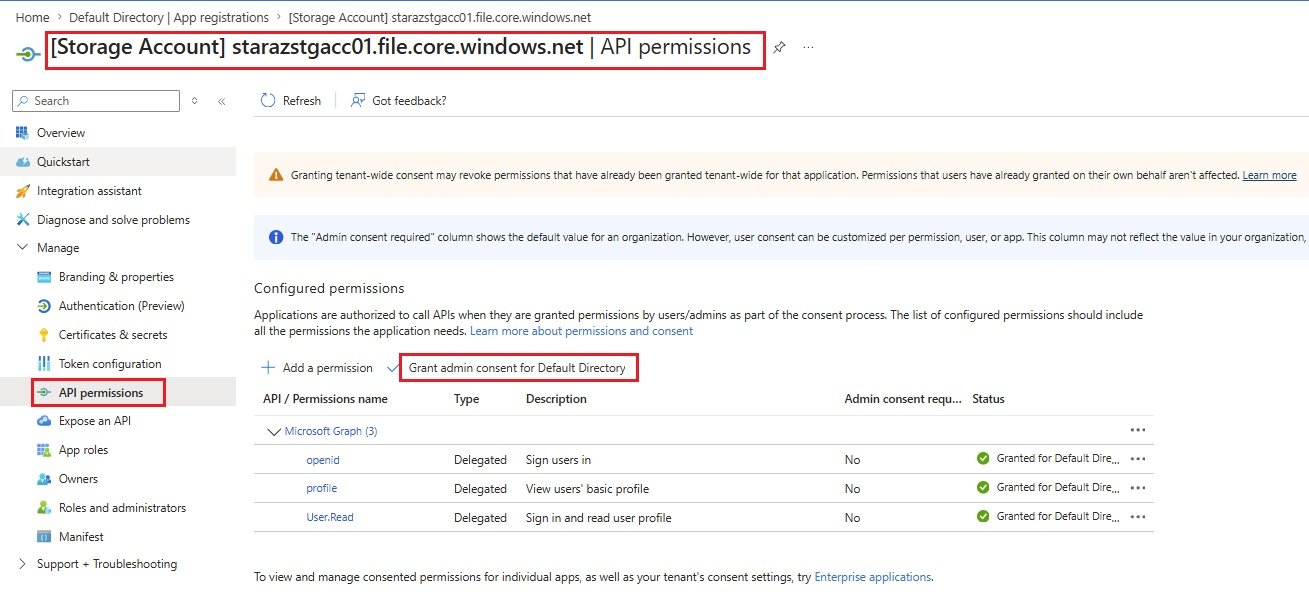
- Click Grant admin consent for Default Directory.
- Run the script again and it will map Z Drive.
- VPN client get disconnected frequently
- Code
Route Tables
- In Azure, routing controls how network traffic moves between subnets, VNets, the internet, and on-premises networks.
- When you create a subnet, by default azure creates system routes which allows traffic to communicate with other resources whithin a subnet and it allows internet by default. System routes are is not visible normally unless you create a routing table and assing routing table to subnet. By default there is no routing table created in a vnet.
- System Define Routes (SDR):
- By default no Routing Table is created, to view system routes, first creaet a routing table and assign with subnets.
- Go to vnets and click Routing Tables. No Routing table.
- Create a routing table for Prod vnet. Go to All Services/Network Foundation/Route Tables/Create
- Subscription: SRMG-SUB-PROD
- Resource Group: rg-vnet-prod
- Name: rt-default-prod
- Tags: Department=It, Environment=HUB, Servie=Route Table
- Go to rt-default-prod routing table.
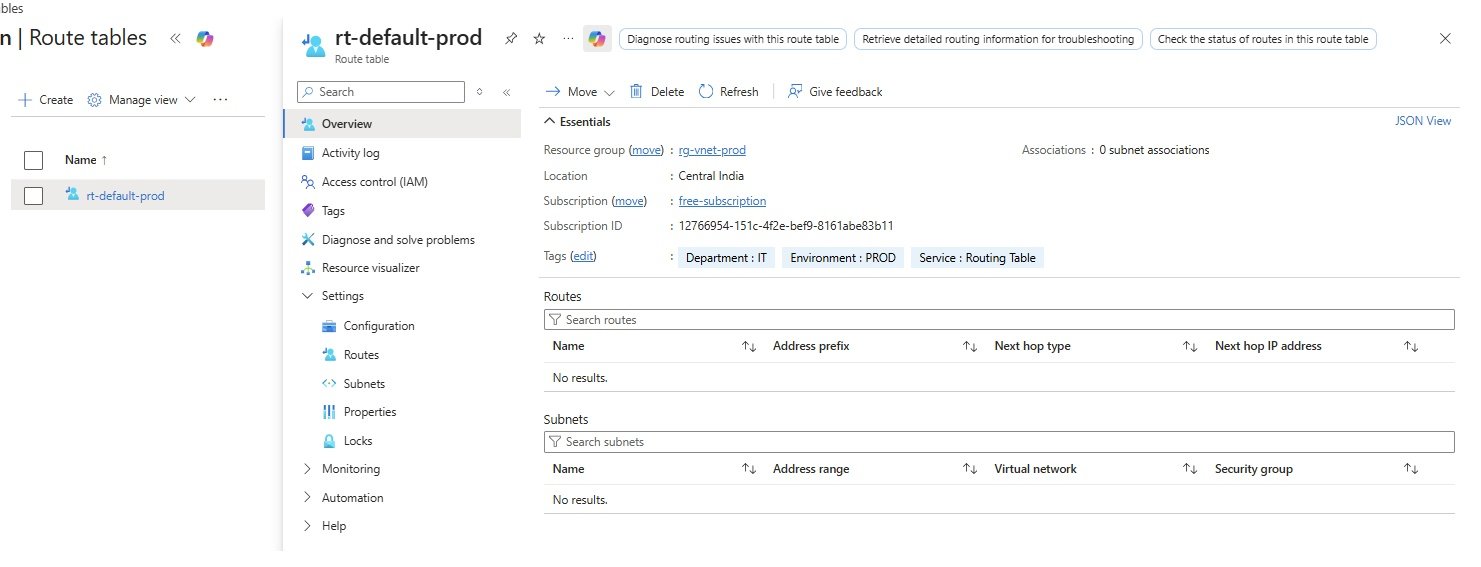
- Routing table is an empty, which first need to associate with subnet.
- Subnet Association:
- Go to Subnets/+Associate
- Virtual network: vnet-star-prod
- subnet: snet-addc-prod.
- Associate all subnets.
- Subnets are associated but there is no system define route is visible
- To view system defined routes, create a VM in any subnet and assign public IP with RDP allowed.
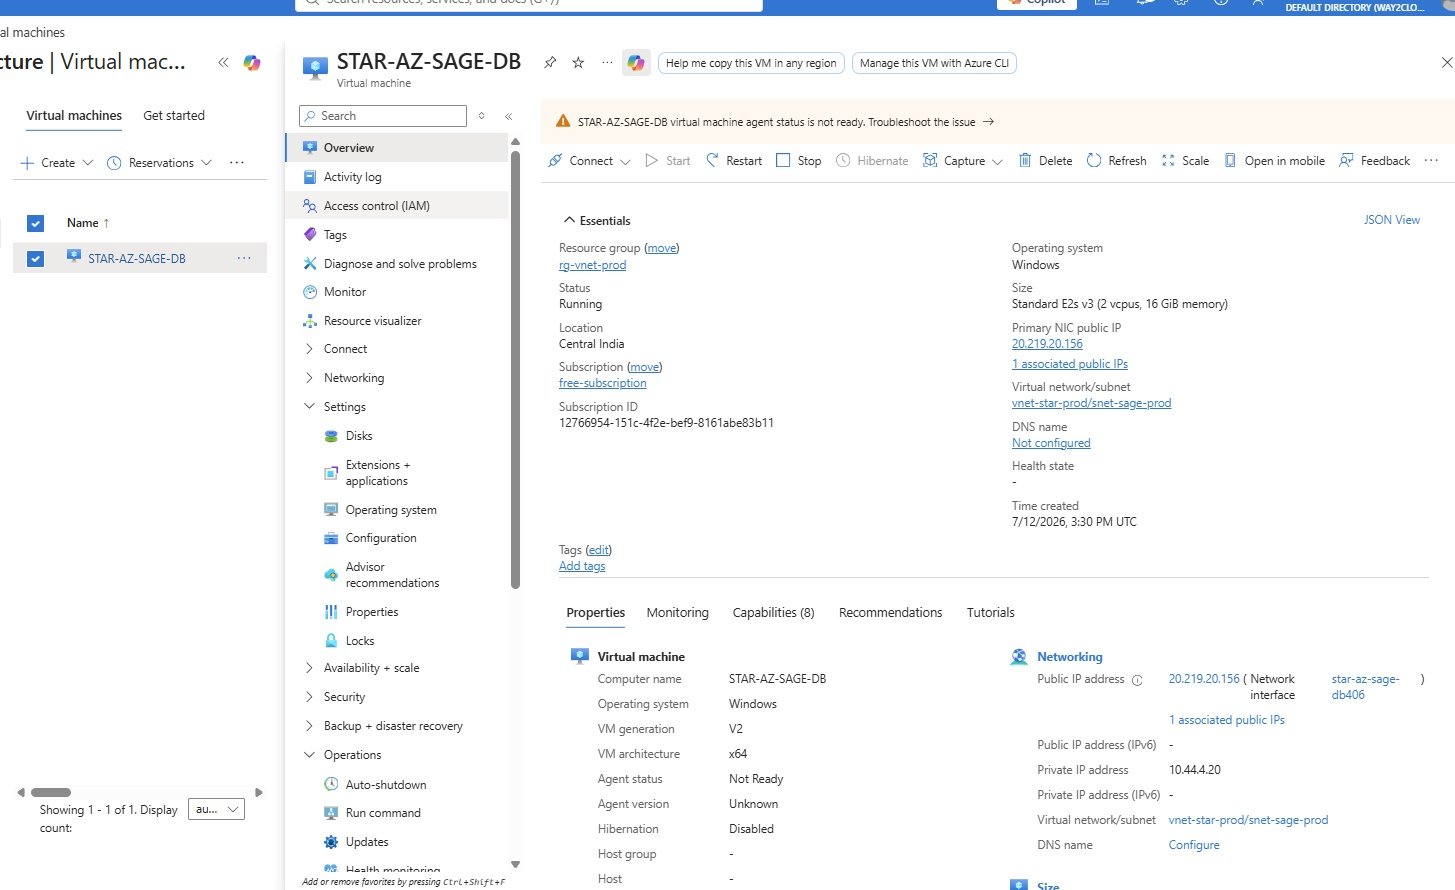
- Go to Route table/rt-default-prod/Help/Effective routes
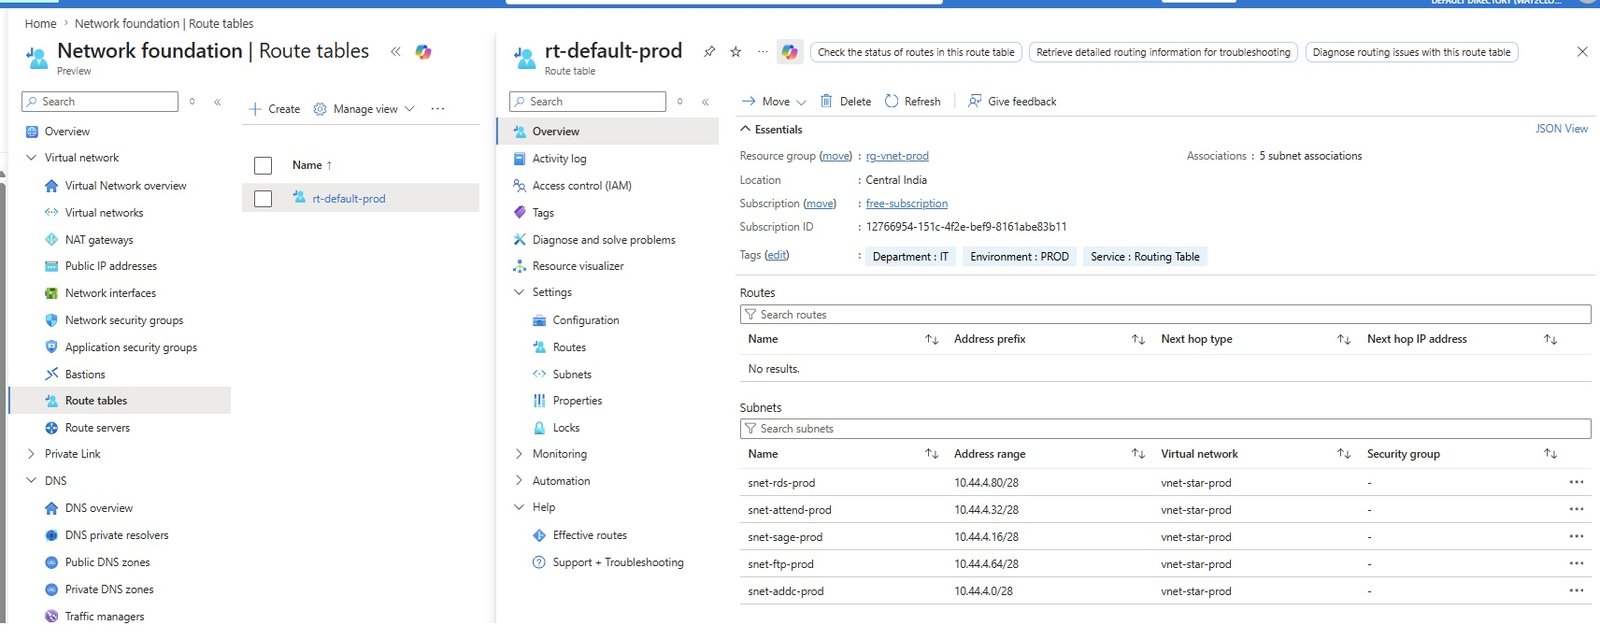
- click Effective routes, select subnet = snet-sage-prod, Network Interface=star-az-sage-db406 (NIC attached to Sage VM)
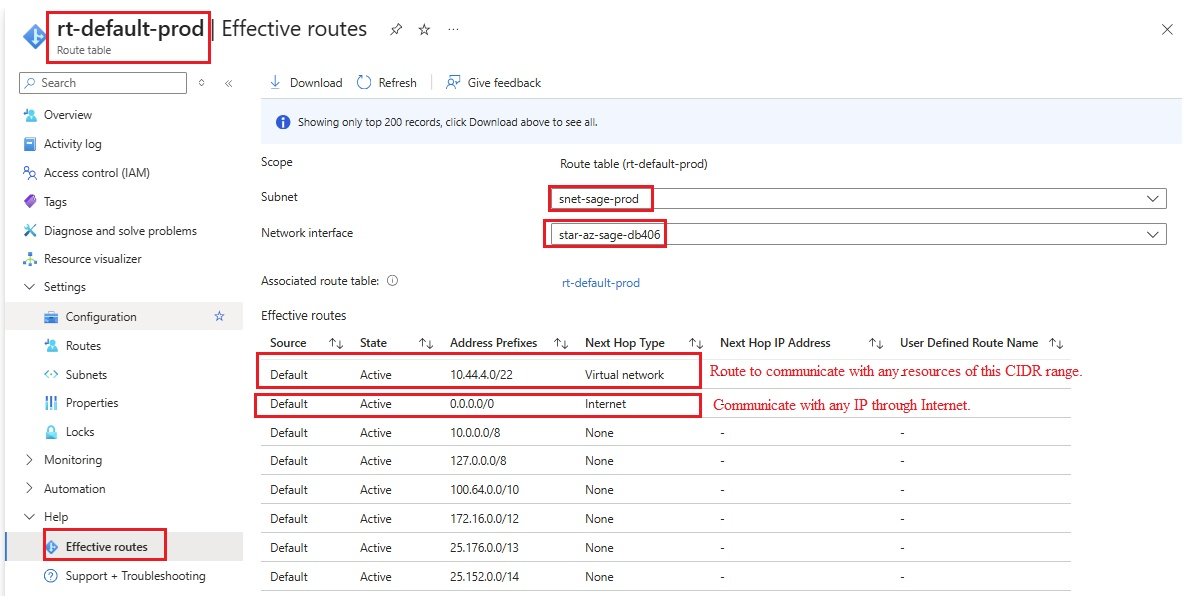
- First Active route is to communicate with any resource of this CIDR range 10.44.4.0/22, communicating with other resources within same Vnet.
- Second Active route is to communicate with any IP using internet. The VM will have internet access.
- The remaining routes next hop type is none, traffic further will not go.
- Create a Firewall and define all routes must pass through Firewall.
- Azure firewall:
- Firewall should be created in the existing resource group rg-vnet-hub
- Copy private IP 10.44.0.68
- User Defined Routes (UDRs):
- All Traffic, Prod vnet and Storage traffic should pass through Firewall (virtual appliances)
- Create 3 routes for all traffic, prod vnet and storage.
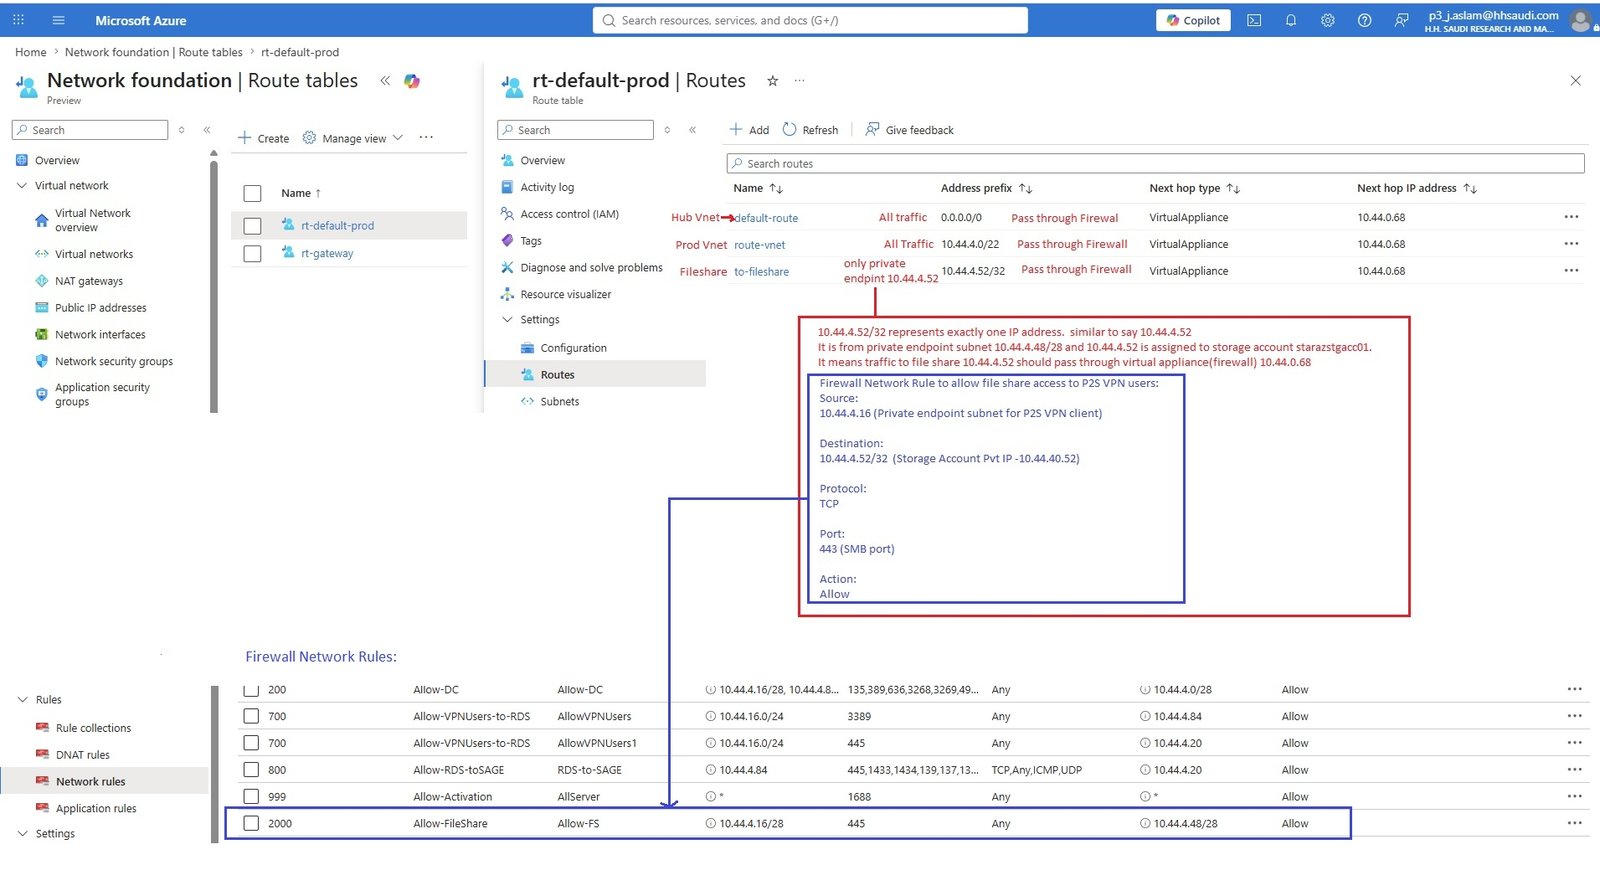
- All traffic:
- Entered firewall IP address in Next hop address of virtual appliance
- Route name = default-route (All Trafic through firewall)
- Destination type: IP Addresses / Service Tag
- Destination IP Addresses/CIDR ranges = 0.0.0.0/0 (traffic from this subnet going to anywhere 0.0.0.0/)
- Next hop type = virtual network gteway/virtual network/internet/virtual appliance/None (virtual appliance is firewall), traffic should go with this hop
- Next hop address: 10.44.0.68 (private IP of Firewall), traffic should pass through firewall.
- Once you save the rule, now the traffic will come to firewall from VM instead it was going directly to internet.
- Prod-vnet:
- Route name = route-vnet
- Destination type: IP Addresses / Service Tag
- Destination IP Addresses/CIDR ranges = 10.44.4.0/22 (traffic for this subnet should pass through firewall)
- Next hop type = virtual network gteway/virtual network/internet/virtual appliance/None (virtual appliance is firewall), traffic should go with this hop
- Next hop address: 10.44.0.68 (private IP of Firewall), traffic should pass through firewall.
- Once you save the rule, now the traffic will come to firewall from VM instead it was going directly to internet.
- Storage Traffic:
- Route name = to-fileshare
- Destination type: IP Addresses / Service Tag
- Destination IP Addresses/CIDR ranges = 10.44.4.52/32 (Private endpoint of starazstgacc01)
- Next hop type = virtual network gteway/virtual network/internet/virtual appliance/None (virtual appliance is firewall), traffic should go with this hop
- Next hop address: 10.44.0.68 (private IP of Firewall), traffic should pass through firewall.
- Once you save the rule, now the traffic will come to firewall from VM instead it was going directly to internet.
- Remote connection will also be disconnected as we do not have define RDP rule in firewall.
- There is no internet in the VM as traffic is at firewall, we need to create a rule in firewall to allow traffic to got to internet but for security reason we do not define public IP.
- Go to Firewall and define the following rules.
- We define DNAT rule so that private IP of VM will translate into Firewall public IP and VM will have internet.
- Rule Collection:
- DNAT rule: It is configure for Incoming Ingress traffic. RDP 3389
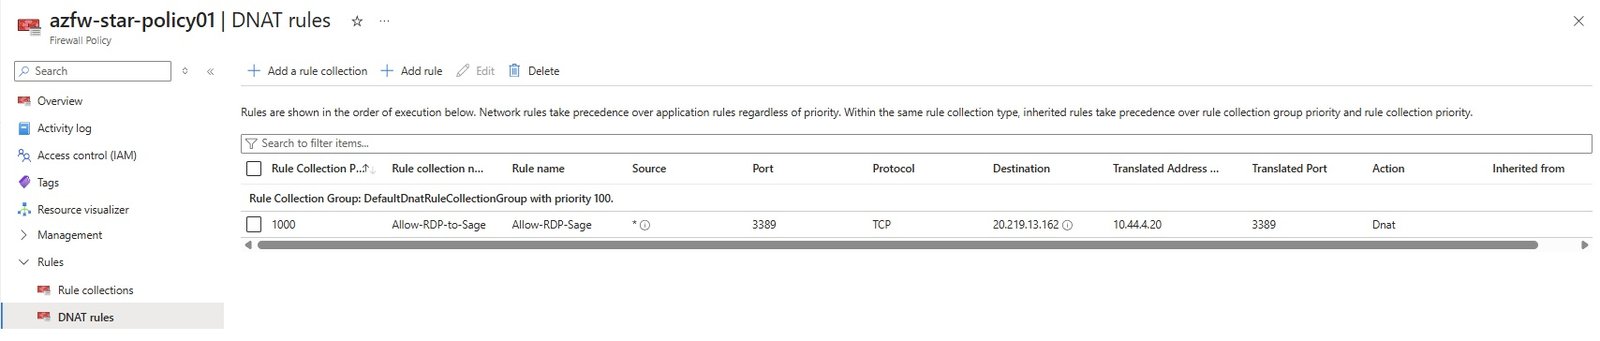
- An Azure DNAT (Destination Network Address Translation) rule is a rule that translates traffic arriving at a public IP and forwards it to a specific private IP address and port inside your Azure virtual network.
- Go to firewall\azfw-star-hub\Firewall Policy: click azfw-star-policy01
- Rules\DNAT rules\Add a rule collection.
- Name:
- Rule collection type:
- Priority:
- Rule collection action:
- Rule collection group:
- Rules:
- Name:
- Source type:
- Source:
- Protocol:
- Destination ports:
- Destination firewall ip:
- Translated type:
- Translated address or:
- Translated port
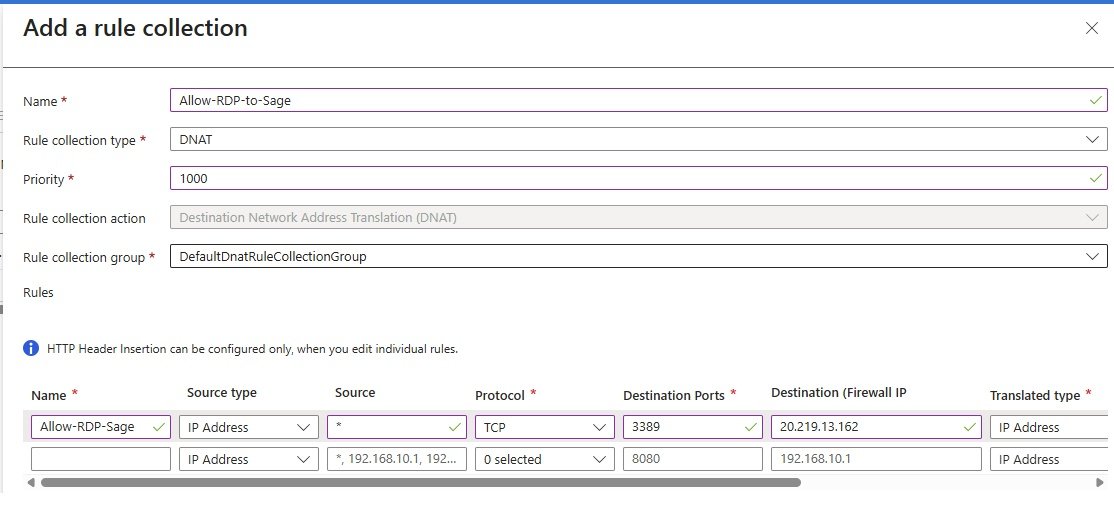
- Continuation of above image
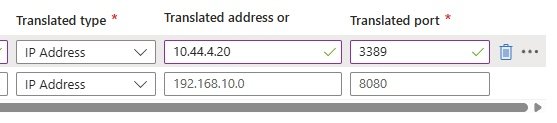
- Save it.
- copy public ip of firewall 20.219.13.162 and enter in Remote Desktop Connection and Check VM is getting RDP.
- Make sure Peering between hub and prod has been done as firewall is configured in hub-vnet and sage server is in Prod-vnet.
- Network Rule: Outgoing traffic, allow ports like 80, 443, 445 (SMB).
- port http:80, https:443 can be define in application rule.
- Rule 2000:
- Fileshare starazstgacc01 has got private ip from private endpoint vnet (10.44.4.52 from subnet 10.44.4.48/28)
- Users need to access fileshare as follows:
- aaatext
- accounts-data
- eic-office
- frontdesk
- hr-data
- it-folder
- These users will access the share by using P2S vpn, VPN will assing a private IP from 10.44.4.16/24 subnet to users so they can access the file share.
- Their authentication is performed through Entra ID.
- Port 445 (SMB) is given to all VPN users subnet (10.44.4.16/28) to storage subnet 10.44.4.48/28
- Attend server need storage access:
- STAR-AZ-ATTEND need an access to fileshare/it-folder which has got applicaiton data need to copied into attend server.
- it-folder is mapped in Attend server and rule has been defined in the above and entered ip address of attend server 10.44.4.36, this will allow SMB(445) acccess to Attend Server.
- Rule 999
- code
- Rule 800
- Code
- Rule 700
- Code
- Rule 700
- Code
- Rule 200
- Code
- Rule 100
- Code
- Code
- Application Rule: Allow browsing http or https port (Internet).
- Allow Internet on Sage Server
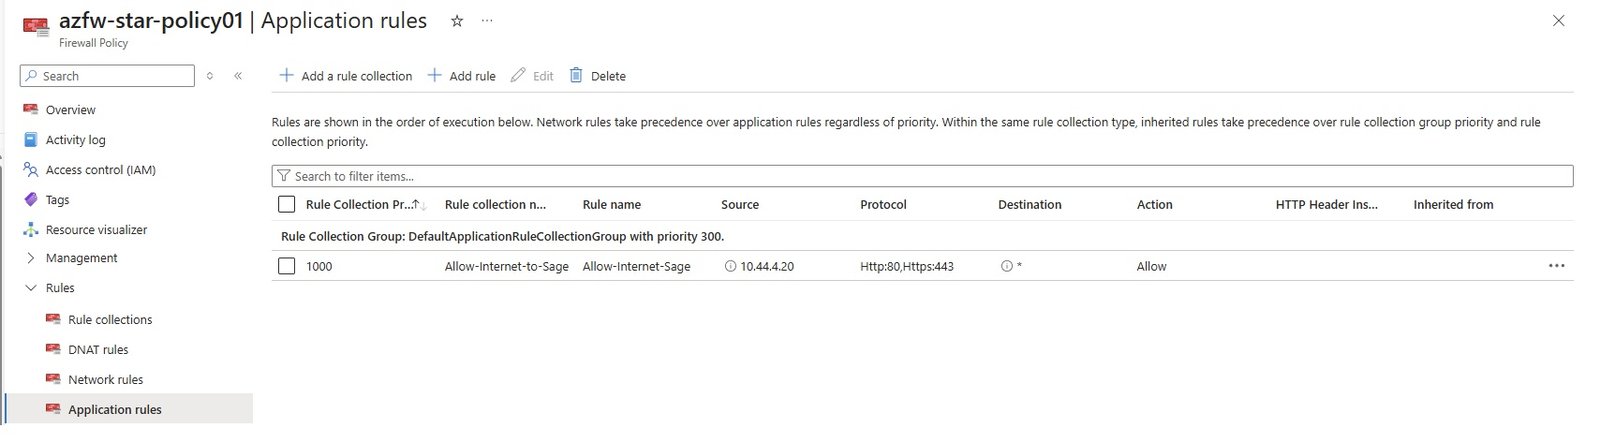
- Add a rule collection
- Name:Allow-internt-to-Sage
- Rule Collection type: Network/Application/DNAt
- Priority: 1000
- Rule collection action: Allow /Deny
- Rule collection group: DefaultApplicationRuleCollectionGroup
- Rules
- Name: Allow-Internet-Sage
- Source type: IP address /IP Group
- Source: 10.44.4.20 (Private IP of Sage Server)
- Protocol: http, https
- TLS inspection:
- Destination type: FQDN/FQDN tags/Web Categories
- Destination: *
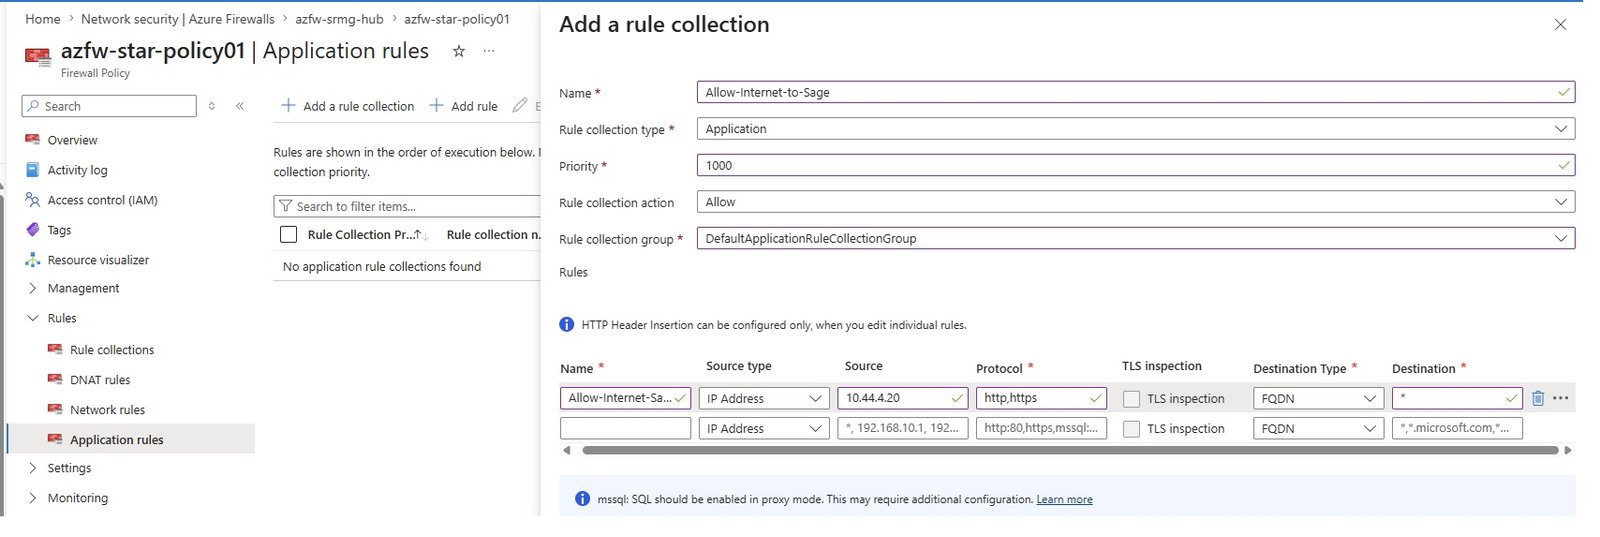
- Check internet in the VM
- Create Route table for Gateway:
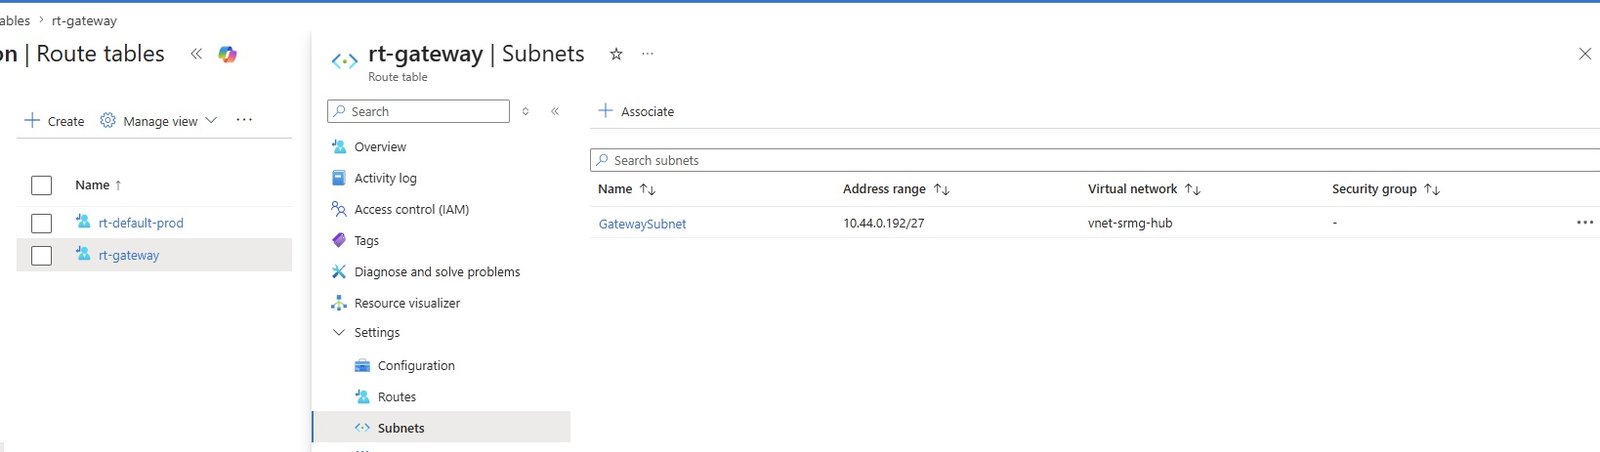
- Go to All Services/Network Foundation/Route Tables/Create
- Subscription: SRMG-SUB-PROD
- Resource Group: rg-vnet-prod
- Name: rt-gateway
- Tags: Department=It, Environment=HUB, Servie=Route Table
- Associate to subnet
- Associate : GatewaySubnet
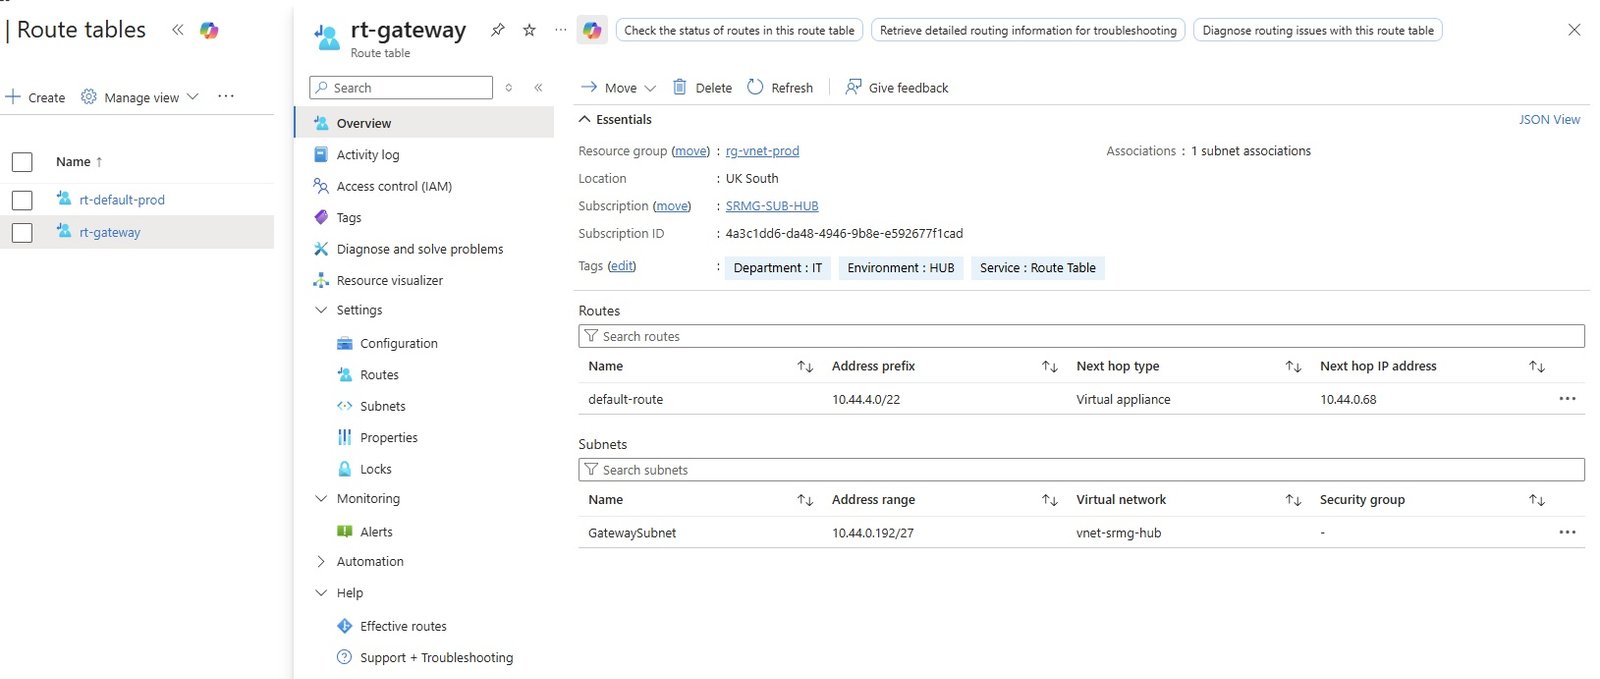
- Add Routes:
- Go to settings/Routes/Add
- All traffic of vnet CIDR 10.44.4.0/22 should pass through firewall 10.44.0.68
- default-route_for_rt_gateway-hub.jpg
- Route is created
- route_for_rt_gateway-hub.jpg
- Code
Private Endpoint
- Create subnet in Prod virtual network
- snet-privateep-prod: Name= snet-privateep-prod, 10.44.4.48/28 (16 addresses), Range will be 10.44.4.48-10.44.4.63, Enable private subnet (no default oubound access Checked).
- Assing this subnet to storage account so that it will assing a private ip address from this CIDR range.
Peering
- Create peering from vnet-star-hub to vnet-star-prod.
- Go to virtual network/vnet-star-hub/settings/peering/add
- Add prod to hub
- code
- code
Storage
- Create storage account
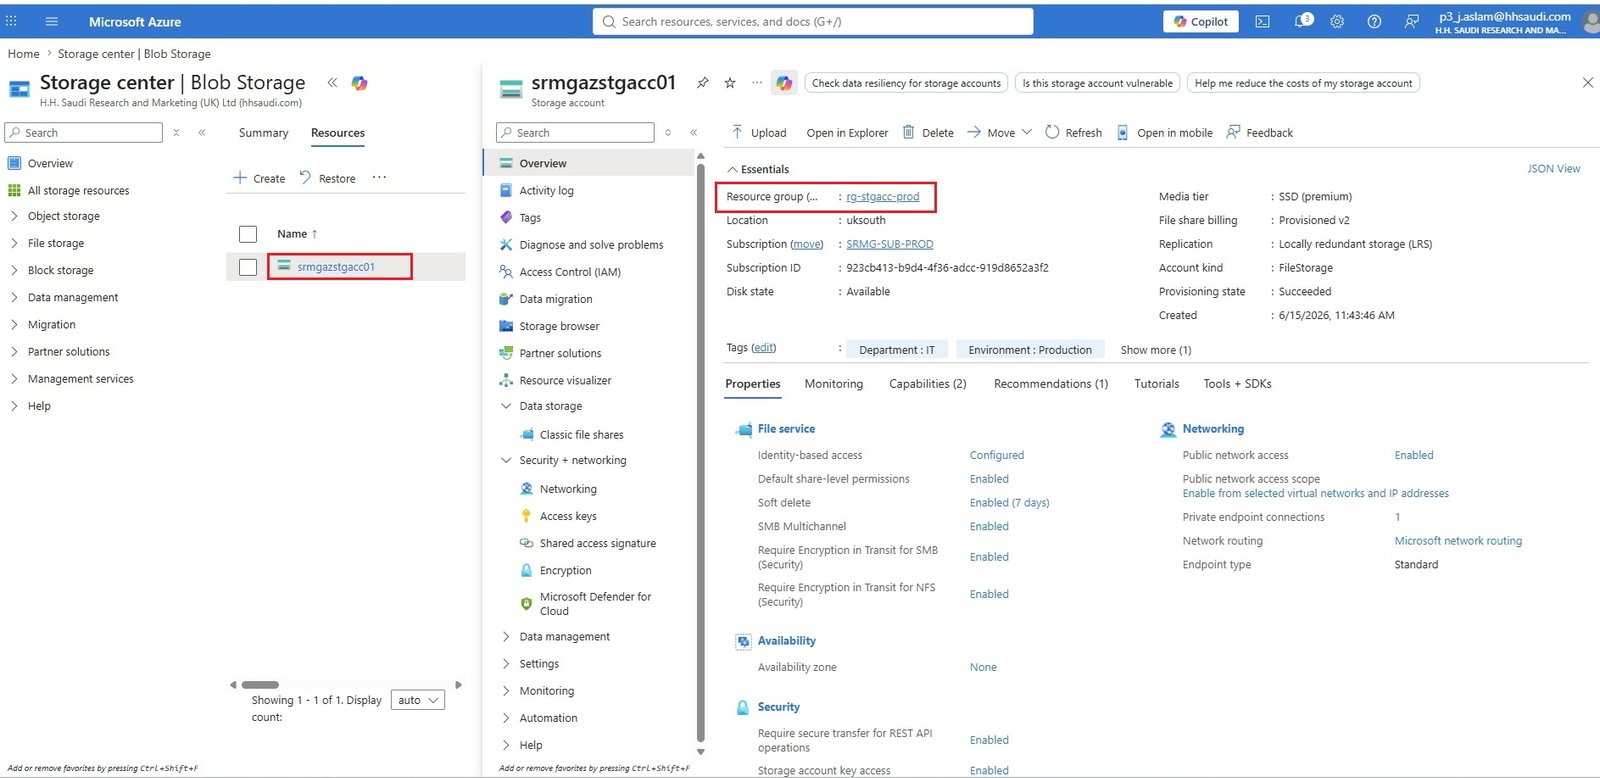
- Security+networking
- Networking:
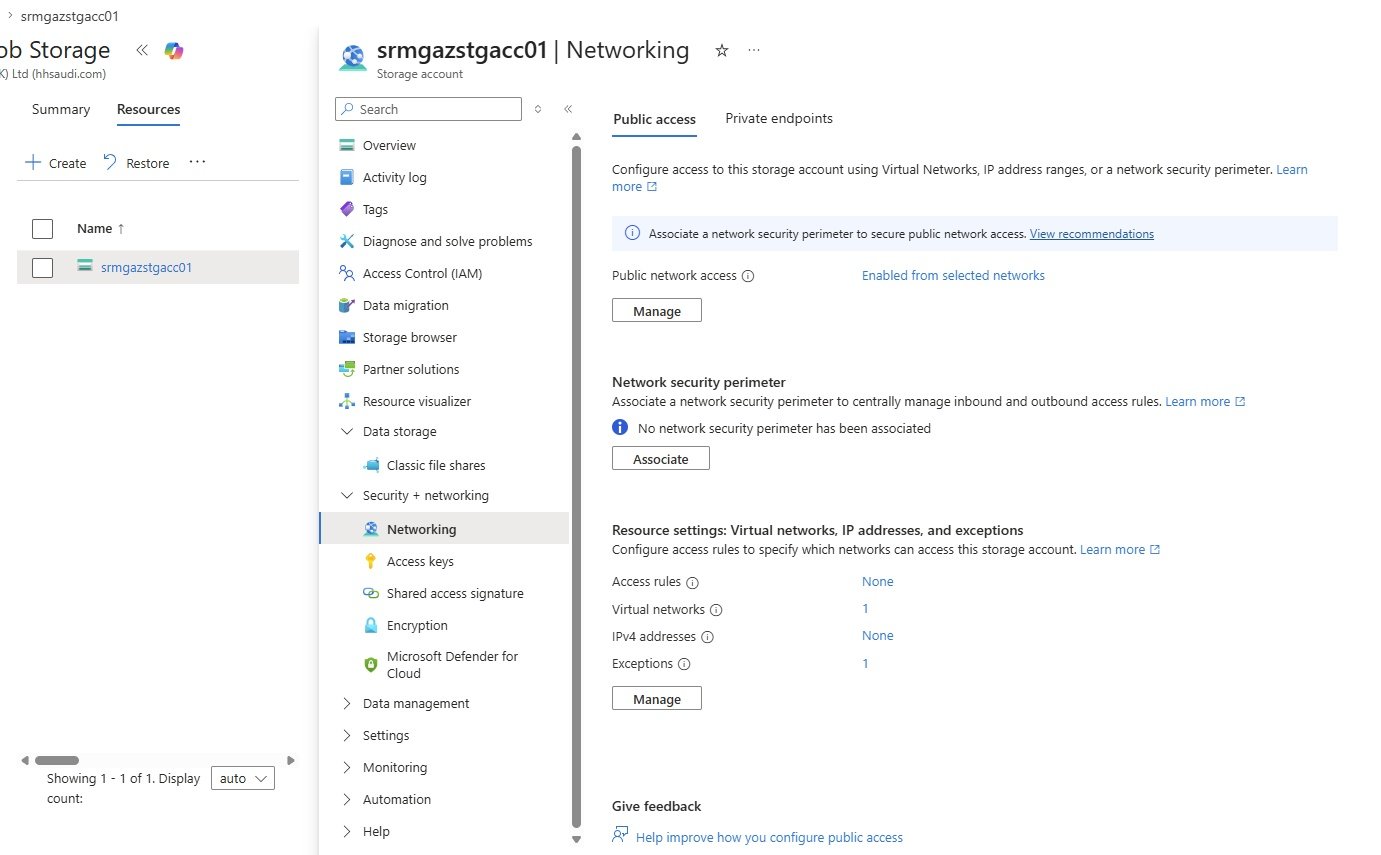
- Manage access:
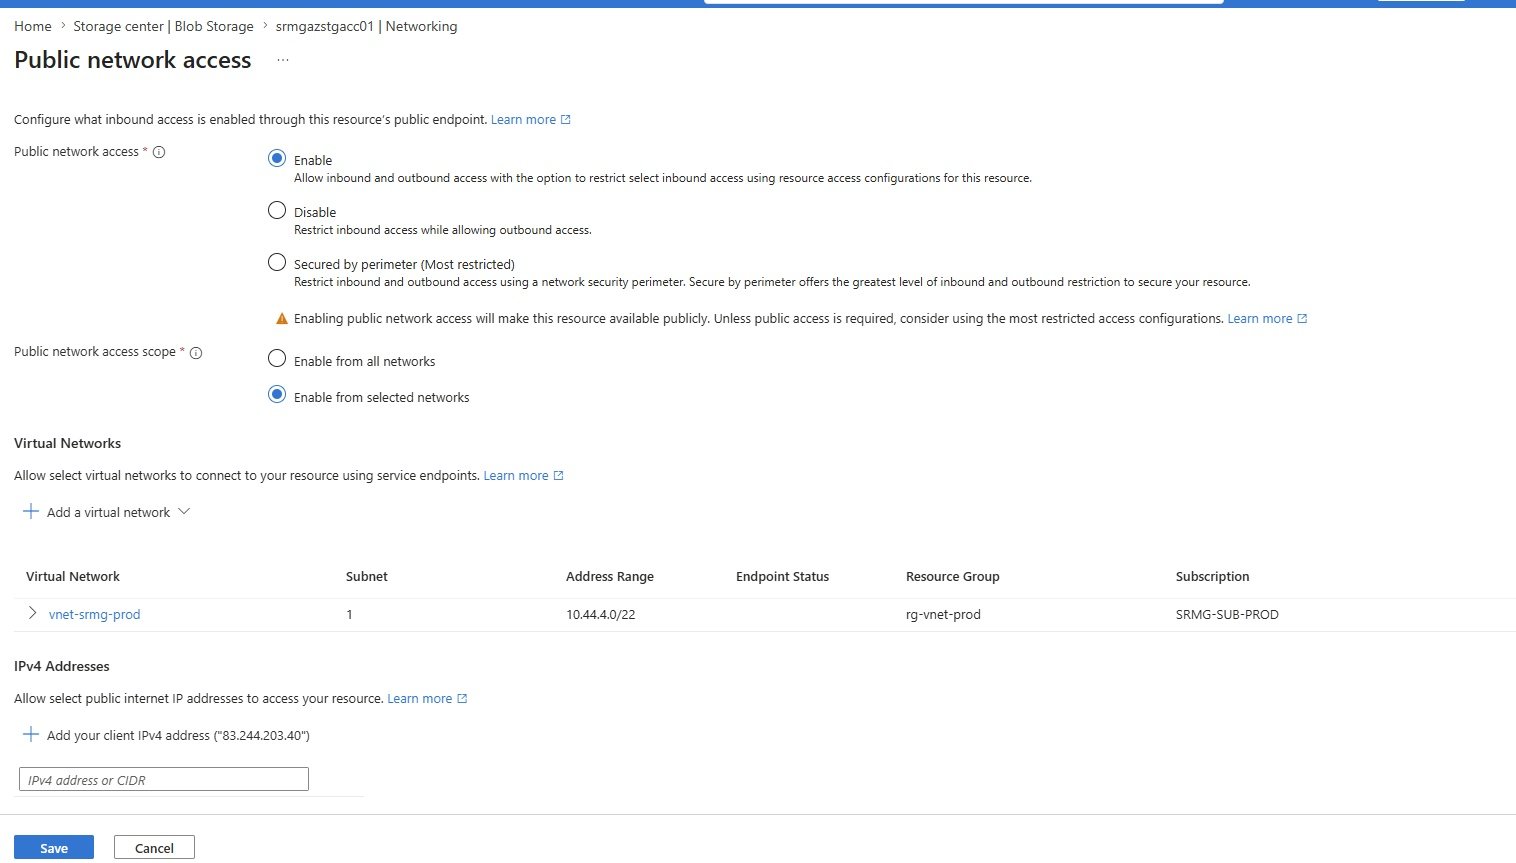
- Private endpoints:

- Private endpoint settings:
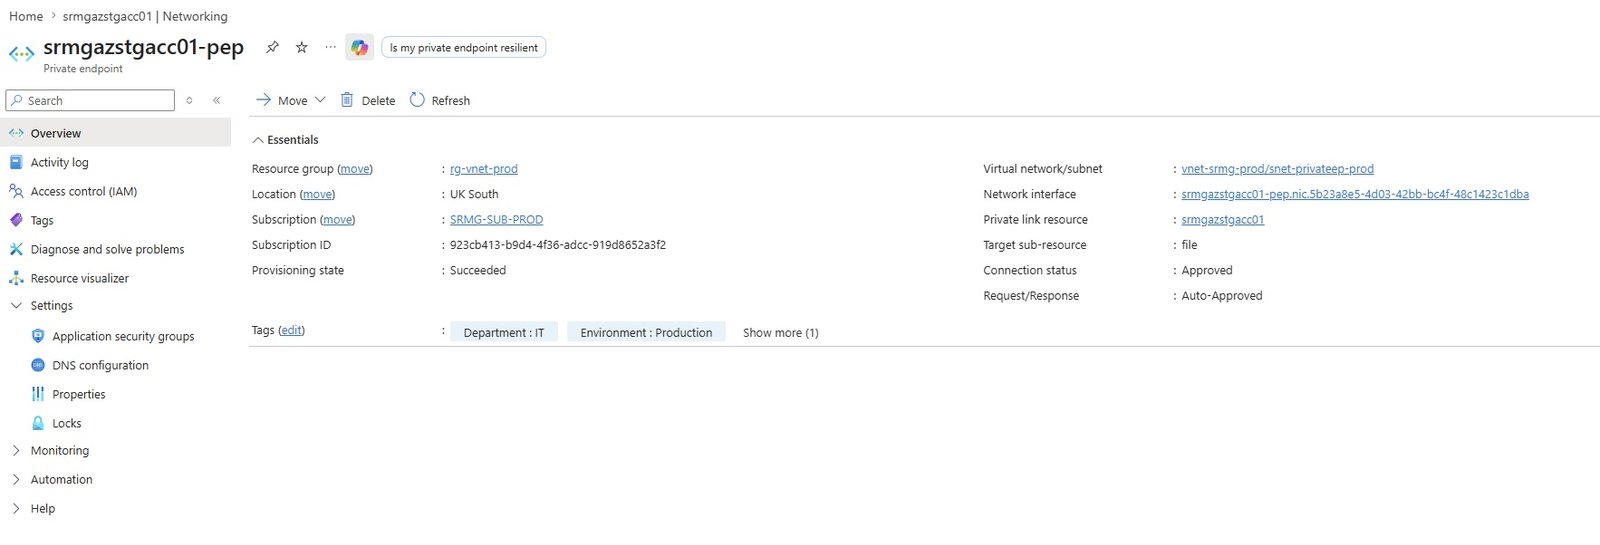
- DNS configuration:
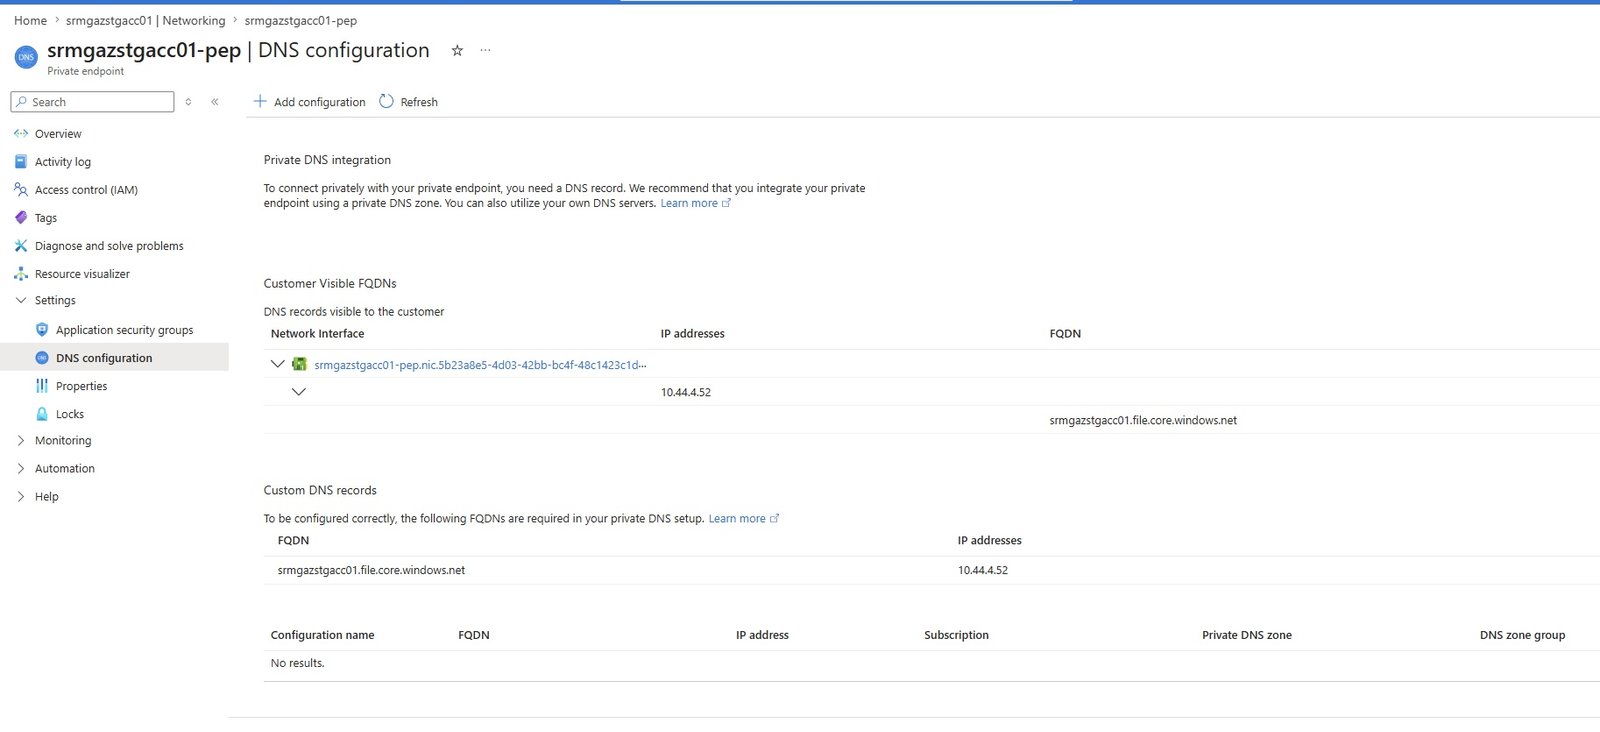
- Resource access settings:
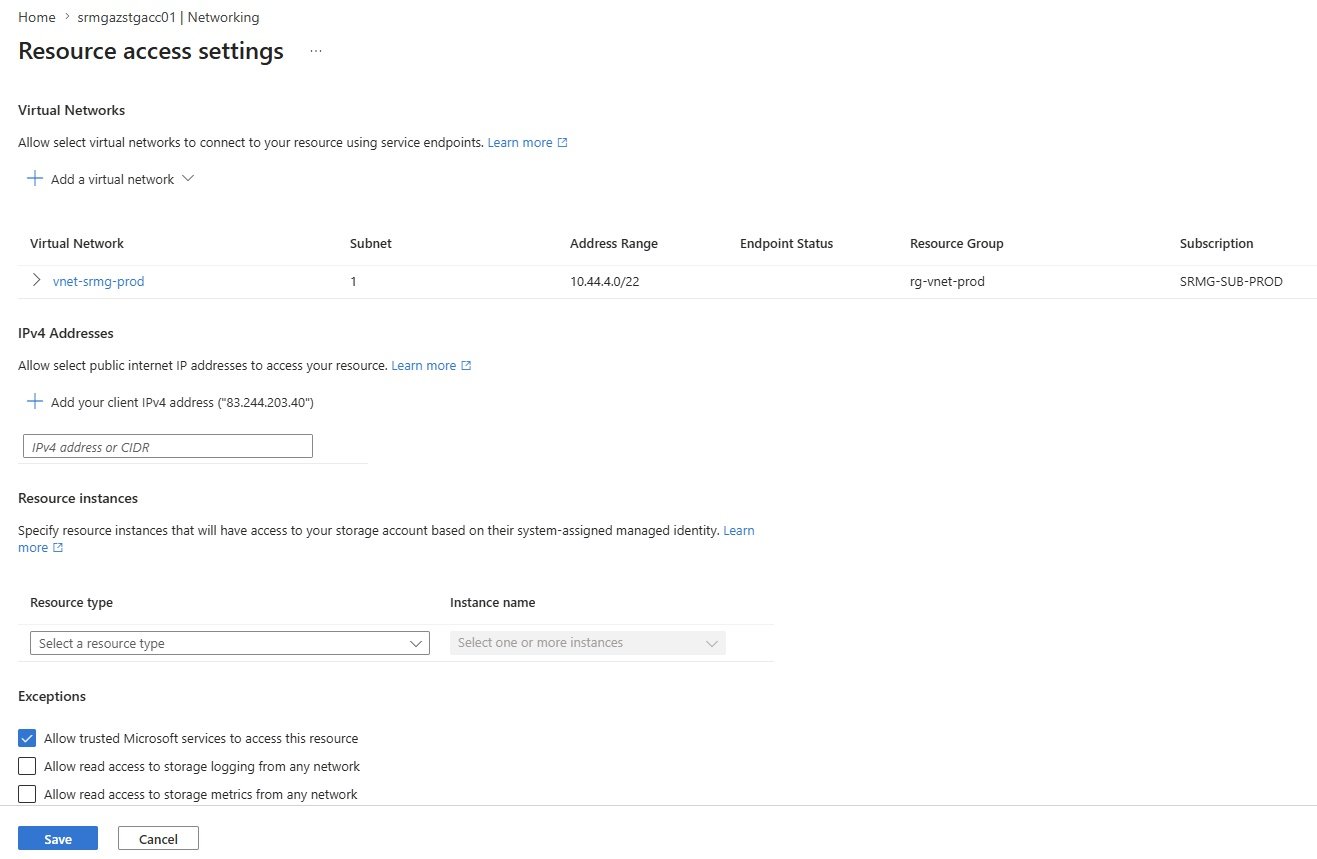
- Create file share:
- Access file share with public access
- Code
- Access file share with private access using Point-to-site-VPN
- To connect a client-to-site (P2S) VPN user to an Azure Storage Account using a private IP, you need to use Azure Private Endpoints and ensure that DNS resolves the storage account name to the private IP address.
- Architecure
-
+-----------------------+
| Remote User Laptop |
| (P2S VPN Client) |
+-----------+-----------+
|
| OpenVPN / IKEv2
|
+-----------v-----------+
| Azure VPN Gateway |
+-----------+-----------+
|
|
+-----------v--------------------------------------+
| Azure Virtual Network (10.0.0.0/16) |
| |
| GatewaySubnet |
| |
| +-------------------------------------------+ |
| | Private Endpoint Subnet | |
| | 10.0.1.4 | |
| +-------------------+-----------------------+ |
| | |
| | |
| Azure Storage Account |
| (Private Endpoint) |
| |
+--------------------------------------------------+DNS:
storageaccount.blob.core.windows.net
↓
10.0.1.4 (Private Endpoint IP) - Configuration: This configuration is for remote users to securely access an Azure Storage Account using a Client-to-Site (P2S) VPN, and a Private Endpoint.
- Step 1: Create a Virtual Network
- vnet-srmg-hub (10.44.0.0/22)
- | Subnet | Example CIDR |
| ---------------------------| ------------ |
| GatewaySubnet |10.0.0.0/24 |
| PrivateEndpointSubnet | 10.0.1.0/24| - GatewaySubnet 10.44.0.192 - to 10.44.0.223
- | Subnet | Example CIDR |
- vnet-srmg-prod (10.44.4.0/22)
- snet-privateep-prod 10.44.4.48 to 10.44.4.63
- vnet-srmg-hub (10.44.0.0/22)
- Step 2: Create the Azure VPN Gateway
- vpngw-srmg-hub
- Virtual network= vnet-srmg-hub
- GatewaySubnet = 10.44.0.192 to 10.44.0.223
- Create a VPN Gateway.
- Select the VNet created above.
- Choose a VPN type (such as Route-based).
- Configure Point-to-site:
- Enable OpenVPN, IKEv2, or both.
- Define a client address pool (for example
172.16.0.0/24). - Configure your chosen authentication method (Azure AD, certificates, etc.).
- Download and install the VPN client profile on user devices.
-
After connecting, confirm the client can reach resources in the VNet.
- Step 3.1: Create the Storage Account
- subscription = SRMG-SUB-PROD
- name = srmgazstgacc01
- Step 3.2: Create a Private Endpoint
- Subscription = SRMG-SUB-PROD
- name = srmgazstgacc01-pep
- Networking Vnet= vnet-srmg-prod
- subnet = snet-privateep-prod (10.44.4.48 to 10.44.4.63)
- privateDNS zone = privatelink.file.core.windows.net
- Open the Storage Account.
- Go to Networking → Private endpoint connections.
- Create a new Private Endpoint.
- Select:
- Target subresource (for example Blob or File).
- The VNet created earlier.
- The
PrivateEndpointSubnet.
- Azure assigns a private IP (for example
10.0.1.4).
- Step 3.3: Configure identity-based access
- select kerberos
- Step 3.4: Create File share
- create file share it-folder
- Step 4: Configure a Private DNS Zone
- Create and link the appropriate Private DNS Zone for the storage service you're using.
- | Storage Service | Private DNS Zone |
| --------------- | ------------------------------------ |
| Blob | `privatelink.blob.core.windows.net` |
| File | `privatelink.file.core.windows.net` |
| Queue | `privatelink.queue.core.windows.net` |
| Table | `privatelink.table.core.windows.net` | - When creating the Private Endpoint, Azure can automatically create the required DNS record.
- mystorageaccount.blob.core.windows.net
│
▼
mystorageaccount.privatelink.blob.core.windows.net
│
▼
10.44.4.52 - Link the Private DNS Zone to the VNet.
- Step 5: Ensure VPN Clients Use the Correct DNS
- VPN clients must resolve the storage account name to the private IP, not the public IP.
- nslookup mystorageaccount.blob.core.windows.net
- The returned address should be the Private Endpoint IP (for example
10.44.4.52).
- Step 6: Configure the Storage Account Firewall
-
Under the Storage Account Networking settings:
- Set Public network access to Disabled (recommended for maximum security), or
- Keep it enabled but restrict access as needed.
With a properly configured Private Endpoint:
- ✅ P2S VPN users access the storage account through the private IP.
- ✅ You do not need to allow individual client public IP addresses in the storage firewall.
-
- Step 7: Check Network Security Groups (NSGs)
-
If NSGs are applied to the Private Endpoint subnet:
- Ensure they do not block required traffic.
- Allow TCP port 443 between VPN clients and the Private Endpoint if restrictive rules are in place.
-
- Step 8: Test Connectivity
- From a connected VPN client:
- Verify DNS:
- Powershell: nslookup mystorageaccount.blob.core.windows.net
- Expected Result:
- Name: mystorageaccount.blob.core.windows.net
Address: 10.44.4.52 - Verify HTTPS:
- powershell: Test-NetConnection mystorageaccount.blob.core.windows.net -Port 443
- A successful connection indicates that routing and network access are working.
- Step 9: Validate with Azure Storage Explorer or Azure CLI
-
After connecting to the VPN:
- Sign in with your Azure credentials (or use an appropriate connection method).
- Access the storage account.
- Upload or download a test blob or file to confirm end-to-end connectivity.
- Troubleshooting Checklist
- | Symptom | Possible Cause | Recommended Check |
| ----------------------------------------------- | ---------------------------------------------------- | ------------------------------------------------------------------- |
| DNS resolves to a public IP | Private DNS not configured or not used by the client | Verify DNS settings and zone linkage |
| VPN connects but storage is unreachable | Missing routes or NSG restrictions | Check effective routes and NSG rules |
| HTTPS connection on port 443 fails | Firewall or network rule blocking traffic | Review NSGs and network path |
| Access works from Azure VMs but not VPN clients | VPN clients are using different DNS servers | Configure VPN clients to use DNS that resolves the Private Endpoint |
-
- Code
- Step 1: Create a Virtual Network
- Code
- code
- code
- Create storage account
VMs
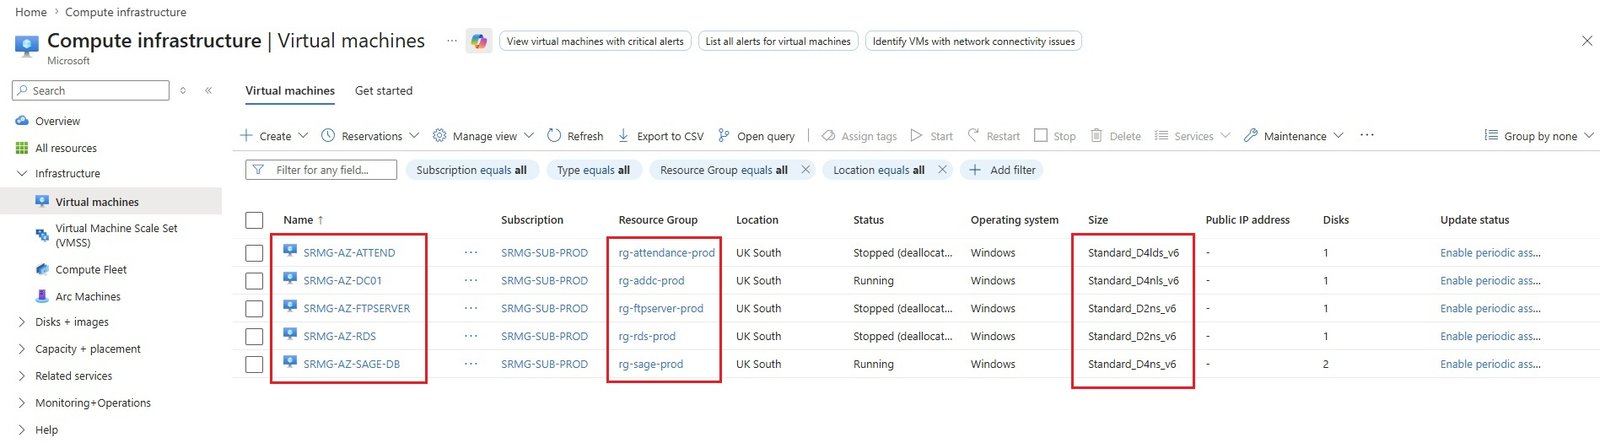
STAR-AZ-DC01
- Basics
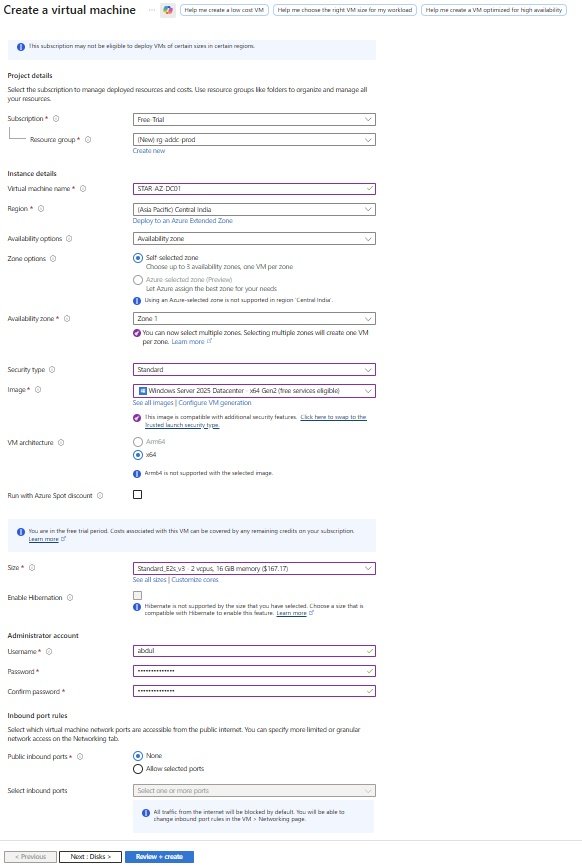
- Disks
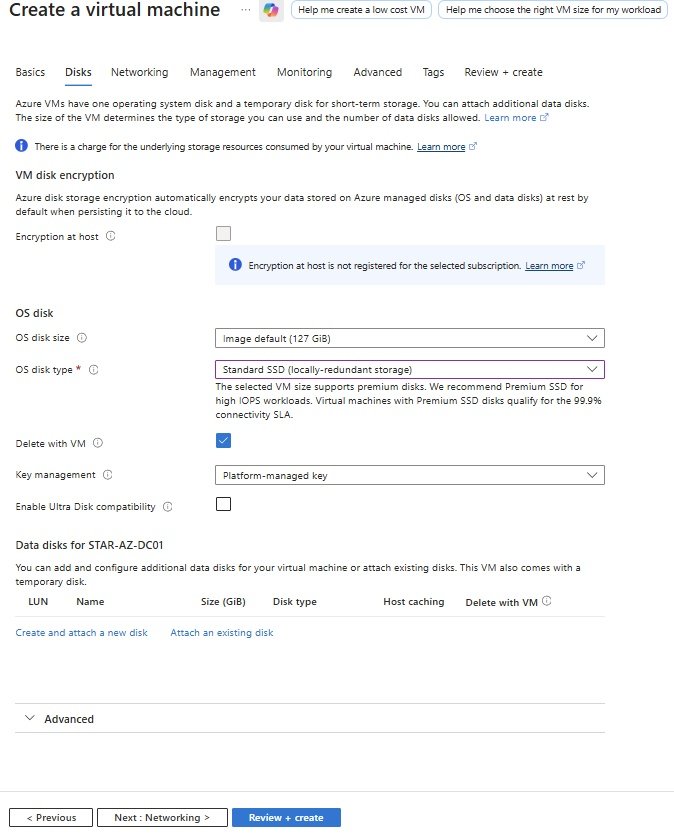
- Networking
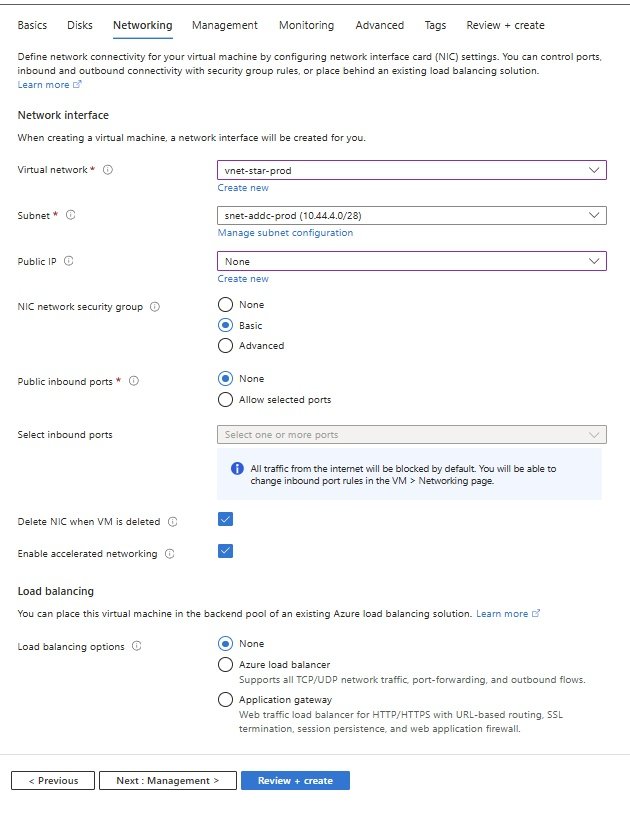
- Management
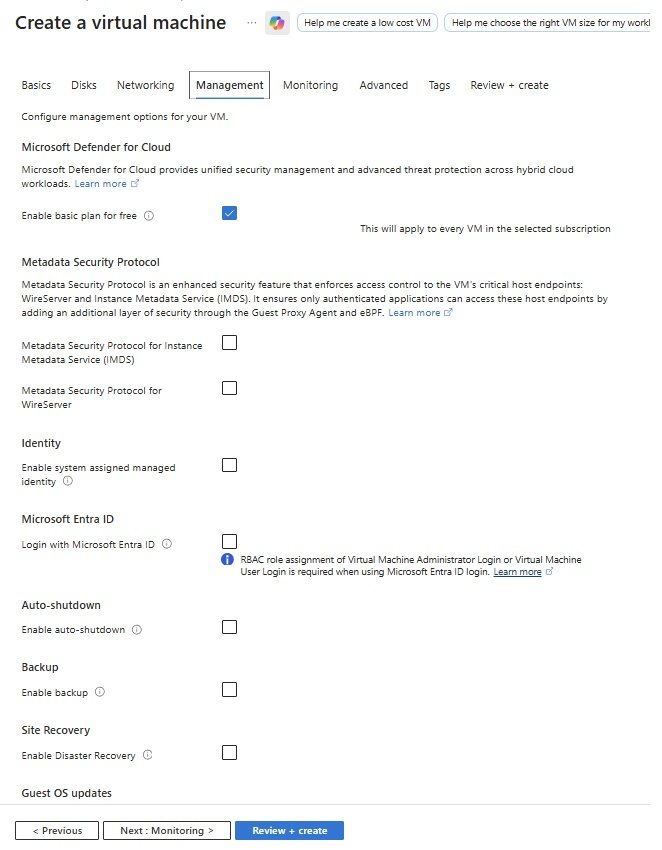
- Monitoring

- Advanced
- No change
- Tags
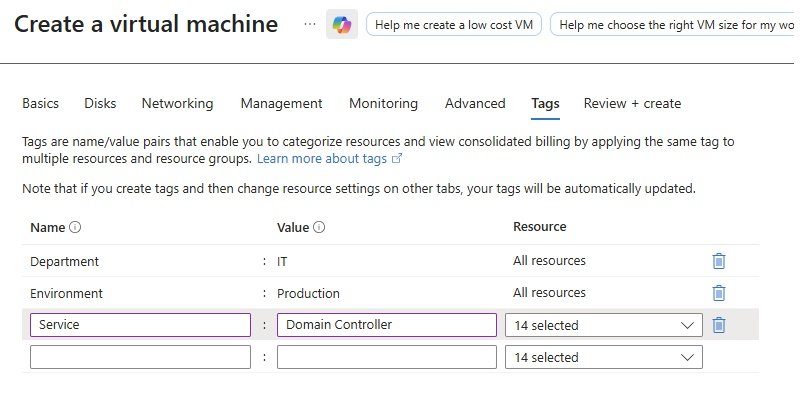
- Review+Create
- Overview of STAR-AZ-DC01
- It creates the follwoing:
- NIC: star-az-dc01578
- NSG: STAR-AZ-DC01-nsg: default rules.
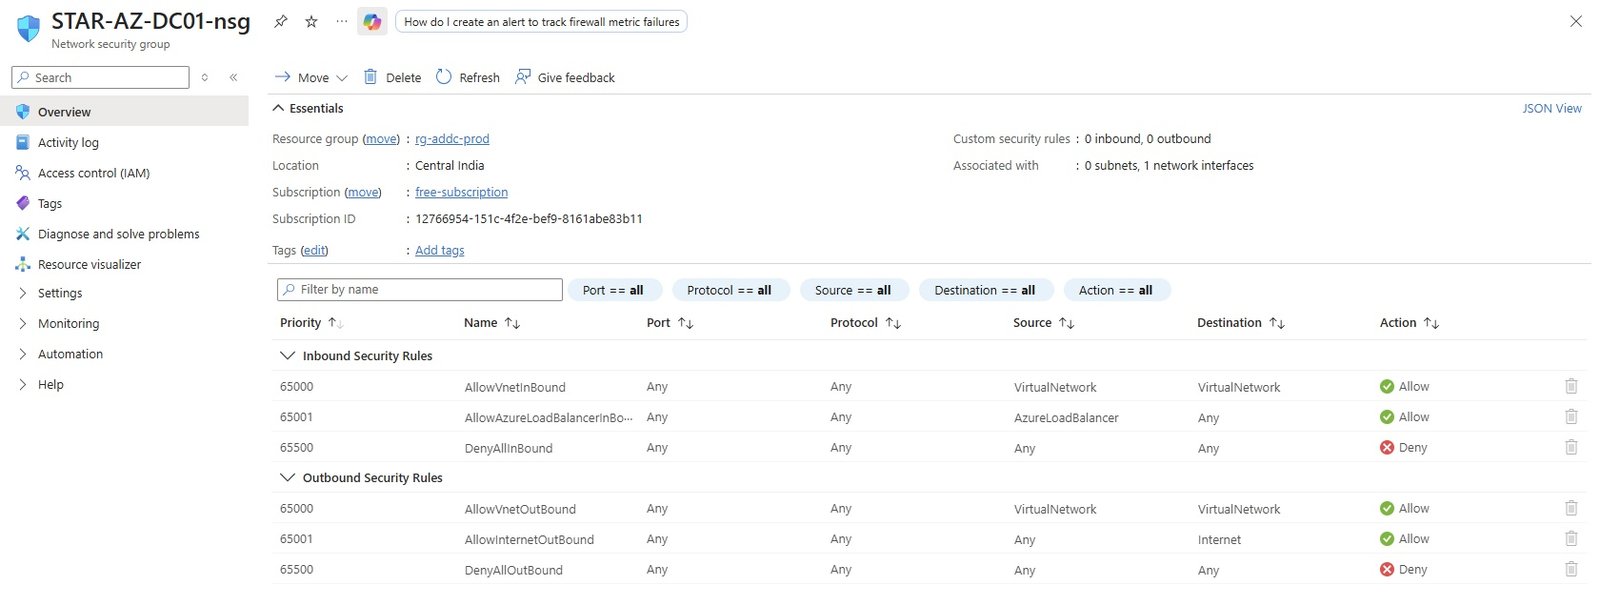
- Default Inbound Security Rules:
- Default Outbound Security Rules:
- Effective Security Rules:
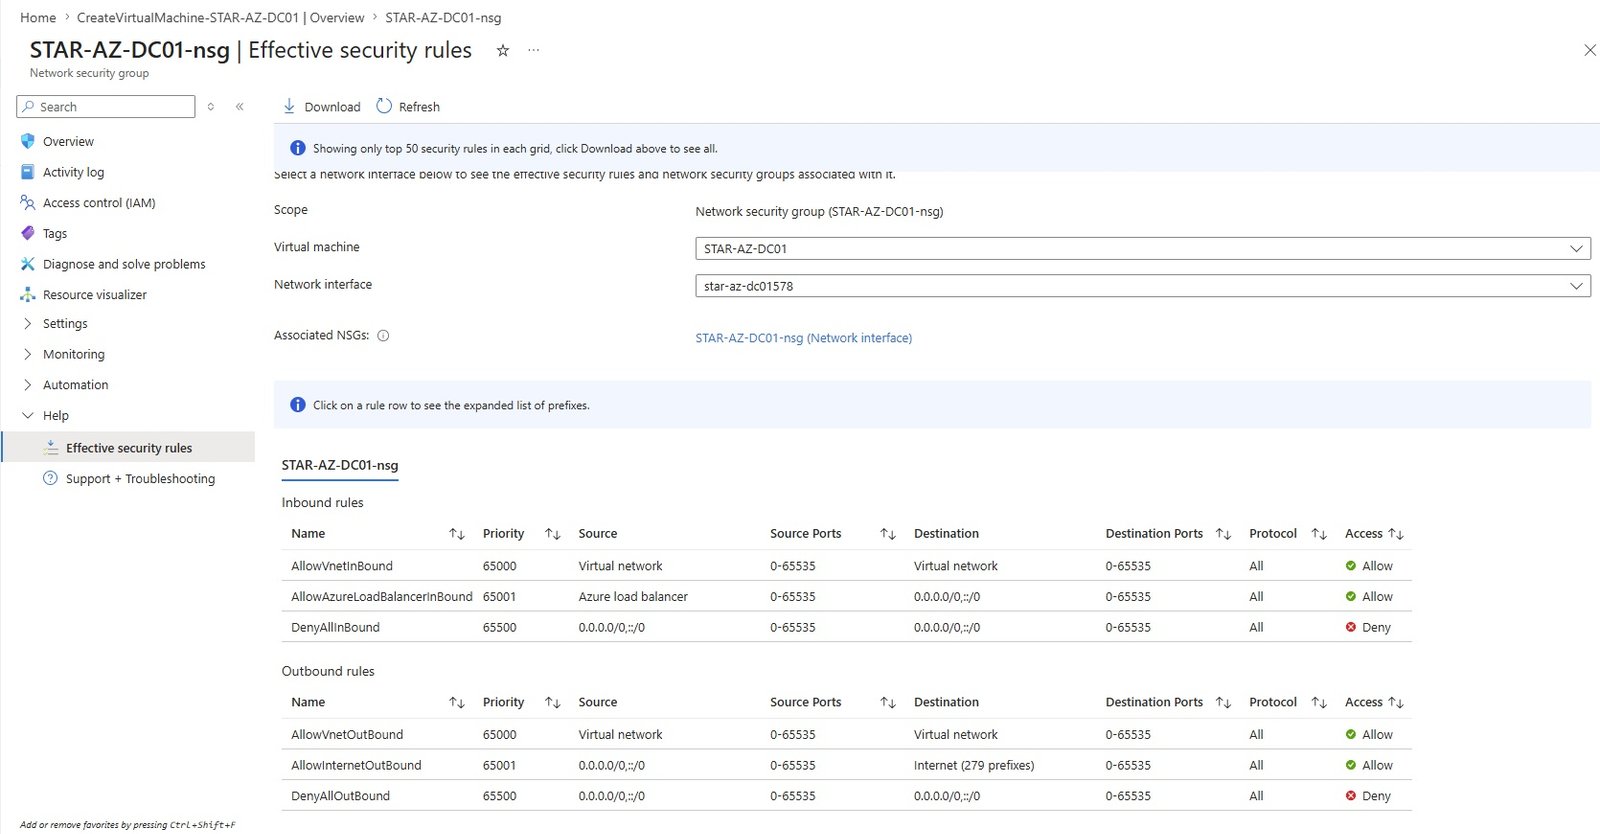
- Route Table, Subnet Association and Routes.
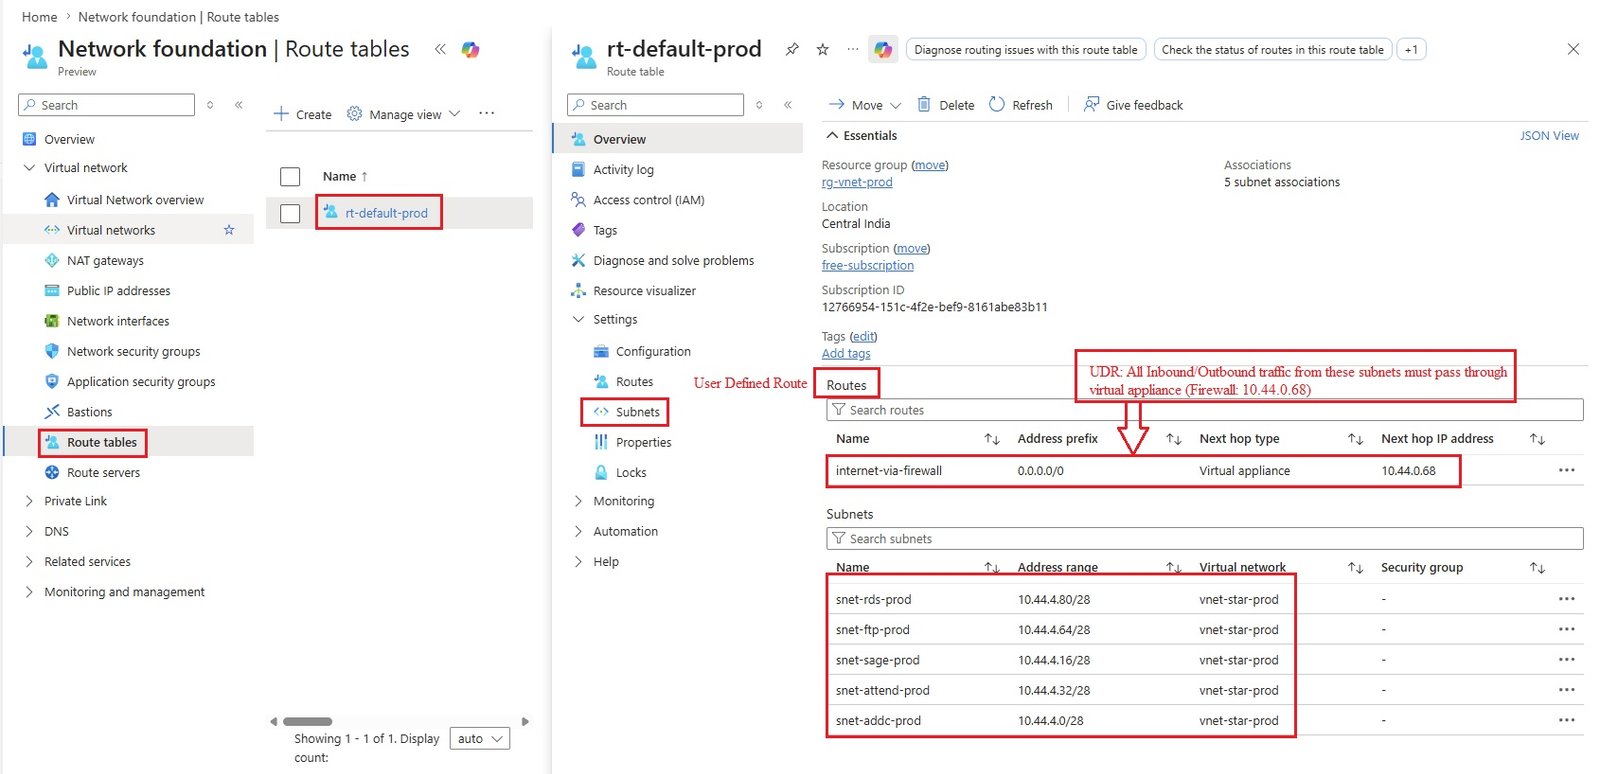
- System Route: By default all traffic are allowed to go to internet but we have define User Defined Route in Route Table that all traffic from associated subnets must pass through firewall.
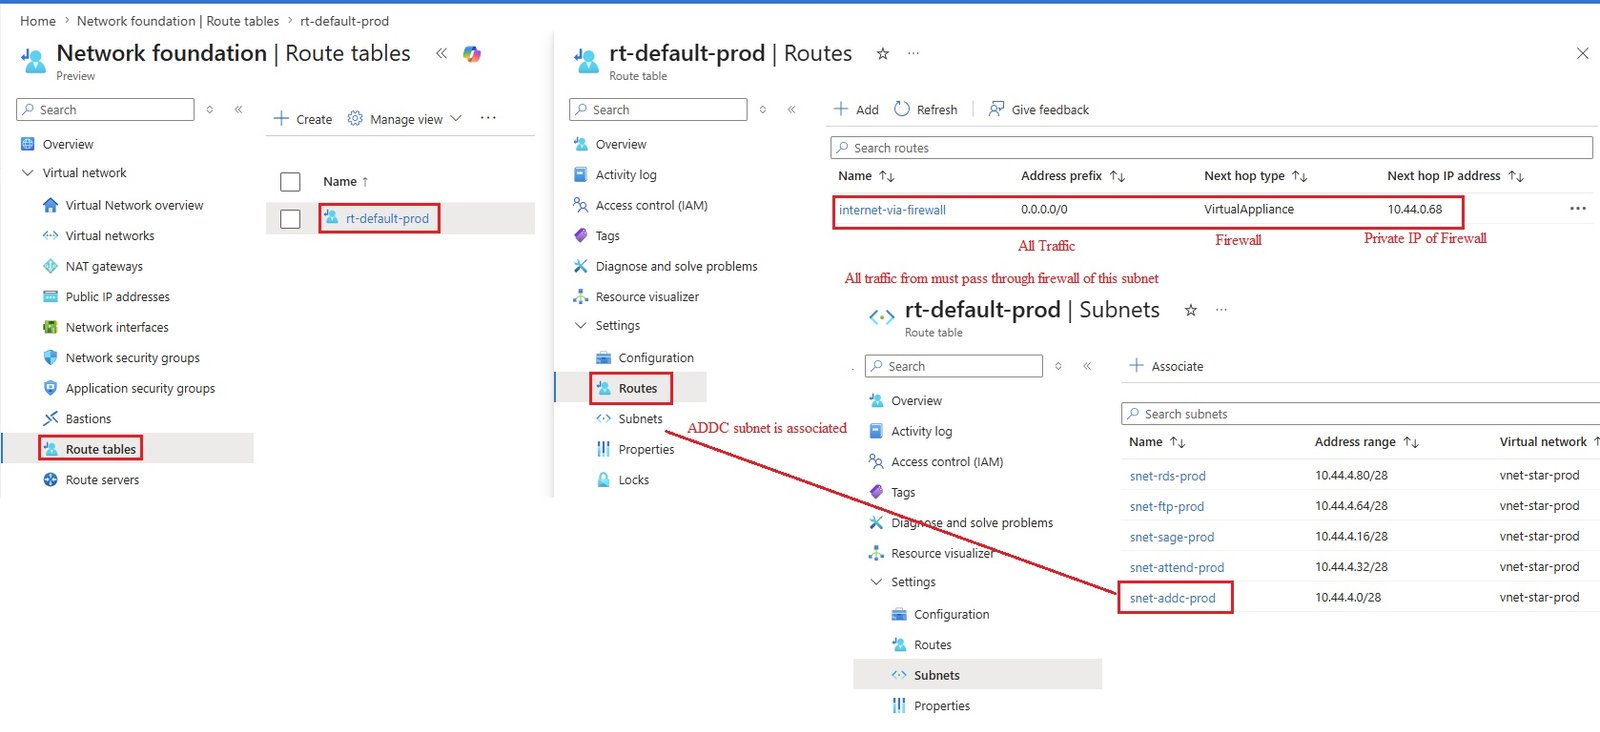
- Allow RDP: Need to create policy in Firewall to allow RDP to This server and Allow Internet.
- Go to Firewall: azfw-star-hub/ click Firewall policy: azfw-star-policy01
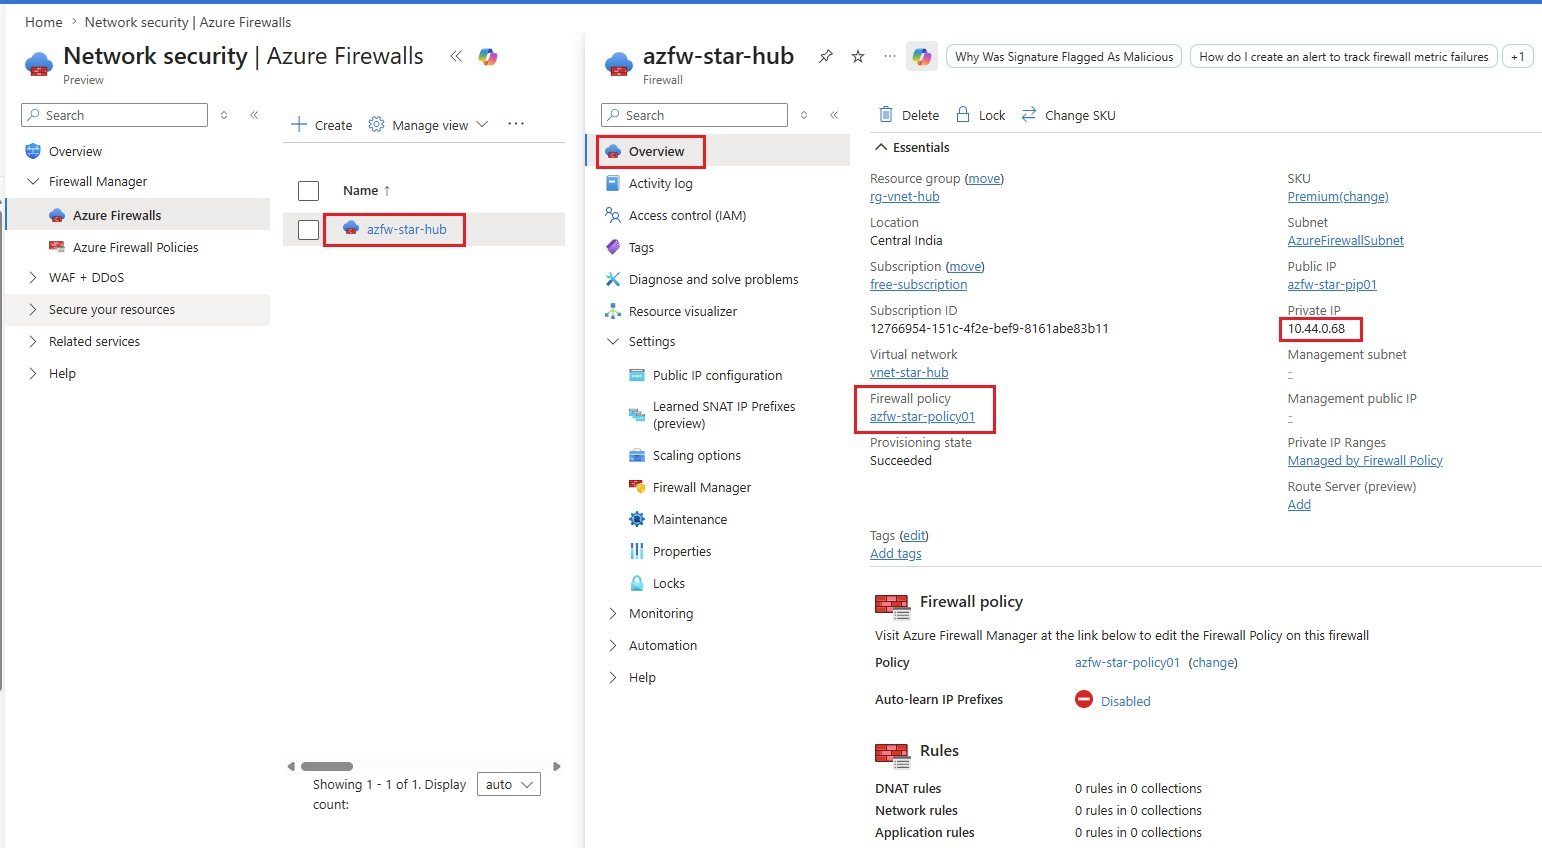
- DNAT Rule: (Incoming traffic Rule) It is Detination Network Address Tranlation rule, As we have private IP of DC01 and to access from internet/outside it should be translated to public IP. we have firewall public IP.
- An Azure DNAT (Destination Network Address Translation) rule is a rule that translates traffic arriving at a public IP and forwards it to a specific private IP address and port inside your Azure virtual network.
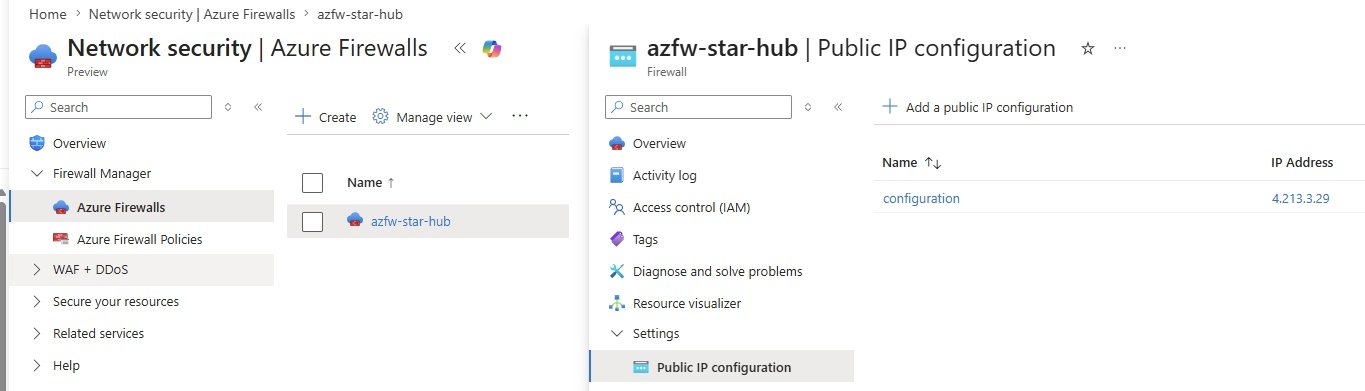
- Add a rule collection:
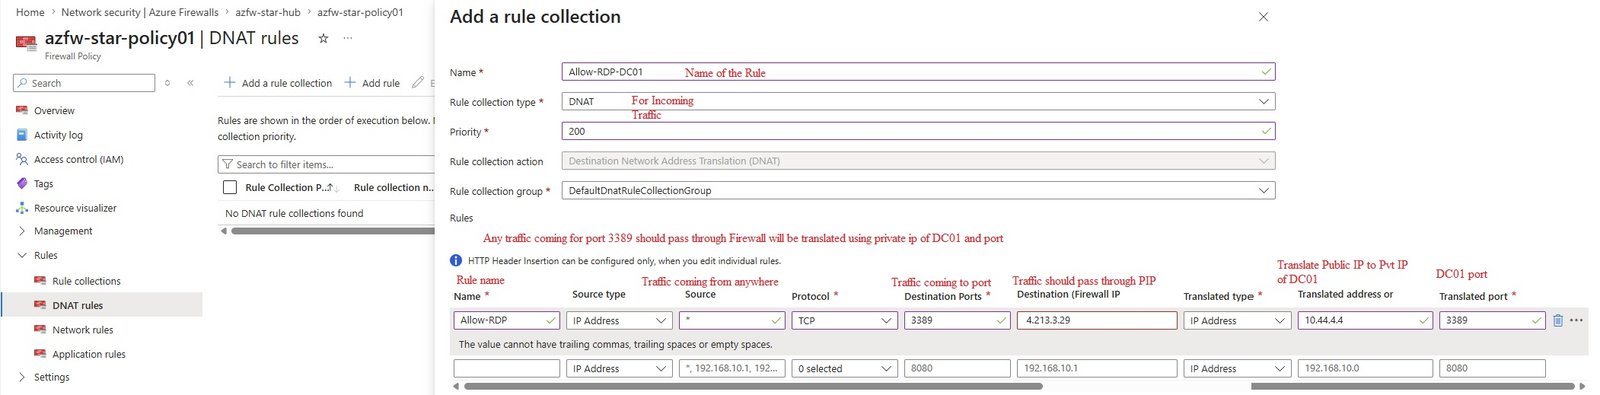
- Rule has been added:

- Traffic flow:
- Internet User
│
▼
Public IP: 4.213.3.29 (Firewall PIP)
│
▼
Azure Firewall
│
DNAT Rule
If destination = 4.213.3.29:3389
│
▼
Translate to
10.44.4.4:3389 (DC01 private IP)
│
▼
Azure VM
- RDP: Access STAR-AZ-DC01 with Remote Desktop connection (mstsc)
- Bastion: Access STAR-AZ-DC01 with Bastion Service
- Go to Virtual Machine STAR-AZ-DC01\connect\Bastion
- Enter credentials.
- Allow Internet: Create an Application policy to Allow Internet.
- Go to Firewall: azfw-star-hub/ click Firewall policy: azfw-star-policy01
- Application Rules: Add a rule collection

- Rules
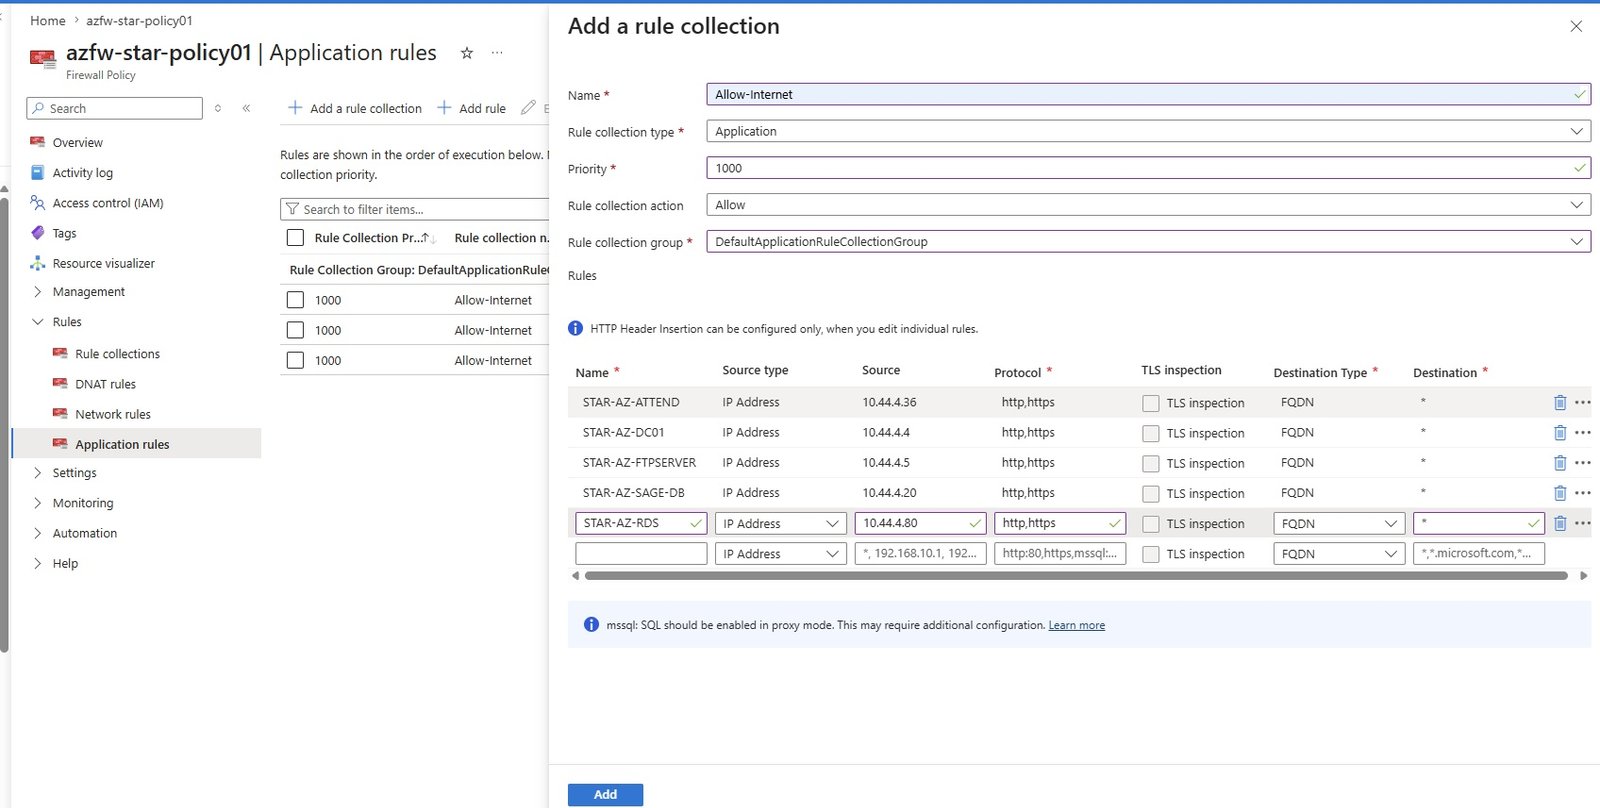
- Network Rule:
- Exaple: File share port 445 has been allowed for attend server.
- STAR-AZ-ATTEND-fileshare6.jpg
- Test the connection in powershell.
- STAR-AZ-ATTEND-fileshare7.jpg
- Map fileshare with script. In this we are not using Active Directory or Entra ID for user authentication, instead we are using storage account key.
- STAR-AZ-ATTEND-fileshare8.jpg
- Configure Domain
- Login to server DC01:
- Server is created without public IP, No Inbound Ports.
- To access either it can be RDP with Bastion service or through Firewall public IP.
- addc16.jpg
- Due to inernet issue this error appearing. It does not connect to Microsoft for license update.
- Allow Internet on VM, if it not resolve than allow port 1688.
- Go to server manager and add role.
- Login to server DC01:
STAR-AZ-SAGE-DB
- Basics
- sage1.jpg
- Disks
- sage2.jpg
- Networking
- sage3.jpg
- Management
- sage4.jpg
- Monitoring
- sage5.jpg
- Advanced
- No change
- Tags
- sage6.jpg
- Review+Create
- Overview of STAR-AZ-Sage-DB
- Code
- Route Table, Subnet Association and Routes.
- Code
- Allow RDP: Need to create policy in Firewall to allow RDP to This server and Allow Internet.
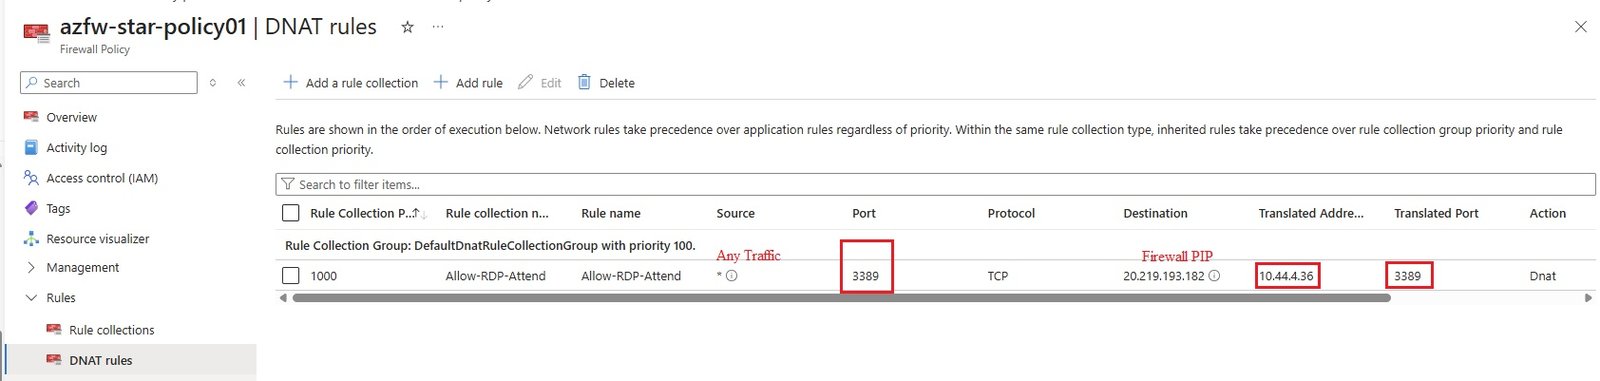
- open remote desktop and enter public IP of Firewall and connect to Attend Server.
- Bastion: Access STAR-AZ-SAGE-DB with Bastion Service, does not rquied RDP rule in firewall.
- Go to Virtual Machine STAR-AZ-SAGE-DB\connect\Bastion
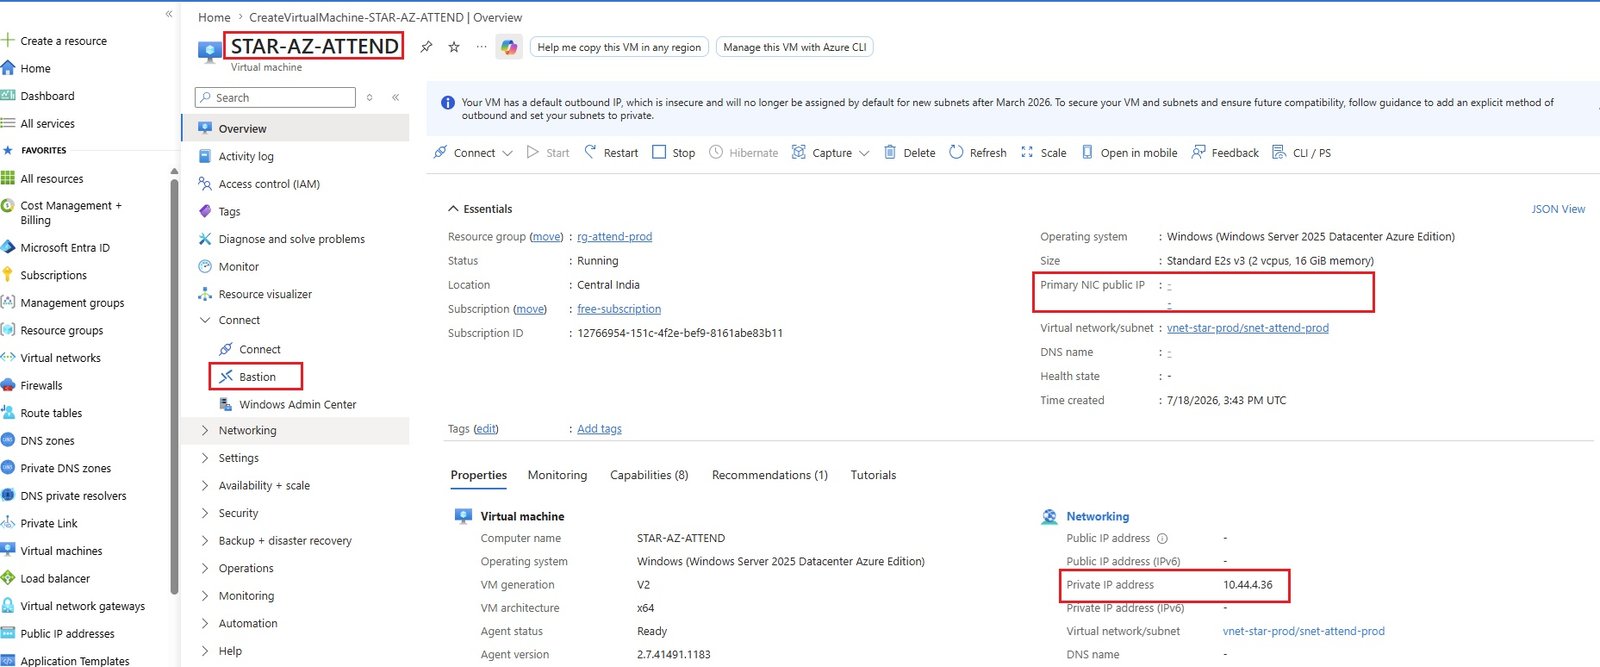
- Enter credentials.
- Shared folder Access:
- Unable to access shared folder/it-folder as there is no rule in firewall which allows port 445 (SMB) for Attend server.
- STAR-AZ-ATTEND-fileshare.jpg
- copy and paste script.
- STAR-AZ-ATTEND-fileshare2.jpg
- Connection get failed.
- STAR-AZ-ATTEND-fileshare3.jpg
- test connection to storage account. PS C:\Windows|system32> tnc 10.44.4.52 -Port 445
- STAR-AZ-ATTEND-fileshare4.jpg
- This is because port 445 is not allowed for Attend sever in Firewall.
- Go to firewall and enable port 445 for Attend server 10.44.4.36
- STAR-AZ-ATTEND-fileshare5.jpg
- File share port 445 has been allowed for attend server.
- STAR-AZ-ATTEND-fileshare6.jpg
- Test the connection in powershell.
- STAR-AZ-ATTEND-fileshare7.jpg
- Now try to map the drive with script.
- Map fileshare with script. In this we are not using Active Directory or Entra ID for user authentication, instead we are using storage account key.
- STAR-AZ-ATTEND-fileshare8.jpg
- Example: Allowing SMB port for entire subnet of point to Site VPN.
- This allows 10.44.4.16/28 is the Point to site VPN client subnet, it allows file share access for users who is accessing through point to side VPN.
- It allows SMB for entire subnet 10.44.4.16/28
- License Error:
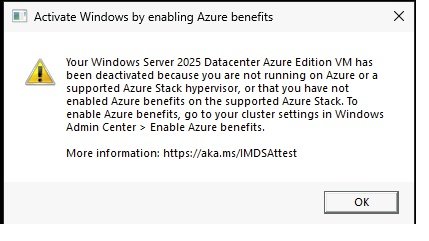
- Internet is not available so server unable to verify license with Microsoft.
- Allow internet.
- Allow Internet: Create an Application policy to Allow Internet.
- Go to Firewall: azfw-star-hub/ click Firewall policy: azfw-star-policy01
- Application Rules: Add a rule collection
- Rules
- Users_Access_Sage
STAR-AZ-ATTEND
- Basics
- addc1.jpg
- Disks
- addc2.jpg
- Networking
- addc3.jpg
- Management
- addc4.jpg
- Monitoring
- addc5.jpg
- Advanced
- No change
- Tags
- addc6.jpg
- Review+Create
STAR-AZ-FTPSERVER
- Basics
- ftp1.jpg
- Disks
- ftp2.jpg
- Networking
- ftp3.jpg
- Management
- ftp4.jpg
- Monitoring
- ftp5.jpg
- Advanced
- No change
- Tags
- ftp6.jpg
- Review+Create
STAR-AZ-RDS
- Basics
- rds1.jpg
- Disks
- rds2.jpg
- Networking
- rds3.jpg
- Management
- rds4.jpg
- Monitoring
- rds5.jpg
- Advanced
- No change
- Tags
- rds6.jpg
- Review+Create
- Code
- Code
- Code
Log Analytics Workspace
- Go to All services/Monotor/Log Analytics workspaces/Create
- Subscription: STAR-SUB-HUB
- Resource Group: create rg-loganalytics-hub
- Name: loganalyticsws-star-hub
- Tags: Department=It, Environment=HUB, Service=Log Aalytics Workspace
- Create
WAF - Application Gateway
- It provides the following features:
- Content based routing: It distribute the traffic to endpoint based on URL path and send traffic according to path: www.abc.com/videos : here it will send traffic to videos section and www.abc.com/Audios it will send to audios seciton.
- SSL off loading /SSL Termination: It encrypt and decrypt the data
- End to End SSL Termination:
- HTTP to HTTPS: It uses these two protocols.
- Multisite hosting: it supports multisite hosting.
- Cookies bases session affinity:
- Connection Draining:
- Azure Application Gateway works with Microsoft Web Apps:
- Host-based routing: Route traffic based on hostname/domain name,
- Path-based routing: Route traffic based on path www.abc.com/videos : here it will send traffic to videos section and www.abc.com/Audios it will send to audios seciton.
- Multi-site hosting: Route traffic based on different site: way2cloud.co.uk & stardistributors.co.uk, Rotue the traffic according to request.
- Work flow & Components of Application Gateway.
- application_gateway_workflow.jpg
- Frontend IP: Application gateway can be use for internal/external load balancer, public IP is used to external load balancing
- Backend pool: Web server VMs/web app is added to backend pool. There are various target types: IP address or FQDN/VM/VMSS/App Services.
- Backend settings: you defie protoco http or https (need TLS authentication) along with cookie-based affinity or session affinity, connection draining, request time-out and host name override and custom probe.
- Listeners: It is created for frontend IP address with port and routing rule is associated with it. You can use Basic or muti site.
- Routing Rules: Listener and backpool are defined.
- HTTP settings:
- Health Probes: On which port application gateway should monitor the health of backend target.
- Deployment:
- Application Gateway is created to access applications attendance system as there is no public IP is assigned to Attendance Server.
- Create Resource Group
- Go to Resource Groups/create
- Subscription: SRMG-SUB-HUB
- Resource Group: create rg-appgw-hub
- Tag: Department=It, Environment=HUB, Service=Azure WAF
- Create Application Gateway
- Go to All Services/Networking/Load balancing/Application gateways/create
- Basics
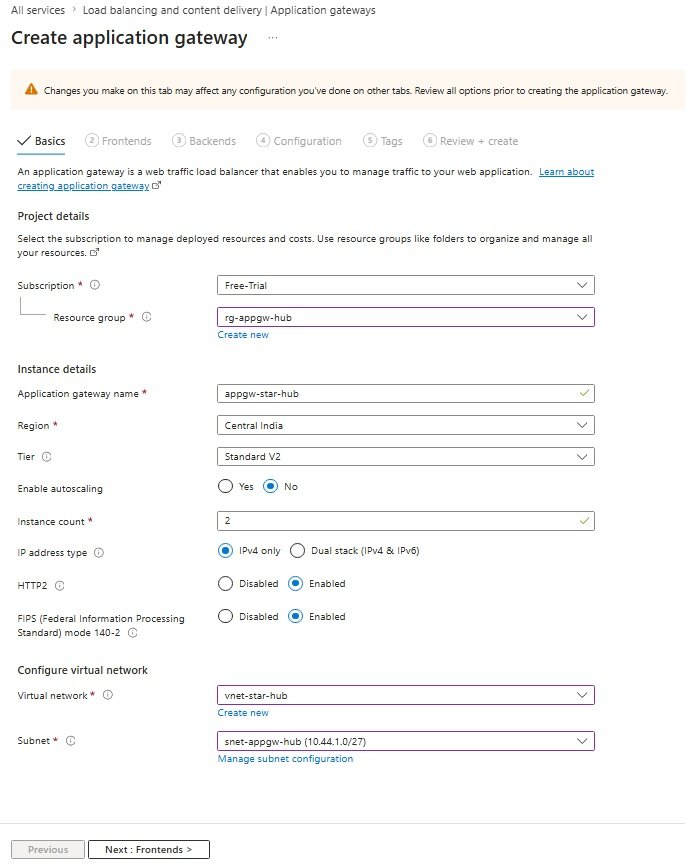
- Frontends
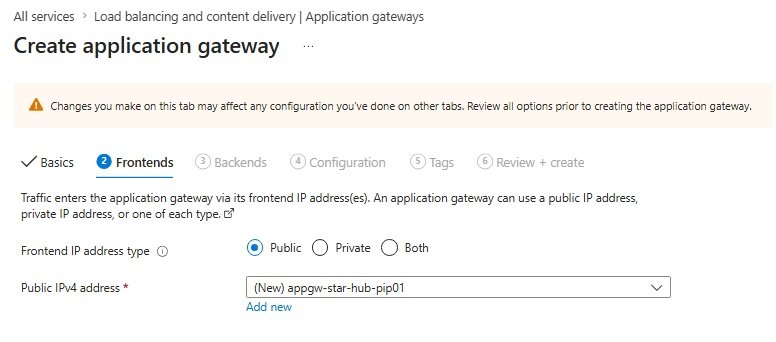
- Backends: Add a backed pool
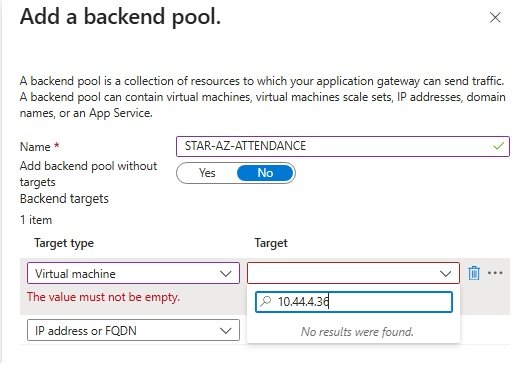
- Configuration: Routing Rules/Add a routing rule
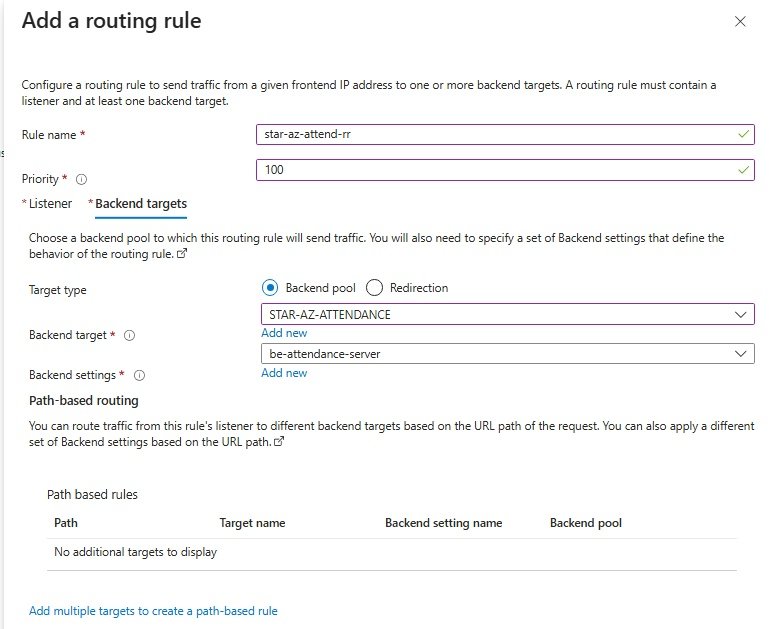
- Listener
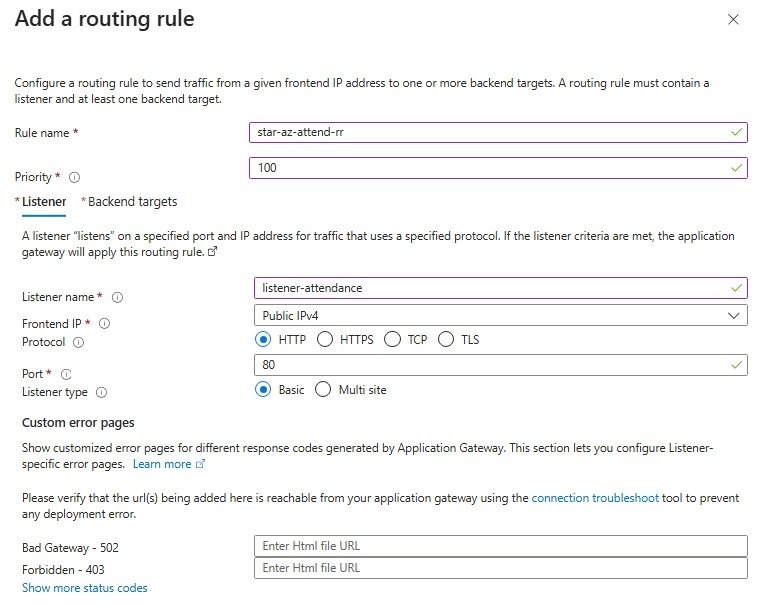
- Backend targets
- Choose Backend target = STAR-AZ-ATTENDANCE
- Backend settings: Add new
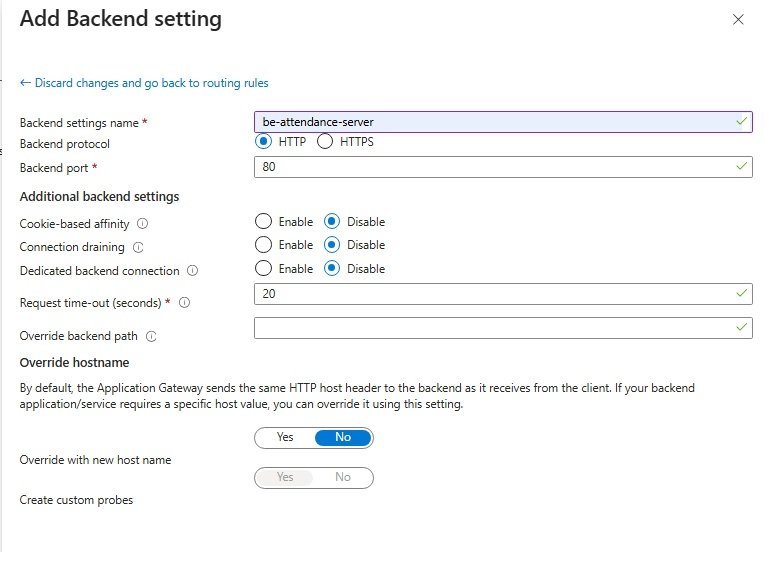
- Tags: Department=It, Environment=Hub, Service=Azure WAF
- Review+Create
- code
- code
- It provides the following features:
Data Analytics
- code
- code
- code
Backup
- code
- code
- code
Code
- code
- code
- code
Code
- code
- code
- code
Code
- code
- code
- code
Code
- code
- code
- code
Code
- code
- code
- code
Code
- code
- code
- code
Code
- code
- code
- code
Code
- code
- code
- code
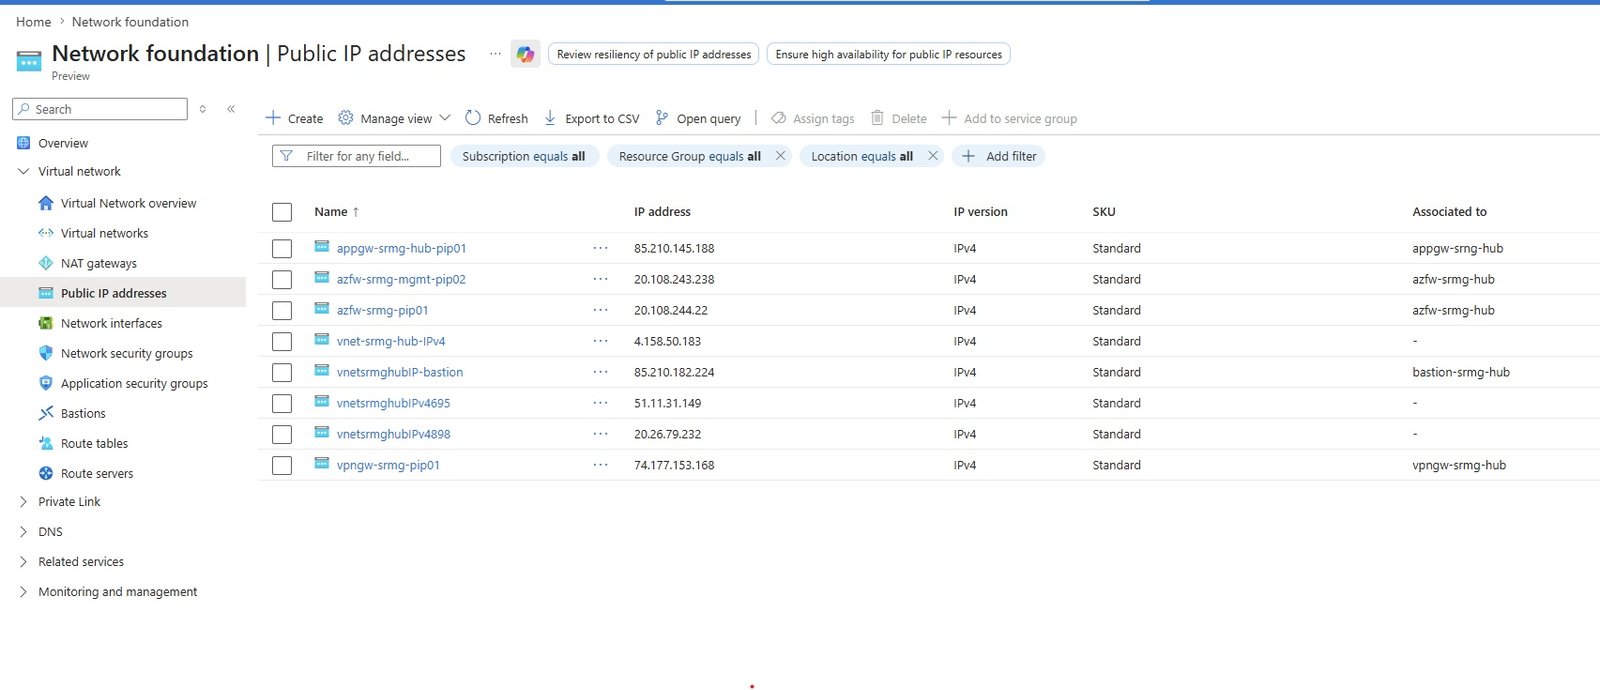
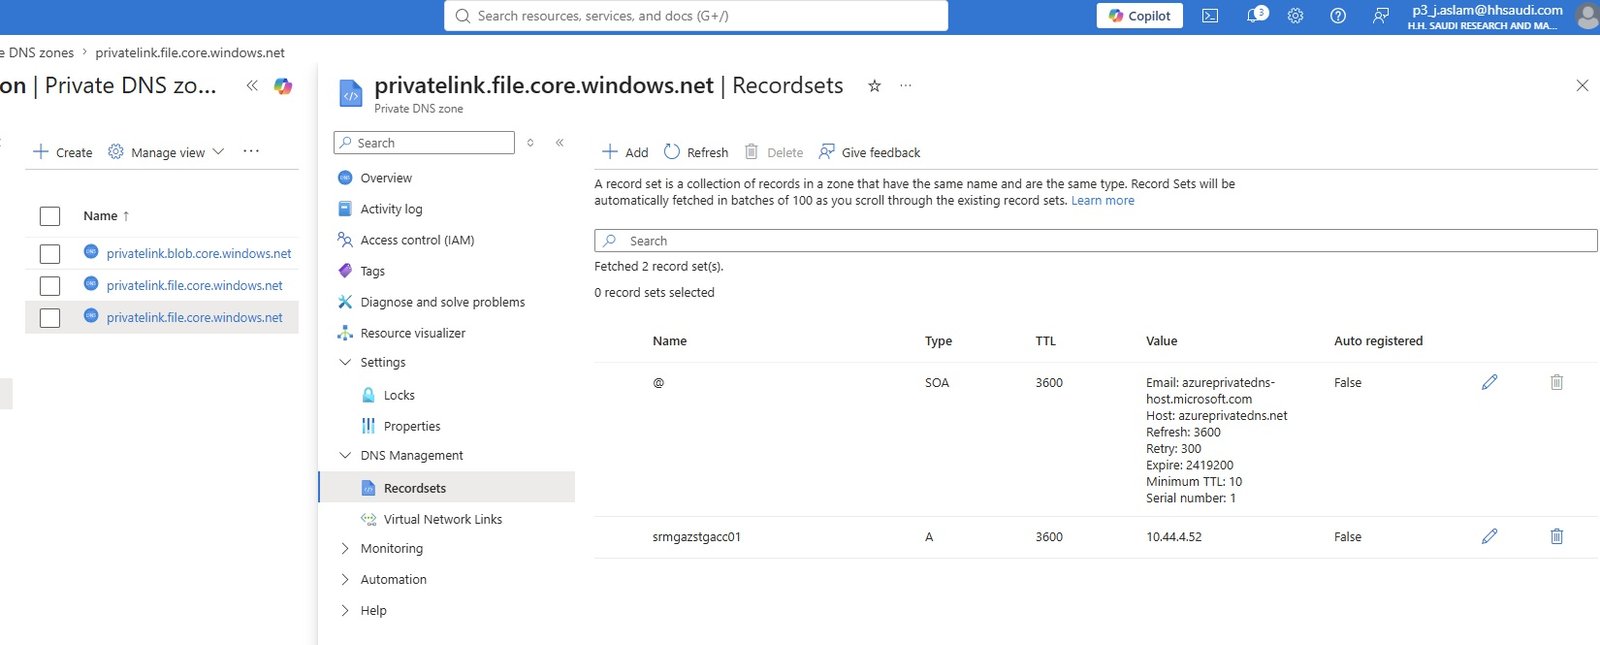
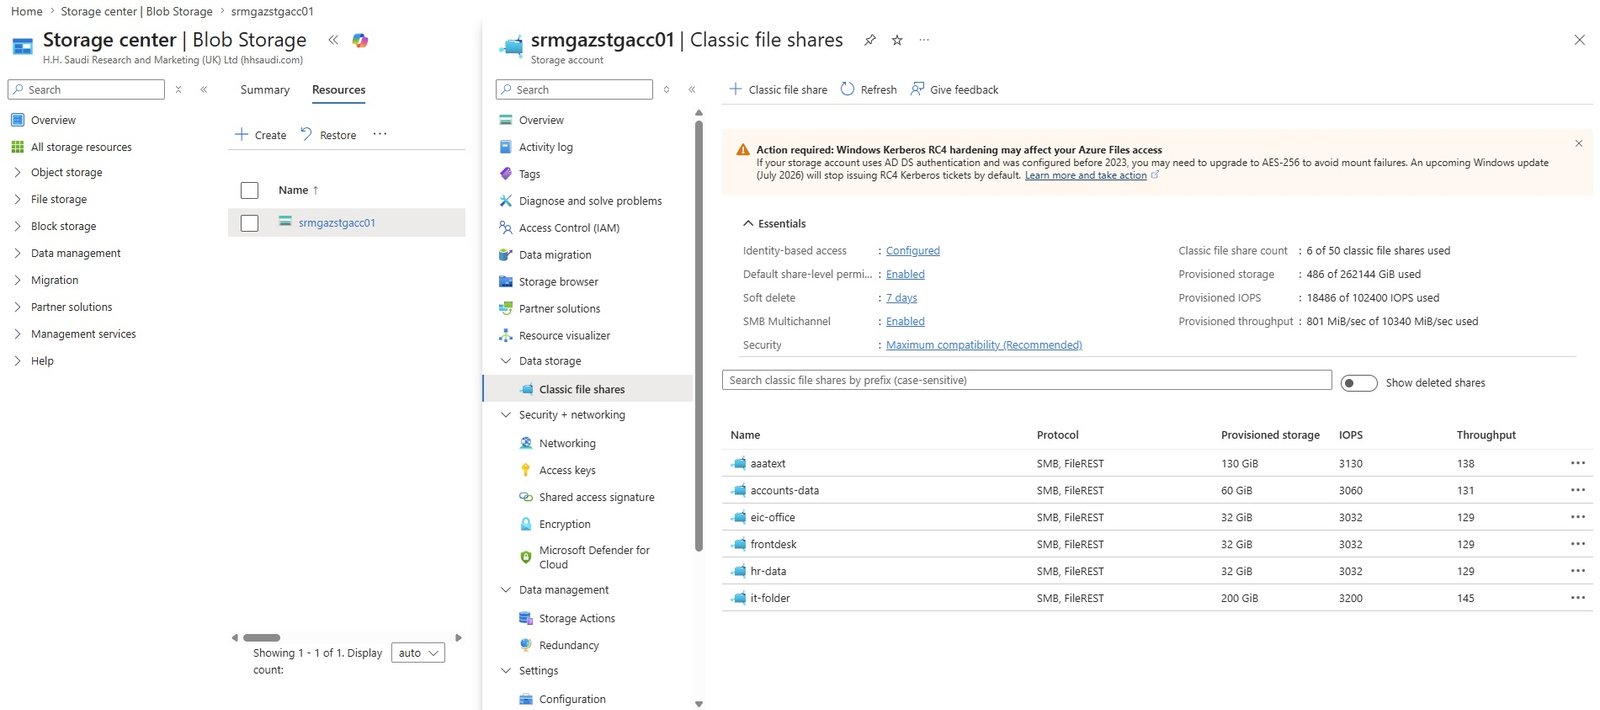
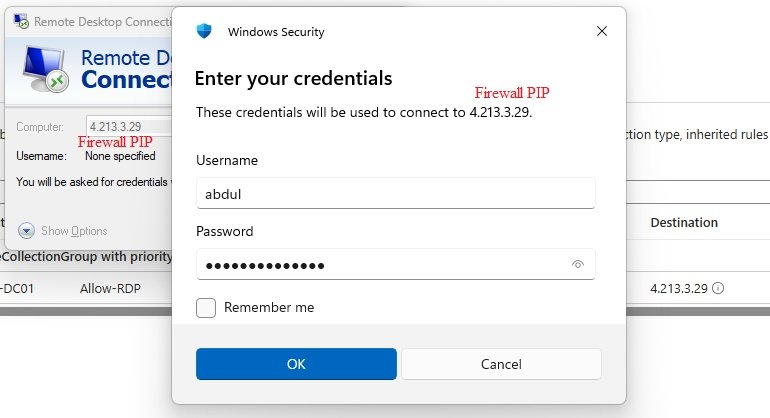
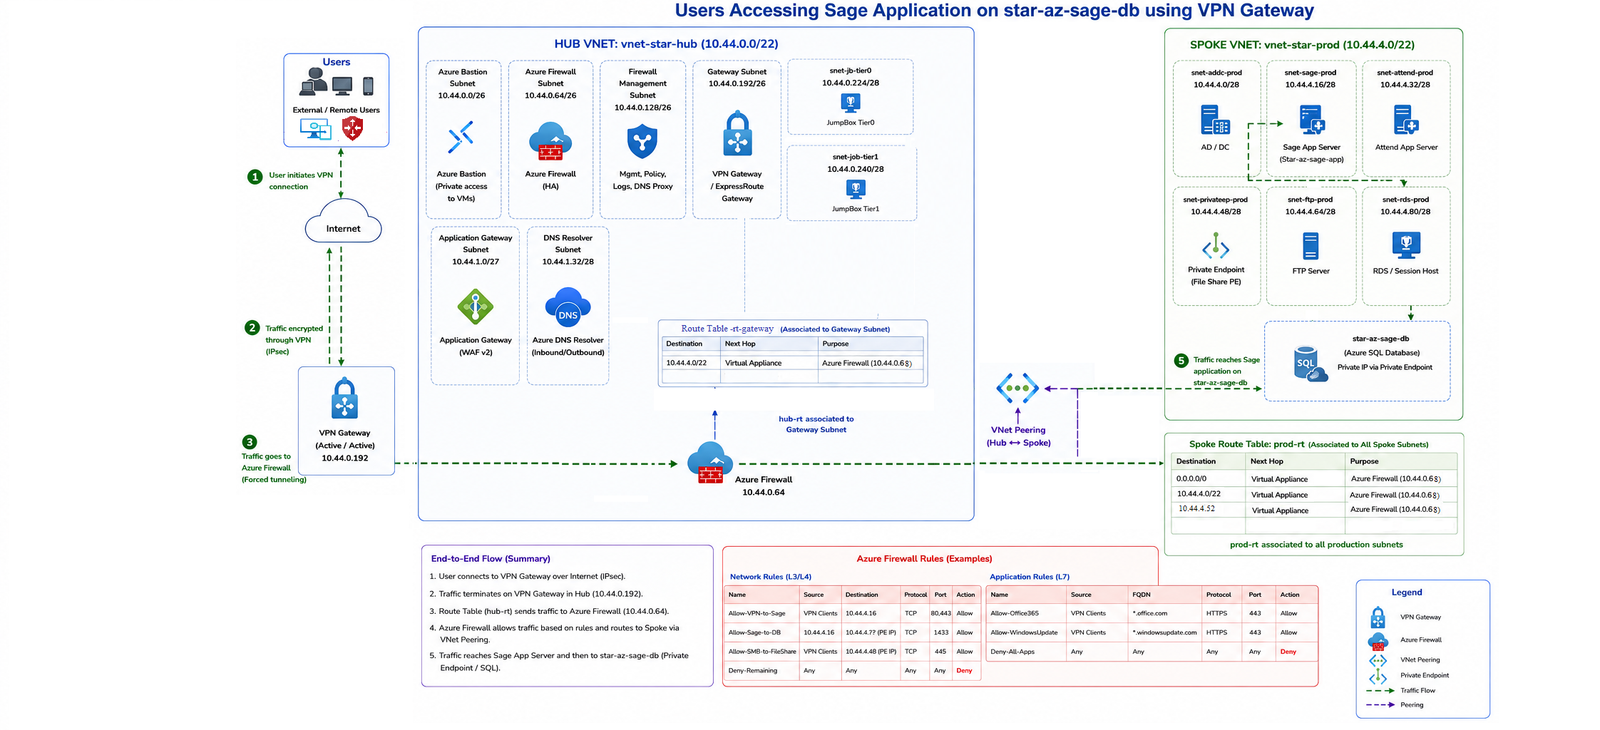
Links
AZ-104 Exam Syllabus & Microsoft Doc links:
- code
Learning
- https://techlearning.spayee.com/s/mycourses (Username:aziz27uk@gmail.com, pass: Ye......!)
- code
- code
code
- code
- code
- code
code
- code
- code
- code
code
- code
- code
- code
code
- code
- code
- code